

iOS CGContextRef/UIBezierPath(绘图)
绘图的底层实现方法
注意:在drawRect方法中系统会默认创建一个上下文(C语言类型)在其他方法中不会有这样一个上下文(可以自己测试)
@implementation DrawView
//注意,在drawRect方法中系统会默认创建一个上下文(C语言类型)
//在其他方法中不会有这样一个上下文(可以自己测试)
//下面这个方法中的rect参数会传入当前view的frame
- (void)drawRect:(CGRect)rect{
    //获取上下文
    CGContextRef ctx = UIGraphicsGetCurrentContext();
    //或者绘图路径对象(可以了理解为画笔)
    UIBezierPath *bezierPath = [UIBezierPath bezierPath];
    //绘图
    [bezierPath moveToPoint:CGPointMake(50, 50)];
    //通过控制点(ControlPoint来改变直线的弧度)
    [bezierPath addQuadCurveToPoint:CGPointMake(250, 250) controlPoint:CGPointMake(50, 250)];
    [bezierPath addLineToPoint:CGPointMake(250, 20)];
/**********设置上下文的状态***********/
    CGContextSetLineWidth(ctx, 10);
    CGContextSetLineJoin(ctx, kCGLineJoinRound);
    CGContextSetLineCap(ctx, kCGLineCapRound);
    //改变路径颜色
    [[UIColor redColor] setStroke];
/***********************************/
    //把路径添加到上下文
    CGContextAddPath(ctx, bezierPath.CGPath);
    //渲染上下文(layer)
    CGContextStrokePath(ctx);
}
@end
效果图:
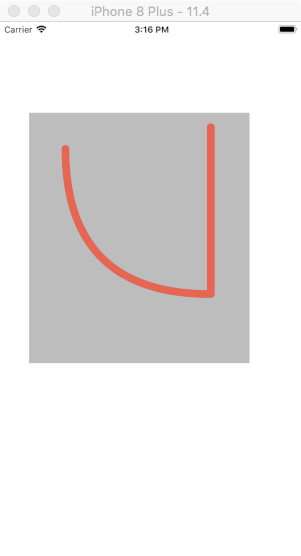
绘图底层执行机制.png
绘制图片(简易)
- (void)drawRect:(CGRect)rect{
    UIBezierPath *path = [UIBezierPath bezierPathWithRect:CGRectMake(50, 50, 150, 150)];
    [[UIColor redColor] setStroke];
    [path setLineWidth:10];
    [[UIColor yellowColor] setFill];
    //fill和stroke必须在绘图的最后一步进行
    [path stroke];
    [path fill];
}

绘制图片2.png
绘图三
- (void)drawRect:(CGRect)rect{
    //绘制扇形
    CGPoint center = CGPointMake(rect.size.width*0.5, rect.size.height*0.5);
    /*arcCenter:扇形圆心
     *radius:半径
     *clockWise:YES(逆时针),NO(顺时针)
     */
    //注意不能位self.center作为扇形的圆形:self.center是以screen的左上角位坐标原点进行绘图
    UIBezierPath *path = [UIBezierPath bezierPathWithArcCenter:center radius:100 startAngle:0 endAngle:M_PI_2 clockwise:YES];
    [path addLineToPoint:center];
    [path closePath];
    [path setLineWidth:10];
    [[UIColor redColor] setStroke];
    [[UIColor yellowColor] setFill];
    [path stroke];
    [path fill];
    //fill方法中,有进行路径的自动关闭,使用了fill有时候可以不使用closePath
}

绘图三.png
绘图三
注意
[self setNeedsDisplay];可以重制绘图内容,刷新UI
//ViewController Slider方法
- (IBAction)progressValue:(UISlider *)sender {
    NSString *progress = [NSString stringWithFormat:@"%.2f%%",sender.value *100];
    self.progressLabel.text = progress;
    self.drawView.progressValue = sender.value;
    [self.drawView drawRect:self.drawView.frame];
}
//drawView中的方法
- (void)setProgressValue:(CGFloat)progressValue{
    _progressValue = progressValue;
    [self setNeedsDisplay];
}
- (void)drawRect:(CGRect)rect{
    CGPoint center = CGPointMake(rect.size.width*0.5, rect.size.height*0.5);
    CGFloat angle = self.progressValue*M_PI*2;
    CGFloat endAngle = angle - M_PI_2;
    UIBezierPath *path = [UIBezierPath bezierPathWithArcCenter:center radius:rect.size.width*0.5 startAngle:-M_PI_2 endAngle:endAngle clockwise:YES];
    [path setLineWidth:10];
    [[UIColor redColor] setStroke];
    [path stroke];
}

下载进度条.gif
绘图四 饼图
@implementation DrawView
- (void)drawRect:(CGRect)rect {
    //模拟获取数据
    NSArray *numberArr = @[@20,@30,@50,@70];
    CGFloat total = 0;
    CGPoint center = CGPointMake(rect.size.width*0.5, rect.size.width*0.5);
    CGFloat radius = rect.size.width*0.5-10;
    for(NSNumber *number in numberArr){
        total += number.doubleValue;
    }
    CGFloat startAngel = 0;
    for(NSNumber *number in numberArr){
        CGFloat numberValue = number.doubleValue / total *M_PI *2;
        [self drawRadiusWith:center WithRadius:radius withStartAngle:startAngel wihtNumber:(CGFloat)numberValue];
        startAngel += numberValue;
    }
}
- (void)drawRadiusWith:(CGPoint)center WithRadius:(CGFloat)radius withStartAngle:(CGFloat)startAngle wihtNumber:(CGFloat)number{
    CGFloat endAngle = startAngle + number;
    UIBezierPath *path = [UIBezierPath bezierPathWithArcCenter:center radius:radius startAngle:startAngle endAngle:endAngle clockwise:YES];
    [path setLineWidth:5];
     [path addLineToPoint:center];
    [[self randomColor] setFill];
    [path fill];
}
//设置随机颜色
- (UIColor *)randomColor{
    CGFloat red = arc4random_uniform(256) / 255.0;
    CGFloat blue = arc4random_uniform(256) / 255.0;
    CGFloat yellow = arc4random_uniform(256) / 255.0;
    return [UIColor colorWithRed:red green:blue blue:yellow alpha:1.0];
}
- (void)touchesBegan:(NSSet<UITouch *> *)touches withEvent:(UIEvent *)event{
    [self setNeedsDisplay];
}
@end
效果图:
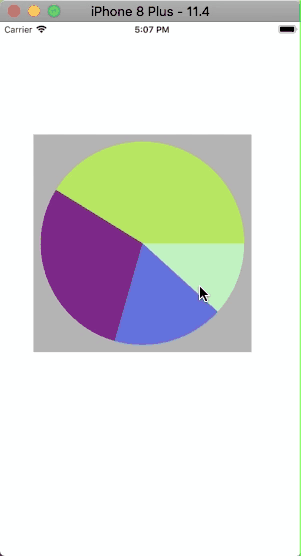
饼图(随机颜色).gif
绘文字
- (void)drawRect:(CGRect)rect {
    NSString *str = @"HELLO";
    NSMutableDictionary *mutableDict = [NSMutableDictionary dictionary];
    mutableDict[NSFontAttributeName] = [UIFont systemFontOfSize:50];
    mutableDict[NSForegroundColorAttributeName]  = [UIColor blueColor];
    mutableDict[NSStrokeColorAttributeName] = [UIColor redColor];
    mutableDict[NSStrokeWidthAttributeName]  = @5;
    NSShadow *shadow = [[NSShadow alloc] init];
    shadow.shadowOffset = CGSizeMake(30, 30);
    shadow.shadowColor = [UIColor yellowColor];
    mutableDict[NSShadowAttributeName] = shadow;
    //drawInRect 会匹配内容,绘图适配
    [str drawInRect:rect withAttributes:mutableDict];
}
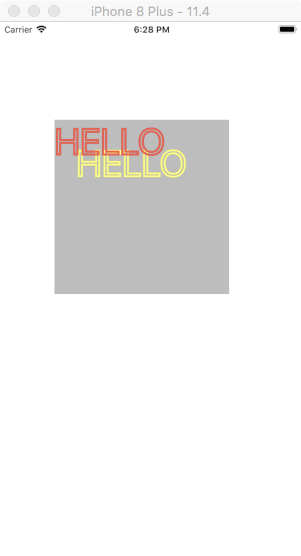
绘文字.png
绘图/UIImage/裁剪
- (void)drawRect:(CGRect)rect {
    UIImage *image = [UIImage imageNamed:@"folder"];
    //这是裁剪区域一定要在绘图前进行设置
    UIRectClip(CGRectMake(50, 50, 50, 50));
    [image drawAsPatternInRect:rect];
}

裁剪:绘图UIImage.png
不再DrawRect中开启位图上下文
注意关闭上下文
- (void)viewDidLoad {
    [super viewDidLoad];
    UIImage *image = [UIImage imageNamed:@"folder"];
    //1.开启一个跟图片原始大小的上下文
    //第二个参数opaque:不透明度
    UIGraphicsBeginImageContextWithOptions(image.size, NO, 0);
    //2.把图片绘制到上下文中
    [image drawAtPoint:CGPointZero];
    //3.把文字绘制到上下文当中
    NSString *str = @"HELLO";
    [str drawAtPoint:CGPointMake(10, 20) withAttributes:nil];
    //4.把上下文中的所有内容绘制成一张图片
    UIImage *newImage = UIGraphicsGetImageFromCurrentImageContext();
    //5.手动关闭上下文
    UIGraphicsEndImageContext();
    self.imageView.image = newImage;
}
@end
效果图类似于微博中的水印

 浙公网安备 33010602011771号