
使用 git 托管代码
在线练习 :
https://learngitbranching.js.org/
1、 下载安装好 git 客户端
2、 找一个家代码托管平台
我用 coding.net,注册个账号,建一个空项目
然后打开安装好的 git bash 客户端,使用 git clone 命令克隆下远程仓库的项目
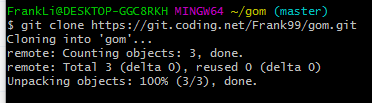
然后cd 进入 本地仓库地址,把 你自己的 代码粘贴进去,手动命令均可
接着,在本地仓库里 git add 那些新文件,然后 git commit -m "这次修改信息" 提交到本地仓库


最后,使用 git push 即可推送到远程仓库啦!

有空再看看 source Tree
修改远程仓库 git 地址
git remote set-url origin http://xxx////.git
```
解决一些问题
git 版本过低
sudo yum update nss curl # nss为名称解析和认证服务 curl为网络请求库```
配置 .gitignore 文件 忽略提交文件及文件夹
target/
*.iml
.idea/
readme.txt
startML.py
src/main/test/
.project
.settings
强制覆盖本地代码
git fetch --all
git reset --hard origin/master
git pull
git常用命令--持续更新
git常用命令:
- git init //初始化本地git环境
- git clone XXX//克隆一份代码到本地仓库
- git pull //把远程库的代码更新到工作台
- git pull --rebase origin master //强制把远程库的代码跟新到当前分支上面
- git fetch //把远程库的代码更新到本地库
- git add . //把本地的修改加到stage中
- git commit -m 'comments here' //把stage中的修改提交到本地库
- git push //把本地库的修改提交到远程库中
- git branch -r/-a //查看远程分支/全部分支
- git checkout master/branch //切换到某个分支
- git checkout -b test //新建test分支
- git checkout -d test //删除test分支
- git merge master //假设当前在test分支上面,把master分支上的修改同步到test分支上
- git merge tool //调用merge工具
- git stash //把未完成的修改缓存到栈容器中
- git stash list //查看所有的缓存
- git stash pop //恢复本地分支到缓存状态
- git blame someFile //查看某个文件的每一行的修改记录()谁在什么时候修改的)
- git status //查看当前分支有哪些修改
- git log //查看当前分支上面的日志信息
- git diff //查看当前没有add的内容
- git diff --cache //查看已经add但是没有commit的内容
- git diff HEAD //上面两个内容的合并
- git reset --hard HEAD //撤销本地修改
- echo $HOME //查看git config的HOME路径
- export $HOME=/c/gitconfig //配置git config的HOME路径
团队协作git操作流程:
- 克隆一个全新的项目,完成新功能并且提交:
- git clone XXX //克隆代码库
- git checkout -b test //新建分支
- modify some files //完成修改
- git add . //把修改加入stage中
- git commit -m '' //提交修改到test分支
- review代码
- git checkout master //切换到master分支
- git pull //更新代码
- git checkout test //切换到test分支
- git meger master //把master分支的代码merge到test分支
- git push origin 分支名//把test分支的代码push到远程库
- 目前正在test分支上面开发某个功能,但是没有完成。突然一个紧急的bug需要处理
- git add .
- git stash
- git checkout bugFixBranch
- git pull --rebase origin master
- fix the bug
- git add .
- git commit -m ''
- git push
- git checkout test
- git stash pop
- continue new feature's development
- git工作流
git clone url -b <branch>
git log --pretty=oneline
git reflog
git checkout -- readme.txt
git reset --hard HEAD^
git reset --hard HEAD~100
git reset --hard f8c9beb
# 比较工作区与暂存区间 某个文件的区别
git diff HEAD -- readme.txt
要关联一个远程库,使用命令
git remote add origin git@server-name:path/repo-name.git;关联后,使用命令
git push -u origin master第一次推送master分支的所有内容;
git tag -a v2.0 -m "version 2.0 released" d7a70c9
git log --author="Frank Li"
看谁提交最多
git shortlog -sn
git shortlog -sn --since='10 weeks' --until='2 weeks'
小小的举动, 大大的温暖
git config --global alias.praise blame
git for-each-ref --count=10 --sort=-committerdate refs/heads/ --format="%(refname:short)"
这将显示我们工作的最后10个(--count=10)分支,按照最后一次在使用的时间排序。它只显示我们本地的分支(refs/heads/),同时显示的格式更友好 --format。
$ git shortlog -sn
80 Harry Roberts
34 Samantha Peters
3 Tom Smith
这个 shortlog 命令是 git log 的总结摘要,-n 将根据每个作者的提交数而不是作者字母顺序对输出进行排序。
上面显示了项目生命周期的所有commit,但是如果您想查看在指定的时间内有多少人完成,可以使用 --since和--untilflags:
$ git shortlog -sn --since='10 weeks' --until='2 weeks'
59 Harry Roberts
24 Samantha Peters
我把它设置别名 $ git stats.
表扬
Git有一个非常有用的 blame 功能,允许我们查看某段特定的代码段是由哪些开发人员负责更改的:
# 找出这个button的CSS文件第5-10行是谁改的:
$ git blame -L5,10 _components.buttons.scss
blame这样的措辞不太好,这好像在说我们要找的这个开发人员做错了事。但事实上可能不总是这样——他们可能做了一些特别聪明或令人印象深刻的事情,我们也想知道是谁干的。
从SVN那儿找到灵感,我把blame的别名设置成praise:
$ git config --global alias.praise blame
那么之前的命令就变成:
# 找出谁补全了提示信息,要给他们买咖啡:
$ git praise -L18,23 _includes/head.html
一个小小的改动,但是很温暖。
隐藏空白噪声
当您用diff或show查看一个有大量空白的对象时,我们会看到很多视觉噪音,这可能使你很难看到更重要的内容。
去除这种噪声很容易,可以通过-w,它可以跟git diff和git show一起使用。例如,使用之前:
a {
color: $color-links;
-&:hover {
- color: $color-links-hover;
-}
+ &:hover {
+ color: $color-links-hover;
+ text-decoration: underline;
+ }
}
使用之后:
a {
color: $color-links;
&:hover {
color: $color-links-hover;
+ text-decoration: underline;
}
}
现在很容易看出,这里唯一有意义的变化是添加了 text-decoration: underline;,而其余的diff 内容是有点误导性的。
显示更改的单词而不是整行
当编辑文字时,与代码相反,查看更改的单词而不是整个发生改动的行通常更有用; 这在写markdown时特别有用。
幸运的是,我们可以用 --word-diff 标志来显示发生更改的单词:
$ git diff --word-diff
下面是执行没有--word-diff标志的 diff 结果,比较乱,很难看到改了哪里:
-My friend Tom recently gave an excellent talk
+My good friend Tom gave an excellent talk
...但是加上 --word-diff 之后重新执行 diff,我们得到了更加有用的信息:
My {+good+} friend Tom [-recently-] gave an excellent talk
查看你最近工作的分支
在很多项目中,开发者要在许多不同的分支之间频繁切换的事情并不鲜见,这样的情况下要保持头脑清醒不太容易。我们可以让Git 帮忙解决这个问题:
$ git for-each-ref --count=10 --sort=-committerdate refs/heads/ --format="%(refname:short)"
这将显示我们工作的最后10个(--count=10)分支,按照最后一次在使用的时间排序。它只显示我们本地的分支(refs/heads/),同时显示的格式更友好 --format。
这一大段有点长,所以我设置了别名 $ git recent。
看看大家都在干什么
有时候,特别是对于team leader来说,对所有分支上每个人的工作情况有个一般了解是很有用的。再一次,Git 很容易做到:
$ git log --all --oneline --no-merges
这将简略显示每个人在所有分支上工作的日志(--no-merges)。
也可以通过以下方式来限制返回的提交数--since:
$ git log --all --since='2 weeks' --oneline --no-merges
对此我有个别名 $ git overview
自己之前的工作回顾
你回到一个旧的项目工作,或者在长时间的休息之后回到办公室,你已经忘了自己最后的工作是什么 。我们可以要求 Git 简要介绍我们之前在此项目上的工作:
$ git log --all --oneline --no-merges --author=<your email address>
我设了别名 $ git recap。
今天的工作内容
我不在这里讨论如何衡量开发人员的生产力,但我觉得让客户知道我在每一天的工作内容非常有用。我不是保留我完成的任务的详细列表,而是让Git提供所有这些信息:
$ git log --since=00:00:00 --all --no-merges --oneline --author=<your email address>
这将log --all 所有分支上, --author在 --since 当天午夜开始的那一天(但是--no-merges)的所有工作,并做一个简单的--oneline概述。
别名 $ git today。
看看有哪些变动需要pull
如果你有段时间没在一个项目里工作了,重新回来的时候,在pull到本地之前你得看看之前都发生了什么事:
$ git log --oneline --no-merges HEAD..<remote>/<branch>
HEAD 是可选的。
例如,看看你度假时某个特定功能都发生了什么:
$ git checkout feature/fonts
$ git fetch
$ git log --oneline --no-merges ..origin/feature/fonts
别名$ git upstream。
检查你要push的内容
希望你有经常commit和push的习惯,但如果由于某些原因,你存了大量的本地commit 没有push,快速回顾一下它们是什么。
为此,我们反转之前的命令:
$ git log --oneline --no-merges <remote>/<branch>..HEAD
例如:
$ git fetch
$ git log --oneline --no-merges origin/feature/fonts..HEAD
git config --global --list
清空不要提交的任何
git clean -xdf
将第六个文件提交修改到上一次一起
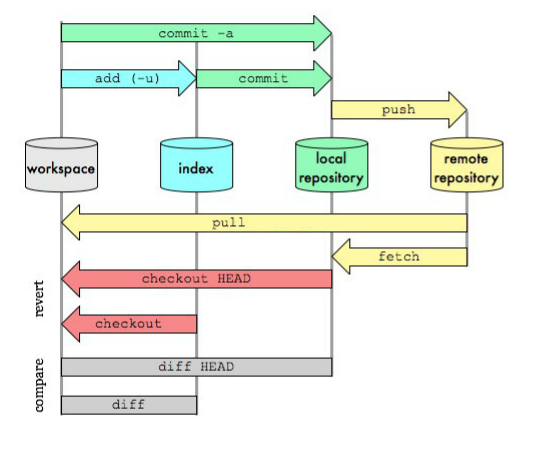
git add file6
git commit --amend --no-edit
Workspace:工作区
Index / Stage:暂存区
Repository:仓库区(或本地仓库)
Remote:远程仓库
一、新建代码库
# 在当前目录新建一个Git代码库
$ git init
# 新建一个目录,将其初始化为Git代码库
$ git init[project-name]
# 下载一个项目和它的整个代码历史
$ git clone [url]
二、配置
Git的设置文件为.gitconfig,它可以在用户主目录下(全局配置),也可以在项目目
录下(项目配置)。
# 显示当前的Git配置
$ git config–list
# 编辑Git配置文件
$ git config -e[–global]
# 设置提交代码时的用户信息
$ git config[–global] user.name “[name]”
$ git config[–global] user.email “[email address]”
三、增加/删除文件
# 添加指定文件到暂存区
$ git add [file1][file2] …
# 添加指定目录到暂存区,包括子目录
$ git add [dir]
# 添加当前目录的所有文件到暂存区
$ git add .
# 添加每个变化前,都会要求确认
# 对于同一个文件的多处变化,可以实现分次提交
$ git add -p
# 删除工作区文件,并且将这次删除放入暂存区
$ git rm [file1][file2] …
# 停止追踪指定文件,但该文件会保留在工作区
$ git rm –cached[file]
# 改名文件,并且将这个改名放入暂存区
$ git mv[file-original] [file-renamed]
四、代码提交
# 提交暂存区到仓库区
$ git commit -m[message]
# 提交暂存区的指定文件到仓库区
$ git commit[file1] [file2] … -m [message]
# 提交工作区自上次commit之后的变化,直接到仓库区
$ git commit -a
# 提交时显示所有diff信息
$ git commit -v
# 使用一次新的commit,替代上一次提交
# 如果代码没有任何新变化,则用来改写上一次commit的提交信息
$ git commit–amend -m [message]
# 重做上一次commit,并包括指定文件的新变化
$ git commit–amend [file1] [file2] …
五、分支
# 列出所有本地分支
$ git branch
# 列出所有远程分支
$ git branch -r
# 列出所有本地分支和远程分支
$ git branch -a
# 新建一个分支,但依然停留在当前分支
$ git branch[branch-name]
# 新建一个分支,并切换到该分支
$ git checkout -b[branch]
# 新建一个分支,指向指定commit
$ git branch[branch] [commit]
# 新建一个分支,与指定的远程分支建立追踪关系
$ git branch–track [branch] [remote-branch]
# 切换到指定分支,并更新工作区
$ git checkout[branch-name]
# 切换到上一个分支
$ git checkout –
# 建立追踪关系,在现有分支与指定的远程分支之间
$ git branch–set-upstream [branch] [remote-branch]
# 合并指定分支到当前分支
$ git merge[branch]
# 选择一个commit,合并进当前分支
$ git cherry-pick[commit]
# 删除分支
$ git branch -d[branch-name]
# 删除远程分支
$ git push origin–delete [branch-name]
$ git branch -dr[remote/branch]
六、标签
# 列出所有tag
$ git tag
# 新建一个tag在当前commit
$ git tag [tag]
# 新建一个tag在指定commit
$ git tag [tag][commit]
# 删除本地tag
$ git tag -d[tag]
# 删除远程tag
$ git push origin:refs/tags/[tagName]
# 查看tag信息
$ git show [tag]
# 提交指定tag
$ git push[remote] [tag]
# 提交所有tag
$ git push[remote] –tags
# 新建一个分支,指向某个tag
$ git checkout -b[branch] [tag]
七、查看信息
# 显示有变更的文件
$ git status
# 显示当前分支的版本历史
$ git log
# 显示commit历史,以及每次commit发生变更的文件
$ git log –stat
# 搜索提交历史,根据关键词
$ git log -S[keyword]
# 显示某个commit之后的所有变动,每个commit占据一行
$ git log [tag]HEAD –pretty=format:%s
# 显示某个commit之后的所有变动,其”提交说明”必须符合搜索条件
$ git log [tag]HEAD –grep feature
# 显示某个文件的版本历史,包括文件改名
$ git log –follow[file]
$ git whatchanged[file]
# 显示指定文件相关的每一次diff
$ git log -p[file]
# 显示过去5次提交
$ git log -5–pretty –oneline
# 显示所有提交过的用户,按提交次数排序
$ git shortlog-sn
# 显示指定文件是什么人在什么时间修改过
$ git blame[file]
# 显示暂存区和工作区的差异
$ git diff
# 显示暂存区和上一个commit的差异
$ git diff–cached [file]
# 显示工作区与当前分支最新commit之间的差异
$ git diff HEAD
# 显示两次提交之间的差异
$ git diff[first-branch]…[second-branch]
# 显示今天你写了多少行代码
$ git diff–shortstat “@{0 day ago}”
# 显示某次提交的元数据和内容变化
$ git show[commit]
# 显示某次提交发生变化的文件
$ git show–name-only [commit]
# 显示某次提交时,某个文件的内容
$ git show[commit]:[filename]
# 显示当前分支的最近几次提交
$ git reflog
八、远程同步
# 下载远程仓库的所有变动
$ git fetch[remote]
# 显示所有远程仓库
$ git remote -v
# 显示某个远程仓库的信息
$ git remote show[remote]
# 增加一个新的远程仓库,并命名
$ git remote add[shortname] [url]
# 取回远程仓库的变化,并与本地分支合并
$ git pull[remote] [branch]
# 上传本地指定分支到远程仓库
$ git push[remote] [branch]
# 强行推送当前分支到远程仓库,即使有冲突
$ git push[remote] –force
# 推送所有分支到远程仓库
$ git push[remote] –all
九、撤销
# 恢复暂存区的指定文件到工作区
$ git checkout[file]
# 恢复某个commit的指定文件到暂存区和工作区
$ git checkout[commit] [file]
# 恢复暂存区的所有文件到工作区
$ git checkout .
# 重置暂存区的指定文件,与上一次commit保持一致,但工作区不变
$ git reset[file]
# 重置暂存区与工作区,与上一次commit保持一致
$ git reset–hard
# 重置当前分支的指针为指定commit,同时重置暂存区,但工作区不变
$ git reset[commit]
# 重置当前分支的HEAD为指定commit,同时重置暂存区和工作区,与指定commit一致
$ git reset–hard [commit]
# 重置当前HEAD为指定commit,但保持暂存区和工作区不变
$ git reset–keep [commit]
# 新建一个commit,用来撤销指定commit
# 后者的所有变化都将被前者抵消,并且应用到当前分支
$ git revert[commit]
# 暂时将未提交的变化移除,稍后再移入
$ git stash
$ git stash pop
十、其他
# 生成一个可供发布的压缩包
$ git archive
仅仅克隆 拉取 dev 分支
git clone -b dev 代码仓库地址 (dev是分支名称)
目的
我们想要获取到代码仓库中分支“a” 中的文件到本地,我了解到有三种方法。
代码仓库方法一:直接获取
*首先新建个文件夹,右键打开Git Bash
Git Bash
*在Git Bash中直接输入指令:git clone -b dev 代码仓库地址 (dev是分支名称)
Clone
*查看文件夹中内容,可以看到已经拉取完毕
拉取成功方法二
*打开Git Bash
*在Git Bash 中输入 git init 进行初始化
*与远程代码仓库建立连接:git remote add origin 代码仓库地址
建立连接
*将远程分支拉到本地:git fetch origin dev(dev即分支名)
拉取分支*创建本地分支:git checkout -b LocalDev origin/dev (LocalDev 为本地分支名,dev为远程分支名)
创建分支
*根据分支的变化,感觉这条指令可能是创建并切换到该分支
*最后一步将远程分支拉取到本地:git pull origin dev(dev为远程分支名)
拉取成功方法三
*打开Git Bash
*输入 git clone 代码仓库地址
*进入文件夹中 命令:cd XXX(文件夹名)
*继续输入指令 git submodule init
*最后 git submodule update


git init
git config --global
git config --global user.name FrankLi
git config --global user.email xxxxx@qq.com
git config --global alias.co checkout
git config --global alias.ci commit
git config --global alias.br branchgit config --global alias.unstage 'reset HEAD'
git config --global alias.last 'log -1'git config --global alias.lg "log --color --graph --pretty=format:'%Cred%h%Creset -%C(yellow)%d%Creset %s %Cgreen(%cr) %C(bold blue)<%an>%Creset' --abbrev-commit"
配置Git的时候,加上--global是针对当前用户起作用的,如果不加,那只针对当前的仓库起作用。
配置文件放哪了?每个仓库的Git配置文件都放在.git/config文件中
而当前用户的Git配置文件放在用户主目录下的一个隐藏文件.gitconfig中有些时候,你想添加一个文件到Git,但发现添加不了,原因是这个文件被.gitignore忽略了:
git status
git diff
$ git add App.class
The following paths are ignored by one of your .gitignore files:
App.class
Use -f if you really want to add them.
如果你确实想添加该文件,可以用-f强制添加到Git:$ git add -f App.class
或者你发现,可能是.gitignore写得有问题,需要找出来到底哪个规则写错了,可以用git check-ignore命令检查:
$ git check-ignore -v App.class
后悔药
git reset --hard HEAD^
git reset --hard HEAD^^
git reset --hard HEAD~100git reset --hard 1094a
穿梭前,用git log可以查看提交历史,以便确定要回退到哪个版本。
git log --graph
要重返未来,用git reflog查看命令历史,以便确定要回到未来的哪个版本。用git diff HEAD -- readme.txt命令可以查看工作区和版本库里面最新版本的区别
后悔药正确吃法:
1. 如果只是 modified 那么 git checkout -- filexxx.py 即可
2. 如果已经 add 但未 commit 那么 git reset HEAD filexxx.py 先 unstage 反暂存 然后执行第一步 恢复到 最近一次 commit 版本
3. 如果已经 commit 那么借助 git log/reflog 进行 git reset --hard commit_id_xxx 即可
git rm filexxx.py 会从版本库中删除文件, 相比之下 rm filexxx.py 会安全一些些, 毕竟这样还可以 git checkout -- filexxx.py
关联并推送到远程仓库
git remote add origin git@github.com:frankli/learngit.git
git push -u origin master
git checkout -b dev 等价于 git switch -c dev
git switch master
git branch -d dev 删除 dev 分支git merge --no-ff -m "merge with no-ff" dev # no fast forward 模式进行 merge
bug 分支一定要好好看
git branch -D <name>强行删除 未被合并过的 分支
git pull也失败了,原因是没有指定本地dev分支与远程origin/dev分支的链接,根据提示,设置dev和origin/dev的链接:
$ git branch --set-upstream-to=origin/dev dev
# 强制拉取 远程代码
git fetch --all && git reset --hard master && git pull

按照commit次数降序排列

git log | grep "^Author: " | awk '{print $2}' | sort | uniq -c | sort -k1,1nr

 浙公网安备 33010602011771号