Ansible-Playbook实战
一、Playbook 实战案例
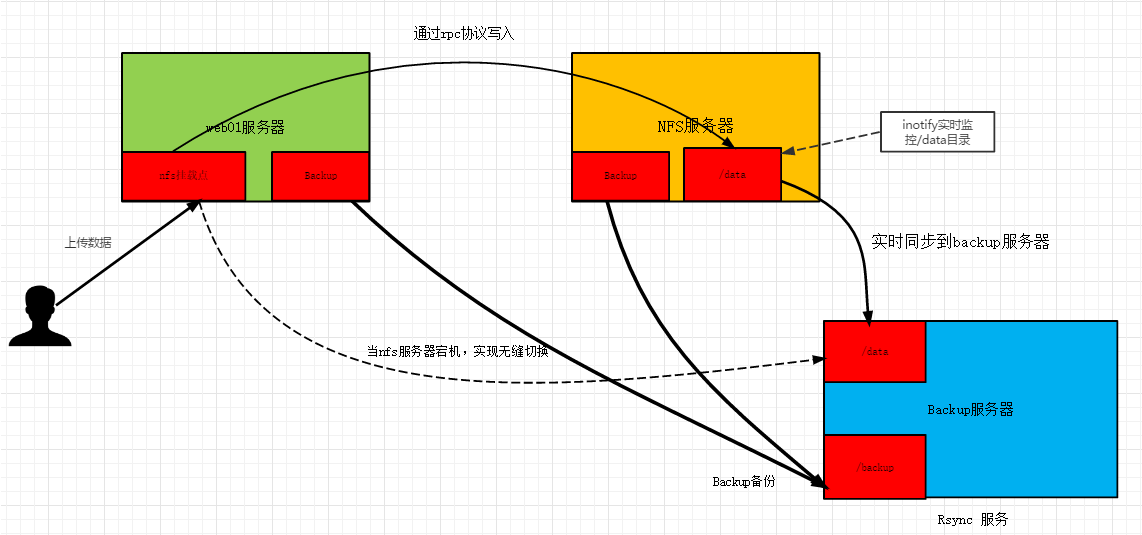
1.准备环境
角色|外网IP(NAT)|内网IP(LAN)|部署软件
---|---|---|---|---
m01|eth0:10.0.0.61|eth1:172.16.1.61|ansible
ly-backup|eth0:10.0.0.101|eth1:172.16.1.101|rsync
ly-nfs|eth0:10.0.0.100|eth1:172.16.1.100|nfs、Sersync
ly-web01|eth0:10.0.0.102|eth1:172.16.1.102|httpd
2.配置ansible对应的主机
[root@m01 project2]# vim hosts
[web]
ly-web01 ansible_ssh_host=172.16.1.102

[nfs]
ly-nfs ansible_ssh_host=172.16.1.100

[backup]
ly-backup ansible_ssh_host=172.16.1.101
3.检查对应的主机组和规划的IP是否一致
[root@m01 project2]# ansible web --list-host -i hosts
  hosts (1):
    ly-web01
[root@m01 project2]# ansible nfs --list-host -i hosts
  hosts (1):
    ly-nfs
[root@m01 project2]# ansible backup --list-host -i hosts
  hosts (1):
    ly-backup
[root@m01 project2]# ansible all --list-host -i hosts
  hosts (3):
    ly-web01
    ly-nfs
    ly-backup
4.建立对应的目录站点,用于存放ansible-playbook文件
[root@m01 ~]# mkdir /project2/{ansible_playbook,file} -p
5.编写基础模块的palybook
0.基础仓库准备
1.安装rsync
2.安装nfs-utils
3.创建www用户指定uid、gid
4.准备rsync客户端密码文件
5.1.建立基础环境的yaml
[root@m01 ansible_playbook]# cat base.yml
- hosts: all
  remote_user: root

  tasks:

    - name: configure yum repos
      yum_repository:
        name: base
        description: base yum repo
        baseurl:
          - http://mirrors.aliyun.com/centos/$releasever/os/$basearch/
          - http://mirrors.aliyuncs.com/centos/$releasever/os/$basearch/
          - http://mirrors.cloud.aliyuncs.com/centos/$releasever/os/$basearch/
        gpgcheck: no

    - name: configure yum repos
      yum_repository:
        name: epel
        description: epel yum repo
        baseurl: http://mirrors.aliyun.com/epel/7/$basearch
        gpgcheck: no

    - name: Create www Group
      group: name=www gid=666

    - name: Create www User
      user: name=www uid=666 group=666 shell=/sbin/nologin create_home=no

    - name: create rsync client pass
      copy: content='123456' dest=/etc/rsync.pass mode=0600

    - name: Push backup scripts
      copy: src=../files/clinet_push_rsync.sh dest=/server/scripts/
      when: (ansible_hostname != "backup")

    - name: Cron Tasks
      cron: name=Rsync_Backup minute=00 hour=01 job='/bin/bash /server/scripts/clinet_push_rsync.sh &>/dev/null'
      when: (ansible_hostname != "backup")
5.2.使用ansible-playbook检测语法, 并进行模拟执行
# 检测语法
[root@m01 ansible_playbook]# ansible-playbook --syntax-check base.yaml
playbook: base.yaml

# 模拟执行
[root@m01 ansible_playbook]# ansible-playbook -C  base.yaml
6.编写应用模块rsync的palybook
1.安装rsync
2.配置rsync
3.启动rsync
4.准备对应数据存储仓库/backup /data 授权为www
5.准备虚拟用户和密码文件,权限600
6.变更配置,重载服务
6.1.准备对应的配置文件存放至/project2/file/
[root@m01 file]# cat /project2/file/rsyncd.conf
uid = www
gid = www
port = 873
fake super = yes
use chroot = no
max connections = 200
timeout = 600
ignore errors
read only = false
list = false
auth users = rsync_backup
secrets file = /etc/rsync.passwd
log file = /var/log/rsyncd.log
#####################################
[backup]
path = /backup

[data]
path = /data
准备认证的虚拟用户文件
[root@m01 file]# cat rsync.passwd
rsync_backup:123456
6.2.编写rsync安装的的yml语法
[root@m01 ansible_playbook]# cat rsync.yml
- hosts: ly-backup
  remote_user: root

  tasks:
    - name: Install Rsync Server
      yum: name=rsync state=present

    - name: Config Rsync Server
      copy: src=../files/{{ item.src }} dest=/etc/{{ item.dest }}  mode={{ item.mode }}
      with_items:
        - { src: "rsyncd.conf", dest: "rsyncd.conf", mode: "0644" }
        - { src: "rsync.passwd", dest: "rsync.passwd", mode: "0600" }
      notify:
        - Restart Rsync Server
      tags: conf_rsync

    - name: Create Directory
      file: name={{ item }} state=directory owner=www group=www recurse=yes
      with_items:
        - /data
        - /backup

    - name: Server Rsync Server
      service: name=rsyncd state=started enabled=yes

    - name: Check Rsync Status
      shell: netstat -lntp|grep rsync
      register: Rsync_Status

    - name: Out Rsync Status
      debug: msg={{ Rsync_Status.stdout_lines }}

  handlers:
    - name: Restart Rsync Server
      service: name=rsyncd state=restarted
7.编写应用模块nfs的palybook
1.安装nfs
2.配置nfs
3.启动nfs
4.准备对应数据存储仓库/data授权为www
5.变更配置,重载服务
7.1.准备nfs配置文件exports
[root@m01 ansible_playbook]# cat /project2/file/exports
{{ share_dir }} {{ share_ip }}(rw,sync,all_squash,anonuid=666,anongid=666)
7.2.编写nfs安装与配置的yml
[root@m01 ansible_playbook]# cat /project2/ansible_playbook/nfs.yml
- hosts: ly-nfs
  remote_user: root
  vars:
    share_dir: /data
    share_ip: 172.16.1.0/24
  tasks:
    - name: Install NFS-Server
      yum: name=nfs-utils state=present

    - name: Configure NFS-Server
      template: src=../files/exports dest=/etc/exports
      notify: Restart Nfs Server

    - name: Create Directory
      file: name={{ share_dir }} state=directory owner=www group=www recurse=yes

    - name: Start NFS-Server
      service: name=nfs state=started enabled=yes

    - name: Check Nfs Server
      shell: cat /var/lib/nfs/etab
      register: NFS_Status

    - name: Out Nfs Server
      debug: msg={{ NFS_Status.stdout_lines }}

  handlers:
    - name: Restart Nfs Server
      service: name=nfs state=restarted
8.编写应用模块sersync的palybook
1.安装sersync
2.配置sersync
3.启动sersync
8.1.下载Sersync软件包
[root@m01 file]# ls
sersync2.5.4_64bit_binary_stable_final.tar.gz
8.2.准备sersync实时同步的配置文件
[root@m01 ansible_playbook]# cat /project2/file/confxml.xml.nfs
<?xml version="1.0" encoding="ISO-8859-1"?>
<head version="2.5">
    <host hostip="localhost" port="8008"></host>
    <debug start="false"/>
    <fileSystem xfs="true"/>
    <filter start="false">
    <exclude expression="(.*)\.svn"></exclude>
    <exclude expression="(.*)\.gz"></exclude>
    <exclude expression="^info/*"></exclude>
    <exclude expression="^static/*"></exclude>
    </filter>
    <inotify>
    <delete start="true"/>
    <createFolder start="true"/>
    <createFile start="true"/>
    <closeWrite start="true"/>
    <moveFrom start="true"/>
    <moveTo start="true"/>
    <attrib start="false"/>
    <modify start="false"/>
    </inotify>

    <sersync>
    <localpath watch="/data">
        <remote ip="172.16.1.101" name="data"/>
    </localpath>

    <rsync>
        <commonParams params="-az"/>
        <auth start="true" users="rsync_backup" passwordfile="/etc/rsync.pass"/>
        <userDefinedPort start="false" port="874"/><!-- port=874 -->
        <timeout start="true" time="100"/><!-- timeout=100 -->
        <ssh start="false"/>
    </rsync>
    <failLog path="/tmp/rsync_fail_log.sh" timeToExecute="60"/><!--default every 60mins execute once-->
    <crontab start="false" schedule="600"><!--600mins-->
        <crontabfilter start="false">
        <exclude expression="*.php"></exclude>
        <exclude expression="info/*"></exclude>
        </crontabfilter>
    </crontab>
    <plugin start="false" name="command"/>
    </sersync>

    <plugin name="command">
    <param prefix="/bin/sh" suffix="" ignoreError="true"/>  <!--prefix /opt/tongbu/mmm.sh suffix-->
    <filter start="false">
        <include expression="(.*)\.php"/>
        <include expression="(.*)\.sh"/>
    </filter>
    </plugin>

    <plugin name="socket">
    <localpath watch="/opt/tongbu">
        <deshost ip="192.168.138.20" port="8009"/>
    </localpath>
    </plugin>
    <plugin name="refreshCDN">
    <localpath watch="/data0/htdocs/cms.xoyo.com/site/">
        <cdninfo domainname="ccms.chinacache.com" port="80" username="xxxx" passwd="xxxx"/>
        <sendurl base="http://pic.xoyo.com/cms"/>
        <regexurl regex="false" match="cms.xoyo.com/site([/a-zA-Z0-9]*).xoyo.com/images"/>
    </localpath>
    </plugin>
</head>
8.3.编写sersync应用的yml
[root@m01 ansible_playbook]# cat sersync.yml
- hosts: ly-nfs
  tasks:

    - name: Installed Sersync
      copy: src=../file/sersync.tar.gz dest=/server/tools/

    - name: Tar xf Sersync
      shell: cd /server/tools/ && tar xf sersync.tar.gz && mv GNU-Linux-x86 /usr/local/sersync
      args:
        creates: /usr/local/sersync

    - name: Config Sersync
      copy: src=../file/confxml.xml.nfs dest=/usr/local/sersync/confxml.xml

    - name: Service Start Sersync
      shell: /usr/local/sersync/sersync2 -dro /usr/local/sersync/confxml.xml
9.编写web应用模块的palybook
[root@m01 ansible_playbook]# cat web.yml
- hosts: ly-web
  remote_user: root
  vars:
    remote_nfs_ip: 172.16.1.102
    local_dir: /var/www/html/
    http_port: 80

  tasks:
    - name: Installed Httpd Server
      yum: name=httpd,php state=present

    - name: Configure Httpd Server
      template: src=../files/httpd.conf dest=/etc/httpd/conf/httpd.conf
      notify: Restart Httpd Server

    - name: Start Httpd Server
      service: name=httpd state=started enabled=yes

    - name: Mount Nfs Server
      mount: src={{remote_nfs_ip}}:/data path={{ local_dir }} fstype=nfs opts=defaults state=mounted

    - name: Push kaoshi.zip
      unarchive: src=../files/kaoshi.zip dest={{ local_dir }}

  handlers:
    - name: Restart Httpd Server
      service: name=httpd state=restarted


#httpd配置文件中引入变量的使用,所以在yml文件中需要提前定义
[root@m01 ansible_playbook]# cat /project2/files/httpd.conf |grep "^Listen"
Listen {{ http_port }}
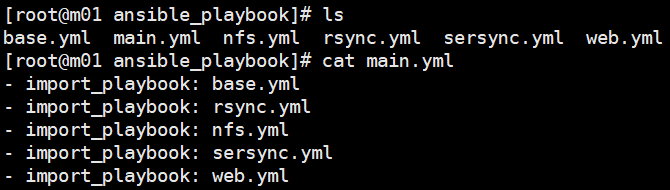
10.将所有编写好的yaml引入至一个文件中, 这样便于一次执行
[root@m01 ansible_playbook]# cat main.yml
- import_playbook: base.yml
- import_playbook: rsync.yml
- import_playbook: nfs.yml
- import_playbook: sersync.yml
- import_playbook: web.yml
11.测试
1.先测试web是否能同步数据至nfs存储
2.nfs是否实时同步至rsync的/data
3.使用客户端测试能否推送数据至rsync的backup
/project2/ansible_playbook下应该有的文件
/project2/file下应该有的文件

二、Playbook Roles
1.Playbook Roles
ansible roles 角色
适合大规模使用
playbook如果文件较多的情况,不清楚哪些主机执行了哪些状态的yml文件
roles能清楚哪些主机应用哪些角色
1.1.roles官方目录的结构,必须这么定义
[root@m01 roles]# mkdir {nfs,rsync,web}/{vars,tasks,templates,handlers,files} -p
[root@m01 roles]# tree
.
├── nfs                 #角色名称
│   ├── files           #存放文件
│   ├── handlers    #触发任务
│   ├── tasks           #具体任务
│   ├── templates   #模板文件
│   └── vars            #存放变量
1.2.roles变量定义方式
1.在vars目录中创建一个main.yml定义
2.在roles目录下创建一个group_vars定义,可以是主机组的名称,也可以是all(所有)
2.Playbook Roles实战
2.1.使用roles创建Rsync服务, 目录结构如下
[root@m01 roles]# tree /etc/ansible/roles/
/etc/ansible/roles/
├── hosts
├── rsync
│   ├── files
│   │   ├── rsyncd.conf
│   │   └── rsync.passwd
│   ├── handlers
│   │   └── main.yml
│   ├── tasks
│   │   └── main.yml
│   ├── templates
│   └── vars
├── site.yml
2.2.定义roles主机清单
[root@m01 roles]# cat /etc/ansible/roles/hosts
[backup]
172.16.1.41
2.3.指定backup主机组,执行那个roles
[root@m01 roles]# cat /etc/ansible/roles/site.yml
- hosts: backup
  remote_user: root
  roles:
    - rsync
2.4.查看rsync角色的tasks任务
[root@m01 roles]# cat /etc/ansible/roles/rsync/tasks/main.yml
- name: Install Rsync Server
  yum: name=rsync state=present

- name: Configure Rsync Server
  copy: src={{ item.src }} dest=/etc/{{ item.dest }} mode={{ item.mode }}
  with_items:
    - {src: "rsyncd.conf", dest: "rsyncd.conf", mode: "0644"}
    - {src: "rsync.passwd", dest: "rsync.passwd", mode: "0600"}
  notify: Restart Rsync Server

- name: Start Rsync Server
  service: name=rsyncd state=started enabled=yes
2.5.查看rsync角色的handlers
[root@m01 roles]# cat /etc/ansible/roles/rsync/handlers/main.yml
- name: Restart Rsync Server
  service: name=rsyncd state=restarted
2.6.查看rsync角色的files目录
[root@m01 roles]#  ll /etc/ansible/roles/rsync/files/
total 8
-rw-r--r-- 1 root root 322 Nov 16 18:49 rsyncd.conf
-rw------- 1 root root  20 Nov 16 18:30 rsync.passwd
2.7.nfs对应的变量定义
[root@m01 roles]# cat /etc/ansible/roles/group_vars/all
#nfs
share_dir: /data
share_ip: 172.16.1.31
2.8.执行roles,使用-t指定执行nfs标签
[root@m01 roles]# ansible-playbook -i hosts  -t nfs site.yml
PLAY [nfs] ********************************************************************************************

TASK [Gathering Facts] ********************************************************************************
ok: [172.16.1.31]

TASK [nfs : Install Nfs-Server] ***********************************************************************
ok: [172.16.1.31]

TASK [nfs : Configure Nfs-Server] *********************************************************************
ok: [172.16.1.31]

TASK [nfs : Create Directory Data] ********************************************************************
ok: [172.16.1.31]

TASK [nfs : Start Nfs-Server] *************************************************************************
ok: [172.16.1.31]

PLAY RECAP ********************************************************************************************
172.16.1.31                : ok=5    changed=0    unreachable=0    failed=0


 浙公网安备 33010602011771号