常用的注意力机制模块(SE、CBAM)
【深度学习】总目录
SE论文:《Squeeze-and-Excitation Networks》将重点放在了通道(channel)关系上,并提出了一种新的结构单元SE block。将SE block堆叠在一起,就形成了SENet。SE块略微增加计算成本但显著地提升了性能,并且即插即用。SENet获得了最后一届ImageNet 2017竞赛分类任务的冠军。
CBAM论文:《Convolutional Block Attention Module》论文(2018年)提出了一种轻量的注意力模块CBAM,可以在通道和空间维度上进行 Attention 。
1 SE模块
卷积神经网络建立在卷积运算的基础上,通过融合局部感受野内的空间信息和通道信息来提取信息特征。为了提高网络的表示能力,许多现有的工作通过在空间维度上对网络的性能进行了提升,比如Inception模块中嵌入多尺度处理来提高准确度,Spatial Transformer Networks(STN)结合空间注意力机制。本文与这些方法相反,专注于通道,并提出了一种新颖的架构单元“Squeeze-and-Excitation”(SE)模块,通过显式地建模通道之间的相互依赖关系,自适应地重新校准通道式的特征响应。具体来说,就是通过学习的方式来自动获取每个通道的重要程度,然后依照这个重要程度去提升有用的特征并抑制对当前任务用处不大的特征。
Squeeze-and-Excitation Module
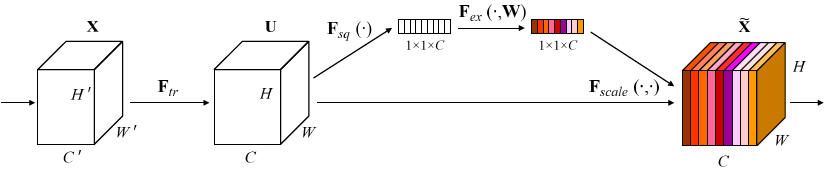
给定一个输入x,其特征通道数为c1,通过一系列卷积等一般变换后得到一个特征通道数为c2的特征。接下来通过SE模块的三个操作来重标定前面得到的特征:
1)Squeeze(压缩)。沿着空间维度压缩特征,将每个通道的二维的特征变成一个实数,可以理解为对每个 channel 的特征信息的进行融合,这个实数某种程度上具有全局的感受野,并且输出的维度和输入的特征通道数相匹配。它表征着在特征通道上响应的全局分布,而且使得靠近输入的层也可以获得全局的感受野,这一点在很多任务中都是非常有用。采用全局平局池化来实现,输出维度为1x1xC。
2)Excitation(激励)。得到Squeeze的1x1xC全局特征后,通过全连接层对每个通道的重要性进行预测。它是一个类似于循环神经网络中门的机制。通过参数来为每个特征通道生成权重,其中参数被学习用来显式地建模特征通道间的相关性。为了减少通道个数从而降低计算量,设置了缩放参数SERatio。 第一个全连接层有C*SERatio个神经元,输入为1×1×C,输出1×1×C×SERadio,起到降维作用。 第二个全连接层有C个神经元,输入为1×1×C×SERadio,输出为1×1×C。
3)Scale(缩放)。将Excitation的输出的权重看做是经过特征选择后的每个特征通道的重要性,然后通过乘法逐通道加权到先前的特征上,完成在通道维度上的对原始特征的重标定。
SE模块的代码实现(pytorch)
from torch import nn
class SELayer(nn.Module):
    def __init__(self, channel, reduction=16):
        super(SELayer, self).__init__()
        self.avg_pool = nn.AdaptiveAvgPool2d(1)
        self.fc = nn.Sequential(
            nn.Linear(channel, channel // reduction, bias=False),
            nn.ReLU(inplace=True),
            nn.Linear(channel // reduction, channel, bias=False),
            nn.Sigmoid()
        )

    def forward(self, x):
        b, c, _, _ = x.size()
        y = self.avg_pool(x).view(b, c)
        y = self.fc(y).view(b, c, 1, 1)
        return x * y.expand_as(x)
2 CBAM模块
CBAM(Convolutional Block Attention Module)是一种轻量的注意力模块,给定一个中间特征图,我们的模块会沿着两个独立的维度(通道和空间)依次推断注意力图,然后将注意力图乘以输入特征图以进行自适应特征修饰。 由于CBAM是轻量级的通用模块,因此可以以可忽略的开销将其无缝集成到任何CNN架构中,并且可以与基础CNN一起进行端到端训练。 论文在 ResNet 和 MobileNet 等经典结构上添加了 CBAM 模块并进行对比分析,同时也进行了可视化,发现 CBAM 更关注识别目标物体,这也使得 CBAM 具有更好的解释性。

2.1 Channel Attention Module(CAM)
通道上的Attention模块以及具体计算如下图所示:
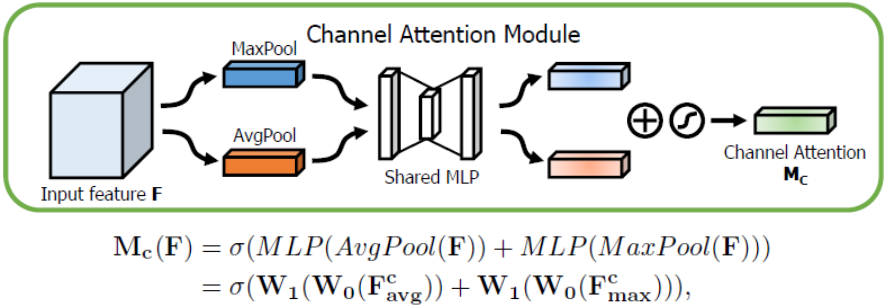
将输入的特征图F(H×W×C)分别经过global max pooling(全局最大池化)和global average pooling(全局平均池化),得到两个1×1×C的特征图,接着,再将它们分别送入一个两层的神经网络(MLP),第一层神经元个数为 C/r(r为减少率),激活函数为 Relu,第二层神经元个数为 C,这个两层的神经网络是共享的。而后,将MLP输出的特征进行基于element-wise的加和操作,再经过sigmoid激活操作,生成最终的channel attention feature,即M_c。最后,将M_c和输入特征图F做element-wise乘法操作,生成Spatial attention模块需要的输入特征。
实验:AvgPool & MaxPool

在channel attention中,表1对于pooling的使用进行了实验对比,发现avg & max的并行池化的效果要更好。这里也有可能是池化丢失的信息太多,avg&max的并行连接方式比单一的池化丢失的信息更少,所以效果会更好一点。
2.2 Spatial Attention Module(SAM)
空间上的Attention模块以及具体计算如下图所示:
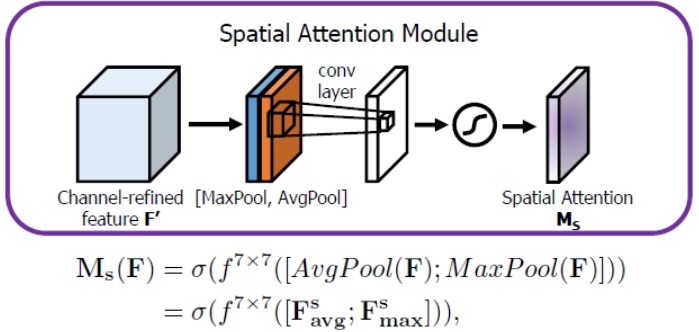
将Channel attention模块输出的特征图F’作为本模块的输入特征图。首先做一个基于channel的global max pooling 和global average pooling,得到两个H×W×1 的特征图,然后将这2个特征图基于channel做concat操作(通道拼接)。然后经过一个7×7卷积(7×7比3×3效果要好)操作,降维为1个channel,即H×W×1。再经过sigmoid生成spatial attention feature,即M_s。最后将该feature和该模块的输入feature做乘法,得到最终生成的特征。
实验:Comparison of different spatial attention methods
使用channel-pooling(沿着通道维度进行平均和最大池化)的同时,使用大kernel size=7效果最好。
2.3 CAM和SAM的组合形式
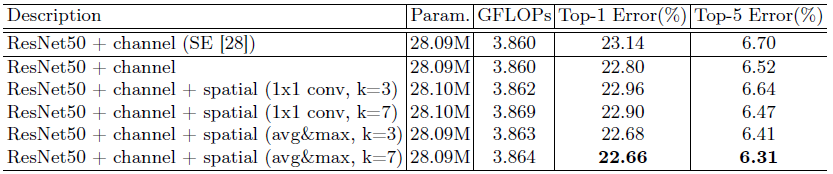
通道注意力和空间注意力这两个模块能够以并行或者串行顺序的方式组合在一块儿,关于通道和空间上的串行顺序和并行作者进行了实验对比,发现先通道再空间的结果会稍微好一点。具体实验结果如下:
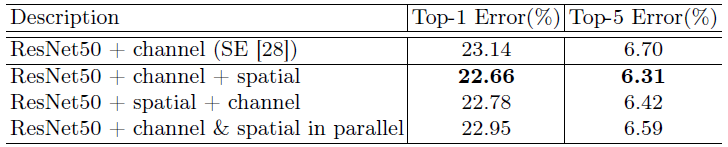
从表中可以看出,在ResNet50的基准架构上,两个attetnion子模块的连接顺序里面的确是channel + spatial的要更好一些,也要好于标准的SENet的通道attention。
3 Grad-CAM可视化
论文:Grad-CAM: Visual Explanations from Deep Networks via Gradient-based Localization
博客:Grad-CAM简介
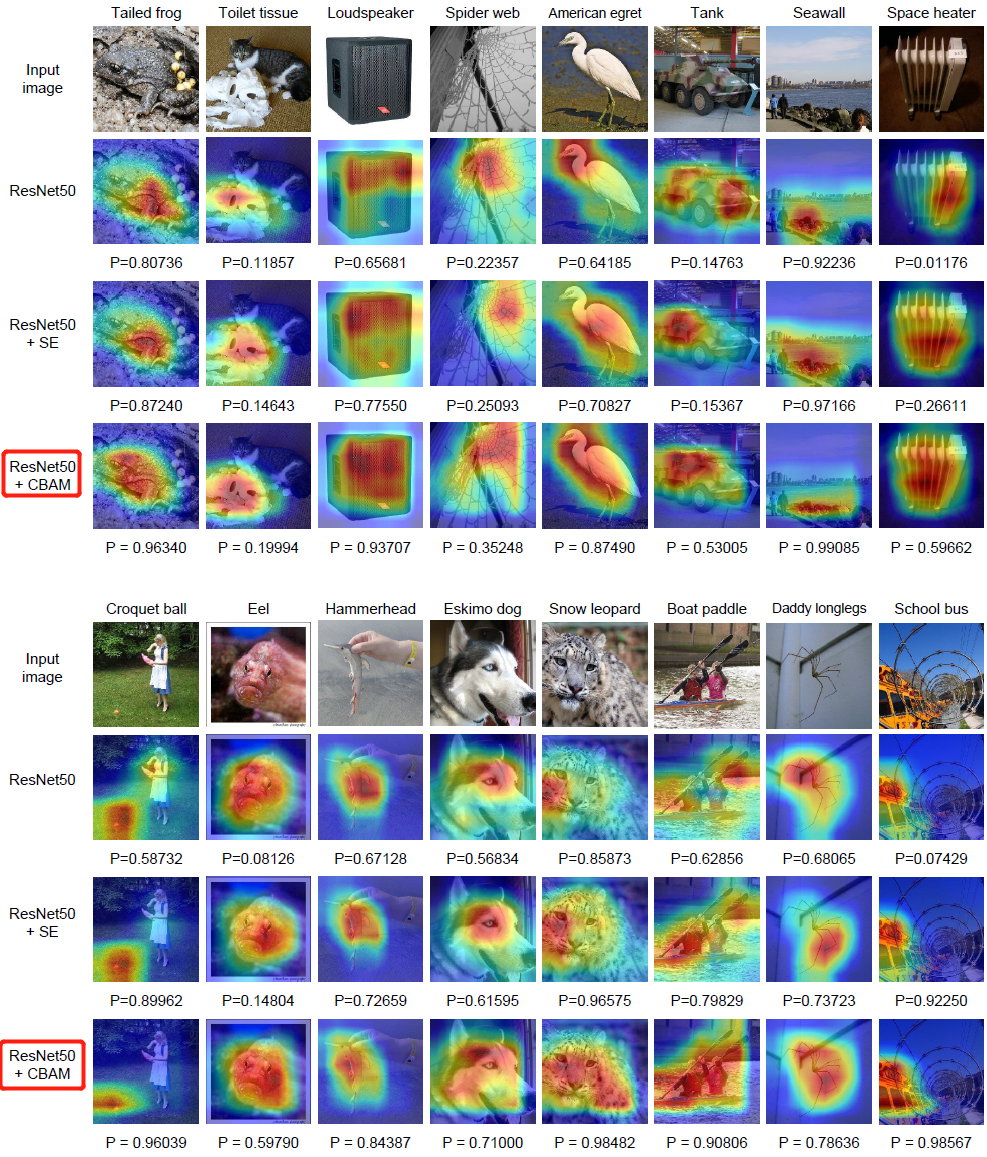
利用 Grad-CAM 对不一样的网络进行可视化后,能够发现,引入 CBAM 后,特征覆盖到了待识别物体的更多部位,而且最终判别物体的几率也更高,这代表注意力机制的确让网络学会了关注重点信息。
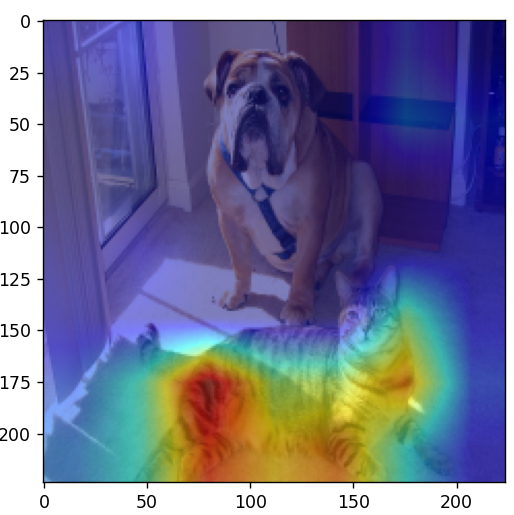
3.1 分类网络使用grad-cam
代码:https://github.com/jacobgil/pytorch-grad-cam
首先安装库 pip install grad-cam,然后运行以下文件
import os
import numpy as np
import torch
from PIL import Image
import matplotlib.pyplot as plt
from pytorch_grad_cam.utils.model_targets import ClassifierOutputTarget
from torchvision import models
from torchvision import transforms
from pytorch_grad_cam import GradCAMPlusPlus, GradCAM, XGradCAM
from pytorch_grad_cam.utils.image import show_cam_on_image


def main():
    model = models.mobilenet_v3_large(pretrained=True)
    print(model)
    target_layers = [model.features[-1]]

    # model = models.vgg16(pretrained=True)
    # target_layers = [model.features]

    # model = models.resnet34(pretrained=True)
    # target_layers = [model.layer4]

    # model = models.regnet_y_800mf(pretrained=True)
    # target_layers = [model.trunk_output]

    # model = models.efficientnet_b0(pretrained=True)
    # target_layers = [model.features]

    data_transform = transforms.Compose([transforms.ToTensor(),
                                         transforms.Normalize([0.485, 0.456, 0.406], [0.229, 0.224, 0.225])])
    # load image
    img_path = "both.png"
    assert os.path.exists(img_path), "file: '{}' dose not exist.".format(img_path)
    img = Image.open(img_path).convert('RGB')
    img = np.array(img, dtype=np.uint8)
    # img = center_crop_img(img, 224)

    # [C, H, W]
    img_tensor = data_transform(img)
    # expand batch dimension
    # [C, H, W] -> [N, C, H, W]
    input_tensor = torch.unsqueeze(img_tensor, dim=0)

    cam = GradCAM(model=model, target_layers=target_layers, use_cuda=False)

    targets = [ClassifierOutputTarget(281)]  # tabby, tabby cat
    # targets = [ClassifierOutputTarget(254)]  # pug, pug-dog

    # You can also pass aug_smooth=True and eigen_smooth=True, to apply smoothing.
    grayscale_cam = cam(input_tensor=input_tensor, targets=targets)
    grayscale_cam = grayscale_cam[0, :]
    visualization = show_cam_on_image(img.astype(dtype=np.float32) / 255.,
                                      grayscale_cam,
                                      use_rgb=True)
    plt.imshow(visualization)
    plt.show()


if __name__ == '__main__':
    main()
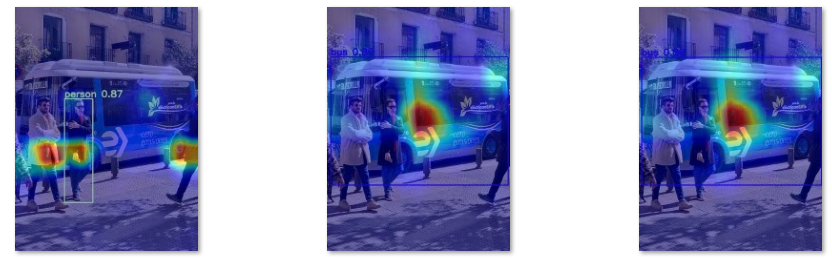
3.2 Yolov5-7.0使用grad-cam
代码:https://github.com/z1069614715/objectdetection_script/tree/master/yolo-gradcam
首先安装库 pip install grad-cam,然后运行以下文件
import warnings

warnings.filterwarnings('ignore')
warnings.simplefilter('ignore')
import torch, yaml, cv2, os, shutil
import numpy as np

np.random.seed(0)
import matplotlib.pyplot as plt
from tqdm import trange
from PIL import Image
from models.yolo import Model
from utils.general import intersect_dicts
from utils.augmentations import letterbox
from utils.general import xywh2xyxy
from pytorch_grad_cam import GradCAMPlusPlus, GradCAM, XGradCAM
from pytorch_grad_cam.utils.image import show_cam_on_image
from pytorch_grad_cam.activations_and_gradients import ActivationsAndGradients


class yolov5_heatmap:
    def __init__(self, weight, cfg, device, method, layer, backward_type, conf_threshold, ratio):
        device = torch.device(device)
        ckpt = torch.load(weight)  # 包含模型权重、epoch、data等
        model_names = ckpt['model'].names  # 80个类别名
        csd = ckpt['model'].float().state_dict()  # checkpoint state_dict as FP32
        model = Model(cfg, ch=3, nc=len(model_names)).to(device)  # create model
        csd = intersect_dicts(csd, model.state_dict(), exclude=['anchor'])  # 筛选预训练权重中的键值对,不加载anchor
        model.load_state_dict(csd, strict=False)  # load
        model.eval()
        print(f'Transferred {len(csd)}/{len(model.state_dict())} items')

        target_layers = [eval(layer)]
        method = eval(method)

        colors = np.random.uniform(0, 255, size=(len(model_names), 3)).astype(np.int_)  # 不同类别的颜色
        self.__dict__.update(locals())

    def post_process(self, result):
        logits_ = result[..., 4:]
        boxes_ = result[..., :4]
        sorted, indices = torch.sort(logits_[..., 0], descending=True)
        return logits_[0][indices[0]], xywh2xyxy(boxes_[0][indices[0]]).cpu().detach().numpy()

    def draw_detections(self, box, color, name, img):
        xmin, ymin, xmax, ymax = list(map(int, list(box)))
        cv2.rectangle(img, (xmin, ymin), (xmax, ymax), tuple(int(x) for x in color), 2)
        cv2.putText(img, str(name), (xmin, ymin - 5), cv2.FONT_HERSHEY_SIMPLEX, 0.8, tuple(int(x) for x in color), 2,
                    lineType=cv2.LINE_AA)
        return img

    def __call__(self, img_path, save_path):
        # remove dir if exist
        if os.path.exists(save_path):
            shutil.rmtree(save_path)
        # make dir if not exist
        os.makedirs(save_path, exist_ok=True)

        # img process
        img = cv2.imread(img_path)
        img = letterbox(img)[0]
        img = cv2.cvtColor(img, cv2.COLOR_BGR2RGB)
        img = np.float32(img) / 255.0
        tensor = torch.from_numpy(np.transpose(img, axes=[2, 0, 1])).unsqueeze(0).to(self.device)

        # init ActivationsAndGradients
        grads = ActivationsAndGradients(self.model, self.target_layers, reshape_transform=None)

        # get ActivationsAndResult
        result = grads(tensor)  # 从指定中间层提取激活值和梯度
        activations = grads.activations[0].cpu().detach().numpy()

        # postprocess to yolo output
        post_result, post_boxes = self.post_process(result[0])
        for i in trange(int(post_result.size(0) * self.ratio)):
            if post_result[i][0] < self.conf_threshold:  # 没有非极大值抑制,只用置信度筛选,所以输出的热力图结果比较多
                break

            self.model.zero_grad()
            if self.backward_type == 'conf':
                post_result[i, 0].backward(retain_graph=True)
            else:
                # get max probability for this prediction
                score = post_result[i, 1:].max()
                score.backward(retain_graph=True)

            # process heatmap
            gradients = grads.gradients[0]
            b, k, u, v = gradients.size()
            weights = self.method.get_cam_weights(self.method, None, None, None, activations,
                                                  gradients.detach().numpy())
            weights = weights.reshape((b, k, 1, 1))
            saliency_map = np.sum(weights * activations, axis=1)
            saliency_map = np.squeeze(np.maximum(saliency_map, 0))
            saliency_map = cv2.resize(saliency_map, (tensor.size(3), tensor.size(2)))  # resize到原图大小
            saliency_map_min, saliency_map_max = saliency_map.min(), saliency_map.max()
            if (saliency_map_max - saliency_map_min) == 0:
                continue
            saliency_map = (saliency_map - saliency_map_min) / (saliency_map_max - saliency_map_min)  # scale到0-255之间

            # add heatmap and box to image
            cam_image = show_cam_on_image(img.copy(), saliency_map, use_rgb=True)
            cam_image = self.draw_detections(post_boxes[i], self.colors[int(post_result[i, 1:].argmax())],
                                             f'{self.model_names[int(post_result[i, 1:].argmax())]} {post_result[i][0]:.2f}',
                                             cam_image)
            cam_image = Image.fromarray(cam_image)
            cam_image.save(f'{save_path}/{i}.png')


def get_params():
    params = {
        'weight': 'yolov5s.pt',
        'cfg': 'models/yolov5s.yaml',
        'device': 'cuda:0',
        'method': 'XGradCAM',  # GradCAMPlusPlus, GradCAM, XGradCAM
        'layer': 'model.model[-2]',
        'backward_type': 'conf',  # class or conf
        'conf_threshold': 0.6,  # 0.6
        'ratio': 0.02  # 0.02-0.1
    }
    return params


if __name__ == '__main__':
    model = yolov5_heatmap(**get_params())
    model(r'data/images/bus.jpg', 'result')
参考
1. SENet概览
4. 注意机制(CBAM)理解
5. Grad-CAM简介
 浙公网安备 33010602011771号