Tkinter界面实操
常用opencv-python进行图像处理,有时需要图形用户界面,写个Demo以备不时之需。
Tkinter
1. 导入库
由于 Tkinter 是内置到 python 的安装包中、只要安装好 Python 之后就能 import Tkinter。
1 import tkinter
2. 窗口
root=Tk()                   #生成主窗口
root.geometry(‘250x250’)    #改变窗体大小(‘宽x高’),注意是x不是*
root.geometry(’+450+450’)   #改变窗体位置(‘+横坐标+纵坐标’)
root.title(‘标题名’)         #修改框体的名字
root.mainloop()             #显示主窗口
root.resizable(0, 0)        #将窗口大小设置为不可变
root.resizable(False, False)#将窗口大小设置为不可变
3. 组件
常用的组件有Label,Button,Checkbutton,Radiobutton,Frame,Entry,Listbox,Scrollbar等。
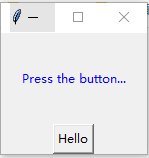
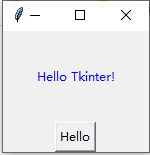
config用来配置tkinter中控件和字体的样式,比如颜色、大小等。给Button的command属性赋值可以指定按钮按下时执行函数中的代码的功能。比如:
import tkinter as tk

def btnHelloClicked():
    labelHello.config(text="Hello Tkinter!")

root = tk.Tk()
root.title("Button Test")
labelHello = tk.Label(root, text="Press the button...", height=5, width=20, fg="blue")
labelHello.pack()
btn = tk.Button(root, text="Hello", command=btnHelloClicked)
btn.pack()
root.mainloop()


4. 布局
管理组件的布局可以使用pack、grid 和 place,其中:
- pack 是按添加顺序排列组件
- grid 是按行/列形式排列组件
- place 则允许程序员指定组件的大小和位置
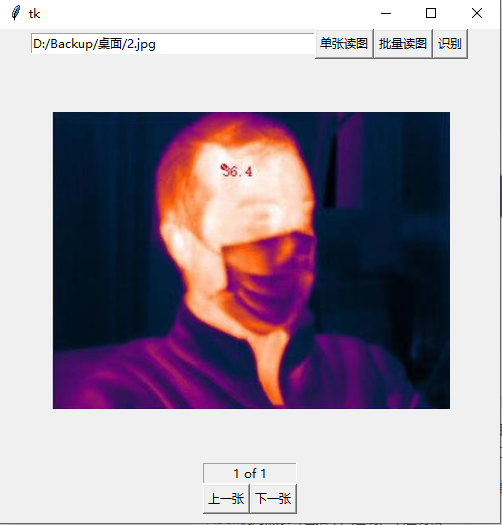
图片查看器

代码:
import glob
import tkinter as tk
from tkinter import filedialog
import numpy as np
from PIL import Image, ImageTk
import cv2
from algorithm import tem, detect

window = tk.Tk()
window.geometry("500x500")

path_frame = tk.Frame(window)
path_frame.pack()
filename_var = tk.StringVar()
txt_Path = tk.Entry(path_frame, width=40, textvariable=filename_var)
txt_Path.pack(side=tk.LEFT)

btn_ChoosePic = tk.Button(path_frame, text="单张读图")
btn_ChooseDir = tk.Button(path_frame, text="批量读图")
btn_detect = tk.Button(path_frame, text="识别")
btn_ChoosePic.pack(side=tk.LEFT)
btn_ChooseDir.pack(side=tk.LEFT)
btn_detect.pack(side=tk.LEFT)

pic_label = tk.Label(window, width=400, height=400)
pic_label.pack()

button_frame = tk.Frame(window)
button_frame.pack()
number_var = tk.StringVar()
number_var.set("0 of 0")
index_label = tk.Label(button_frame, textvariable=number_var, bd=1, relief=tk.SUNKEN, anchor=tk.CENTER)
index_label.pack(fill=tk.X)
btn_PrePic = tk.Button(button_frame, text="上一张")
btn_NextPic = tk.Button(button_frame, text="下一张")
btn_PrePic.pack(side=tk.LEFT, anchor=tk.CENTER)
btn_NextPic.pack(side=tk.RIGHT, anchor=tk.CENTER)

index = 0

"""
将图片显示在控件上
"""
def ShowPic():
    global file, filename_var
    picture = Image.open(file)
    filename_var.set(file)
    w, h = picture.size
    picture = resize(w, h, 400, 400, picture)
    picture = ImageTk.PhotoImage(picture)
    pic_label.configure(image=picture, width=400, height=400)
    window.mainloop()


"""
对pil_image对象进行缩放,让它在一个矩形框内,还能保持比例
"""
def resize(w, h, w_box, h_box, pil_image):
    f1 = 1.0 * w_box / w
    f2 = 1.0 * h_box / h
    factor = min([f1, f2])
    width = int(w * factor)
    height = int(h * factor)
    return pil_image.resize((width, height), Image.ANTIALIAS)


def ChoosePic():
    global file
    file = filedialog.askopenfilename()
    number_var.set("1 of 1")
    ShowPic()


def ChooseDir():
    global files, file
    directory = filedialog.askdirectory()
    files = glob.glob(directory + "/*.jpg")
    file = files[0]
    number_var.set("1 of {}".format(len(files)))
    ShowPic()


def ChangePic(next_no):
    global index, file
    index += next_no
    if index > len(files) - 1:
        index = len(files) - 1
    if index < 0:
        index = 0
    file = files[index]
    number_var.set("{} of {}".format(index + 1, len(files)))
    ShowPic()


def Detect():
    img = cv2.imread(file)
    #  图像处理(略)
    picture = Image.fromarray(cv2.cvtColor(dst, cv2.COLOR_BGR2RGB))
    w, h = picture.size
    w, h = picture.size
    picture = resize(w, h, 400, 400, picture)
    picture = ImageTk.PhotoImage(picture)
    pic_label.configure(image=picture, width=400, height=400)
    window.mainloop()

# 按钮绑定事件
btn_ChoosePic.config(command=ChoosePic)
btn_ChooseDir.config(command=ChooseDir)
btn_detect.config(command=Detect)
btn_PrePic.config(command=lambda: ChangePic(-1))
btn_NextPic.config(command=lambda: ChangePic(1))
window.mainloop()


