CS144计算机网络lab0: networking warmup
1. 搭建GUN/Linux环境
这里就不详细展开了,需要的小伙伴可以看这两篇博客:
Linux系统安装
GUN环境安装
2. 手动上网
2.1 访问网页
- 使用浏览器,访问网页 http://cs144.keithw.org/hello
- 使用telnet访问
- 输入如下指令
telnet cs144.keithw.org http GET /hello HTTP/1.1 Host: cs144.keithw.org Conncetion: close- 观察结果如下:
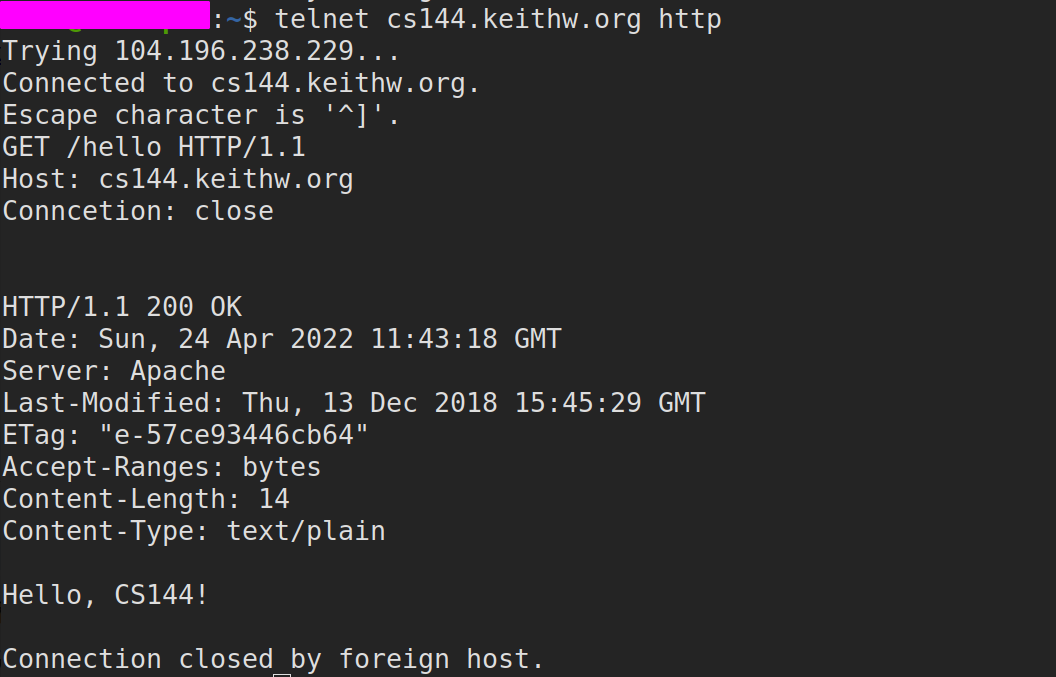
PS:实验成功的关键是输入的速度足够快,可以复制粘贴输入,速度慢了会返回404错误。这里telnet首先使用http端口连接服务器,然后提交一个GET请求,获得服务器 /hello下的内容,然后关闭连接。这实际上与我们用浏览器访问该网址是一样的,只不过这里不是图形化页面,同时会返回所有的信息。
- 任务:访问网址:http://cs144.keithw.org/lab0/sunetid ,其中sunetid可以自行设置,可以获得一个密码在 X-Your-Code-Is。
- 命令
telnet cs144.keithw.org http GET /lab0/peng HTTP/1.1 Host: cs144.keithw.org Conncetion: close- 运行结果就不展示了,这里注意还是输入的速度要快,和我一样打字速度慢的可以先写好,复制粘贴。
2.2 送给你自己一封邮件
这个实验,使用CS144提供的实验不能够完成,因为使用到Stanford的邮箱服务,因此这里使用了QQ邮箱来完成该实验。
-
在使用QQ邮箱进行实验之前,首先需要获得自己QQ邮箱的16位校验码,使用的是校验码登录。设置步骤如下:
- 网页登录qq邮箱
- 点击设置,账户设置
- 在账户安全下面有 POP3/IMAP/SMTP/Exchange/CardDAV/CalDAV服务选项,如下图所示:

- 先点击开启SMTP服务,开启后点击生成授权码,生成一个十六位的校验码,记录下来。
-
得到16位校验码之后,我们还不能使用,因为登录时使用的是校验码和qq号的64位base加密码。
- 打开64base加密网址:https://base64.us/
- 输入你的qq号点击加密,把结果记录下来
- 输入你的16位校验码点击加密,把结果记录下来
笔者进行了如下记录:

-
接下来就可以进行实验啦
- 使用telnet连接qq邮箱的服务器
- 给服务器发送一个helo请求,helo可以大写,也可以小写
- 收到回复之后发送auth login,请求登录
- 接下来发送qq号的64位base码
- 发送邮箱的16位校验码的base码
- 登录成功之后就可以发送邮件啦
- 发送 MAIL FROM: <QQ号@qq.com> 告诉邮箱服务器邮件发送方,就你目前登录的qq邮箱
- 发送 RCPT TO: <手机号@163.com> 告诉邮箱服务器邮件接收方,就你想要发送的目标邮箱,这里笔者使用了自己的163邮箱
- 发送 DATA +回车 告诉服务器要输入邮件信息了
- 发送信息的模板如下:
From: <QQ号@qq.com> #发送方 To: <手机号@163.com> #接收方 subject: test # 邮件主题,好多样例里只发送主题, 注意发送邮件内容需要在主题后有一空行 # 空行 I am the ... # 邮件内容,邮件内容后也需要一空行 # 空行 . # ‘.’ 加回车提示邮件内容发送完成- 发送完邮件之前,可以输入QUIT加回车关闭telnet连接
-
实验完整的命令如下:
telnet smtp.qq.com smtp
HELO smtp.qq.com
auth login
QQ号的64位base编码:自己的qq号base64编码
16位校验码的base编码:16位校验码的base64编码
MAIL FROM: <qq号@qq.com>
RCPT TO: <手机号@163.com>
DATA
From: <qq号@qq.com>
To: <手机号@163.com>
subject: test

  I am the ...

.
- 实验结果
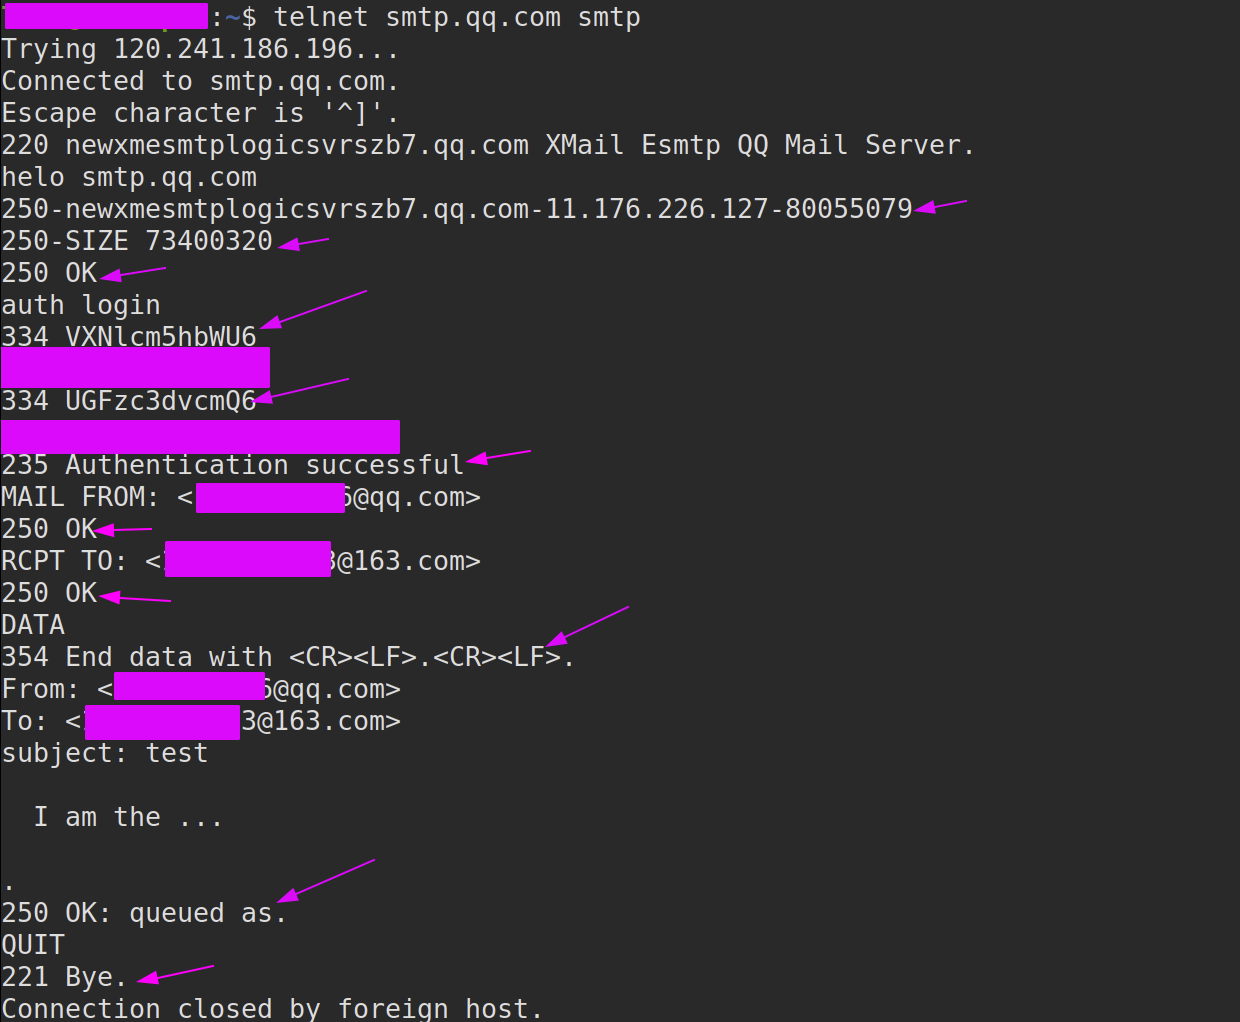
其中箭头指向的是来自服务器的回复信息。

2.3 听和连接
这个实验是实现运行在同一台电脑上的两个终端之间进行通信。
- 实验步骤:
- 打开一个终端,输入命令
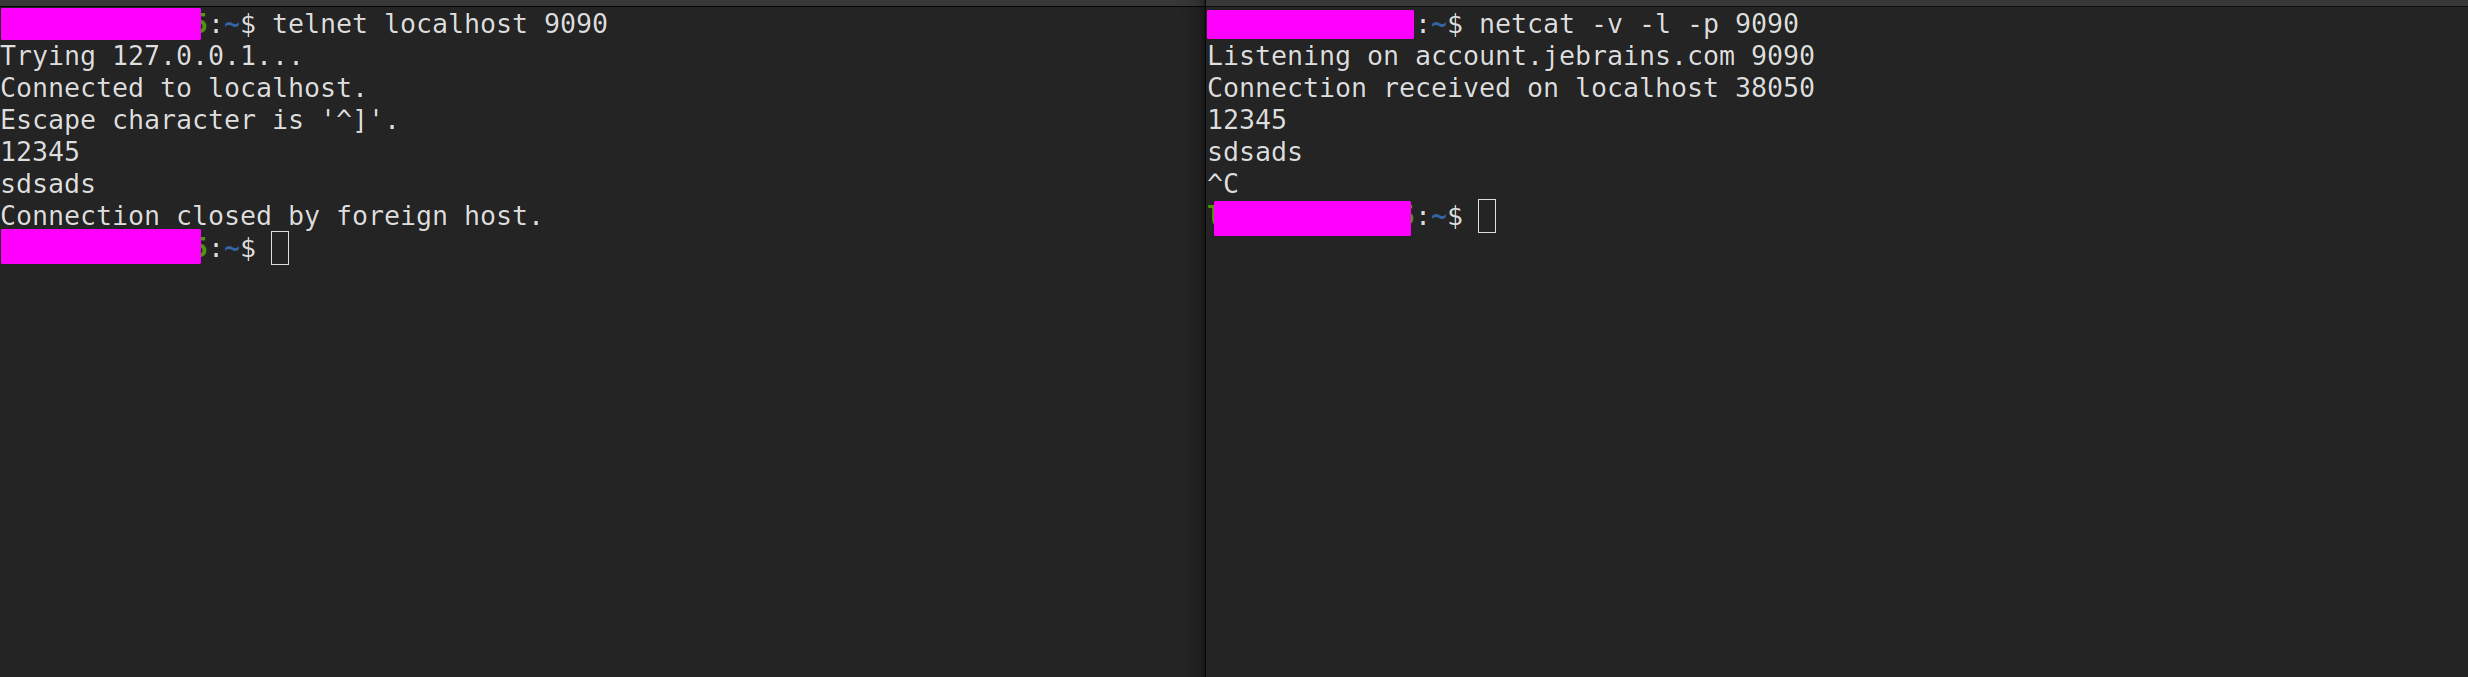
netcat -v -l -p 9090,开启该终端的监听服务 - 打开另一个终端, 使用 telnet 进行连接, 输入指令
telnet localhost 9090 - 如果运行顺利的话,两个终端都会收到消息,客户端(telnet)提示连接成功,服务端(netcat)提示,收到客户端(telnet)的连接
- 你可以在服务端或者客户端输入信息,按下回车键后会同步显示在另一个终端上
- 最后可以在服务端(netcat)输入
ctrl-C关闭服务
- 打开一个终端,输入命令
- 运行结果
3. 编写一个使用系统流套接字的网络程序
这里使用linux系统的套接字实现一个小程序webget,即我们之前使用telnet进行访问网页的程序。为了编写这个程序,我们首先需要使用git将github代码仓库里的代码克隆到本地,这里笔者使用的Vscode的Git管理,构建VscodeGit管理的教程,可以参考这篇博客:https://www.cnblogs.com/Fight-go/p/15851321.html
3.1 克隆项目
为了克隆这个实验项目,在终端输入如下指令:
git clone https://github.com/cs144/sponge就可以将源码拷贝到本地了。cd sponge进入实验0目录mkdir build创建build目录cd build进入编译目录cmake ..设置编译系统make编译源码,(可以使用make -j4 使用四个处理器)
3.2 编码风格建议
在课程建议使用C++11的代码风格,这里笔者可能只使用了一部分,做后面的实验中应该也会优化之前的代码。
这里是课程给出的编码建议:
- Use the language documentation at https://en.cppreference.com as a resource.
- Never use malloc() or free().
- Never use new or delete.
- Essentially never use raw pointers (*), and use “smart” pointers (unique ptr or shared ptr) only when necessary. (You will not need to use these in CS144.)
- Avoid templates, threads, locks, and virtual functions. (You will not need to use these in CS144.)
- Avoid C-style strings (char *str) or string functions (strlen(), strcpy()). These are pretty error-prone. Use a std::string instead.
- Never use C-style casts (e.g., (FILE *)x). Use a C++ static cast if you have to (you generally will not need this in CS144).
- Prefer passing function arguments by const reference (e.g.: const Address & address).
- Make every variable const unless it needs to be mutated.
- Make every method const unless it needs to mutate the object.
- Avoid global variables, and give every variable the smallest scope possible.
- Before handing in an assignment, please run make format to normalize the coding style.
3.3 读Sponge文件
关键需要阅读 libsponge/util目录下的文件:file descriptor.hh, socket.hh, and address.hh.
3.4 编写webget程序
- 使用IDE或者文本编辑器打开 apps/webget.cc 文件
- 在get_URL()函数中,编写代码,可以看到开始提示"// Your code here"
套接字本身是一个文件描述符,程序通过它对“某个文件(字节流抽象)”执行操作,这里通过套接字的EOF标志符判断是否到达文件流结尾,如果到达,则停止读取,否则,一直进行读取。
代码如下:
void get_URL(const string &host, const string &path) {
    // Your code here.

    // You will need to connect to the "http" service on
    // the computer whose name is in the "host" string,
    // then request the URL path given in the "path" string.

    TCPSocket local_socket;
    Address sever_addr = Address(host, "http");   // get the address of sever
    local_socket.connect(sever_addr);           // connect to the sever

    // Then you'll need to print out everything the server sends back,
    // (not just one call to read() -- everything) until you reach
    // the "eof" (end of file).
    // send GET request
    // string get_request = "GET/ HTTP/1.1\r\nHost: " + host + "\r\n" +
    //     "Accept: " + path + "\r\n" + "Connection: close\r\n\r\n";
    string get_request = "GET " + path + " HTTP/1.1\r\n"
        + "Host: " + host + "\r\n"
        + "Connection: close\r\n\r\n";
    local_socket.write(get_request);
    // read the message from sever
    while (!local_socket.eof()){
        cout << local_socket.read();
    }
    local_socket.close();
    if (local_socket.closed()){
        // cout << "Connection closed by foreign host." << endl;
        return;
    }
    cerr << "Function called: get_URL(" << host << ", " << path << ").\n";
    cerr << "Warning: get_URL() has not been implemented yet.\n";
}
- 编写完程序,可以运行make,如果看到错误信息,需要首先修复该信息
- 测试程序,通过运行
./apps/webget cs144.keithw.org /hello,可以看到通过网页访问的结果 - 测试正确后,运行
make check_webget来执行自动化测试
4. 一个记忆可靠的字节流
因特网本身不对传输可靠性做保证,而是由终端即服务器和客户端的操作系统来保证可靠性。我们现在要实现的是位于TCP连接两端的套接字中的字节流数据结构。TCPSocket中有两个ByteStream,inbound用于接收数据,outbound用于发送数据。 大体上,ByteStream具有一定的容量,最大允许存储该容量大小的数据;在读取端读出一部分数据后,它会释放掉已经被读出的内容,以腾出空间继续让写端写入数据。
字节流以ByteStream类实现,在文件byte_stream.hh中定义,实现方法在byte_stream.cc中。这里笔者创建了一个字符串类型的buffer变量,来作为缓冲区的存储空间,还添加了一系列成员来实现读和写的工作,这里实现读和写的功能都是使用字符串类型的方法实现的。
代码如下:
#ifndef SPONGE_LIBSPONGE_BYTE_STREAM_HH
#define SPONGE_LIBSPONGE_BYTE_STREAM_HH

#include <string>

//! \brief An in-order byte stream.

//! Bytes are written on the "input" side and read from the "output"
//! side.  The byte stream is finite: the writer can end the input,
//! and then no more bytes can be written.
class ByteStream {
  private:
    // Your code here -- add private members as necessary.
    size_t _capacity;       // capacity of buffer
    size_t _bytes_written;    // total len of written bytes
    size_t _bytes_read;       // total len of read bytes
    size_t _buffer_size;    // the size of buffer
    size_t _remaining_capacity;        // now the len of buffer
    std::string _buffer;    // buffer of bytestream
    bool _input_ended;       // flag indiacating that input is end
    bool _eof;              // end of file flag
    bool _buffer_empty;     // flag indicating that the buffer is empty

    // Hint: This doesn't need to be a sophisticated data structure at
    // all, but if any of your tests are taking longer than a second,
    // that's a sign that you probably want to keep exploring
    // different approaches.

    bool _error{};  //!< Flag indicating that the stream suffered an error.

  public:
    //! Construct a stream with room for `capacity` bytes.
    ByteStream(const size_t capacity);

    //! \name "Input" interface for the writer
    //!@{

    //! Write a string of bytes into the stream. Write as many
    //! as will fit, and return how many were written.
    //! \returns the number of bytes accepted into the stream
    size_t write(const std::string &data);

    //! \returns the number of additional bytes that the stream has space for
    size_t remaining_capacity() const;

    //! Signal that the byte stream has reached its ending
    void end_input();

    //! Indicate that the stream suffered an error.
    void set_error() { _error = true; }
    //!@}

    //! \name "Output" interface for the reader
    //!@{

    //! Peek at next "len" bytes of the stream
    //! \returns a string
    std::string peek_output(const size_t len) const;

    //! Remove bytes from the buffer
    void pop_output(const size_t len);

    //! Read (i.e., copy and then pop) the next "len" bytes of the stream
    //! \returns a string
    std::string read(const size_t len);

    //! \returns `true` if the stream input has ended
    bool input_ended() const;

    //! \returns `true` if the stream has suffered an error
    bool error() const { return _error; }

    //! \returns the maximum amount that can currently be read from the stream
    size_t buffer_size() const;

    //! \returns `true` if the buffer is empty
    bool buffer_empty() const;

    //! \returns `true` if the output has reached the ending
    bool eof() const;
    //!@}

    //! \name General accounting
    //!@{

    //! Total number of bytes written
    size_t bytes_written() const;

    //! Total number of bytes popped
    size_t bytes_read() const;
    //!@}
};

#endif  // SPONGE_LIBSPONGE_BYTE_STREAM_HH
#include "byte_stream.hh"

// Dummy implementation of a flow-controlled in-memory byte stream.

// For Lab 0, please replace with a real implementation that passes the
// automated checks run by `make check_lab0`.

// You will need to add private members to the class declaration in `byte_stream.hh`

template <typename... Targs>
void DUMMY_CODE(Targs &&... /* unused */) {}

using namespace std;

ByteStream::ByteStream(const size_t capacity) : _capacity(capacity),
    _bytes_written(0), _bytes_read(0), _buffer_size(0), _remaining_capacity(capacity), _buffer('0',_capacity),
    _input_ended(false), _eof(false), _buffer_empty(true){
    _error = false;
    }

size_t ByteStream::write(const string &data) {
    if (buffer_empty()){// see if buffer is empty
        _buffer_empty = false;
    }
    if (data.size() >= _remaining_capacity){
        size_t len = _remaining_capacity;
        _buffer.replace(_buffer.begin() + _buffer_size, _buffer.end(), data);
        _bytes_written += _remaining_capacity;
        _buffer_size = _capacity;
        _remaining_capacity = 0;
        return len;
    }
    _buffer.replace(_buffer.begin() + _buffer_size, _buffer.begin() + _buffer_size + data.size(), data);
    _bytes_written += data.size();
    _buffer_size += data.size();
    _remaining_capacity -= data.size();
    return data.size();
}

//! \param[in] len bytes will be copied from the output side of the buffer
string ByteStream::peek_output(const size_t len) const {
    return _buffer.substr(0, len);
}

//! \param[in] len bytes will be removed from the output side of the buffer
void ByteStream::pop_output(const size_t len) {
    _buffer.erase(0, len);
    _remaining_capacity += len;
    _buffer_size -= len;
    _bytes_read += len;
    if (_buffer_size == 0){
        _buffer_empty = true;
        if (input_ended())
            _eof = true;
    }
}

//! Read (i.e., copy and then pop) the next "len" bytes of the stream
//! \param[in] len bytes will be popped and returned
//! \returns a string
std::string ByteStream::read(const size_t len) {
    std::string read_txt = peek_output(len);
    pop_output(len);
    return read_txt;
}

void ByteStream::end_input() {
    _input_ended = true;
    if(buffer_empty())
        _eof = true;
}

bool ByteStream::input_ended() const { return _input_ended; }

size_t ByteStream::buffer_size() const { return _buffer_size; }

bool ByteStream::buffer_empty() const { return _buffer_empty; }

bool ByteStream::eof() const { return _eof; }

size_t ByteStream::bytes_written() const { return _bytes_written; }

size_t ByteStream::bytes_read() const { return _bytes_read; }

size_t ByteStream::remaining_capacity() const { return _remaining_capacity; }
- 编写完成后运行
make check_lab0运行所有的测试样例

 浙公网安备 33010602011771号