基于LNMP(fastcgi协议)环境部署、原理介绍以及fastcgi_cache配置以及upstream模块负载均衡讲解
ngx_http_proxy_module只能反向代理后端使用HTTP协议的主机。而ngx_http_fastcgi_module只能反向代理后端使用FPM或者使用FastCGI协议的客户端。
一、部署LNMP
1、首先安装必要的包
[root@ELK-chaofeng07 nginx]# yum install php-fpm  php-mcrypt php-mbstring  php-mysql mariadb-server
Loaded plugins: fastestmirror
2、接下来我们还要修改php-fpm的配置文件
主要是修改以下几处
1)监听端口
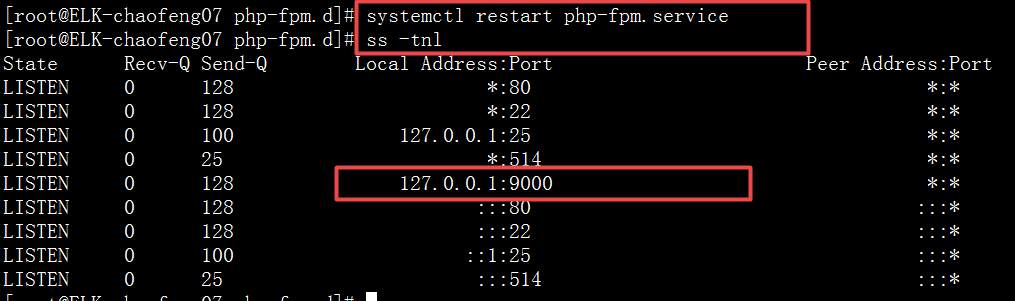
; Note: This value is mandatory.
listen = 127.0.0.1:9000
此处表示监听在哪个ip的9000端口,我这里只是用在本地,并且是只有一个主机安装LNMP,所以我就监听在本地。一般上来说这个修改为IP地址比较好。
2)允许哪些客户端访问
; Default Value: any
listen.allowed_clients = 127.0.0.1
我的是本地安装LNMP,因此这个值就可以满足要求
3)修改访问用户
; RPM: apache Choosed to be able to access some dir as httpd
user = nginx
; RPM: Keep a group allowed to write in log dir.
group = nginx
4)接下来是一些调优参数
; Note: This value is mandatory.
pm.max_children = 150
; Default Value: 0
pm.max_requests = 500
需要调优的比较多,可以视情况而定
5)打开php的状态获取功能
; Default Value: not set
pm.status_path = /status
6)开启php-fpm的状态检测功能
ping.path = /ping

; This directive may be used to customize the response of a ping request. The
; response is formatted as text/plain with a 200 response code.
; Default Value: pong
ping.response = pong
7)会话保存的地址
; Set session path to a directory owned by process user
php_value[session.save_handler] = files
php_value[session.save_path] = /var/lib/php/session
此地址需要手动创建,并赋予权限
3、手动创建会话保存路径。确保以文件的形式保存
[root@ELK-chaofeng07 php-fpm.d]# mkdir /var/lib/php/session -pv
[root@ELK-chaofeng07 php-fpm.d]# chown nginx:nginx /var/lib/php/session
赋予的用户以及用户组是我们刚刚上面修改的那两个
4、重启php-fpm服务
5、编写nginx的配置文件。
server{
        listen 80;
        server_name www.lnmp.io;
        index index.php index.html;
        location / {
                root /data/nginx/html;
        }
        location ~* \.php$ {
                fastcgi_pass 127.0.0.1:9000;
                fastcgi_index index.php;
                include fastcgi_params;
                fastcgi_param   SCRIPT_FILENAME /data/nginx_php/$fastcgi_script_name;
        }
}
include的目的是主要加载fastcgi_params这个文件内容。它是在/etc/nginx目录下存放的。我们使用nginx向php-fpm转发请求时,与我们平时的http代理是不相同的。从语法上就不一样。这与LAMP中的php-fpm的调用写法也是不同的。
我们最后一行的fastcgi_param的内容也是重写fastcgi_params这个文件内容中的一个参数,是SCRIPT_FILENAME参数。因为我们路径需要重新映射,这里的php-fpm的路径映射与nginx的路径映射方法是不一样的。此处需要注意一下。
详细如文章最后所示。
6、接下来是我们编写文件中路径以及index.html和index.php文件。
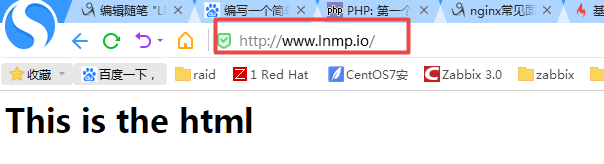
[root@ELK-chaofeng07 nginx]# cat /data/nginx/html/index.html
<h1>This is the html</h1>
[root@ELK-chaofeng07 nginx]# cat /data/nginx_php/index.php
<html>
 <head>
  <title>PHP </title>
 </head>
 <body>
 <?php echo '<p>Hello World</p>'; ?>
 </body>
</html>
7、重载nginx服务,我们来测试一下看看效果。
访问index.html
访问php文件

可以看看调用情况:
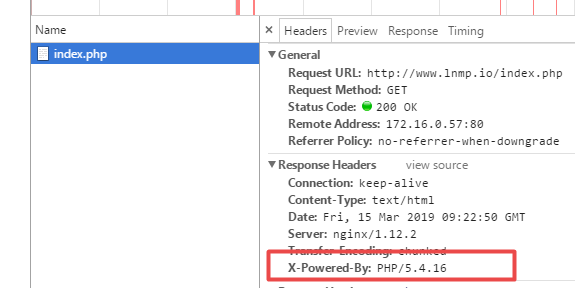
这说明nginx在处理php网页的时候调用php-fpm来处理请求。
2、LNMP的原理:
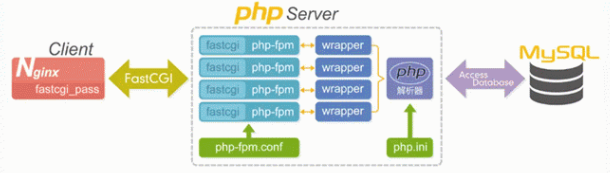
 第一步,浏览器发送http request请求到服务器(Nginx),服务器响应并处理web请求,将一些静态资源(CSS,图片,视频等)保存服务器上。

 第二步,将php脚本通过接口传输协议(网关协议)PHP-FCGI(fast-cgi)传输给PHP-FPM(进程管理程序),PHP-FPM不做处理,然后PHP-FPM调用PHP解析器进程,PHP解析器解析php脚本信息。PHP解析器进程可以启动多个,进行并发执行。

 第三步,将解析后的脚本返回到PHP-FPM,PHP-FPM再通过fast-cgi的形式将脚本信息传送给Nginx。

 第四步,服务器再通过Http response的形式传送给浏览器。浏览器再进行解析与渲染然后进行呈现。
nginx配置文件补充说明,背会:
ngx_http_fastcgi_module模块:

            The ngx_http_fastcgi_module module allows passing requests to a FastCGI server.

            1、fastcgi_pass address;
                address为fastcgi server的地址;    location, if in location;

                    http://www.ilinux.io/admin/index.php --> /admin/index.php (uri)
                        /data/application/admin/index.php


            2、fastcgi_index name;
                fastcgi默认的主页资源;

            3、fastcgi_param parameter value [if_not_empty];
                Sets a parameter that should be passed to the FastCGI server. The value can contain text, variables, and their combination.

            配置示例1:
                前提:配置好fpm server和mariadb-server服务;
                    location ~* \.php$ {
                        root           /usr/share/nginx/html;
                        fastcgi_pass   127.0.0.1:9000;
                        fastcgi_index  index.php;
                        fastcgi_param  SCRIPT_FILENAME  /usr/share/nginx/html$fastcgi_script_name;
                        include        fastcgi_params;
                    }

            配置示例2:通过/pm_status和/ping来获取fpm server状态信息;
                location ~* ^/(pm_status|ping)$ {
                    include        fastcgi_params;
                    fastcgi_pass 127.0.0.1:9000;
                    fastcgi_param  SCRIPT_FILENAME  $fastcgi_script_name;
                }
          这个例子就和我这篇博客:https://www.cnblogs.com/FengGeBlog/p/10539898.html    讲都是类似的原因。这个例子中我们请求pm_status时,默认不会去匹配php后缀名的那个主机上找“location ~* \.php$”,是因为location中的uri不一致,所以无法匹配。那这个时候就需要一种处理方法,当访问的uri是pm_status的时候,我们也要去“location ~* \.php$”的主机上去寻找,这时候就需要重新定义location了或者重写rewrite规则来实现。
3、重点讲解:ngx_http_fastcgimodule模块中的fastcgi_cache功能
4、fastcgi_cache_path path [levels=levels] [use_temp_path=on|off] keys_zone=name:size [inactive=time] [max_size=size] [manager_files=number] [manager_sleep=time] [manager_threshold=time] [loader_files=number] [loader_sleep=time] [loader_threshold=time] [purger=on|off] [purger_files=number] [purger_sleep=time] [purger_threshold=time];

                定义fastcgi的缓存;缓存位置为磁盘上的文件系统,由path所指定路径来定义;

                    levels=levels:缓存目录的层级数量,以及每一级的目录数量;levels=ONE:TWO:THREE
                        leves=1:2:2
                    keys_zone=name:size
                        k/v映射的内存空间的名称及大小
                    inactive=time
                        非活动时长
                    max_size=size
                        磁盘上用于缓存数据的缓存空间上限

            5、fastcgi_cache zone | off;
                调用指定的缓存空间来缓存数据;http, server, location

            6、fastcgi_cache_key string;
                定义用作缓存项的key的字符串;

            7、fastcgi_cache_methods GET | HEAD | POST ...;
                为哪些请求方法使用缓存;

            8、fastcgi_cache_min_uses number;
                缓存空间中的缓存项在inactive定义的非活动时间内至少要被访问到此处所指定的次数方可被认作活动项;

            9、fastcgi_cache_valid [code ...] time;
                不同的响应码各自的缓存时长;

                示例:
                    http {
                        ...
                        fastcgi_cache_path /var/cache/nginx/fastcgi_cache levels=1:2:1 keys_zone=fcgi:20m inactive=120s;
                        ...
                        server {
                            ...
                            location ~* \.php$ {
                                ...
                                fastcgi_cache fcgi;
                                fastcgi_cache_key $request_uri;
                                fastcgi_cache_valid 200 302 10m;
                                fastcgi_cache_valid 301 1h;
                                fastcgi_cache_valid any 1m;
                                ...
                            }
                            ...
                        }
                        ...
                    }
要记住上面红色字体的内容。
4、开启fastcgi协议的保持长连接功能:
 10、fastcgi_keep_conn on | off;
          By default, a FastCGI server will close a connection right after sending the response. However, when this directive is set to the value on, nginx will instruct a FastCGI server to keep connections open.
案例演示:
在反向代理的服务器上进行如下配置:
5、对上述的知识做一个综合实例:
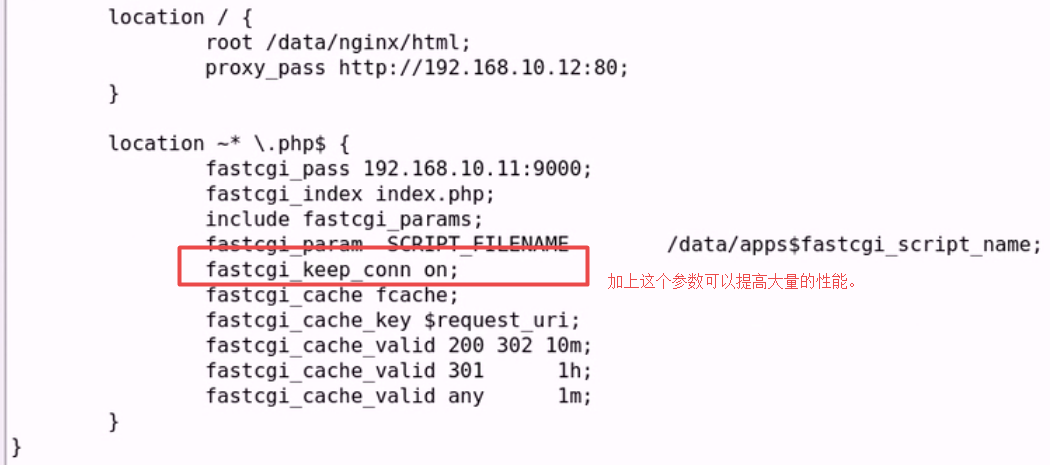
server {
        listen 80;
        server_name www.chaofeng.io;
        index index.php index.html;
        location / {
                root /data/nginx/html;
                proxy_pass http://10.10.10.12:80;
        }
        location ~* \.php$ {
                fastcgi_pass 192.168.22.23:9000;  #指定fastcgi服务器
                fastcgi_index index.php;  #指定默认的fastcgi主页
                include fastcgi_params;  #调用nginx的变量定义
                fastcgi_param   SCRIPT_FILENAME /data/apps/$fastcgi_script_name;  #指定fastcgi服务器上的php目录
                fastcgi_cache   fcache;  #调用fache缓存空间
                fastcgi_cache_key $request_uri;  #设置缓存的key为$request_uri
                fastcgi_cache_valid 200 302 10m;  #状态码为200和302的页面缓存10分钟
                fastcgi_cache_valid 301         1h;  #状态码为301的页面缓存1小时
                fastcgi_cache_valid any         1m;  #剩下的都缓存1分钟
                fastcgi_keep_conn on;  #开启长连接
        }
        location ~* ^/(status|ping)$ {
                fastcgi_pass 10.10.10.11:9000;
                include fastcgi_params;
                fastcgi_param   SCRIPT_FILENAME /data/apps/$fastcgi_script_name;
        }
}
6、 nginx的负载均衡配置讲解
此模块用于定义能够被proxy_pass, fastcgi_pass, uwsgi_pass, scgi_pass和memcached_pass配置段所引用的服务器组。
1、upstream name { ... }
配置段:http
此指令为一个上下文配置段,用于定义能后端服务器组,此服务器组能够被proxy_pass, fastcgi_pass, uwsgi_pass, scgi_pass和memcached_pass所调用。
示例:
upstream httpdsrvs {
    server 10.10.10.11:80;
    server  10.10.10.12:80;
    ...
}
upstream模块调度算法一般分为两类“
第一类:静态调度算法
分配的时候,不需要考虑后端服务器节点的情况(rr,wrr,ip_hash算法)
第二类:动态调度算法
负载均衡器根据后端服务器的节点状态来进行调度
2、server address [parameters];
配置段: upstream
此指定用于在上下文中定义后端服务器成员以及相关的参数。
其中address的表示格式为可使用下列三种格式:
unix:/PATH/TO/SOME_SOCK_FILE
IP[:PORT]
HOSTNAME[:PORT]
parameters的配置内容如下所示:
weight=number
    权重,默认为1;
max_fails=number
    失败尝试最大次数;超出此处指定的次数时,server将被标记为不可用,默认为1;
fail_timeout=time
    设置将服务器标记为不可用状态的超时时长;
max_conns=number
    当前的服务器的最大并发连接数;
backup
    将服务器标记为“备用”,即所有服务器均不可用时此服务器才启用;
down
    标记为“不可用”;
2、rr轮询(默认调度算法)
rr轮询调度算法是按照客户端请求顺序把客户端的请求逐一分配到不同后端节点服务器
3、wrr权重轮询
在rr轮询算法的基础上加上权重,权重值越大,被转发的请求就越多,可以根据服务器状态进行指定权重大小
4、ip_hash;
配置段: upstream
在指定的服务器组中使用源地址hash调度方法;来自同一个IP地址的请求统一被分配到同一个server响应,相当于lvs的sh调度算法。
5、least_conn;
配置段: upstream
在指定的服务器组中启动最少连接调度算法,请求被发送到激活连接数最少的服务器,当设置了权重时,相当于WLC加权最少连接调度算法;默认nginx负载均衡的调度算法为轮询。
6、hash key [consistent];
配置段:upstream
基于指定的key的hash表来实现对请求的调度,此处的key可以直接文本、变量或二者的组合;能够将请求分类,同一类请求将发往同一个后端服务器 。
示例:
hash $request_uri consistent;
hash $remote_addr;
这里讲解一下一致性hash算法
一致性hash算法一般用于代理后端业务为缓存服务(squid、memocached)的场景,通过将用户请求的URL或指定字符串进行计算,然后调度到后端服务器上,此后任何用户查找同一个URL或者指定字符串都会被调度到这一台服务器上。
7、keepalive connections;
配置段:upstream
设置为每个nginx worker进程保留的空闲的长连接数量。
upstream http_backend {
    server 127.0.0.1:8080;
    keepalive 16;
}
注意:对于使用fastcgi代理的后端服务器来说,keepalive要结合fastcgi_keep_conn指令一起使用才会生效,比如:
upstream fastcgi_backend {
    server 127.0.0.1:9000;

    keepalive 8;
}

server {
    ...

    location /fastcgi/ {
        fastcgi_pass fastcgi_backend;
        fastcgi_keep_conn on;
        ...
    }
}
8、总结
upstream模块的综合使用
##在/etc/nginx/nginx.conf文件中配置:
    upstream websrvs {
            ip_hash;
            server 10.10.10.11:80 weight=2 down;
            server 10.10.10.12:80 weight=1 fail_timeout=1 max_fails=3;
            server 127.0.0.1:80 backup;
        }

#在server配置段:
server {
        listen 80;
        server_name www.ilinux.io;
        location / {
                root /data/nginx/html;
                proxy_pass http://websrvs;
        }
}

 浙公网安备 33010602011771号