Spring 配置文件加密
前文
在某些场景下,使用 Spring 作为开发组件时,不可避免地需要使用到配置文件,然而,对于配置文件中的某些敏感数据(如密码等信息字段),如果使用明文的方式,则可能在一定程度上导致信息泄露。为此,需要一种有效的方式来对这些字段进行加密处理,当前主流的一种加密方式就是 Jasypt
基本使用
对于主流的 Spring 应用程序,现在基本上都是采用 Spring-Boot 的方式进行开发,因此我们可以很方便地以 starter 的方式引入 Jasypt 对应的 starter 依赖
<dependency>
    <groupId>com.github.ulisesbocchio</groupId>
    <artifactId>jasypt-spring-boot-starter</artifactId>
    <version>3.0.5</version> <!-- 具体以 Maven 仓库的为准 -->
</dependency>
然后,需要在对应的应用程序配置文件中配置 Jasypt 的相关配置属性:
jasypt:
  encryptor:
    # 解密时需要用到的对称密码
    password: 1234567
    # 解密时使用的解密算法,具体可以查看 com.sun.crypto.provider.PBEKeyFactory 的相关子类
    algorithm: PBEWithHmacSHA224AndAES_128
    # 一些通用的配置属性,如过滤字段是否需要解密、需要解密的字段的格式等
    property:
      # 如果字段需要解密,则这个字段的值的开始前缀
      prefix: ENC(
      # 如果字段需要解密,则这个字段的值的后缀
      suffix: )
    # 加密时的重 Hash 次数
    key-obtention-iterations: 1000
然而,对于需要解密的字段,需要按照解密的规则对其进行加密处理,Jasypt 已经提供了现有的工具类,只需要传入我们需要的参数进行加密即可:
import org.jasypt.encryption.pbe.StandardPBEStringEncryptor;
import org.jasypt.encryption.pbe.config.EnvironmentStringPBEConfig;
import org.jasypt.iv.RandomIvGenerator;
import org.jasypt.salt.RandomSaltGenerator;
import org.junit.Test;
import org.slf4j.Logger;
import org.slf4j.LoggerFactory;
import org.springframework.boot.test.context.SpringBootTest;

import javax.crypto.SecretKeyFactory;
import java.security.NoSuchAlgorithmException;
import java.security.Provider;
import java.security.Security;

@SpringBootTest(classes = {DemoApplication.class})
public class SimpleEncryptTest {

    private final static Logger log = LoggerFactory.getLogger(SimpleEncryptTest.class);

    // 注意,这里的 Config 必须与上文配置文件中的一致,否则会导致解密结果与最初值不一致
    private static EnvironmentStringPBEConfig pbeConfig() {
        String password = "1234567"; // 这里的密码需要与配置文件里的相对应

        final EnvironmentStringPBEConfig config = new EnvironmentStringPBEConfig();

        config.setPassword(password); // 当前对称加密算法需要的基本密码,而不是需要转换的文本

        /*
            具体对称加密算法,目前系统提供了 com.sun.crypto.provider.PBEKeyFactory 子类相关的算法
         */
        config.setAlgorithm("PBEWithHmacSHA224AndAES_128");

        /*
            迭代计算次数,通过增加这个值可以提高加密效果的强度
         */
        config.setKeyObtentionIterations(1000); // 如果配置文件不做配置,则默认 1000 次

        config.setSaltGenerator(new RandomSaltGenerator()); // 具体的盐值生成器,未配置时默认使用 RandomSaltGenerator

        /*
            如果需要设置自定义的对称加密算法,那么这里可能需要设置成对应的算法提供对象,
            在一般情况下,系统提供的加密算法已经足够满足需求,因此可以设置为 null
         */
        config.setProvider(null);

        config.setStringOutputType("Base64"); // 处理时的字节表示形式

        config.setIvGenerator(new RandomIvGenerator()); // 某些算法可能需要使用到的初始向量生成器,默认为 RandomIvGenerator
        return config;
    }

    @Test
    public void encryptTest() {
        String message = "123"; // 当前需要被加密的密码

        final EnvironmentStringPBEConfig config = pbeConfig();

        final StandardPBEStringEncryptor encryptor = new StandardPBEStringEncryptor();
        encryptor.setConfig(config);

        log.info("{}", encryptor.encrypt(message)); // 这里得到的就是加密后的结果
    }
}
现在,将加密后的密码配置到我们系统的配置文件中,使用 jasypt 配置中定义的前后缀进行包装,以 Druid 配置为例,通过上文的加密算法,我将密码 "123" 加密后得到了 对应的加密文本 "354GiF5aGOgfrpisxVAw+y1fCNQ43Hv4vaHd9GVp8YZi86e0igV8sS6zyF1N14AP",现在将它配置到 Druid 的登录密码中:
spring:
  datasource:
    druid:
      stat-view-servlet:
        enabled: true
        login-username: admin
        login-password: ENC(354GiF5aGOgfrpisxVAw+y1fCNQ43Hv4vaHd9GVp8YZi86e0igV8sS6zyF1N14AP)
之后,如果希望登录 Druid 监视界面,只需要输入用户名为 admin 并且密码 123 即可完成登录
组件配置
一般情况下,Jasypt 默认的配置已经足够满足大部分的应用场景,然而,如果希望能够自定义相关的配置,Jasypt 也提供了相应的配置选项,主要包括 "过滤器"、"解码器" 以及 "检测器",这些组件在 com.ulisesbocchio.jasyptspringboot.properties.JasyptEncryptorConfigurationProperties.PropertyConfigurationProperties 有具体的描述
过滤器
过滤器的目的为了过滤那些需要进行解码的属性,默认情况下是对所有的配置属性都进行拦截处理,如果需要进行相关配置,可以在配置文件中加入相关的过滤属性字段:
jasypt:
  encryptor:
    property:
      filter:
      	# 需要传入全限定名称,以过滤这些不需要解密的字段
        exclude-names: ["spring.datasource.druid.stat-view-servlet.login-password"]
显然,如果需要过滤的字段太多,一个一个配置比较麻烦,因此我们可以自定顶一个过滤器来完成相关的过滤操作,具体的实现以 com.ulisesbocchio.jasyptspringboot.EncryptablePropertyFilter 定义的为准:
import com.ulisesbocchio.jasyptspringboot.EncryptablePropertyFilter;
import com.ulisesbocchio.jasyptspringboot.properties.JasyptEncryptorConfigurationProperties;
import org.springframework.beans.factory.annotation.Autowired;
import org.springframework.core.env.ConfigurableEnvironment;
import org.springframework.core.env.PropertySource;
import org.springframework.stereotype.Component;

import java.util.HashSet;
import java.util.Set;

// 设置过滤器 Bean 名称,使得能够被加载到 Jasypt 的配置中
@Component("jasyptPropertiesFilter")
public class PropertiesFilter
        implements EncryptablePropertyFilter {

    private final Set<String> excludeSet = new HashSet<>();

    @Autowired
    public PropertiesFilter(ConfigurableEnvironment env) {
        // 复用 Jasypt 的过滤器配置属性
        JasyptEncryptorConfigurationProperties props = JasyptEncryptorConfigurationProperties.bindConfigProps(env);
        JasyptEncryptorConfigurationProperties.PropertyConfigurationProperties.FilterConfigurationProperties filterProps = props.getProperty().getFilter();
        excludeSet.addAll(filterProps.getExcludeNames());
    }

    @Override
    public boolean shouldInclude(PropertySource<?> source, String name) {
        // 如果是开发环境,则不需要对字段进行加密处理
        if (source.getName().endsWith("dev.yml")) {
            return true;
        }
        // 如果前缀与配置的匹配,则不进行加密处理
        for (String excludeName : excludeSet) {
            if (excludeName.startsWith(name)) {
                return false;
            }
        }
        return true;
    }
}
同时,需要将编写好的过滤器替换到原有的过滤器,可以通过配置如下属性来完成:
jasypt:
  encryptor:
    property:
      filter:
      	# 通过我们自定的过滤器,就不再需要写全限定名称了,只需要写对应的不匹配前缀即可
        exclude-names: ["spring.datasource.druid"]
      filter-bean: jasyptPropertiesFilter
检测器
检测器的目的是为了检查配置的属性是否是被加密的,效果与过滤器类似,区别在于过滤器的效果会先于检测器,默认的检测器实现是通过配置的前后缀值来进行判断的,即配置的 ENC()。如果希望改变这个行为(虽然基本不会改变 😦),也可以自定编写检测器来替换现有的行为,具体的实现需要以 com.ulisesbocchio.jasyptspringboot.EncryptablePropertyDetector 定位为准:
import com.ulisesbocchio.jasyptspringboot.EncryptablePropertyDetector;
import com.ulisesbocchio.jasyptspringboot.detector.DefaultPropertyDetector;
import org.apache.commons.codec.binary.Base64;
import org.springframework.stereotype.Component;

@Component("jasyptPropertiesDetector")
public class PropertiesDetector
        extends DefaultPropertyDetector
        implements EncryptablePropertyDetector {

    private String prefix = "ENC(";

    public PropertiesDetector() {
        super();
    }

    public PropertiesDetector(String prefix, String suffix) {
        super(prefix, suffix);
        this.prefix = prefix;
    }

    @Override
    public boolean isEncrypted(String property) {
        if (super.isEncrypted(property)) {
            return true;
        }
        // 如果是以 Base64 的方式进行的编码,则我们认为它是被加密的
		return property.length() >= 64 && Base64.isBase64(property);
    }

    @Override
    public String unwrapEncryptedValue(String property) {
        if (property.contains(prefix)) {
            return super.unwrapEncryptedValue(property);
        }
        return property;
    }
}
同样,需要将其配置到对应的配置文件中,替换默认的检测器使得其生效:
jasypt:
  encryptor:
    property:
      detector-bean: jasyptPropertiesDetector
解码器
解码器是真正完成解码工作的组件,如果希望配置一些额外的加密选项(如加盐、替换向量生成器,使用自定义的解密算法等),都可以通过重写该组件来完成。
具体的解码器需要按照 com.ulisesbocchio.jasyptspringboot.EncryptablePropertyResolver 来实现:
import com.ulisesbocchio.jasyptspringboot.EncryptablePropertyDetector;
import com.ulisesbocchio.jasyptspringboot.EncryptablePropertyResolver;
import com.ulisesbocchio.jasyptspringboot.exception.DecryptionException;
import com.ulisesbocchio.jasyptspringboot.properties.JasyptEncryptorConfigurationProperties;
import org.jasypt.encryption.pbe.PooledPBEStringEncryptor;
import org.jasypt.encryption.pbe.config.SimpleStringPBEConfig;
import org.jasypt.exceptions.EncryptionOperationNotPossibleException;
import org.jasypt.iv.StringFixedIvGenerator;
import org.jasypt.salt.StringFixedSaltGenerator;
import org.slf4j.Logger;
import org.slf4j.LoggerFactory;
import org.springframework.beans.factory.annotation.Autowired;
import org.springframework.beans.factory.annotation.Qualifier;
import org.springframework.core.env.ConfigurableEnvironment;
import org.springframework.core.env.Environment;
import org.springframework.stereotype.Component;

import java.util.Optional;

@Component("jasyptPropertiesPropertyResolver")
public class PropertiesPropertyResolver
        implements EncryptablePropertyResolver {

    private final static Logger log = LoggerFactory.getLogger(PropertiesPropertyResolver.class);

    private final static String IV_GEN_TEXT = "这是一个向量生成器";

    private final static String SALT_TEXT = "我能够吞下玻璃而不伤身体";

    private final Environment environment;

    private final PooledPBEStringEncryptor encryptor;

    private final EncryptablePropertyDetector detector;

    @Autowired
    public PropertiesPropertyResolver(ConfigurableEnvironment env,
                                      @Qualifier("jasyptPropertiesDetector") EncryptablePropertyDetector detector) {
        this.environment = env;
        this.encryptor = new PooledPBEStringEncryptor();
        this.detector = detector;

        // 复用原有 Jasypt 的配置属性
        JasyptEncryptorConfigurationProperties props = JasyptEncryptorConfigurationProperties.bindConfigProps(env);
        String password = props.getPassword();

        // 这里的配置将会覆盖原有配置文件中的相关配置,因为配置文件中的配置并不能显示地支持配置对象的设置
        SimpleStringPBEConfig config = new SimpleStringPBEConfig();
        config.setPasswordCharArray(password.toCharArray());
        config.setAlgorithm("PBEWITHHMACSHA512ANDAES_256");
        config.setKeyObtentionIterations("1000");
        config.setPoolSize(1);
        config.setProviderName("SunJCE");
        config.setSaltGenerator(new StringFixedSaltGenerator(SALT_TEXT)); // 替换默认的盐值生成器
        config.setIvGenerator(new StringFixedIvGenerator(IV_GEN_TEXT)); // 替换默认的向量生成器
        config.setStringOutputType("base64");
        this.encryptor.setConfig(config);
    }

    @Override
    public String resolvePropertyValue(String value) {
        return Optional.ofNullable(value)
                .map(environment::resolvePlaceholders)
                .filter(detector::isEncrypted)
                .map(resolvedValue -> {
                    try {
                        String unwrappedProperty = detector.unwrapEncryptedValue(resolvedValue.trim());
                        String resolvedProperty = environment.resolvePlaceholders(unwrappedProperty);
                        String decrypt = encryptor.decrypt(resolvedProperty);
                        log.info("from {} to {}", resolvedProperty, decrypt);
                        return decrypt;
                    } catch (EncryptionOperationNotPossibleException e) {
                        throw new DecryptionException("Unable to decrypt property: "
                                + value + " resolved to: " + resolvedValue + ". Decryption of Properties failed,  make sure encryption/decryption " +
                                "passwords match", e);
                    }
                })
                .orElse(value);
    }
}
同样地,也需要在配置文件中进行配置以替换默认的解码器:
jasypt:
  encryptor:
    property:
      resolver-bean: jasyptPropertiesPropertyResolver
实现原理
一般来讲,在 SpringBoot 项目中引入 starter 来实现自动装配 功能,基本上都是通过加载 META/spring.factories 文件中的自动配置项来实现的,对于 Jassypt 的 starter 来讲,对应的 spring.factories 文件如下:
org.springframework.boot.autoconfigure.EnableAutoConfiguration=com.ulisesbocchio.jasyptspringbootstarter.JasyptSpringBootAutoConfiguration

org.springframework.cloud.bootstrap.BootstrapConfiguration=com.ulisesbocchio.jasyptspringbootstarter.JasyptSpringCloudBootstrapConfiguration
SpringBoot 的加载接口从 EnableAutoConfiguration 配置引入,对应的配置项为 com.ulisesbocchio.jasyptspringbootstarter.JasyptSpringBootAutoConfiguration:
import com.ulisesbocchio.jasyptspringboot.configuration.EnableEncryptablePropertiesConfiguration;

import org.springframework.context.annotation.Configuration;
import org.springframework.context.annotation.Import;

@Configuration
@Import(EnableEncryptablePropertiesConfiguration.class)
public class JasyptSpringBootAutoConfiguration {
}
实际上这个类并没有实际的配置操作,而是通过导入 EnableEncryptablePropertiesConfiguration 来间接实现的:
import com.ulisesbocchio.jasyptspringboot.EncryptablePropertySourceConverter;
import org.jasypt.encryption.StringEncryptor;
import org.jasypt.encryption.pbe.config.StringPBEConfig;
import org.springframework.beans.factory.config.BeanFactoryPostProcessor;
import org.springframework.context.annotation.Bean;
import org.springframework.context.annotation.Configuration;
import org.springframework.context.annotation.Import;
import org.springframework.core.env.ConfigurableEnvironment;
import org.springframework.core.env.Environment;
import org.springframework.core.env.PropertySource;

@Configuration
/*
	EncryptablePropertyResolverConfiguration 这个配置类为上文的 "解码器" 等相关组件的配置类,也就是
	实际完成解码工作的组件类
*/
@Import({EncryptablePropertyResolverConfiguration.class, CachingConfiguration.class})
public class EnableEncryptablePropertiesConfiguration {

    @Bean
    public static EnableEncryptablePropertiesBeanFactoryPostProcessor enableEncryptablePropertySourcesPostProcessor(final ConfigurableEnvironment environment, EncryptablePropertySourceConverter converter) {
        return new EnableEncryptablePropertiesBeanFactoryPostProcessor(environment, converter);
    }
}
对于内置的 EnableEncryptablePropertiesBeanFactoryPostProcessor Bean,Spring 会在初始化 BeanFactory 时调用这些 BeanPostProcessor 的 postProcessBeanFactory 方法,以实现对 BeanFactory 的配置处理。具体 EnableEncryptablePropertiesBeanFactoryPostProcessor 的处理如下:
import com.ulisesbocchio.jasyptspringboot.EncryptablePropertyResolver;
import com.ulisesbocchio.jasyptspringboot.EncryptablePropertySourceConverter;
import lombok.extern.slf4j.Slf4j;
import org.springframework.beans.BeansException;
import org.springframework.beans.factory.config.BeanFactoryPostProcessor;
import org.springframework.beans.factory.config.ConfigurableListableBeanFactory;
import org.springframework.core.Ordered;
import org.springframework.core.env.ConfigurableEnvironment;
import org.springframework.core.env.MutablePropertySources;

public class EnableEncryptablePropertiesBeanFactoryPostProcessor
    implements BeanFactoryPostProcessor, Ordered {

    private final ConfigurableEnvironment environment;
    private final EncryptablePropertySourceConverter converter;

    public EnableEncryptablePropertiesBeanFactoryPostProcessor(ConfigurableEnvironment environment, EncryptablePropertySourceConverter converter) {
        this.environment = environment;
        this.converter = converter;
    }

    @Override
    public void postProcessBeanFactory(ConfigurableListableBeanFactory beanFactory) throws BeansException {
        log.info("Post-processing PropertySource instances");
        /*
        	这里的作用是加载系统中存在的配置文件,包括系统自带的 System、BootStrap 以及 application 等配置文件
        */
        MutablePropertySources propSources = environment.getPropertySources();

        /*
        	替换原有的配置文件对象,以改变获取配置属性值的相关行为
        */
        converter.convertPropertySources(propSources);
    }

    // 省略部分代码
}
关键的部分在于对 propSources 的替换处理,具体的源码如下:
public class EncryptablePropertySourceConverter {

    public void convertPropertySources(MutablePropertySources propSources) {
        propSources.stream()
                .filter(ps -> !(ps instanceof EncryptablePropertySource))
                .map(this::makeEncryptable)
                .collect(toList())
                .forEach(ps -> propSources.replace(ps.getName(), ps));
    }

    public <T> PropertySource<T> makeEncryptable(PropertySource<T> propertySource) {
        // 省略部分代码。。。。
        PropertySource<T> encryptablePropertySource = convertPropertySource(propertySource);
        return encryptablePropertySource;
    }

    private <T> PropertySource<T> convertPropertySource(PropertySource<T> propertySource) {
        // 默认不是代理模式,因此走 instantiatePropertySource 方法
        return interceptionMode == InterceptionMode.PROXY
                ? proxyPropertySource(propertySource) : instantiatePropertySource(propertySource);
    }

    private <T> PropertySource<T> instantiatePropertySource(PropertySource<T> propertySource) {
        PropertySource<T> encryptablePropertySource;
        if (needsProxyAnyway(propertySource)) {
            encryptablePropertySource = proxyPropertySource(propertySource);
        } else if (propertySource instanceof SystemEnvironmentPropertySource) {
            encryptablePropertySource = (PropertySource<T>) new EncryptableSystemEnvironmentPropertySourceWrapper((SystemEnvironmentPropertySource) propertySource, propertyResolver, propertyFilter);
        } else if (propertySource instanceof MapPropertySource) {
            /*
            	应用程序的配置文件对应的类型为 MapPropertySource,因此走这里,
            	即:将原有应用程序配置文件对应的属性配置对象替换成了 EncryptableMapPropertySourceWrapper 类型
            */
            encryptablePropertySource = (PropertySource<T>) new EncryptableMapPropertySourceWrapper((MapPropertySource) propertySource, propertyResolver, propertyFilter);
        } else if (propertySource instanceof EnumerablePropertySource) {
            encryptablePropertySource = new EncryptableEnumerablePropertySourceWrapper<>((EnumerablePropertySource) propertySource, propertyResolver, propertyFilter);
        } else {
            encryptablePropertySource = new EncryptablePropertySourceWrapper<>(propertySource, propertyResolver, propertyFilter);
        }
        return encryptablePropertySource;
    }
}
继续查看 EncryptableMapPropertySourceWrapper对应的源码:
import com.ulisesbocchio.jasyptspringboot.caching.CachingDelegateEncryptablePropertySource;
import com.ulisesbocchio.jasyptspringboot.EncryptablePropertyFilter;
import com.ulisesbocchio.jasyptspringboot.EncryptablePropertyResolver;
import com.ulisesbocchio.jasyptspringboot.EncryptablePropertySource;
import org.springframework.boot.origin.Origin;
import org.springframework.boot.origin.OriginLookup;
import org.springframework.boot.origin.OriginTrackedValue;
import org.springframework.core.env.MapPropertySource;
import org.springframework.core.env.PropertySource;

import java.util.Map;

public class EncryptableMapPropertySourceWrapper extends MapPropertySource implements EncryptablePropertySource<Map<String, Object>> {

    private final CachingDelegateEncryptablePropertySource<Map<String, Object>> encryptableDelegate;

    public EncryptableMapPropertySourceWrapper(MapPropertySource delegate, EncryptablePropertyResolver resolver, EncryptablePropertyFilter filter) {
        super(delegate.getName(), delegate.getSource());
        encryptableDelegate = new CachingDelegateEncryptablePropertySource<>(delegate, resolver, filter);
    }

    /*
    	重点在于对于获取属性时的特殊处理,具体是由 CachingDelegateEncryptablePropertySource 完成的实际处理
    */
    @Override
    public Object getProperty(String name) {
        return encryptableDelegate.getProperty(name);
    }

    @Override
    public PropertySource<Map<String, Object>> getDelegate() {
        return encryptableDelegate;
    }
}
继续查看 CachingDelegateEncryptablePropertySource :
import com.ulisesbocchio.jasyptspringboot.EncryptablePropertyFilter;
import com.ulisesbocchio.jasyptspringboot.EncryptablePropertyResolver;
import com.ulisesbocchio.jasyptspringboot.EncryptablePropertySource;
import java.util.Map;
import java.util.Objects;
import java.util.concurrent.ConcurrentHashMap;
import lombok.AllArgsConstructor;
import org.springframework.core.env.PropertySource;
import org.springframework.util.Assert;
public class CachingDelegateEncryptablePropertySource<T> extends PropertySource<T> implements EncryptablePropertySource<T> {
private final PropertySource<T> delegate; // 原有的配置属性对象
private final EncryptablePropertyResolver resolver; // 解码器
private final EncryptablePropertyFilter filter; // 过滤器
private final Map<String, CachedValue> cache; // 缓存,不重要
public CachingDelegateEncryptablePropertySource(PropertySource<T> delegate, EncryptablePropertyResolver resolver, EncryptablePropertyFilter filter) {
super(delegate.getName(), delegate.getSource());
Assert.notNull(delegate, "PropertySource delegate cannot be null");
Assert.notNull(resolver, "EncryptablePropertyResolver cannot be null");
Assert.notNull(filter, "EncryptablePropertyFilter cannot be null");
this.delegate = delegate;
this.resolver = resolver;
this.filter = filter;
this.cache = new ConcurrentHashMap<>();
}
// 省略部分源码。。。。
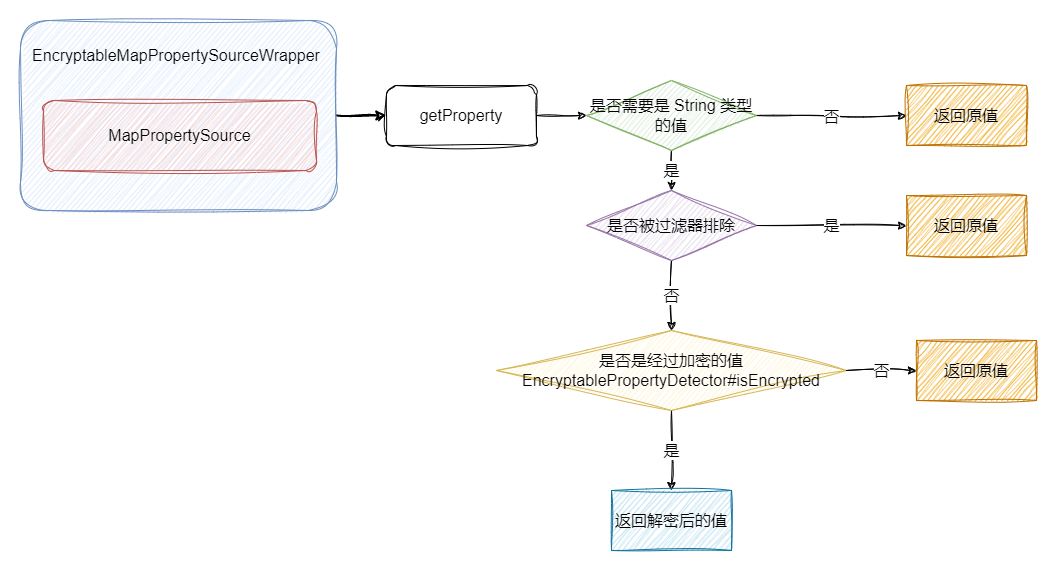
@Override
public Object getProperty(String name) {
Object originValue = delegate.getProperty(name);
if (!(originValue instanceof String)) {
/*
由于实际的解码器只能支持对 String 类型的解码,因此如果不是 String 类型的值则不做处理
*/
return originValue;
}
// 省略缓存的有关处理
// 如果该字段不在过滤器的排除选项中,则进一步考虑解密的处理
if (filter.shouldInclude(delegate, name)) {
String originStringValue = (String) originValue;
/*
解码器的实际解码处理,至此,完成了对加密字段的解密获取处理
*/
String resolved = resolver.resolvePropertyValue(originStringValue);
// 省略缓存的有关处理
return resolved;
}
return originValue;
}
// 省略部分源码。。。。
}
具体结构图如下所示:

 浙公网安备 33010602011771号