Spring 中循环依赖的处理
Spring 提供了十分强大的依赖注入功能,使得我们不再需要手动去管理对象的依赖项。然而,在实际的使用场景中,可能会遇到类似下面的依赖异常:
Exception encountered during context initialization - cancelling refresh attempt: org.springframework.beans.factory.UnsatisfiedDependencyException: Error creating bean with name 'author' defined in file [/home/lxh/JavaProject/sample/target/classes/com/example/sample/component/Author.class]: Unsatisfied dependency expressed through constructor parameter 0; nested exception is org.springframework.beans.factory.UnsatisfiedDependencyException: Error creating bean with name 'book' defined in file [/home/lxh/JavaProject/sample/target/classes/com/example/sample/component/Book.class]: Unsatisfied dependency expressed through constructor parameter 0; nested exception is org.springframework.beans.factory.BeanCurrentlyInCreationException: Error creating bean with name 'author': Requested bean is currently in creation: Is there an unresolvable circular reference?
一般来讲,这种情况的出现都是由于 Bean 类的设计不合理导致的,通常的解决方案都是选择重新设计 Bean 类的组织结构来打破循环依赖。然而,在某些特定的情况下,可能没有办法重新设计这些类组织结构(比如旧有代码的遗留问题等),这种情况有几种特殊的处理方式。但是在介绍这些处理方式之前,让我们先来了解一下 Spring 中对于循环依赖的处理
IOC 处理流程
在开始之前,明确一下常用的几个概念:
-
一级缓存
private final Map<String, Object> singletonObjects = new ConcurrentHashMap<>(256);这个缓存的目的是存储已经创建好的 Bean 实例,通过这个缓存可以保证得到的 Bean 是单例的
-
二级缓存
private final Map<String, Object> earlySingletonObjects = new ConcurrentHashMap<>(16);这个缓存被称为 “二级缓存”,主要的目的是存储通过三级缓存的工厂对象直接创建的 Bean 实例
-
三级缓存
private final Map<String, ObjectFactory<?>> singletonFactories = new HashMap<>(16);三级缓存并不直接缓存 Bean 实例,而是存储一个创建 Bean 实例的工厂对象
假设现在存在这样的关系:
@Component
public class Author {
    @Resource
    private Book book;
}

@Component
public class Book {
    @Resource
    private Author author;
}
回想一下 Spring 中获取 Bean 的流程,详情可以参考:Spring IOC 容器源码分析,获取 Bean 的大概流程如下(没有代理的情况):
- 获取 Bean 类型的实例对象(可以理解为
new关键字创建的对象) - 填充 Bean 实例的相关属性(即
@Resource或@Autowire注解标记的属性) - 应用
BeanFactory的后置方法和注册销毁方法
首先对于实例化对象来讲,对应的执行流程如下:
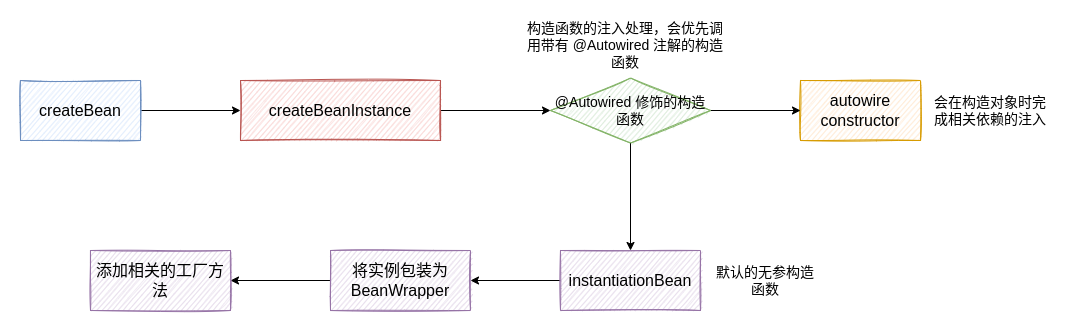
值得一提的是,对于构造函数的注入来讲,如果只存在唯一的注入构造函数,那么即使不添加 @Autowired 注解同样会将这个构造函数视为注入的构造函数
在实例化 Bean 对象之后,会添加一个 ObjectFactory 到三级缓存中,对应的源码如下:
protected Object doCreateBean(String beanName, RootBeanDefinition mbd, @Nullable Object[] args)
			throws BeanCreationException {
    // 省略前置的相关代码
    boolean earlySingletonExposure = (mbd.isSingleton() && this.allowCircularReferences &&
				isSingletonCurrentlyInCreation(beanName));
    if (earlySingletonExposure) {
        if (logger.isTraceEnabled()) {
            logger.trace("Eagerly caching bean '" + beanName +
                         "' to allow for resolving potential circular references");
        }
        addSingletonFactory(beanName, () -> getEarlyBeanReference(beanName, mbd, bean));
    }
    // 省略后置的相关代码
}

protected void addSingletonFactory(String beanName, ObjectFactory<?> singletonFactory) {
    Assert.notNull(singletonFactory, "Singleton factory must not be null");
    synchronized (this.singletonObjects) {
        if (!this.singletonObjects.containsKey(beanName)) {
            this.singletonFactories.put(beanName, singletonFactory); // 将这个 ObjectFactory 工厂对象放入三级缓存
            this.earlySingletonObjects.remove(beanName);
            this.registeredSingletons.add(beanName);
        }
    }
}

protected Object getEarlyBeanReference(String beanName, RootBeanDefinition mbd, Object bean) {
    Object exposedObject = bean;
    /*
    	这里的主要目的是给予需要代理的切面一个机会去代理相关的 Bean 实例,由于我们假设现在不存在代理,因此会直接返回当前的 Bean 实例对象
    */
    if (!mbd.isSynthetic() && hasInstantiationAwareBeanPostProcessors()) {
        for (SmartInstantiationAwareBeanPostProcessor bp : getBeanPostProcessorCache().smartInstantiationAware) {
            exposedObject = bp.getEarlyBeanReference(exposedObject, beanName);
        }
    }
    return exposedObject;
}
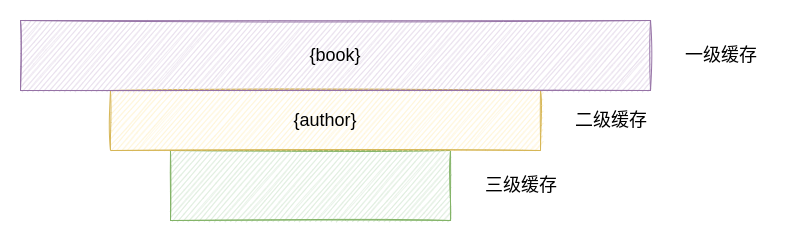
现在需要明确的是,在实例化了一个 Bean 的实例对象之后,会生成一个匿名类对象作为工厂对象放入到三级缓存中。按照上文我们给定的依赖关系,此时 Spring 容器中的缓存情况应当如下所示(我们关心的情况):
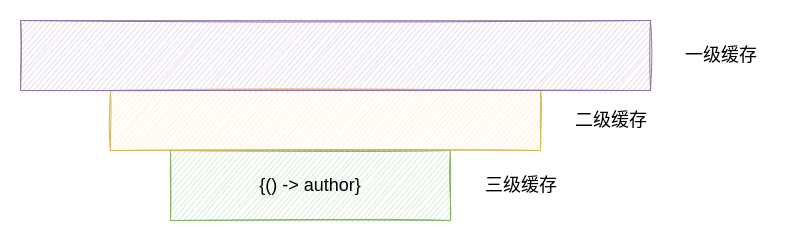
注意,在实例化 Bean 的这个过程中,只是实例化 Bean,因此 @Order 注解在这个过程中是不会生效的,Bean 的初始化顺序将会按照 beanName 的顺序进行实例化,因此按照我们上文的定义,我们关心的 Bean 中,现在只有一个创建 author Bean 的工厂对象
当处理完成 BeanFactory 之后,会填充 Bean 中相关的属性,我们熟知的 @Resource、@Autowired 以及 @Inject 注解就是在这个过程中进行处理的,具体对应的源代码如下:
protected void populateBean(String beanName, RootBeanDefinition mbd, @Nullable BeanWrapper bw) {
    // 省略部分代码
    for (InstantiationAwareBeanPostProcessor bp : getBeanPostProcessorCache().instantiationAware) {
        PropertyValues pvsToUse = bp.postProcessProperties(pvs, bw.getWrappedInstance(), beanName);
        if (pvsToUse == null) {
            if (filteredPds == null) {
                filteredPds = filterPropertyDescriptorsForDependencyCheck(bw, mbd.allowCaching);
            }
            pvsToUse = bp.postProcessPropertyValues(pvs, filteredPds, bw.getWrappedInstance(), beanName);
            if (pvsToUse == null) {
                return;
            }
        }
        pvs = pvsToUse;
    }
    // 省略部分代码
}
InstantiationAwareBeanPostProcessor 可以定义一些在实例化 Bean 之后的后置操作,这里我们主要关心的是对于字段属性注入的相关处理,因此我们主要关心 CommonAnnotationBeanPostProcessor 实现类的相关处理(处理 @Resource 的注入,对于 @Autowired 注入的处理在 AutowiredAnnotationBeanPostProcessor 中实现),具体的处理逻辑如下:
public PropertyValues postProcessProperties(PropertyValues pvs, Object bean, String beanName) {
    InjectionMetadata metadata = findResourceMetadata(beanName, bean.getClass(), pvs);
    try {
        metadata.inject(bean, beanName, pvs);
    }
    catch (Throwable ex) {
        throw new BeanCreationException(beanName, "Injection of resource dependencies failed", ex);
    }
    return pvs;
}

// 处理 @Resource 相关的元数据信息
private InjectionMetadata findResourceMetadata(String beanName, Class<?> clazz, @Nullable PropertyValues pvs) {
    String cacheKey = (StringUtils.hasLength(beanName) ? beanName : clazz.getName());
    InjectionMetadata metadata = this.injectionMetadataCache.get(cacheKey);
    if (InjectionMetadata.needsRefresh(metadata, clazz)) { // 这里也用到了缓存
        synchronized (this.injectionMetadataCache) {
            metadata = this.injectionMetadataCache.get(cacheKey);
            if (InjectionMetadata.needsRefresh(metadata, clazz)) {
                if (metadata != null) {
                    metadata.clear(pvs);
                }
                metadata = buildResourceMetadata(clazz); // 解析 @Resource 注解处理的元数据
                this.injectionMetadataCache.put(cacheKey, metadata);
            }
        }
    }
    return metadata;
}

private InjectionMetadata buildResourceMetadata(Class<?> clazz) {
    List<InjectionMetadata.InjectedElement> elements = new ArrayList<>();
    Class<?> targetClass = clazz;

    do {
        final List<InjectionMetadata.InjectedElement> currElements = new ArrayList<>();
        // 这一部分用于处理被 @Reource 修饰的字段(基于字段的注入)
        ReflectionUtils.doWithLocalFields(targetClass, field -> {
            // 省略部分不太重要的源码。。。
            if (field.isAnnotationPresent(Resource.class)) { // 检查当前属性是否被 @Resource 注解修饰过
                if (Modifier.isStatic(field.getModifiers())) {
                    throw new IllegalStateException("@Resource annotation is not supported on static fields");
                }
                if (!this.ignoredResourceTypes.contains(field.getType().getName())) {
                    currElements.add(new ResourceElement(field, field, null));
                }
            }
        });

        // 这一部分用于处理被 @Reource 修饰的所有方法(基于方法的注入)
        ReflectionUtils.doWithLocalMethods(targetClass, method -> {
            Method bridgedMethod = BridgeMethodResolver.findBridgedMethod(method);
            if (!BridgeMethodResolver.isVisibilityBridgeMethodPair(method, bridgedMethod)) {
                return;
            }
            if (method.equals(ClassUtils.getMostSpecificMethod(method, clazz))) {
                // 省略部分源码
                if (bridgedMethod.isAnnotationPresent(Resource.class)) {
                    if (Modifier.isStatic(method.getModifiers())) {
                        throw new IllegalStateException("@Resource annotation is not supported on static methods");
                    }
                    Class<?>[] paramTypes = method.getParameterTypes();
                    if (paramTypes.length != 1) {
                        throw new IllegalStateException("@Resource annotation requires a single-arg method: " + method);
                    }
                    if (!this.ignoredResourceTypes.contains(paramTypes[0].getName())) {
                        PropertyDescriptor pd = BeanUtils.findPropertyForMethod(bridgedMethod, clazz);
                        currElements.add(new ResourceElement(method, bridgedMethod, pd));
                    }
                }
            }
        });

        elements.addAll(0, currElements); // 添加到此被 @Resource 修饰的字段到元数据对象
        targetClass = targetClass.getSuperclass(); // 父类的递归处理
    }
    while (targetClass != null && targetClass != Object.class);

    return InjectionMetadata.forElements(elements, clazz); // 包装成统一的元数据对象
}
随后就是对相关属性的注入了,具体源码如下:
public void inject(Object target, @Nullable String beanName, @Nullable PropertyValues pvs) throws Throwable {
    Collection<InjectedElement> checkedElements = this.checkedElements;
    /*
    	这里的 injectedElements 在处理 @Resource 注解时被添加到当前元数据对象,
    	因此这里处理的就是当前对象中所有被 @Resource 注解修饰的属性
    */
    Collection<InjectedElement> elementsToIterate =
        (checkedElements != null ? checkedElements : this.injectedElements);
    if (!elementsToIterate.isEmpty()) { //
        for (InjectedElement element : elementsToIterate) {
            element.inject(target, beanName, pvs);
        }
    }
}

protected void inject(Object target, @Nullable String requestingBeanName, @Nullable PropertyValues pvs)
				throws Throwable {
    if (this.isField) { // 这里也被称为 “基于字段的注入”,即通过反射的方式进行注入,一般我们都是通过这种方式来实现注入的
        Field field = (Field) this.member;
        ReflectionUtils.makeAccessible(field);
        field.set(target, getResourceToInject(target, requestingBeanName));
    }
    else { // 基于方法的注入
        if (checkPropertySkipping(pvs)) {
            return;
        }
        try {
            Method method = (Method) this.member;
            ReflectionUtils.makeAccessible(method);
            method.invoke(target, getResourceToInject(target, requestingBeanName));
        }
        catch (InvocationTargetException ex) {
            throw ex.getTargetException();
        }
    }
}
当执行到这一步的时候,Spring 就会去寻找对应的依赖项,最终在 autowireResource 方法中完成对所需 Bean 的注入:
protected Object autowireResource(BeanFactory factory, LookupElement element, @Nullable String requestingBeanName)
throws NoSuchBeanDefinitionException {
Object resource;
Set<String> autowiredBeanNames;
String name = element.name;
if (factory instanceof AutowireCapableBeanFactory) {
AutowireCapableBeanFactory beanFactory = (AutowireCapableBeanFactory) factory;
DependencyDescriptor descriptor = element.getDependencyDescriptor();
/*
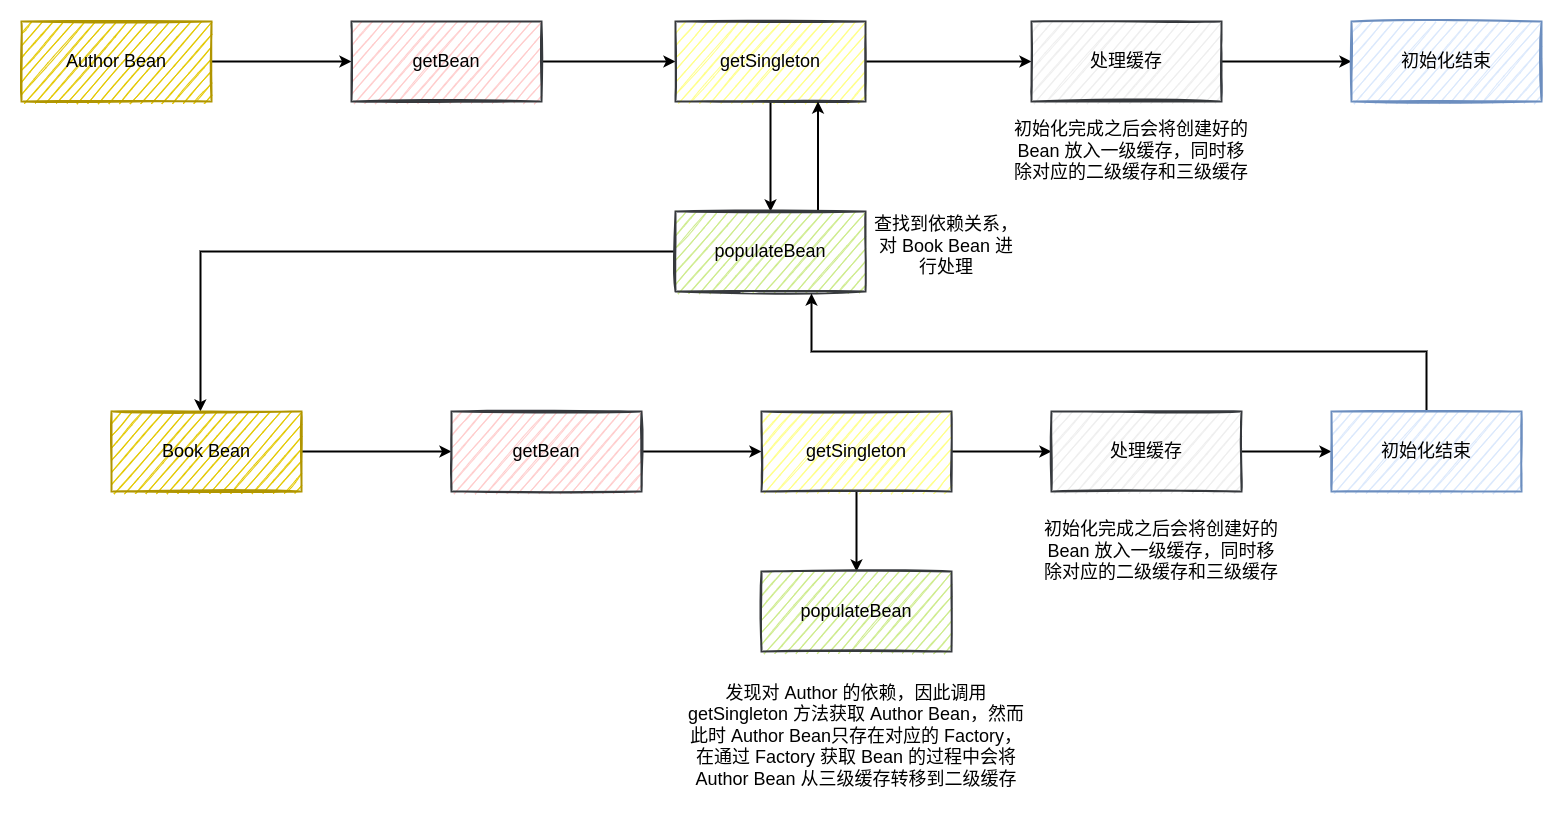
从 BeanFactory 中查找依赖项,由于 Author Bean 优先于 Book Bean 进行初始化,因此在填充 Author Bean 的
依赖项 Book Bean 时 Spring 容器按照相同的方式对 Book Bean 进行初始化
*/
resource = beanFactory.resolveBeanByName(name, descriptor);
autowiredBeanNames = Collections.singleton(name);
}
// 省略部分源代码
return resource;
}
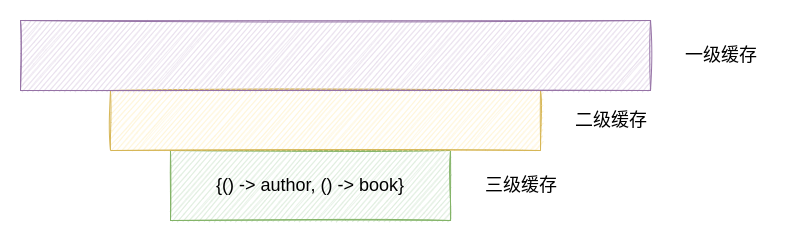
按照相同的策略,完成 Book Bean 的初始化,然而和 Author Bean 初始化不同的地方在于,Book Bean 中的依赖项 Author 已经在 “三级缓存” 中存在了对应的工厂类,此时的缓存情况如下图所示:
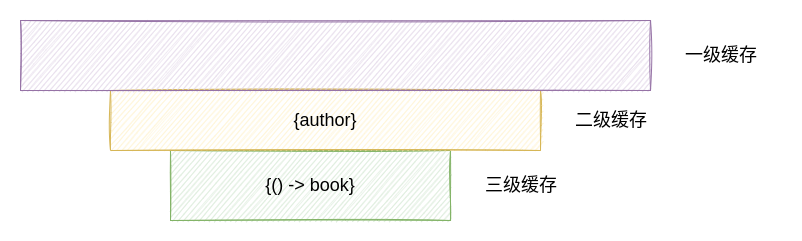
当在执行对 Book Bean 的属性注入时,从容器中获取 Author Bean 的方式将会是从 “三级缓存” 中直接获取对应的 Bean,对应的源码如下:
protected Object getSingleton(String beanName, boolean allowEarlyReference) {
    Object singletonObject = this.singletonObjects.get(beanName);
    if (singletonObject == null && isSingletonCurrentlyInCreation(beanName)) {
        singletonObject = this.earlySingletonObjects.get(beanName);
        if (singletonObject == null && allowEarlyReference) {
            synchronized (this.singletonObjects) {
                singletonObject = this.singletonObjects.get(beanName);
                if (singletonObject == null) {
                    singletonObject = this.earlySingletonObjects.get(beanName);
                    if (singletonObject == null) {
                        ObjectFactory<?> singletonFactory = this.singletonFactories.get(beanName);
                        if (singletonFactory != null) {
                            /*
                            	从三级缓存中对应 Bean 的 Factory 获取对象,同时将获取到的对象放入二级缓存
                            */
                            singletonObject = singletonFactory.getObject();
                            this.earlySingletonObjects.put(beanName, singletonObject);
                            this.singletonFactories.remove(beanName);
                        }
                    }
                }
            }
        }
    }
    return singletonObject;
}
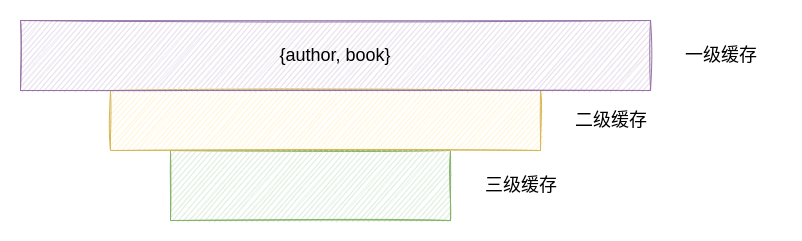
因此,当初始化 Book Bean 的过程中处理完对应的依赖项之后,此时容器的缓存情况如下图所示:
当 Book Bean 初始化完成之后,按照相关的逻辑,会对当前 Bean 的缓存进行一次处理,主要的目的是将初始化好的 Bean 放入到一级缓存:
protected void addSingleton(String beanName, Object singletonObject) {
    synchronized (this.singletonObjects) {
        this.singletonObjects.put(beanName, singletonObject);
        this.singletonFactories.remove(beanName);
        this.earlySingletonObjects.remove(beanName);
        this.registeredSingletons.add(beanName);
    }
}
因此在 Book Bean 初始化完成之后,此时的缓存情况如下所示:
同样地,初始化完成 Book Bean 之后,Author Bean 的依赖项已经被解决了,因此 Author Bean 也会完成初始化,对相关的 Bean 进行同样的缓存处理操作,最终容器中的缓存如下所示:
至此,Author Bean 和 Book Bean 全部完成初始化
总的执行流程如下图所示:
存在的问题
为什么需要三级缓存
根据上文的描述,实际上只需要使用到两个缓存即可完成对应依赖的处理,二级缓存的存在是否是多余的?
在上文的处理过程中,有一个前提条件是 “不存在代理”,当需要进行代理处理,如 AOP 等功能时,会创建对应的代理类,一般来讲,代理的处理是放在实例化 Bean 之后,放入三级缓存中(三级缓存缓存的是 Factory 对象,重新定义了 Bean 的获取逻辑),具体的 Factory 逻辑如下:
protected Object getEarlyBeanReference(String beanName, RootBeanDefinition mbd, Object bean) {
    Object exposedObject = bean;
    if (!mbd.isSynthetic() && hasInstantiationAwareBeanPostProcessors()) {
        for (SmartInstantiationAwareBeanPostProcessor bp : getBeanPostProcessorCache().smartInstantiationAware) {
            exposedObject = bp.getEarlyBeanReference(exposedObject, beanName);
        }
    }
    return exposedObject;
}
一般 AOP 或者其它的代理方式的实现都是通过 org.springframework.aop.framework.autoproxy.AbstractAutoProxyCreator 的具体实现类来完成的,具体的源码如下所示:
@Override
public Object getEarlyBeanReference(Object bean, String beanName) {
    Object cacheKey = getCacheKey(bean.getClass(), beanName);
    this.earlyProxyReferences.put(cacheKey, bean);
    return wrapIfNecessary(bean, beanName, cacheKey);
}

protected Object wrapIfNecessary(Object bean, String beanName, Object cacheKey) {
    // 省略部分源代码

    /*
    	检查当前 Bean 上存在的切面,根据需要创建对应的代理对象
    */
    Object[] specificInterceptors = getAdvicesAndAdvisorsForBean(bean.getClass(), beanName, null);
    if (specificInterceptors != DO_NOT_PROXY) {
        this.advisedBeans.put(cacheKey, Boolean.TRUE);
        Object proxy = createProxy(
            bean.getClass(), beanName, specificInterceptors, new SingletonTargetSource(bean));
        this.proxyTypes.put(cacheKey, proxy.getClass());
        return proxy;
    }

    this.advisedBeans.put(cacheKey, Boolean.FALSE);
    return bean;
}
假设现在存在以下的依赖关系:
@Component
@Transactional
public class Author {
    @Resource
    private Book book;

    @Resource
    private Publisher publisher;
}

@Component
@Transactional
public class Book {
    @Resource
    private Author author;

    @Resource
    private Publisher publisher;
}

@Component
@Transactional
public class Publisher {
    @Resource
    private Author author;

    @Resource
    private Book book;
}
由于现在我们加上了 @Transactional 注解,因此在从三级缓存中获取对应的 Bean 时会执行代理操作,假设我们现在只有一级缓存和三级缓存,那么当 Book Bean 和 Publisher Bean 填充 Author 的依赖项时,都会从三级缓存中通过 Factory 执行一次获取 Author Bean 的操作(注意 Author Bean 被放入一级缓存时是在构造完成之后,然而此时是在处理 Book Bean 和 Publisher Bean 的初始化的过程中),使得 Author Bean 的单例特征无法保证。而通过引入二级缓存,在首次通过三级缓存获取 Bean 时,会将获取到的 Bean 放入到二级缓存,从而维护了 Bean 实例的单例属性
基于构造函数的注入
根据上文的分析,可以得知 Spring 中对于基于字段或方法的 Bean 注入,是能够自行处理循环依赖的(后续 Spring 版本默认关闭了这个行为,因为出现这种情况很大概率是设计存在缺陷)。但是针对基于构造函数的注入来讲,情况可能不大一样
上文的分析都是在实例化对应的 Bean 对象之后进行的,基于构造函数的注入则是在构造这个 Bean 实例的时候进行处理,对应的源码如下:
protected BeanWrapper createBeanInstance(String beanName, RootBeanDefinition mbd, @Nullable Object[] args) {
    // Make sure bean class is actually resolved at this point.
    Class<?> beanClass = resolveBeanClass(mbd, beanName);
    // 省略部分源码

    /**
    * 查找被 @Autowired 注解修饰的构造函数作为构造 Bean 的构造函数,如果只存在一个构造函数,那么不管它有没有被
    * @Autowired 注解修饰过,都将作为本次 Bean 的构造函数
    */
    Constructor<?>[] ctors = determineConstructorsFromBeanPostProcessors(beanClass, beanName);
    if (ctors != null || mbd.getResolvedAutowireMode() == AUTOWIRE_CONSTRUCTOR ||
        mbd.hasConstructorArgumentValues() || !ObjectUtils.isEmpty(args)) {
        return autowireConstructor(beanName, mbd, ctors, args); // 对于依赖项的处理和基于字段的注入类似
    }

    // Preferred constructors for default construction?
    ctors = mbd.getPreferredConstructors();
    if (ctors != null) {
        return autowireConstructor(beanName, mbd, ctors, null);
    }

    // No special handling: simply use no-arg constructor.
    return instantiateBean(beanName, mbd);
}
问题在于,由于基于构造函数的注入发生在构造 Bean 实例对象的过程中,因此被构造的 Bean 实际上在三级缓存中是不存在对应的 Factory 对象的,这就会出现其它的 Bean 对于被构造的 Bean 的依赖无法被解决,从而抛出异常。更为具体的一点,我们依旧以下面的例子为例讲述一下这个问题
加入此时的依赖关系是下面这样:
@Component
public class Author {
    @Autowired
    public Author(Book book) {}
}

@Component
public class Book {
    @Resource
    public Author author;
}
由于 Author Bean 会比 Book Bean 优先初始化(按照 Bean Name 排序,此时 @Order 注解不生效),因此当 Author Bean 在解决对 Book Bean 的依赖时,由于 Book Bean 同样也依赖于 Author Bean,但是此时 Spring 容器中并不存在 Author Bean 对应的缓存(此时 Author Bean 还在实例化的过程中),因此在解决 Book Bean 的依赖过程中就无法被解决,从而抛出异常
然而,如果是依赖关系是下面这样:
@Component
public class Author {
    @Resource
    private Book book;
}

@Component
public class Book {
    @Autowired
    public Book(Author author){}
}
由于在解决 Book Bean 的依赖过程中 Author Bean 已经实例化,并且已经放入了三级缓存,因此可以解决 Book Bean 所需的依赖项(尽管此时 Book Bean 处于实例化的过程中,即缓存中不存在 Book Bean),使得循环依赖能够被解决
解决循环依赖
最好的做法是改善依赖关系,避免循环依赖的出现
在了解了相关的处理逻辑之后,我们就可以针对性的采取相关的措施解决循环以来
-
对相关的依赖项添加
@Lazy,如下:@Component public class Author { @Autowired public Author(Book book) {} } import org.springframework.context.annotation.Lazy; @Component public class Book { @Autowired public Book(@Lazy Author author) { } }通过添加
@Lazy注解,使得当前 Book Bean 对于 Author Bean 的依赖可以被延迟处理,从而打破了循环的结构 -
如果可以,可以考虑使用基于字段或者方法的注入方式替换基于构造函数的注入,因为我们发现只有在基于构造函数的注入时才会导致循环依赖的产生
Note: 由于 Spring 后来默认把循环依赖这一功能给禁用了,可以通过在配置文件中打开这个选项:
# application.yaml
spring:
  main:
    allow-circular-references: true
参考:
[1] https://www.baeldung.com/circular-dependencies-in-spring

 浙公网安备 33010602011771号