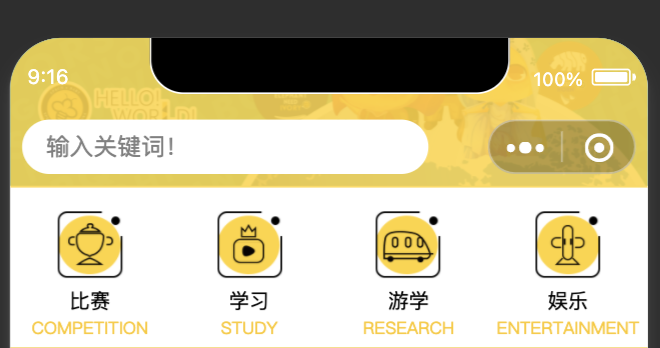
微信小程序自定义渐变的tabbar导航栏
做为自己的一个小笔记,以免后面再用到


1,在需要自定义的界面的json文件中加入下面代码 "navigationStyle": "custom" ,隐藏系统导航栏
{
    "navigationBarTitleText": "",
    "navigationBarBackgroundColor": "#000",
    "navigationBarTextStyle": "white",
    "backgroundTextStyle": "dark",
    "usingComponents": {
    },
    "navigationStyle": "custom"
}
2,创建components 文件,为了方便复用
js 文件内容:
const app = getApp()
Component({
properties: {
defaultData: {
type: Object,
value: {
title: "默认标题"
},
observer: function (newVal, oldVal) {}
},
topOpacity: {
type: Number,
value: {
topOpacity: 0,
}
}
},
data: {
navBarHeight: app.globalData.navBarHeight,
menuRight: app.globalData.menuRight,
menuTop: app.globalData.menuTop,
menuHeight: app.globalData.menuHeight,
},
attached: function () {
},
methods: {
}
})
wxml文件内容:
<!-- 自定义顶部栏 -->
<view class="nav-bar" style="height:{{navBarHeight}}px;">
<view class="nav-barback" style="height:{{navBarHeight}}px;opacity:{{topOpacity}}"></view>
<input class="search" placeholder="输入关键词!" style="height:{{menuHeight}}px; min-height:{{menuHeight}}px; line-height:{{menuHeight}}px; left:{{menuRight}}px; top:{{menuTop}}px;"></input>
</view>
<!-- 占位,高度与顶部栏一样 -->
<view style="height:{{navBarHeight}}px;"></view>

wxss文件内容:
.nav-bar {
position: fixed;
width: 100%;
top: 0;
color: rgb(255, 255, 255);
/* background: rgb(255, 255, 255); */
z-index: 10000;
}
.nav-barback{
background-color: #FFD52F;
width: 100%;
position: relative;
top: 0;
z-index: 10001;
}
.nav-bar .search {
width: 60%;
color: #333;
font-size: 14px;
background: #fff;
position: absolute;
border-radius: 50px;
background: rgb(255, 255, 255);
padding-left: 14px;
z-index: 10002;
}
在需要使用的界面使用方法
1,在json中引入该components,
2,wxml中
<navigationBar default-data="{{defaultData}}" topOpacity="{{topOpacityFloat}}"></navigationBar>
3,js中,这个标题看需求后面可以替换搜索栏
defaultData: {
  title: "我的主页", // 导航栏标题
},
4,该方法是监听当前界面滚动的回调,上滑时,自定义的背景色透明度会从0一直到1,达成渐变效果
onPageScroll(t){
    let topOpacity = t.scrollTop / 100
    console.log('topOpacity',t.scrollTop,topOpacity);
    if (t.scrollTop < 10) {
        topOpacity = 0
    } else if (topOpacity >= 1) {
        topOpacity = 1
    }
    this.setData({
        topOpacityFloat: topOpacity
    })
},
仅作为个人随笔或有使用到的朋友做为小参考


 浙公网安备 33010602011771号