

【关节电机专栏】ESP32 TWAI CAN Arduino库驱动大然电机(PDA-04)
前言
大然电机官方提供了 STM32、Arduino 等函数库,但是没有提供ESP32的函数库
ESP32、ESP32-S3都自带有CAN接口,使用起来很方便,同时利于集成蓝牙功能,因此想办法弄出来了SP32-S3/ESP32的驱动库。
环境:PlatformIO、Arduino框架、ESP32-S3(ESP32也适用)
完整代码-项目仓库:https://gitee.com/wenlilili/dr-joint-motor-esp32-lib
本项目用到了ESP32-TWAI-CAN底层CAN库,需要提前调用好 Platform 的库。不会的话参考文章:【关节电机专栏】ESP32 TWAI CAN Arduino库驱动小米电机(CyberGear微电机)
驱动库介绍:
共包含以下三对文件(.cpp/.h)
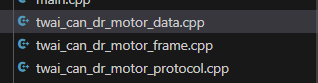
分别为数据转换(如 float 与 int 之间的转换)、帧结构(标准帧还是扩展帧?遥控帧还是数据帧?帧ID的具体含义?)以及上层的协议命令。
1. 首先,在main.c中包含以下头文件
#include "twai_can_dr_motor_frame.h"
#include "twai_can_dr_motor_protocol.h"
2. 然后,在setup() 函数中初始化电机CAN总线 (设置比特率、队列等等) Motor_CAN_Init();
3. 最后,在loop()函数中,或在中断中,调用电机控制类函数(比如控制角度、速度、自适应等等)
比如: set_angle(id_num, angle, speed, param, mode); // 控制 7 号关节转到 0°
具体思路之1—— 如何进行CAN初始化?
以下是ESP32-TWAI-CAN库的CAN总线初始化函数(begin())
bool begin(TwaiSpeed twaiSpeed = TWAI_SPEED_500KBPS,
                int8_t txPin = -1, int8_t rxPin = -1,
                uint16_t txQueue = 0xFFFF, uint16_t rxQueue = 0xFFFF,
                twai_filter_config_t*  fConfig = nullptr,
                twai_general_config_t* gConfig = nullptr,
                twai_timing_config_t*  tConfig = nullptr);
主要需要知道以下数据:
- CAN的引脚
- 电机驱动板对应的比特率
如何实现发送 CAN 消息?——第一步:明确帧格式
有的电机(大然电机)是标准帧,有的电机(小米电机)是扩展帧,下面分别给出举例:
小米电机
/*

	小米电机驱动器通信协议及使用说明

  电机通信为 CAN 2.0 通信接口,波特率 1Mbps,采用扩展帧格式,如下所示:
  数据域          29 位 ID            8Byte 数据区
  大小 Bit28~bit24 bit23~8 bit7~0     Byte0~Byte7
  描述 通信类型 数据区 2 目标地址     数据区 1
 */
由上面的定义,可以定义一个帧的结构体:
//发送数据包
typedef struct {
  uint32_t id:8;      //8位CAN ID
  uint32_t data:16;   //16位数据
  uint32_t mode:5;    //5位模式
  uint32_t res:3;     //3位保留
  uint8_t tx_data[8];
}can_frame_t;
其发送帧的函数如下:
//底层的CAN发送指令,小米电机采用扩展帧,数据帧的格式
static void CAN_Send_Frame(can_frame_t* frame)
{
    CanFrame obdFrame = { 0 };
    uint32_t id_val,data_val,mode_val;
    uint32_t combined_val;

    obdFrame.extd = 1;              //0-标准帧; 1-扩展帧 小米电机采用扩展帧
    obdFrame.rtr = 0;               //0-数据帧; 1-远程帧
    obdFrame.ss = 0;                //0-错误重发; 1-单次发送(仲裁或丢失时消息不会被重发),对接收消息无效
    obdFrame.self = 0;              //0-不接收自己发送的消息,1-接收自己发送的消息,对接收消息无效
    obdFrame.dlc_non_comp = 0;      //0-数据长度不大于8(ISO 11898-1); 1-数据长度大于8(非标); 数据长度为标准长度
    //拼接ID
    id_val = frame->id;
    data_val = frame->data;
    mode_val = frame->mode;
    combined_val |= (mode_val << 24);
    combined_val |= (data_val << 8);
    combined_val |= id_val;

    obdFrame.identifier = combined_val; //普通帧直接写id,扩展帧需要计算。11/29位ID
    obdFrame.data_length_code = 8;      //要发送的字节数

    for (int i = 0; i < 8; i++)
    {
        obdFrame.data[i] = frame->tx_data[i];
    }
    ESP32Can.writeFrame(obdFrame);
}
大然电机
与之相对,大然电机采用标准帧(帧信息为1字节,帧ID为两个字节):

因此可以参照小米电机的代码,写出大然电机CAN发送frame的代码
// CAN发送函数
void send_command(uint8_t id_num, char cmd, unsigned char *data,uint8_t rt)
{
    //short id_list = (id_num << 5) + cmd;
    /* Can_Send_Msg(id_list, 8, data);
    uint8_t Can_Send_Msg(uint32_t id,uint8_t len,uint8_t *data) {
        uint32_t i=0;
        static  uint32_t  TxMailbox;
        CAN_TxHeaderTypeDef  CAN_TxHeader;
        HAL_StatusTypeDef  HAL_RetVal;
        CAN_TxHeader.IDE = CAN_ID_STD;
        CAN_TxHeader.StdId = id;
        CAN_TxHeader.DLC = len;
        CAN_TxHeader.RTR = CAN_RTR_DATA;
        CAN_TxHeader.TransmitGlobalTime = DISABLE;

        while(HAL_CAN_GetTxMailboxesFreeLevel(&SERVO_CAN) == 0)
        {
            i++;
            if(i>0xffffe)
                return 1;
        }
        HAL_RetVal = HAL_CAN_AddTxMessage(&SERVO_CAN,&CAN_TxHeader,data,&TxMailbox);
        if(HAL_RetVal != HAL_OK)
            return  1;
     return  0;
    }*/

    CanFrame obdFrame = { 0 };
    uint16_t combined_val;

    obdFrame.extd = 0;              //0-标准帧; 1-扩展帧 小米电机采用扩展帧;大然电机采用标准帧
    obdFrame.rtr = 0;               //0-数据帧; 1-远程帧
    obdFrame.ss = 0;                //0-错误重发; 1-单次发送(仲裁或丢失时消息不会被重发),对接收消息无效
    obdFrame.self = 0;              //0-不接收自己发送的消息,1-接收自己发送的消息,对接收消息无效
    obdFrame.dlc_non_comp = 0;      //0-数据长度不大于8(ISO 11898-1); 1-数据长度大于8(非标); 数据长度为标准长度

    combined_val |= (id_num << 5);
    combined_val |= cmd;

    obdFrame.identifier = combined_val; //普通帧直接写id,扩展帧需要计算。11/29位ID  (这里很重要)(这里感觉有问题??????)
    obdFrame.data_length_code = 8;      //要发送的字节数

    for (int i = 0; i < 8; i++)
    {
        obdFrame.data[i] = data[i];
    }
    ESP32Can.writeFrame(obdFrame);
}
具体思路之2——如何发送有实际效用的数据帧——找电机驱动板的《指令对照表》
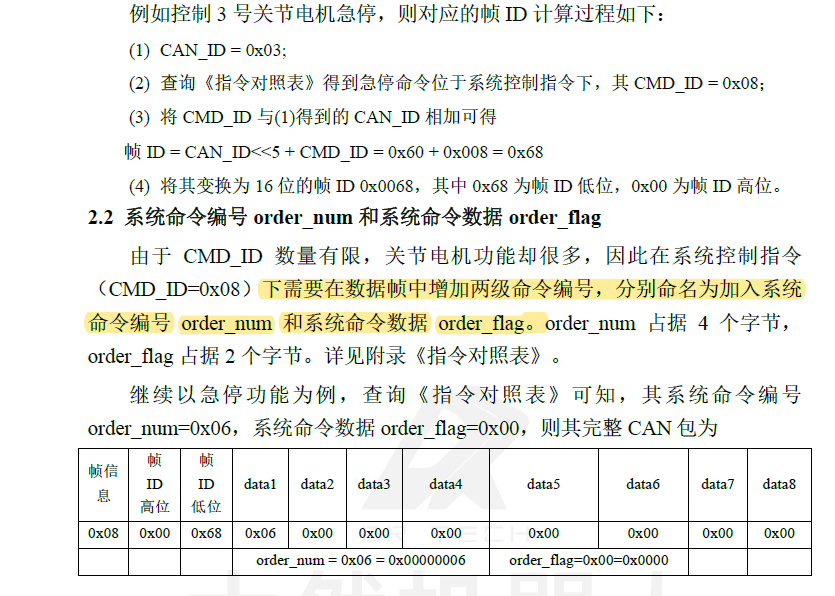
以下是大然电机协议说明书:(完整的命令由 帧ID中的CMD_ID + 数据帧中的 order_num (4个字节) + order_flag(2个字节)共同定义)
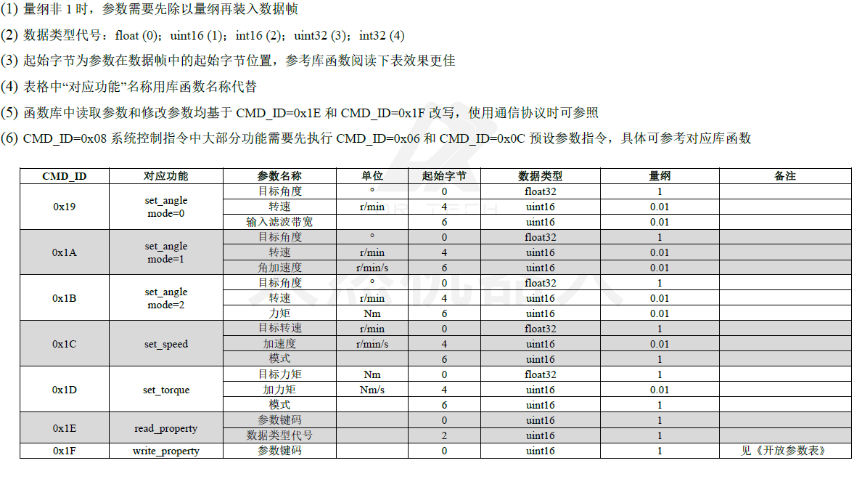
大然电机《指令对照表》
大然电机的函数库中已经有这部分内容,由于完成了底层的CAN信息发送,这部分直接复制即可,如
/**
 * @brief 单个关节速度控制函数。
 * 控制指定关节编号的关节按照指定的速度连续整周转动。
 *
 * @param id_num 需要设置的关节ID编号,如果不知道当前关节ID,可以用0广播,如果总线上有多个关节,则多个关节都会执行该操作。
 * @param speed 目标速度(r/min)
 * @param param mode=1, 前馈扭矩(Nm); mode!=1,或目标加速度((r/min)/s)
 * @param mode 控制模式选择
 *             mode=1, 速度前馈控制模式,关节将目标速度直接设为speed
 *             mode!=1,速度爬升控制模式,关节将按照目标加速度axis0.controller.config_.vel_ramp_rate变化到speed。
 * @note 在速度爬升模式下,如果目标加速度设置为0,则关节速度将保持当前值不变。
 */
void set_speed(uint8_t id_num, float speed, float param, int mode)
{
    float factor = 0.01;
    float f_speed = speed;
    if (mode == 0)
    {
        int s16_torque = (int)((param) / factor);
        if( f_speed == 0)
            s16_torque = 0;
        unsigned short u16_input_mode = 1;

        float value_data[3]= {f_speed,s16_torque,u16_input_mode};
        int type_data[3]= {0,2,1};
        format_data(value_data,type_data,3,"encode");
    }
    else
    {
        int s16_ramp_rate = (int)((param) / factor);
        unsigned short u16_input_mode = 2;

        float value_data[3]= {f_speed,s16_ramp_rate,u16_input_mode};
        int type_data[3]= {0,2,1};
        format_data(value_data,type_data,3,"encode");
    }
    send_command(id_num,0x1c,data_list.byte_data,0);
}
附:ESP32-TWAI-CAN库Readme文档
ESP32-TWAI-CAN
Usage
```cpp
#include <ESP32-TWAI-CAN.hpp>

// Default for ESP32
#define CAN_TX 5
#define CAN_RX 4

CanFrame rxFrame;

void sendObdFrame(uint8_t obdId) {
        CanFrame obdFrame = { 0 };
        obdFrame.identifier = 0x7DF; // Default OBD2 address;
        obdFrame.extd = 0;
        obdFrame.data_length_code = 8;
        obdFrame.data[0] = 2;
        obdFrame.data[1] = 1;
        obdFrame.data[2] = obdId;
        obdFrame.data[3] = 0xAA;    // Best to use 0xAA (0b10101010) instead of 0
        obdFrame.data[4] = 0xAA;    // CAN works better this way as it needs
        obdFrame.data[5] = 0xAA;    // to avoid bit-stuffing
        obdFrame.data[6] = 0xAA;
        obdFrame.data[7] = 0xAA;
    // Accepts both pointers and references
    ESP32Can.writeFrame(obdFrame);  // timeout defaults to 1 ms
}


void setup() {
    // Setup serial for debbuging.
    Serial.begin(115200);


    // Set pins
ESP32Can.setPins(CAN_TX, CAN_RX);


    // You can set custom size for the queues - those are default
    ESP32Can.setRxQueueSize(5);
ESP32Can.setTxQueueSize(5);


    // .setSpeed() and .begin() functions require to use TwaiSpeed enum,
    // but you can easily convert it from numerical value using .convertSpeed()
    ESP32Can.setSpeed(ESP32Can.convertSpeed(500));


    // You can also just use .begin()..
    if(ESP32Can.begin()) {
        Serial.println("CAN bus started!");
    } else {
        Serial.println("CAN bus failed!");
    }


    // or override everything in one command;
    // It is also safe to use .begin() without .end() as it calls it internally
    if(ESP32Can.begin(ESP32Can.convertSpeed(500), CAN_TX, CAN_RX, 10, 10)) {
        Serial.println("CAN bus started!");
    } else {
        Serial.println("CAN bus failed!");
    }
}


void loop() {
    static uint32_t lastStamp = 0;
    uint32_t currentStamp = millis();

    if(currentStamp - lastStamp > 1000) {   // sends OBD2 request every second
        lastStamp = currentStamp;
        sendObdFrame(5); // For coolant temperature
    }


    // You can set custom timeout, default is 1000
    if(ESP32Can.readFrame(rxFrame, 1000)) {
        // Comment out if too many requests
        Serial.printf("Received frame: %03X \r\n", rxFrame.identifier);
        if(rxFrame.identifier == 0x7E8) {   // Standard OBD2 frame responce ID
            Serial.printf("Collant temp: %3d°C \r\n", rxFrame.data[3] - 40); // Convert to °C
        }
    }
}
```
Advanced
```cpp
// Everything is defaulted so you can just call .begin() or .begin(TwaiSpeed)
// Calling begin() to change speed works, it will disable current driver first
bool begin(TwaiSpeed twaiSpeed = TWAI_SPEED_500KBPS,
                int8_t txPin = -1, int8_t rxPin = -1,
                uint16_t txQueue = 0xFFFF, uint16_t rxQueue = 0xFFFF,
                twai_filter_config_t*  fConfig = nullptr,
                twai_general_config_t* gConfig = nullptr,
                twai_timing_config_t*  tConfig = nullptr);
```
```c
typedef struct {
    union {
        struct {
            //The order of these bits must match deprecated message flags for compatibility reasons
            uint32_t extd: 1;           /**< Extended Frame Format (29bit ID) */
            uint32_t rtr: 1;            /**< Message is a Remote Frame */
            uint32_t ss: 1;             /**< Transmit as a Single Shot Transmission. Unused for received. */
            uint32_t self: 1;           /**< Transmit as a Self Reception Request. Unused for received. */
            uint32_t dlc_non_comp: 1;   /**< Message's Data length code is larger than 8. This will break compliance with ISO 11898-1 */
            uint32_t reserved: 27;      /**< Reserved bits */
        };
        //Todo: Deprecate flags
        uint32_t flags;                 /**< Deprecated: Alternate way to set bits using message flags */
    };
    uint32_t identifier;                /**< 11 or 29 bit identifier */
    uint8_t data_length_code;           /**< Data length code */
    uint8_t data[TWAI_FRAME_MAX_DLC];    /**< Data bytes (not relevant in RTR frame) */
} twai_message_t;


/**
 * @brief   Structure for bit timing configuration of the TWAI driver
 *
 * @note    Macro initializers are available for this structure
 */
typedef struct {
    uint32_t brp;                   /**< Baudrate prescaler (i.e., APB clock divider). Any even number from 2 to 128 for ESP32, 2 to 32768 for ESP32S2.
                                         For ESP32 Rev 2 or later, multiples of 4 from 132 to 256 are also supported */
    uint8_t tseg_1;                 /**< Timing segment 1 (Number of time quanta, between 1 to 16) */
    uint8_t tseg_2;                 /**< Timing segment 2 (Number of time quanta, 1 to 8) */
    uint8_t sjw;                    /**< Synchronization Jump Width (Max time quanta jump for synchronize from 1 to 4) */
    bool triple_sampling;           /**< Enables triple sampling when the TWAI controller samples a bit */
} twai_timing_config_t;


/**
 * @brief   Structure for acceptance filter configuration of the TWAI driver (see documentation)
 *
 * @note    Macro initializers are available for this structure
 */
typedef struct {
    uint32_t acceptance_code;       /**< 32-bit acceptance code */
    uint32_t acceptance_mask;       /**< 32-bit acceptance mask */
    bool single_filter;             /**< Use Single Filter Mode (see documentation) */
} twai_filter_config_t;
```


【推荐】国内首个AI IDE,深度理解中文开发场景,立即下载体验Trae
【推荐】编程新体验,更懂你的AI,立即体验豆包MarsCode编程助手
【推荐】抖音旗下AI助手豆包,你的智能百科全书,全免费不限次数
【推荐】轻量又高性能的 SSH 工具 IShell:AI 加持,快人一步
· 阿里最新开源QwQ-32B,效果媲美deepseek-r1满血版,部署成本又又又降低了!
· 开源Multi-agent AI智能体框架aevatar.ai,欢迎大家贡献代码
· Manus重磅发布:全球首款通用AI代理技术深度解析与实战指南
· 被坑几百块钱后,我竟然真的恢复了删除的微信聊天记录!
· AI技术革命,工作效率10个最佳AI工具
2024-01-09 【机试刷题】顺时针旋转矩阵