【esp32 项目】使用I2C——第二篇:编程实战实现网络时钟
原理图:
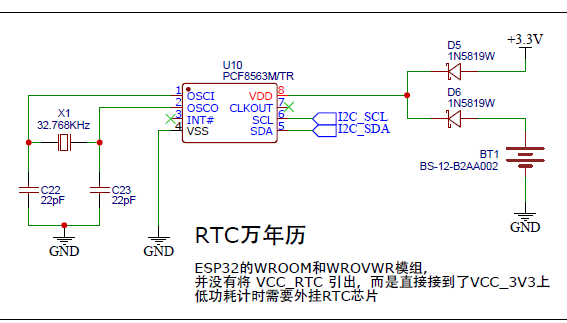
图 I2C接口的RTC芯片
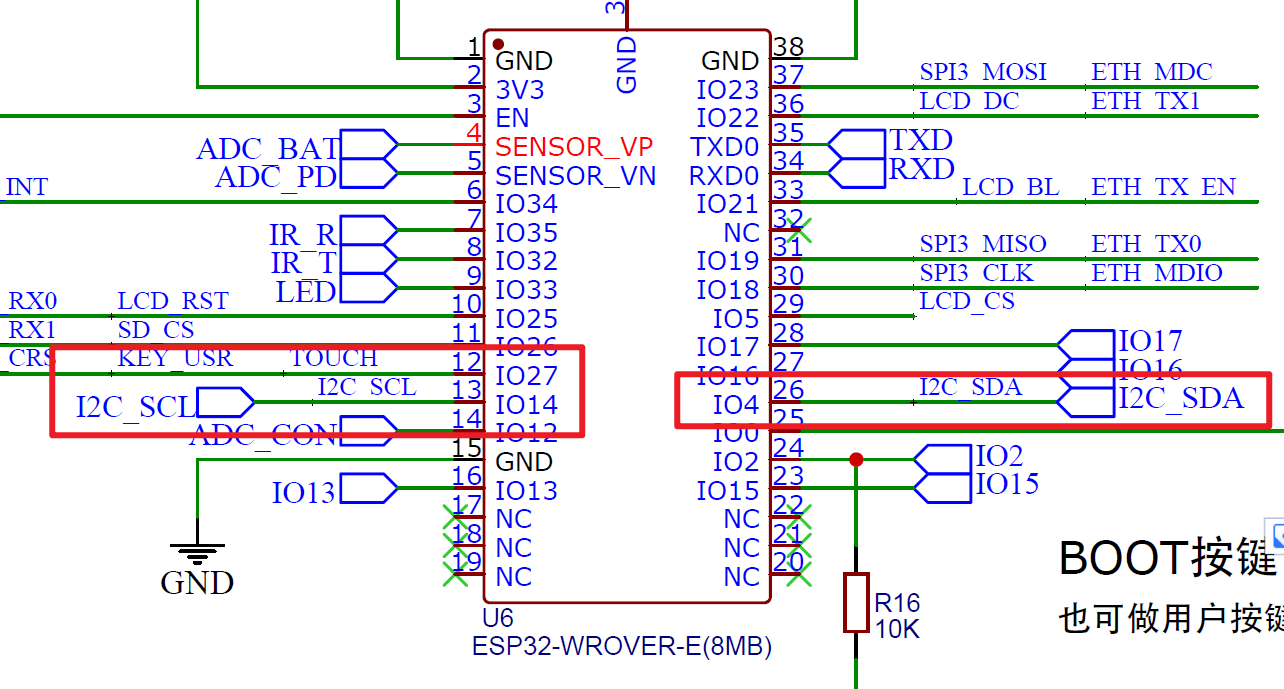
图 单片机I2C部分引脚图
软件
启动I2C
启动Wire库并作为主机或者从机加入总线,这个函数调用一次即可,参数为7位从机地址,不带参数就以主机的形式加入总线。
Wire.begin();
Wire.begin(address);
主设备从从设备请求字节
由主设备向从设备请求字节,之后用available()和read()函数读取字节,第三个参数位为stop,在请求后会发送停止消息,释放I2C总线,否则总线就不会被释放。
Wire.requestFrom(address, quantity);
Wire.requestFrom(address, quantity, stop);
给指定地址的从设备传输数据
给指定地址的从设备传输数据,之后调用write()函数排队传输字节,要通过endTransmission()结束传输。
Wire.beginTransmission(address)endTransmission()有以下几个返回结果:
-
0:成功
-
1:数据太长,无法放入发送缓冲区
-
2:在发送地址时收到 NACK
-
3:在发送数据时收到 NACK
-
4:其他错误
写数据
向从设备写入数据,在调用 beginTransmission() 和 endTransmission() 之间。
Wire.write(value)
Wire.write(string)
Wire.write(data, length)
举个例子
#include <Wire.h>
byte val = 0;

void setup()
{
  Wire.begin(); // join i2c bus
}

void loop()
{
  Wire.beginTransmission(44); // transmit to device #44 (0x2c)
                 // device address is specified in datasheet
  Wire.write(val);       // sends value byte
  Wire.endTransmission();    // stop transmitting

  val++;        // increment value
  if(val == 64)      // if reached 64th position (max)
  {
    val = 0;    // start over from lowest value
  }
  delay(500);
}
读数据
调用requestFrom()后从从设备读取数据。
Wire.read()举个例子
#include <Wire.h>

void setup(){
  Wire.begin();        // join i2c bus (address optional for master)
  Serial.begin(9600);  // start serial for output
}

void loop(){
  Wire.requestFrom(2, 6);    // request 6 bytes from slave device #2

  while(Wire.available())    // slave may send less than requested
  {
      char c = Wire.read();    // receive a byte as character
      Serial.print(c);         // print the character
  }

  delay(500);
}
还有其它一些函数,例如修改时钟频率等等,大家用到的时候自行了解一下。
完整程序
这里我们用一个例子来演示一下,I2C启动之后,我们开始扫描总线上存在的设备,并通过串口打印结果出来,我在I2C下面接了一个OLED的设备。
#include "Wire.h"

void setup()
{
  Serial.begin(115200);
  Serial.println();
  Serial.println("Scanning for I2C Devices ...");
  Serial.print("\r\n");

    int I2CDevices = 0;
    byte address;

  Wire.begin();
  for (address = 1; address < 127; address++)
  {
    Wire.beginTransmission(address);
        if (Wire.endTransmission() == 0) //发送成功
    {
      Serial.print("Found I2C Device: ");
      Serial.print(" (0x");

            if (address < 16)
      {
        Serial.print("0");
      }
      Serial.print(address, HEX);
      Serial.println(")");
      I2CDevices++;
    }
  }

    if (I2CDevices == 0)
  {
    Serial.println("没有发现I2C设备!\n");
  }
    else
  {
    Serial.print("发现了");
    Serial.print(I2CDevices);
    Serial.println("个I2C设备!\n");
  }
}

void loop()
{
}Wire.endTransmission()返回0,代表这个地址通信成功,我们就认为总线上存在这个地址的设备。
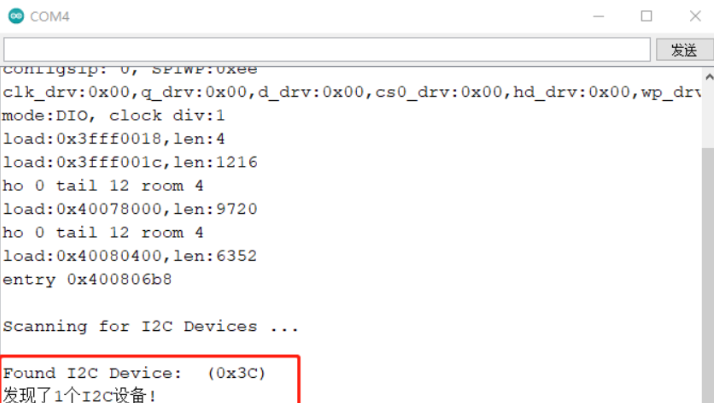
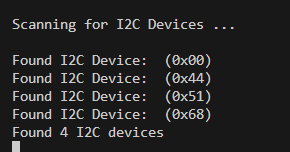
由于我当前做的项目I2C总线上挂载了3个IC,因此共发现3个I2C设备(0x00 是主机):
ESP32使用PCF8563时钟模块进行网络校时(用到 I2C_BM8563 库)
PCF8563 是PHILIPS 公司推出的一款工业级内含I2C总线接口功能的具有极低功耗的多功能时钟/日历芯片。PCF8563 的多种报警功能、定时器功能、时钟输出功能以及中断输出功能能完成各种复杂的定时服务,甚至可为单片机提供看门狗功能。是一款性价比极高的时钟芯片,它已被广泛用于电表、水表、气表、电话、传真机、便携式仪器以及电池供电的仪器仪表等产品领域。

图 PCF8563模块
我们可以看到PCF8563有6个针脚,其中SDA和SCL以及VSS、GND是必要的。细心的同学可能通过上图看到了晶振,对,这个晶振保持这款芯片稳定、准确的走时,配合这个价格,真是良心产品。好下面我们将这四个针脚连接esp32的GPIO口,接线如下:
| 针脚 | ESP对应IO |
|---|---|
| SDA | D21 |
| SCL | D22 |
| VCC | 3V3 |
| GND | GND |
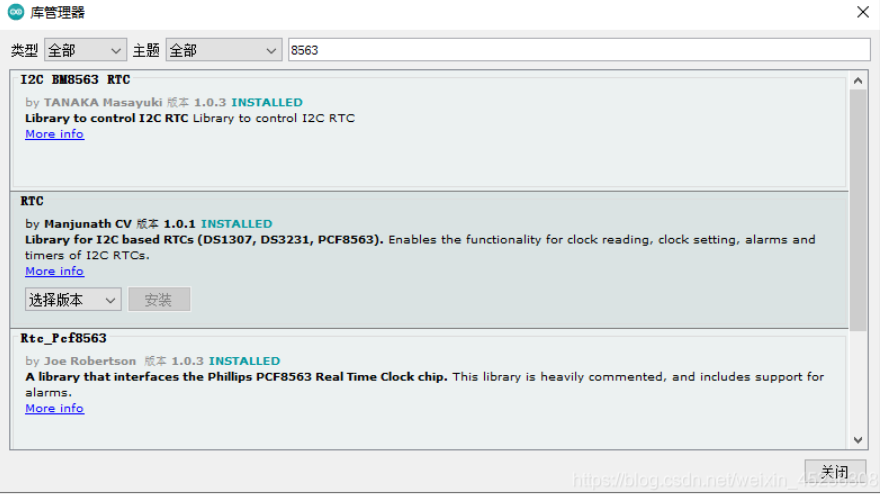
下载Arduino的PCF8563库
这里我们下载I2C_BM8563库:
上代码
下载完成之后我们可以在示例中看到这个时钟模块的各种用法,我将示例代码作了本地化的修改,主要是采用了中国的时区,替换了阿里云的校时服务器,除此以个将校时封闭成了独立函数,下面上代码:
最核心代码:void GetNtpTime()
void GetNtpTime(){ //获取网络校时
  // Connect to an access point
  //WiFi.begin();                 // Connect to the access point of the last connection
  WiFi.begin("SSID", "PASSWD");  // Or, Connect to the specified access point

  Serial.print("Connecting to Wi-Fi ");
  while (WiFi.status() != WL_CONNECTED) {
    delay(500);
    Serial.print(".");
  }
  Serial.println(" CONNECTED");

  // Set ntp time to local
  configTime(8 * 3600, 0, ntpServer);

  // Init I2C
  //Wire1.begin(BM8563_I2C_SDA, BM8563_I2C_SCL);

  // Get local time
  struct tm timeInfo;
  if (getLocalTime(&timeInfo)) {
    // Set RTC time
    I2C_BM8563_TimeTypeDef timeStruct;
    timeStruct.hours   = timeInfo.tm_hour;
    timeStruct.minutes = timeInfo.tm_min;
    timeStruct.seconds = timeInfo.tm_sec;
    rtc.setTime(&timeStruct);

    // Set RTC Date
    I2C_BM8563_DateTypeDef dateStruct;
    dateStruct.weekDay = timeInfo.tm_wday;
    dateStruct.month   = timeInfo.tm_mon + 1;
    dateStruct.date    = timeInfo.tm_mday;
    dateStruct.year    = timeInfo.tm_year + 1900;
    rtc.setDate(&dateStruct);
  }
}
科普:用Arduino编程访问 NTP 服务器设置 ESP32 时间
1)ESP32访问NTP服务器获取时间并更新内部时钟RTC,该功能仅需要核心库(#include"time.h")就可以完成。
2)通用的流程为:连接到本地 wifi,调用 configTime( ) ,然后调用 getLocalTime( &timeInfo ),以获取 timeInfo 结构中的时间。configTime( ) 执行成功后,会将NTP时间存储为系统时间。
3)“每次调用 getLocalTime( &timeInfo ) 时,都会向 NTP 服务器发送一个请求。“的说法是错误的,更可能的流程是: getLocalTime 的调用实际上是根据通过 millis( ) 访问的内部时钟恢复时间。
4)要从 NTP 服务器更新时间,您需要偶尔重新连接到 wifi 并再次调用 configTime(...)。
5)如果ConfigTime() 不成功,那么getLocalTime() 也会不成功。
6)如果不能从NTP获取时间,可以用settimeofday( )手动设置内部时钟,并且可以用getLocalTime()函数获取时间。换句话说,ESP32 有自己的内部实时时钟,可以通过settimeofday( )进行设置,也可以通过 NTP 服务器进行设置。
参考:- ESP-IDF Programming Guide latest documentation
完整的工程代码:
#include "I2C_BM8563.h"
#include <WiFi.h>
// RTC BM8563 I2C port
// I2C pin definition for M5Stick & M5Stick Plus & M5Stack Core2
#define BM8563_I2C_SDA 21
#define BM8563_I2C_SCL 22
I2C_BM8563 rtc(I2C_BM8563_DEFAULT_ADDRESS, Wire1);
const char* ntpServer = "ntp.aliyun.com";
void setup() {
// Init Serial
Serial.begin(115200);
delay(50);
Wire1.begin(BM8563_I2C_SDA, BM8563_I2C_SCL);//开启I2C
// Init RTC
rtc.begin();
GetNtpTime();
}
void loop() {
I2C_BM8563_DateTypeDef dateStruct;
I2C_BM8563_TimeTypeDef timeStruct;
// Get RTC
rtc.getDate(&dateStruct);
rtc.getTime(&timeStruct);
// Print RTC
Serial.printf("%04d/%02d/%02d %02d:%02d:%02d\n",
dateStruct.year,
dateStruct.month,
dateStruct.date,
timeStruct.hours,
timeStruct.minutes,
timeStruct.seconds
);
// Wait
delay(1000);
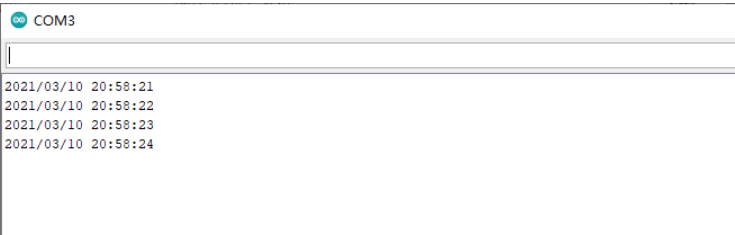
}这段代码先将esp32连上家里的无线路由器(上面的代码中的SSID和PASSWD改成自己家的路由器密码),然后通过阿里云的校时服务器获取中国的日期与时间,并且将这个时间设置到PCF8563时钟芯片中,这样以后我们可以在串口监视器中看到日期与时间:
参考资料:
1.ESP32使用PCF8563时钟模块进行网络校时 https://blog.csdn.net/weixin_45236308/article/details/114646567
2.

 浙公网安备 33010602011771号