1. 什么是服务
-
服务是长期于后台运行的程序,首先它是一个组件,用于执行长期运行的任务,并且与用户没有交互。每一个服务都需要在配置文件 AndroidManifest.xml 文件里面进行申明。
-
申明流程:
使用
<service>标签。通过
Context.startService()来开启服务,通过Context.stop来停止服务。此外,另外一种启动形式就是
Context.bindService()。
2. 为什么使用服务
-
服务用于执行长期后台运行的操作。有些时候,没有界面,但是程序还需要进行。例如音乐播放与后台文件下载。
-
此外,服务还会用于进程。
-
前台进程:最顶部的、和用户直接交互的进程。例如操作的 Activity 界面。
-
可见进程:可见但不可操作的。例如在一个 Activity 的顶部弹出一个 Dialog,这个 Dialog就是前台进程。但是这个 Activity 却是个可见进程。
-
服务进程:忙碌的后台进程。
-
后台进程:不做事的进程。
-
空进程:什么都不做,仅作缓存作用。
假设,内存不够用了,会先杀谁呢?
首先杀的是空进程,要是还不够就杀后台进程,要是还不够,那么就杀服务,但是服务被杀死以后,等内存够用了,服务又会跑起来了。
-
-
所以:如果需要长期后台操作的任务,使用 Service 就对了!
Framework 里多数是服务。如果我们进行音乐播放,即使退到了后台,也可以播放,使用服务完成。如果下载东西,退到后台也能下载,那么就使用服务。如果在不停地记录日志,那就用服务。
如果面试问到:服务用于执行耗时操作,这是对的吗?
如果服务直接执行耗时操作,也会出现 anr.
-
anr 的时长知识。首先 ANR 的意思是android no response,也就是无相应或者理解为操作超时。系统会在应用无法对用户输入响应时显示 ANR。
在任何情况下,都不要在 UI 线程执行耗时任务,取而代之的是创建一个工作线程,在这个线程里操作。这可以保持 UI 线程运行,阻止系统因为代码卡住而结束应用。
在android系统中广播的ANR时长为:
// How long we allow a receiver to run before giving up on it.
// 前台广播为 10 秒
static final int BROADCAST_FG_TIMEOUT = 10*1000;
// 后台广播为 60 秒
static final int BROADCAST_BG_TIMEOUT = 60*1000;
按钮事件的时长为 5 秒,常指的是 Activity 的操作
// How long we wait until we timeout on key dispatching.
// 按钮的时长为 5 秒
static final int KEY_DISPATCHING_TIMEOUT = 5*1000;
而对于服务,也有自己响应的时长:
// How long we wait for a service to finish executing.
// 前台服务为 20 秒超时
static final int SERVICE_TIMEOUT = 20*1000;
// How long we wait for a service to finish executing.
// 后台服务为 200 秒超时
static final int SERVICE_BACKGROUND_TIMEOUT = SERVICE_TIMEOUT * 10;
因此,服务也会触发 ANR 异常。所以如果要做耗时操作,比如说网络的访问,数据库的读写之类的,可以开线程去做。
3. 服务的生命周期
-
首先写一个类继承
android.app.Service,然后实现onBind(Intent intent)方法。(在工程下创建了 services 包,包内定义服务类)代码如下:package com.example.servicedemo.services; import android.content.Intent; import android.os.IBinder; import android.util.Log; import androidx.annotation.Nullable; // 同 Acitivty,Service 也继承自 Context // 服务在后台运行,所以没有 onResume() 和 onPause() 方法 public class FirstService extends android.app.Service { private static final String TAG = FirstService.class.getName(); @Nullable @Override public IBinder onBind(Intent intent) { return null; } @Override public void onCreate() { super.onCreate(); Log.d(TAG, "onCreate..."); } // onStart 已经过时 @Override public int onStartCommand(Intent intent, int flags, int startId) { Log.d(TAG, "onStartCommand..."); return super.onStartCommand(intent, flags, startId); } @Override public void onDestroy() { super.onDestroy(); Log.d(TAG, "onDestory..."); } } -
写一个 Activity 来调用与控制服务,代码如下:
package com.example.servicedemo; import androidx.appcompat.app.AppCompatActivity; import android.content.Intent; import android.os.Bundle; import android.view.View; import com.example.servicedemo.services.FirstService; // Activity 间接继承自 Context public class MainActivity extends AppCompatActivity { @Override protected void onCreate(Bundle savedInstanceState) { super.onCreate(savedInstanceState); setContentView(R.layout.activity_main); } /** * 开启服务 * @param view */ public void startServiceClick(View view){ Intent intent = new Intent(); // 使用 setClass 跳转到其他的 Activity 或者 Service intent.setClass(this, FirstService.class); startService(intent); } /** * 停止服务 * @param view */ public void stopServiceClick(View view){ Intent intent = new Intent(); intent.setClass(this, FirstService.class); stopService(intent); } } -
activity_main.xml 中定义了 Activity 的样式,使用两个按钮进行服务的开启与关闭:
<?xml version="1.0" encoding="utf-8"?> <LinearLayout xmlns:android="http://schemas.android.com/apk/res/android" xmlns:app="http://schemas.android.com/apk/res-auto" xmlns:tools="http://schemas.android.com/tools" android:layout_width="match_parent" android:layout_height="match_parent" tools:context=".MainActivity" android:orientation="vertical"> <Button android:onClick="startServiceClick" android:layout_width="match_parent" android:layout_height="wrap_content" android:text="开启服务"/> <Button android:onClick="stopServiceClick" android:layout_width="match_parent" android:layout_height="wrap_content" android:text="停止服务"/> </LinearLayout> -
在 AndroidManifest.xml 中注册服务:
<service android:name=".service.FirstService"></service> -
结果如下:
-
第一次开启服务:
![image-20220118171028265]()
-
第二次开启服务:
![image-20220118171118307]()
-
停止服务:
![image-20220118171153907]()
-
4. 调用服务内部的方法
-
不可以直接通过 new 一个实例来调用服务内的方法。
/** * 不可以通过这种方式直接调用服务内的方法。 * 首先如果 Android 是通过一个 main() 方法来启动程序,那么我们就可以在里面执行例如 new 一个 Activity 等操作。 * Android 的应用模型是基于组件的应用设计模式,组件能够运行需要一个完整的工程环境。 * 同时,各个组件拥有自己独立的场景 (Context),并不能采用 new 的方式创建一个组件对象。 * 而服务 Service 恰恰是继承于 Context,所以不能用 new 的方式。 * Context 可以理解为用户与操作系统交互的一个过程,是一个抽象类 * @param view */ // public void callServiceMethod(View view){ // Log.d(TAG, "call Service inner method"); // FirstService firstService = new FirstService(); // firstService.sayHello(); // } -
因此,正确的步骤应该是:
-
在继承 Service 的类中自定义一个 binder 类,该类继承类 Binder。
-
在此类中,可以定义一些方法来调用服务中一些方法。
-
重写
onBind(Intent intent),返回自定义的 Binder 类,当服务绑定时调用。 -
在 Activity 中调用
bindService()绑定服务,此时还需要创建 ServiceConnection。 -
创建连接,重写
onServiceConnected()和onServiceDisconnected()方法,其中在onServiceConnected()方法中取出 binder(强转成自己定义的 binder 类),在onServiceDisconnected()中将其置为空值以释放资源。但是直接创建变量实现方法的连接类不要在unbindService()中置为空,否则在解绑后不能再次绑定服务。如果创建的是一个连接类,实现 ServiceConnection 的接口。那么在
bindService()的时候要实例化该类并调用,同时在unbindService()的时候尽量将连接类的实例置为空以释放资源让系统回收。 -
利用取出的 binder 来调用服务内的方法。
-
-
具体的代码如下:
-
自定义 binder 类和服务内中的方法:
/** * 继承 binder 类,在这里面实现服务内部的方法调用 */ public class InnerBinder extends Binder{ /** * 定义一个调用服务的内部方法 */ public void callServiceInnerMethod(){ sayHello(); } } /** * 服务内的方法 */ private void sayHello(){ Toast.makeText(this, "hello",Toast.LENGTH_SHORT).show(); } -
重写
onBind()@Nullable @Override // 返回于服务通信的通道,这里是自定义类,继承了 Binder(也继承于 IBinder)的 InnerBinder // 当被绑定时执行 public IBinder onBind(Intent intent) { Log.d(TAG, "onBind..."); return new InnerBinder(); } -
绑定服务与解绑服务
/** * 绑定服务 * @param view */ public void bindServiceClick(View view){ Intent intent = new Intent(); intent.setClass(this, FirstService.class); // 当绑定存在时其会自动创建服务(此时就可以不用自己再开启服务) // 绑定服务时需要创建一个连接(ServiceConnection) mIsServiceBinded = bindService(intent, mConnection, BIND_AUTO_CREATE); } /** * 解绑服务 */ public void unbindServiceClick(View view){ if (mConnection != null) { unbindService(mConnection); } } -
创建连接给绑定服务用:
private ServiceConnection mConnection = new ServiceConnection() { /** * 当连接成功时调用该方法 * @param name * @param service */ @Override public void onServiceConnected(ComponentName name, IBinder service) { Log.d(TAG, "onServiceConnected..."); // 进行强转,转成自己定义的绑定器,取出绑定器。 mRemoteBinder = (FirstService.InnerBinder) service; } /** * 当连接断开时调用该方法(也就是解绑时调用) * @param name */ @Override public void onServiceDisconnected(ComponentName name) { Log.d(TAG, "onServiceDisconnected..."); // 将其变成空以释放资源 mRemoteBinder = null; } }; -
调用服务内方法:
/** * 经过绑定,创建连接后调用该方法。 * @param view */ public void callServiceMethod(View view){ Log.d(TAG, "call service inner method"); mRemoteBinder.callServiceInnerMethod(); } -
UI
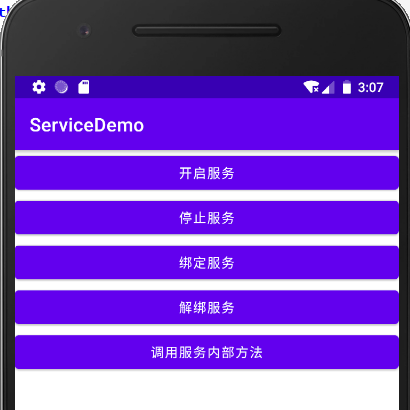
<?xml version="1.0" encoding="utf-8"?> <LinearLayout xmlns:android="http://schemas.android.com/apk/res/android" xmlns:app="http://schemas.android.com/apk/res-auto" xmlns:tools="http://schemas.android.com/tools" android:layout_width="match_parent" android:layout_height="match_parent" tools:context=".MainActivity" android:orientation="vertical"> <Button android:onClick="startServiceClick" android:layout_width="match_parent" android:layout_height="wrap_content" android:text="开启服务"/> <Button android:onClick="stopServiceClick" android:layout_width="match_parent" android:layout_height="wrap_content" android:text="停止服务"/> <Button android:onClick="bindServiceClick" android:layout_width="match_parent" android:layout_height="wrap_content" android:text="绑定服务"/> <Button android:onClick="unbindServiceClick" android:layout_width="match_parent" android:layout_height="wrap_content" android:text="解绑服务"/> <Button android:onClick="callServiceMethod" android:layout_width="match_parent" android:layout_height="wrap_content" android:text="调用服务内部方法"/> </LinearLayout> -
运行结果
UI图:
![image-20220118230730294]()
绑定服务:
![image-20220118230827571]()
调用方法:
![image-20220118230900509]()
注意:只有当程序调用
startService()才会自动调用onStartCommand()。因此通过绑定器绑定并自动开启服务是不会调用该方法
-
5. 两种开启服务的方式的区别
- 第一点:通过
startService()创建的服务是长期运行的,只有通过调用stopService()方法才会停止服务。而bindService()启动服务,不用的时候需要调用unbindService(),否则会导致内存泄漏(虽然实验过直接退出后并不会,可能是由于 Android 版本较高的原因,因此当 Activity 销毁时,自动解绑)并且通过绑定开启服务后,调用unbindService()后会立即调用stopService(),这也就是为什么绑定服务不能长久运行。 - 第二点:
startService()来启动服务可以长期运行,但是不能和服务内的属性和方法通讯。而通过bindService()方法创建的服务可以。
6. 通过接口隐藏服务内部部分方法和方法的实现
-
定义一个接口,在该接口中定义对外可以使用的方法:
package com.example.servicedemo.Interfaces; public interface ICommunication { void callServiceInnerMethod(); } -
将上文中自定义的 binder 类私有化,继承接口并实现接口中的方法:
/** * 继承 binder 类,在这里面实现服务内部的方法调用 * 将类私有化,隐藏方法,通过调用接口 */ private class InnerBinder extends Binder implements ICommunication { /** * 实例化接口中的方法,在该方法中调用服务的私有方法 */ public void callServiceInnerMethod(){ sayHello(); } } -
将前文的代码中取出的 binder(mRemoteBinder) 改成接口的引用。:
/** * 当连接成功时调用该方法 * @param name * @param service */ @Override public void onServiceConnected(ComponentName name, IBinder service) { Log.d(TAG, "onServiceConnected..."); // 这里的 service 来自于 {@link #FirstService.onBind()} 的返回值 // 接口中,可以使用接口类型的引用指向一个实现了该接口的对象,并且可以调用这个接口中的方法。(JAVA 的多态) // 此处的 service 就是实现了该接口的对象(自定义 InnerBinder() 的对象) // 这里就是通过系统的方法返回自己私有的,隐藏的类,同时还能取出其中的方法并调用。 mICommunication = (ICommunication) service; } -
内部方法的调用:
    /**
     * 经过绑定,创建连接后调用该方法。
     * @param view
     */
    public void callServiceMethod(View view){
        Log.d(TAG, "call service inner method");
        // 这里体现了私有的隐蔽性,无法调用自定义私有类中的,未在接口中定义的方法。
        mICommunication.callServiceInnerMethod();
    }
7. 银行服务例子(缺少)
-
首先创建三种接口,这三种接口分别为 INormalUserAction、IBankWorkerAction、IBankBossAction。这三个接口可以放在一个名为 Interfaces 的 Package 文件夹中(自己创建)。
INormalUserAction:
package com.example.bankservice.actions.Interfaces;

public interface INormalUserAction {
    // 存钱
    void saveMoney(float money);

    // 取钱
    float getMoney();

    // 贷款
    float loan();
}
IBankWorkerAction:
package com.example.bankservice.actions.Interfaces;

public interface IBankWorkerAction extends INormalUserAction{
    // 查用户的信用
    void checkUserCredit();

    // 冻结用户账号
    void freezeUserAccount();
}
IBankBossAction:
package com.example.bankservice.actions.Interfaces; public interface IBankBossAction extends IBankWorkerAction{ // 修改用户金额 void modifyUserDeposit(); } -
接口创建后,就要实现接口中的方法。创建名为 impl 的 package,里面存放着三个接口实现类--NormalUserActionImpl、BankWorkerActionImpl、BankBossActionImpl;
由于类的多态性,这个接口我认为可以算作 Impl 的父类(
这些接口都继承了 Binder,因此都是 Binder。
NormalUserActionImpl:
package com.example.bankservice.actions.impl; import android.os.Binder; import android.util.Log; import com.example.bankservice.actions.Interfaces.INormalUserAction; // 这里的 Impl 就类比于自己定义的 binder public class NormalUserActionImpl extends Binder implements INormalUserAction { private static final String TAG = "NormalUserActionImpl"; @Override public void saveMoney(float money) { Log.d(TAG, "saveMoney --> " + money); } @Override public float getMoney() { Log.d(TAG, "getMoney --> " + 100.00); return 100.00f; } @Override public float loan() { Log.d(TAG, "loanMoney --> " + 100.00); return 100.00f; } } -
这里设置服务为隐式服务(即服务也类似于意图一样,分显式和隐式启动)。在 AndroidManifest.xml 中注册设置。
AndroidManifest.xml 中注册:
<service android:name=".BankServices" android:exported="true"> <intent-filter> <action android:name="com.example.bankservice.ACTION_NORMAL_USER" /> <category android:name="android.intent.category.DEFAULT" /> </intent-filter> <intent-filter> <action android:name="com.example.bankservice.ACTION_BANK_WORKER" /> <category android:name="android.intent.category.DEFAULT" /> </intent-filter> <intent-filter> <action android:name="com.example.bankservice.ACTION_BANK_BOSS" /> <category android:name="android.intent.category.DEFAULT" /> </intent-filter> </service> -
创建服务类,重写
onBind(Intent intent):public class BankServices extends Service { @Nullable @Override public IBinder onBind(Intent intent) { String action = intent.getAction(); if(!TextUtils.isEmpty(action)){ // 这里的 Impl 就类比于自己定义的 binder if (ServicesConstants.ACTION_NORMAL_USER.equals(action)) { return new NormalUserActionImpl(); } else if(ServicesConstants.ACTION_BANK_WORKER.equals(action)){ return new BankWorkerActionImpl(); } else if(ServicesConstants.ACTION_BANK_BOSS.equals(action)){ return new BankBossActionImpl(); } } return null; } } -
为每个接口的实现创建一个界面,从而操作各自的方法。名字为 NormalUserActivity、BankWorkerActivity、BankBossActivity
NormalUserActivity:
package com.example.bankservice.Activities; import androidx.appcompat.app.AppCompatActivity; import android.content.ComponentName; import android.content.Intent; import android.content.ServiceConnection; import android.os.Bundle; import android.os.IBinder; import android.util.Log; import android.view.View; import com.example.bankservice.R; import com.example.bankservice.ServicesConstants; import com.example.bankservice.actions.Interfaces.INormalUserAction; public class NormalUserActivity extends AppCompatActivity { private static final String TAG = "NormalUserActivity"; private NormalUserConnection mNormalUserConnection; private boolean mIsBind; private INormalUserAction mINormalUserAction; @Override protected void onCreate(Bundle savedInstanceState) { super.onCreate(savedInstanceState); setContentView(R.layout.activity_normal_user); bindUserService(); } /** * 绑定用户能获得的服务 */ private void bindUserService() { Log.d(TAG, "bindUserService..."); Intent intent = new Intent(); // 通过隐式服务 // 通过设置 action 表示身份和调用对应的 Impl intent.setAction(ServicesConstants.ACTION_NORMAL_USER); intent.addCategory(Intent.CATEGORY_DEFAULT); // Android 5.0 以后服务意图必须事显示声明,这是为了防止冲突(例如有多个 Service 用同样的 intent-filter) // 要么通过显式意图启动 Service,要么添加包名 intent.setPackage(getPackageName()); mNormalUserConnection = new NormalUserConnection(); // 通过 bindService() 隐式启动服务 mIsBind = bindService(intent, mNormalUserConnection, BIND_AUTO_CREATE); } private class NormalUserConnection implements ServiceConnection{ @Override public void onServiceConnected(ComponentName name, IBinder service) { Log.d(TAG, "onServiceConnected..." + name); if(service instanceof INormalUserAction){ mINormalUserAction = (INormalUserAction) service; } } @Override public void onServiceDisconnected(ComponentName name) { Log.d(TAG, "onServiceDisconnected..." + name); } } public void saveMoneyClick(View view){ Log.d(TAG, "saveMoneyClick..."); mINormalUserAction.saveMoney(500.00f); } public void getMoneyClick(View view){ Log.d(TAG, "getMoneyClick..."); mINormalUserAction.getMoney(); } public void loanMoneyClick(View view){ Log.d(TAG, "loanMoneyClick..."); mINormalUserAction.loan(); } @Override protected void onDestroy() { super.onDestroy(); // 如果已经绑定了且已经建立的服务的连接 if(mIsBind && mNormalUserConnection != null){ unbindService(mNormalUserConnection); Log.d(TAG, "服务已经解绑"); mNormalUserConnection = null; mIsBind = false; } } } -
常量的配置:
package com.example.bankservice; public class ServicesConstants { public static final String ACTION_NORMAL_USER = "com.example.bankservice.ACTION_NORMAL_USER"; public static final String ACTION_BANK_WORKER = "com.example.bankservice.ACTION_BANK_WORKER"; public static final String ACTION_BANK_BOSS = "com.example.bankservice.ACTION_BANK_BOSS"; } -
MainActivity:
package com.example.bankservice.Activities; import androidx.appcompat.app.AppCompatActivity; import android.content.Intent; import android.os.Bundle; import android.view.View; import com.example.bankservice.R; public class MainActivity extends AppCompatActivity { @Override protected void onCreate(Bundle savedInstanceState) { super.onCreate(savedInstanceState); setContentView(R.layout.activity_main); } public void normalUserClick(View view){ startActivity(new Intent(this, NormalUserActivity.class)); } public void bankWorkerClick(View view) { startActivity(new Intent(this, BankWorkerActivity.class)); } public void bankBossClick(View view) { startActivity(new Intent(this, BankBossActivity.class)); } } -
布局:
由于三者在布局上有重叠(就是三种职责都用到了普通人的内容),因此使用 include 来减少代码量。
用 include 时,注意每个布局文件中最大的 Layout 的 width 和 height 有时不能为 match_parent,否则会造成布局覆盖
先是 include_normal_user_action_layout.xml:
<?xml version="1.0" encoding="utf-8"?>
<LinearLayout xmlns:android="http://schemas.android.com/apk/res/android"
    xmlns:app="http://schemas.android.com/apk/res-auto"
    xmlns:tools="http://schemas.android.com/tools"
    android:layout_width="match_parent"
    android:layout_height="wrap_content"
    tools:context=".Activities.NormalUserActivity"
    android:orientation="vertical">

    <Button
        android:layout_width="match_parent"
        android:layout_height="wrap_content"
        android:text="存款"
        android:onClick="saveMoneyClick"/>

    <Button
        android:layout_width="match_parent"
        android:layout_height="wrap_content"
        android:text="取钱"
        android:onClick="getMoneyClick"/>

    <Button
        android:layout_width="match_parent"
        android:layout_height="wrap_content"
        android:text="贷款"
        android:onClick="loanMoneyClick"/>

</LinearLayout>
接着就是 include_bank_worker_action_layout.xml:
<?xml version="1.0" encoding="utf-8"?>
<LinearLayout xmlns:android="http://schemas.android.com/apk/res/android"
    xmlns:app="http://schemas.android.com/apk/res-auto"
    xmlns:tools="http://schemas.android.com/tools"
    android:layout_width="match_parent"
    android:layout_height="wrap_content"
    tools:context=".Activities.NormalUserActivity"
    android:orientation="vertical">

    <Button
        android:layout_width="match_parent"
        android:layout_height="wrap_content"
        android:text="查询用户信用"
        android:onClick="checkUserCreditClick"/>

    <Button
        android:layout_width="match_parent"
        android:layout_height="wrap_content"
        android:text="冻结用户账号"
        android:onClick="freezeAccountClick"/>

</LinearLayout>
最后就是 include_bank_boss_action_layout.xml:
<?xml version="1.0" encoding="utf-8"?>
<LinearLayout xmlns:android="http://schemas.android.com/apk/res/android"
    xmlns:app="http://schemas.android.com/apk/res-auto"
    xmlns:tools="http://schemas.android.com/tools"
    android:layout_width="match_parent"
    android:layout_height="wrap_content"
    tools:context=".Activities.NormalUserActivity"
    android:orientation="vertical">

    <Button
        android:layout_width="match_parent"
        android:layout_height="wrap_content"
        android:text="修改账户余额"
        android:onClick="modifyAccountMoneyClick"/>

</LinearLayout>
activity_normal_user.xml:
<?xml version="1.0" encoding="utf-8"?>
<LinearLayout xmlns:android="http://schemas.android.com/apk/res/android"
    xmlns:app="http://schemas.android.com/apk/res-auto"
    xmlns:tools="http://schemas.android.com/tools"
    android:layout_width="match_parent"
    android:layout_height="match_parent"
    tools:context=".Activities.NormalUserActivity"
    android:orientation="vertical">

    <include layout="@layout/include_normal_user_action_layout"/>

</LinearLayout>
activity_bank_worker:
<?xml version="1.0" encoding="utf-8"?>
<LinearLayout xmlns:android="http://schemas.android.com/apk/res/android"
    android:orientation="vertical"
    android:layout_width="match_parent"
    android:layout_height="match_parent">

    <include layout="@layout/include_normal_user_action_layout"/>
    <include layout="@layout/include_bank_worker_action_layout"/>

</LinearLayout>
activity_bank_boss.xml:
<?xml version="1.0" encoding="utf-8"?>
<LinearLayout xmlns:android="http://schemas.android.com/apk/res/android"
    android:orientation="vertical"
    android:layout_width="match_parent"
    android:layout_height="match_parent">

    <include layout="@layout/include_normal_user_action_layout"/>
    <include layout="@layout/include_bank_worker_action_layout"/>
    <include layout="@layout/include_bank_boss_action_layout"/>

</LinearLayout>
activity_main.xml:
<?xml version="1.0" encoding="utf-8"?>
<LinearLayout
    xmlns:android="http://schemas.android.com/apk/res/android"
    xmlns:app="http://schemas.android.com/apk/res-auto"
    xmlns:tools="http://schemas.android.com/tools"
    android:layout_width="match_parent"
    android:layout_height="match_parent"
    tools:context=".Activities.MainActivity"
    android:orientation="vertical">

    <Button
        android:layout_width="match_parent"
        android:layout_height="wrap_content"
        android:text="普通用户"
        android:onClick="normalUserClick"/>

    <Button
        android:layout_width="match_parent"
        android:layout_height="wrap_content"
        android:text="银行工作人员"
        android:onClick="bankWorkerClick"/>

    <Button
        android:layout_width="match_parent"
        android:layout_height="wrap_content"
        android:text="银行行长"
        android:onClick="bankBossClick"/>

</LinearLayout>
include 在于将一些部件模块化,不会都拥挤在一个 xml 文件中。
8. 支付宝第三方支付界面模拟(服务运用与 AIDL)
1. 梳理
-
先写一个服务类叫 PayService 继承 Service
-
在 AndroidManifest.xml 中注册服务
-
由于是第三方应用调用支付服务,因此需要设置服务的类型为隐式服务
- 设置
<intent-filter> - 添加 action
- 添加 category
- 设置
-
在
onBind()中获取别的意图转移过来的 action,判断动作的类型(getAction()和 action 与 注册的 action 比较,这里需要将注册的 action 设置为常量)。如果相等就表明为第三方支付。 -
onBind()要返回一个 Binder 的具体实现类,然后这个具体实现类实现第三方支付请求动作的接口。在 AIDL 中,接口的Stub就继承自 Binder。因此,这里定义一个请求动作的接口,为 IThirdPartPayAction.aidl。 -
IThirdPartPayAction.aidl 中定义发起支付请求的一些函数。这里为:
void requestPay(String orderInfo, float payMoney, IThirdPartPayResult callback);该方法是发出支付请求,参数为账单信息、金钱数和回调接口(类)。 -
发出支付请求后,支付宝需要对账单进行处理,处理完成后需要调用第三方的回调方法来告知第三方支付已经完成。因此还需要创建一个回调接口,里面包含回调函数。这个回调接口就是 IThirdPartPayResult.aidl。在第三方发起支付时,同时还给支付宝一个实现了回调接口的回调类。告诉程序在支付宝支付完成后应该怎么操作(由支付宝调用回调接口的回调类的方法)。
void onPaySuccess();支付成功时的回调方法void onPayFailed(int errorCode, in String msg);支付失败时的回调方法。支付宝在调用该方法时,会传入支付的失败码和失败信息。 -
在 PayService 中创建发起第三方支付请求接口的实现类 ThirdPartPayImpl。继承 ThirdPartPayAction.Stub。实现发起请求方法
requestPay()的逻辑过程。这里的逻辑过程就是创建支付的界面。通过意图,意图中将第三方调用函数时传入的信息再给传到支付界面并跳转到支付界面。
-
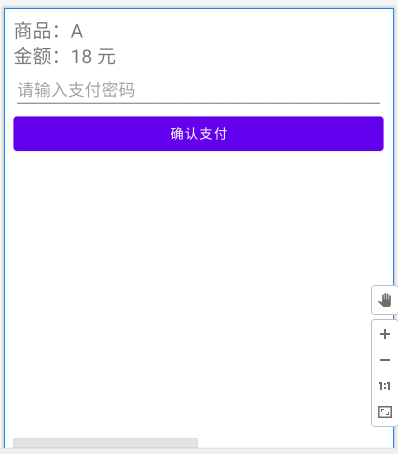
创建第三方支付界面 ThirdPartPayActivity.java,该界面要显示订单信息,订单金额、支付密码和支付按钮。
-
写完第三方支付界面后,回到 ThirdPartPayImpl 中。除了完成第 8 点的任务,其还需要创建方法以实现对回调函数的调用。
-
第三方支付界面 ThirdPartPayActivity.java 也要与服务进行通讯交互,其需要将账号用户密码交给服务让其判断,以及让服务发起网络请求,处理金额问题。
-
因此在 PayService 中,除了第 5 点提到的
onBind()要返回 mThirdPartPayImpl;同时,当不是第三方支付绑定服务,而是自身创建的第三方支付界面需要绑定服务时,还需要返回一个 Binder 的继承类。 -
从而创建 PayAction 类,继承 Binder。实现用户的支付密码加密判断(这里就用简单的逻辑判断)、发起网络请求以处理金额以及支付成功和失败时的方法调用(本质上就是调用回调函数)(也就是
ThirdPartPayImpl.paySuccess() 和 ThirdPartPayImpl.payFailed(errorCode, errorMsg)) -
写完 PayAction 后,接着 11 点,在 ThirdPartPayActivity 中完成按钮事件的处理(也就是获取支付密码、请求服务)
-
到此,支付宝对第三方的处理写完
-
新建项目为 ThirdPartPayClient,该项目用来模拟第三方调用支付的项目。
-
将支付宝中的 AIDL 文件全部拷贝到这个项目中。
-
写一个简易的布局。
-
创建一个方法来绑定支付宝的服务(在现实开发中,这部分由支付宝的 SDK 完成)。
-
创建意图隐式启动服务,然后实现绑定服务和解绑服务。
-
在 ServiceConnection 中,获取到的 IBinder 用
IThirdPartPayAction.Stub.asInterface(service)转成接口。 -
初始化布局内容。
-
完善按钮的事件,创建一个回调函数类,实现 IThirdPartPayResult.aidl 接口。将支付完成和支付失败的两个回调函数实现。然后实例化该类,作为参数传入
requestPay(orderInfo, payMoney, callback)中。
2. 代码
-
隐式服务注册:
<service android:name=".PayService" android:exported="true"> <intent-filter> <action android:name="com.example.alipaysimulator.THIRD_PART_PAY_ACTION" /> <category android:name="android.intent.category.DEFAULT" /> </intent-filter> </service> -
PayService 中的
onBind():@Nullable @Override public IBinder onBind(Intent intent) { String action = intent.getAction(); Log.d(TAG, "onBind ---> action --->" + action); if (action != null && ServiceConstants.THIRD_PART_PAY_ACTION.equals(action)) { // 说明是第三方要求我们支付宝进行支付 mThirdPartPayImpl = new ThirdPartPayImpl(); return mThirdPartPayImpl; } return new PayAction(); } -
IThirdPartPayAcion.aidl & IThirdPartPayResult.aidl:
interface IThirdPartPayAction {
    /**
     * Demonstrates some basic types that you can use as parameters
     * and return values in AIDL.
     */
    void basicTypes(int anInt, long aLong, boolean aBoolean, float aFloat,
            double aDouble, String aString);
    /**
    * 发起支付
    */
    void requestPay(String orderInfo, float payMoney, IThirdPartPayResult callback);

}
interface IThirdPartPayResult { /** * Demonstrates some basic types that you can use as parameters * and return values in AIDL. */ void basicTypes(int anInt, long aLong, boolean aBoolean, float aFloat, double aDouble, String aString); void onPaySuccess(); void onPayFailed(int errorCode,in String msg); } -
ThirdPartPayImpl:
private class ThirdPartPayImpl extends IThirdPartPayAction.Stub{ private IThirdPartPayResult mCallback; @Override public void basicTypes(int anInt, long aLong, boolean aBoolean, float aFloat, double aDouble, String aString) throws RemoteException { } @Override public void requestPay(String orderInfo, float payMoney, IThirdPartPayResult callback) throws RemoteException { this.mCallback = callback; // 第三方应用发起请求,打开一个支付界面 Intent intent = new Intent(); intent.setClass(PayService.this, ThirdPartPayActivity.class); intent.putExtra(ServiceConstants.KEY_BILL_INFO, orderInfo); intent.putExtra(ServiceConstants.KEY_PAY_MONEY, payMoney); // 将 Service 和 ThirdPartPayActivity 跑在不同的任务上(即 activity 要存在于 activity 的栈中, // 而非 activity 的途径启动 activity 时(这里就是通过 service 启动)必然不存在一个 activity 的栈, // 所以要新起一个栈装入启动的 activity) intent.setFlags(Intent.FLAG_ACTIVITY_NEW_TASK); startActivity(intent); } /** * 调用回调函数 */ public void paySuccess(){ try { mCallback.onPaySuccess(); } catch (RemoteException e) { e.printStackTrace(); } } /** * 调用回调函数 */ public void payFailed(int errorCode, String errorMsg){ if (mCallback != null) { try { mCallback.onPayFailed(errorCode, errorMsg); } catch (RemoteException e) { e.printStackTrace(); } } } } -
支付宝内部第三方支付界面的服务绑定,以及 ServiceConnection 的创建:
private void doBindService() { Intent intent = new Intent(this, PayService.class); mIsBind = bindService(intent, mServiceConnection, BIND_AUTO_CREATE); } private ServiceConnection mServiceConnection = new ServiceConnection() { @Override public void onServiceConnected(ComponentName name, IBinder service) { mPayAction = (PayService.PayAction) service; } @Override public void onServiceDisconnected(ComponentName name) { mPayAction = null; } }; -
PayAction:
/** * 用户定义,继承 Binder 并且调用了 ThirdPartPayImpl 的方法 */ public class PayAction extends Binder{ /** * 支付 * @param payMoney 支付金额 */ public void pay(float payMoney){ Log.d(TAG, "pay money is ---> " + payMoney); // 实际支付时,这里需要发起网络请求 if (mThirdPartPayImpl != null) { mThirdPartPayImpl.paySuccess(); } } /** * 用户取消支付 */ public void onUserCancel(){ if (mThirdPartPayImpl != null) { mThirdPartPayImpl.payFailed(1, "user canceled the payment"); Toast.makeText(PayService.this, "取消充值!", Toast.LENGTH_LONG).show(); } } } -
支付界面按钮事件处理:
mCommitBtn.setOnClickListener(new View.OnClickListener() {
    @Override
    public void onClick(View v) {
        // 提交点击了
        String payPassword = mPasswordET.getText().toString().trim();
        if ("123456".equals(payPassword)) {
            mPayAction.pay(mPayMoney);
            Toast.makeText(ThirdPartPayActivity.this, "支付成功!", Toast.LENGTH_LONG).show();
            Log.d(TAG, "pay finished...");
            finish();
        }
        else{
            Toast.makeText(ThirdPartPayActivity.this, "密码错误!", Toast.LENGTH_LONG).show();
        }
    }
});
-
第三方通过隐式服务绑定。
bindAliPayService():/** * 绑定支付宝的服务 */ private void bindAliPayService() { Intent intent = new Intent(); intent.setAction("com.example.alipaysimulator.THIRD_PART_PAY_ACTION"); intent.addCategory(Intent.CATEGORY_DEFAULT); intent.setPackage("com.example.alipaysimulator"); mAliPayServiceConnection = new AliPayServiceConnection(); mIsBind = bindService(intent, mAliPayServiceConnection, BIND_AUTO_CREATE); } private class AliPayServiceConnection implements ServiceConnection{ @Override public void onServiceConnected(ComponentName name, IBinder service) { Log.d(TAG, "onServiceConnected..." + service); mIThirdPartPayAction = IThirdPartPayAction.Stub.asInterface(service); } @Override public void onServiceDisconnected(ComponentName name) { Log.d(TAG, "onServiceDisconnected..."); } }解绑:
@Override protected void onDestroy() { super.onDestroy(); if (mIsBind && mAliPayServiceConnection != null) { Log.d(TAG, "release the mAliPayServiceConnection..."); unbindService(mAliPayServiceConnection); mAliPayServiceConnection = null; mIsBind = false; } } -
第三方触发支付界面的按钮:
mRecharge100CoinBtn.setOnClickListener(new View.OnClickListener() { @Override public void onClick(View v) { // 进行充值 try { if (mIThirdPartPayAction != null) { PayCallback payCallback = new PayCallback(); mIThirdPartPayAction.requestPay("充值 100 币", 100.00f, payCallback); } } catch (RemoteException e) { e.printStackTrace(); } } }); -
回调类 PayCallback 的定义:
private class PayCallback extends IThirdPartPayResult.Stub {
    @Override
    public void basicTypes(int anInt, long aLong, boolean aBoolean, float aFloat, double aDouble, String aStri
    }

    /**
     * 支付成功时,修改 UI 上的内容
     * 实际操作中是和服务器交互,修改数据库。实际上是支付宝通过回调的 url,通知第三方的服务器支付成功。
     * @throws RemoteException
     */
    @Override
    public void onPaySuccess() throws RemoteException {
        Log.d(TAG, "支付成功...");
        mCoinCountViewTv.setText("100");
    }

    @Override
    public void onPayFailed(int errorCode, String msg) throws RemoteException {
        Log.d(TAG, "error code is --> " + errorCode + "error msg is ---> " + msg);
    }
}
3. 完整代码
-
PayService.java:
package com.example.alipaysimulator; import android.app.Service; import android.content.Intent; import android.os.Binder; import android.os.IBinder; import android.os.RemoteException; import android.util.Log; import android.widget.Toast; import androidx.annotation.Nullable; public class PayService extends Service { private static final String TAG = "PayService"; private ThirdPartPayImpl mThirdPartPayImpl; @Nullable @Override public IBinder onBind(Intent intent) { String action = intent.getAction(); Log.d(TAG, "onBind ---> action --->" + action); if (action != null && ServiceConstants.THIRD_PART_PAY_ACTION.equals(action)) { // 说明是第三方要求我们支付宝进行支付 mThirdPartPayImpl = new ThirdPartPayImpl(); return mThirdPartPayImpl; } return new PayAction(); } /** * 用户定义,继承 Binder 并且调用了 ThirdPartPayImpl 的方法 */ public class PayAction extends Binder{ /** * 支付 * @param payMoney 支付金额 */ public void pay(float payMoney){ Log.d(TAG, "pay money is ---> " + payMoney); // 实际支付时,这里需要发起网络请求 if (mThirdPartPayImpl != null) { mThirdPartPayImpl.paySuccess(); } } /** * 用户取消支付 */ public void onUserCancel(){ if (mThirdPartPayImpl != null) { mThirdPartPayImpl.payFailed(1, "user canceled the payment"); Toast.makeText(PayService.this, "取消充值!", Toast.LENGTH_LONG).show(); } } } private class ThirdPartPayImpl extends IThirdPartPayAction.Stub{ private IThirdPartPayResult mCallback; @Override public void basicTypes(int anInt, long aLong, boolean aBoolean, float aFloat, double aDouble, String aString) throws RemoteException { } @Override public void requestPay(String orderInfo, float payMoney, IThirdPartPayResult callback) throws RemoteException { this.mCallback = callback; // 第三方应用发起请求,打开一个支付界面 Intent intent = new Intent(); intent.setClass(PayService.this, ThirdPartPayActivity.class); intent.putExtra(ServiceConstants.KEY_BILL_INFO, orderInfo); intent.putExtra(ServiceConstants.KEY_PAY_MONEY, payMoney); // 将 Service 和 ThirdPartPayActivity 跑在不同的任务上(即 activity 要存在于 activity 的栈中, // 而非 activity 的途径启动 activity 时(这里就是通过 service 启动)必然不存在一个 activity 的栈, // 所以要新起一个栈装入启动的 activity) intent.setFlags(Intent.FLAG_ACTIVITY_NEW_TASK); startActivity(intent); } /** * 调用回调函数 */ public void paySuccess(){ try { mCallback.onPaySuccess(); } catch (RemoteException e) { e.printStackTrace(); } } /** * 调用回调函数 */ public void payFailed(int errorCode, String errorMsg){ if (mCallback != null) { try { mCallback.onPayFailed(errorCode, errorMsg); } catch (RemoteException e) { e.printStackTrace(); } } } } } -
ThirdPartPayActivity.java:
package com.example.alipaysimulator; import androidx.appcompat.app.AppCompatActivity; import android.content.ComponentName; import android.content.Intent; import android.content.ServiceConnection; import android.nfc.Tag; import android.os.Bundle; import android.os.IBinder; import android.util.Log; import android.view.View; import android.widget.Button; import android.widget.EditText; import android.widget.TextView; import android.widget.Toast; public class ThirdPartPayActivity extends AppCompatActivity { private static final String TAG = "ThirdPartPayActivity"; private boolean mIsBind; private TextView mOrderIntoTV; private TextView mPayMoneyTV; private EditText mPasswordET; private Button mCommitBtn; private PayService.PayAction mPayAction; private float mPayMoney; private String mOrderInfo; @Override protected void onCreate(Bundle savedInstanceState) { super.onCreate(savedInstanceState); setContentView(R.layout.activity_third_part_pay); // 因为 Activity 也要和服务进行通讯,告诉服务支付结果,所以也要绑定服务 doBindService(); // 取得数据 Intent intent = getIntent(); mOrderInfo = intent.getStringExtra(ServiceConstants.KEY_BILL_INFO); mPayMoney = intent.getFloatExtra(ServiceConstants.KEY_PAY_MONEY, 0); // 控件获取 initView(); mOrderIntoTV.setText("支付信息:" + mOrderInfo); mPayMoneyTV.setText("支付金额" + mPayMoney + "元"); } private void initView() { mOrderIntoTV = this.findViewById(R.id.order_info_tv); mPayMoneyTV = this.findViewById(R.id.pay_money_tv); mPasswordET = this.findViewById(R.id.pay_password_input); mCommitBtn = this.findViewById(R.id.pay_commit); mCommitBtn.setOnClickListener(new View.OnClickListener() { @Override public void onClick(View v) { // 提交点击了 String payPassword = mPasswordET.getText().toString().trim(); if ("123456".equals(payPassword)) { mPayAction.pay(mPayMoney); Toast.makeText(ThirdPartPayActivity.this, "支付成功!", Toast.LENGTH_LONG).show(); Log.d(TAG, "pay finished..."); finish(); } else{ Toast.makeText(ThirdPartPayActivity.this, "密码错误!", Toast.LENGTH_LONG).show(); } } }); } /** * Called when the activity has detected the user's press of the back key * 当用户点击返回按钮,即退出支付界面时。 */ @Override public void onBackPressed() { super.onBackPressed(); mPayAction.onUserCancel(); } private void doBindService() { Intent intent = new Intent(this, PayService.class); mIsBind = bindService(intent, mServiceConnection, BIND_AUTO_CREATE); } private ServiceConnection mServiceConnection = new ServiceConnection() { @Override public void onServiceConnected(ComponentName name, IBinder service) { mPayAction = (PayService.PayAction) service; } @Override public void onServiceDisconnected(ComponentName name) { mPayAction = null; } }; @Override protected void onDestroy() { super.onDestroy(); if (mIsBind && mServiceConnection != null) { unbindService(mServiceConnection); mIsBind = false; mServiceConnection = null; } } } -
IThirdPartPayAction.aidl:
// IThirdPartPayAction.aidl
package com.example.alipaysimulator;
import com.example.alipaysimulator.IThirdPartPayResult;

// Declare any non-default types here with import statements

interface IThirdPartPayAction {
    /**
     * Demonstrates some basic types that you can use as parameters
     * and return values in AIDL.
     */
    void basicTypes(int anInt, long aLong, boolean aBoolean, float aFloat,
            double aDouble, String aString);
    /**
    * 发起支付
    */
    void requestPay(String orderInfo, float payMoney, IThirdPartPayResult callback);

}
IThirdPartPayResult.aidl:
// IThirdPartPayResult.aidl package com.example.alipaysimulator; // Declare any non-default types here with import statements interface IThirdPartPayResult { /** * Demonstrates some basic types that you can use as parameters * and return values in AIDL. */ void basicTypes(int anInt, long aLong, boolean aBoolean, float aFloat, double aDouble, String aString); void onPaySuccess(); void onPayFailed(int errorCode,in String msg); } -
activity_third_part_pay.xml:
<?xml version="1.0" encoding="utf-8"?> <LinearLayout xmlns:android="http://schemas.android.com/apk/res/android" xmlns:app="http://schemas.android.com/apk/res-auto" xmlns:tools="http://schemas.android.com/tools" android:layout_width="match_parent" android:layout_height="match_parent" tools:context=".ThirdPartPayActivity" android:orientation="vertical" android:padding="10dp"> <TextView android:id="@+id/order_info_tv" android:layout_width="match_parent" android:layout_height="wrap_content" android:text="商品:A" android:textSize="20sp"/> <TextView android:id="@+id/pay_money_tv" android:layout_width="match_parent" android:layout_height="wrap_content" android:text="金额:18 元" android:textSize="20sp"/> <EditText android:id="@+id/pay_password_input" android:layout_width="match_parent" android:layout_height="wrap_content" android:hint="请输入支付密码" android:inputType="numberPassword"/> <Button android:id="@+id/pay_commit" android:layout_width="match_parent" android:layout_height="wrap_content" android:text="确认支付"/> </LinearLayout>![image-20220127164824485]()
-
ThirdPartPayClient.MainActivty.java:
package com.example.thirdpartpayclient; import androidx.appcompat.app.AppCompatActivity; import android.content.ComponentName; import android.content.Intent; import android.content.ServiceConnection; import android.os.Bundle; import android.os.IBinder; import android.os.RemoteException; import android.util.Log; import android.view.View; import android.widget.Button; import android.widget.TextView; import android.widget.Toast; import com.example.alipaysimulator.IThirdPartPayAction; import com.example.alipaysimulator.IThirdPartPayResult; public class MainActivity extends AppCompatActivity { private static final String TAG = "MainActivity"; private TextView mCoinCountViewTv; private Button mRecharge100CoinBtn; private AliPayServiceConnection mAliPayServiceConnection; private boolean mIsBind; private IThirdPartPayAction mIThirdPartPayAction; @Override protected void onCreate(Bundle savedInstanceState) { super.onCreate(savedInstanceState); setContentView(R.layout.activity_main); // 绑定支付宝的服务,在现实开发中,这部分其实由支付宝的 SDK 完成。 bindAliPayService(); initView(); } /** * 绑定支付宝的服务 */ private void bindAliPayService() { Intent intent = new Intent(); intent.setAction("com.example.alipaysimulator.THIRD_PART_PAY_ACTION"); intent.addCategory(Intent.CATEGORY_DEFAULT); intent.setPackage("com.example.alipaysimulator"); mAliPayServiceConnection = new AliPayServiceConnection(); mIsBind = bindService(intent, mAliPayServiceConnection, BIND_AUTO_CREATE); } private class AliPayServiceConnection implements ServiceConnection{ @Override public void onServiceConnected(ComponentName name, IBinder service) { Log.d(TAG, "onServiceConnected..." + service); mIThirdPartPayAction = IThirdPartPayAction.Stub.asInterface(service); } @Override public void onServiceDisconnected(ComponentName name) { Log.d(TAG, "onServiceDisconnected..."); } } private void initView() { mCoinCountViewTv = this.findViewById(R.id.coin_count_tv); mRecharge100CoinBtn = this.findViewById(R.id.recharge_100_coin_btn); mRecharge100CoinBtn.setOnClickListener(new View.OnClickListener() { @Override public void onClick(View v) { // 进行充值 try { if (mIThirdPartPayAction != null) { PayCallback payCallback = new PayCallback(); mIThirdPartPayAction.requestPay("充值 100 币", 100.00f, payCallback); } } catch (RemoteException e) { e.printStackTrace(); } } }); } private class PayCallback extends IThirdPartPayResult.Stub { @Override public void basicTypes(int anInt, long aLong, boolean aBoolean, float aFloat, double aDouble, String aString) throws RemoteException { } /** * 支付成功时,修改 UI 上的内容 * 实际操作中是和服务器交互,修改数据库。实际上是支付宝通过回调的 url,通知第三方的服务器支付成功。 * @throws RemoteException */ @Override public void onPaySuccess() throws RemoteException { Log.d(TAG, "支付成功..."); mCoinCountViewTv.setText("100"); } @Override public void onPayFailed(int errorCode, String msg) throws RemoteException { Log.d(TAG, "error code is --> " + errorCode + "error msg is ---> " + msg); } } @Override protected void onDestroy() { super.onDestroy(); if (mIsBind && mAliPayServiceConnection != null) { Log.d(TAG, "release the mAliPayServiceConnection..."); unbindService(mAliPayServiceConnection); mAliPayServiceConnection = null; mIsBind = false; } } } -
ThirdPartPayClient.activity_main.xml:
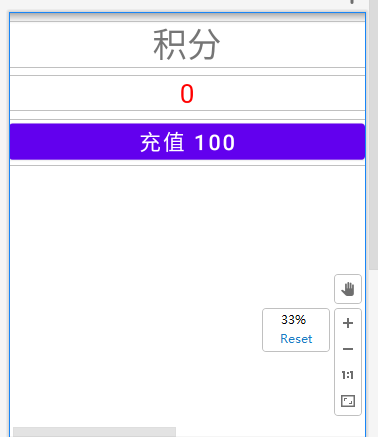
<?xml version="1.0" encoding="utf-8"?> <LinearLayout xmlns:android="http://schemas.android.com/apk/res/android" xmlns:app="http://schemas.android.com/apk/res-auto" xmlns:tools="http://schemas.android.com/tools" android:layout_width="match_parent" android:layout_height="match_parent" tools:context=".MainActivity" android:orientation="vertical"> <TextView android:layout_width="match_parent" android:layout_height="wrap_content" android:text="积分" android:textSize="40sp" android:gravity="center" android:layout_marginTop="10dp"/> <TextView android:id="@+id/coin_count_tv" android:layout_width="match_parent" android:layout_height="wrap_content" android:gravity="center" android:text="0" android:textSize="30sp" android:textColor="#ff0000" android:layout_marginTop="10dp"/> <Button android:id="@+id/recharge_100_coin_btn" android:layout_width="match_parent" android:layout_height="wrap_content" android:text="充值 100" android:textSize="25sp" android:layout_marginTop="10dp"/> </LinearLayout>![image-20220127164921565]()
9. 混合开启服务的生命周期
-
服务的开启方法:
- startService() --> stopService()
- bindService(),如果服务没有启动,则可以设置其为自动启动 --> unBindService()
-
生命周期:
-
最基本的生命周期:
onCreate() --> onStartCommand() --> onDestory()
-
多次启动服务的生命周期,即服务已经创建:
onCreate() -->onStartCommand()(多次执行) --> onDestory()。即 onCreate() 和 onDestory() 成对出现
-
绑定启动生命周期:
onCreate() --> onBind() --> onUnBind() --> onDestory()
-
-
混合开启服务的生命周期
- 如果先开启服务,再绑定服务。未解绑之前,服务无法被停止。
- 开启服务后,多次绑定与解绑服务,服务不会停止,只能通过 stopService() 来停止服务。
-
混合开启服务的方式:
-
开启服务,调用
startService(intent)来启动服务,确保服务能在后台执行。 -
绑定服务,为了能和服务进行通讯。
-
调用服务内部方法。
-
退出 Activity,要记得解绑服务以释放资源。
-
如果不使用服务后,要让服务停止,就要调用
stopService(intent) -
流程:
startService() --> bindService() --> unbindService() --> stopService()
-
10. 模拟音乐播放器(利用混合启动服务)
1. 梳理
-
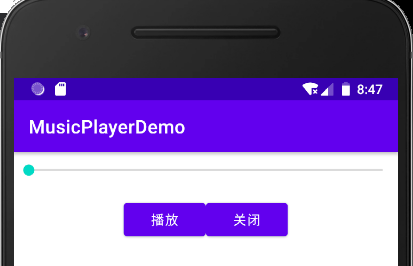
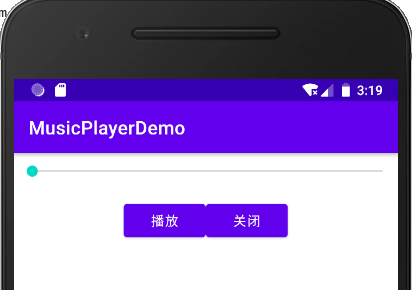
创建 MainActivity,写出音乐播放器的前端布局。
![image-20220129164750406]()
-
定义接口。这里定义两个接口。这两个接口的作用分别为:UI 逻辑的实现(回调接口)和后端播放逻辑的实现。UI 的逻辑实现后,将 UI 的控制权交给服务处理(一些方法是回调)。播放逻辑实现后,前端按钮使用后端的方法。
-
前端 UI 接口:IPlayerViewController。
后端播放逻辑接口:IPlayerControl
-
写一个服务,以便前端代码的编写:PlayerService 继承 Service。
-
回到前端,(Android 版本高于 6.0 要动态申请相关的权限)先初始化控件和控件的相关事件(先空着),然后混合启动服务。
-
在 ServiceConnection 的
onServiceConnected()中,除了获得服务的 binder(也就是后端的播放方法),同时也要将自己 UI 的控制权(包括一些回调的方法,例如执行完播放状态改变的方法后调用 UI 发生变化的回调函数) -
回到第 5 点,完善控件的事件,用取得的 binder 的方法完成事件的逻辑。
-
回到第 3 点,将 UI 的控制接口实现。IPlayerViewController 主要实现的方法就是:
- 后端处理完播放状态的逻辑后,立即调用前端定义的播放状态改变时,按钮发生变化的方法。
- 播放时进度条发生改变的方法
-
回到第 3 点,实现后端的播放逻辑接口。在 PlayerService 类中创建一个类,继承 Binder 并实现 IPlayerControl 的接口。这里由于后端逻辑较长,可以将其抽离出来,创建一个包为 presenter(这个包内专门存放后端逻辑),包内创建 PlayerPresenter 类来继承 Binder 并实现 IPlayerControl 接口。这样在服务中可以直接实例化一个然后返回或者销毁。
-
在 PlayerPresenter 类中实现 IPlayerControl 的方法。包括但不限于播放器的初始化,播放状态的切换和进度条的跳转。注意用变量来表明播放的状态。
-
实现进度条跳转的时候,要注意数值的换算,特别是播放的百分比。
-
进度条播放时,要用计数器 Timer 和 TimerTask 线程来实现。
-
写代码的时候,要多用
Log.d()。以后运行调试的时候方便。 -
在使用某个变量之前尽量要判断是否为空,否则出意外的时候容易崩溃。
2. 完整代码
-
activity_main.xml:
<?xml version="1.0" encoding="utf-8"?> <LinearLayout xmlns:android="http://schemas.android.com/apk/res/android" xmlns:app="http://schemas.android.com/apk/res-auto" xmlns:tools="http://schemas.android.com/tools" android:layout_width="match_parent" android:layout_height="match_parent" tools:context=".MainActivity" android:orientation="vertical"> <SeekBar android:id="@+id/music_sb" android:layout_width="match_parent" android:layout_height="wrap_content" android:max="100" android:layout_marginTop="10dp"/> <LinearLayout android:layout_width="match_parent" android:layout_height="wrap_content" android:layout_marginTop="20dp" android:gravity="center" android:orientation="horizontal"> <Button android:id="@+id/play_or_pause_btn" android:layout_width="wrap_content" android:layout_height="wrap_content" android:text="播放"/> <Button android:id="@+id/close_btn" android:layout_width="wrap_content" android:layout_height="wrap_content" android:text="关闭"/> </LinearLayout> </LinearLayout>![image-20220129231923523]()
-
MainActivity:
package com.example.musicplayerdemo; import androidx.appcompat.app.AppCompatActivity; import androidx.core.app.ActivityCompat; import androidx.core.content.ContextCompat; import android.Manifest; import android.app.Activity; import android.content.ComponentName; import android.content.Intent; import android.content.ServiceConnection; import android.content.pm.PackageManager; import android.os.Bundle; import android.os.IBinder; import android.util.Log; import android.view.View; import android.widget.Button; import android.widget.SeekBar; import com.example.Interfaces.IPlayerControl; import com.example.Interfaces.IPlayerViewController; import com.example.Services.PlayerService; public class MainActivity extends AppCompatActivity { private static final String TAG = "MainActivity"; private SeekBar mMusicSB; private Button mCloseBtn; private Button mPlayOrPauseBtn; private PlayerServiceConnection mPlayerServiceConnection; private IPlayerControl mIPlayerControl; private boolean mIsBinded; private boolean isUserTouchProgressBar = false; private static String[] PERMISSIONS_STORAGE = { "android.permission.READ_EXTERNAL_STORAGE", "android.permission.WRITE_EXTERNAL_STORAGE" }; @Override protected void onCreate(Bundle savedInstanceState) { super.onCreate(savedInstanceState); setContentView(R.layout.activity_main); // 初始化控件方法 initView(); // 设置相关的事件 initEvent(); // 动态获取 SD 卡权限 verifyStoragePermissions(); // 先开启服务,然后绑定服务。这样才能混合启动服务 initService(); // 绑定服务 initBindService(); } /** * 在 Android 8.0 以上的版本中,需要对一些权限使用动态获取 */ public void verifyStoragePermissions(){ int permission = ActivityCompat.checkSelfPermission(MainActivity.this, PERMISSIONS_STORAGE[1]); if ((permission != PackageManager.PERMISSION_GRANTED)) { // 没有写的权限,需要申请,此时弹出对话框 ActivityCompat.requestPermissions(MainActivity.this, PERMISSIONS_STORAGE, 1); } } /** * 开启播放的服务 */ private void initService() { Log.d(TAG, "initService..."); startService(new Intent(this, PlayerService.class)); } private void initBindService() { Log.d(TAG, "initBindService..."); Intent intent = new Intent(this, PlayerService.class); mPlayerServiceConnection = new PlayerServiceConnection(); mIsBinded = bindService(intent, mPlayerServiceConnection, BIND_AUTO_CREATE); } private class PlayerServiceConnection implements ServiceConnection { @Override public void onServiceConnected(ComponentName name, IBinder service) { Log.d(TAG, "onServiceConnected..."); mIPlayerControl = (IPlayerControl) service; // 将对 UI 的控制交给服务 mIPlayerControl.registerViewController(mIPlayerViewController); } @Override public void onServiceDisconnected(ComponentName name) { Log.d(TAG, "onServiceDisconnected..."); mIPlayerControl = null; } } private void initEvent() { // 进度条的事件处理 mMusicSB.setOnSeekBarChangeListener(new SeekBar.OnSeekBarChangeListener() { /** * 进度条发生改变时触发事件 * @param seekBar * @param progress * @param fromUser */ @Override public void onProgressChanged(SeekBar seekBar, int progress, boolean fromUser) { } /** * 当用户触摸上去拖动的时候触发事件 * @param seekBar */ @Override public void onStartTrackingTouch(SeekBar seekBar) { isUserTouchProgressBar = true; } /** * 停止拖动,也就是用户从触摸到松开,松开的那一时刻触发的事件 * @param seekBar */ @Override public void onStopTrackingTouch(SeekBar seekBar) { isUserTouchProgressBar = false; int touchProgress = seekBar.getProgress(); Log.d(TAG, "stopTrackingTouch ---> " + touchProgress); if (mIPlayerControl != null) { mIPlayerControl.seekTo(touchProgress); } } }); // 播放与暂停按钮的事件处理 mPlayOrPauseBtn.setOnClickListener(new View.OnClickListener() { @Override public void onClick(View v) { if (mIPlayerControl != null) { mIPlayerControl.playOrPause(); } } }); // 关闭按钮的事件处理 mCloseBtn.setOnClickListener(new View.OnClickListener() { @Override public void onClick(View v) { if (mIPlayerControl != null) { mIPlayerControl.stopPlay(); } } }); } /** * 初始化控件 */ private void initView() { mMusicSB = this.findViewById(R.id.music_sb); mPlayOrPauseBtn = this.findViewById(R.id.play_or_pause_btn); mCloseBtn = this.findViewById(R.id.close_btn); } /** * 界面消除时取消服务绑定 */ @Override protected void onDestroy() { Log.d(TAG, "Activity onDestory..."); super.onDestroy(); if(mPlayerServiceConnection != null && mIsBinded){ Log.d(TAG, "Unbind Service..."); // 释放资源 mIPlayerControl.unRegisterViewController(); unbindService(mPlayerServiceConnection); mIsBinded = false; } } /** * 在 Activity 中实现 UI 更新接口。然后在服务端即可直接调用处理,即将 UI 的控制权交给服务。 * 让服务来决定什么时候调用。 */ private IPlayerViewController mIPlayerViewController = new IPlayerViewController() { @Override public void onPlayerStateChange(int state) { // 根据播放状态修改 UI switch (state){ case IPlayerControl.PLAY_STATE_PLAY: // 播放中要修改按钮显示成暂停 mPlayOrPauseBtn.setText("暂停"); break; case IPlayerControl.PLAY_STATE_PAUSE: case IPlayerControl.PLAY_STATE_STOP: // 同样的,当此时的状态为暂停或者停止时,按钮显示为播放 mPlayOrPauseBtn.setText("播放"); break; } } @Override public void onSeekChange(final int seek) { // 改变播放进度 // 当用户的手触摸到进度条的时候要不更新,否则会有一个抖动的效果。 // 线程是 Timer-0,而不是主线程。但是更新 UI 时没有崩溃。 // 因为在 Android 中,progressBar 和 surfaceView 这两个控件是可以用子进程去更新的 // 所以严格上来说,还需要调用 runOnUiThread 方法 // Log.d(TAG, "current thread --> " + Thread.currentThread().getName()); runOnUiThread(new Runnable() { @Override public void run() { if (!isUserTouchProgressBar) { mMusicSB.setProgress(seek); } } }); } }; } -
IPlayerControl.java:
package com.example.Interfaces; public interface IPlayerControl { // 播放状态 // 播放 static final int PLAY_STATE_PLAY = 1; static final int PLAY_STATE_PAUSE = 2; static final int PLAY_STATE_STOP = 3; /** * 把 UI 的控制接口设置给逻辑层(服务),让逻辑层对其处理 * @param iPlayerViewController */ void registerViewController(IPlayerViewController iPlayerViewController); /** * 释放对 UI 接口通知的注册 */ void unRegisterViewController(); /** * 播放或者暂停音乐 */ void playOrPause(); /** * 停止播放 */ void stopPlay(); /** * 设置播放进度 * @param seek 播放的进度 */ void seekTo(int seek); } -
IPlayerViewController.java:
package com.example.Interfaces; public interface IPlayerViewController { /** * 播放状态的改变 * @param state 状态 */ void onPlayerStateChange(int state); /** * 进度条状态的改变,例如播放的时候进度条要发生改变 * @param seek 进度条状态 */ void onSeekChange(int seek); } -
PlayerService.java:
package com.example.Services; import android.app.Service; import android.content.Intent; import android.os.IBinder; import androidx.annotation.Nullable; import com.example.presenter.PlayerPresenter; public class PlayerService extends Service { private PlayerPresenter mPlayerPresenter; @Override public void onCreate() { super.onCreate(); if (mPlayerPresenter == null) { mPlayerPresenter = new PlayerPresenter(); } } @Nullable @Override public IBinder onBind(Intent intent) { // 当返回为空时,不执行 onServiceConnected() return mPlayerPresenter; } @Override public void onDestroy() { super.onDestroy(); mPlayerPresenter = null; } } -
PlayerPresenter.java:
package com.example.presenter;

import android.Manifest;
import android.content.pm.PackageManager;
import android.media.AudioAttributes;
import android.media.AudioManager;
import android.media.MediaParser;
import android.media.MediaPlayer;
import android.os.Binder;
import android.util.Log;

import androidx.core.content.ContextCompat;

import com.example.Interfaces.IPlayerControl;
import com.example.Interfaces.IPlayerViewController;
import com.example.musicplayerdemo.MainActivity;

import java.io.IOException;
import java.util.Timer;
import java.util.TimerTask;

/**
 * 实现播放器的后端逻辑
 * ctrl + h 查看某个接口的实现
 */
public class PlayerPresenter extends Binder implements IPlayerControl {

    private static final String TAG = "PlayerPresenter";
    private IPlayerViewController mIPlayerViewController;
    private int mCurrentState = IPlayerControl.PLAY_STATE_STOP;
    private MediaPlayer mMediaPlayer;
    private Timer mTimer;
    private SeekTimeTask mTimeTask;

    @Override
    public void registerViewController(IPlayerViewController iPlayerViewController) {
        mIPlayerViewController = iPlayerViewController;
    }

    @Override
    public void unRegisterViewController() {
        mIPlayerViewController = null;
    }


    @Override
    public void playOrPause() {
        Log.d(TAG, "playOrPause...");
        if (mCurrentState == IPlayerControl.PLAY_STATE_STOP) {
            // 一开始的默认状态就是停止状态
            // 创建播放器
            initPlayer();
        }
        else if(mCurrentState == IPlayerControl.PLAY_STATE_PLAY){
            // 如果当前状态是播放,那就暂停
            if (mMediaPlayer != null) {
                mMediaPlayer.pause();
                stopTimer();
                // 注意状态要记得改变
                mCurrentState = IPlayerControl.PLAY_STATE_PAUSE;
            }
        }
        else if(mCurrentState == IPlayerControl.PLAY_STATE_PAUSE){
            // 如果当前的播放状态是暂停,那么就继续播放
            if (mMediaPlayer != null) {
                mMediaPlayer.start();
                startTimer();
                mCurrentState = IPlayerControl.PLAY_STATE_PLAY;
            }
        }
        // 最后别忘了对 UI 界面的更改,在播放状态改变的时候同时要改变 UI
        if (mIPlayerViewController != null) {
            mIPlayerViewController.onPlayerStateChange(mCurrentState);
        }
    }

    private void initPlayer() {
        mMediaPlayer = new MediaPlayer();
        try {
            mMediaPlayer.setDataSource("/mnt/sdcard/Mood.mp3");
            mMediaPlayer.prepare();
            mMediaPlayer.start();
            startTimer();
            mCurrentState = IPlayerControl.PLAY_STATE_PLAY;
        } catch (IOException e) {
            e.printStackTrace();
        }
    }

    @Override
    public void stopPlay() {
        Log.d(TAG, "stopPlay...");
        if (mMediaPlayer != null) {
            mMediaPlayer.stop();
            mCurrentState = IPlayerControl.PLAY_STATE_STOP;
            mMediaPlayer.release();
            // 将播放器的进度清空,间接使得 timeTask 从头开始
            mMediaPlayer = null;
            stopTimer();
        }
        // 同样的,UI 状态也要更新
        if(mIPlayerViewController != null){
            mIPlayerViewController.onPlayerStateChange(mCurrentState);
            mIPlayerViewController.onSeekChange(0);
        }
    }

    @Override
    public void seekTo(int seek) {
        Log.d(TAG, "seekTo ---> " + seek);
        // 在前端,seek 设置其最大值为 100
        // 做转换,得到的 seek 是一个百分比
        if (mMediaPlayer != null) {
            // 百分比数要先 / 100 转换成小数,然后 * 总时长
            int targetSeek = (int)(seek * 1.0f / 100 * mMediaPlayer.getDuration());
            mMediaPlayer.seekTo(targetSeek);
        }
    }

    /**
     * 开启一个 timerTask
     */
    private void startTimer(){
        if (mTimer == null) {
            mTimer = new Timer();
        }
        if (mTimeTask == null) {
            mTimeTask = new SeekTimeTask();
        }
        // 每 500 毫秒(0.5s)执行一次 timeTask
        mTimer.schedule(mTimeTask, 0, 500);
    }

    private void stopTimer(){
        if (mTimer != null) {
            mTimer.cancel();
            mTimer = null;
        }
        if (mTimeTask != null) {
            mTimeTask.cancel();
            mTimeTask = null;
        }
    }

    private class SeekTimeTask extends TimerTask{

        /**
         * 获取当前的播放进度
         */
        @Override
        public void run() {
            if (mMediaPlayer != null && mIPlayerViewController != null) {
                int currentPosition = mMediaPlayer.getCurrentPosition();
//                Log.d(TAG, "current play position..." + mMediaPlayer.getCurrentPosition());
                // 当前位置 / 总长度 * 100 来表示百分数。同一用百分数来设置。
                int cursorPosition = (int)(currentPosition * 100f / mMediaPlayer.getDuration());
                mIPlayerViewController.onSeekChange(cursorPosition);
            }
        }
    }
}





 浙公网安备 33010602011771号