实验环境:
harbor服务器系统:CentOS Linux release 7.5.1804 (Core)
harbor服务器IP:10.1.12.114
harbor版本:v1.5.0
docker版本:17.05.0-ce
另外为了测试pull镜像,使用了另一台test机器:10.200.22.8
GitHub地址:https://github.com/goharbor/harbor
部署过程:
1、下载安装包
下载地址:http://harbor.orientsoft.cn/
cd /data && wget http://harbor.orientsoft.cn/harbor-v1.5.0/harbor-offline-installer-v1.5.0.tgz
2、上传并解压安装包
将下载下来的安装包解压到服务器的/usr/local目录
[root@devopsdb1 soft]# tar -xzvf harbor-offline-installer-v1.5.0.tgz -C /usr/local/
[root@devopsdb1 local]# cd /usr/local/harbor/
[root@devopsdb1 harbor]# ll
total 854960
drwxr-xr-x 3 root root        23 Feb 26 13:01 common
-rw-r--r-- 1 root root      1185 May  2  2018 docker-compose.clair.yml
-rw-r--r-- 1 root root      1725 May  2  2018 docker-compose.notary.yml
-rw-r--r-- 1 root root      3596 May  2  2018 docker-compose.yml
drwxr-xr-x 3 root root       156 May  2  2018 ha
-rw-r--r-- 1 root root      6687 May  2  2018 harbor.cfg
-rw-r--r-- 1 root root 875401338 May  2  2018 harbor.v1.5.0.tar.gz
-rwxr-xr-x 1 root root      5773 May  2  2018 install.sh
-rw-r--r-- 1 root root     10771 May  2  2018 LICENSE
-rw-r--r-- 1 root root       482 May  2  2018 NOTICE
-rwxr-xr-x 1 root root     27379 May  2  2018 prepare
3、配置harbor和docker修改配置(重点)
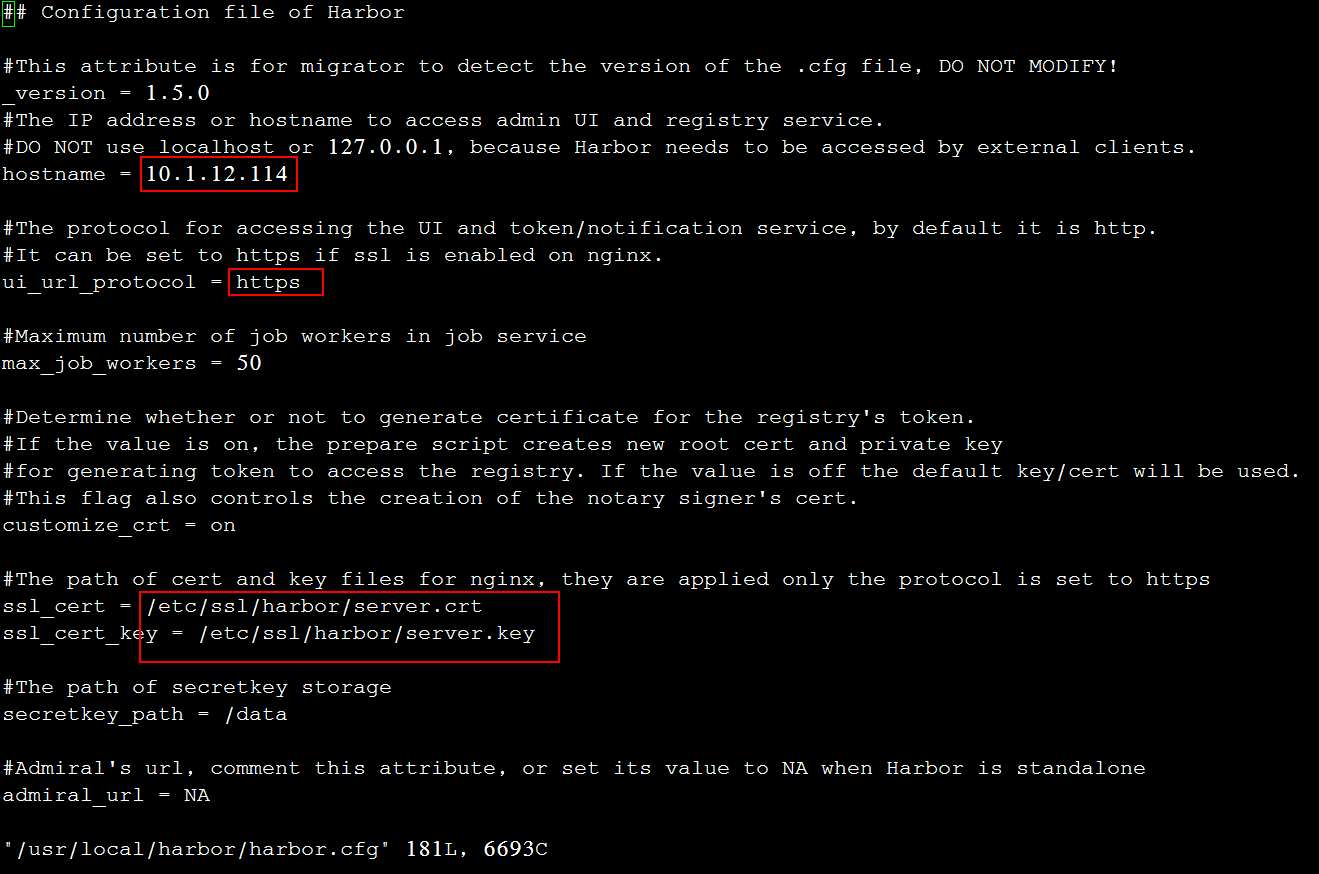
3.1 编辑/usr/local/habor/harbor.cfg,主要修改两个地方:
80(HTTP) and 443(HTTPS)

3.2 SSL证书配置
官网配置说明:
https://github.com/vmware/harbor/blob/master/docs/configure_https.md
#签发根证书
[root@devopsdb1 harbor]# mkdir -p /data/cert && cd /data/cert       #创建证书存放目录
[root@devopsdb1 harbor]# openssl genrsa -out ca.key 2048         #生成根证书私钥(无加密)
[root@devopsdb1 harbor]# openssl req -x509 -new -nodes -key ca.key -days 10000 -out ca.crt -subj "/CN=Harbor-ca" #创建自己的CA证书(不使用第三方权威机构的CA来认证,自己充当CA的角色)
  req     产生证书签发申请命令
  -x509   签发X.509格式证书命令。X.509是最通用的一种签名证书格式。
  -new    生成证书请求-key     指定私钥文件-nodes   表示私钥不加密
  -out    输出-subj    指定用户信息 -days    有效期
[root@devopsdb1 harbor]# openssl req -newkey rsa:4096 -nodes -sha256 -keyout server.key -out server.csr #生成服务器端私钥和CSR签名请求

#签发服务器证书
[root@devopsdb1 harbor]# echo subjectAltName = IP:10.1.12.114 > extfile.cnf
[root@devopsdb1 harbor]# openssl x509 -req -in server.csr -CA ca.crt -CAkey ca.key -CAcreateserial -days 365 -extfile extfile.cnf -out server.crt
   x509           签发X.509格式证书命令。
   -req           表示证书输入请求。
    -days          表示有效天数  -extensions    表示按OpenSSL配置文件v3_req项添加扩展。
    -CA            表示CA证书,这里为ca.crt
    -CAkey         表示CA证书密钥,这里为ca.key
    -CAcreateserial表示创建CA证书序列号
    -extfile      指定文件
#设置docker证书
# 如果如下目录不存在,请创建,如果有域名请按此格式依次创建
[root@devopsdb1 cert]#  mkdir -p /etc/docker/certs.d/10.1.12.114
# 如果端口为443,则不需要指定。如果为自定义端口,请指定端口
# /etc/docker/certs.d/yourdomain.com:port

# 将ca根证书依次复制到上述创建的目录中
[root@devopsdb1 cert]# cp /data/cert/ca.crt /etc/docker/certs.d/10.1.12.114/
[root@devopsdb1 cert]# cp server.crt server.key /etc/pki/ca-trust/source/anchors/
[root@devopsdb1 cert]# mkdir -p /etc/ssl/harbor/
[root@devopsdb1 cert]# cp /data/cert/server.crt /etc/ssl/harbor/
[root@devopsdb1 cert]# cp /data/cert/server.key /etc/ssl/harbor/
3.3 重启docker服务:
[root@devopsdb1 cert]# update-ca-trust enable
[root@devopsdb1 cert]# update-ca-trust extract
[root@devopsdb1 cert]# systemctl daemon-reload    #踩过的坑证明,这一步最好不要忘了,不然即使重启了docker,配置文件有可能也会不生效,导致各种奇怪的问题
[root@devopsdb1 cert]# systemctl restart docker
4、安装docker-compose
# curl -L https://github.com/docker/compose/releases/download/1.8.1/docker-compose-`uname -s`-`uname -m` > /usr/local/bin/docker-compose
# chmod +x /usr/local/bin/docker-compose

或者
yum -y install docker-compose
5、 执行install.sh脚本,安装harbor仓库
[root@devopsdb1 harbor]# docker-compose up -d
离线安装docker-compose和执行install.sh的注意事项都在《离线手动部署docker镜像仓库——harbor仓库(一)》里面说过,就不赘述了。
6、检查部署是否OK
6.1 检查容器启动状况,已经全部OK,默认使用443端口:

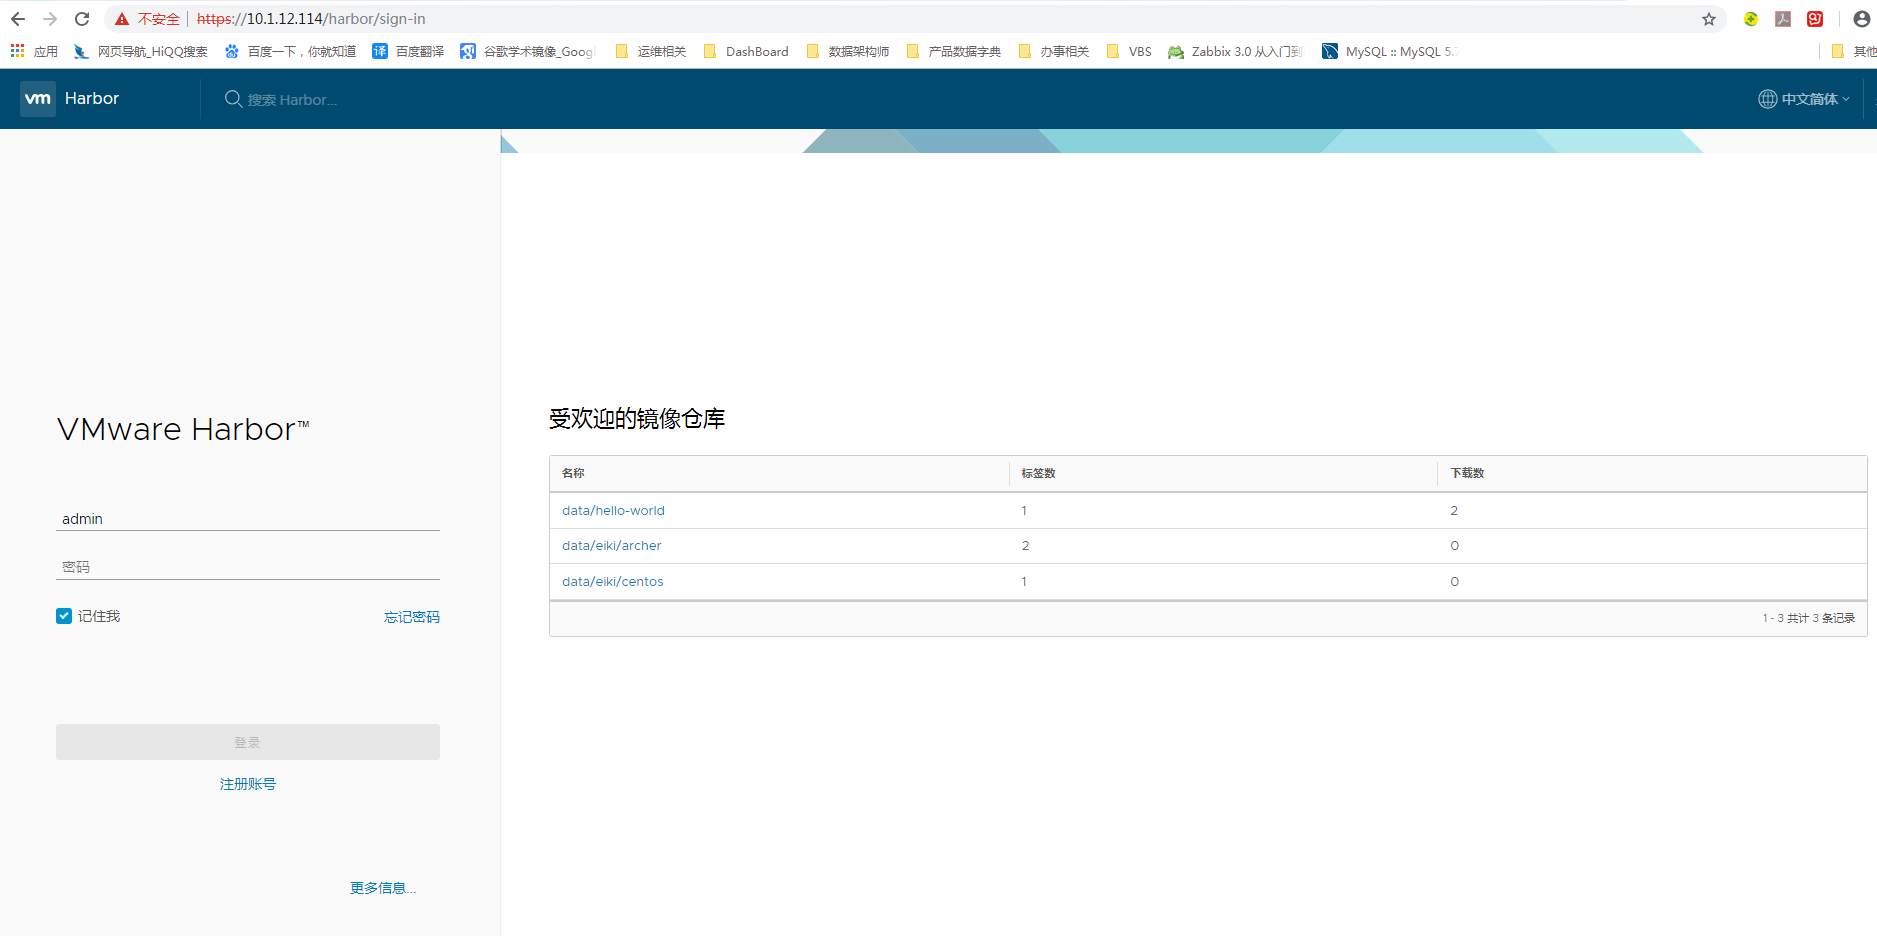
6.2 界面访问(加上1180端口哦):

7、测试使用
7.1 登录后创建一个data项目:

7.2 创建测试镜像并推送到仓库(这里也要带上端口号哟):
[root@devopsdb1 cert]# docker tag 10.1.12.114:5000/eiki/archer:v2.0 10.1.12.114/data/eiki/archer:v2.0
[root@devopsdb1 cert]# docker push 10.1.12.114/data/eiki/archer:v2.0
7.3 查看仓库,镜像已经存在(登录账号:admin / Harbor12345)

7.4 复制pull命令,在test机器上测试pull命令:
[root@www anchors]# docker pull 10.1.12.114/data/eiki/archer:v2.0
The push refers to a repository [10.1.12.114/data/eiki/archer]
af0b15c8625b: Pushed
v2.0: digest: sha256:aea2c7bc314d5015556c3725dbcb66c739d9d7acc6df0681368d1b9aae3c9cd9 size: 524
=============下面的操作在test机器上进行=============
1、传递CA认证信息到test库:
cd /data/cert/ && scp ca.crt 10.200.22.8:/etc/pki/ca-trust/source/anchors/
cd /data/cert/ && scp server.crt 10.200.22.8:/etc/pki/ca-trust/source/anchors/
2、重启test的docker服务:
update-ca-trust enable
update-ca-trust extract
systemctl restart docker
3.、登录:
[root@www anchors]# docker login 10.1.12.114
Username (admin): admin
Password:
Login Succeeded
4、在test机器上测试pull镜像:
[root@www anchors]# docker images
REPOSITORY                    TAG                 IMAGE ID            CREATED             SIZE
eiki/archer                   latest              de9c6958d8e4        4 days ago          1.8GB
centos                        7                   1e1148e4cc2c        2 months ago        202MB
[root@www anchors]# docker pull 10.1.12.114/data/hello-world:v12
v12: Pulling from data/hello-world
3f9a4cb51977: Pull complete
Digest: sha256:aea2c7bc314d5015556c3725dbcb66c739d9d7acc6df0681368d1b9aae3c9cd9
Status: Downloaded newer image for 10.1.12.114/data/hello-world:v12
[root@www anchors]# docker images
REPOSITORY                     TAG                 IMAGE ID            CREATED             SIZE
eiki/archer                    latest              de9c6958d8e4        4 days ago          1.8GB
10.1.12.114/data/hello-world   v12                 fce289e99eb9        8 weeks ago         1.84kB
centos                         7                   1e1148e4cc2c        2 months ago        202MB
[root@www anchors]#
至此,harbor仓库就部署好了。
参考来源:
https://blog.51cto.com/10950710/2152638
https://blog.51cto.com/10950710/2153086
https://blog.51cto.com/10950710/2301257
