WPF and Silverlight 学习笔记(二十三):绑定集合数据源
绑定到集合数据源,原则上说只需要实现IEnumerable接口的类型均可以做为集合数据源进行数据绑定,例如:定义一个学生类(StudentInfo),一个学生集合类(继承ObservableCollection<StudentInfo>类),在集合类中添加若干学生的信息。
1: using System.ComponentModel;
2:
3: namespace WPFBindingCollection
4: {
5: /// <summary>
6: /// 学生信息类
7: /// </summary>
8: public class StudentInfo : INotifyPropertyChanged
9: {
10: private int _StudentID;
11: private string _StudentName;
12: private double _Score;
13: private string _HeaderImage;
14:
15: public int StudentID
16: {
17: set
18: {
19: if (value != _StudentID)
20: {
21: _StudentID = value;
22: Notify("StudentID");
23: }
24: }
25: get
26: {
27: return _StudentID;
28: }
29: }
30: public string StudentName
31: {
32: set
33: {
34: if (value != _StudentName)
35: {
36: _StudentName = value;
37: Notify("StudentName");
38: }
39: }
40: get
41: {
42: return _StudentName;
43: }
44: }
45: public double Score
46: {
47: set
48: {
49: if (value != _Score)
50: {
51: _Score = value;
52: Notify("Score");
53: }
54: }
55: get
56: {
57: return _Score;
58: }
59: }
60: public string HeaderImage
61: {
62: set
63: {
64: if (value != _HeaderImage)
65: {
66: _HeaderImage = value;
67: Notify("HeaderImage");
68: }
69: }
70: get
71: {
72: return _HeaderImage;
73: }
74: }
75:
76: public override string ToString()
77: {
78: return string.Format(
79: "Student ID is {0},Name is {1},Score is {2},Header Image File Name is {3}.",
80: StudentID, StudentName, Score, HeaderImage);
81: }
82:
83: public event PropertyChangedEventHandler PropertyChanged;
84:
85: private void Notify(string propertyName)
86: {
87: if (PropertyChanged != null)
88: {
89: PropertyChanged(this, new PropertyChangedEventArgs(propertyName));
90: }
91: }
92: }
93: }
1: using System;
2: using System.Collections.ObjectModel;
3:
4: namespace WPFBindingCollection
5: {
6: /// <summary>
7: /// 学生集合类
8: /// </summary>
9: public class MyStudentCollection : ObservableCollection<StudentInfo>
10: {
11: public MyStudentCollection()
12: {
13: Random ran = new Random();
14: for (int i = 1; i <= 10; i++)
15: {
16: int id = i;
17: string name = string.Format("Student {0}", (char)(64 + i));
18: double score = Math.Round((ran.NextDouble() * 40 + 60), 2);
19: string image = string.Format(
20: "Images/Image{0}.gif", i);
21:
22: StudentInfo info = new StudentInfo()
23: {
24: StudentID = id,
25: StudentName = name,
26: Score = score,
27: HeaderImage = image
28: };
29:
30: Add(info);
31: }
32: }
33: }
34: }
将其做为整个应用程序的资源,添加到App.xaml文件中:
1: <Application x:Class="WPFBindingCollection.App"
2: xmlns="http://schemas.microsoft.com/winfx/2006/xaml/presentation"
3: xmlns:x="http://schemas.microsoft.com/winfx/2006/xaml"
4: xmlns:local="clr-namespace:WPFBindingCollection"
5: StartupUri="Window1.xaml">
6: <Application.Resources>
7: <local:MyStudentCollection x:Key="myDataSource" />
8: </Application.Resources>
9: </Application>
一、将集合绑定到文本框
如果类似于上两节那样,将集合做为数据源绑定到文本框上:
1: <Window x:Class="WPFBindingCollection.BindingCollectionDemo1"
2: xmlns="http://schemas.microsoft.com/winfx/2006/xaml/presentation"
3: xmlns:x="http://schemas.microsoft.com/winfx/2006/xaml"
4: Title="绑定集合到文本框" Height="200" Width="300">
5: <Window.DataContext>
6: <Binding Source="{StaticResource myDataSource}" />
7: </Window.DataContext>
8: <Grid Margin="5">
9: <Grid.RowDefinitions>
10: <RowDefinition Height="21*" />
11: <RowDefinition Height="21*" />
12: <RowDefinition Height="21*" />
13: <RowDefinition Height="21*" />
14: <RowDefinition Height="16*" />
15: </Grid.RowDefinitions>
16: <Grid.ColumnDefinitions>
17: <ColumnDefinition Width="3*" />
18: <ColumnDefinition Width="7*"/>
19: </Grid.ColumnDefinitions>
20: <TextBlock Grid.Row="0" Grid.Column="0"
21: HorizontalAlignment="Right" VerticalAlignment="Center"
22: Text="学号:" />
23: <TextBlock Grid.Row="1" Grid.Column="0"
24: HorizontalAlignment="Right" VerticalAlignment="Center"
25: Text="姓名:" />
26: <TextBlock Grid.Row="2" Grid.Column="0"
27: HorizontalAlignment="Right" VerticalAlignment="Center"
28: Text="成绩:" />
29: <TextBlock Grid.Row="3" Grid.Column="0"
30: HorizontalAlignment="Right" VerticalAlignment="Center"
31: Text="图片:" />
32:
33: <TextBox Grid.Row="0" Grid.Column="1"
34: Text="{Binding Path=StudentID}" />
35: <TextBox Grid.Row="1" Grid.Column="1"
36: Text="{Binding Path=StudentName}" />
37: <TextBox Grid.Row="2" Grid.Column="1"
38: Text="{Binding Path=Score}" />
39: <Image Grid.Row="3" Grid.Column="1" HorizontalAlignment="Left"
40: Source="{Binding Path=HeaderImage}" />
41:
42: <StackPanel Grid.Row="4" Grid.Column="0" Grid.ColumnSpan="2"
43: Orientation="Horizontal" HorizontalAlignment="Center">
44: <Button x:Name="First" Margin="5,0,5,0" Click="NavigateButton_Click">
45: <Image Source="NavigateImage/DataContainer_MoveFirstHS.png" />
46: </Button>
47: <Button x:Name="Previous" Margin="5,0,5,0" Click="NavigateButton_Click"
48: IsEnabled="False">
49: <Image Source="NavigateImage/DataContainer_MovePreviousHS.png" />
50: </Button>
51: <Button x:Name="Next" Margin="5,0,5,0" Click="NavigateButton_Click">
52: <Image Source="NavigateImage/DataContainer_MoveNextHS.png" />
53: </Button>
54: <Button x:Name="Last" Margin="5,0,5,0" Click="NavigateButton_Click">
55: <Image Source="NavigateImage/DataContainer_MoveLastHS.png" />
56: </Button>
57: </StackPanel>
58: </Grid>
59: </Window>
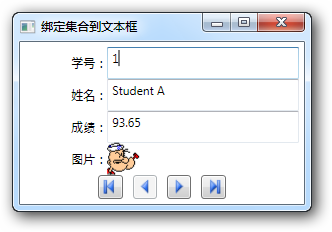
从程序的执行结果上来看,将集合绑定到类似于文本框这类控件上时,默认显示的是集合中的第一个元素。如果需要更改当前显示的元素,可以使用集合视图(CollectionView)对象。
二、集合视图
WPF中的集合与集合视图类似于DataSet中的DataTable与DataView的关系,集合视图用来提供一些绑定到集合数据源的辅助的功能,例如“指针”,筛选等功能,其继承结构如下:
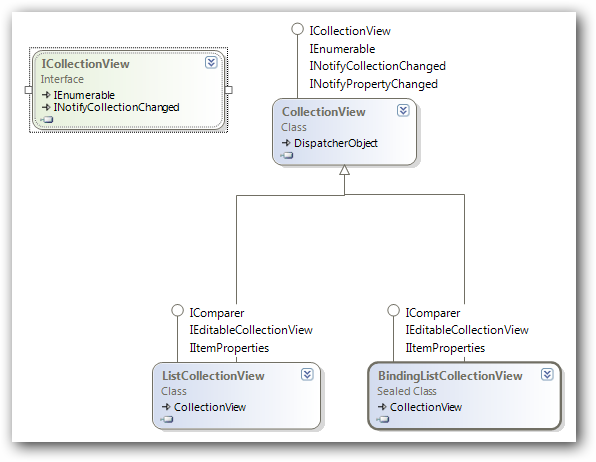
对应不同的集合,可以使用不同的CollectionView:
- IEnumerable接口集合对应CollectionView
- IList接口集合对应ListCollectionView
- IBindingList接口集合对应BindingCollectionView
要获取集合对应的集合视图可以通过CollectionViewSource类进行操作,例如上例中,实现四个按钮的点击操作,以完成对数据的导航:
1: private void NavigateButton_Click(object sender, RoutedEventArgs e)
2: {
3: // 获取集合数据源
4: MyStudentCollection source = (MyStudentCollection)(this.DataContext);
5:
6: // 获取集合视图
7: ICollectionView view = CollectionViewSource.GetDefaultView(source);
8:
9: // 确定点击的按钮
10: Button btn = (Button) (e.Source);
11:
12: // 实现数据导航
13: switch (btn.Name)
14: {
15: case "First":
16: view.MoveCurrentToFirst();
17: break;
18: case "Previous":
19: view.MoveCurrentToPrevious();
20: break;
21: case "Next":
22: view.MoveCurrentToNext();
23: break;
24: case "Last":
25: view.MoveCurrentToLast();
26: break;
27: }
28:
29: // 处理按钮状态
30: Previous.IsEnabled = true;
31: Next.IsEnabled = true;
32: if (view.CurrentPosition == 0)
33: {
34: Previous.IsEnabled = false;
35: }
36: if (view.CurrentPosition == source.Count - 1)
37: {
38: Next.IsEnabled = false;
39: }
40: }
三、绑定集合数据源到ListBox控件
对于类似于ListBox、ComboBox、ListView等控件,可以直接显示集合数据源的所有的元素,在这里以ListBox为例,将前面的MyStudentCollection绑定到ListBox上。
1: <Window x:Class="WPFBindingCollection.BindingCollectionDemo2"
2: xmlns="http://schemas.microsoft.com/winfx/2006/xaml/presentation"
3: xmlns:x="http://schemas.microsoft.com/winfx/2006/xaml"
4: Title="绑定集合数据源到ListBox" Height="300" Width="580">
5: <StackPanel>
6: <ListBox Margin="5"
7: ItemsSource="{StaticResource myDataSource}" />
8: </StackPanel>
9: </Window>
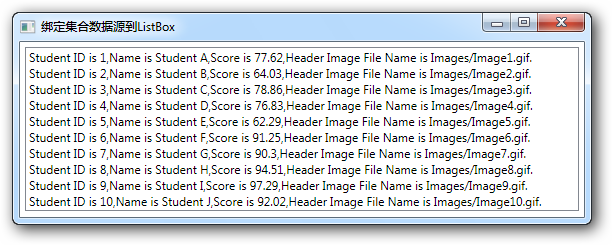
默认情况下,在ListBox中每一项显示的内容为集合元素类型的ToString返回的字符串,用户可以自定义Convertor或覆盖ToString方法达到更改显示内容的目的。
还可以在绑定时指定ListBox每一项显示的属性名(DisplayMemberPath)及内部保存的属性(SelectedValuePath),类似于Windows应用程序ListBox绑定时的DisplayMember和ValueMember。
1: <Window x:Class="WPFBindingCollection.BindingCollectionDemo2"
2: xmlns="http://schemas.microsoft.com/winfx/2006/xaml/presentation"
3: xmlns:x="http://schemas.microsoft.com/winfx/2006/xaml"
4: Title="绑定集合数据源到ListBox" Height="300" Width="580">
5: <StackPanel>
6: <ListBox Margin="5" x:Name="lstStudent"
7: ItemsSource="{StaticResource myDataSource}"
8: DisplayMemberPath="StudentName"
9: SelectedValuePath="StudentID"
10: SelectionChanged="ListBox_SelectionChanged"/>
11: </StackPanel>
12: </Window>
1: private void ListBox_SelectionChanged(object sender, SelectionChangedEventArgs e)
2: {
3: int studenntID = (int) (lstStudent.SelectedValue);
4: MessageBox.Show(
5: string.Format("Selected student id is {0}.", studenntID),
6: "Information", MessageBoxButton.OK, MessageBoxImage.Information);
7: }
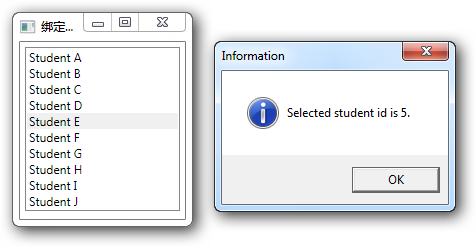
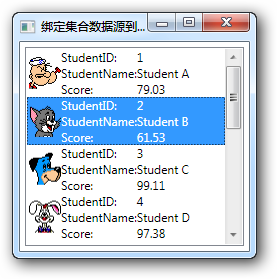
还可以通过ItemTemplate定制显示的每一项的显示方式:
1: <Window x:Class="WPFBindingCollection.BindingCollectionDemo2"
2: xmlns="http://schemas.microsoft.com/winfx/2006/xaml/presentation"
3: xmlns:x="http://schemas.microsoft.com/winfx/2006/xaml"
4: Title="绑定集合数据源到ListBox" Height="247" Width="245">
5: <StackPanel>
6: <ListBox Margin="5" x:Name="lstStudent" Height="199"
7: ItemsSource="{StaticResource myDataSource}">
8: <ListBox.ItemTemplate>
9: <DataTemplate>
10: <Grid>
11: <Grid.RowDefinitions>
12: <RowDefinition />
13: <RowDefinition />
14: <RowDefinition />
15: </Grid.RowDefinitions>
16: <Grid.ColumnDefinitions>
17: <ColumnDefinition Width="3*" />
18: <ColumnDefinition Width="3*" />
19: <ColumnDefinition Width="4*" />
20: </Grid.ColumnDefinitions>
21:
22: <Image Grid.Row="0" Grid.Column="0" Grid.RowSpan="3"
23: Source="{Binding Path=HeaderImage}" />
24: <TextBlock Grid.Row="0" Grid.Column="1"
25: Text="StudentID:" />
26: <TextBlock Grid.Row="1" Grid.Column="1"
27: Text="StudentName:" />
28: <TextBlock Grid.Row="2" Grid.Column="1"
29: Text="Score:" />
30: <TextBlock Grid.Row="0" Grid.Column="2"
31: Text="{Binding Path=StudentID}" />
32: <TextBlock Grid.Row="1" Grid.Column="2"
33: Text="{Binding Path=StudentName}" />
34: <TextBlock Grid.Row="2" Grid.Column="2"
35: Text="{Binding Path=Score}" />
36: </Grid>
37: </DataTemplate>
38: </ListBox.ItemTemplate>
39: </ListBox>
40: </StackPanel>
41: </Window>
本文版权归作者所有,未经同意,请勿用作商业用途。


