Accessing List Data using the JavaScript Client OM and displaying in a Dialog
In SharePoint 2010, there are a number of object models that can be used by developers to access the server. The Client OM is a unified model which uses the same or similar concepts on the server, via web services and WCF services, via a client (JavaScript) API, and via REST. This paves the way for richer applications by dramatically simplifying accessing SharePoint data from client machines and other machines in the infrastructure.
In this exercise, we will use the EcmaScript client-side object model to update and read list data dynamically. Also shown is the new Dialog API's from client-side script.
The JavaScript client side object model allows JavaScript developers access to SharePoint objects such as Site, Web and List (and more) from client side JavaScript.
Task 1 – Create a new project and add a web part
In this task a solution and project will be created. It will contain the rest of the development work in this exercise.
- Open Visual Studio 2010 by going to the Start Menu | Programs | Microsoft Visual Studio 2010 | Microsoft Visual Studio 2010.
- From the menu, select File | New | Project.
- In the New Project dialog box, expand the Installed Templates left hand menu to Visual C# | SharePoint | 2010 and choose the Visual Web Part project type in the project type list in the middle section of the screen.
- Enter ScriptOMandDialog in the Name textbox.
- Enter C:\SPHOLS\SPCHOL308\CS\Ex2 in the Location textbox.
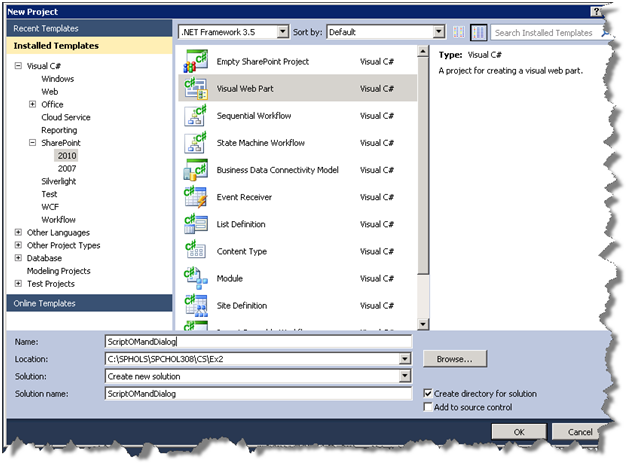
Figure 19 - New Project Dialog
- Click OK.
- A SharePoint Customization Wizard dialog box will appear.
- In the What local site do you want to use for debugging? box, type http://intranet.contoso.com
- From the What is the trust level for this SharePoint solution? radio buttons, choose Deploy as a farm solution.
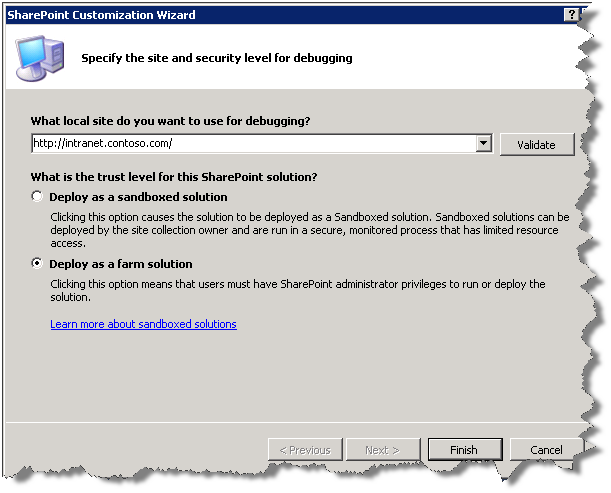
Figure 20 - SharePoint Customization Wizard
- Press Finish to complete the customization wizard.
- Visual Studio will create the ScriptOMandDialog solution and add the necessary files.
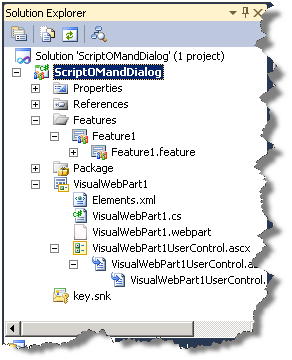
Figure 21 - Solution Explorer with Visual Web Part Project
- In the Solution Explorer, double-click on the VisualWebPart1.webpart file.
- Set the Title property to ScriptOMandDialog
- Set the Description property to ScriptOMandDialog description

Figure 22 - Visual Web Part webpart file
- Save and close the file.
Task 2 - Add scripting code to access and render SharePoint list data.
- In the Solution Explorer, double-click on VisualWebPart1UserControl.ascx
- Add the following markup code at the end of the file.
<SharePoint:ScriptLink ID="ScriptLink1" runat="server" Name="sp.js" Localizable="false" LoadAfterUI="true" />
<script language="ecmascript" type="text/ecmascript">
</script>
Code Snippet: My HTML Snippets | spchol308_ex2_ScriptTags
- Add the following JavaScript code within the Script block. You can either copy and paste all of the following code blocks or use one code snippet. This code declares important variables our code will use later on and adds our Initialize() function to be called after all of the SharePoint client side objects have loaded.
/* SharePoint list names */
var ProjectListName = "Projects";
/* SharePoint list field names */
var ProjectNameField = "Title";
var ProjectDescriptionField = "Description";
/* List objects */
var projectsList;
/* variable to hold list items from the projects list */
var projects;
/* client context object - used to access SharePoint data */
var context;
/* web (SPWeb) that our page is running on */
var web;
/* variable to hold modalDialog to close later */
var modalDialog;
/* used when creating a new project ListItem. */
var projectListItem;
var copyOfAddProjectForm;
/* our startup method when the page loads */
_spBodyOnLoadFunctionNames.push("Initialize()");
Code Snippet: My JScript Snippets | spchol308_ex2_Jscript
- Our Initialize() function retrieves the SharePoint ClientContext object and loads up the projects list and initializes projects (Projects list items).
/* Initialize useful variables and retrieve ClientContext */
function Initialize() {
/* Retrieves the current ClientContext object */
context = SP.ClientContext.get_current();
web = context.get_web();
// Get references to the lists we will use
projectsList = web.get_lists().getByTitle(ProjectListName);
var camlQuery = new SP.CamlQuery();
camlQuery.set_viewXml('<View><Query/></View>');
projects = projectsList.getItems(camlQuery);
context.load(projects, 'Include(Title, Description)');
context.executeQueryAsync(onListsLoaded, OnError);
}
- The onListsLoaded() event is called asynchronously from the Initialize() function.
/* Event handler called loading the projects list
This method dynamically renders an HTML table to display the list data */
function onListsLoaded() {
// Get the list items for the contacts list
var projectTable = document.getElementById("tblProjectList");
// clear out the table
while (projectTable.rows.length > 0)
projectTable.deleteRow(projectTable.rows.length - 1);
var content;
var cell;
var tbo = document.createElement('tbody');
// Loop for each project
var listItemEnumerator = projects.getEnumerator();
while (listItemEnumerator.moveNext()) {
// For each project create a row in the table
var newTR = document.createElement('tr');
var projectLI = listItemEnumerator.get_current();
// get_item() retrieves the listitem value
var projectName =
projectLI.get_item(ProjectNameField);
var projectDesc =
projectLI.get_item(ProjectDescriptionField);
// add the cells for the row
cell = document.createElement('td');
content = document.createTextNode(projectName);
cell.appendChild(content);
newTR.appendChild(cell);
cell = document.createElement('td');
content = document.createTextNode(projectDesc);
cell.appendChild(content);
newTR.appendChild(cell);
// Add the row to the table body
tbo.appendChild(newTR);
}
// add the table body to the table
projectTable.appendChild(tbo);
}
- The ShowAddProject() function finds the divAddProjectElement (which we'll add later) and displays it using the ModalDialog.showModalDialog() method.
/* Hide the modal dialog and display the updated UI */
function onProjectAdded() {
HideAddProject();
}
/* Show a modalDialog with the contents of divAddProject */
function ShowAddProject() {
var divAddProject = document.getElementById("divAddProject");
// showModalDialog removes the element passed in from the DOM
// so we save a copy and add it back later
copyOfAddProjectForm = divAddProject.cloneNode(true);
divAddProject.style.display = "block";
var options = { html: divAddProject, width: 200, height: 350, dialogReturnValueCallback: ReAddClonedForm };
modalDialog = SP.UI.ModalDialog.showModalDialog(options);
}
/* Close the modalDialog */
function HideAddProject() {
modalDialog.close();
Initialize();
}
function ReAddClonedForm() {
document.body.appendChild(copyOfAddProjectForm);
}
- The AddProject() function creates a new list item in the Project List.
/* Called from the Add Project modal dialog
Creates a list item in the Project list */
function AddProject() {
var lici1 = new SP.ListItemCreationInformation();
projectListItem = projectsList.addItem(lici1);
projectListItem.set_item(ProjectNameField, getTBValue("txtProjectName"));
projectListItem.set_item(ProjectDescriptionField, getTBValue("txtDescription"));
projectListItem.update();
context.load(projectListItem);
// Execute the query to create the project list
// onProjectAdded is our call back method called when the call to the server has completed
context.executeQueryAysnc(onProjectAdded, OnError);
}
- Helper functions / Error handler
/* Error handler */
function OnError(sender, args) {
var spnError = document.getElementById("spnError");
spnError.innerHTML = args.get_message();
}
/* Helper function - shortcut to the value property of a textbox */
function getTBValue(elID) {
var el = document.getElementById(elID);
return el.value;
}
- Add the following HTML code below the ending script block tag (</script>). tblProjectList is an empty table that our script dynamically adds rows/columns to for each project. There is also a link to invoke ShowAddProject(), which will launch a modal dialog box. The markup within divAddProject will be displayed in a modal dialog that allows the user to input data to create a new project.
<div style="font-weight: bold">Project List</div>
<br />
<table id="tblProjectList" style="border: solid 1px silver">
</table>
<br />
<a href="javascript:ShowAddProject()">Add a project</a>
<br />
<div id="divAddProject" style="display: none; padding: 5px">
<b>Project Information</b><br /><br />
Name <br />
<input type="text" id="txtProjectName" /><br />
Description<br />
<input type="text" id="txtDescription" /><br />
<span id="spnError" style="color: Red" /><br />
<input type="button" value="Add New Project" onclick="AddProject()" />
</div>
Code Snippet: My HTML Snippets | spchol308_ex2_HTML
Task 3 - Deploy and test the web part
- Right-click on the ScriptOMandDialog project node and select Deploy.
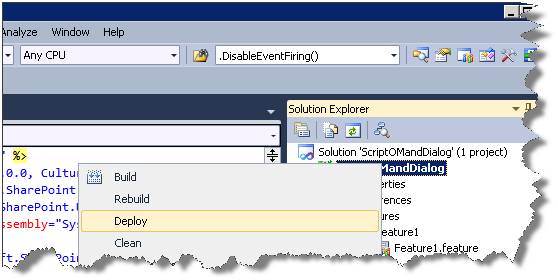
Figure 23 - Deploy
- When deployment is complete (you can watch the progress in the Output window and see the status updated in the status bar), add the web part to a web part page:
- Open Internet Explorer and browse to http://intranet.contoso.com
- Click the Edit icon to view the Edit ribbon.
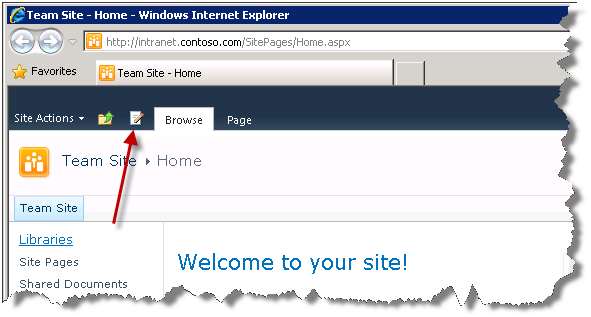
Figure 24 – Edit Icon
- Select Insert from the Editing Tools tab on the Edit ribbon
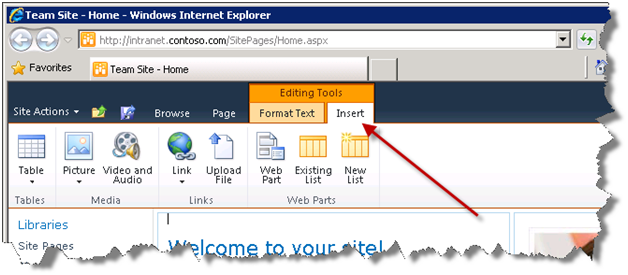
Figure 25 - Format Text Tab
- Click the Web Part button on the Insert ribbon
- Choose Custom from the Categories column
- Choose ScriptOMandDialog from the Web Parts column
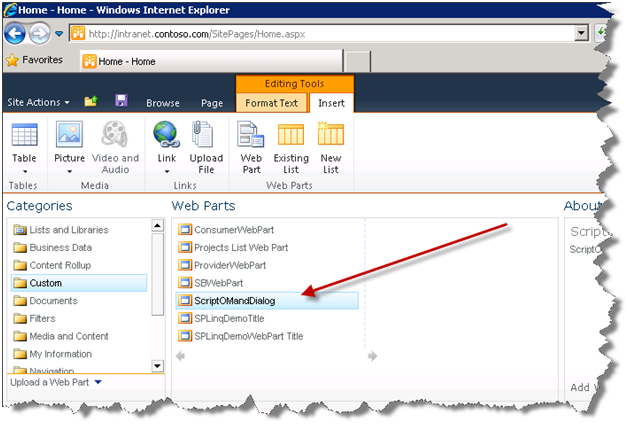
Figure 26 - Insert Web Part
- Click the Add button at the bottom right of the Add Web Part area
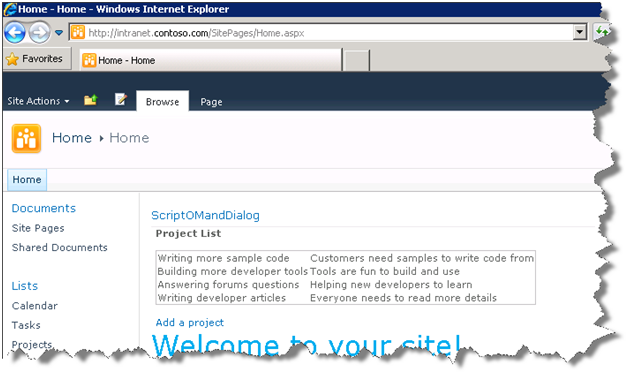
Figure 27 - ScriptOMandDialog Web Part
- Click Page in the ribbon.
- Click the down arrow under the Save & Close button on the ribbon, then select Stop Editing.
- Click Yes when you see the Save Changes dialog. Your ScriptOMandDialog web part should now be displayed on the page.
- Click the Add a project link (directly under the new web part), fill in the Name and Description fields as you wish, then click the Add New Project button.

Figure Sample 28 - Add a project
- You should see the new project with the details you specified appear in the Project List.
In the past few minutes, you have demonstrated how to use the JavaScript Client Object Model and build & deploy a Visual Web Part.
Lab Summary
In this lab you performed the following exercises.
- Created new SharePoint 2010 project of type Empty
- Added an Element.xml file to a SharePoint project containing a Custom Action to extend the Ribbon menu
- Added a SharePoint Images mapped folder which maps to the Images folder in the SharePoint 2010 directory.
- Deployed the Empty project type containing one feature to your SharePoint site
- Created new SharePoint 2010 project type of a Visual Web Part
- Added client-side script to the web part to render list data
- Added client-side script and HTML to the web part to utilize the Dialog Framework
- Deployed a SharePoint Visual Web Part solution


