VUE源码——初始化流程
初始化流程
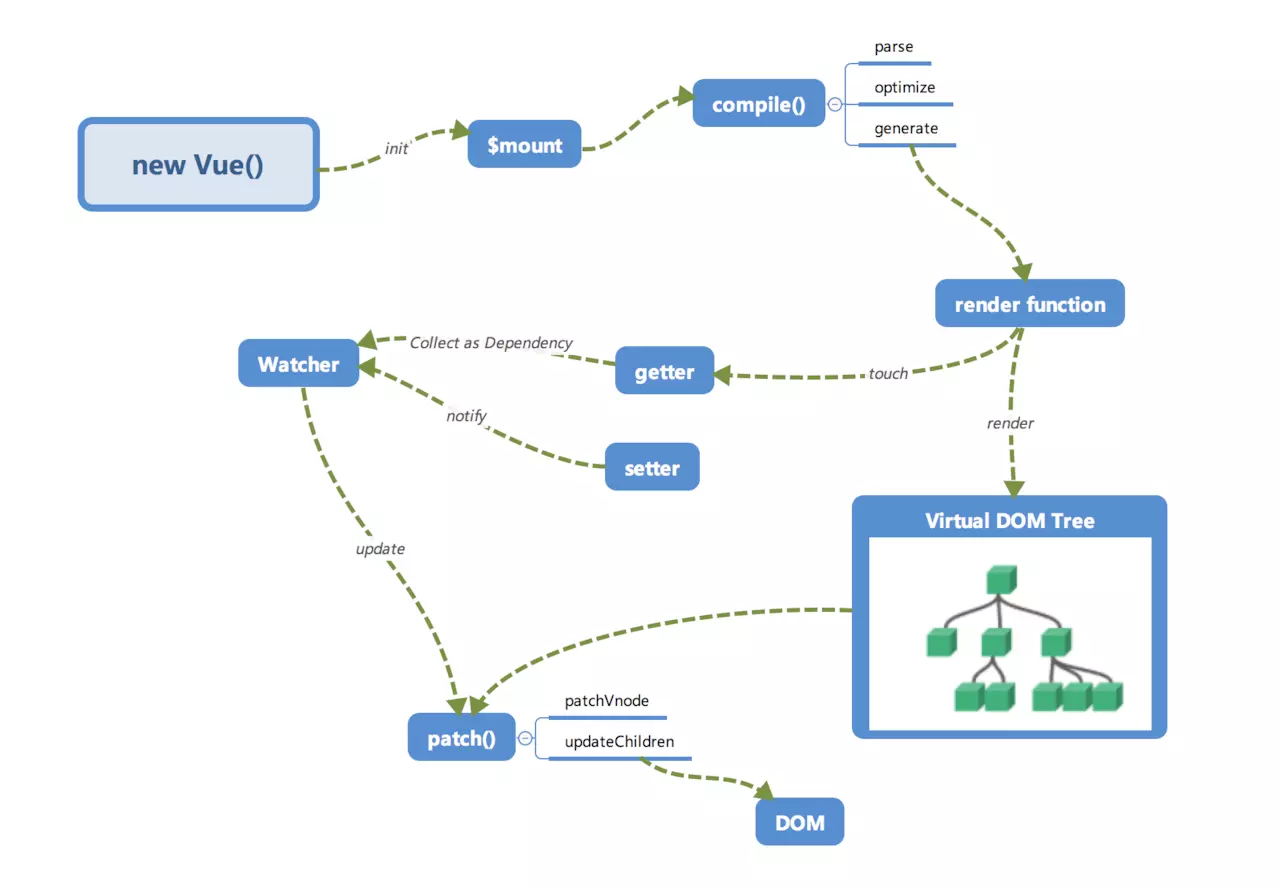
Vue的初始化流程,是从 new Vue() 开始的,从以下的图中可以看知道。在 new Vue()后,会执行init,再 $mount实现挂载,再到编译compile,生成render函数,接下来是响应式依赖收集,通过pach实现异步更新 。render function 会被转化为Vnode节点,Virtual DOM 是一棵以JavaScript对象(Vnode节点)为基础的树。是对真实DOM的描述。通过patch() 转化为真的 DOM。在数据有变化时,会通过setter -> Watcher -> update 来更新视图。整个Vue的运行机制大致就是这样。

接下来,我们来看在 new Vue() 过后发生了什么。Vue 中我们是通过 $mount 实现方法去挂载 vm 的。我们接下来主要分析带 complier 版本的 $mount 。
带 compiler 版本的 $mount 是在 src/platform/web/entry-runtime-with-compiler.js 中定义的。
const mount = Vue.prototype.$mount
// 扩展了$mount 方法
Vue.prototype.$mount = function (
  el?: string | Element,
  hydrating?: boolean
): Component {
  el = el && query(el)

  /* istanbul ignore if */
  if (el === document.body || el === document.documentElement) {
    process.env.NODE_ENV !== 'production' && warn(
      `Do not mount Vue to <html> or <body> - mount to normal elements instead.`
    )
    return this
  }
  // 处理el 和 template 选项
  const options = this.$options
  // resolve template/el and convert to render function
  // render 不存在时才考虑 el 和 template
  if (!options.render) {
    let template = options.template
    if (template) {
      if (typeof template === 'string') {
        // template 是选择器
        if (template.charAt(0) === '#') {
          template = idToTemplate(template)
          /* istanbul ignore if */
          if (process.env.NODE_ENV !== 'production' && !template) {
            warn(
              `Template element not found or is empty: ${options.template}`,
              this
            )
          }
        }
      } else if (template.nodeType) {
        template = template.innerHTML
      } else {
        if (process.env.NODE_ENV !== 'production') {
          warn('invalid template option:' + template, this)
        }
        return this
      }
    } else if (el) {
      // el 作为template
      template = getOuterHTML(el)
    }
    // 编译过程
    if (template) {
      /* istanbul ignore if */
      if (process.env.NODE_ENV !== 'production' && config.performance && mark) {
        mark('compile')
      }
      // 执行编译, 将template字符串 转化为 render 函数
      const { render, staticRenderFns } = compileToFunctions(template, {
        outputSourceRange: process.env.NODE_ENV !== 'production',
        shouldDecodeNewlines,
        shouldDecodeNewlinesForHref,
        delimiters: options.delimiters,
        comments: options.comments
      }, this)
      options.render = render
      options.staticRenderFns = staticRenderFns

      /* istanbul ignore if */
      if (process.env.NODE_ENV !== 'production' && config.performance && mark) {
        mark('compile end')
        measure(`vue ${this._name} compile`, 'compile', 'compile end')
      }
    }
  }
  return mount.call(this, el, hydrating)
}
可以看到,这里是实现了对 $mount 进行了扩展,处理了template 或 el 选项。尝试编译他们为render函数。
我们在使用Vue 实例的时候,通常会这样写
const app = new Vue({
  el: '#app',
})
那其实可以写成
const app = new Vue({
 render: h => h(App),
})

const app = new Vue({
 template: '<div>测试</div>',
})
根据以上对以上代码的分析,Vue 不能挂载到 body、html 根节点上,然后会去如果没有 render 方法,才会去找 el 和 template,然后转换成render 方法。所以不管是 el 还是 template,最终都会转化成 render。 我们知道优先级的顺序 render > template > el 。 最后调用之前原型上的 $mount 方法挂载。
那么问题来了,现在的 Vue 构造函数从哪里来的呢?
import Vue from './runtime/index'
进入到platforms/web/runtime/index.js里面导出了Vue。
在这里,其实也不是Vue 构造函数的声明。这里主要干了两件事儿:
- 定义 $mount : 挂载根组件到宿主元素上。
- 定义 _patch: 补丁函数,执行patching 算法进行更新
// 实现了patch 方法
Vue.prototype.__patch__ = inBrowser ? patch : noop

Vue.prototype.$mount = function (
  el?: string | Element,
  hydrating?: boolean
): Component {
  el = el && inBrowser ? query(el) : undefined
  // 执行挂载
  return mountComponent(this, el, hydrating)
}
这里的 $mount 方法支持传入2个参数,第一个是 el ,表示挂载的元素,可以是字符串,也可以是 DOM 对象,如果是字符串在浏览器环境下调用 query 方法转换成 DOM, 第二次参数是和服务端渲染相关,在浏览器环境下不需要传第二个参数。
$mount 方法会调用 mountComponent 方法,后面再详讲。
接下来我们继续找 Vue 构造函数, 进入到核心代码 core/index 。
import Vue from 'core/index'
在这里我们依然没有找到Vue 构造函数,但是这里有个核心代码。实现了全局 api
initGlobalAPI(Vue)
进入到 initGlobalAPI 函数,具体实现了以下 api
Vue.set = set
Vue.delete = del
Vue.nextTick = nextTick
initUse(Vue) // 实现Vue.use函数
initMixin(Vue) // 实现Vue.mixin函数
initExtend(Vue) // 实现Vue.extend函数
initAssetRegisters(Vue) // 注册实现Vue.component/directive/filter
我们再继续找 Vue 构造函数,进入到 core/instance/index.js 里面。我们终于找到了 Vue 构造函数。
function Vue (options) {
  ...
  // 初始化
  this._init(options)
}
Vue 构造函数内部非常简单,只执行了 this._init(options),实现初始化。 那么这里的 this.init() 又是在哪里定义的呢?
接着往下看
initMixin(Vue) // 实现了_init()函数
stateMixin(Vue) //状态相关api $data,$props,$set,$delete,$watch
eventsMixin(Vue) // 事件相关api $on,$once,$off,$emit
lifecycleMixin(Vue) // 生命周期api _update,$forceUpdate,$destroy
renderMixin(Vue) // 渲染api _render,$nextTick
initMixin(Vue) 实现了_init() 函数,当我们在 new Vue() 时,实际上是执行了 initMixin(Vue) 实现的方法,
core/instance/init.js 进入到 initMixin 方法。
export function initMixin (Vue: Class<Component>) {
  Vue.prototype._init = function (options?: Object) {
    const vm: Component = this
    // a uid
    vm._uid = uid++

    ...
    vm._self = vm
    initLifecycle(vm)  //生命周期初始化 $parent, $root, $refs, $children
    initEvents(vm) // 事件初始化 处理父组件传递的监听器
    initRender(vm) // $slots,$scopedSlots,_c,$createElement
    callHook(vm, 'beforeCreate') //生命周期钩子beforeCreate
    initInjections(vm) // resolve injections before data/props  获取注入数据
    initState(vm) // 初始化组件中的props,methods,data,computed,watch
    initProvide(vm) // resolve provide after data/props 提供数据注入
    callHook(vm, 'created') //生命周期钩子created

    /* istanbul ignore if */
    if (process.env.NODE_ENV !== 'production' && config.performance && mark) {
      vm._name = formatComponentName(vm, false)
      mark(endTag)
      measure(`vue ${vm._name} init`, startTag, endTag)
    }

    if (vm.$options.el) {
      vm.$mount(vm.$options.el)
    }
  }
}
在 initMixin 方法中,在 Vue 的 原型上挂载了一个 _init。 初始化函数。在 _init() 中主要干了几件事儿:
- initLifecycle: 生命周期初始化 $parent, $root, $refs, $children
- initEvents: 事件初始化 处理父组件传递的监听器
- initRender: $slots,$scopedSlots,_c,$createElement
- callHook(vm, 'beforeCreate'): 生命周期钩子 beforeCreate
- initInjections: 获取注入数据
- initState: 初始化组件中的 props,methods,data,computed,watch
- initProvide: 提供数据注入
- callHook(vm, 'created'):生命周期钩子 created
根据以上的执行顺序,我们知道,在生命周期 beforeCreate 里面我们只可以拿到 $parent, $root, $refs, $children ,如果我们想要获取 props,methods,data,computed,watch,起码要等到created里面。
接着往下走
if (vm.$options.el) {
  vm.$mount(vm.$options.el)
}
如果我们的选项中有 el,那么将会实现 $mount() 挂载。
以上就是整个的初始化流程。


 浙公网安备 33010602011771号