IDAPython 教程4
Using IDAPython to Make Your Life Easier: Part 4
原文:https://unit42.paloaltonetworks.com/using-idapython-to-make-your-life-easier-part-4/
本系列的前几期(第1部分,第2部分 和第3部分)已经研究了如何使用IDAPython来简化生活。现在让我们看一下反向工程师如何使用IDAPython的颜色和强大的脚本功能。
分析师通常面临着越来越复杂的代码,并且通常不容易在动态执行过程中运行什么代码。使用IDAPython的功能,我们不仅能够识别程序中正在运行的指令,还可以识别使用了这些指令的次数。
背景
对于此特定的博客文章,我用C语言编写了一个简单程序。为此练习编写并编译了以下代码:
|
1
2
3
4
5
6
7
8
9
10
11
12
13
14
15
16
17
18
19
20
21
22
23
24
25
26
27
28
29
|
#include "stdafx.h"
#include <stdlib.h>
#include <time.h>
int _tmain(int argc, _TCHAR* argv[])
{
char* start = "Running the program.";
printf("[+] %s\n", start);
char* loop_string = "Looping...";
srand (time(NULL));
int bool_value = rand() % 10 + 1;
printf("[+] %d selected.\n", bool_value);
if(bool_value > 5)
{
char* over_five = "Number over 5 selected. Looping 2 times.";
printf("[+] %s\n", over_five);
for(int x = 0; x < 2; x++)
printf("[+] %s\n", loop_string);
}
else
{
char* under_five = "Number under 5 selected. Looping 5 times.";
printf("[+] %s\n", under_five);
for(int x = 0; x < 5; x++)
printf("[+] %s\n", loop_string);
}
return 0;
}
|
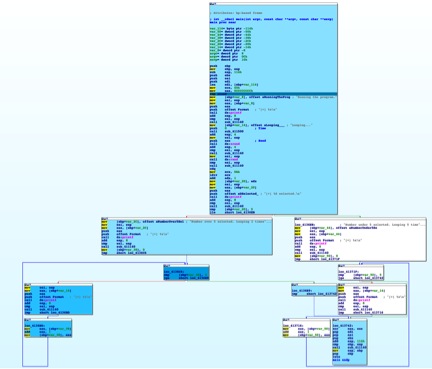
一旦在IDA Pro中加载了此二进制文件,就可以看到预期的循环和代码重定向语句。如果我们在不了解底层代码的情况下查看此示例,则可能可以通过静态分析确定正在发生的情况。
图1程序图分解
但是,如果我们想确定在运行时执行了哪些代码块,该怎么办?让我们使用IDAPython应对这一挑战。
IDAPython中的脚本
我们必须解决的首要挑战之一是逐步完成每条指令,我们将使用以下代码完成这些指令。(已包括调试打印语句,以演示正在执行的指令。)
|
1
2
3
4
5
6
7
8
9
10
11
|
RunTo(BeginEA())
event = GetDebuggerEvent(WFNE_SUSP, -1)
EnableTracing(TRACE_STEP, 1)
event = GetDebuggerEvent(WFNE_ANY|WFNE_CONT, -1)
while True:
event = GetDebuggerEvent(WFNE_ANY, -1)
addr = GetEventEa()
print "Debug: current address", hex(addr), "| debug event", hex(event)
if event <= 1: break
|
在上面的代码中,我们首先启动调试器并使用对“ RunTo(BeginEA())”的调用执行到入口点。对GetDebuggerEvent()的以下调用将等待,直到达到此断点。
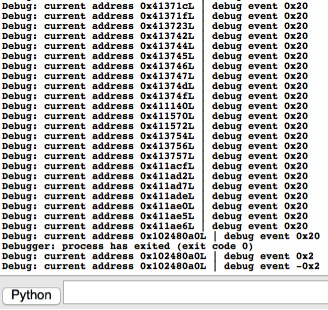
然后,我们通过调用EnableTracing()在IDA Pro中启用跟踪。对GetDebuggerEvent()的后续调用将继续调试器,该调试器现已配置为进行步骤跟踪。最后,我们进入一个循环并遍历每个地址,直到达到表明该进程已终止的事件条件为止。该特定脚本的结尾输出在IDA Pro中如下所示:
图2 IDAPython脚本的输出
下一步是为执行的每个受影响的行检索颜色并为其分配颜色。为此,我们可以分别使用GetColor()和SetColor()函数。以下代码将获取给定行的当前颜色,确定要设置的颜色,然后为该行设置该颜色。
在此示例中,我使用了四种不同蓝色阴影的调色板。较深的阴影表示重复执行了特定的行。(鼓励读者修改此设置以满足他们的个人喜好。)
|
1
2
3
4
5
6
7
8
9
10
11
12
13
14
15
16
|
def get_new_color(current_color):
colors = [0xffe699, 0xffcc33, 0xe6ac00, 0xb38600]
if current_color == 0xFFFFFF:
return colors[0]
if current_color in colors:
pos = colors.index(current_color)
if pos == len(colors)-1:
return colors[pos]
else:
return colors[pos+1]
return 0xFFFFFF
current_color = GetColor(addr, CIC_ITEM)
new_color = get_new_color(current_color)
SetColor(addr, CIC_ITEM, new_color)
|
在没有颜色的给定行上运行上面的代码将导致将其设置为最浅的蓝色阴影。此外,再次在同一行上运行此代码会将其变成更深的蓝色阴影。
图3演示基于指令调用次数的颜色变化
我们可以使用以下代码删除IDA Pro文件上的所有以前的颜色。将颜色设置为0xFFFFFF会将其设置为白色,或有效地删除以前存在的任何其他颜色。
|
1
2
3
|
heads = Heads(SegStart(ScreenEA()), SegEnd(ScreenEA()))
for i in heads:
SetColor(i, CIC_ITEM, 0xFFFFFF)
|
将所有这些代码放在一起,我们得到以下结果:
|
1
2
3
4
5
6
7
8
9
10
11
12
13
14
15
16
17
18
19
20
21
22
23
24
25
26
27
28
|
heads = Heads(SegStart(ScreenEA()), SegEnd(ScreenEA()))
for i in heads:
SetColor(i, CIC_ITEM, 0xFFFFFF)
def get_new_color(current_color):
colors = [0xffe699, 0xffcc33, 0xe6ac00, 0xb38600]
if current_color == 0xFFFFFF:
return colors[0]
if current_color in colors:
pos = colors.index(current_color)
if pos == len(colors)-1:
return colors[pos]
else:
return colors[pos+1]
return 0xFFFFFF
RunTo(BeginEA())
event = GetDebuggerEvent(WFNE_SUSP, -1)
EnableTracing(TRACE_STEP, 1)
event = GetDebuggerEvent(WFNE_ANY|WFNE_CONT, -1)
while True:
event = GetDebuggerEvent(WFNE_ANY, -1)
addr = GetEventEa()
current_color = GetColor(addr, CIC_ITEM)
new_color = get_new_color(current_color)
SetColor(addr, CIC_ITEM, new_color)
if event <= 1: break
|
在程序上运行此代码时,我们看到了以下内容,其中突出显示了已执行的汇编指令。如下图所示,多次执行的指令具有较深的灰色阴影,使我们能够轻松理解执行流程。
图4运行IDAPython脚本的结果
结论
诚然,此博客中演示的示例很简单,它展示了IDA Pro调试功能与API中提供的颗粒状着色选项的结合使用。这项技术可以为分析人员节省大量时间,以查找复杂应用程序的代码。


 浙公网安备 33010602011771号