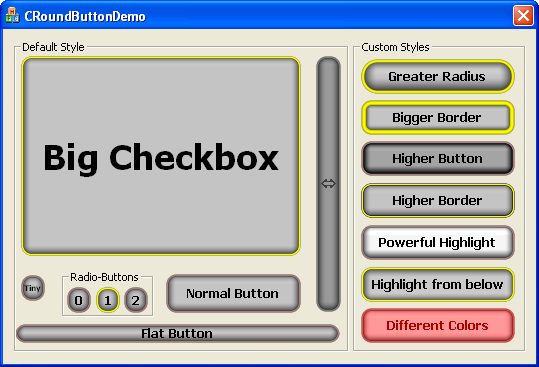
CRoundButton2 -一个花哨的图形按钮

介绍
我需要一个可换肤的用户界面按钮,用户可以在其中更改视觉方面。我的第一个想法是使用位图来蒙皮的按钮,这对我的界面来说有点不方便,所以我搜索了一个可以使用内部公式和一些用户给定的参数来绘制自己的按钮。长话短说,我找不到适合我需要的课程,于是我开始编写代码。
我的第一次尝试是个灾难;-)。一个使用大约15个按钮的应用程序在10秒内启动——因为按钮需要时间来绘制。第二次尝试要好得多。时间关键图形以通用的方式绘制一次,然后由按钮来绘制自己的图像。使用这种结构,还可以为整个项目生成全局按钮样式。
介绍使用的类和结构
CRoundButton2需要两个类:“CRoundButton2”和“CRoundButtonStyle”。每个按钮都需要一个类型为“CRoundButton2”的对象。这个类表示按钮及其功能。类型为“CRoundButtonStyle”的只需要一个对象(好,好,每个使用的按钮样式一个)。这个对象控制使用它的所有按钮的样式。让我们从它开始…
CRoundButtonStyle
CRoundButtonStyle有一些公共函数,但是除了构造函数和析构函数外,我们感兴趣的两个函数是:
- GetButtonStyle (tButtonStyle * _ptButtonStyle) 它用于用当前设置样式填充tButtonStyle结构。
- SetButtonStyle (tButtonStyle * _ptButtonStyle) 用于将当前样式设置为tButtonStyle结构中给定的样式。
两个函数都需要一个指向类型为tButtonStyle的对象的指针。
tButtonStyle
tButtonStyle是一个包含该样式的所有可更改选项的结构。图片显示了按钮样式的主要参数:

按钮的几何形状由显示的函数计算。
具体参数如下:
- 双m_dSizeAA 用于使图像平滑的抗锯齿区域的像素大小。
- 双m_dRadius 钮扣边缘的半径。如果按钮对于所选的半径太小,它将被缩小,但是要小心,缩放程序不是很好。如果你必须使用非常小的按钮和大的按钮,使用第二个按钮的规模,这只是在这个参数不同。
- 双m_dBorderRatio 边界和半径之间的比率(0.0和1.0之间)。如果你的半径是16.0和m_dBorderRatio是0.25,按钮的边框将是4.0像素宽。
- 双m_dHeightBorder 边界的颜色是由函数y=x^2计算的,有这个高度。你需要做一些实验来为你的按钮找到一个合适的值。
- 双m_dHeightButton 按钮的颜色是由函数y=x^2计算的,也就是这个高度。你需要做一些实验来为你的按钮找到一个合适的值。
- 双m_dHighLightX 按钮在x方向上高亮的位置。使用这个和下一个值来改变3d效果。
- 双m_dHighLightY 按钮在x方向上高亮的位置。使用这个值和前面的值来改变3d效果。
- 双m_dRadiusHighLight 使用的高亮的半径。你必须做一些实验来找到一个好看的值。
- 双m_dPowerHighLight 使用高亮显示的能力。更多的这和突出的区域变成白色;-)
- tColorScheme m_tColorBack 这是按钮背景的颜色。因为按钮本身并不是透明的,所以可以在这里为对话框面指定颜色,这样按钮看起来就不是矩形,而是圆形的。
- tColorScheme m_tColorBorder 这是显示在按钮边框的最高点的颜色。
- tColorScheme m_tColorFace 这是按钮脸上显示的颜色,按钮中间的区域。
tColorScheme
按钮的着色是由这个结构完成的,它包括按钮的所有不同状态的颜色。
这里有详细说明:
- 也就是说m_tDisabled 如果按钮被禁用,则使用此颜色。
- 也就是说m_tEnabled 如果按钮已启用,但未被单击,则使用此颜色。
- 也就是说m_tClicked 单击按钮时使用此颜色。如果按钮是复选框,则表示选中;如果按钮是单选按钮,则表示选中。
- 也就是说m_tPressed 按下按钮时使用这种颜色。这意味着,鼠标在按钮上,单击鼠标左键。
- 也就是说m_tHot 如果按钮是热点按钮,并且鼠标指针悬停在按钮上,则使用这种颜色。
所以每个按钮都使用一个类的对象。
CRoundButton2
这个类包括一些用于控制按钮行为的Set和Get例程。这里有详细说明:
- bool SetRoundButtonStyle (CRoundButtonStyle * _ptRoundButtonStyle) 这个例程在按钮对象中设置一个指向全局按钮样式对象的指针。这样,您就可以控制哪个按钮使用哪个按钮样式。
- bool GetFont (LOGFONT * _ptLogFont) 您必须提供LOGFONT类型的对象的地址,该对象由函数用实际的set字体-data填充。LOGFONT是MFC的CreateFontIndirect使用的结构。
- bool SetFont (LOGFONT * _ptLogFont) 您必须提供一个LOGFONT类型的对象的地址,该函数使用它来设置按钮的实际字体。LOGFONT是MFC的CreateFontIndirect使用的结构。
- bool GetTextColor (tColorScheme * _ptTextColor) 这个例程用按钮文本的当前设置颜色填充_ptTextColor的对象。这个颜色被指定为tColorScheme,因此您可以为禁用的按钮使用不同的颜色,或者您可以用另一种字体颜色标记被选中的按钮。
- bool GetTextColor (tColorScheme * _ptTextColor) 这个例程将按钮的字体颜色设置为_pttextColor中给定的值。这个颜色被指定为tColorScheme,因此您可以为禁用的按钮使用不同的颜色,或者您可以用另一种字体颜色标记被选中的按钮。
- 空白SetCheckButton (bool _bCheckButton) 将按钮的状态更改为“检查按钮”或“返回”。如果_bCheckbutton为真,该按钮是一个检查按钮。每次单击鼠标,检查的状态都会改变。
- bool GetCheckButton () 如果按钮是一个检查按钮,返回true,否则为false。
- 空白SetRadioButton (bool _bRadioButton) 将按钮的状态更改为单选按钮或返回。如果_bRadiobutton为真,则该按钮是单选按钮。每次鼠标点击都会选中一个单选按钮。取消组的其他单选按钮必须手动完成(目前)。(参见后面的示例。)
- bool GetRadioButton () 如果按钮是单选按钮,返回true,否则返回false。
- 空白SetHotButton (bool _bHotButton) 将按钮的状态更改为热按钮或返回。如果_bRadiobutton为真,则该按钮是一个热点按钮。如果鼠标悬停在按钮的表面上,按钮将改变它的外观为热按钮样式,这样它更明显。
- bool GetHotButton () 如果按钮是热点按钮,返回true,否则返回false。
- 空白SetCheck (bool _bIsChecked) 选中或取消选中按钮。
- bool GetCheck () 获取按钮的实际检查状态。true表示勾选按钮。
使用的代码
首先,你必须在你的项目中包括这四个文件:
- RoundButton2.h
- RoundButton2.cpp
- RoundButtonStyle.h
- RoundButtonStyle.cpp
使用代码最简单的方法是为每个使用的按钮生成变量。第一步:转到对话框的头文件,包括:
.
.
.
#include "..."

#include "RoundButton2.h"
#include "RoundButtonStyle.h"

class CMyDialog : public CDialog
{
.
.
.
下一步是进入对话框编辑器。首先我们需要一个按钮样式来使用。右键单击对话框标题并选择“添加变量…”。在对话框中,将变量类型更改为“CRoundButtonStyle”,并为变量命名。这个例子使用m_tMyButtonStyle。按“OK”,您的第一个全局按钮样式将生成。
现在,我们需要为每个使用过的按钮设置一个变量。要获得它们,请为每个按钮遵循以下步骤:
右击你想要改变的按钮,选择“添加变量…”。在接下来的对话框中,选择变量名(本例使用m_tMyButton1等)并将变量类型更改为CRoundButton2。按“OK”按钮的变量包括在内。
最后一步是将样式与按钮关联起来。转到对话框的OnInitDialog()例程,为每个按钮设置如下行:
BOOL CMyDialog::OnInitDialog()
{
    .
    .
    .
    All other initialization

    m_tMyButton1.SetRoundButtonStyle(&m_tMyButtonStyle);
    m_tMyButton2.SetRoundButtonStyle(&m_tMyButtonStyle);
    m_tMyButton3.SetRoundButtonStyle(&m_tMyButtonStyle);
    m_tMyButton4.SetRoundButtonStyle(&m_tMyButtonStyle);
    m_tMyButton5.SetRoundButtonStyle(&m_tMyButtonStyle);

    return TRUE
}
现在你可以像使用其他MFC按钮一样使用你的按钮。
复选框
如果你想使用你的按钮作为一个复选框,你只需调用…
BOOL CMyDialog::OnInitDialog()
{
    .
    .
    .
    All other initialization

    m_tMyButton1.SetCheckButton(true);

    return TRUE
}
…在OnInitDialog()例程中。这个按钮会随着每次点击而改变检查状态,或者你也可以通过调用void SetCheck(bool)来改变状态。您可以通过调用bool GetCheck()来获得实际的检查状态。
单选按钮
单选按钮的实现有点复杂。在这个例子中,让我们假设您想使用“MyButton2”到“MyButton4”作为单选按钮组。首先,你必须设置按钮的状态为“单选按钮”使用以下代码:
BOOL CMyDialog::OnInitDialog()
{
    .
    .
    .
    All other initialization

    m_tMyButton2.SetRadioButton(true);
    m_tMyButton3.SetRadioButton(true);
    m_tMyButton4.SetRadioButton(true);

    return TRUE
}
单选按钮每次都被“选中”,用户单击它。您必须自己取消单选按钮组中未选中的按钮。为此,为单选按钮组的每个按钮实现OnBnClicked()函数。这些函数包括以下代码:
void CMyDialog::OnBnClickedMyButton2()
{
    // Uncheck the two other Buttons
    m_tMyButton3.SetCheck(false);
    m_tMyButton4.SetCheck(false);
}

void CMyDialog::OnBnClickedMyButton3()
{
    // Uncheck the two other Buttons
    m_tMyButton2.SetCheck(false);
    m_tMyButton4.SetCheck(false);
}

void CMyDialog::OnBnClickedMyButton4()
{
    // Uncheck the two other Buttons
    m_tMyButton2.SetCheck(false);
    m_tMyButton3.SetCheck(false);
}
这将取消选中单选按钮组中所有未被单击的按钮。
热点
要让按钮热,你得打电话…
BOOL CMyDialog::OnInitDialog()
{
    .
    .
    .
    All other initialization

    m_tMyButton5.SetHotButton(true);

    return TRUE
}
…在OnInitDialog()例程中。当鼠标停留在热按钮上时,热按钮将改变其外观
按钮的重新设计
在重新设计中有两个可能的部分。首先是……
ButtonStyle
要重新设计按钮的风格,你必须遵循这个简单的概念:
// Generate local struct-object for style-data
tButtonStyle tStyle;

// Get the current style of your button-style-object
m_tMyButtonStyle.GetRoundButtonStyle(&tStyle);

// Do your changes here. As example lets change the radius
// of the button and the color of the checked button face:
tStyle.m_dRadius = 16.0;
tStyle.m_tColorFace.m_tChecked = RGB(0xFF, 0xFF, 0);

// Save the style back
m_tMyButtonStyle.SetRoundButtonStyle(&tStyle);
现在,您已经更改了按钮的样式,因此使用此样式的所有按钮的外观都将发生变化。
要改变的第二种风格是……
FontStyle
FontStyle是CRoundButton2类的一部分,因为它更经常需要更改按钮的字体,而不是它的图形细节。例如,考虑一个带有符号的按钮,比如演示应用程序中的细长按钮。它使用了一个双箭头的“翅膀”。这个例子显示了按钮标题的字体和字体颜色的变化。
// Generate local font object
LOGFONT tFont;

// Get the current font of your button-object
m_tMyButton1.GetFont(&tFont);

// Do your changes here. As example lets change the
// font to "WingDings" and the font-size to 14:
strcpy(tFont.lfFaceName,"WingDings");
tFont.lfHeight = 14;

// Save the Font back
m_tMyButton1.SetFont(&tStyle);

// Generate local ColorSheme object
tColorScheme tColor;

// Get current Color of Caption
m_tMyButton1.GetFontColor(&tColor);

// Do your changes here. As example lets change the
// captions' color of a checked button to yellow:
tColor.m_tChecked = RGB(0xFF, 0xFF, 0);

// Set Color of Caption
m_tMyButton1.SetFontColor(&tColor);
历史
- 12.09.2005 -初始版本。
- 29.09.2005—添加了按钮功能(感谢AndrewSmirnov)并修复了两个bug(感谢Thomas Kayser和Bhalvinder)。
本文转载于:http://www.diyabc.com/frontweb/news14678.html


