
堡垒机实例以及数据库操作
堡垒机实例以及数据库操作
堡垒机前戏
开发堡垒机之前,先来学习Python的paramiko模块,该模块基于SSH用于连接远程服务器并执行相关操作
使用Python语言的paramiko模块编写服务器批量管理脚本,可完成一些常规任务,例如自动化部署软件、批量执行命令、文件传输等。除了Paramiko模块,还有相同作用的fabric和pexpect模块。
Paramiko模块是基于Python实现的SSH远程安全连接,用于SSH远程执行命令、文件传输等功能。默认Python没有自带。
需要手动安装:pip install paramiko
如果安装失败,可以尝试yum安装:yum install python-paramiko
SSHClient
用于连接远程服务器并执行基本命令
import paramiko

# 创建SSH对象
ssh = paramiko.SSHClient()
# 允许连接不在know_hosts文件中的主机
ssh.set_missing_host_key_policy(paramiko.AutoAddPolicy())
# 连接服务器
ssh.connect(hostname='c1.salt.com', port=22, username='wupeiqi', password='123')

# 执行命令
stdin, stdout, stderr = ssh.exec_command('df')
# 获取命令结果
result = stdout.read()

# 关闭连接
ssh.close()
import paramiko

transport = paramiko.Transport(('hostname', 22))
transport.connect(username='wupeiqi', password='123')

ssh = paramiko.SSHClient()
ssh._transport = transport

stdin, stdout, stderr = ssh.exec_command('df')
print stdout.read()

transport.close()

SSHClient 封装 Transport
基于公钥密钥连接:
import paramiko

private_key = paramiko.RSAKey.from_private_key_file('/home/auto/.ssh/id_rsa')

# 创建SSH对象
ssh = paramiko.SSHClient()
# 允许连接不在know_hosts文件中的主机
ssh.set_missing_host_key_policy(paramiko.AutoAddPolicy())
# 连接服务器
ssh.connect(hostname='c1.salt.com', port=22, username='wupeiqi', key=private_key)

# 执行命令
stdin, stdout, stderr = ssh.exec_command('df')
# 获取命令结果
result = stdout.read()

# 关闭连接
ssh.close()
import paramiko

private_key = paramiko.RSAKey.from_private_key_file('/home/auto/.ssh/id_rsa')

transport = paramiko.Transport(('hostname', 22))
transport.connect(username='wupeiqi', pkey=private_key)

ssh = paramiko.SSHClient()
ssh._transport = transport

stdin, stdout, stderr = ssh.exec_command('df')

transport.close()
import paramiko
from io import StringIO

key_str = """-----BEGIN RSA PRIVATE KEY-----
MIIEpQIBAAKCAQEAq7gLsqYArAFco02/55IgNg0r7NXOtEM3qXpb/dabJ5Uyky/8
NEHhFiQ7deHIRIuTW5Zb0kD6h6EBbVlUMBmwJrC2oSzySLU1w+ZNfH0PE6W6fans
H80whhuc/YgP+fjiO+VR/gFcqib8Rll5UfYzf5H8uuOnDeIXGCVgyHQSmt8if1+e
7hn1MVO1Lrm9Fco8ABI7dyv8/ZEwoSfh2C9rGYgA58LT1FkBRkOePbHD43xNfAYC
tfLvz6LErMnwdOW4sNMEWWAWv1fsTB35PAm5CazfKzmam9n5IQXhmUNcNvmaZtvP
c4f4g59mdsaWNtNaY96UjOfx83Om86gmdkKcnwIDAQABAoIBAQCnDBGFJuv8aA7A
ZkBLe+GN815JtOyye7lIS1n2I7En3oImoUWNaJEYwwJ8+LmjxMwDCtAkR0XwbvY+
c+nsKPEtkjb3sAu6I148RmwWsGncSRqUaJrljOypaW9dS+GO4Ujjz3/lw1lrxSUh
IqVc0E7kyRW8kP3QCaNBwArYteHreZFFp6XmtKMtXaEA3saJYILxaaXlYkoRi4k8
S2/K8aw3ZMR4tDCOfB4o47JaeiA/e185RK3A+mLn9xTDhTdZqTQpv17/YRPcgmwz
zu30fhVXQT/SuI0sO+bzCO4YGoEwoBX718AWhdLJFoFq1B7k2ZEzXTAtjEXQEWm6
01ndU/jhAasdfasdasdfasdfa3eraszxqwefasdfadasdffsFIfAsjQb4HdkmHuC
OeJrJOd+CYvdEeqJJNnF6AbHyYHIECkj0Qq1kEfLOEsqzd5nDbtkKBte6M1trbjl
HtJ2Yb8w6o/q/6Sbj7wf/cW3LIYEdeVCjScozVcQ9R83ea05J+QOAr4nAoGBAMaq
UzLJfLNWZ5Qosmir2oHStFlZpxspax/ln7DlWLW4wPB4YJalSVovF2Buo8hr8X65
lnPiE41M+G0Z7icEXiFyDBFDCtzx0x/RmaBokLathrFtI81UCx4gQPLaSVNMlvQA
539GsubSrO4LpHRNGg/weZ6EqQOXvHvkUkm2bDDJAoGATytFNxen6GtC0ZT3SRQM
WYfasdf3xbtuykmnluiofasd2sfmjnljkt7khghmghdasSDFGQfgaFoKfaawoYeH
C2XasVUsVviBn8kPSLSVBPX4JUfQmA6h8HsajeVahxN1U9e0nYJ0sYDQFUMTS2t8
RT57+WK/0ONwTWHdu+KnaJECgYEAid/ta8LQC3p82iNAZkpWlGDSD2yb/8rH8NQg
9tjEryFwrbMtfX9qn+8srx06B796U3OjifstjJQNmVI0qNlsJpQK8fPwVxRxbJS/
pMbNICrf3sUa4sZgDOFfkeuSlgACh4cVIozDXlR59Z8Y3CoiW0uObEgvMDIfenAj
98pl3ZkCgYEAj/UCSni0dwX4pnKNPm6LUgiS7QvIgM3H9piyt8aipQuzBi5LUKWw
DlQC4Zb73nHgdREtQYYXTu7p27Bl0Gizz1sW2eSgxFU8eTh+ucfVwOXKAXKU5SeI
+MbuBfUYQ4if2N/BXn47+/ecf3A4KgB37Le5SbLDddwCNxGlBzbpBa0=
-----END RSA PRIVATE KEY-----"""

private_key = paramiko.RSAKey(file_obj=StringIO(key_str))
transport = paramiko.Transport(('10.0.1.40', 22))
transport.connect(username='wupeiqi', pkey=private_key)

ssh = paramiko.SSHClient()
ssh._transport = transport

stdin, stdout, stderr = ssh.exec_command('df')
result = stdout.read()

transport.close()

print(result)

基于私钥字符串进行连接
SFTPClient
用于连接远程服务器并执行上传下载
基于用户名密码上传下载
import paramiko

transport = paramiko.Transport(('hostname',22))
transport.connect(username='wupeiqi',password='123')

sftp = paramiko.SFTPClient.from_transport(transport)
# 将location.py 上传至服务器 /tmp/test.py
sftp.put('/tmp/location.py', '/tmp/test.py')
# 将remove_path 下载到本地 local_path
sftp.get('remove_path', 'local_path')

transport.close()
基于公钥密钥上传下载
import paramiko

private_key = paramiko.RSAKey.from_private_key_file('/home/auto/.ssh/id_rsa')

transport = paramiko.Transport(('hostname', 22))
transport.connect(username='wupeiqi', pkey=private_key )

sftp = paramiko.SFTPClient.from_transport(transport)
# 将location.py 上传至服务器 /tmp/test.py
sftp.put('/tmp/location.py', '/tmp/test.py')
# 将remove_path 下载到本地 local_path
sftp.get('remove_path', 'local_path')

transport.close()
#!/usr/bin/env python
# -*- coding:utf-8 -*-
import paramiko
import uuid

class Haproxy(object):

    def __init__(self):
        self.host = '172.16.103.191'
        self.port = 22
        self.username = 'wupeiqi'
        self.pwd = '123'
        self.__k = None

    def create_file(self):
        file_name = str(uuid.uuid4())
        with open(file_name,'w') as f:
            f.write('sb')
        return file_name

    def run(self):
        self.connect()
        self.upload()
        self.rename()
        self.close()

    def connect(self):
        transport = paramiko.Transport((self.host,self.port))
        transport.connect(username=self.username,password=self.pwd)
        self.__transport = transport

    def close(self):

        self.__transport.close()

    def upload(self):
        # 连接,上传
        file_name = self.create_file()

        sftp = paramiko.SFTPClient.from_transport(self.__transport)
        # 将location.py 上传至服务器 /tmp/test.py
        sftp.put(file_name, '/home/wupeiqi/tttttttttttt.py')

    def rename(self):

        ssh = paramiko.SSHClient()
        ssh._transport = self.__transport
        # 执行命令
        stdin, stdout, stderr = ssh.exec_command('mv /home/wupeiqi/tttttttttttt.py /home/wupeiqi/ooooooooo.py')
        # 获取命令结果
        result = stdout.read()


ha = Haproxy()
ha.run()

Demo
堡垒机的实现
实现思路:
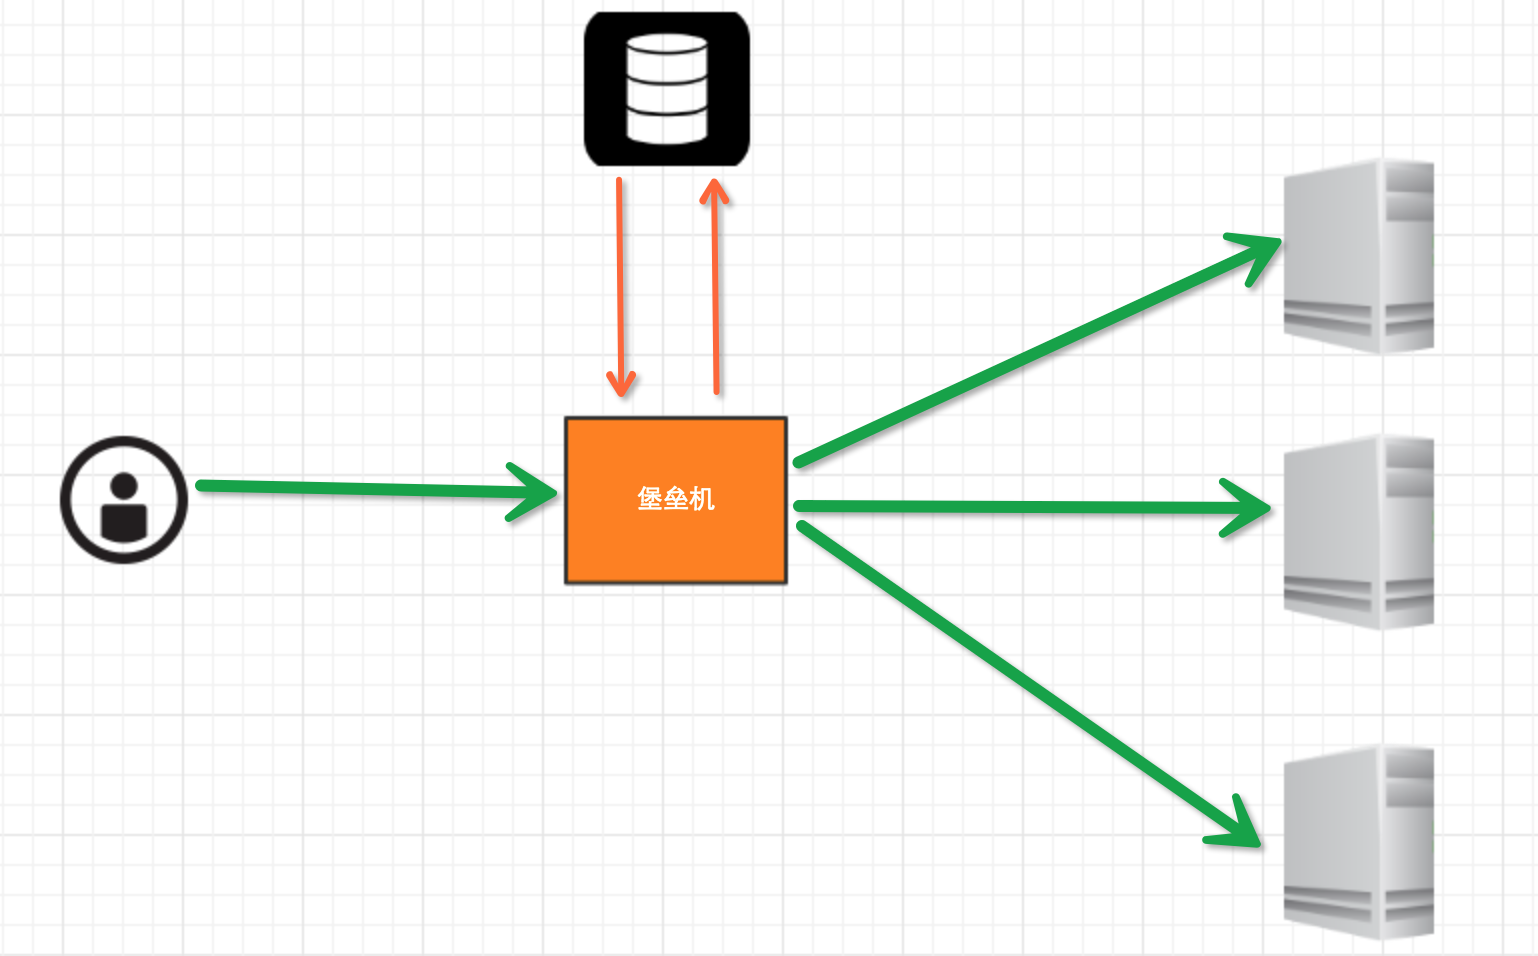
堡垒机执行流程:
- 管理员为用户在服务器上创建账号(将公钥放置服务器,或者使用用户名密码)
- 用户登陆堡垒机,输入堡垒机用户名密码,现实当前用户管理的服务器列表
- 用户选择服务器,并自动登陆
- 执行操作并同时将用户操作记录
注:配置.brashrc实现ssh登陆后自动执行脚本,如:/usr/bin/python /home/wupeiqi/menu.py
实现过程
步骤一,实现用户登陆
import getpass

user = raw_input('username:')
pwd = getpass.getpass('password')
if user == 'alex' and pwd == '123':
    print '登陆成功'
else:
    print '登陆失败'
步骤二,根据用户获取相关服务器列表
dic = {
    'alex': [
        '172.16.103.189',
        'c10.puppet.com',
        'c11.puppet.com',
    ],
    'eric': [
        'c100.puppet.com',
    ]
}

host_list = dic['alex']

print 'please select:'
for index, item in enumerate(host_list, 1):
    print index, item

inp = raw_input('your select (No):')
inp = int(inp)
hostname = host_list[inp-1]
port = 22
步骤三,根据用户名、私钥登陆服务器
tran = paramiko.Transport((hostname, port,))
tran.start_client()
default_path = os.path.join(os.environ['HOME'], '.ssh', 'id_rsa')
key = paramiko.RSAKey.from_private_key_file(default_path)
tran.auth_publickey('wupeiqi', key)

# 打开一个通道
chan = tran.open_session()
# 获取一个终端
chan.get_pty()
# 激活器
chan.invoke_shell()

#########
# 利用sys.stdin,肆意妄为执行操作
# 用户在终端输入内容,并将内容发送至远程服务器
# 远程服务器执行命令,并将结果返回
# 用户终端显示内容
#########

chan.close()
tran.close()
while True:
    # 监视用户输入和服务器返回数据
    # sys.stdin 处理用户输入
    # chan 是之前创建的通道,用于接收服务器返回信息
    readable, writeable, error = select.select([chan, sys.stdin, ],[],[],1)
    if chan in readable:
        try:
            x = chan.recv(1024)
            if len(x) == 0:
                print '\r\n*** EOF\r\n',
                break
            sys.stdout.write(x)
            sys.stdout.flush()
        except socket.timeout:
            pass
    if sys.stdin in readable:
        inp = sys.stdin.readline()
        chan.sendall(inp)

肆意妄为方式一
# 获取原tty属性
oldtty = termios.tcgetattr(sys.stdin)
try:
    # 为tty设置新属性
    # 默认当前tty设备属性:
    #   输入一行回车,执行
    #   CTRL+C 进程退出,遇到特殊字符,特殊处理。

    # 这是为原始模式,不认识所有特殊符号
    # 放置特殊字符应用在当前终端,如此设置,将所有的用户输入均发送到远程服务器
    tty.setraw(sys.stdin.fileno())
    chan.settimeout(0.0)

    while True:
        # 监视 用户输入 和 远程服务器返回数据(socket)
        # 阻塞,直到句柄可读
        r, w, e = select.select([chan, sys.stdin], [], [], 1)
        if chan in r:
            try:
                x = chan.recv(1024)
                if len(x) == 0:
                    print '\r\n*** EOF\r\n',
                    break
                sys.stdout.write(x)
                sys.stdout.flush()
            except socket.timeout:
                pass
        if sys.stdin in r:
            x = sys.stdin.read(1)
            if len(x) == 0:
                break
            chan.send(x)

finally:
    # 重新设置终端属性
    termios.tcsetattr(sys.stdin, termios.TCSADRAIN, oldtty)

肆意妄为方式二
def windows_shell(chan):
    import threading

    sys.stdout.write("Line-buffered terminal emulation. Press F6 or ^Z to send EOF.\r\n\r\n")

    def writeall(sock):
        while True:
            data = sock.recv(256)
            if not data:
                sys.stdout.write('\r\n*** EOF ***\r\n\r\n')
                sys.stdout.flush()
                break
            sys.stdout.write(data)
            sys.stdout.flush()

    writer = threading.Thread(target=writeall, args=(chan,))
    writer.start()

    try:
        while True:
            d = sys.stdin.read(1)
            if not d:
                break
            chan.send(d)
    except EOFError:
        # user hit ^Z or F6
        pass

肆意妄为方式三
注:密码验证 t.auth_password(username, pw)
详见:paramiko源码demo
数据库操作
Python 操作 Mysql 模块的安装
linux:
    yum install MySQL-python

window:
    https://files.cnblogs.com/files/wupeiqi/py-mysql-win.zip
SQL基本使用
1、数据库操作
show databases;
use [databasename];
create database  [name];
2、数据表操作
show tables;

create table students
    (
        id int  not null auto_increment primary key,
        name char(8) not null,
        sex char(4) not null,
        age tinyint unsigned not null,
        tel char(13) null default "-"
    );
CREATE TABLE `wb_blog` (
    `id` smallint(8) unsigned NOT NULL,
    `catid` smallint(5) unsigned NOT NULL DEFAULT '0',
    `title` varchar(80) NOT NULL DEFAULT '',
    `content` text NOT NULL,
    PRIMARY KEY (`id`),
    UNIQUE KEY `catename` (`catid`)
) ;
3、数据操作
insert into students(name,sex,age,tel) values('alex','man',18,'151515151')

delete from students where id =2;

update students set name = 'sb' where id =1;

select * from students
4、其他
主键
外键
左右连接
Python MySQL API
一、插入数据
import MySQLdb

conn = MySQLdb.connect(host='127.0.0.1',user='root',passwd='1234',db='mydb')

cur = conn.cursor()

reCount = cur.execute('insert into UserInfo(Name,Address) values(%s,%s)',('alex','usa'))
# reCount = cur.execute('insert into UserInfo(Name,Address) values(%(id)s, %(name)s)',{'id':12345,'name':'wupeiqi'})

conn.commit()

cur.close()
conn.close()

print reCount
import MySQLdb

conn = MySQLdb.connect(host='127.0.0.1',user='root',passwd='1234',db='mydb')

cur = conn.cursor()

li =[
     ('alex','usa'),
     ('sb','usa'),
]
reCount = cur.executemany('insert into UserInfo(Name,Address) values(%s,%s)',li)

conn.commit()
cur.close()
conn.close()

print reCount

批量插入数据
注意:cur.lastrowid
二、删除数据
import MySQLdb

conn = MySQLdb.connect(host='127.0.0.1',user='root',passwd='1234',db='mydb')

cur = conn.cursor()

reCount = cur.execute('delete from UserInfo')

conn.commit()

cur.close()
conn.close()

print reCount
三、修改数据
import MySQLdb

conn = MySQLdb.connect(host='127.0.0.1',user='root',passwd='1234',db='mydb')

cur = conn.cursor()

reCount = cur.execute('update UserInfo set Name = %s',('alin',))

conn.commit()
cur.close()
conn.close()

print reCount
四、查数据
# ############################## fetchone/fetchmany(num)  ##############################

import MySQLdb

conn = MySQLdb.connect(host='127.0.0.1',user='root',passwd='1234',db='mydb')
cur = conn.cursor()

reCount = cur.execute('select * from UserInfo')

print cur.fetchone()
print cur.fetchone()
cur.scroll(-1,mode='relative')
print cur.fetchone()
print cur.fetchone()
cur.scroll(0,mode='absolute')
print cur.fetchone()
print cur.fetchone()

cur.close()
conn.close()

print reCount


# ############################## fetchall  ##############################

import MySQLdb

conn = MySQLdb.connect(host='127.0.0.1',user='root',passwd='1234',db='mydb')
#cur = conn.cursor(cursorclass = MySQLdb.cursors.DictCursor)
cur = conn.cursor()

reCount = cur.execute('select Name,Address from UserInfo')

nRet = cur.fetchall()

cur.close()
conn.close()

print reCount
print nRet
for i in nRet:
    print i[0],i[1]
出处:http://www.cnblogs.com/wupeiqi/
如对您有帮助,支持下呗!
微信

支付宝


 浙公网安备 33010602011771号