CentOS8.2 安装部署squid代理服务器
Squid是一个缓存和转发HTTP Web代理。Squid具有很多功能,可用于多种情况,例如通过缓存重复的请求来加速Web服务器,缓存Web和dns查找,过滤流量,阻止网站等。它是用C ++编写的,并在GNU GPL下分发执照。
Squid被认为是最可靠的内容控制软件,并且自最近20年以来已被许多组织使用。
本文特别强调CentOS 8上Squid代理服务器的安装和初始配置。因此,如果您愿意在Squid代理中配置一些高级设置,则强烈建议您购买[Squid Proxy Server 3.1:入门指南].
环境规格:
我们已提供了具有以下规范的CentOS 8虚拟机。
- CPU -3.4 GHz(1核心)
- 内存-1 GB
- 储存空间-20 GB
- 作业系统-CentOS 8.2
- 主机名-squid-proxy.lianglab.cn
- IP地址-192.168.6.175/24
在CentOS 8上安装Squid Web代理:
使用ssh作为root用户连接squid-proxy.lianglab.cn。
Squid软件包在标准yum存储库中可用,因此,我们正在使用yum命令安装Squid代理。
[root@squid-proxy ~]# dnf install -y squid Last metadata expiration check: 2:12:45 ago on Thu 17 Dec 2020 09:03:48 PM CST. Dependencies resolved. ============================================================================================ Package Arch Version Repository Size ============================================================================================ Installing: squid x86_64 7:4.4-8.module_el8.2.0+319+d18e041f.1 AppStream 3.5 M Installing dependencies: libecap x86_64 1.0.1-2.module_el8.2.0+319+d18e041f AppStream 29 k Enabling module streams: squid 4Transaction Summary
Install 2 Packages
Total download size: 3.6 M
Installed size: 12 M
Downloading Packages:
(1/2): libecap-1.0.1-2.module_el8.2.0+319+d18e041f.x86_64.r 1.5 MB/s | 29 kB 00:00
(2/2): squid-4.4-8.module_el8.2.0+319+d18e041f.1.x86_64.rpm 41 MB/s | 3.5 MB 00:00Total 40 MB/s | 3.6 MB 00:00
Running transaction check
Transaction check succeeded.
Running transaction test
Transaction test succeeded.
Running transaction
Running scriptlet: squid-7:4.4-8.module_el8.2.0+319+d18e041f.1.x86_64 1/1
Preparing : 1/1
Installing : libecap-1.0.1-2.module_el8.2.0+319+d18e041f.x86_64 1/2
Running scriptlet: libecap-1.0.1-2.module_el8.2.0+319+d18e041f.x86_64 1/2
Running scriptlet: squid-7:4.4-8.module_el8.2.0+319+d18e041f.1.x86_64 2/2
Installing : squid-7:4.4-8.module_el8.2.0+319+d18e041f.1.x86_64 2/2
Running scriptlet: squid-7:4.4-8.module_el8.2.0+319+d18e041f.1.x86_64 2/2
Verifying : libecap-1.0.1-2.module_el8.2.0+319+d18e041f.x86_64 1/2
Verifying : squid-7:4.4-8.module_el8.2.0+319+d18e041f.1.x86_64 2/2
Installed products updated.Installed:
libecap-1.0.1-2.module_el8.2.0+319+d18e041f.x86_64
squid-7:4.4-8.module_el8.2.0+319+d18e041f.1.x86_64
Complete!
启用并启动Squid代理服务。
[root@squid-proxy ~]# systemctl enable --now squid.service Created symlink /etc/systemd/system/multi-user.target.wants/squid.service → /usr/lib/systemd/system/squid.service. [root@squid-proxy ~]# systemctl status squid.service ● squid.service - Squid caching proxy Loaded: loaded (/usr/lib/systemd/system/squid.service; enabled; vendor preset: disabled) Active: active (running) since Thu 2020-12-17 23:17:24 CST; 8s ago Docs: man:squid(8) Process: 3894564 ExecStart=/usr/sbin/squid $SQUID_OPTS -f $SQUID_CONF (code=exited, statu> Process: 3894559 ExecStartPre=/usr/libexec/squid/cache_swap.sh (code=exited, status=0/SUC> Main PID: 3894566 (squid) Tasks: 3 (limit: 23840) Memory: 14.2M CGroup: /system.slice/squid.service ├─3894566 /usr/sbin/squid -f /etc/squid/squid.conf ├─3894573 (squid-1) --kid squid-1 -f /etc/squid/squid.conf └─3894582 (logfile-daemon) /var/log/squid/access.logDec 17 23:17:24 squid-proxy.lianglab.cn systemd[1]: Starting Squid caching proxy...
[root@squid-proxy ~]# netstat -antpl| grep squid
tcp6 0 0 :::3128 ::😗 LISTEN 3894573/(squid-1)
[root@squid-proxy ~]# ss -antpl| grep squid
LISTEN 0 4096 *:3128 : users:(("squid",pid=3894573,fd=13))
[root@squid-proxy ~]#
在CentOS 8防火墙中允许Squid代理服务。
[root@squid-proxy ~]#  firewall-cmd --permanent --add-service=squid
success
[root@squid-proxy ~]#  firewall-cmd --reload
success
在CentOS 8上配置Squid Web代理:
Squid Web代理的全局配置文件是/etc/squid/squid.conf。我们可以根据我们的要求进行定制。
[root@squid-proxy ~]# vi /etc/squid/squid.conf
在其中添加以下指令。
dns_v4_first on
重新启动Squid代理服务以加载更改。
[root@squid-proxy ~]# systemctl restart squid
配置客户端浏览器以使用Squid代理:
启动客户端浏览器,并在其设置中添加我们的Squid代理。
为此,请打开Internet Explorer并转到Internet选项。
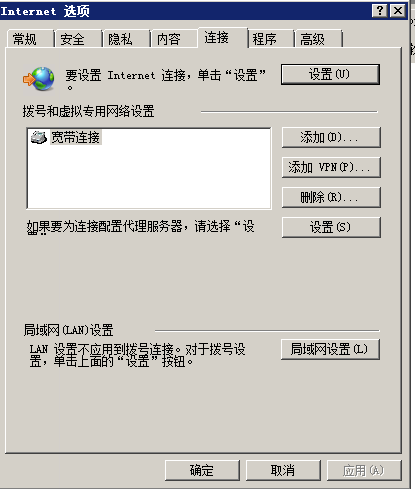
转到“连接”选项卡,然后单击“局域网设置”。
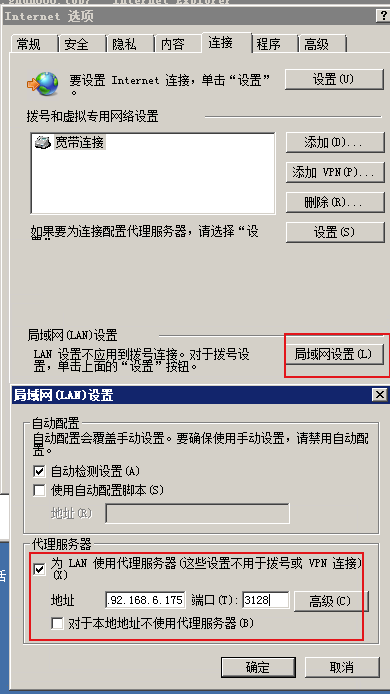
在上面的对话框中输入Squid代理IP地址和端口。
单击“确定”退出Internet选项。
在Internet Explorer中浏览. https://www.baidu.com
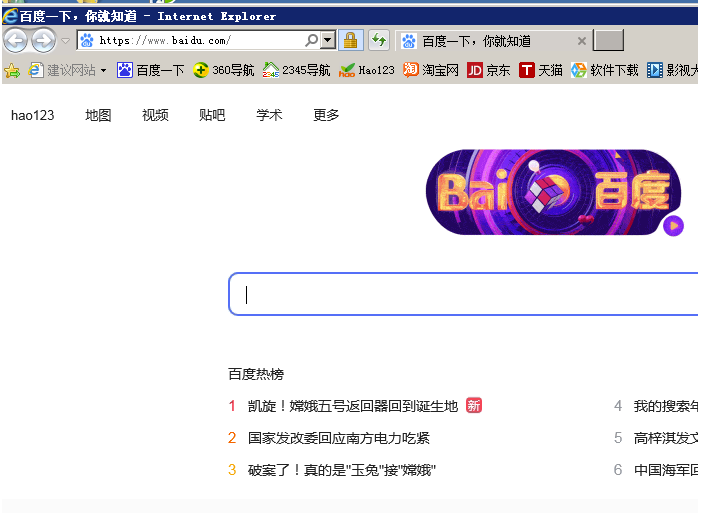
以上网站已通过我们的Squid代理服务器提供服务。
配置Squid客户端身份验证:
我们可以使用HTTP基本身份验证为Squid代理服务器配置基于用户的身份验证。
使用yum命令安装httpd-tools软件包。
[root@squid-proxy ~]# dnf install -y httpd-tools
Last metadata expiration check: 2:41:04 ago on Thu 17 Dec 2020 09:03:48 PM CST.
Dependencies resolved.
=======================================================================================================================
 Package                    Architecture     Version                                         Repository           Size
=======================================================================================================================
Installing:
 httpd-tools                x86_64           2.4.37-21.module_el8.2.0+494+1df74eae           AppStream           103 k
Installing dependencies:
 apr                        x86_64           1.6.3-9.el8                                     AppStream           125 k
 apr-util                   x86_64           1.6.1-6.el8                                     AppStream           105 k
Installing weak dependencies:
 apr-util-bdb               x86_64           1.6.1-6.el8                                     AppStream            25 k
 apr-util-openssl           x86_64           1.6.1-6.el8                                     AppStream            27 k
Enabling module streams:
 httpd                                       2.4
Transaction Summary

=======================================================================================================================

Install  5 Packages
Total download size: 385 k

Installed size: 750 k

Downloading Packages:

(1/5): apr-util-bdb-1.6.1-6.el8.x86_64.rpm                                             9.8 MB/s |  25 kB     00:00

(2/5): apr-1.6.3-9.el8.x86_64.rpm                                                       22 MB/s | 125 kB     00:00

(3/5): apr-util-openssl-1.6.1-6.el8.x86_64.rpm                                          11 MB/s |  27 kB     00:00

(4/5): apr-util-1.6.1-6.el8.x86_64.rpm                                                  15 MB/s | 105 kB     00:00

(5/5): httpd-tools-2.4.37-21.module_el8.2.0+494+1df74eae.x86_64.rpm                     36 MB/s | 103 kB     00:00

-----------------------------------------------------------------------------------------------------------------------

Total                                                                                   33 MB/s | 385 kB     00:00

Running transaction check

Transaction check succeeded.

Running transaction test

Transaction test succeeded.

Running transaction

Preparing        :                                                                                               1/1

Installing       : apr-1.6.3-9.el8.x86_64                                                                        1/5

Running scriptlet: apr-1.6.3-9.el8.x86_64                                                                        1/5

Installing       : apr-util-bdb-1.6.1-6.el8.x86_64                                                               2/5

Installing       : apr-util-openssl-1.6.1-6.el8.x86_64                                                           3/5

Installing       : apr-util-1.6.1-6.el8.x86_64                                                                   4/5

Running scriptlet: apr-util-1.6.1-6.el8.x86_64                                                                   4/5

Installing       : httpd-tools-2.4.37-21.module_el8.2.0+494+1df74eae.x86_64                                      5/5

Running scriptlet: httpd-tools-2.4.37-21.module_el8.2.0+494+1df74eae.x86_64                                      5/5

Verifying        : apr-1.6.3-9.el8.x86_64                                                                        1/5

Verifying        : apr-util-1.6.1-6.el8.x86_64                                                                   2/5

Verifying        : apr-util-bdb-1.6.1-6.el8.x86_64                                                               3/5

Verifying        : apr-util-openssl-1.6.1-6.el8.x86_64                                                           4/5

Verifying        : httpd-tools-2.4.37-21.module_el8.2.0+494+1df74eae.x86_64                                      5/5

Installed products updated.
Installed:

apr-1.6.3-9.el8.x86_64                                               apr-util-1.6.1-6.el8.x86_64

apr-util-bdb-1.6.1-6.el8.x86_64                                      apr-util-openssl-1.6.1-6.el8.x86_64

httpd-tools-2.4.37-21.module_el8.2.0+494+1df74eae.x86_64
Complete!
创建密码文件并在其中添加squiduser用户。
[root@squid-proxy ~]# htpasswd -c /etc/squid/passwd squiduser
New password:
Re-type new password:
Adding password for user squiduser
[root@squid-proxy ~]#
更改passwd文件的所有者。
[root@squid-proxy ~]# chown squid.squid /etc/squid/passwd
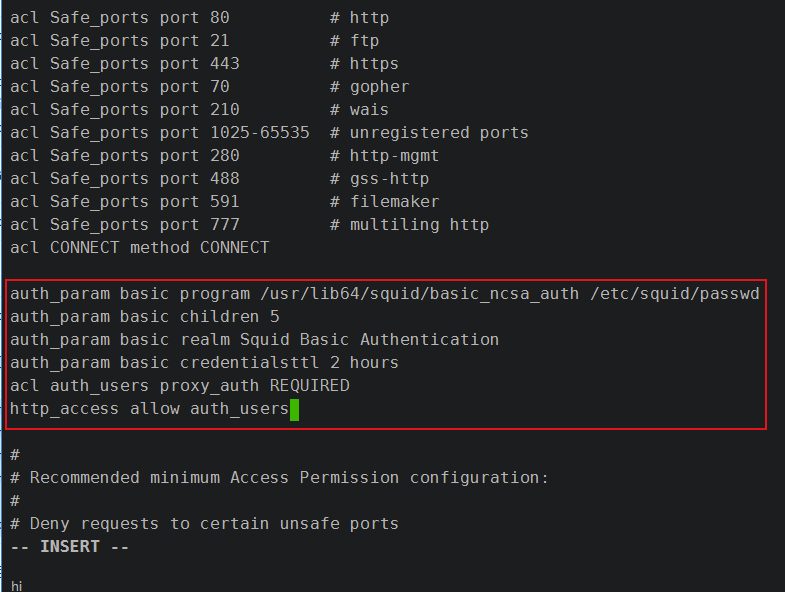
编辑Squid配置文件并添加客户端身份验证设置。
[root@squid-proxy ~]# vi /etc/squid/squid.conf
在端口的ACL后面添加以下指令。
auth_param basic program /usr/lib64/squid/basic_ncsa_auth /etc/squid/passwd
auth_param basic children 5
auth_param basic realm Squid Basic Authentication
auth_param basic credentialsttl 2 hours
acl auth_users proxy_auth REQUIRED
http_access allow auth_users
重新启动Squid代理服务以使更改生效。
[root@squid-proxy ~]# systemctl restart squid
在客户端的浏览器中打开URL https://www.baidu.com
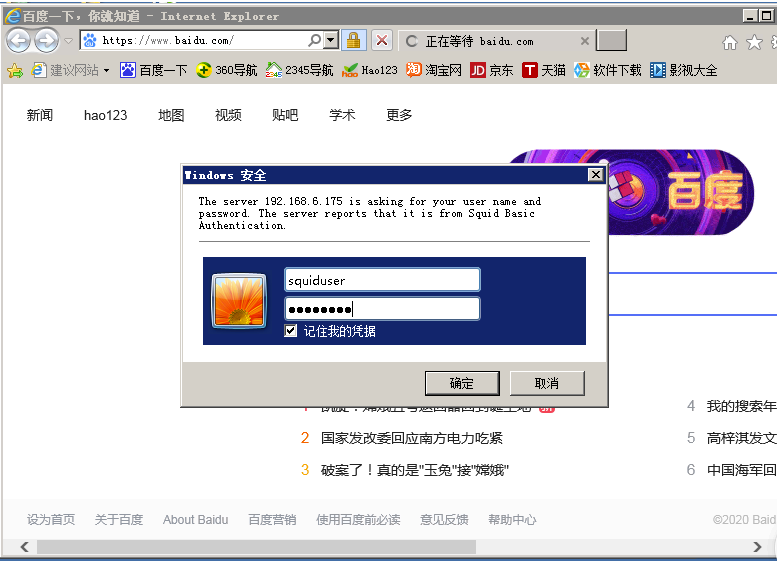
这次,它提示进行身份验证。
创建自定义黑名单以通过Squid代理阻止网站:
创建黑名单文件以阻止网站。
[root@squid-proxy ~]# vi /etc/squid/blacklist
并在其中添加以下网址。
.youku.com
.taobao.com
编辑Squid代理配置文件以添加黑名单设置。
[root@squid-proxy ~]# vi /etc/squid/squid.conf
在端口的ACL后面添加以下指令。
acl bad_urls dstdomain "/etc/squid/blacklist"
http_access deny bad_urls
重新启动Squid代理服务以加载更改。
[root@squid-proxy ~]# systemctl restart squid
在客户端的浏览器中浏览URL http://www.youku.com。
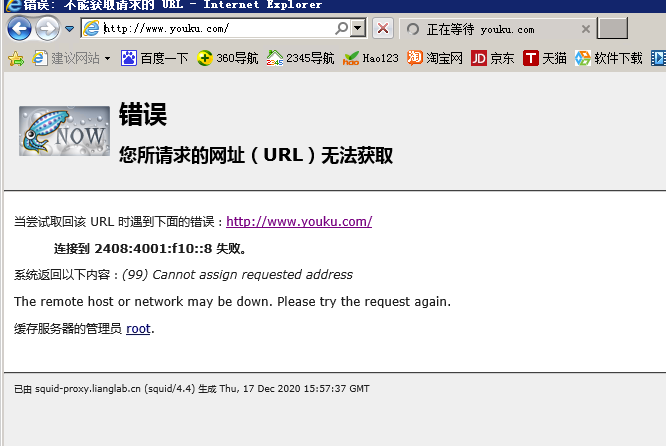
查看squid 日志信息
[root@squid-proxy ~]# tail -f /var/log/squid/access.log1608220657.698 15460 192.168.6.43 TCP_MISS/503 4192 GET http://www.youku.com/ squiduser HIER_DIRECT/2408:4001:f10::8 text/html
1608220657.804 0 192.168.6.43 TCP_HIT/200 13102 GET http://squid-proxy.lianglab.cn:3128/squid-internal-static/icons/SN.png squiduser HIER_NONE/- image/png
1608220676.642 15562 192.168.6.43 TCP_MISS/503 4262 GET http://www.youku.com/favicon.ico squiduser HIER_DIRECT/2408:4001:f10::8 text/html
1608220729.378 15325 192.168.6.43 TCP_MISS/503 4192 GET http://www.youku.com/ squiduser HIER_DIRECT/2408:4001:f10::8 text/html

 浙公网安备 33010602011771号