十四、 数据库
十四、 数据库
1 安装数据库
1.1 安装Mysql
- 安装准备好的mysql.exe。点击下一步操作。
- 虚拟机window安装注意,防火墙设置问题、入站规则3306、mysql 1130解决问题。
- 出现“1130 - Host '106.92.242.42’is not allowed to connect to this MysQL server”的问题解决方案:(此报错是说明连接不上mysql数据库,具体可能有这几个原因:①云服务端口未打开,可以进行端口扫描查看mysql服务的端口是否开放在线扫描网站 ②mysql服务当前连接账号只允许本地连接)
操作方法如下:
管理员身份进入cmd界面,输入 mysql -u root -p
输入密码后进入mysql
切换数据库输入 show databases,然后再输入分号等展示后,再使用数据库,输入 use mysql
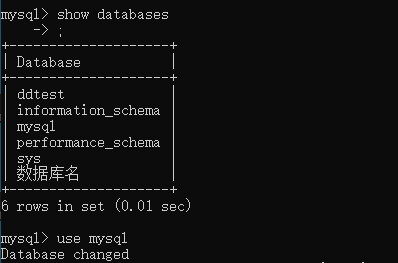
查询数据库root用户host配置,输入 select host from user where user='root'; 找到用户权限host问题

如果root用户host配置的是localhost或者127.0.0.1,就将host修改为%,输入 update user set host = '%' where user = 'root';
最后刷新权限,输入 select host, user from user;
再输入 flush privileges;
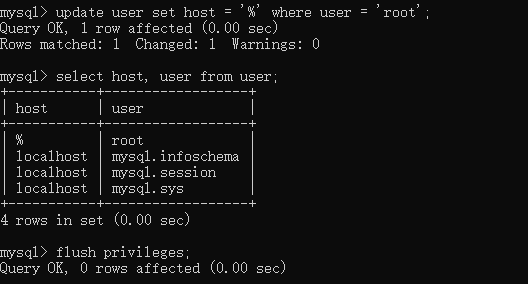
最后就可以用navicat连接虚拟机的mysql8.1数据库了。
2、创建数据库
use mysql
3、查询数据库root用户host配置(如果root用户的host是localhost或者127.0.0.1就需要进行修改)
SELECT host FROM user WHERE user='root';

4、修改root用户host(如果root用户host配置的是localhost或者127.0.0.1,就将host修改为%;最后刷新权限,就可以连接了)
update user set host = '%' where user = 'root';
select host, user from user;
flush privileges;
注意
1.2 安装工具 - navicat
2 数据库及表的创建
2.1 创建数据库
- 使用Navicat工具创建。
右键新增数据库 → 选择字符集 utf8mb4 → 选择 general_ci 排序规则
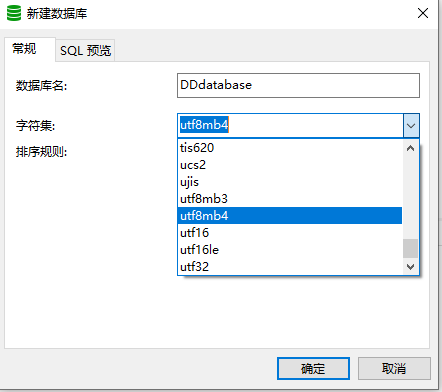
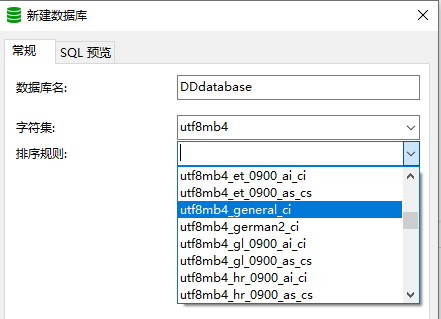
- 使用SQL语句创建。
create database if not exists 数据库名 default charset utf8 collate utf8_general_ci;
 创建     数据库    判断是否存在              默认   字符集utf8          校对规则 uft8
2.2 创建表
- 使用Navicat工具创建
右键 新建表
![]()
添加字段
![]()
再 添加字段
![]()
最后保存 输入user 作为表格名即可
- 使用SQL语句创建
create table if not exists user(
 创建   表格  判断不存在则创建

user_id int unsigned auto_increment,
字段名叫user_id 整数类型 无符号的 自增的

user_name VARCHAR(100) not null,
字段名叫user_name 最大能存储100个字符的字符串 不可以为空

birthday date,
字段名叫birthday 日期类型

primary key(user_id)
唯一主键是user_id

) engine=INNODB DEFAULT CHARSET=utf8;
存储引擎为InnoDB    默认字符编码utf8
2.3 多表创建
- 使用Navicat工具创建
- 使用SQL语句创建
 1 -- shcool
 2 -- id 数字 不能为空 自增 主键
 3 -- school_name 不能为空 字符串
 4 -- school_address 可以为空 字符串
 5
 6 create table school(
 7     id int unsigned auto_increment,
 8     school_name varchar(100) not null,
 9     school_address varchar(100),
10     primary key(id)
11 ) engine=innodb default charset=utf8;
12
13
14 -- grade
15 -- id 数字 不能为空 自增 主键
16 -- school_id 不能为空 数字
17 -- grade_name 年纪名称 不能为空 字符串
18 create table grade(
19     id int unsigned auto_increment,
20     school_id int not null,
21     grade_name varchar(100) not null,
22     primary key(id)
23 ) engine=innodb default charset=utf8;
24
25 -- class
26 -- id 数字 不能为空 自增 主键
27 -- grade_id 不能为空 数字
28 -- class_name 班级名称 不能空 字符串
29 create table class(
30     id int unsigned auto_increment,
31     grade_id int not null,
32     class_name varchar(100) not null,
33     primary key(id)
34 ) engine=innodb default charset=utf8;
35
36
37 -- student
38 -- id 数字 不能为空 自增 主键
39 -- class_id 班级id 不能为空 数字
40 -- student_name 学生名称 不能为空 字符串
41 -- student_birthday 学生生日 日期类型
42 -- sex 性别  整数  不能为空
43 create table student(
44     id int unsigned auto_increment,
45     class_id int not null,
46     student_name varchar(100) not null,
47     student_birthday date,
48     sex int not null,
49     primary key(id)
50 ) engine=innodb default charset=utf8;
51
52
53 -- course
54 -- id 数字 不能为空 自增 主键
55 -- grade_id 年级id 不能为空数字
56 -- course_name 课程名称 不能空 字符串
57 -- full_mark  满分分数 数字类型
58 -- passing_score  及格分数  数字类型
59 create table course(
60     id int unsigned auto_increment,
61     grade_id int not null,
62     course_name varchar(100) not null,
63     full_mark int,
64     passing_score int,
65     primary key(id)
66 ) engine=innodb default charset=utf8;
67
68
69 -- score
70 -- id 数字 不能为空 自增 主键
71 -- student_id 学生id 不能为空 数字
72 -- course_id 课程id 整数 不能为空
73 -- score 分数 可以为空 数字
74 create table score(
75     id int unsigned auto_increment,
76     student_id int not null,
77     course_id int not null,
78     score int,
79     primary key(id)
80 ) engine=innodb default charset=utf8;
3 mysql基本操作
1.1 数据增加
- 使用SQL语句创建
- 新增一行数据个
insert into user (user_name, birthday)
values ('xiaoqiang','2040-05-01')
- 一次新增多行数据
insert into user (user_name, birthday)
values
('小强','1987-01-01'),
('韩梅梅','1960-08-04'),
('建国','1955-06-07'),
('卫国','1930-08-09'),
('狗子','1925-12-25');
- 新增一行数据个
2.1 数据改
- 使用SQL语句创建
- 按同一类修改
update user set sex=0;
- 按条件修改多个
update user set sex=1
where user_name = '小强'
or user_name = '韩梅梅'
- 按多个条件修改
update user set user_name='xiaoqiang222',sex=0
where user_id = 3
- 按条件判断修改
--比较性别,当为1的时候,变成0,其余的变成1
update user set sex =
( case sex
        when 1 then 0
        else 1
        end
)
- 按同一类修改
3.1 数据删除
- 使用Navicat工具删除
- 删除表 = drop table user
![]()
-
清空表 = delete from 表(有痕迹)
![]()
-
截断表 = truncate table user(无痕迹)
![]()
- 删除表 = drop table user
-
使用SQL语句删除
- 删除表中全部数据(有痕迹,如id创建新的后会继续排序下去)
delete from 表名
delete from user;
- 清空表中数据(清空痕迹,如id创建新的后会新排序)
truncate table 表名
truncate table user;
- 按条件删除表中部分数据
delete from 表名 where 字段名=字段值;
delete from user where user_id = 4;
- 删除表
drop table [if exists] 表名;
drop table user;
4.1 数据查询
- 使用SQL语句查询
- 查询表中全部字段
select * from 表名
select * from user;
- 查询表中指定的字段
select 字段1,字段2,......from 表名
select user_name,birthday from user;
- 查询中改表头名
select user_name as '用户名',
birthday as '生日'
from user;

select user_name '用户名',
birthday '生日'
from user;
- 查询表中全部字段
-
- 单条件查询段
select * from 表名 where 字段名=字段值
select * from student where class_id = 2
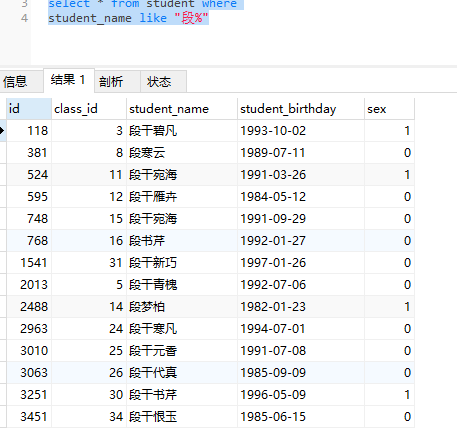
- 模糊条件查询
select * from 表名 where 字段名 like "%关键字"
select * from student where
student_name like "段%"
![]()
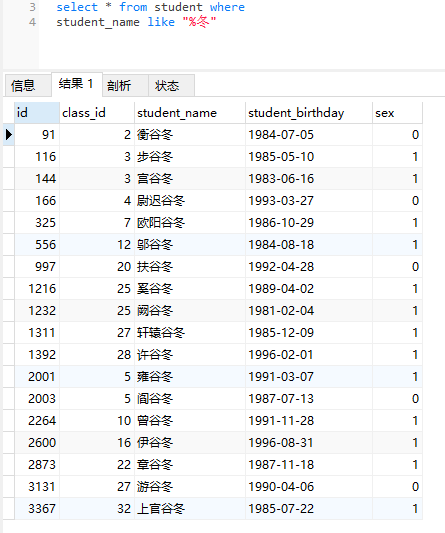
select * from 表名 where 字段名 like "关键字%"select * from student where student_name like "%冬"
![]()
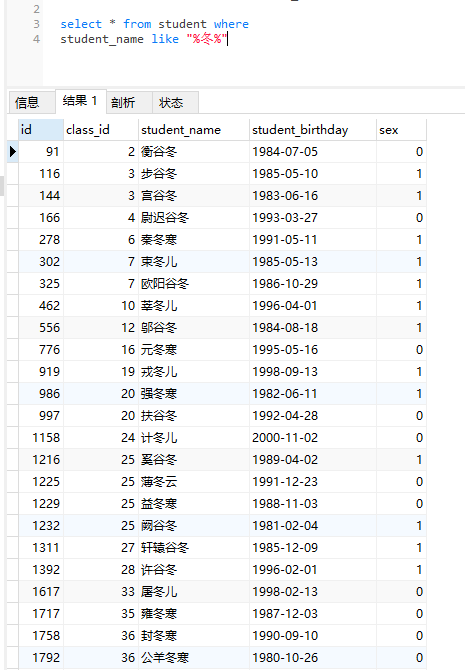
select * from 表名 where 字段名 like "关键字%关键字%关键字"select * from student where student_name like "%冬%"
![]()
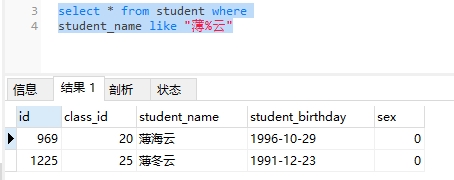
select * from student where
student_name like "薄%云"
![]()
select * from 表名 where 字段名 like "李_" #一个下划线select * from student where student_name like '周_'
![]()
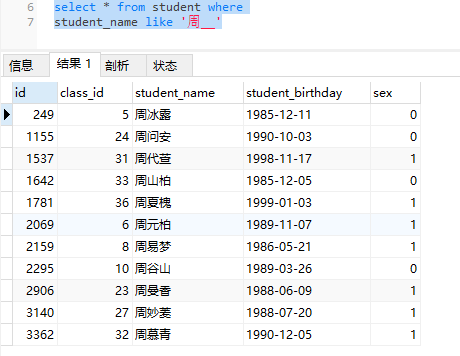
select * from 表名 where 字段名 like "李__" #两个下划线select * from student where student_name like '周__'
![]()
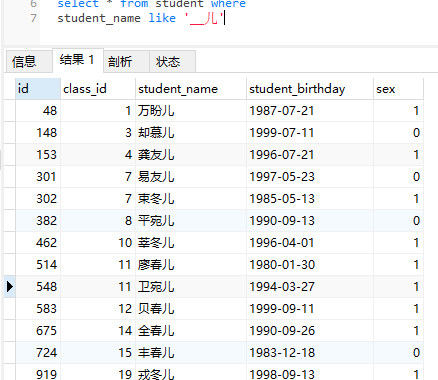
select * from 表名 where 字段名 like "__儿"select * from student where student_name like '__儿'
![]()
-
数据筛选查询
 1 --大于
 2 select * from score where score > 90
 3
 4
 5 --小于
 6 select * from score where score < 30
 7
 8
 9 --大于等于
10 select * from score where score >= 90
11
12
13 --小于等于
14 select * from score where score <= 10
15
16
17 --不等于
18 select * from school where school_address != ""
19
20
21 --null
22 select * from school where school_address is null
23
24
25 --不为null
26 select * from school where school_address is not null
27
28
29 --空字符串""
30 select * from school where school_address = ""
31
32
33 --包含in
34 select * from score where score in (30,40,50)
35
36
37 --不包含not in
38 select * from score where score not in (30,40,50)
39
40
41 --两者之间between and
42 select * from score where score between 90 and 100
43
44
45 --返回指定条数limit
46 select * from score where score between 90 and 100
47 limit 3
48
49
50 --跳过前三条,返回指定条数
51 select * from student
52 limit 3,5
- 多条件查询
 1 --与 and
 2 select * from student
 3 where
 4 class_id = 1 and sex = 1
 5
 6 select * from student
 7 where
 8 class_id = 1 and sex = 1 and student_name like "%香"
 9
10
11 --或 or
12 select * from course
13 where full_mark = 100
14 or passing_score = 90
15 or grade_id = 10
16
17
18 --如果and和or一起使用会怎样?(and和or 自上而下,自左而右顺序匹配)
19 select * from course
20 where grade_id = 10
21 or grade_id = 9
22 and full_mark = 120
23
24 --想要让哪些条件一起运行,就把他们用括号括起来
25 select * from course
26 where
27 (full_mark = 120 and grade_id = 10) or grade_id = 1
28
29 select * from course
30 where
31 full_mark = 120 and (grade_id = 9 or grade_id = 1)
-
左关联查询(以左侧表为基础,右为匹配)
--左关联查询
select school.*,grade.*
from school left join grade
/*
左表school关联右表grade
左表school中的id关联右表grade中的school_id
*/
on school.id = grade.school_id

--左关联别名写法1(字段太长时使用)
select s.*,g.*
from school as s left join grade as g
on s.id = g.school_id

--左关联别名写法2
select s.*,g.*
from school s left join grade g
on s.id = g.school_id

--左关联别名写法3
select s.id '学校id',s.school_name '学校名称',s.school_address '学校地址',
g.id '班级id',g.school_id '所属学校id',g.grade_name '班级名称'
from school s left join grade g
on s.id = g.school_id
-
右关联查询(以右侧表为基础,左为匹配)
--右关联查询
select grade.*,school.*
from grade right join school
on grade.school_id = school.id


--右关联别名写法
select g.id '班级id', g.school_id '学校id', g.grade_name '班级名称',
s.id '所属学校id', s.school_name '学校名称', s.school_address '学校地址'
from school as s right join grade as g
on g.school_id = s.id
-
全关联查询实战
--全关联查询
select s.*,g.*
from school as s join grade as g
on s.id = g.school_id

--全关联查询(去掉as)
select s.*,g.*
from school s
join grade g
on s.id = g.school_id
-
查询表中全部字段
select * from 表名
select * from 表名
select * from 表名
-
查询表中指定的字段
select 字段1,字段2,......from 表名
- 单条件查询段
N、 链接虚拟机数据库
1 安装Mysql
1.1 虚拟机window server 2022 安装Mysql
1.2 设置Mysql权限
- 打开mysql窗口

按步骤输入以下代码即可 备注:一定要记得在写sql的时候要在语句完成后加上" ; "
已正常连上mysql服务器的,此步省略。 连接服务器: mysql -u root -p
看当前所有数据库:show databases;
进入mysql数据库:use mysql;

查看mysql数据库中所有的表:show tables;

查看user表中的数据:select Host, User from user;
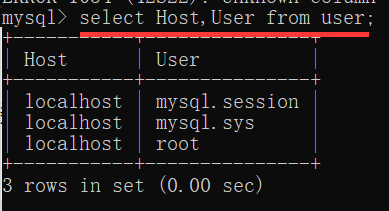
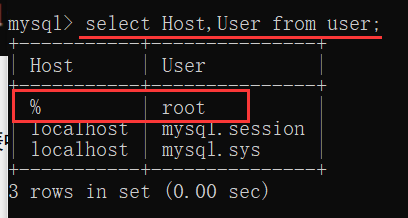
修改user表中的Host:update user set Host='%' where User='root';

再次查看user表中的数据:select Host, User from user;(数据已修改)
最后刷新一下:flush privileges;

此时再次连接成功!




 浙公网安备 33010602011771号