XML标签语法学习(CANoe)
参考bloghttps://wuliang.blog.csdn.net/article/details/106551500 侵删
🌎相关文章
🌎前言
- 🍅 capl 编程中xml语法很重要,当一个测试工程越大,越能体现xml 编程的优越性,可以让你的CASE开发的更通用性
- 🌳测试软硬件环境:
- Win10 x64
- CANoe 11 SP2 x64

CANoe中XML编程常用语法
🌎Structuring Elements
🌙Test Module
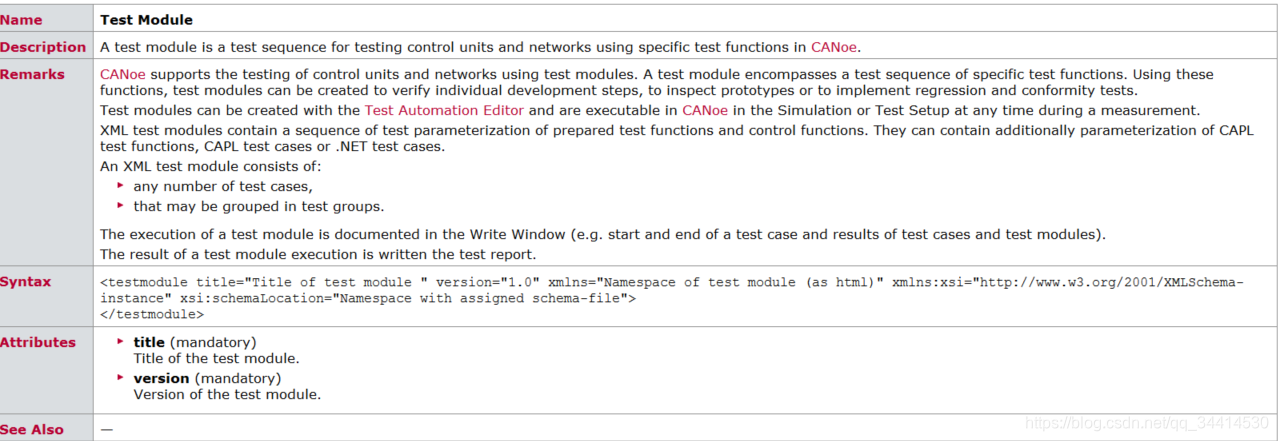
- 1️⃣ 我认为一个 text.xml 文件应该只有一个 Test Module 标签,这个标签有两个属性title 和version,其中title属性的值,会在测试报告html文件的文件名。

- 2️⃣ 例如,新建一个xml文件,命名为test.xml ,写入如下代码,新建一个XML Test Modele 节点,测试下,观察测试报告的输出
<?xml version="1.0" encoding="iso-8859-1" standalone="yes"?>
<testmodule title="testmodel_tag" version="1.13"></testmodule>- 3️⃣ 根据输出报告可以看出 title=“testmodel_tag” ,输出的报告名字就是testmodel_tag

🌙Test Group
- 1️⃣ Test Group 是最常用的 标签,可以包含testcase 标签也可以嵌套包含 Test Group 标签。

- 2️⃣ test.xml文件中的代码如下:
<?xml version="1.0" encoding="iso-8859-1" standalone="yes"?>
<testmodule title="testmodel_tag" version="1.13">
	<testgroup title="demo1"> <!-- father -->
		<testgroup title="demo1-1"> <!-- children 1 -->
			<testgroup title="demo1-1-1"></testgroup> <!-- grandchildren -->
		</testgroup>

		<testgroup title="demo1-2"> <!-- children 2 -->
			<testgroup title="demo1-2-1"></testgroup>
		</testgroup>
	</testgroup>
	<testgroup title="demo2"></testgroup>
	<testgroup title="demo3"></testgroup>
</testmodule>- 3️⃣ 在 test setup中的视图如下:

🌙 Test Case
- 1️⃣ 这个标签我用的少,相比test group ,这个可以包含一下实例化的参数设置,比如信号,变量,值的设置,但是不能包含《capltestcase》标签

- 2️⃣ test.xml文件中的代码如下:
<?xml version="1.0" encoding="iso-8859-1" standalone="yes"?>
<testmodule title="testmodel_tag" version="1.13">
	<testgroup title="demo1"> <!-- father -->
		<testgroup title="demo1-1"> <!-- children 1 -->
			<testgroup title="demo1-1-1"></testgroup> <!-- grandchildren -->
		</testgroup>
		<testgroup title="demo1-2"> <!-- children 2 -->
			<testgroup title="demo1-2-1"></testgroup>
		</testgroup>
	</testgroup>
	<testgroup title="demo2"></testgroup>

	<testcase ident="TC101" title="Lock statically">

		<!-- <capltestcase name ="test_01" title="test_01 "/> -->
		<preparation>
			<initialize title="Initialize test module" wait="1000">
				<envvar name="env_TM_INIT">1</envvar>
				<envvar name="env_TEST_Report">1</envvar>
				<envvar name="env_TEST_ReportMksVer">1</envvar>
				<envvar name="env_WriteVersions2Report">1</envvar>
			</initialize>
		</preparation>
	</testcase>

	<testcase ident="TC101" title="Lock statically">
		<!-- <capltestcase name ="test_01" title="test_01 "/> -->
		<preparation>
			<initialize title="Initialize test module" wait="1000">
				<envvar name="env_TM_INIT">2</envvar>
				<envvar name="env_TEST_Report">2</envvar>
				<envvar name="env_TEST_ReportMksVer">2</envvar>
				<envvar name="env_WriteVersions2Report">2</envvar>
			</initialize>
		</preparation>
	</testcase>
</testmodule>- 3️⃣ 在 test setup中的视图如下:

🌙CAPL Test Case
- 1️⃣ 这个标签重点说下
caplparam type & name,这个参数可以向CAPL中传递参数,type 是参数类型,name 是capl脚本中testcase的参数名

- 2️⃣ 这里我们列出了所有的参数类型, 整形,浮点型,字符串,环境变量,系统变量,信号 :
// Some comments here
<?xml version="1.0" encoding="iso-8859-1" standalone="yes"?>
<testmodule title="testmodel_tag" version="1.13">
	<testgroup title="demo2">
		<capltestcase name="TC1">
		  <caplparam name="int_type" type="int">10</caplparam>  <!--传递整形参数-->
		  <caplparam name="float_type" type="float">20</caplparam>  <!--传递浮点参数-->
		  <caplparam name="str_type" type="string">this is string type</caplparam> <!--传递字符串参数-->
   		  <caplparam type="envvar" name="envvar_type">  <!--传递环境变量参数-->
		    <envvar name="env_TEST_Report"></envvar>
		  </caplparam>

		  <caplparam name="sysvar_type" type="sysvar">  <!--传递系统变量参数-->
    			<sysvar namespace="GEEA_CommFunctionVar" name="LostCommuticaionFrameID"></sysvar>
  		 </caplparam>

		  <caplparam name="flexraysignal" type="signal"> <!--传递flexray signal参数-->
		  	<flexraysignal name="isCarTiGlb" />
	  	 </caplparam>

		  <caplparam name="cansignal" type="signal">  <!--传递can signal参数-->
		  	<cansignal name="PrimAsyALgtReqRngForSafeMax" />
		  </caplparam>
		</capltestcase>
	</testgroup>

</testmodule>- 3️⃣ 新建一个can文件 ,test.can 脚本如下:
// Some comments here
testcase TC1(int int_type, double float_type, char str_type[],envvarInt * envvar_type,sysvarInt* sysvar_type, signal * flexraysignal,signal * cansignal)
{
  $flexraysignal = float_type;
  $cansignal = float_type;
  testWaitForTimeout(100);
  Write("int:%d",int_type);
  Write("double:%f",float_type);
  Write("char:%s",str_type);
  Write("envvarInt:%d",@envvar_type);
  Write("env_TEST_Report:%d",@env_TEST_Report);
  Write("sysvarInt:%d",@sysvar_type);
  Write("flexraysignal:%f",$flexraysignal);
  Write("cansignal:%f",$cansignal);
}
- 4️⃣ CANoe中输出打印结果:

🌎Other Elements
🌙 Initialize&preparation&completion
- 1️⃣一般在Initialize 标签内初始化某些变量,信号的值。Initialize作为preparation的子节点, completion常常用当前test group 的结束的地方


- 2️⃣ test.xml文件中的代码如下:
<?xml version="1.0" encoding="iso-8859-1" standalone="yes"?>
<testmodule title="testmodel_tag" version="1.13">
	<testgroup title="demo2">
		<preparation>
		  <initialize title="Initialize test module" wait="200">
			<envvar name="env_TEST_Report">1</envvar>
			<sysvar name="LostCommuticaionFrameID" namespace="GEEA_CommFunctionVar">3</sysvar>
			<flexraysignal name="isCarTiGlb"> 100 </flexraysignal>
			<cansignal name="DeactiveTJPReqChks"> 100 </cansignal>
		 </initialize>
	    </preparation>
	</testgroup>
</testmodule>
- 3️⃣ 测试报告中的结果:
🌙Comment
- 1️⃣ 在xml文件中可以添加comment ,会在test reporter中打印出来,比较有意思的是,可以添加图片在报告中

- 2️⃣ test.xml文件中的代码如下:
<?xml version="1.0" encoding="iso-8859-1" standalone="yes"?>
<testmodule title="testmodel_tag" version="1.13">
	<testgroup title="Velocity">
		<preparation>
			<initialize wait="200ms" title="Initialize signal">
			   <flexraysignal name="isCarTiGlb"> 100 </flexraysignal>
			</initialize>
		</preparation>

		<testcase title=" WWW" ident="ID of test case">
		 <comment>aaaaaaaaaaaaaaaaaaaaaa
		  </comment>
		 <comment>bbbbbbbbbbbbbbbbbbbbbb
		  </comment>
		 <comment>                      <!--添加一张图片-->
		    <text>xml code example.</text>
		    <resource width="400px" height="400px">testpng.png</resource>
		  </comment>
		</testcase>
		<capltestcase name ="test_01" title="1 test "/>
	</testgroup>
</testmodule>- 3️⃣ 测试报告中的结果:


