IOS:个人笔记|UI_UITableView
下面是使用UITableView必须实现的方法,需要设置数据源,实现UITableviewDataSource
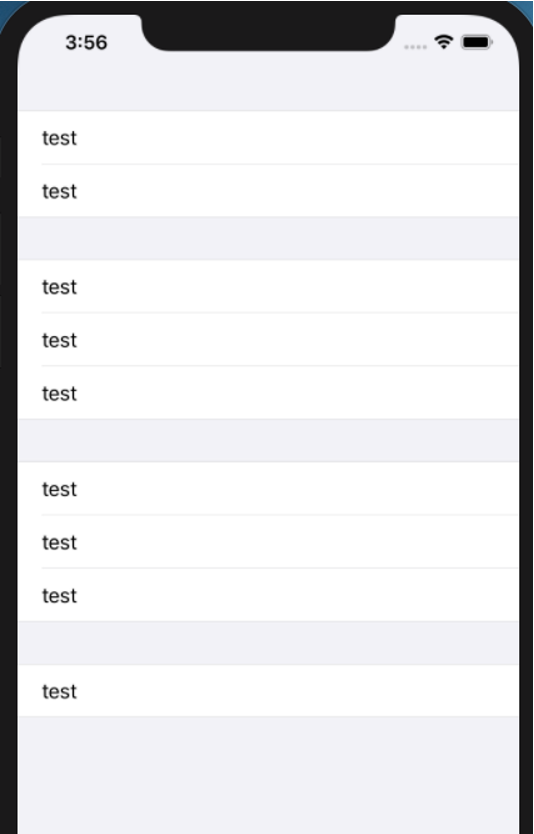
 1 - (void)viewDidLoad {
 2     [super viewDidLoad];
 3     // Do any additional setup after loading the view.
 4 //    [self setUIScrollView];
 5 //    self.view.backgroundColor=[UIColor redColor];
 6     [self setTableview];
 7 }
 8 -(void)setTableview{
 9     _tableview=[[UITableView alloc]initWithFrame:CGRectMake(0, 0, self.view.bounds.size.width, self.view.bounds.size.height) style:UITableViewStyleGrouped];
10     _tableview.dataSource=self;
11     [self.view addSubview:_tableview];
12 }
13 //数据有多少组
14 -(NSInteger)numberOfSectionsInTableView:(UITableView *)tableView{
15     return 4;
16 }
17 //每组有多少行
18 - (NSInteger)tableView:(UITableView *)tableView numberOfRowsInSection:(NSInteger)section{
19     if(section==0)
20         return 2;
21    else if(section==1)
22         return 3;
23     else if(section==2)
24         return 3;
25     else
26         return 1;
27 }
28 //每行显示什么
29 - (UITableViewCell *)tableView:(UITableView *)tableView cellForRowAtIndexPath:(NSIndexPath *)indexPath
30 {
31     UITableViewCell *cell=[[UITableViewCell alloc]init];
32     cell.textLabel.text=@"test";
33     return cell;
34
35 }

UITableView的两种样式,
UITableViewStylePlain,UITableViewStyleGrouped
Tableview的样式为只读属性,用代码设置的话,需要在初始化 的时候initwithframe:style来初始化.
上面是简单的展示,如果对每行显示不同的内容,可以通过indexPath.section,indexPath.row来判断几组几行,然后在里面写具体的展示的东西
Cell右侧的指示样式,可以设置cell.accessoryType属性。这个属性是枚举值,每个值右侧都是显示不同的样式。
如果希望右侧显示其它的,例如一个开关,可以设置cell.accessoryView=具体的控件。
accessoryView的优先级大于sccessoryType,如果都在外层设置了,那么生效的只是accessoryview。
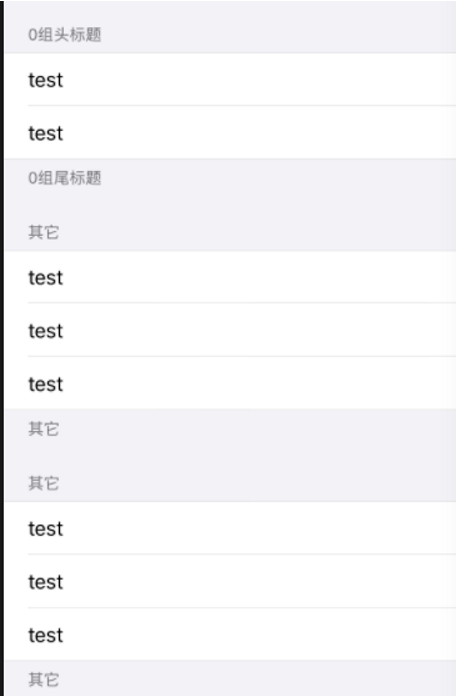
 1 //每组的头部标签
 2 - (NSString *)tableView:(UITableView *)tableView titleForHeaderInSection:(NSInteger)section
 3 {
 4     if(section==0)
 5         return @"0组头标题";
 6     else
 7         return @"其它";
 8 }
 9 //每组的尾标题
10 - (NSString *)tableView:(UITableView *)tableView titleForFooterInSection:(NSInteger)section
11 {
12     if(section==0)
13         return @"0组尾标题";
14     else
15         return @"其它";
16 }
由于上面的方式非常不方便,增加减少一组数据要改动代码的地方更多,于是想着用其他方式进行改进。
使用模型展示数据,把标题头,组内容,标题尾封装成一个实体类,其中组内容因为不只一个东西,比如我用了图片和textlabel,
所以组内容也可以抽取出来封装成一个类。然后要展示的数据全部放在懒加载的数组里,数组里初始化啥的,都是赋的实体类,组内容
作为一个实体类也添加到每组里。先上结果图看下
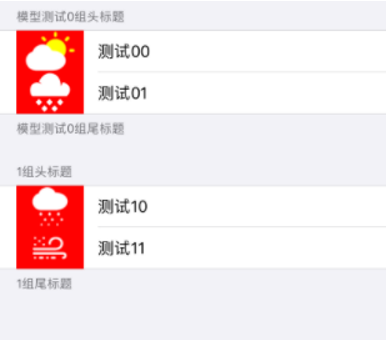
 1 @interface weatherModel : NSObject
 2 //头标题
 3 @property(nonatomic,copy)NSString *header;
 4 //尾标题
 5 @property(nonatomic,copy)NSString *footer;
 6 //组内容数据
 7 @property(nonatomic,copy)NSArray *arr;
 8 @end
 9 //------------------------------------
10 @interface weather : NSObject
11 //内容
12 @property(nonatomic,copy)NSString *name;
13 //图片名称
14 @property(nonatomic,copy)NSString *pictName;
15 +(instancetype)weatherWithName:(NSString *)name pictName:(NSString *)pictName;
16 @end
17 @implementation weather
18 +(instancetype)weatherWithName:(NSString *)name pictName:(NSString *)pictName
19 {
20     weather *wea=[[weather alloc]init];
21     wea.name=name;
22     wea.pictName=pictName;
23     return wea;
24 }
25 @end
26 //---------------------------------
27 @interface ViewController ()<UITableViewDataSource>
28 @property(strong,nonatomic)UITableView *tableview;
29 //所有组的数据
30 @property(nonatomic,strong)NSArray *arrGroup;
31 @end
32 //--------------------------
33 -(NSArray *)arrGroup{
34     if(!_arrGroup)
35     {
36         weatherModel *weatherM0=[[weatherModel alloc]init];
37         weatherM0.header=@"模型测试0组头标题";
38         weatherM0.footer=@"模型测试0组尾标题";
39         weatherM0.arr=@[[weather  weatherWithName:@"测试00" pictName:@"1.png"],
40                        [ weather  weatherWithName:@"测试01" pictName:@"2.png"]
41                  ];
42         weatherModel *weatherM1=[[weatherModel alloc]init];
43         weatherM1.header=@"1组头标题";
44         weatherM1.footer=@"1组尾标题";
45         weatherM1.arr=@[[weather  weatherWithName:@"测试10" pictName:@"3.png"],
46                        [ weather  weatherWithName:@"测试11" pictName:@"4.png"]
47               ];
48         _arrGroup=@[weatherM0,weatherM1];
49     }
50     return _arrGroup;
51
52 }
53 -(void)setTableview{
54     _tableview=[[UITableView alloc]initWithFrame:CGRectMake(0, 0, self.view.bounds.size.width, self.view.bounds.size.height) style:UITableViewStyleGrouped];
55     _tableview.dataSource=self;
56     [self.view addSubview:_tableview];
57 }
58 //数据有多少组
59 -(NSInteger)numberOfSectionsInTableView:(UITableView *)tableView{
60     return self.arrGroup.count;
61 }
62 //每组有多少行
63 - (NSInteger)tableView:(UITableView *)tableView numberOfRowsInSection:(NSInteger)section{
64     weatherModel *wea=self.arrGroup[section];
65     return  wea.arr.count ;
66 }
67 //每行显示什么
68 - (UITableViewCell *)tableView:(UITableView *)tableView cellForRowAtIndexPath:(NSIndexPath *)indexPath
69 {
70     UITableViewCell *cell=[[UITableViewCell alloc]init];
71     cell.imageView.backgroundColor=[UIColor redColor];
72     weatherModel *weaArr=self.arrGroup[indexPath.section];
73     weather   *wea=weaArr.arr[indexPath.row];
74     cell.textLabel.text=wea.name;
75     cell.imageView.image=[UIImage imageNamed:wea.pictName];
76     return cell;
77
78 }
79 //每组的头部标签
80 - (NSString *)tableView:(UITableView *)tableView titleForHeaderInSection:(NSInteger)section
81 {
82     weatherModel *weaArr=self.arrGroup[section];
83     return  weaArr.header;
84 }
85 //每组的尾标题
86 - (NSString *)tableView:(UITableView *)tableView titleForFooterInSection:(NSInteger)section
87 {
88    weatherModel *weaArr=self.arrGroup[section];
89    return  weaArr.footer;
90 }
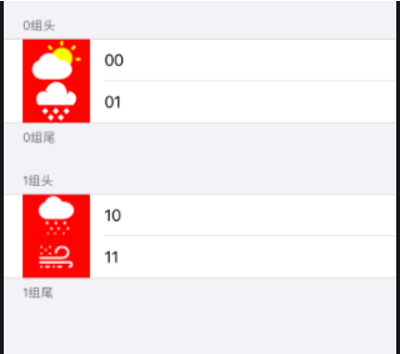
下面我们尝试解析复杂字典模型,其实和上面的大体上一样,上面的例子实现了一层转模型,把图片和标题直接在初始化的时候
给了。其实要做的就是在组实体类里,把组内容实体类(图片和标题的)再转一次就OK。视频教程里是弄得解析PList文件里的
数据,我就直接给出来。要改的无非是数组初始化的地方,然后把外层的初始化的时候读取内层,再这么写一遍
 1 -(NSArray *)arrGroup{
 2     if(!_arrGroup)
 3     {
 4         NSArray *nsa=@[   @{@"header":@"0组头",@"footer":@"0组尾",@"wea":@[@{@"name":@"00",@"pictName":@"1.png"},
 5                                                             @{@"name":@"01",@"pictName":@"2.png"} ]
 6
 7                            },
 8                           @{@"header":@"1组头",@"footer":@"1组尾",@"wea":@[@{@"name":@"10",@"pictName":@"3.png"},
 9                                                                 @{@"name":@"11",@"pictName":@"4.png"} ]
10
11                           }
12
13                      ];
14         NSLog(@"%@",nsa);
15         NSMutableArray *weaArr=[NSMutableArray array];
16         for(NSDictionary *dic in nsa)
17         {
18             weatherModel *weaModel=[weatherModel   weatherModelWithdict:dic];
19             [weaArr addObject:weaModel];
20         }
21         _arrGroup=weaArr;
22     }
23     return _arrGroup;
24
25 }
26 +(instancetype)weatherModelWithdict:(NSDictionary *)dic
27 {
28      weatherModel *wea=[[self alloc]init];
29 //    [wea setValuesForKeysWithDictionary:dic];
30     wea.header=dic[@"header"];
31     wea.footer=dic[@"footer"];
32     NSMutableArray *arr=[NSMutableArray array];
33     for(NSDictionary *d in dic[@"wea"])
34     {
35         weather *w=[weather weatherWithName:d[@"name"] pictName:d[@"pictName"]];
36         [arr addObject:w];
37     }
38     wea.arr=arr;
39     return wea;
40
41 }
只用改数初始化的地方和实体类稍微改动下,tableview展示数据的地方不用变
结果也是能够正常展示数据
--------------------------------------------------------------------------
UITableView的常见属性
tableView.rowHeight //设置行高,我自己试过感觉不好用, 有问题
tableview.sectionFooterHeight //尾区高度
tableview.sectionHeaderHeight //头区高度
tableview.separatorColor //分割线颜色
Tableview.separatorStyle //分割线样式
一个小技巧:如果希望没数据的地方没有分割线,可以设置style为group,或者给表的footview传一个UIview对象(不用设置具体的宽高)
----------------------------------------------------------------------
tableViewCell的常见属性
Cell.accessoryType //右侧的指示样式,例如箭头,圆圈等等
Cell.accessoryView //右侧显示的指示控件,例如右侧给一个UISwitch
Cell.seectionStyle //cell选中时的样式,设置blue的在ios7之后已经失效,需要重写UITableviewCell,重写setselect方法
Cell.backgroundColor //背景颜色
Cell.backgroundView //背景view
Cell.selectedBackgroundView //选中时的背景view
Cell上有一层contentView,contentView宽度和cell一样,高度比cell略矮,cell的imageview,textlabel,detailtextlabel是content
view上的。这么设计的 原因是因为苹果想的是左划或者右划出来删除,直接挪动contentView即可,而不是单个的去挪每个控件
------------------------------------------------------
UITableView的代理方法
didselectRowAtIndexpath //选中某一行会执行的方法,
didDeselectRowAtIndexpath //取消选择某行会执行的方法。例如选则了第一行,然后点击第二行,选择第二行前会先取消第一行
的选中状态,此时就会调用这个方法
viewForHeadInsection,viewForFootInsection//头部或者尾部添加一个控件,可以使用懒加载的方式直接return一个self.XXX,具体头
部或者尾部定义的东西去单独写。
heightforheaderInsection,heightforfootInsection,设置头部或者尾部的高度
heightforRowAtIndexPath //设置每行的高度
--------------------------------------------------
UITableViewController
控制器内部有tableview,而且已经遵守代理和数据源协议,直接拿来用即可
使用的时候注意xib或者storyboard的控制器是不是UIttableview的
-------------------------------------------------
SectionIndexTitlesForTableview 屏幕右侧的索引条
返回值是一个字符串数组,如果自己手写返回一个数组,点击会按照顺序来,跳转到对应顺序的分组
正确做法是添加一个可变数组,然后遍历模型的头标题,添加到数组里
或者valueforkeypath,抽取模型数组的组标题
sectionindexColor索引条字体的颜色
sectionindexBackground索引条的背景颜色

 浙公网安备 33010602011771号