项目四遇到的知识点总结
一、Vue组件之间传值
(一)、父组件向子组件传递数据
- 1.父组件调用子组件的时候绑定动态属性
- 2.在子组件里面通过props接收父组件传过来的数据
1、在 Vue 中,可以使用 props 向子组件传递数据。
(1).子组件
<template>
    <div class="children">
        <h5>{{msg}}</h5>
        <ul class="children-list">
            <li>
                <span>姓名</span>
                <span>性别</span>
                <span>年龄</span>
            </li>
            <li  v-for="item in items">
                <span>{{item.name}}</span>
                <span>{{item.sex}}</span>
                <span>{{item.age}}</span>
            </li>
        </ul>
    </div>
</template>
<script>
    export default {
        name: 'children',
        props: ['items'],
        data() {
            return {
                msg: '我是子组件',
            }
        }
    }
</script>

(2).父组件
<template>
    <div class="more">
        <h3>我是父组件</h3>
        <Children :items="itemList"></Children>
    </div>
</template>
<script>
    import Children from './children.vue'
    export default {
        name: 'more',
        data() {
            return {
                itemList:[//itemList这个数据是后端给的
                    {
                        name: '张三',
                        sex: '男',
                        age: '18'
                    },
                    {
                        name: '李四',
                        sex: '女',
                        age: '19'
                    },
                    {
                        name: '王麻子',
                        sex: '男',
                        age: '20'
                    }
                ]
            }
        },
        components: {
            Children
        }
    }
</script>
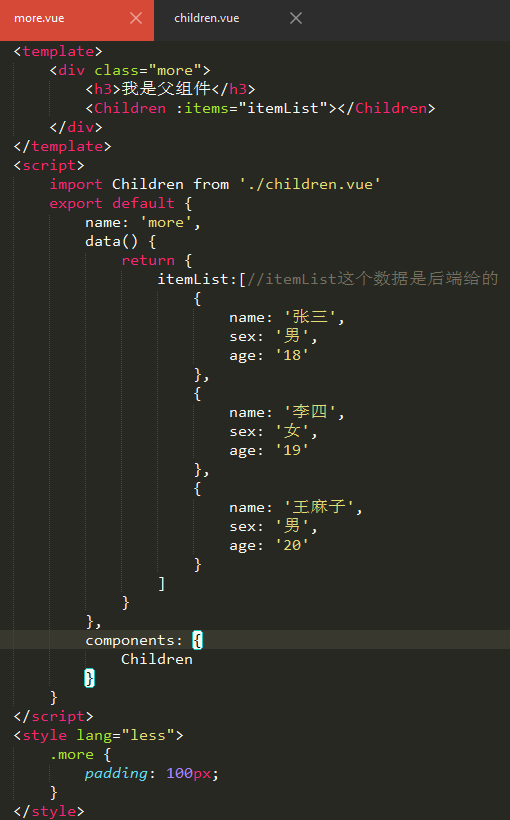
(3).浏览器运行结果
2、父组件主动获取子组件的数据和方法
(1) 调用子组件的时候定义一个ref
<Children ref="header"></Children>
(2) 在父组件里面通过
        this.$refs.header.属性
        this.$refs.header.方法
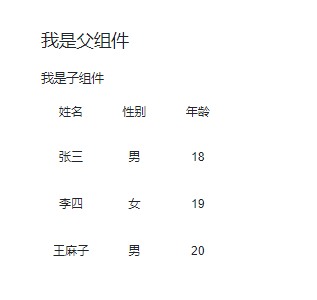
(二)、子组件向父组件传递数据
1、子组件主要通过事件传递数据给父组件
(1).子组件
<template>
    <div class="children">
        <h5>{{msg}}</h5>
        <span>子组件用户名:</span>
        <input type="text" v-model="name" @change="getChange">
    </div>
</template>
<script>
    export default {
        name: 'children',
        data() {
            return {
                msg: '我是子组件',
                name: ''
            }
        },
        methods: {
            getChange() {
                this.$emit('userName',this.name)

            }

        }
    }
</script>
(2).父组件组件
<template>
    <div class="more">
        <h3>我是父组件</h3>
        <Children @userName="getUser"></Children>
        <p>父组件用户名为:{{user}}</p>
    </div>
</template>
<script>
    import Children from './children.vue'
    export default {
        name: 'more',
        data() {
            return {
                user: ''
            }
        },
        methods: {
            getUser(msg) {
                this.user = msg
            }
        },
        components: {
            Children
        }
    }
</script>
(3).运行结果
2、子组件主动获取父组件的数据和方法
    this.$parent.数据
    this.$parent.方法
(三)、非父子组件的传值
- 架起一个沟通的桥梁,是数据能够传递
1、新建一个js文件 然后引入vue 实例化vue 最后暴露这个实例
    event.js
    import Vue from 'vue';
    var Event = new Vue();
    export default Event;
2、在相应的组件引入刚才的实例
import Event from './event.js'
3、通过Event.$emit('名称','数据')
4、在接收数据的地方通过$on接收数据
Event.$on('名称',function(){})
二、vue图片懒加载---vue lazyload插件的简单实用
1、插件地址
2、 npm地址
3、开始使用
(1).安装
-
安装在所在项目中
npm install vue-lazyload --save
(2).在main.js引入插件
import Lazyload from 'vue-lazyload'
Vue.use(Lazyload,{
	error: './static/images/default.png',
	loading: './static/images/default.png'
});
(3).Vue文件中将需要懒加载的图片绑定v-bind:src(:src)修改为v-lazy
-
图片懒加载的简单效果已经实现
<img class="item-pic" v-lazy="items.imgUrl"/>
遇到问题
- 之前为了加载快把所有的图片做成懒加载
- 同一个接口渲染列表的时候图片出现问题,取消懒加载就可以了。
(三)、vue前端开发--图片查看大图插件 vue-photo-preview
1、npm地址
2、开始实用
(1). 安装
npm install vue-photo-preview --save
(2). main.js中使用
import preview from 'vue-photo-preview'
import 'vue-photo-preview/dist/skin.css'
Vue.use(preview)
(3) 直接使用
//在img标签添加preview属性 preview值相同即表示为同一组
<img src="xxx.jpg" preview="0" preview-text="描述文字">
//分组
<img src="xxx.jpg" preview="1" preview-text="描述文字">
<img src="xxx.jpg" preview="1" preview-text="描述文字">
<img src="xxx.jpg" preview="2" preview-text="描述文字">
<img src="xxx.jpg" preview="2" preview-text="描述文字">
(4)script
var options = {}
(四)、VUE中如何定义全局函数
1、方法1
(1)在main.js写入函数
-
$changeData名字随便定义,加$是为了区分其他函数,可以不加。
  Vue.prototype.$changeData = function() {
  	alert('我是全局函数')
  }
(2)在所有组件里可调用函数
this.$changeData();
2、方法2
(1)新建所需要的components.js
- components.js(名字随便定义)
components.js
export default(Vue) => {
	//格式化手机号码,手机号中间4位加*号
	Vue.prototype.$formatePhone = (phone) => {
		if(!isNaN(phone)) {
			return phone.substr(0, 3) + '****' + phone.substr(7);
		} else {
			return '***********';
		}
	}
}
- 手机号中间4位加*号
- var str='1366668888';
- var str2 = str.substr(0,3)+"****"+str.substr(7);
- 这样写只能在当前位置使用
(2)main.js引入并使用
import Components from './component'
Vue.use(Components)
(3)在所有组件里可调用函数
$formatePhone(12345678945)
(五)、keep-alive使用
<keep-alive>是Vue的内置组件,能在组件切换过程中将状态保留在内存中,防止重复渲染DOM<keep-alive>包裹动态组件时,会缓存不活动的组件实例,而不是销毁它们。和<transition>相似,<keep-alive>是一个抽象组件:它自身不会渲染一个DOM元素,也不会出现在父组件链中
1、prop:
- include:字符串或正则表达式。只有匹配的组件会被缓存
- exclude:字符串或正则表达式。任何匹配的组件都不会被缓存
2、常见用法:
//组件
export default {
	name: 'test-keep-alive',
	data() {
		return {
			includedComponents: "test-keep-alive"
		}
	}
}
``
 <keep-alive include="test-keep-alive">
    <!-- 将缓存name为test-keep-alive的组件 -->
    <component></component>
</keep-alive>
<keep-alive include="a,b">
    <!-- 将缓存name为a或者b的组件,结合动态组件使用 -->
    <component :is="view"></component>
</keep-alive>

<!-- 使用正则表达式,需使用v-bind -->
<keep-alive :include="/a|b/">
    <component></component>
</keep-alive>

<!-- 动态判断 -->
<keep-alive :include="includedComponents">
    <router-view></router-view>
</keep-alive>

<keep-alive exclude="test-keep-alive">
    <!-- 将不缓存name为test-keep-alive的组件 -->
    <component></component>
</keep-alive>
项目中遇到缓存问题
-
之前把
:include="includedComponents放在最外层的app.vue是不生效的,里面还有一个index.vue<keep-alive :include="includedComponents"> <router-view class="content"></router-view> </keep-alive> data:() =>{ return { //缓存界面name值列表 'new', 'new-detail' } }
3、结合router,缓存部分页面
-
使用$router.meta的keepAlive属性:
<keep-alive> <router-view v-if="$router.meta.keepAlive"></router-view> </keep-alive> <router-view v-if="!$router.meta.keepAlive"></router-view> -
需要在
router中设置router的元信息meta://router.js export default new Router({ routes:[ { path: '/home', name: 'Hello', component: Hello, meta: { keepAlive: false //不需要缓存 } }, { path: '/page1', name: 'Page1', component: Page1, meta: { keepAlive: true //不需要缓存 } } ] })
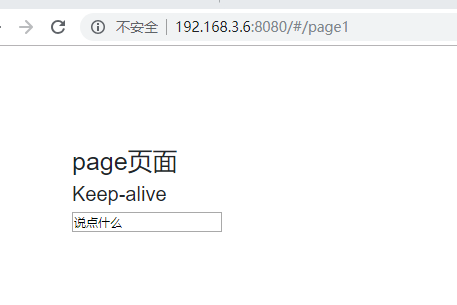
4、使用效果
-
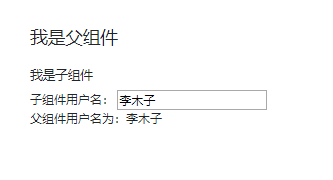
以上面router的代码为例
  <!-- Page1页面 -->
  <template>
    <div class="hello">
      <h1>page页面</h1>
      <h2>{{msg}}</h2>
      <input placeholder="输入框"></input>
    </div>
  </template>
  <script>
      export default {
          data:() => {
              return {
                  msg: 'Keep-alive'

              }
          }
      }
  </script>
``
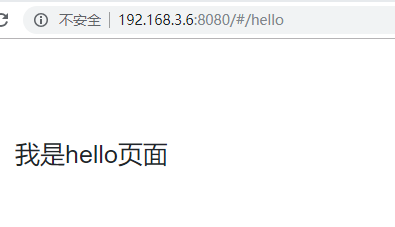
<!-- Hello页面 -->
<template>
  <div class="hello">
    <h1>{{msg}}</h1>
  </div>
</template>
<script>
    export default {
        data() {
            return {
                msg: '我是hello页面'
            }
        }
    }
</script>
- 进入Page1页面,并输入‘说点什么’
- 跳转到Hello
- 进入Page1页面,输入框数据会被保留
(六)vue-router中$route和$router
1、$route对象
- route是一个跳转的路由对象,每一个路由都会有一个route对象,是一个局部的对象,可以获取对应的name,path,params,query等。
![]()

(1)$route表示当前路由信息对象
-
路由对象表示当前活动路由的状态。它包含当前URL的解析信息以及URL匹配的路由记录。
-
路由对象是不可改变的。每次成功导航都会产生一个新的路线对象
-
路径对象可以在多个位置找到:
-
1.内部组件为this.$route
-
2.内部$route观察者回调
-
3.作为调用的返回值router.match(location)
-
内部导航守卫作为前两个参数
router.beforeEach((to, from, next) => { // `to` and `from` are both route objects }) -
scrollBehavior函数内部作为前两个参数
  const router = new VueRouter({
    scrollBehavior (to, from, savedPosition) {
      // `to` and `from` are both route objects
    }
  })
(2)路由对象属性
1. $route.path:  对应当前路径的字符串,始终解析为绝对路径。例如'/trust'.
2. $route.params: 一个key/value对象,包含了动态片段和全匹配片段,如果没有路由参数,就是一个空对象。
3. $route.query:  一个key/value对象,表示URL查询参数。
例如,对于路径/trust?id=1,则有$route.query.id == 1,如果没有查询参数,则是个空对象
4. $route.hash: 当前路由的哈希值(#如果有)。如果没有哈希值,则为空字符串。
5. $route.fullPath: 完成解析后的URL,包含查询参数和hash的完整路径。
6. $route.matched: 数组,包含当前匹配的路径中所包含的所有片段所对应的配置参数对象
7. $route.name: 当前路径名字
8. $route.meta: 路由元信息
2、$router对象
- router是VueRouter的一个对象,通过Vue.use(VueROuter)和VueRouter构造函数得到一个router的实例对象,这个对象中是一个全局的对象,它包含所有的路由包含了许多关键的对象和属性
(1) 路由器实例属性
- router.app: router注入的根Vue实例
- router.mode: 路由器正在使用的模式
- router.currentRoute: 当前路由表示为路由对象
(2)、路由器实例方法
- this.$router.push()
- this.$router.replace()
- this.$router.go()
- this.$router.back()
- this.$router.forward()
(七)、Vue.js实现tab切换效果
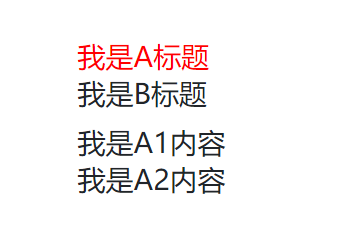
<ul>
     <li v-for="(item,index) in items" :class="{'actived': curIndex == index}" @click="isShow(index)">{{item.value}}</li>
</ul>
<div v-for="(item,index) in items" v-show="curIndex == index">
      <div v-for="list in item.lists">
           {{list.text}}
       </div>
 </div>

<script>
export default{
	data:()=>{
		return {
 			curIndex: 0,
            items: [
                {
                    value: '我是A标题',
                    lists: [
                        {
                            text: '我是A1内容',
                        },
                        {
                            text: '我是A2内容',
                        }
                    ]
                },
                {
                    value: '我是B标题',
                    lists: [
                        {
                            text: '我是B的内容'
                        },
                        {
                            text: '哈哈我也是B的内容'
                        }
                    ]
                }
            ]
},
methods: {
    isShow(index){
        this.curIndex = index;
    }
}
}
css
.actived {
    color: red;
}
(八)、css修改滚动条默认样式
1、滚动条
::-webkit-scrollbar {} //滚动条整体部分
::-webkit-scrollbar-track{} //滚动条滑轨
::-webkit-scrollbar-track-piece{} //内层轨道,滚动条中间部分
::-webkit-scrollbar-thumb{}//滚动条滑块
::-webkit-scrollbar-button{} //滑轨两头的监听按钮
::-webkit-scrollbar-button:start {}//滑轨顶部的监听按钮
::-webkie-scrollbar-button:end{}//滑轨底部的监听按钮
::-webkit-scrollbar-corner{}//横向滚动条和纵向滚动条相交处的尖角
::-webkit-resizer{}//两个滚动条的交汇处上用于通过拖动调整元素大小的小控件

//还可设置鼠标移动上去时的变化
::-webkit-scrollbar-track:hover{}
::-webkit-scrollbar-thumb:hover{}
::-webkit-scrollbar-button:start:hover{}
::-webkit-scrollbar-button:end:hover{}
-
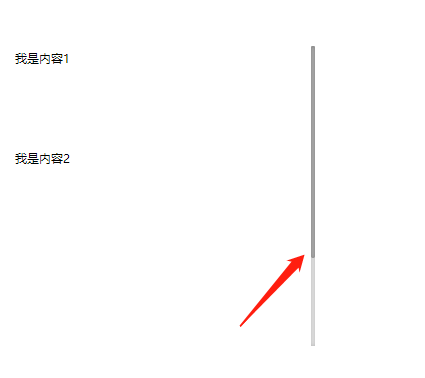
html代码
<div class="inner"> <div class="inner-box"> <p style="height:100px;">我是内容1</p> <p style="height:300px;">我是内容2</p> <p>那我就是内容3</p> </div> </div> -
css代码
  .inner {
      position: absolute;
      top: 50%;//根据实际需求写
      left: 15px;
      overflow: hidden;
      width: 300px;
      height: 300px;
  }
  .inner-box {
      overflow-x: hidden;
      overflow-y: auto;
      color: #000;
      height: 100%;
  }
   /*滚动条样式*/
  .inner-box::-webkit-scrollbar {/*滚动条整体样式*/
      width: 4px;     /*高宽分别对应横竖滚动条的尺寸*/
      height: 4px;
  }
  .inner-box::-webkit-scrollbar-thumb {/*滚动条里面小方块*/
      border-radius: 5px;
      -webkit-box-shadow: inset 0 0 5px rgba(0,0,0,0.2);
      background: rgba(0,0,0,0.2);
  }
  .inner-box::-webkit-scrollbar-track {/*滚动条里面轨道*/
      -webkit-box-shadow: inset 0 0 5px rgba(0,0,0,0.2);
      border-radius: 0;
      background: rgba(0,0,0,0.1);
  }
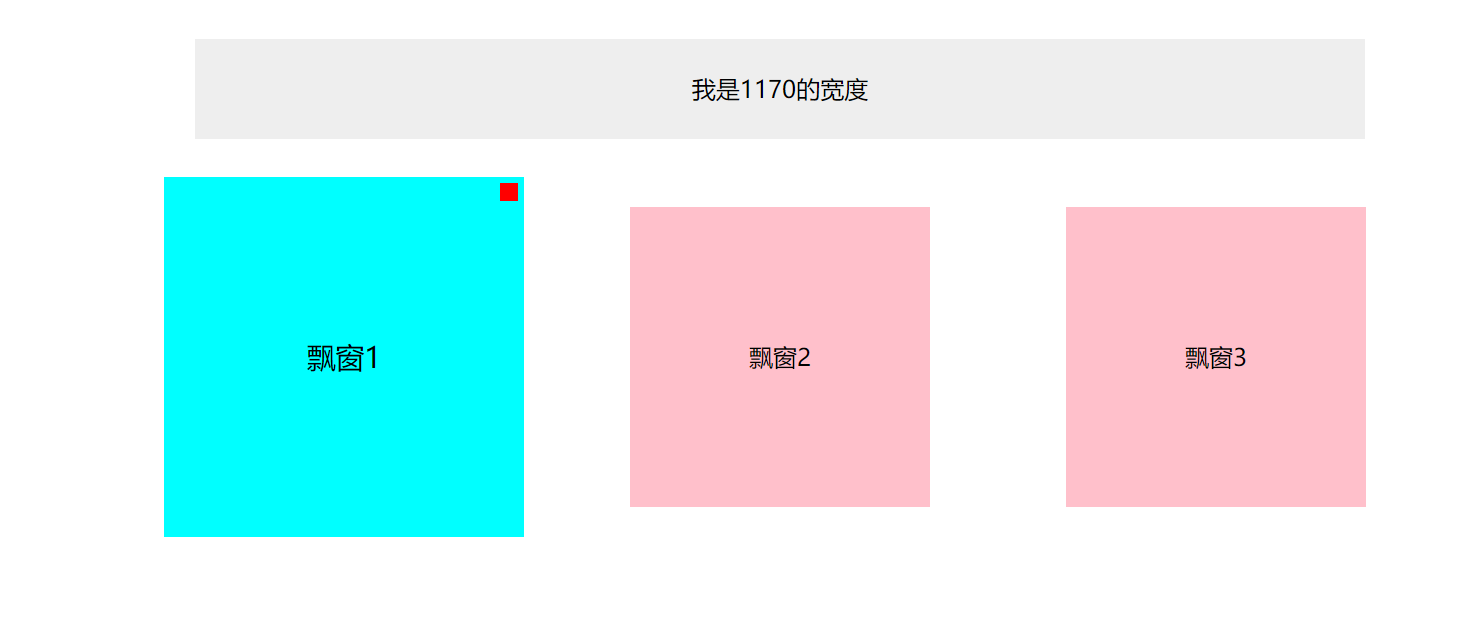
### (九)、css点击放大1.2倍
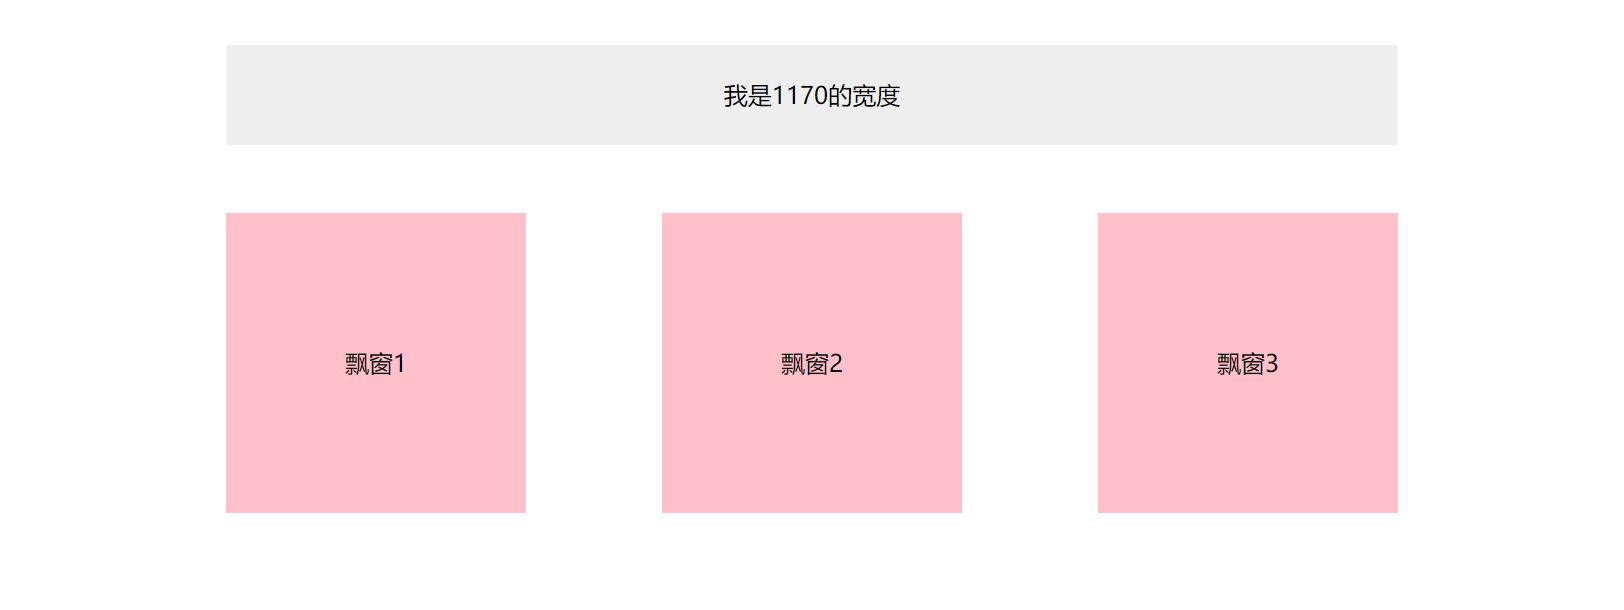
<!DOCTYPE html>
<html lang="en">
<head>
    <meta charset="UTF-8" />
    <title>阳台飘窗实例</title>
    <style type="text/css">
        * {
            margin: 0;
            padding: 0;
        }
        .box {
            margin: 100px auto;
        }
        .top {
            width: 1170px;
            height: 100px;
            line-height: 100px;
            background: #eee;
            margin: 0 auto;
            text-align: center;
            font-size: 24px;
            color: #000;
        }
        .bay-window {
            position: relative;
            width: 1308px;//width*子元素的个数+margin*6 300*3+68*6
            margin: 0 auto;
        }
        .bay-list {
            width: 300px;
            height: 300px;
            float: left;
            margin: 68px;
            background: pink;
            font-size: 24px;
            text-align: center;
            line-height: 300px;
        }
        .bay-list:hover{
            transform: scale(1.2);
            transition: all .25s;
            background: cyan;
        }
        .bay-list:hover:before {
            position: absolute;
            top: 0;
            right: 0;
            content: '';
            width: 15px;
            height: 15px;
            margin: 5px;
            background: red;
            z-index: 1;

        }
    </style>
</head>
<body>
<div class="box">
    <div class="top">我是1170的宽度</div>
    <div class="bay-window">
        <div class="bay-list">飘窗1</div>
        <div class="bay-list">飘窗2</div>
        <div class="bay-list">飘窗3</div>
        <div style="clear:both;"></div>
    </div>
</div>
</body>
</html>
(十)判断是PC还是客户端
-
pc首页写
created(){ this.initData(); }, methods: { initData() { //判断手机还是pc var MOBILE_WEB = '客户端地址'; var userAgentInfo = navigator.userAgent; var Agents = ["Android","iPhone","SymbianOS","Windows Phone","iPad","iPod"]; var isPc = true; for(var v = 0; v < Agents.length; v++){ if(userAgentInfo.indexOf(Agents[v]) > 0){ isPc = false; break; } } if (!isPc) { location.href = MOBILE_WEB; } } } -
客户端首页写
  <script>
  	//判断手机还是pc
      var PC_WEB = 'pc地址'
      var userAgentInfo = navigator.userAgent;
      var Agents = ["Android","iPhone","SymbianOS","Windows Phone","iPad","iPod"];

      var isPc = true;
      for(var v = 0; v < Agents.length; v++){
          if(userAgentInfo.indexOf(Agents[v]) > 0){
              isPc = false;
              break;
          }
      }
      if (isPc) {
          location.href = PC_WEB;
      }
  </script>
零碎知识点
Safari3D 变换会忽略z-index 解决方法
-
父级,任意父级,非body级别,设置overflow:hidden可恢复和其他浏览器一样的渲染。
-
不能给父级设置overflow:hidden,怎么办呢?
  .bar {
      position: fixed;
      z-index: 99;
      /* 以毒攻毒 */
      transform: translateZ(100px);
  }
屏幕滚动到一定位置div显示
-
top是div的class类,fixed固定位置
  $(window).scroll(function(){
  	var winHeight = $(window).height();
  	var top = $(this).scrollTop();
  	var isVisible = top >= winHeight;
  	if(isVisible){
  		$('.top').addClass('fixed');
  	}else{
  		$('.top').removeClass('fixed');
  	}
  });
监听鼠标,超过一分钟鼠标没有移动,弹框
var that = this;

  document.onmousemove = function () {
    window.lastMove = new Date().getTime();
  }
  window.lastMove = new Date().getTime();
  window.setInterval(function() {
    var now = new Date().getTime();
    if(now - lastMove > 60000 ){
        alert('超过一分钟我出现了')
    }
  },1000)
需求在首页出现弹框,其他页不出现,用vue写的项目
    export default {
          name: 'home',
          data: ()=>{
            return {
                      lastMoveTimer: null
            }
      },
      mounted() {
                  var that = this;
                  //监听鼠标,鼠标没有移动超过1分钟,弹销售扫码。
                  document.onmousemove = function () {
                        window.lastMove = new Date().getTime();
                  }
                  window.lastMove = new Date().getTime();
                  that.lastMoveTimer = setInterval(function() {
                   var now = new Date().getTime();
                   if(now - lastMove > 120000){
                        //两分钟后出现弹框

                   }
          },1000)

      },
       // 生命周期销毁
      beforeDestroy:function(){
            clearInterval(this.lastMoveTimer);
            this.lastMove = null;
      }
}
路由跳转新窗口
-
home 详情页
let routeData = this.$router.resolve({ path: '/home/'+item.id}); window.open(routeData.href, '_blank'); -
点击按钮打开邮箱的代码
点击按钮打开邮箱:<input type="button" value="邮件" onclick="mailto:xxx@163.com"> 点击按钮发送邮件(以126邮箱为例): <a href="mailto:XXX@126.com">Email</a> -
解决input获得焦点时边框没有border-radius
-
-webkit-appearance —— webkit外观样式属性
  input {
   	border-radius: 8px;
      outline: 0;
      -webkit-transition:.2s border-color;//属性渐变
      -webkit-appearance: none;//来移除原生控件样式
  }
  input:focus {
  	border-color: #20a0ff;
  }

 浙公网安备 33010602011771号