SpringSecurityOauth2系列学习(二):授权服务
系列导航
SpringSecurity系列
- SpringSecurity系列学习(一):初识SpringSecurity
- SpringSecurity系列学习(二):密码验证
- SpringSecurity系列学习(三):认证流程和源码解析
- SpringSecurity系列学习(四):基于JWT的认证
- SpringSecurity系列学习(四-番外):多因子验证和TOTP
- SpringSecurity系列学习(五):授权流程和源码分析
- SpringSecurity系列学习(六):基于RBAC的授权
SpringSecurityOauth2系列
- SpringSecurityOauth2系列学习(一):初认Oauth2
- SpringSecurityOauth2系列学习(二):授权服务
- SpringSecurityOauth2系列学习(三):资源服务
- SpringSecurityOauth2系列学习(四):自定义登陆登出接口
- SpringSecurityOauth2系列学习(五):授权服务自定义异常处理
授权服务
认识了Oauth2之后,接下来我们就要开始正式编码写一个demo了
从上一节学习中看来,授权服务起了非常大的重用,我们这里也从搭建一个授权服务开始
在动手之前,咱们来了解一下SpringSecurityOauth2中授权服务的一些概念
概念
授权服务配置
- 配置一个授权服务,需要考虑
授权类型(GrantType)、不同授权类型为客户端(Client)提供了不同的获取令牌(Token)方式,每一个客户端(Client)都能够通过明确的配置以及权限来实现不同的授权访问机制,也就是说如果你提供了一个client_credentials授权方式,并不意味着其它客户端就要采用这种方式来授权 - 使用
@EnableAuthorizationServer来配置授权服务机制,并继承AuthorizationServerConfigurerAdapter该类重写configure方法定义授权服务器策略
配置客户端详情(Client Details)
ClientDetailsServiceConfigurer能够使用内存或 JDBC 方式实现获取已注册的客户端详情,有几个重要的属性:- clientId:客户端标识 ID(账号)
- secret:客户端安全码(密码)
- scope:客户端访问范围,默认为空则拥有全部范围
- authorizedGrantTypes:客户端使用的授权类型,默认为空
- authorities:客户端可使用的权限
管理令牌(Managing Token)
读和写令牌所用的tokenService不同
ResourceServerTokenServices接口定义了令牌加载、读取方法AuthorizationServerTokenServices接口定义了令牌的创建、获取、刷新方法ConsumerTokenServices定义了令牌的撤销方法(删除)DefaultTokenServices实现了上述三个接口,它包含了一些令牌业务的实现,如创建令牌、读取令牌、刷新令牌、获取客户端ID。默认的创建一个令牌时,是使用 UUID 随机值进行填充的。除了持久化令牌是委托一个TokenStore接口实现以外,这个类几乎帮你做了所有事情- 而
TokenStore接口负责持久化令牌,也有一些实现:InMemoryTokenStore:默认采用该实现,将令牌信息保存在内存中,易于调试JdbcTokenStore:令牌会被保存近关系型数据库,可以在不同服务器之间共享令牌JwtTokenStore:使用 JWT 方式保存令牌,它不需要进行存储,但是它撤销一个已经授权令牌会非常困难,所以通常用来处理一个生命周期较短的令牌以及撤销刷新令牌RedisTokenStore:保存在Redis中,这种方式比起JDBC的优点在于redis的性能高,读取和写入非常快,缺点就是需要一个多维护一个reids中间件环境。
JWT 令牌(JWT Tokens)
- 使用 JWT 令牌需要在授权服务中配置一个
tokenEnhancer去签发JWT令牌,JWT的签发与验证 依赖这个类进行编码以及解码,因此授权服务需要这个转换类,并为资源服务器提供密钥(对称加密)或者公钥(非对称加密)对JWT进行解密 - Token 令牌默认是有签名的,并且资源服务器中需要验证这个签名,因此需要一个对称的 Key 值,用来参与签名计算
- 这个 Key 值存在于授权服务之中,或者使用非对称加密算法加密 Token 进行签名,Public Key 公布在 jwk set这个端点接口中,需要自行实现
配置授权类型(Grant Types)
- 授权是使用
AuthorizationEndpoint这个端点来进行控制的,使用AuthorizationServerEndpointsConfigurer这个对象实例来进行配置,它可配置以下属性:authenticationManager:认证管理器,当你选择了资源所有者密码(password)授权类型的时候,请设置这个属性注入一个AuthenticationManager对象userDetailsService:可定义自己的UserDetailsService接口实现authorizationCodeServices:用来设置收取码服务的(即 AuthorizationCodeServices 的实例对象),主要用于authorization_code授权码类型模式implicitGrantService:这个属性用于设置隐式授权模式,用来管理隐式授权模式的状态
tokenGranter:完全自定义授权服务实现(TokenGranter 接口实现),只有当标准的四种授权模式已无法满足需求时才需要自行去实现。
配置授权端点 URL(Endpoint URLs)
-
AuthorizationServerEndpointsConfigurer配置对象有一个pathMapping()方法用来配置端点的 URL,它有两个参数:- 参数一:端点 URL 默认链接
- 参数二:替代的 URL 链接
-
下面是一些默认的端点 URL:
/oauth/authorize:授权端点/oauth/token:令牌端点/oauth/confirm_access:用户确认授权提交端点/oauth/error:授权服务错误信息端点/oauth/check_token:用于资源服务访问的令牌解析端点
授权端点的 URL 应该被 Spring Security 保护起来只供授权用户访问(加入spring security对这些端点进行身份验证)
可能这些概念现在还不够太理解,没关系,先留个印象,完成这个demo之后,再回顾一下就懂了。
建表
/*
 Navicat Premium Data Transfer

 Source Server         : localhost
 Source Server Type    : MySQL
 Source Server Version : 50730
 Source Host           : localhost:3306
 Source Schema         : demo

 Target Server Type    : MySQL
 Target Server Version : 50730
 File Encoding         : 65001

 Date: 31/08/2021 17:24:14
*/

SET NAMES utf8mb4;
SET FOREIGN_KEY_CHECKS = 0;

-- ----------------------------
-- Table structure for oauth_access_token
-- ----------------------------
DROP TABLE IF EXISTS `oauth_access_token`;
CREATE TABLE `oauth_access_token` (
  `token_id` varchar(255) DEFAULT NULL,
  `token` blob,
  `authentication_id` varchar(255) DEFAULT NULL,
  `user_name` varchar(255) DEFAULT NULL,
  `client_id` varchar(255) DEFAULT NULL,
  `authentication` blob,
  `refresh_token` varchar(255) DEFAULT NULL
) ENGINE=InnoDB DEFAULT CHARSET=utf8mb4;

-- ----------------------------
-- Records of oauth_access_token
-- ----------------------------
BEGIN;
COMMIT;

-- ----------------------------
-- Table structure for oauth_approvals
-- ----------------------------
DROP TABLE IF EXISTS `oauth_approvals`;
CREATE TABLE `oauth_approvals` (
  `userid` varchar(255) DEFAULT NULL,
  `clientid` varchar(255) DEFAULT NULL,
  `scope` varchar(255) DEFAULT NULL,
  `status` varchar(10) DEFAULT NULL,
  `expiresat` timestamp NOT NULL DEFAULT CURRENT_TIMESTAMP ON UPDATE CURRENT_TIMESTAMP,
  `lastmodifiedat` timestamp NOT NULL DEFAULT CURRENT_TIMESTAMP
) ENGINE=InnoDB DEFAULT CHARSET=utf8mb4;

-- ----------------------------
-- Records of oauth_approvals
-- ----------------------------
BEGIN;
COMMIT;

-- ----------------------------
-- Table structure for oauth_client_details
-- ----------------------------
DROP TABLE IF EXISTS `oauth_client_details`;
CREATE TABLE `oauth_client_details` (
  `client_id` varchar(255) NOT NULL COMMENT '客户端唯一标识',
  `client_name` varchar(255) DEFAULT NULL COMMENT '客户端名称',
  `resource_ids` varchar(255) DEFAULT NULL COMMENT '客户端所能访问的资源id集合,多个资源时用逗号(,)分隔',
  `client_secret` varchar(255) DEFAULT NULL COMMENT '客户端密钥',
  `scope` varchar(255) DEFAULT NULL COMMENT '客户端申请的权限范围,可选值包括read,write,trust;若有多个权限范围用逗号(,)分隔',
  `authorized_grant_types` varchar(255) NOT NULL COMMENT '客户端支持的授权许可类型(grant_type),可选值包括authorization_code,password,refresh_token,implicit,client_credentials,若支持多个授权许可类型用逗号(,)分隔',
  `web_server_redirect_uri` varchar(255) DEFAULT NULL COMMENT '客户端重定向URI,当grant_type为authorization_code或implicit时, 在Oauth的流程中会使用并检查与数据库内的redirect_uri是否一致',
  `authorities` varchar(255) DEFAULT NULL COMMENT '客户端所拥有的Spring Security的权限值,可选, 若有多个权限值,用逗号(,)分隔',
  `access_token_validity` int(11) DEFAULT NULL COMMENT '设定客户端的access_token的有效时间值(单位:秒),若不设定值则使用默认的有效时间值(60 * 60 * 12, 12小时)',
  `refresh_token_validity` int(11) DEFAULT NULL COMMENT '设定客户端的refresh_token的有效时间值(单位:秒),若不设定值则使用默认的有效时间值(60 * 60 * 24 * 30, 30天)',
  `additional_information` varchar(4096) DEFAULT NULL COMMENT '这是一个预留的字段,在Oauth的流程中没有实际的使用,可选,但若设置值,必须是JSON格式的数据',
  `autoapprove` varchar(255) DEFAULT 'false' COMMENT '设置用户是否自动批准授予权限操作, 默认值为 ‘false’, 可选值包括 ‘true’,‘false’, ‘read’,‘write’.',
  PRIMARY KEY (`client_id`)
) ENGINE=InnoDB DEFAULT CHARSET=utf8 COMMENT='oath2客户端表';

-- ----------------------------
-- Records of oauth_client_details
-- ----------------------------
BEGIN;
INSERT INTO `oauth_client_details` VALUES ('web-client', '前端', NULL, '{bcrypt}$2a$10$jhS817qUHgOR4uQSoEBRxO58.rZ1dBCmCTjG8PeuQAX4eISf.zowm', 'todo.read,todo.write', 'authorization_code,password,refresh_token,client_credentials', 'http://localhost:8081/login/oauth2/code/web-client-auth-code', NULL, 900, 31536000, '{}', NULL);
INSERT INTO `oauth_client_details` VALUES ('resource-server', '资源服务器', NULL, '{bcrypt}$2a$10$jhS817qUHgOR4uQSoEBRxO58.rZ1dBCmCTjG8PeuQAX4eISf.zowm', 'todo.read,todo.write', 'authorization_code,password,refresh_token,client_credentials', 'http://localhost:8081/login/oauth2/code/web-client-auth-code', NULL, 900, 31536000, '{}', NULL);
COMMIT;

-- ----------------------------
-- Table structure for oauth_client_token
-- ----------------------------
DROP TABLE IF EXISTS `oauth_client_token`;
CREATE TABLE `oauth_client_token` (
  `token_id` varchar(255) NOT NULL,
  `token` blob,
  `authentication_id` varchar(255) DEFAULT NULL,
  `user_name` varchar(255) DEFAULT NULL,
  `client_id` varchar(255) DEFAULT NULL,
  PRIMARY KEY (`token_id`) USING BTREE
) ENGINE=InnoDB DEFAULT CHARSET=utf8mb4;

-- ----------------------------
-- Records of oauth_client_token
-- ----------------------------
BEGIN;
COMMIT;

-- ----------------------------
-- Table structure for oauth_code
-- ----------------------------
DROP TABLE IF EXISTS `oauth_code`;
CREATE TABLE `oauth_code` (
  `code` varchar(255) DEFAULT NULL,
  `authentication` blob
) ENGINE=InnoDB DEFAULT CHARSET=utf8mb4 COMMENT='授权码Code记录表';

-- ----------------------------
-- Records of oauth_code
-- ----------------------------
BEGIN;
COMMIT;

-- ----------------------------
-- Table structure for oauth_refresh_token
-- ----------------------------
DROP TABLE IF EXISTS `oauth_refresh_token`;
CREATE TABLE `oauth_refresh_token` (
  `token_id` varchar(255) DEFAULT NULL,
  `token` blob,
  `authentication` blob
) ENGINE=InnoDB DEFAULT CHARSET=utf8mb4;

-- ----------------------------
-- Records of oauth_refresh_token
-- ----------------------------
BEGIN;
COMMIT;

-- ----------------------------
-- Table structure for ss_authority
-- ----------------------------
DROP TABLE IF EXISTS `ss_authority`;
CREATE TABLE `ss_authority` (
  `id` int(11) NOT NULL COMMENT '主键',
  `parent_id` int(11) DEFAULT NULL COMMENT '父权限id',
  `name` varchar(255) NOT NULL COMMENT '权限名称',
  `desc` varchar(255) DEFAULT NULL COMMENT '权限描述',
  `resource` varchar(255) DEFAULT NULL COMMENT '权限资源,当type为1时有值',
  `type` int(1) NOT NULL COMMENT '权限类型。0:菜单,1:组件',
  `create_at` datetime NOT NULL DEFAULT CURRENT_TIMESTAMP COMMENT '创建时间',
  PRIMARY KEY (`id`)
) ENGINE=InnoDB DEFAULT CHARSET=utf8 COMMENT='权限表';

-- ----------------------------
-- Records of ss_authority
-- ----------------------------
BEGIN;
INSERT INTO `ss_authority` VALUES (1, NULL, '用户菜单', '用户菜单', NULL, 0, '2021-08-23 16:15:15');
INSERT INTO `ss_authority` VALUES (101, 1, '菜单1', '菜单1', NULL, 0, '2021-08-23 16:15:36');
INSERT INTO `ss_authority` VALUES (102, 1, '菜单2', '菜单2', NULL, 0, '2021-08-23 16:15:54');
INSERT INTO `ss_authority` VALUES (10101, 101, '问好', '菜单1功能:问好', 'api:hello', 1, '2021-08-23 16:18:01');
INSERT INTO `ss_authority` VALUES (10201, 102, '用户名', '菜单2功能:输出用户名', 'user:name', 1, '2021-08-23 17:02:08');
COMMIT;

-- ----------------------------
-- Table structure for ss_authority_role_rel
-- ----------------------------
DROP TABLE IF EXISTS `ss_authority_role_rel`;
CREATE TABLE `ss_authority_role_rel` (
  `id` int(11) NOT NULL AUTO_INCREMENT COMMENT '自增主键',
  `authority_id` int(11) NOT NULL COMMENT '权限id',
  `role_id` int(11) NOT NULL COMMENT '角色id',
  PRIMARY KEY (`id`,`authority_id`,`role_id`)
) ENGINE=InnoDB AUTO_INCREMENT=9 DEFAULT CHARSET=utf8 COMMENT='权限—角色关联表';

-- ----------------------------
-- Records of ss_authority_role_rel
-- ----------------------------
BEGIN;
INSERT INTO `ss_authority_role_rel` VALUES (1, 1, 1);
INSERT INTO `ss_authority_role_rel` VALUES (2, 101, 1);
INSERT INTO `ss_authority_role_rel` VALUES (3, 102, 1);
INSERT INTO `ss_authority_role_rel` VALUES (4, 10101, 1);
INSERT INTO `ss_authority_role_rel` VALUES (5, 10201, 1);
INSERT INTO `ss_authority_role_rel` VALUES (6, 1, 2);
INSERT INTO `ss_authority_role_rel` VALUES (7, 101, 2);
INSERT INTO `ss_authority_role_rel` VALUES (8, 10101, 2);
COMMIT;

-- ----------------------------
-- Table structure for ss_role
-- ----------------------------
DROP TABLE IF EXISTS `ss_role`;
CREATE TABLE `ss_role` (
  `id` int(11) NOT NULL AUTO_INCREMENT,
  `name` varchar(255) DEFAULT NULL COMMENT '角色名',
  `desc` varchar(255) DEFAULT NULL COMMENT '角色描述',
  `create_at` datetime NOT NULL DEFAULT CURRENT_TIMESTAMP COMMENT '创建时间',
  PRIMARY KEY (`id`) USING BTREE
) ENGINE=InnoDB AUTO_INCREMENT=3 DEFAULT CHARSET=utf8 ROW_FORMAT=DYNAMIC COMMENT='角色表';

-- ----------------------------
-- Records of ss_role
-- ----------------------------
BEGIN;
INSERT INTO `ss_role` VALUES (1, 'ADMIN', '超级管理员', '2021-08-23 16:08:02');
INSERT INTO `ss_role` VALUES (2, 'USER', '用户', '2021-08-23 16:08:02');
COMMIT;

-- ----------------------------
-- Table structure for ss_user
-- ----------------------------
DROP TABLE IF EXISTS `ss_user`;
CREATE TABLE `ss_user` (
  `id` int(11) NOT NULL AUTO_INCREMENT,
  `username` varchar(255) NOT NULL COMMENT '用户名',
  `password` varchar(255) NOT NULL COMMENT '密码',
  `status` int(4) DEFAULT NULL COMMENT '状态',
  PRIMARY KEY (`id`) USING BTREE
) ENGINE=InnoDB AUTO_INCREMENT=3 DEFAULT CHARSET=utf8 ROW_FORMAT=DYNAMIC COMMENT='用户表';

-- ----------------------------
-- Records of ss_user
-- ----------------------------
BEGIN;
INSERT INTO `ss_user` VALUES (1, 'user', '{bcrypt}$2a$10$jhS817qUHgOR4uQSoEBRxO58.rZ1dBCmCTjG8PeuQAX4eISf.zowm', 1);
INSERT INTO `ss_user` VALUES (2, 'test', '{bcrypt}$2a$10$jhS817qUHgOR4uQSoEBRxO58.rZ1dBCmCTjG8PeuQAX4eISf.zowm', 1);
COMMIT;

-- ----------------------------
-- Table structure for ss_user_role_rel
-- ----------------------------
DROP TABLE IF EXISTS `ss_user_role_rel`;
CREATE TABLE `ss_user_role_rel` (
  `id` int(11) NOT NULL AUTO_INCREMENT COMMENT '自增主键',
  `rid` int(11) NOT NULL COMMENT '角色表id',
  `uid` int(11) NOT NULL COMMENT '用户表id',
  PRIMARY KEY (`id`,`rid`,`uid`) USING BTREE
) ENGINE=InnoDB AUTO_INCREMENT=4 DEFAULT CHARSET=utf8 ROW_FORMAT=DYNAMIC COMMENT='用户-角色关联表';

-- ----------------------------
-- Records of ss_user_role_rel
-- ----------------------------
BEGIN;
INSERT INTO `ss_user_role_rel` VALUES (1, 1, 1);
INSERT INTO `ss_user_role_rel` VALUES (2, 2, 1);
INSERT INTO `ss_user_role_rel` VALUES (3, 2, 2);
COMMIT;

SET FOREIGN_KEY_CHECKS = 1;
需要关注的是以oauth开头的表,其是SpringSecurityOauth2相关的表,也是官方的表结构
最重要的是oauth_client_details表,已经有注解了,通过access_token_validity和refresh_token_validity去设定token的过期时间
oauth_access_token和oauth_refresh_token在token持久化设定为JDBC的形式的时候会使用到,会将生成的access_token和refresh_token保存在这两个表中。如果Token持久化设定为redis或者内存的话,便不需要这两个表。
接下来我们开始demo的编写
依赖和配置
新建一个maven项目,引入依赖
<?xml version="1.0" encoding="UTF-8"?>
<project xmlns="http://maven.apache.org/POM/4.0.0"
         xmlns:xsi="http://www.w3.org/2001/XMLSchema-instance"
         xsi:schemaLocation="http://maven.apache.org/POM/4.0.0 http://maven.apache.org/xsd/maven-4.0.0.xsd">
    <parent>
        <groupId>org.springframework.boot</groupId>
        <artifactId>spring-boot-starter-parent</artifactId>
        <version>2.4.3</version>
        <relativePath /> <!-- lookup parent from repository -->
    </parent>
    <modelVersion>4.0.0</modelVersion>

    <artifactId>authority-server</artifactId>
    <groupId>com.cupricnitrate</groupId>
    <version>1.0.0</version>

    <properties>
        <maven.compiler.source>8</maven.compiler.source>
        <maven.compiler.target>8</maven.compiler.target>

        <security.oauth2.version>2.5.0.RELEASE</security.oauth2.version>
        <security.oauth2.autoconfigure.version>2.3.0.RELEASE</security.oauth2.autoconfigure.version>

        <mybatis.plus.version>3.4.3</mybatis.plus.version>
        <mysql.version>8.0.25</mysql.version>

    </properties>

    <dependencies>
        <dependency>
            <groupId>org.springframework.boot</groupId>
            <artifactId>spring-boot-starter-web</artifactId>
        </dependency>

        <dependency>
            <groupId>org.projectlombok</groupId>
            <artifactId>lombok</artifactId>
            <optional>true</optional>
        </dependency>

        <!-- Spring Security OAuth2 依赖 -->
        <!-- 注意,Spring 已经在开发 Spring Authorization Server,下面三个依赖以后逐渐会弃用 -->
        <dependency>
            <groupId>org.springframework.security.oauth.boot</groupId>
            <artifactId>spring-security-oauth2-autoconfigure</artifactId>
            <version>${security.oauth2.autoconfigure.version}</version>
        </dependency>

        <dependency>
            <groupId>org.springframework.security.oauth</groupId>
            <artifactId>spring-security-oauth2</artifactId>
            <version>${security.oauth2.version}</version>
        </dependency>

        <!-- 新版 Resource Server 类库 -->
        <dependency>
            <groupId>org.springframework.boot</groupId>
            <artifactId>spring-boot-starter-oauth2-resource-server</artifactId>
        </dependency>
        <!-- 下面这两个依赖已经包含在 spring-boot-starter-oauth2-resource-server 中 -->
        <!-- JWK 依赖 -->
        <!-- <dependency>
            <groupId>com.nimbusds</groupId>
            <artifactId>nimbus-jose-jwt</artifactId>
            <version>${nimbus.jose.jwt.version}</version>
        </dependency> -->
        <!-- JWT 依赖 -->
        <!-- <dependency>
            <groupId>org.springframework.security</groupId>
            <artifactId>spring-security-jwt</artifactId>
            <version>${security.jwt.version}</version>
        </dependency> -->

        <!--ORM框架-->
        <dependency>
            <groupId>com.baomidou</groupId>
            <artifactId>mybatis-plus-boot-starter</artifactId>
            <version>${mybatis.plus.version}</version>
        </dependency>

        <dependency>
            <groupId>mysql</groupId>
            <artifactId>mysql-connector-java</artifactId>
            <version>${mysql.version}</version>
        </dependency>

        <!--token持久化到redis中-->
        <dependency>
            <groupId>org.springframework.boot</groupId>
            <artifactId>spring-boot-starter-data-redis</artifactId>
        </dependency>
    </dependencies>

</project>
这个demo采用的依赖版本:
spring-boot:2.4.3spring-security-oauth2:2.5.0.RELEASEmybatis-plus:3.4.3mysql-connector-java:8.0.25
application.yml
server:
  port: 8080
  servlet:
    context-path: /${spring.application.name}

spring:
  application:
    #服务名称
    name: authorization-server
  servlet:
    multipart:
      max-file-size: 1024MB
      max-request-size: 1024MB
  datasource:
    type: com.zaxxer.hikari.HikariDataSource
    #mysql驱动8.x版本使用com.mysql.cj.jdbc.Driver
    #5.x使用com.mysql.jdbc.Driver
    driver-class-name: com.mysql.cj.jdbc.Driver
    #数据库地址
    url: jdbc:mysql://localhost:3306/demo?useUnicode=true&characterEncoding=utf-8&useSSL=true&serverTimezone=UTC
    #数据库账号
    username: root
    #数据库密码
    password: root
    #hikari连接池
    hikari:
      #2*cpu
      maximum-pool-size: 16
      #cpu
      minimum-idle: 8
      data-source-properties:
        cachePrepStmts: true
        prepStmtCacheSize: 250
        prepStmtCacheSqlLimit: 2048
        useServerPrepStmts: true
  redis:
    port: 6379
    host: localhost
    database: 0
配置好数据库,redis
jwk set
授权服务器会提供一个接入点或者api。通过这个api可以直接将服务端的JWK的定义直接拿出来
按照惯例,这个接口是在服务端的.well-known/jwks.json接口
其返回结构如下:
{
  "keys": [
    {
      # 用什么算法加密
      "kty": "RSA",
      "e": "AQAB",
      # 公钥
      "n": "xxxxx"
    }
  ]
}
客户端请求token,不是在其内部内嵌一个公钥,而是从服务器申请,得到公钥和加密方式
生成密钥对
之前我们使用的是java工具类去生成一个密钥对,这里我们使用命令行去生成,并对密钥对设置存储密码
$ keytool -genkeypair -alias 别名 -keyalg RSA -keypass 密钥的密码 -keystore 密钥名 -storepass 存储密码
比如:
$ keytool -genkeypair -alias oauth-jwt -keyalg RSA -keypass password -keystore jwt.jks -storepass password
执行之后,会出现一个warning:
Warning:
JKS 密钥库使用专用格式。建议使用 "keytool -importkeystore -srckeystore jwt.jks -destkeystore jwt.jks -deststoretype pkcs12" 迁移到行业标准格式 PKCS12。
我们按照这个warning进行操作:
$ keytool -importkeystore -srckeystore jwt.jks -destkeystore jwt.jks -deststoretype pkcs12
输入存储密码,得到密钥jwt.jks
然后将这个密钥jwt.jks放入授权服务的资源文件夹resources中
对jwk set配置安全表达式
创建JwkSetEndpointConfiguration类
import org.springframework.context.annotation.Configuration;
import org.springframework.core.annotation.Order;
import org.springframework.security.config.annotation.web.builders.HttpSecurity;
import org.springframework.security.oauth2.config.annotation.web.configuration.AuthorizationServerSecurityConfiguration;

/**
 * Authorization Server 的安全配置
 * 需要配置以下 /.well-known/jwks.json 允许公开访问
 * 在存在多个 Security 配置的情况下,需要设置不同的顺序,@Order 是必须的
 * 这个配置是授权服务器的,所以优先级高
 *
 */
@Order(1)
@Configuration
class JwkSetEndpointConfiguration extends AuthorizationServerSecurityConfiguration {
    @Override
    protected void configure(HttpSecurity http) throws Exception {
        http
                .requestMatchers(req -> req.mvcMatchers("/.well-known/jwks.json"))
                .authorizeRequests(req -> req.mvcMatchers("/.well-known/jwks.json").permitAll());
    }
}
写完代码后,看见AuthorizationServerSecurityConfiguration被划了一道横线,表示这个类已经被弃用了。
瓦特发!你要拿前朝的剑斩当朝的官?
等一下!这似有原因滴!
因为Spring团队已经在开发 Spring Authorization Server啦,其旨在代替SpringSecurity中的授权服务器相关依赖。所以SpringSecurity正在慢慢的将授权服务相关的东西丢弃掉。
但是Spring Authorization Server项目现在正在开发中,并且在现在(2021-09-23)的发布版本是0.2,这个版本有点低,虽然Spring团队表示这个项目已经脱离实验阶段了,但是在生产环境谁敢用这个0.2?出了碧油鸡咋办?
并且除了AuthorizationServerSecurityConfiguration这个类,也没有其他的选择,所以还是使用这个类。
创建接入点
公钥转换成JSON返回
package com.cupricnitrate.authority.oauth2;

import com.nimbusds.jose.jwk.JWKSet;
import com.nimbusds.jose.jwk.RSAKey;
import org.springframework.security.oauth2.provider.endpoint.FrameworkEndpoint;
import org.springframework.web.bind.annotation.GetMapping;
import org.springframework.web.bind.annotation.ResponseBody;

import javax.annotation.Resource;
import java.security.KeyPair;
import java.security.interfaces.RSAPublicKey;
import java.util.Map;

/**
 * 为了和 Spring Security 5.1 以上版本的 Resource Server 兼容
 * 我们需要让 Spring Security OAuth2 支持 JWK
 * 这个类是为了暴露 JWK 的接入点
 * `@FrameworkEndpoint` 注解表示其为框架级的接入点,这里可以理解成一个`@RestController`
 *
 * @author 硝酸铜
 * @date 2021/9/23
 */
@FrameworkEndpoint
class JwkSetEndpoint {

    @Resource
    private KeyPair keyPair;

    @GetMapping("/.well-known/jwks.json")
    @ResponseBody
    public Map<String, Object> getKey() {
        RSAPublicKey publicKey = (RSAPublicKey) this.keyPair.getPublic();
        RSAKey key = new RSAKey.Builder(publicKey).build();
        return new JWKSet(key).toJSONObject();
    }
}
Spring Security 5.1 以上版本的 资源服务在配置了jwt为token之后,其默认配置采用非对称加密解析jwt签名,但是配置了授权服务的jwk set地址,便会通过这个url区获取公钥,使用对称加密的方式解析jwt签名
所以我们这里需要将密钥对配置上,也就是之前使用命令生成的那个密钥对
keypair配置
这里我们顺便把编码器也配置上,之后会使用
package com.cupricnitrate.authority.config;

import org.springframework.context.annotation.Bean;
import org.springframework.context.annotation.Configuration;
import org.springframework.core.io.ClassPathResource;
import org.springframework.security.crypto.bcrypt.BCryptPasswordEncoder;
import org.springframework.security.crypto.password.DelegatingPasswordEncoder;
import org.springframework.security.crypto.password.PasswordEncoder;
import org.springframework.security.oauth2.provider.token.store.KeyStoreKeyFactory;

import java.security.KeyPair;
import java.util.HashMap;
import java.util.Map;

/**
 * @author 硝酸铜
 * @date 2021/9/23
 */
@Configuration
public class WebConfig {

    /**
     * 编码器创建
     * @return PasswordEncoder
     */
    @Bean
    public PasswordEncoder passwordEncoder(){

        //默认编码算法的Id,新的密码编码都会使用这个id对应的编码器
        String idForEncode = "bcrypt";
        //要支持的多种编码器
        //举例:历史原因,之前用的SHA-1编码,现在我们希望新的密码使用bcrypt编码
        //老用户使用SHA-1这种老的编码格式,新用户使用bcrypt这种编码格式,登录过程无缝切换
        Map encoders = new HashMap();
        encoders.put(idForEncode,new BCryptPasswordEncoder());
        //encoders.put("SHA-1",new MessageDigestPasswordEncoder("SHA-1"));

        //(默认编码器id,编码器map)
        return new DelegatingPasswordEncoder(idForEncode,encoders);
    }

    @Bean
    public KeyPair keyPair() {
        //获取资源文件中的密钥
        ClassPathResource ksFile = new ClassPathResource("jwt.jks");
        //输入密码创建KeyStoreKeyFactory
        KeyStoreKeyFactory ksFactory = new KeyStoreKeyFactory(ksFile, "password".toCharArray());
        //通过别名获取KeyPair
        return ksFactory.getKeyPair("oauth-jwt");
    }
}
测试
启动项目,请求这个接口

这样一个jwk set接入点就做好了,接下来我们完成授权服务的主要配置
建立授权服务安全配置
授权服务需要使用@EnableAuthorizationServer来配置授权服务机制,并继承 AuthorizationServerConfigurerAdapter 该类重写 configure 方法定义授权服务策略
package com.cupricnitrate.authority.config;

import com.cupricnitrate.authority.service.UserDetailsServiceImpl;
import org.springframework.context.annotation.Bean;
import org.springframework.context.annotation.Configuration;
import org.springframework.data.redis.connection.RedisConnectionFactory;
import org.springframework.security.authentication.AuthenticationManager;
import org.springframework.security.crypto.password.PasswordEncoder;
import org.springframework.security.oauth2.config.annotation.configurers.ClientDetailsServiceConfigurer;
import org.springframework.security.oauth2.config.annotation.web.configuration.AuthorizationServerConfigurerAdapter;
import org.springframework.security.oauth2.config.annotation.web.configuration.EnableAuthorizationServer;
import org.springframework.security.oauth2.config.annotation.web.configurers.AuthorizationServerEndpointsConfigurer;
import org.springframework.security.oauth2.config.annotation.web.configurers.AuthorizationServerSecurityConfigurer;
import org.springframework.security.oauth2.provider.token.TokenEnhancerChain;
import org.springframework.security.oauth2.provider.token.TokenStore;
import org.springframework.security.oauth2.provider.token.store.JwtAccessTokenConverter;
import org.springframework.security.oauth2.provider.token.store.redis.RedisTokenStore;

import javax.annotation.Resource;
import javax.sql.DataSource;
import java.security.KeyPair;
import java.util.Collections;

/**
 * `@EnableAuthorizationServer` 注解表示激活授权服务器
 * @author 硝酸铜
 * @date 2021/8/27
 */
@EnableAuthorizationServer
@Configuration
public class AuthorizationServerConfig extends AuthorizationServerConfigurerAdapter {

    /**
     * 密钥对
     */
    @Resource
    private KeyPair keyPair;

    /**
     * 数据源
     * RedisTokenStore 需要RedisConnectionFactory,其会读取配置文件spring.redis的配置
     */
    @Resource
    private RedisConnectionFactory connectionFactory;

    /**
     * 数据源
     * 读取配置文件中spring.datasource的配置
     */
    @Resource
    private DataSource dataSource;

    /**
     * 用户service
     */
    @Resource
    private UserDetailsServiceImpl userDetailsServiceImpl;

    /**
     * 密码编码器
     */
    @Resource
    private PasswordEncoder passwordEncoder;

    @Resource
    private AuthenticationManager authenticationManager;


    /**
     * 配置授权服务器的 token 接入点
     *
     * @param security
     * @throws Exception
     */
    @Override
    public void configure(AuthorizationServerSecurityConfigurer security) throws Exception {
        security
                // 与SpringSecurity中的access()方法类似,设置复杂安全表达式
                // 设置可以请求接入点的安全表达式为`permitAll()`
                .tokenKeyAccess("permitAll()")
                // 设置检查token的安全表达式为`isAuthenticated()`,已认证
                .checkTokenAccess("isAuthenticated()")
                // 允许进行表单认证
                .allowFormAuthenticationForClients()
                // 设置oauth_client_details中的密码编码器
                .passwordEncoder(passwordEncoder);
    }

    /**
     * 配置 Jdbc 版本的 JdbcClientDetailsService
     * 也就是读取oauth_client_details表的信息
     *
     * @param clients
     * @throws Exception
     */
    @Override
    public void configure(ClientDetailsServiceConfigurer clients) throws Exception {
        // 读取配置文件中spring.datasource的配置
        clients.jdbc(dataSource);
    }

    /**
     * 配置授权访问的接入点
     * @param endpoints
     */
    @Override
    public void configure(AuthorizationServerEndpointsConfigurer endpoints) {
        // endpoints.pathMapping("/oauth/token","/token/login");  设置token生成请求地址
        TokenEnhancerChain chain = new TokenEnhancerChain();
        chain.setTokenEnhancers(Collections.singletonList(accessTokenConverter()));

        endpoints
                // chain和accessTokenConverter()二选一即可
                //.accessTokenConverter(accessTokenConverter())
                .tokenEnhancer(chain)
                // token 持久化
                .tokenStore(tokenStore())
                // 配置认证 manager
                .authenticationManager(authenticationManager)
                // 配置用户
                .userDetailsService(userDetailsServiceImpl);
    }

    /**
     * 使用jwt生成token
     * 如果需要自定义token或者获取token接口的返回体,需要实现TokenEnhancer接口的enhance方法,具体可以看一下JwtAccessTokenConverter类
     * @return JwtAccessTokenConverter
     */
    @Bean
    public JwtAccessTokenConverter accessTokenConverter() {
        JwtAccessTokenConverter converter = new JwtAccessTokenConverter();
        //非对称加密签名
        converter.setKeyPair(this.keyPair);

        //对称加密签名
        //converter.setSigningKey("xxx");
        return converter;
    }

    /**
     * token持久化
     * @return TokenStore
     */
    @Bean
    public TokenStore tokenStore() {
        //将token保存在redis中
        return new RedisTokenStore(connectionFactory);

        //将token保存在内存中
        //return new InMemoryTokenStore();


        //不用管如何进行存储(内存或磁盘),因为它可以把相关信息数据编码存放在令牌里。JwtTokenStore 不会保存任何数据
        //return new JwtTokenStore(accessTokenConverter());

        //将token保存在数据库中
        //return new JdbcTokenStore(dataSource);
    }

}
具体看代码,注释已经写得很详细了
其中的userDetailsServiceImpl所涉及的model和mapper以及其本身的逻辑,和上一节中学习SpringSecurity的逻辑是一样的,这里就不多做赘述了。
我们来关注一下tokenStore()这个方法,就是TokenStore,对token的持久化
token持久化
token持久化主要作用于/oauth/token(获取令牌端点接口)和/oauth/check_token(令牌检查解析端点接口)。
调用/oauth/token端点接口时,会先通过TokenStore判断持久化容器中是否有这个token,token过期没有。
如果有这个token并且这个token也没有过期,则会直接返回这个token,不会生成新的token。如果TokenStore没有这个token或者有但是token过期了,则会生成新的token并保存在持久化容器中。
调用/oauth/check_token端点接口的时候,会先通过TokenStore判断持久化容器中是否有这个token,token过期没有。
如果TokenStore中有并且没有过期,则会将token中所包含的荷载信息解析出来。如果TokenStore没有这个token或者有但是token过期了,则会报错token无效。
InMemoryTokenStore
这个是OAuth2默认采用的实现方式。在单服务上可以体现出很好特效(即并发量不大,并且它在失败的时候不会进行备份),大多项目都可以采用此方法。根据名字就知道了,是存储在内存中,毕竟存在内存,而不是磁盘中,调试简易。
JdbcTokenStore
这个是基于JDBC的实现,令牌(Access Token)会保存到数据库。这个方式,可以在多个服务之间实现令牌共享。
需要有oauth_access_token表和oauth_refresh_token表
表的结构在上文ddl中
JwtTokenStore
jwt全称 JSON Web Token。这个实现方式不用管如何进行存储(内存或磁盘),因为它可以把相关信息数据编码存放在令牌里。JwtTokenStore 不会保存任何数据,但是它在转换令牌值以及授权信息方面与 DefaultTokenServices 所扮演的角色是一样的。
这种方式有个缺陷,授权服务无法主动控制token的失效,只能等token自己失效过期(登出不能主动控制)
RedisTokenStore
由于TokenStore作用就是对于OAuth2令牌持久化接口,而我们在实际开发中,对于内存的使用是慎之又慎,而对于存储到数据库也是根据项目需求进行调配。因此就想,可不可以用redis来进行存储持久化我们的OAuth2令牌。当然是可以的,并且这也是微服务中保存token使用的较多的方案
AuthenticationManager
AuthenticationManager来自于授权服务器的WebSecurityConfigurerAdapter
那么现在问题来了:为什么授权服务器还需要WebSecurityConfigurerAdapter配置呢?不是有AuthorizationServerConfigurerAdapter就可以了吗?
AuthorizationServerConfigurerAdapter只是授权服务的安全配置,来自于依赖spring-security-oauth2,对oauth2的授权部分做了配置。但是该依赖中也包含spring-security-core、spring-security-web、spring-security-config,也就是说其也受SpringSecurity所保护
通过之前的内容我们知道,引入SpringSecurity依赖后,默认会有一个配置,但是这种默认的配置不满足我们的需求,所以还是需要继承WebSecurityConfigurerAdapter做好安全配置
package com.cupricnitrate.authority.config;

import org.springframework.boot.autoconfigure.security.servlet.PathRequest;
import org.springframework.context.annotation.Bean;
import org.springframework.context.annotation.Configuration;
import org.springframework.security.authentication.AuthenticationManager;
import org.springframework.security.config.annotation.web.builders.HttpSecurity;
import org.springframework.security.config.annotation.web.builders.WebSecurity;
import org.springframework.security.config.annotation.web.configuration.EnableWebSecurity;
import org.springframework.security.config.annotation.web.configuration.WebSecurityConfigurerAdapter;
import org.springframework.security.config.annotation.web.configurers.AbstractHttpConfigurer;


/**
 * @author 硝酸铜
 * @date 2021/8/30
 */

@Configuration
@EnableWebSecurity(debug = true)
public class WebSecurityConfig extends WebSecurityConfigurerAdapter {

    @Bean
    @Override
    public AuthenticationManager authenticationManagerBean() throws Exception {
        return super.authenticationManagerBean();
    }

    @Override
    protected void configure(HttpSecurity http) throws Exception {
        http
                //授权模式登陆页面,这里采用默认的登陆页面
                .formLogin()
                .and()
                .httpBasic()
                .and()
                .csrf(AbstractHttpConfigurer::disable)
                .logout(AbstractHttpConfigurer::disable)
                // 授权模式这里采用默认的页面,登陆成功后从session中拿取回调url
                //.sessionManagement(sessionManagement -> sessionManagement.sessionCreationPolicy(SessionCreationPolicy.STATELESS))
                .authorizeRequests(req -> req
                        //oauth2 的接口在 /oauth 接口下面,这里配置其不走SpringSecurity的认证流程
                        .antMatchers("/oauth/**").permitAll()
                        .anyRequest().authenticated()
                ) ;
    }

    @Override
    public void configure(WebSecurity web) {
        web
                .ignoring()
                .antMatchers("/error",
                        "/resources/**",
                        "/static/**",
                        "/public/**",
                        "/h2-console/**",
                        "/swagger-ui.html",
                        "/swagger-ui/**",
                        "/v3/api-docs/**",
                        "/v2/api-docs/**",
                        "/doc.html",
                        "/swagger-resources/**")
                .requestMatchers(PathRequest.toStaticResources().atCommonLocations());
    }
}
学习了之前SpringSecurity的小伙伴看到这个配置,可能会有所疑惑,为什么这里要使用登陆页面呢?说好的前后端分离呢?
你且听我慢慢道来~
这个页面其实都是为了服务Oauth2中的授权码模式的,授权码模式一共就需要两个页面,一个是登陆页面,一个是同意授权的页面。
为了这两个页面搞前后端分离,不仅要重写授权端点接口(获取授权码的端点接口源码就是按照前后端一体的方式做的,其有一个model入参),项目上线的时候还要为这两个页面搭一个ng实在是有点不合适,浪费资源!并且我这里只是做一个demo,就使用默认登陆页面了。
启动服务,测试端点
到这里一个授权服务就搭好了,我们启动项目,测试一下
启动项目前先确定redis正常并且配置正常
密码模式
调用接口
http://localhost:8080/authorization-server/oauth/token
grant_type指定为:password
注意,此处需加 Authorization 请求头,值为 Basic xxx xxx 为 client_id:client_secret 的 base64编码。

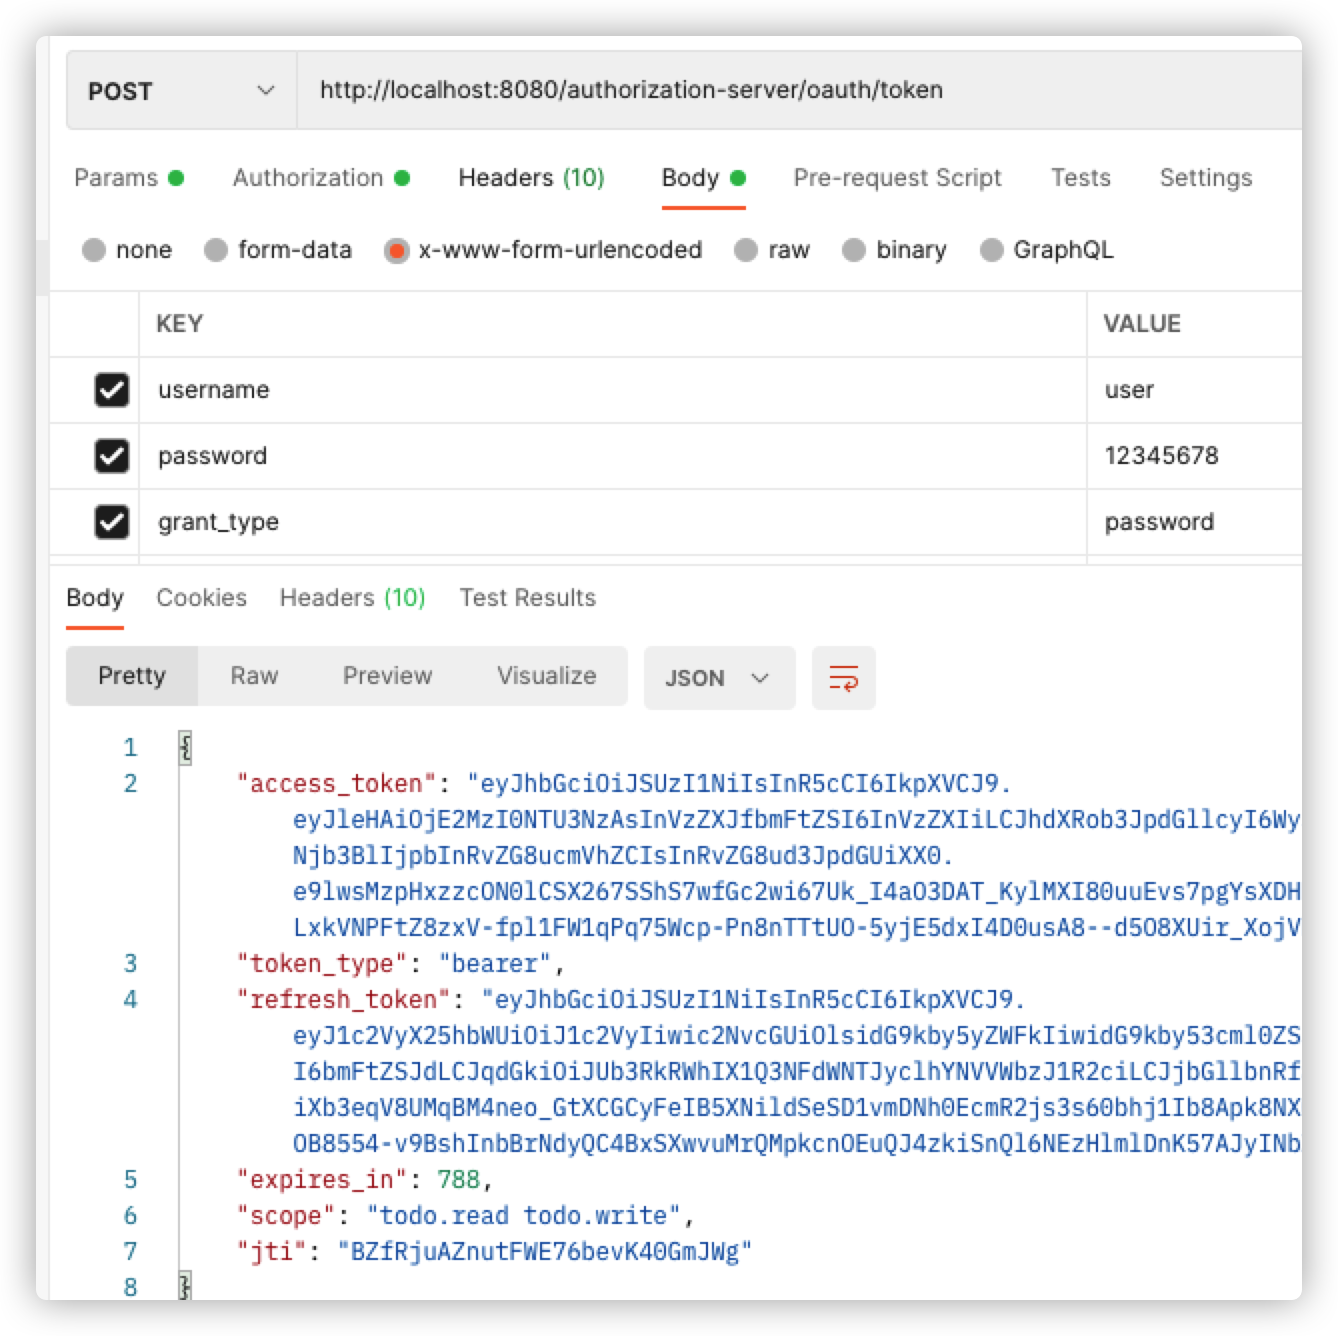
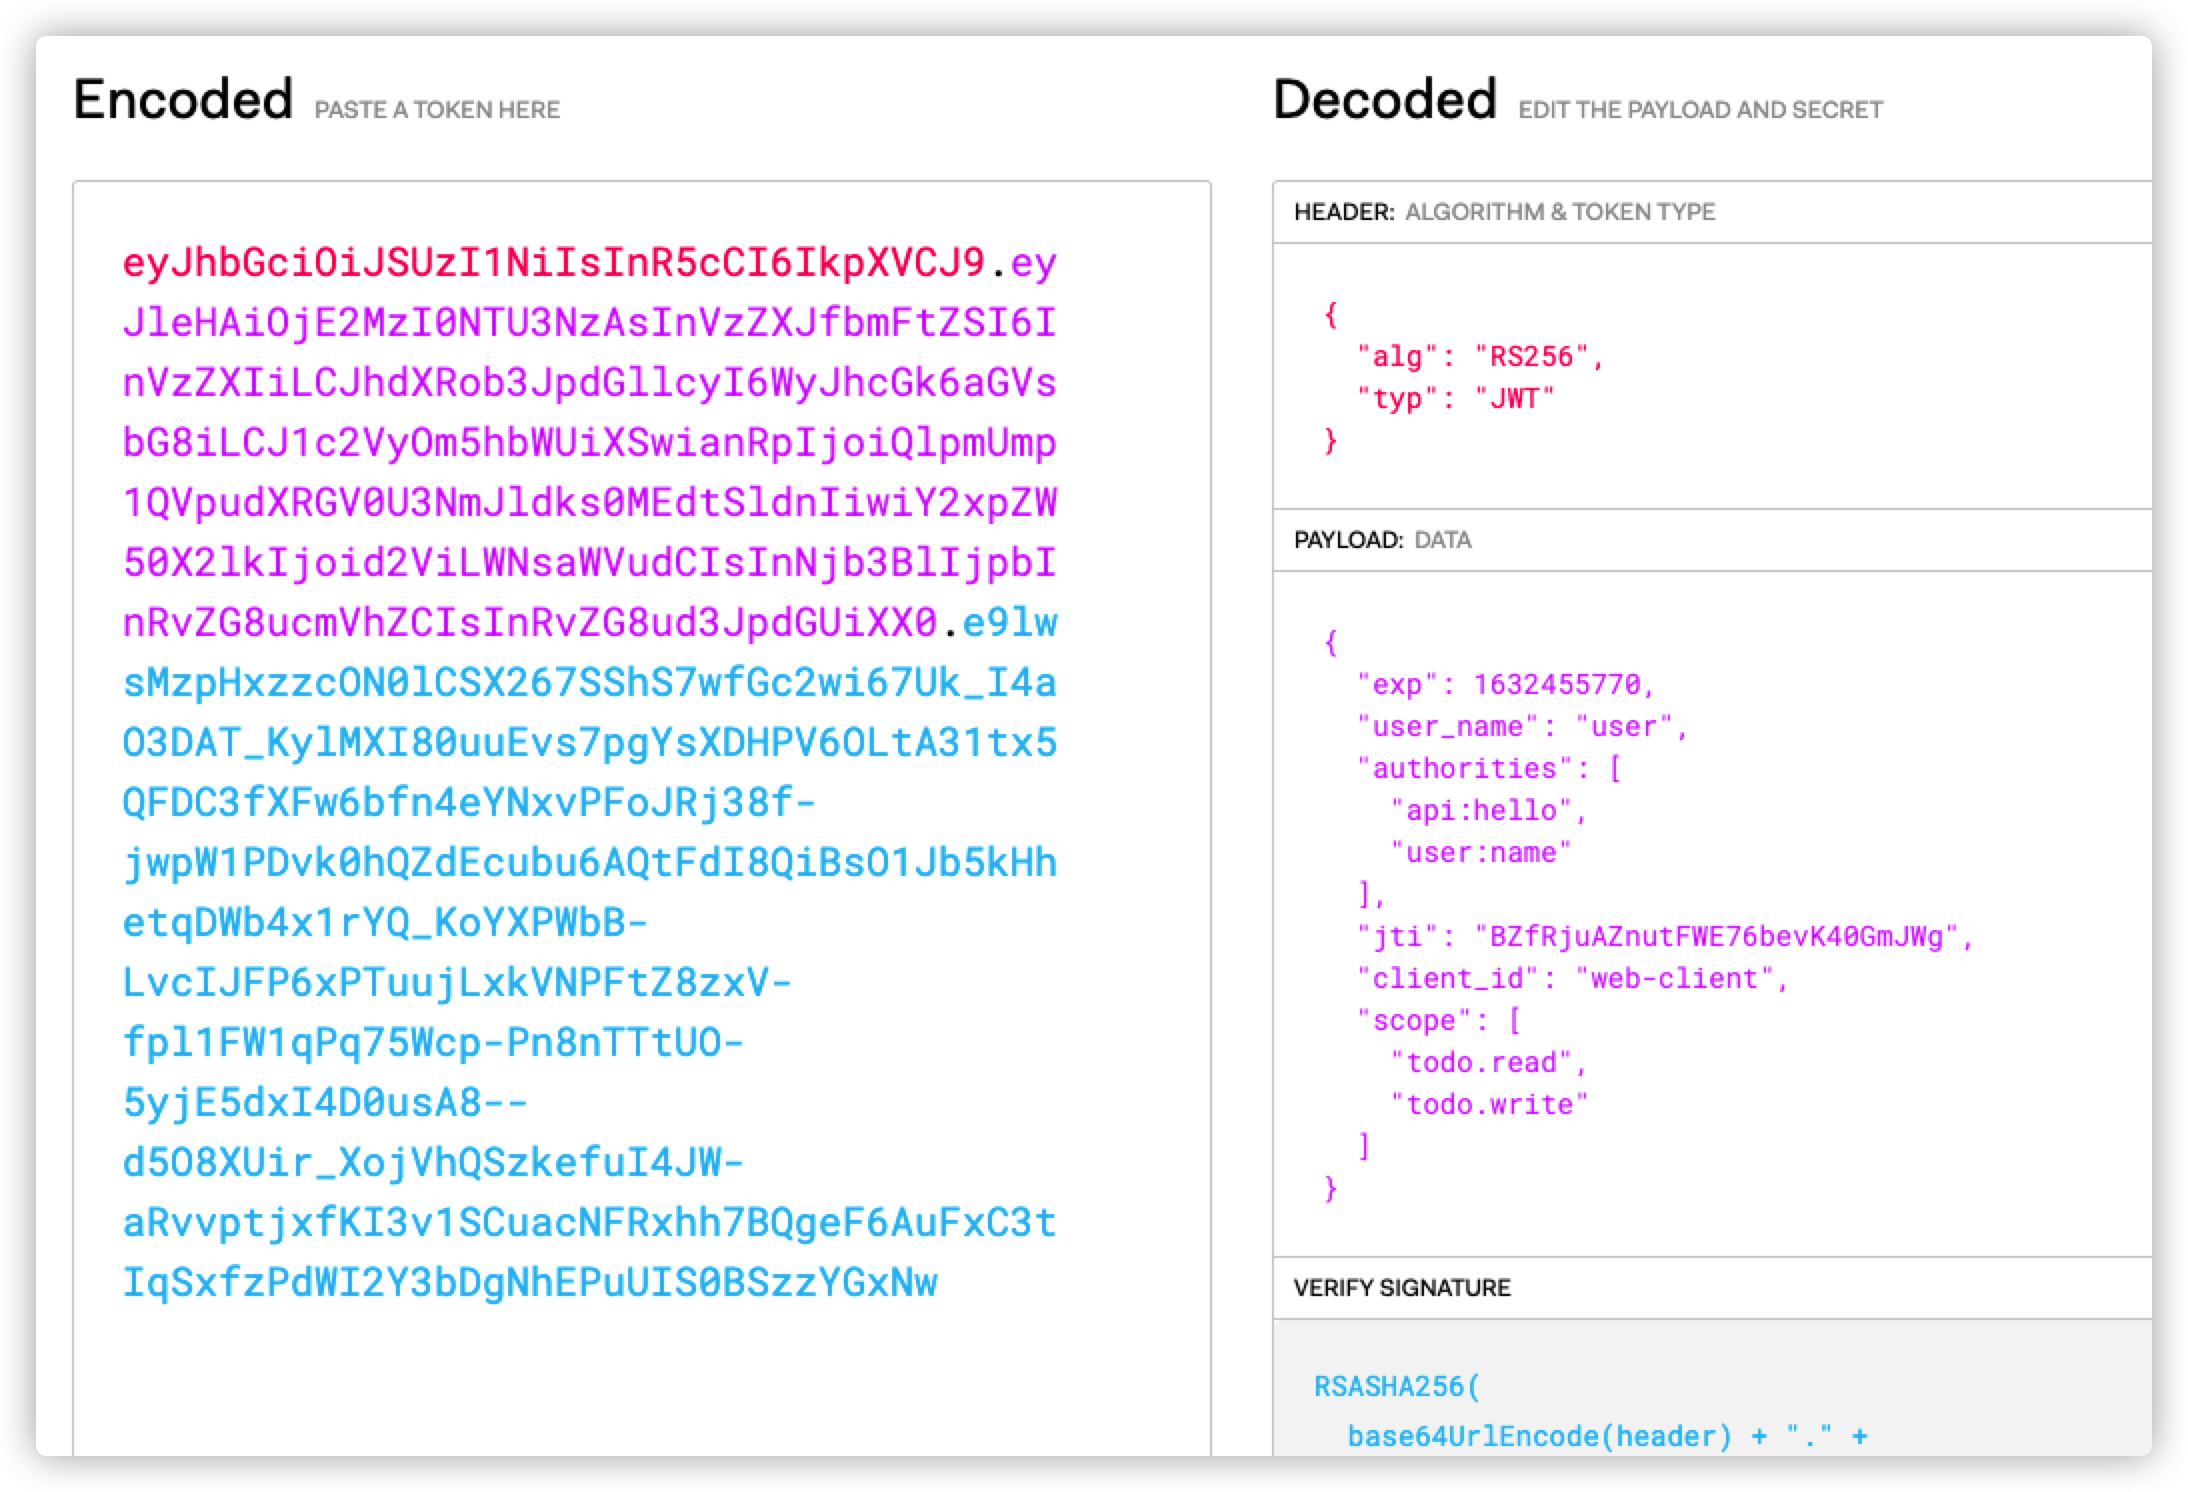
在https://jwt.io/上面解析token:
授权码模式
还记得授权码模式需要访问页面吗?需要登陆和同意授权,这也是为什么授权服务器打开了登陆页面的原因
浏览器访问:
http://localhost:8080/authorization-server/oauth/authorize?response_type=code&client_id=web-client&client_secret=$2a$10$jhS817qUHgOR4uQSoEBRxO58.rZ1dBCmCTjG8PeuQAX4eISf.zowm&redirect_uri=http://localhost:8081/login/oauth2/code/web-client-auth-code&state=123
参数说明:
redirect_uri:回调地址,如果数据库里面配置这个参数,则需要带上这个参数,并且需要和数据库中一致state:回调的时候会带上这个state,自定义,可以对其这个字段进行校验,判断其是否来自oauth2接口
SpringSecurity发现我们没有登陆,重定向到登陆页面
先进行登陆
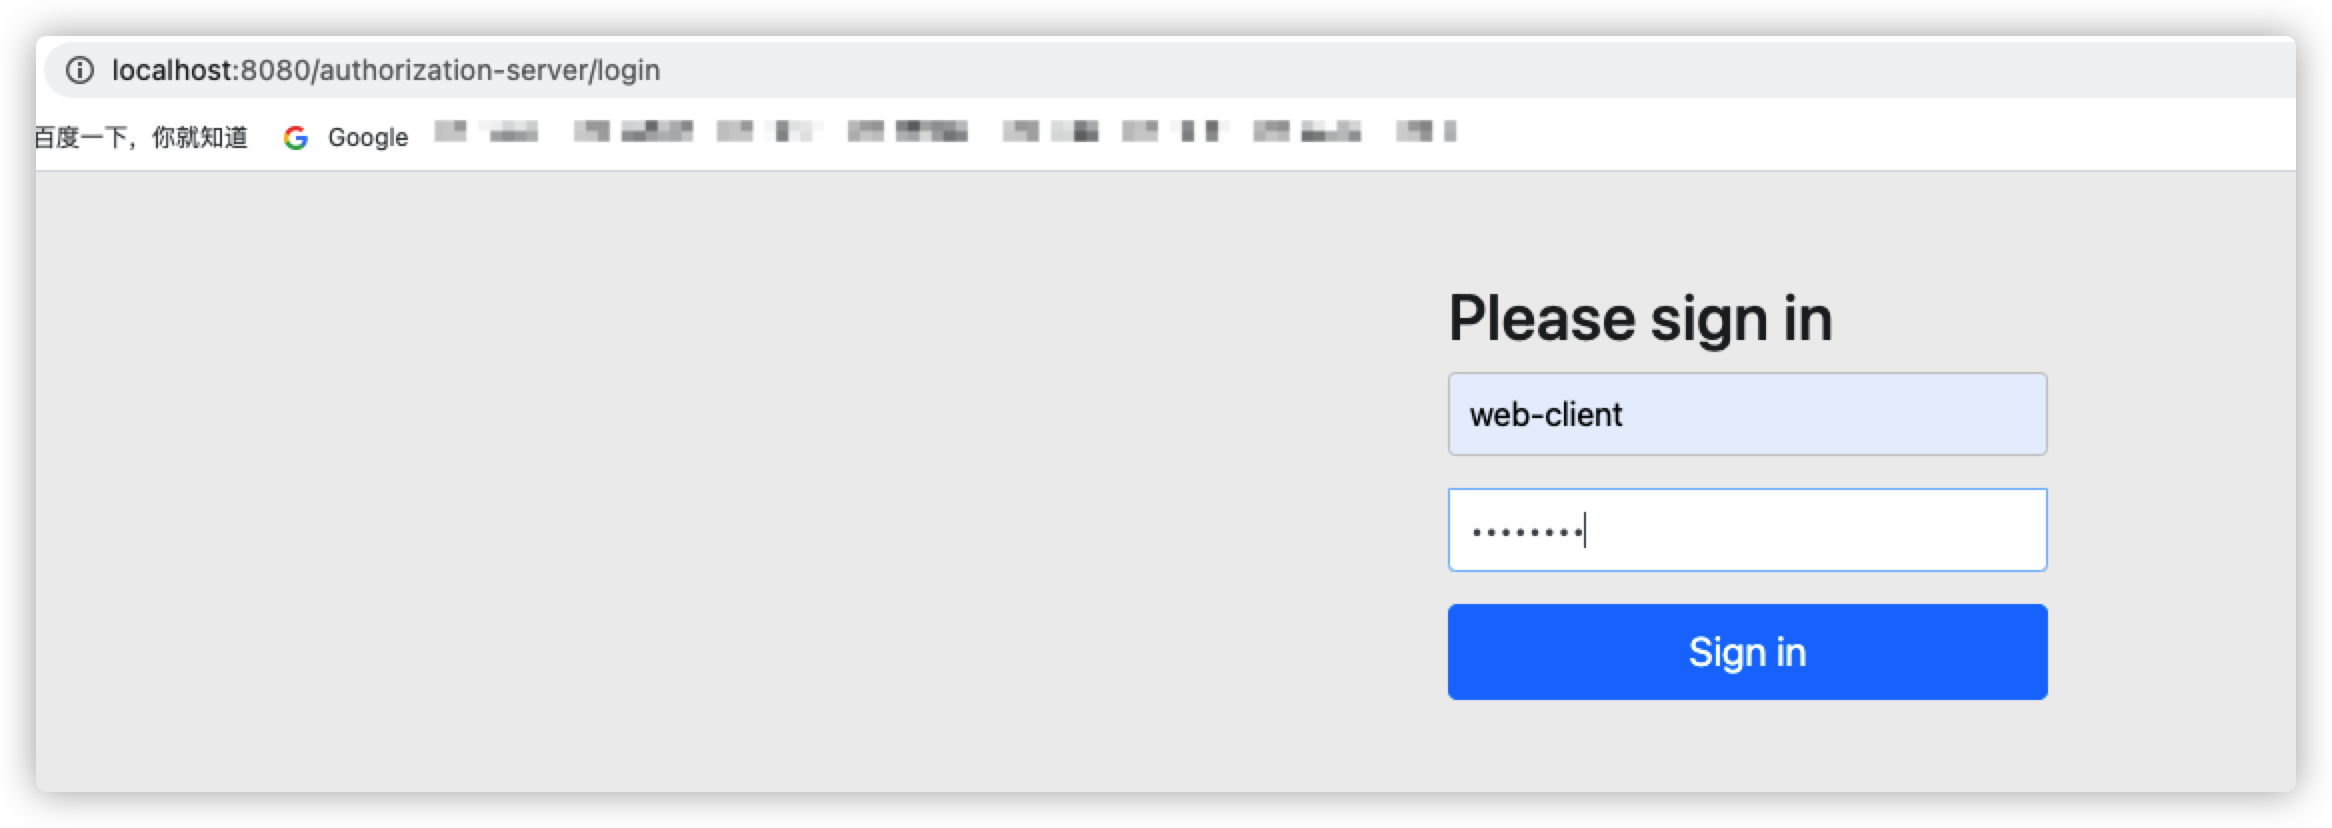
登陆后跳转到oauth2默认的授权页面
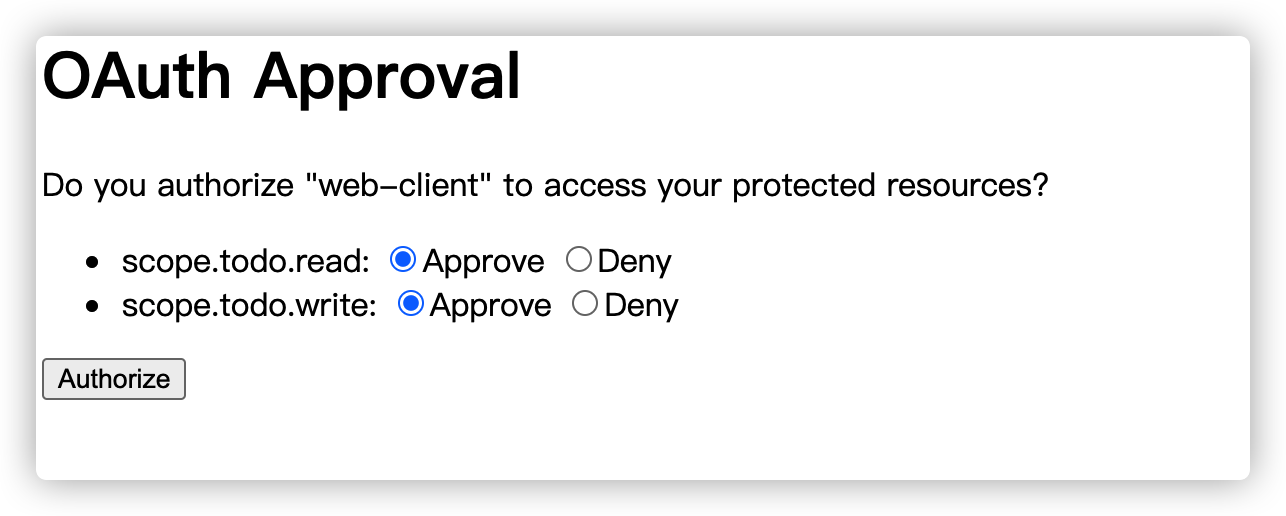
点击Authorize,进入回调页面,也就是设置的回调redirect_uri

这里会带上code和state参数,code就是授权码,state就是之前请求时带上的状态码,可用判断是否是Oauth2回调返回。
通过code获取授权码,并且code只能使用一次
注意,此处需加 Authorization 请求头,值为 Basic xxx xxx 为 client_id:client_secret 的 base64编码。

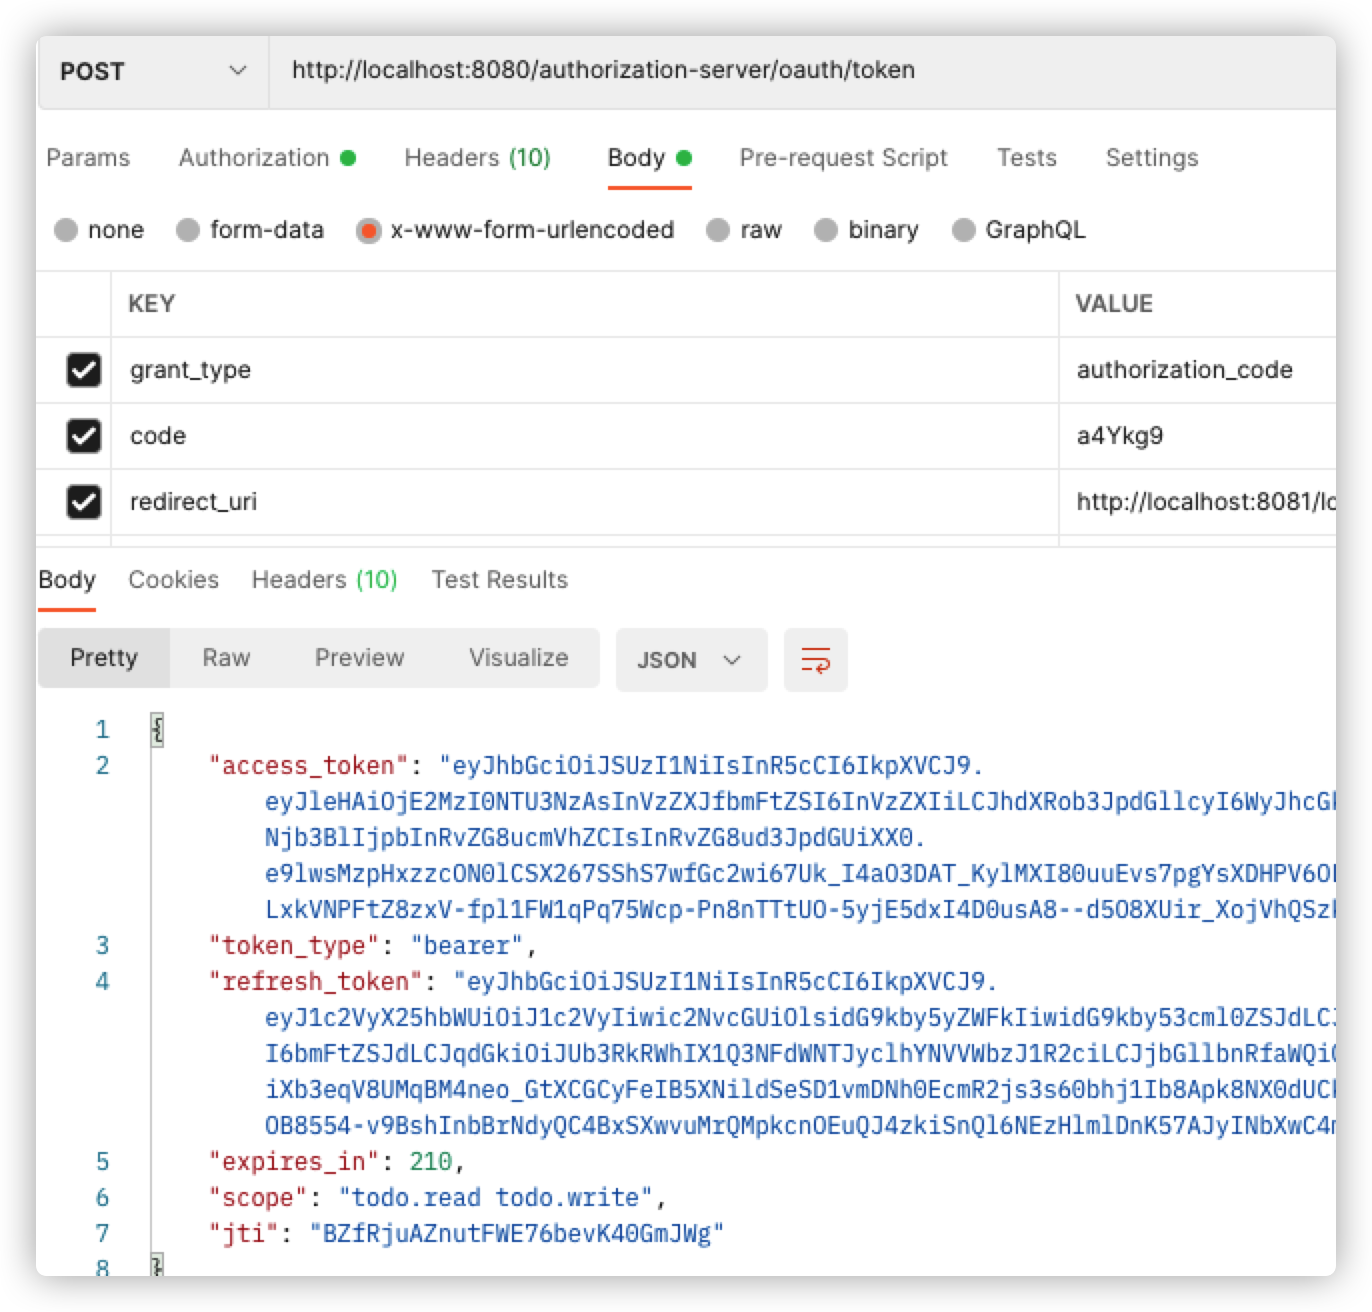
grant_type值为authorization_code
这里填写的redirect_uri也需要和数据库中的一致

