SpringSecurity系列学习(一):初识SpringSecurity
系列导航
SpringSecurity系列
- SpringSecurity系列学习(一):初识SpringSecurity
- SpringSecurity系列学习(二):密码验证
- SpringSecurity系列学习(三):认证流程和源码解析
- SpringSecurity系列学习(四):基于JWT的认证
- SpringSecurity系列学习(四-番外):多因子验证和TOTP
- SpringSecurity系列学习(五):授权流程和源码分析
- SpringSecurity系列学习(六):基于RBAC的授权
SpringSecurityOauth2系列
- SpringSecurityOauth2系列学习(一):初认Oauth2
- SpringSecurityOauth2系列学习(二):授权服务
- SpringSecurityOauth2系列学习(三):资源服务
- SpringSecurityOauth2系列学习(四):自定义登陆登出接口
- SpringSecurityOauth2系列学习(五):授权服务自定义异常处理
SpringSecurity
Spring Security是spring采用AOP思想,基于servlet过滤器实现的安全框架。它提供了完善的认证机制和方法级的
授权功能。是一款非常优秀的权限管理框架。
学习SpringSecurity,一般都是从前后端不分离架构开始学习,然后学习前后端分离的JWT + SpringSecurity架构,之后再学习SpringSecurity + Oauth2微服务架构。
现在大部分项目都是前后端分离的,为什么还需要去看前后端不分离架构下SpringSecurity的一些东西呢?其实这部分的学习只是为了打一个基础,SpringSecurity的发展也是从前后端不分离开始的,不论是后来的前后端分离架构还是微服务架构,SpringSecurity的主要逻辑都是大同小异的。
当然这部分的学习我们先不进行编码,主要是去看概念和源码,因为在做项目的时候,主要还是采用的前后端分离的JWT + SpringSecurity架构或者SpringSecurity + Oauth2微服务架构,编码我们从第二章开始,这一章我们先看看SpringSecurity中的一些基础的东西。
认证和授权
说到SpringSecurity就要说到它的核心功能:认证和授权
认证:我是谁的问题,也就是我们通常说的登陆

授权:身份验证,我能干什么。

认证和授权在SpringSecurity中是怎么样的流程呢?
这里我们写一个简单的demo,来看一下在SpringSecurity中认证和授权的流程
认证Demo
新建一个springboot工程,引入依赖
	<dependency>
            <groupId>org.springframework.boot</groupId>
            <artifactId>spring-boot-starter-security</artifactId>
        </dependency>
引入依赖之后,SpringSecurity就已经有默认的配置了,这个时候写一个简单的控制器访问,会被SpringSecurity保护拦截。
/**
 * @author 硝酸铜
 * @date 2021/6/2
 */
@RestController
@RequestMapping(value = "/api")
public class UserResource {

    @GetMapping(value = "/greeting")
    public String greeting(){

        return "Hello World";
    }
}
启动项目,访问http://localhost:8080/greeting,会被SpringSecurity拦截,重定向到http://localhost:8080/login进行登录,这个页面是SpringSecurity默认的登陆页面
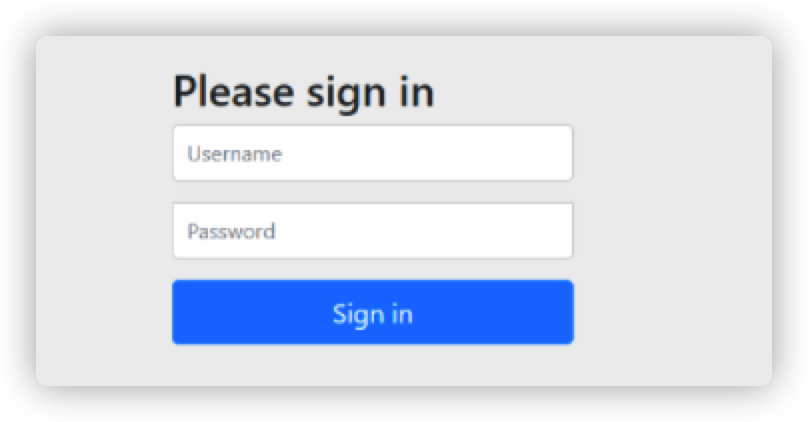
默认的用户名是:user,密码会在控制台输出出来:

登录之后,正常进行业务:
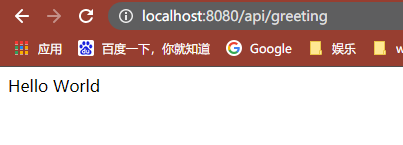
如果我们不使用网页去调用接口,而是使用postman这类工具去调用接口该怎么进行认证呢?
默认情况下,SpringSecurity会接受请求头中的Authorization的值去进行认证,以Basic 开头,后接账号密码,比如在请求接口的时候,添加请求头Authorization:Basic user a76dbd63-65d2-4cff-aebc-cc5dc4a6973d
这样就不会被重定向到登陆页面,而是直接通过认证。
授权demo
SpringSecurity默认配置下,所有接口只要认证通过即可访问,如果我们需要对一个接口进行限制,必须有哪一种权限才能访问,则需要进行安全配置
/**
 * @author 硝酸铜
 * @date 2021/6/2
 */
@EnableWebSecurity
public class SecurityConfig extends WebSecurityConfigurerAdapter {

    @Override
    protected void configure(HttpSecurity http) throws Exception {
        http.authorizeRequests(req -> req.mvcMatchers("/api/greeting").hasAnyRole("ADMIN"));
    }
}
具体为什么这么写我们先不讨论,这里的意思就是访问/api/greeing这个路径需要有ADMIN这个角色,重新启动项目,访问该路径:

403禁止访问,未授权,没有该权限
我们现在给用户授权:
	@Override
    protected void configure(HttpSecurity http) throws Exception {
        http
                .formLogin(Customizer.withDefaults())
                ///api/greeting 路径需要检查认证信息
                .authorizeRequests(req -> req.mvcMatchers("/api/greeting").authenticated());
    }
这里的意思是,我们不再检查权限,只检查该认证信息,重新启动,访问该路径:

这就是在SpringSecurity中的认证和授权的过程,其中的具体逻辑和源码,我们在后面进行详细学习,现在小伙伴们先了解个大概
安全配置
一开始我们引入SS的时候,会生成默认的配置,比如默认的表单登录页面,HTTP BASIC认证等等,其本质就是WebSecurityConfigurerAdapter这个基类带来的配置
public abstract class WebSecurityConfigurerAdapter implements WebSecurityConfigurer<WebSecurity> {
    ...
    protected void configure(HttpSecurity http) throws Exception {
        this.logger.debug("Using default configure(HttpSecurity). If subclassed this will potentially override subclass configure(HttpSecurity).");
        http.authorizeRequests((requests) -> {
            // 所有的接口都需要通过认证
            ((AuthorizedUrl)requests.anyRequest()).authenticated();
        });
        // 默认的表单登陆页面
        http.formLogin();
        // 使用HTTP BASIC认证,也就是请求头中的Authorization:Basic username passowrd
        http.httpBasic();
    }
    ...
}
这个默认的方法分为三个部分:
- 配置认证请求
- 配置表单
- 配置HttpBasic
这三个部分可以通过and()来连接,and()返回一个HttpSecurity,形成链式写法。
如果用函数式写法(推荐),直接就能使用链式写法。
如果我们需要自定义安全配置,则需要继承WebSecurityConfigurerAdapter这个基类,重写configure方法。
import org.springframework.security.config.Customizer;
import org.springframework.security.config.annotation.web.builders.HttpSecurity;
import org.springframework.security.config.annotation.web.configuration.EnableWebSecurity;
import org.springframework.security.config.annotation.web.configuration.WebSecurityConfigurerAdapter;
import org.springframework.security.config.annotation.web.configurers.AbstractHttpConfigurer;

/**
 * `@EnableWebSecurity` 注解 deug参数为true时,开启调试模式,会有更多的debug输出,不要用在生产环境
 * @author 硝酸铜
 * @date 2021/6/2
 */
@EnableWebSecurity(debug = true)
public class SecurityConfig extends WebSecurityConfigurerAdapter {

   @Override
    protected void configure(HttpSecurity http) throws Exception {
        http
                //取消CSRF保护
                .csrf(AbstractHttpConfigurer::disable)
                //默认的HTTP Basic Auth认证
                .httpBasic(Customizer.withDefaults())
                //默认的表单登录
                //.formLogin(Customizer.withDefaults())
                //关闭表单登录
                .formLogin(AbstractHttpConfigurer::disable)
                //对 /api 路径下的所有接口进行验证,需要权限`ROLE_USER`
                .authorizeRequests(req -> req.antMatchers("/api/**").hasAnyRole("USER"));
    }

  	@Override
    public void configure(WebSecurity web) {
        web
                .ignoring()
                .antMatchers("/error",
                        "/resources/**",
                        "/static/**",
                        "/public/**",
                        "/h2-console/**",
                        "/swagger-ui.html",
                        "/swagger-ui/**",
                        "/v3/api-docs/**",
                        "/v2/api-docs/**",
                        "/doc.html",
                        "/swagger-resources/**")
                .requestMatchers(PathRequest.toStaticResources().atCommonLocations());
    }
}
重写configure(HttpSecurity http)让我们可以配置认证和授权,也就是说走到这个方法的时候,是经过了过滤器链的。
启动过滤器链是很昂贵的,占用了系统很多资源,有时候我们经过一个路径(比如访问静态资源:图片,视频等),不需要进行认证和授权,也就不需要启动过滤器链,为了节约系统资源,可以通过重写configure(WebSecurity web)方法来禁用过滤器链
一些前后端不分离的安全配置概念(了解即可)
CSRF攻击
CSRF攻击对于无状态应用(前后端分离,使用token,天然免疫)来说是无效的,只有Session类应用需要去预防
当进行登录的时候,如果没有禁用CSRF配置,那么每个POST请求必须携带一个CSRF Token,否则不予授权
为什么会有这样一个配置呢,这首先要从CSRF攻击说起
这种攻击的前提条件是:用户已经登录正常站点
很多网站的登录状态都是一个有时间周期的Session,这种攻击就是利用这一点。
当一个受害用户已经正常的登录过一个站点,并且这个登录的Session还在有效期内时,一个恶意用户发起一个链接给受害用户,比如发起一个银行账户变更通知的链接,然后受害用户登录点击进去,那个恶意页面也和正常的银行页面长得非常像。
这个恶意页面要求受害用户输入他的银行账户,密码,姓名等敏感信息。等受害用户输入之后,这个恶意页面就将这些信息发送给网银,由于受害用户已经登录过网银,并且其Session还没有过期,这些恶意页面发送的数据就等于是在受害用户许可之下发送的,受害用户的网银就被轻松攻破了。
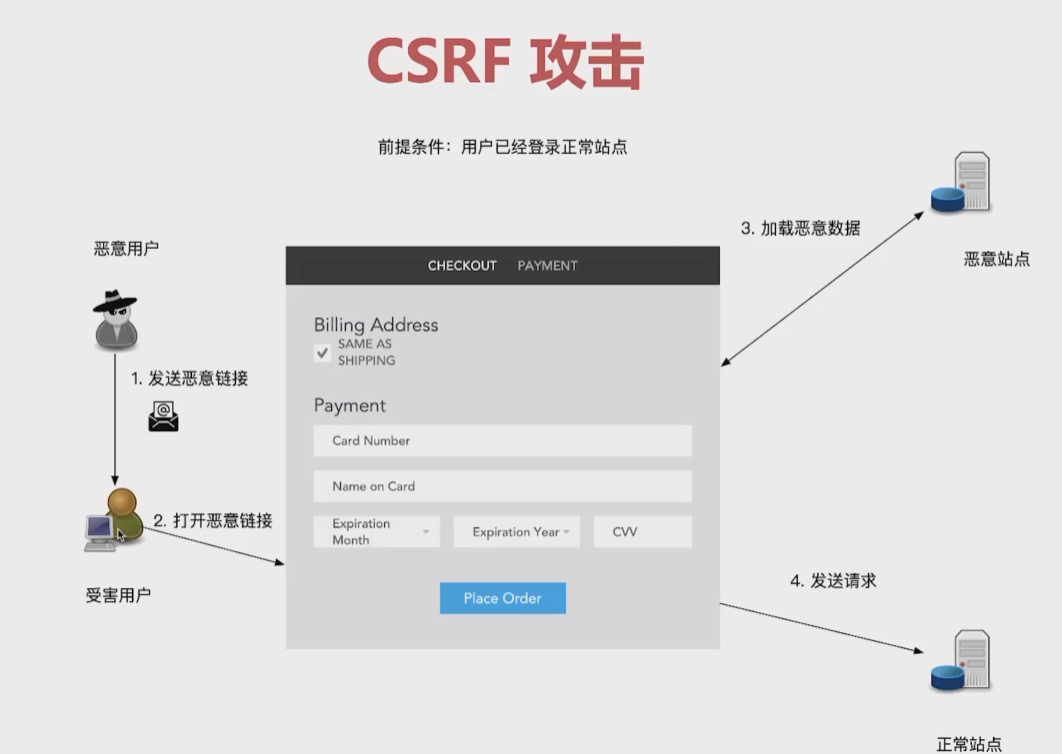
防止受到CSRF攻击的方式
第一种:CSRF Token
由服务器生成,并设置到浏览器Cookie当中,前端每次都会从cookie中将这个token读取出来,服务端要求每个请求都需要带上这个token。提交到服务端之后,服务端会比较CSRF Token,看他是不是和服务端保存在Session中的token一致。这个token每个请求都是不一样的
第二种:在响应当中设置Cookie的SameSite属性
private AuthenticationSuccessHandler jsonLoginSuccessHandler(){
       return (req,res,auth) ->{
           //..
           Collection<String > headers = res.getHeaders(HttpHeaders.SET_COOKIE);
           res.addHeader(HttpHeaders.SET_COOKIE,String.format("%s; %s",header,"SameSite=Strict"));
       };
    }
即在响应当中的Cookie当中设置SameSite属性
但是这个对于浏览器兼容性来说不友好,ie不支持。
所以现在主流还是CSRF Token方法
设置CSRF
http.csrf(csrf -> {
            //保存策略,可以保存在在session(HttpSessionCsrfTokenRepository)或者cookie(CookieCsrfTokenRepository)中
            csrf.csrfTokenRepository()
                    //忽略哪些路径
                    .ignoringRequestMatchers()
                    //哪些需要保护
                    .requireCsrfProtectionMatcher();
        })
Remember me 功能
基于Session的功能:Session过期后,用户不需要登录就能直接访问
SpringSecurity提供开箱即用的配置rememberMe
原理:使用Cookie存储用户名,过期时间,以及一个Hash,Hash:md5(用户名+过期时间+密码+key)
当用户访问的时候,会判断Session有没有过期,如果过期了,就直接导到登录页。
如果没有过期,服务端就根据用户名,从数据库里面查到的用户名,密码,过期时间,key,进行md5加密,然后与客户端提交的md5进行对比,如果一致,则认证成功。
注意:md5加密中有密码,也就是说如果用户修改了密码,则需要重新登录。
http.rememberMe(rememberMe -> {
            //存储策略,
            rememberMe.tokenRepository()
                    //设置Cookie名称
                    .rememberMeCookieName()
                    //有效期设置,单位s
                    .tokenValiditySeconds()
                    //设置用户查询服务,实现UserDetailsService接口的类,提供根据用户名查询用户的方法
                    .userDetailsService()
                    //是否用安全的Cookie
                    .useSecureCookie();
        })
退出
前后端不分离的退出设置
http
                .logout(logout -> {
                    //退出登录的url
                    logout.logoutUrl()
                            //退出登录成功,重定向的url
                            .logoutSuccessUrl()
                            //设置LogoutHandler,自定义退出登录逻辑
                            .addLogoutHandler()
                            //删除Cookies
                            .deleteCookies()
                            //取消Session
                            .invalidateHttpSession()
                            //清理认证
                            .clearAuthentication();
                })
前后端分离的登陆和退出采用增加过滤器或者接口的方式,不需要使用这个配置
Spring Security过滤器链
过滤器
其实任何的Spring Web程序,在本质上都是一个Servlet程序
Spring Security Filter在HTTP请求到达你的Controller之前,过滤每一个传入的HTTP请求
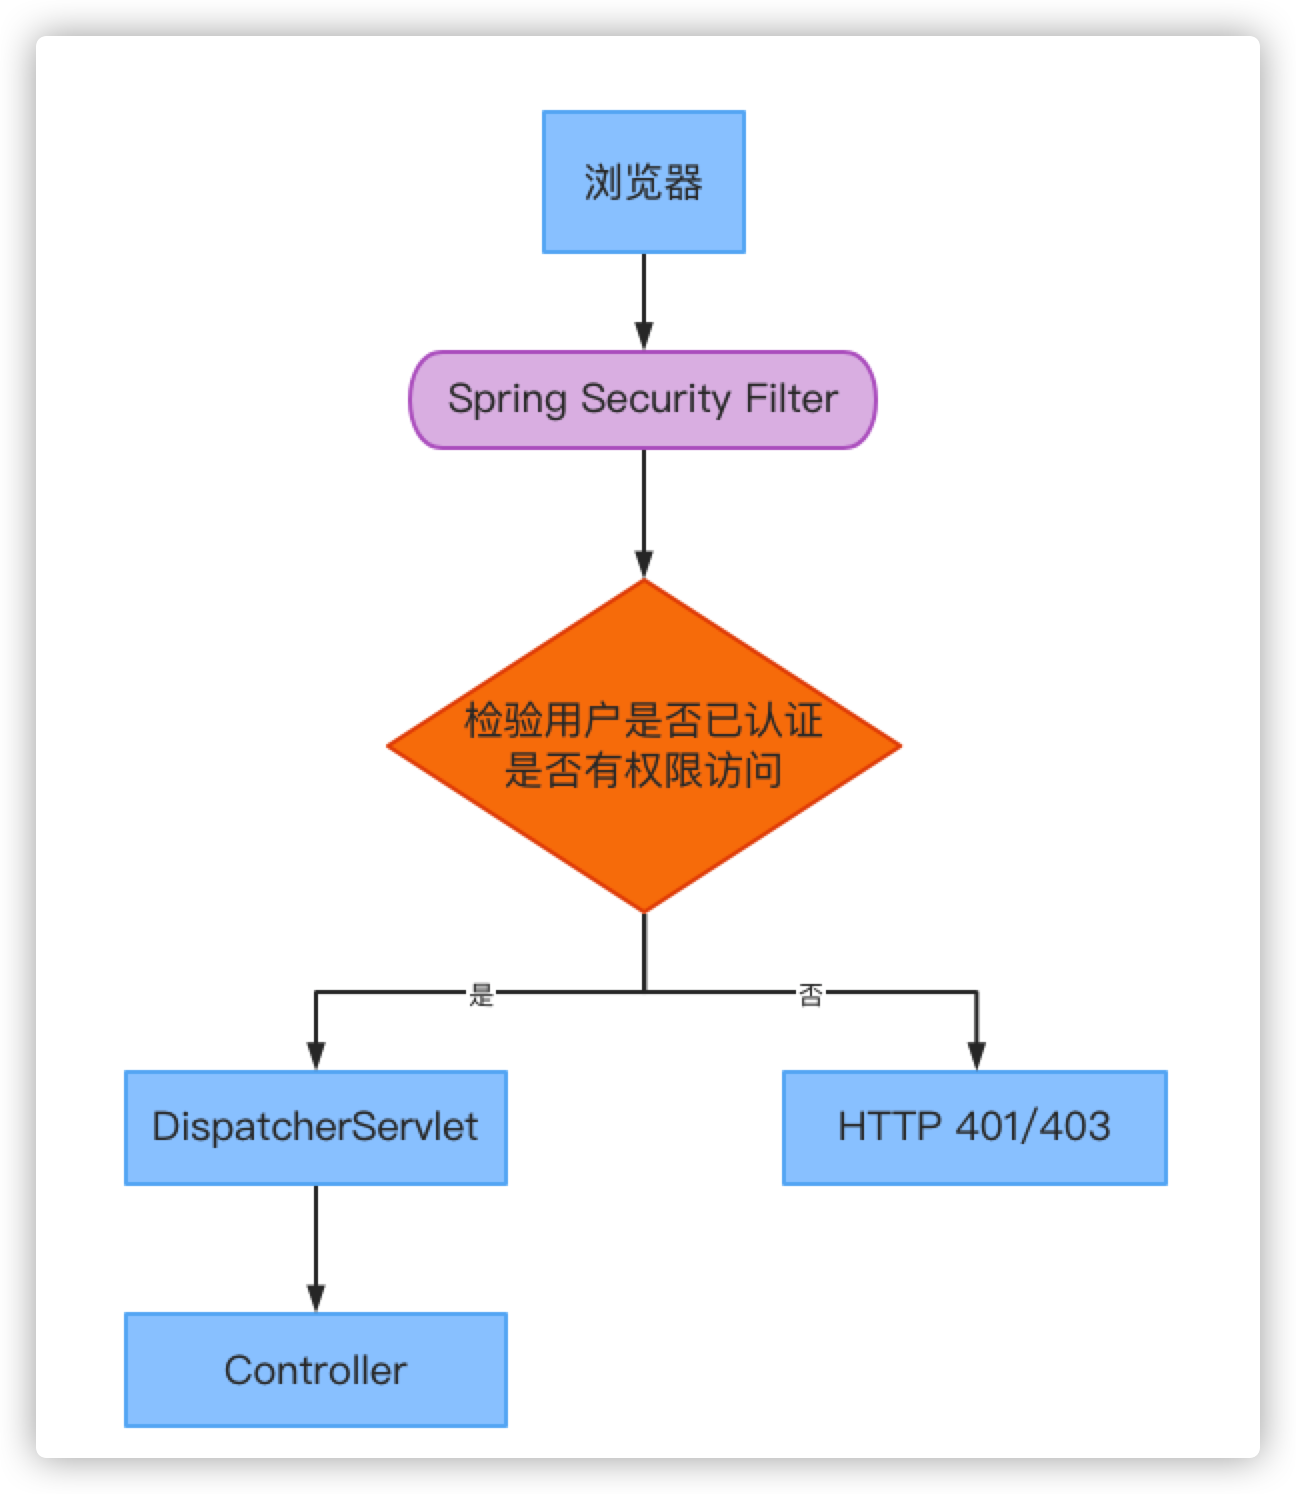
- 首先,过滤器需要从请求中提取一个用户名/密码。它可以通过一个基本的HTTP头,或者表单字段,或者
cookie等等。 - 然后,过滤器需要对用户名/密码组合进行验证比如数据库。
- 在验证成功后,过滤器需要检查用户是否被授权访问请求的URI。
- 如果请求通过了所有这些检查,那么过滤器就可以让请求通过你的
DispatcherServlet后重定向到@Controllers或者@RestController。
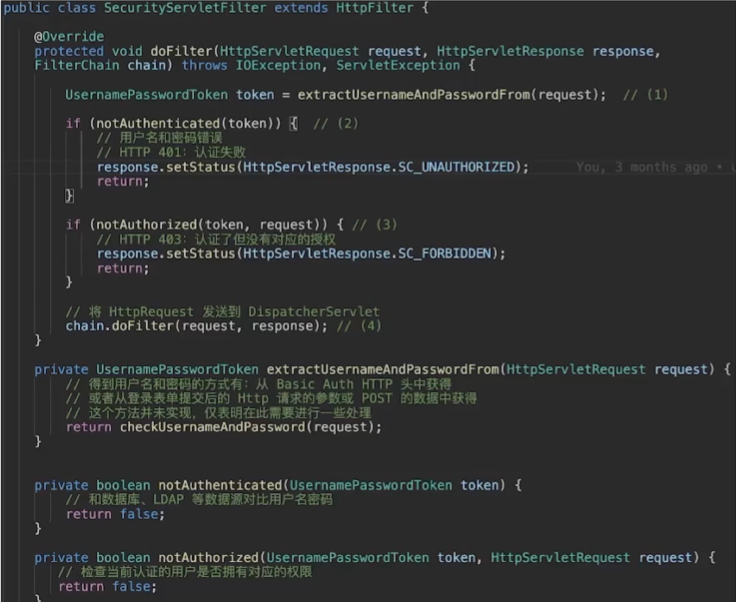
要使Spring Security生效,从可行性上来说,我们需要有一个Spring Security的Filter能够被Servlet容器(比如Tomcat、Undertow等)感知到,这个Filter便是DelegatingFilterProxy,该Filter并不受Spring IoC容器的管理,也不是Spring Security引入的,而是Spring Framework中的一个通用的Filter。在Servlet容器眼中,DelegatingFilterProxy只是一个Filter而已,跟其他的Servlet Filter没什么却别。
虽然DelegatingFilterProxy本身不在IoC容器中,它却能够访问到IoC容器中的其他对象(通过WebApplicationContextUtils.getWebApplicationContext可以获取到IoC容器,进而操作容器中的Bean),这些对象才是真正完成Spring Security逻辑的对象。这些对象中的部分对象本身也实现了javax.servlet.Filter接口,但是他们并不能被Servlet容器感知到,比如UsernamePasswordAuthenticationFilter。
过滤器链
通过这个过滤器示例,可以了解到通过过滤器完成认证和授权的基本过程。
在SpringSecurity中,这一过程不是通过一个过滤器来完成的,而是一系列的过滤器,也就是一个过滤器链,认证有认证的过滤器,授权有授权的过滤器,除此之外还有更多的,不同功能的过滤器

这种过滤器链的好处:
- 每个过滤器的职责单一
- 链式处理是一种比较好的方式,由简单的逻辑构成复杂的逻辑
当一个项目启动的时候,其Spring Security的日志输出:
2021-09-18 14:10:50.935 INFO 8265 --- [ main] o.s.s.web.DefaultSecurityFilterChain : Will secure any request with [org.springframework.security.web.context.request.async.WebAsyncManagerIntegrationFilter@56da7487, org.springframework.security.web.context.SecurityContextPersistenceFilter@6f94a5a5, org.springframework.security.web.header.HeaderWriterFilter@7ceb4478, org.springframework.security.web.authentication.logout.LogoutFilter@7cbeac65, org.springframework.security.web.savedrequest.RequestCacheAwareFilter@a451491, org.springframework.security.web.servletapi.SecurityContextHolderAwareRequestFilter@a92be4f, org.springframework.security.web.authentication.AnonymousAuthenticationFilter@10f7c76, org.springframework.security.web.session.SessionManagementFilter@25ad4f71, org.springframework.security.web.access.ExceptionTranslationFilter@77bbadc, org.springframework.security.web.access.intercept.FilterSecurityInterceptor@2b680207]
这就是Spring Security的过滤器链
重新访问/api/greeing这个路径,我们来看看日志:
2021-09-18 14:10:54.545 DEBUG 8004 --- [nio-8080-exec-1] FilterSecurityInterceptor                : Failed to authorize filter invocation [GET /api/greeting] with attributes [authenticated]
2021-09-18 14:10:54.545 DEBUG 8004 --- [nio-8080-exec-1] HttpSessionRequestCache                  : Saved request http://localhost:8080/api/greeting to session
2021-09-18 14:10:54.545 DEBUG 8004 --- [nio-8080-exec-1] DefaultRedirectStrategy                  : Redirecting to http://localhost:8080/login
认证失败,重定向到了login
登录之后:
2021-09-18 14:11:03.247 DEBUG 8004 --- [nio-8080-exec-6] DaoAuthenticationProvider                : Authenticated user
... ...
2021-09-18 14:11:03.247 DEBUG 8004 --- [nio-8080-exec-6] DefaultRedirectStrategy                  : Redirecting to http://localhost:8080/api/greeting
... ...
2021-09-18 14:11:03.247 DEBUG 8004 --- [nio-8080-exec-9] FilterSecurityInterceptor                : Authorized filter invocation [GET /api/greeting] with attributes [authenticated]
2021-09-18 14:11:03.247 DEBUG 8004 --- [nio-8080-exec-9] FilterChainProxy                         : Secured GET /api/greeting
常见的内建过滤器链
SpringSecurity过滤器很多,并且还可以自己添加过滤器,如何添加过滤器我们之后在分析认证流程源码的时候会介绍。
不需要将每个SpringSecurity过滤器都搞明白,只需要知道一些常见的过滤器的作用就行了
org.springframework.security.web.authentication.www.BasicAuthenticationFilter此过滤器会自动解析HTTP请求中头部名字为Authentication,且以Basic开头的头信息。
org.springframework.security.web.authentication.UsernamePasswordAuthenticationFilter认证操作全靠这个过滤器,默认匹配URL为
/login且必须为POST请求。之后我们自定义认证流程其实也是通过重写这个过滤器实现。
org.springframework.security.web.authentication.AnonymousAuthenticationFilter当
SecurityContextHolder中认证信息为空,则会创建一个匿名用户存入到SecurityContextHolder中。SecurityContextHolder是什么在下一章解释spring security为了兼容未登录的访问,也走了一套认证流程,只不过是一个匿名的身份。
org.springframework.security.web.authentication.ui.DefaultLoginPageGeneratingFilter如果没有在配置文件中指定认证页面,则由该过滤器生成一个默认认证页面。
org.springframework.security.web.authentication.ui.DefaultLogoutPageGeneratingFilter由此过滤器可以生产一个默认的退出登录页面
自定义Filter
如果我们想自定义认证的流程,比如使用前后端分离的架构时,认证的时候不重定向到一个页面,而是使用Restful风格的接口进行认证,返回json响应。这个时候就需要我们自定义一个Filter了
在自定义这样一个Filter前,我们需要先搞清楚SpringSecurity在验证用户的时候,走的什么逻辑。
关于认证的具体源码我们之后再讨论,我只现在只需要知道在表单登录的时候,用处理登录逻辑的过滤器叫做UsernamePasswordAuthenticationFilter,其在方法attemptAuthentication中处理认证这个过程的
	private String usernameParameter = "username";
    private String passwordParameter = "password";

	public Authentication attemptAuthentication(HttpServletRequest request, HttpServletResponse response) throws AuthenticationException {
    	//第一步:判断请求方法是不是POST,如果不是就返回一个异常
        if (this.postOnly && !request.getMethod().equals("POST")) {
            throw new AuthenticationServiceException("Authentication method not supported: " + request.getMethod());
        } else {
            //第二步:从HttpRequest中获得用户名和密码
            String username = this.obtainUsername(request);
            username = username != null ? username : "";
            username = username.trim();
            String password = this.obtainPassword(request);
            password = password != null ? password : "";

            //第三步:构造一个UsernamePasswordAuthenticationToken,一个更高层的安全对象,以后再说明,这里先不深究
            UsernamePasswordAuthenticationToken authRequest = new UsernamePasswordAuthenticationToken(username, password);

            //第四步:设置setDetails,设置ip等信息
            this.setDetails(request, authRequest);
            //最后:getAuthenticationManager是认证处理的最终的一个机制(后面说明,这里先不深究),对安全对象进行认证
            return this.getAuthenticationManager().authenticate(authRequest);
        }
    }

    @Nullable
    protected String obtainPassword(HttpServletRequest request) {
        //从HttpRequest获取参数名为password的参数作为密码
        return request.getParameter(this.passwordParameter);
    }

    @Nullable
    protected String obtainUsername(HttpServletRequest request) {
        //从HttpRequest获取参数名为username的参数作为账号
        return request.getParameter(this.usernameParameter);
    }

    protected void setDetails(HttpServletRequest request, UsernamePasswordAuthenticationToken authRequest) {
        authRequest.setDetails(this.authenticationDetailsSource.buildDetails(request));
    }
看完这个源码,可以想到如果我们想要实现前后端分离架构的认证,也可以自定义一个过滤器,走这个认证流程,不过我们HTTP Request中传递的json中去读取用户名和密码,登陆成功返回一个json
public class RestAuthticationFilter extends UsernamePasswordAuthenticationFilter {

    /**
     * json格式:
     *
     * {
     *     “username": "user",
     *     "password": "12345678"
     * }
     *
     * @param request 请求体
     * @param response 返回体
     * @return Authentication
     * @throws AuthenticationException 认证异常
     */
     @Override
    public Authentication attemptAuthentication(HttpServletRequest request, HttpServletResponse response) throws AuthenticationException {

        InputStream is = null;
        String username = null;
        String password = null;
        try {
            is = request.getInputStream();
            JSONObject jsonObject= JSON.parseObject(is, JSONObject.class);
            username = jsonObject.getString("username");
            password = jsonObject.getString("password");
        } catch (IOException e) {
            e.printStackTrace();
            throw new BadCredentialsException("json格式错误,没有找到用户名或密码");
        }


        //认证,同父类
        UsernamePasswordAuthenticationToken authRequest = new UsernamePasswordAuthenticationToken(username, password);
        this.setDetails(request, authRequest);
        return this.getAuthenticationManager().authenticate(authRequest);
    }
  /**
     * 认证成功逻辑
     */
    @Override
    protected void successfulAuthentication(HttpServletRequest req, HttpServletResponse res, FilterChain chain, Authentication auth) throws IOException, ServletException {
      			res.setStatus(HttpStatus.OK.value());
            res.setContentType(MediaType.APPLICATION_JSON_VALUE);
            res.setCharacterEncoding("UTF-8");
            res.getWriter().println(JSON.toJSONString(auth));
    }
}
过滤器写完之后,编写配置文件,前后端分离架构的认证配置
import com.alibaba.fastjson.JSON;
import com.cupricnitrate.uaa.filter.RestAuthticationFilter;
import lombok.SneakyThrows;
import lombok.extern.slf4j.Slf4j;
import org.springframework.http.HttpStatus;
import org.springframework.http.MediaType;
import org.springframework.security.config.Customizer;
import org.springframework.security.config.annotation.web.builders.HttpSecurity;
import org.springframework.security.config.annotation.web.builders.WebSecurity;
import org.springframework.security.config.annotation.web.configuration.EnableWebSecurity;
import org.springframework.security.config.annotation.web.configuration.WebSecurityConfigurerAdapter;
import org.springframework.security.config.annotation.web.configurers.AbstractHttpConfigurer;
import org.springframework.security.web.authentication.AuthenticationSuccessHandler;
import org.springframework.security.web.authentication.UsernamePasswordAuthenticationFilter;

/**
 * `@EnableWebSecurity` 注解 deug参数为true时,开启调试模式,会有更多的debug输出
 *
 * @author 硝酸铜
 * @date 2021/6/2
 */
@EnableWebSecurity(debug = true)
@Slf4j
public class SecurityConfig extends WebSecurityConfigurerAdapter {

    @Override
    protected void configure(HttpSecurity http) throws Exception {
        http
                //禁用生成默认的登陆页面
                .formLogin(AbstractHttpConfigurer::disable)
                //关闭httpBasic,采用自定义过滤器
                .httpBasic(AbstractHttpConfigurer::disable)
                //前后端分离架构不需要csrf保护,这里关闭
                .csrf(AbstractHttpConfigurer::disable)
                //禁用生成默认的注销页面
                .logout(AbstractHttpConfigurer::disable)
                .authorizeRequests(req -> req
                        //可公开访问路径
                        .antMatchers("/authorize/**").permitAll()
                        //访问 /admin路径下的请求 要有ROLE_ADMIN权限
                        .antMatchers("/admin/**").hasRole("ADMIN")
                        //访问 /api路径下的请求 要有ROLE_USER
                        .antMatchers("/api/**").hasRole("USER")
                        //其他接口只需要认证即可
                        .anyRequest().authenticated()
                )
                //前后端分离是无状态的,不用session了,直接禁用。
                .sessionManagement().sessionCreationPolicy(SessionCreationPolicy.STATELESS);
                //在添加我们自定义的过滤器,替代UsernamePasswordAuthenticationFilter
                .addFilterAt(restAuthticationFilter(), UsernamePasswordAuthenticationFilter.class);

                /*
                .csrf(csrf -> csrf.disable())
                //默认的HTTP Basic Auth认证
                .httpBasic(Customizer.withDefaults())
                //自定义表单登录
                .formLogin(form -> form.successHandler((req,res,auth)->{
                    res.setStatus(HttpStatus.OK.value());
                    res.setContentType(MediaType.APPLICATION_JSON_VALUE);
                    res.setCharacterEncoding("UTF-8");
                    res.getWriter().println(JSON.toJSONString(auth));
                    log.info("认证成功");}))
                //对 /api 路径下的所有接口进行验证
                .authorizeRequests(req -> req.antMatchers("/api/**").hasAnyRole("USER"));*/

    }

    @SneakyThrows
    private RestAuthticationFilter restAuthticationFilter() {
        RestAuthticationFilter filter = new RestAuthticationFilter();
        //配置AuthenticationManager,是父类的一个方法
        filter.setAuthenticationManager(authenticationManager());

        //filter的入口
        filter.setFilterProcessesUrl("/authorize/login");
        return filter;
    }

    @Override
    public void configure(WebSecurity web) throws Exception {
        // /public 路径下的请求,都不会启动过滤器链
        web.ignoring().mvcMatchers("/public/**");
    }
}
我们使用idea 的Http-client功能调用接口试一下
###
POST http://localhost:8080/authorize/login
Content-Type: application/json

{
  "username": "user",
  "password": "12345678"
}


HTTP/1.1 200
X-Content-Type-Options: nosniff
X-XSS-Protection: 1; mode=block
Cache-Control: no-cache, no-store, max-age=0, must-revalidate
Pragma: no-cache
Expires: 0
X-Frame-Options: DENY
Set-Cookie: JSESSIONID=9BAAD30C4014FD926C940972E1D13D00; Path=/; HttpOnly
Content-Type: application/json;charset=UTF-8
Content-Length: 344
Date: Fri, 04 Jun 2021 10:12:37 GMT
Keep-Alive: timeout=60
Connection: keep-alive

{
  "authenticated": true,
  "authorities": [
    {
      "authority": "ROLE_ADMIN"
    },
    {
      "authority": "ROLE_USER"
    }
  ],
  "details": {
    "remoteAddress": "127.0.0.1"
  },
  "name": "user",
  "principal": {
    "accountNonExpired": true,
    "accountNonLocked": true,
    "authorities": [
      {
        "$ref": "$.authorities[0]"
      },
      {
        "$ref": "$.authorities[1]"
      }
    ],
    "credentialsNonExpired": true,
    "enabled": true,
    "username": "user"
  }
}
成功返回,走自定义逻辑,并且返回了json
这才是前后端分离架构的认证逻辑

