django+nginx+uwsgi+vue部署服务器
一、首先需要配置django+nginx+uwsgi
1. 安装虚拟环境
2. 安装项目所需要依赖的包
sudo pip3 freeze > requirements.txt
pip3 install -r requirements.txt
3. 安装和配置uwsgi
安装uwsgi
pip3 install uwsgi
在/opt文件下建立文件
vi /opt/uwsgi.ini
对uwsgi文件配置如下
[uwsgi]

# 项目目录

chdir=/home/litong/original_code/zjs_server

module=ipm2020.wsgi:application

# the virtualenv (虚拟环境的绝对路径)

home = /home/litong/.virtualenvs/manpeng2

#热重载

#touch-reload = /opt/ipm2020

#py-auto-reload = 1

# 指定sock的文件路径

#socket=/home/litong/proj/script/uwsgi.sock

#或者指定地址直接(指定文件路径就是相当于单独写了个配置导入,相当于import导入,可以修改和删除,可维护性高点)

#socket=127.0.0.1:9090 使用nginx连接时使用

socket=0.0.0.0:9090

#直接做服务器用http模式 直接做web服务器使用 python manage.py runserver ip:port

http=0.0.0.0:9500

# 进程个数

workers=1

pidfile=/(%chdir)/uwsgi/uwsgi.pid

# 指定静态文件,这个项目中没有,如果你的项目中有静态文件的话按这个目录结构配置

#static-map=/static=/home/litong/proj/

# 启动uwsgi的用户名和用户组

uid=root

gid=root

# 启用主进程

master=true

# 自动移除unix Socket和pid文件当服务停止的时候

vacuum=true

# 序列化接受的内容,如果可能的话

#thunder-lock=true

# 启用线程

enable-threads=true

# 设置自中断时间

#harakiri=30

# 设置缓冲

post-buffering=4096

# 设置日志目录

#daemonize=/opt/uwsgi/uwsgi.log
uwsgi常用参数介绍
chdir=/xxx/xxx # 指定项目目录
home=/xxx/xxx # 指定虚拟环境变量
wsgi-file=xxx # 指定加载WSGI文件
socket=xxx # 指定uwsgi的客户端将要连接的socket的路径(使用UNIX socket的情况)或者地址(使用网络地址的情况)。
callable=xxx # uWSGI加载的模块中哪个变量将被调用
master=true # 指定启动主进程
processes=4 # 设置工作进程的数量
threads=2 # 设置每个工作进程的线程数
vacuum=true # 当服务器退出时自动删除unix socket文件和pid文件
logfile-chmod=644 # 指定日志文件的权限
daemonize=%(chdir)/xxx.log # 进程在后台运行,并将日志打印到指定文件
pidfile=%(chdir)/xxx.pid # 在失去权限前,将主进程pid写到指定的文件
uid=xxx # uWSGI服务器运行时的用户id
gid=xxx # uWSGI服务器运行时的用户组id
procname-prefix-spaced=xxx # 指定工作进程名称的前缀
uwsgi的启动与停止
启动: uwsgi --ini 配置文件路径      例如:uwsgi --ini uwsgi.ini
停止: uwsgi --stop uwsgi.pid 路径  例如:uwsgi --stop uwsgi.pid
配置完成之后测试uwsgi是否安装成功。
在随意位置新建一个test.py文件,输入如下内容
1 def application(env, start_response):
2     start_response('200 OK', [('Content_Type', 'text/html')])
3     return [b"Congraduation!!! uWSGI Testing OK!!!"]
进入该文件的目录中,输入如下内容
uwsgi --http :8000 --wsgi-file test.py
参数意义
http :8000:使用http协议,8000端口
wsgi-file test.py:载入特定文件, test.py
打开浏览器输入服务器ip:端口号8000,如果能看到 Congraduation!!! uWSGI Testing OK!!! 则证明uwsgi安装成功
4. 配置django+uwsgi
测试完成后,配置django与uwsgi连接。此处,假定django项目位置为/home/litong/original_code/zjs_server
使用下列指令配置django与uwsgi连接
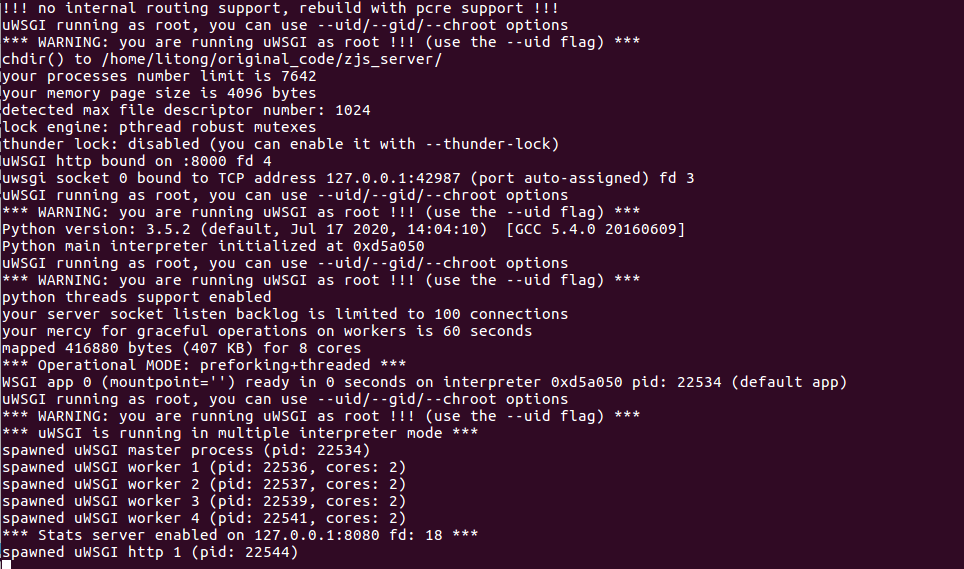
uwsgi --http :8000 --chdir /home/litong/original_code/zjs_server/ --wsgi-file zjs_server/wsgi.py --master --processes 4 --threads 2 --stats 127.0.0.1:8080
常用选项
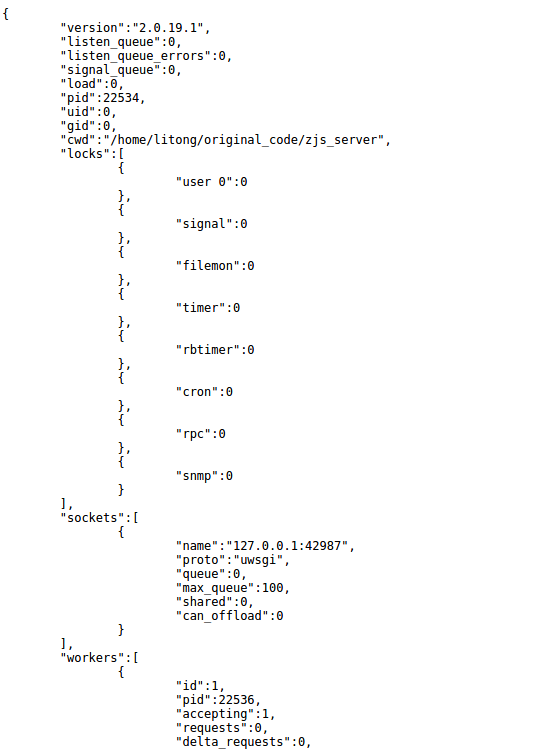
常用选项:
http : 协议类型和端口号
processes : 开启的进程数量
workers : 开启的进程数量,等同于processes(官网的说法是spawn the specified number ofworkers / processes)
chdir : 指定运行目录(chdir to specified directory before apps loading)
wsgi-file : 载入wsgi-file(load .wsgi file)
stats : 在指定的地址上,开启状态服务(enable the stats server on the specified address)
threads : 运行线程。由于GIL的存在,我觉得这个真心没啥用。(run each worker in prethreaded mode with the specified number of threads)
master : 允许主进程存在(enable master process)
daemonize : 使进程在后台运行,并将日志打到指定的日志文件或者udp服务器(daemonize uWSGI)。实际上最常用的,还是把运行记录输出到一个本地文件上。
pidfile : 指定pid文件的位置,记录主进程的pid号。
vacuum : 当服务器退出的时候自动清理环境,删除unix socket文件和pid文件(try to remove all of the generated file/sockets)
结果如下
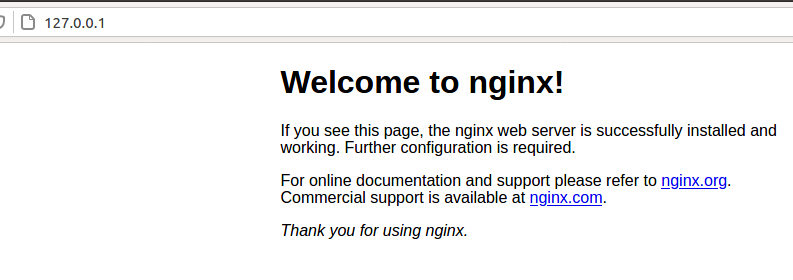
此时,打开浏览器输入127.0.0.1:8080,显示如下页面则证明配置成功
5. nginx安装与配置
安装gcc,g++的依赖库
apt-get install build-essential
apt-get install libtool
安装pcre的依赖库
sudo apt-get update
sudo apt-get install libpcre3 libpcre3-dev
安装zlib依赖库
apt-get install zlib1g-dev
安装ssl依赖库
apt-get install openssl
安装nginx
sudo apt-get install nginx #安装
启动nginx
/etc/init.d/nginx start  #启动
/etc/init.d/nginx stop  #关闭
/etc/init.d/nginx restart  #重启
安装好后可以通过which nginx和whereis nginx 来查看nginx安装的位置

其中,/usr/sbin/nginx存放主程序,/etc/nginx存放配置文件,/usr/share/nginx存放静态文件,/var/log/nginx存放日志
配置文件是
/etc/nginx/conf.d/default.conf
页面存放的位置
/usr/share/nginx/html
nginx默认的端口号是80
通过ip可以访问到nginx默认运行的文件
在nginx文件配置中,有些教程说配置/etc/nginx/nginx.conf,有些教程说配置/etc/nginx/sites-enabled/default.conf文件,容易让人产生混淆,下面解释这两个文件之间的关系
/etc/nginx/sites-enabled/default.conf文件被include到/etc/nginx/nginx.conf中,运行default.conf相当于是运行nginx.conf文件,项目启动不会主动运行default.conf,其是会运行nginx.conf文件的,运行过程中遇到下列语句

找到default.conf文件运行
nginx服务下面,有一个uwsgi_params文件,才能保证nginx和uwsgi服务进行关联,而uwsgi和django服务进行关联的,最终nginx可以访问django项目
配置nginx
首先先在项目中manage.py文件夹中新建一个文件zjs_server_nginx.conf文件,输入以下配置文件
 1 upstream django {
 2      # server
 3      server 127.0.0.1:8001; # for a web port socket (we'll use this first)} 和uwsgi端口一致
 4 }
 5  # configuration of the server
 6 server
 7 {
 8       # the port your site will be served on
 9       listen      8000;    # the domain name it will serve for    server_name .example.com; # substitute your machine's IP address or FQDN
10        charset     utf-8;
11        # max upload size
12        client_max_body_size 75M;   # adjust to taste
13        location /static {
14            /home/litong/original_code/zjs_server; # your Django project's static files - amend as required
15         }
16         # Finally, send all non-media requests to the Django server.
17         location / {
18             uwsgi_pass  django;
19             include   /home/litong/original_code/zjs_server/uwsgi_params; # the uwsgi_params file you installed
20         }
21 }
创建软连接
sudo ln -s /home/litong/original_code/zjs_server/zjs_server_nginx.conf /etc/nginx/sites-enabled/
输入后重启nginx
systemctl restart nginx.service
6. nginx+uwsgi+Django
接下来,我们要将三者结合起来。首先罗列一下项目所需要的文件,项目目录为/home/litong/original_code/zjs_server
由于被安装了uwsgi之后,在项目中的settings.py所在文件夹的路径中会增加一个uwsgi.py文件
项目所需文件
zjs_server/
|--------manage.py
|--------zjs_server/
| |--------_init.py
| |--------settings.py
| |--------urls.py
| |--------uwsgi.py
|--------zjs_server.ini
在我们通过Django常见zjs_server项目时,在子目录zjs_server中已经磅我们生成的wsgi.py文件。所以,我们只需要再创建zjs_server.ini配置文件即可。当然,uwsgi支持多种类型的配置文件,如xml, ini等,此处我们使用ini类型的配置。
我们创建的zjs_server.ini配置文件如下
[uwsgi]
# 项目目录
chdir=/home/litong/original_code/zjs_server

#指定wsgi模块
module=zjs_server.wsgi:application

# the virtualenv (虚拟环境的绝对路径)

home = /home/litong/.virtualenvs/manpeng2

#热重载
#touch-reload = /opt/ipm2020
#py-auto-reload = 1
# 指定sock的文件路径
#socket=%(chdir)/uwsgi/uwsgi.sock
#或者指定地址直接(指定文件路径就是相当于单独写了个配置导入,相当于import导入,可以修改和删除,可维护性高点)
#socket=127.0.0.1:9090

socket=127.0.0.1:8000
http=127.0.0.1:8000

#直接做服务器用http模式

#http=0.0.0.0:9500

# 进程个数

workers=1

pidfile=%(chdir)/uwsgi.pid

# 指定静态文件,这个项目中没有,如果你的项目中有静态文件的话按这个目录结构配置#static-map=/static=/home/litong/proj/

# 启动uwsgi的用户名和用户组

uid=root

gid=root

# 启用主进程

master=true

# 自动移除unix Socket和pid文件当服务停止的时候

vacuum=true

# 序列化接受的内容,如果可能的话

#thunder-lock=true

# 启用线程

enable-threads=true

# 设置自中断时间

#harakiri=30

# 设置缓冲

post-buffering=4096

# 设置日志目录
#daemonize=/opt/uwsgi/uwsgi.log
这个配置,其实就相当于在上衣小节中通过uwsgi命令,后面跟一堆参数的方式,给文件化了。
每个参数的意义如下
   socket  指定项目执行的端口号。
  chdir   指定项目的目录。
  module  zjs_server.wsgi ,可以这么来理解,对于zjs_serveri.ini文件来说,与它的平级的有一个zjs_server目录,这个目录下有一个wsgi.py文件。
7. 配置ngin
接下来要做的就是修改nginx.conf配置文件,打开/etc/nginx/nginx.conf文件,再添加如下内容
#       server {
#           listen         8080;
#           server_name    127.0.0.1
#           charset UTF-8;
#           access_log      /var/log/nginx/zjs_server_access.log;
#           error_log       /var/log/nginx/zjs_server_error.log;
#
#           client_max_body_size 75M;
#
#           location / {
#               include uwsgi_params
#               uwsgi_pass 127.0.0.1:8000;
#               uwsgi_read_timeout 2;
#       }
#       location /static {
#            expires 30d;
#            autoindex on;
#            add_header Cache-Control private;
#            alias /home/litong/original_code/zjs_server/static/;
#       }
# }
参数说明
    listen 指定的是nginx代理uwsgi对外的端口号。
  server_name  网上大多资料都是设置的一个网址(例,www.example.com),我这里如果设置成网址无法访问,所以,指定的到了本机默认ip。
  在进行配置的时候,我有个问题一直想不通。nginx到底是如何uwsgi产生关联。现在看来大概最主要的就是这两行配置。
  include uwsgi_params;
  uwsgi_pass 127.0.0.1:8000;
  include 必须指定为uwsgi_params;而uwsgi_pass指的本机IP的端口号与myweb_uwsgi.ini配置中的文件中的必须一致。
然后重新启动nginx

 浙公网安备 33010602011771号