VUE 3
Prerequisite
学习目的:① 实现一个简约版 B 站前端 ② 完成毕设的前端
前置知识点
- 拥有 HTML、CSS、JavaScript、TypeScript(此处放简书的 Js 和 Ts 链接)的基础
- 关于 Node.js 和 Vue 的关系【Vue 是前端框架,Node.js 是服务端语言。前者是前端,主要和 HTML 和 JavaScript 打交道;后者是后端,主要用 JavaScript 作为开发语言】
配置环境
- VSCode 插件
- HTML 启动方式(第一种常用于静态加载,第二种常用于动态加载)
- Show Preview【点击右上角,直接在 VScode 显示网页内容】
- Open with Live Server【Live Preview 插件,以伪部署的方式显示网页内容,默认端口为 5500】
- Vue 启动方式
- 快速构建 Vue 项目:
vue create hello【在目标文件夹中执行命令】 - 运行 Vue 项目:
npm run serve【前提是进入项目中】
- 快速构建 Vue 项目:
Reference
- 我看的教程
- 其他教程
基本用法
快速运行 Vue
<!DOCTYPE html>
<html lang="en">
  <head>
    <meta charset="UTF-8" />
    <title>Vue</title>
    <!-- 导入 Vue.js -->
    <script src="https://unpkg.com/vue@3"></script>
  </head>
  <body>
    <!-- 声明要被 Vue 所控制的 DOM 区域 -->
    <div id="app">{{message}}</div>

    <!-- 创建 Vue 的实例对象 -->
    <script>
      const hello = {
        // 指定数据源,即 MVVM 中的 Model
        data: function () {
          return {
            message: "Hello Vue!",
          };
        },
      };
      const app = Vue.createApp(hello);
      app.mount("#app");
    </script>
  </body>
</html>
内容渲染指令【v-html】
<!DOCTYPE html>
<html lang="en">
  <head>
    <meta charset="UTF-8" />
    <title>Vue</title>
    <script src="https://unpkg.com/vue@3"></script>
  </head>
  <body>
    <div id="app">
      <p>姓名:{{name}}</p>
      <p>年龄:{{age}}</p>
      <!-- 下面不可渲染 -->
      <p>网站1:{{desc}}</p>
      <!-- 下面可渲染 -->
      <p v-html="desc"></p>
    </div>

    <!-- 创建 Vue 的实例对象 -->
    <script>
      const hello = {
        data: function () {
          return {
            name: "筱团",
            age: "20",
            desc: '<a href="https://www.baidu.com">百度</a>',
          };
        },
      };
      const app = Vue.createApp(hello);
      app.mount("#app");
    </script>
  </body>
</html>

属性绑定指令【v-bind、:href、:placeholder、:src、:style】
<!DOCTYPE html>
<html lang="en">
  <head>
    <meta charset="UTF-8" />
    <title>Vue</title>
    <script src="https://unpkg.com/vue@3"></script>
  </head>
  <body>
    <div id="app">
      <!-- : 实际上是 v-bind: 的缩写 -->
      <a :href="link">百度</a>
      <input type="text" :placeholder="inputValue" />
      <img :src="imgSrc" :style="{width:w}" alt="" />
    </div>

    <!-- 创建 Vue 的实例对象 -->
    <script>
      const hello = {
        data: function () {
          return {
            link: "https://www.baidu.com",
            // 文本框的占位符内容
            inputValue: "请输入内容",
            // 图片的 src 地址
            imgSrc: "./assets/images/socks_blue.jpg",
            w: "50px",
          };
        },
      };
      const app = Vue.createApp(hello);
      app.mount("#app");
    </script>
  </body>
</html>

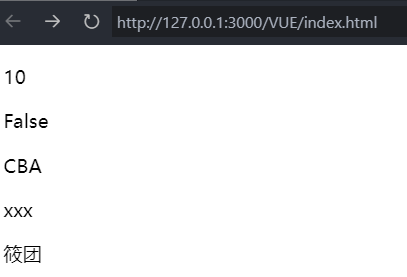
使用 JavaScript 表达式【:id】
<!DOCTYPE html>
<html lang="en">
  <head>
    <meta charset="UTF-8" />
    <title>Vue</title>
    <script src="https://unpkg.com/vue@3"></script>
  </head>
  <body>
    <div id="app">
      <p>{{number+1}}</p>
      <p>{{ok ? 'True' : 'False'}}</p>
      <p>{{message.split('').reverse().join('')}}</p>
      <p :id="'list-' + id">xxx</p>
      <p>{{user.name}}</p>
      <p></p>
    </div>

    <!-- 创建 Vue 的实例对象 -->
    <script>
      const hello = {
        data: function () {
          return {
            number: 9,
            ok: false,
            message: "  ABC  ",
            id: 3,
            user: {
              name: "筱团",
            },
          };
        },
      };
      const app = Vue.createApp(hello);
      app.mount("#app");
    </script>
  </body>
</html>
事件绑定指令【v-on:click、@click】
<!DOCTYPE html>
<html lang="en">
  <head>
    <meta charset="UTF-8" />
    <title>Vue</title>
    <script src="https://unpkg.com/vue@3"></script>
  </head>
  <body>
    <div id="app">
      <h3>count 的值为:{{count}}</h3>
      <!-- 下面两种方法都能使 count + 1 -->
      <button v-on:click="addCount">+1</button>
      <button @click="count+=1">+1</button>
    </div>

    <!-- 创建 Vue 的实例对象 -->
    <script>
      const hello = {
        // 存储数据
        data: function () {
          return {
            count: 0,
          };
        },
        // 储存方法(函数)
        methods: {
          addCount() {
            this.count += 1;
          },
        },
      };
      const app = Vue.createApp(hello);
      app.mount("#app");
    </script>
  </body>
</html>

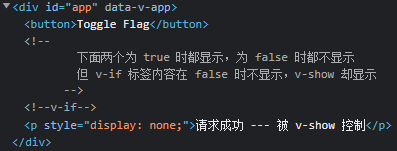
条件渲染指令【@click、v-if、v-show】
<!DOCTYPE html>
<html lang="en">
  <head>
    <meta charset="UTF-8" />
    <title>Vue</title>
    <script src="https://unpkg.com/vue@3"></script>
  </head>
  <body>
    <div id="app">
      <button @click="flag = !flag">Toggle Flag</button>
      <!--
        下面两个为 true 时都显示,为 false 时都不显示
        但 v-if 标签内容在 false 时不显示,v-show 却显示
      -->
      <p v-if="flag">请求成功 --- 被 v-if 控制</p>
      <p v-show="flag">请求成功 --- 被 v-show 控制</p>
    </div>

    <!-- 创建 Vue 的实例对象 -->
    <script>
      const hello = {
        // 存储数据
        data: function () {
          return {
            flag: false,
          };
        },
      };
      const app = Vue.createApp(hello);
      app.mount("#app");
    </script>
  </body>
</html>
v-else 和 v-else-if 指令【v-if、v-else-if、v-else】
<!DOCTYPE html>
<html lang="en">
  <head>
    <meta charset="UTF-8" />
    <title>Vue</title>
    <script src="https://unpkg.com/vue@3"></script>
  </head>
  <body>
    <div id="app">
      <div v-if="type === 'A'">A</div>
      <div v-else-if="type === 'B'">B</div>
      <div v-else-if="type === 'C'">C</div>
      <div v-else>Not A/B/C</div>
    </div>

    <!-- 创建 Vue 的实例对象 -->
    <script>
      const hello = {
        // 存储数据
        data: function () {
          return {
            type: "B",
          };
        },
      };
      const app = Vue.createApp(hello);
      app.mount("#app");
    </script>
  </body>
</html>
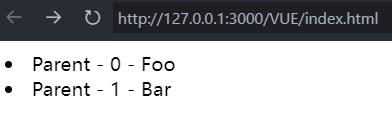
列表渲染指令【v-for】
<!DOCTYPE html>
<html lang="en">
  <head>
    <meta charset="UTF-8" />
    <title>Vue</title>
    <script src="https://unpkg.com/vue@3"></script>
  </head>
  <body>
    <div id="app">
      <!-- 如果只写 item 而不是括号,那么只会返回值 -->
      <li v-for="(item, index) in items">
        {{ parentMessage }} - {{ index }} - {{ item.message }}
      </li>
    </div>

    <!-- 创建 Vue 的实例对象 -->
    <script>
      const hello = {
        // 存储数据
        data: function () {
          return {
            parentMessage: "Parent",
            items: [{ message: "Foo" }, { message: "Bar" }],
          };
        },
      };
      const app = Vue.createApp(hello);
      app.mount("#app");
    </script>
  </body>
</html>
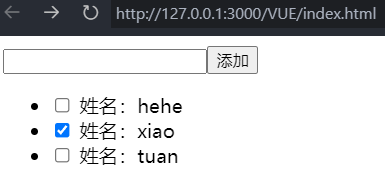
v-for 中的 key【v-for、v-model、@click、:key】
<!DOCTYPE html>
<html lang="en">
  <head>
    <meta charset="UTF-8" />
    <title>Vue</title>
    <script src="https://unpkg.com/vue@3"></script>
  </head>
  <body>
    <div id="app">
      <!-- 新添加用户的区域 -->
      <div>
        <!-- v-model 使得 name 双向绑定 -->
        <!-- 相当于 name 和 data 中的 name 完全一致 -->
        <input type="text" v-model="name" />
        <button @click="addNewUser">添加</button>
      </div>

      <!-- 用户列表区域 -->
      <ul>
        <!-- key 绑定了 user.id,这样勾选的内容不会动态变化 -->
        <li v-for="(user, index) in userlist" :key="user.id">
          <input type="checkbox" />
          姓名:{{user.name}}
        </li>
      </ul>
    </div>

    <!-- 创建 Vue 的实例对象 -->
    <script>
      const hello = {
        data: function () {
          return {
            // 用户列表
            userlist: [
              { id: 1, name: "xiao" },
              { id: 2, name: "tuan" },
            ],
            // 输入的用户名
            name: "",
            // 下一个可用的 id 值
            nextId: 3,
          };
        },
        methods: {
          addNewUser() {
            this.userlist.unshift({ id: this.nextId, name: this.name });
            this.name = "";
            this.nextId++;
          },
        },
      };
      const app = Vue.createApp(hello);
      app.mount("#app");
    </script>
  </body>
</html>
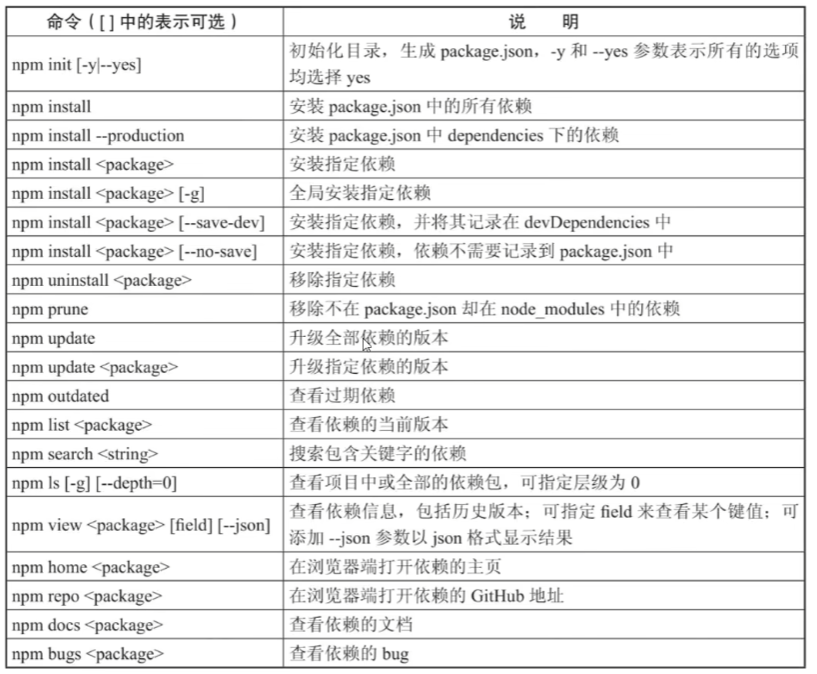
NPM
NPM (Node Package Manager)是一个 NodeJS 包管理和分发工具,最常见的用法就是用于安装和更新依赖,但它只是 Node.js 中的一个工具
- Node.js 官方下载地址:https://nodejs.org/zh-cn/ 【选择长期维护版;下载过程最后的选项,打个勾】
- 查看 NPM 是否安装成功:
npm --version - NPM 换源
npm i nrm -g【安装 nrm】nrm ls【查看可用镜像源】nrm use taobao【换淘宝源】npm config get registry【查看是否换源成功】
- NPM 升级自身版本:
npm install -g npm@latest - NPM 指令大全(但目前只需要用到 install、run 等常用的指令)
Vue CLI(基于 webpack 构建)【旧版】
Vue CLI 是 Vue 官方提供的构建工具,通常称为脚手架,用于快速搭建一个带有热重载及构建生产版本等功能的单页面应用
安装方法:npm install -g @vue/cli【重复执行相当于更新】
常用指令(舍弃):
- 快速构建 Vue 项目:
vue create vue-project【仅支持 Vue 框架】 - 运行 Vue 项目:
npm run serve【进入 vue-project 后执行】 - 打包 Vue 项目:
npm run build【进入 vue-project 后执行】
PS:现在 Vue CLI 已经逐步使用 Vite 构建项目,且指令也有所更改,因此上面指令不再具有参考价值
Create-Vite(基于 Vite 构建)【推荐使用】
Creta-Vite 也是一个脚手架,终究会取代 VUE CLI
Vite 是基于原生 ES6 Modules,在生产环境下打包使用的是 Rollup,天然支持引入 .ts 文件
Vite 是新一代前端开发构建工具,更强,相当于(webpack + web 常用配置 + webpack-dev-server)
不需要提前安装
常用指令:
- 快速构建前端项目:
npm create vite@latest【支持 Vue、React、Angular 等前端框架】 - 下载所需库:
npm install【进入 vite-project 后执行】 - 运行前端项目:
npm run dev【进入 vite-project 后执行】 - 打包前端项目:
npm run build【进入 vite-project 后执行】
Vue 组件化开发
Vue 中规定组件的后缀为 .vue,每个组件都由三部分组成,分别是:
- template,组件的模板结构,包含 HTML 文件
- script,组件的 JS 代码,包含 JavaScript 文件
- style,组件的样式,包含 CSS 文件
Vue 2 和 Vue 3 的差异:
- Vue 2 和 Vue 3 的构造方式不同(体现在 main.js 中)
- Vue 2 的 template 必须由一个 div 包着
PS:VUE CLI 与 Create-Vite 构建出来的 VUE 前端项目结构大致一致,但存在一定差异
提示:关于 VUE CLI、Create-Vite、Webpack、Vite 等概念可以看看这个视频
Vite + VUE 3 构建 VUE 项目的文件总览
node_modules:存放所有的依赖项,通常不需要手动修改public:存放静态文件,如图片和字体等。其中,index.html 是应用的入口文件,其他静态文件可以根据需要添加或删除dist:打包后的项目,可以直接分发给用户或者部署到服务器上src:存放源代码assets:存放应用程序中使用的图片、字体等静态资源components:存放应用程序中的 Vue 组件,可以进一步划分为功能组件和 UI 组件等router:存放 Vue Router 相关的配置文件store:存放 Vuex 相关的配置文件views:存放应用程序中的页面级组件App.vue:应用程序的根组件,包含其他所有组件main.js:应用程序的入口文件,用于初始化 Vue 应用style.css:存放全局 CSS 样式的文件
index.html:Web 应用主程序的入口文件,属于静态资源package.json:应用程序的配置文件,包含了所有的依赖项和脚本命令package-lock.json:更详细的应用程序的配置文件README.md:项目的说明文件,包含了如何运行、构建和测试项目的指南vite.config.js:Vite 的配置文件
知识补充
① JavaScript 的回顾
② Vue 组件模板(关于 Vue 的生命周期看这篇博客)
// JavaScript
<script>
export default {
  data() {
    return {
      message: "Hello!", // 数据
    };
  },
  created: function () {
    console.log("APP 被创建");
  },
  mounted: function () {
    console.log("APP 被挂载");
  },
  components: {}, // 引用其他组件
};
</script>

// HTML
<template>
  <h1>{{ message }}</h1>
</template>

// CSS,该样式只能适用于当前组件元素,被引用时无效
<style scoped>

</style>
③ <script setup> 的用法
下面两种 Vue 组件,在被 App.vue 调用时(import Hello from "./components/Hello.vue")效果是一致的,详细参考官方文档和大佬的笔记
// Vue 组件中 script setup 的用法
<script setup>
const message = "Hello!"
</script>

<template>
  <h1>{{ message }}</h1>
</template>
// Vue 组件中 script 的用法
<script>
export default {
  data() {
    return {
      message: "Hello!"
    }
  }
}
</script>

<template>
  <h1>{{ message }}</h1>
</template>
PS:妈的,我看半天还是没看懂,真得从零学起啊。。。
④ 第三方组件
- Element Plus UI
- 安装命令:
npm install element-plus --save【进入 project 后执行】 - 安装插件:
npm install -D unplugin-vue-components unplugin-auto-import - 并进行如下配置
- 安装命令:
// vite.config.js
import { defineConfig } from 'vite'
import AutoImport from 'unplugin-auto-import/vite'
import Components from 'unplugin-vue-components/vite'
import { ElementPlusResolver } from 'unplugin-vue-components/resolvers'

export default defineConfig({
  // ...
  plugins: [
    // ...
    AutoImport({
      resolvers: [ElementPlusResolver()],
    }),
    Components({
      resolvers: [ElementPlusResolver()],
    }),
  ],
})
- Naive UI
- 安装命令:
npm i -D naive-ui【进入 project 后执行】 - 剩下操作看文档,就不写了,占位置
- 安装命令:
- fontawesome 图标
- 安装命令 1:
npm i --save @fortawesome/fontawesome-svg-core【进入 project 后执行】 - 安装命令 2-1:
npm i --save @fortawesome/free-solid-svg-icons - 安装命令 2-2:
npm i --save @fortawesome/free-regular-svg-icons - 安装命令 2-3:
npm i --save @fortawesome/free-brands-svg-icons - 安装命令 3:
npm i --save @fortawesome/vue-fontawesome@latest-3 - 并进行如下配置
- 安装命令 1:
// main.js
import { library } from '@fortawesome/fontawesome-svg-core'
import { FontAwesomeIcon } from '@fortawesome/vue-fontawesome'
import { fas } from '@fortawesome/free-solid-svg-icons'
import { far } from '@fortawesome/free-regular-svg-icons'
import { fab } from '@fortawesome/free-brands-svg-icons'

library.add(fas, far, fab)
createApp(App)
.component('font-awesome-icon', FontAwesomeIcon)
.mount('#app')
⑤ Axios
- 读法:[æk'si:əʊ]
- 下载方法:
npm install axios - 作用:发送网络请求,如 GET、POST
// Hello.vue
// 更详细的使用在下面一个章节

// 发起一个 POST 请求
axios({
  method: 'post',
  url: '/user/12345',
  data: {
    firstName: 'Fred',
    lastName: 'Flintstone'
  }
});

// 在 node.js 用 GET 请求获取远程图片
axios({
  method: 'get',
  url: 'http://bit.ly/2mTM3nY',
  responseType: 'stream'
})
.then(function (response) {
  response.data.pipe(fs.createWriteStream('ada_lovelace.jpg'))
});
⑥ 跨域问题解决
| 当前页面 URL | 被请求页面 URL | 是否跨域 | 原因 |
|---|---|---|---|
| http://www.test.com/ | http://www.test.com/index.html | 否 | 同源(协议、域名、端口号相同) |
| http://www.test.com/ | https://www.test.com/index.html | 跨域 | 协议不同(http / https) |
| http://www.test.com/ | http://www.baidu.com/ | 跨域 | 主域名不同(test / baidu) |
| http://www.test.com/ | http://blog.test.com/ | 跨域 | 子域名不同(www / blog) |
| http://www.test.com:8080/ | http://www.test.com:7001/ | 跨域 | 端口号不同(8080 / 7001) |
- CORS (Cross-Origin Resource Sharing)是由 W3C 制定的一种跨域资源共享技术标准,其目的就是为了解决前端的跨域请求
- CORS 可以在不破坏即有规则的情况下,通过后端服务器实现CORS接口,从而实现跨域通信
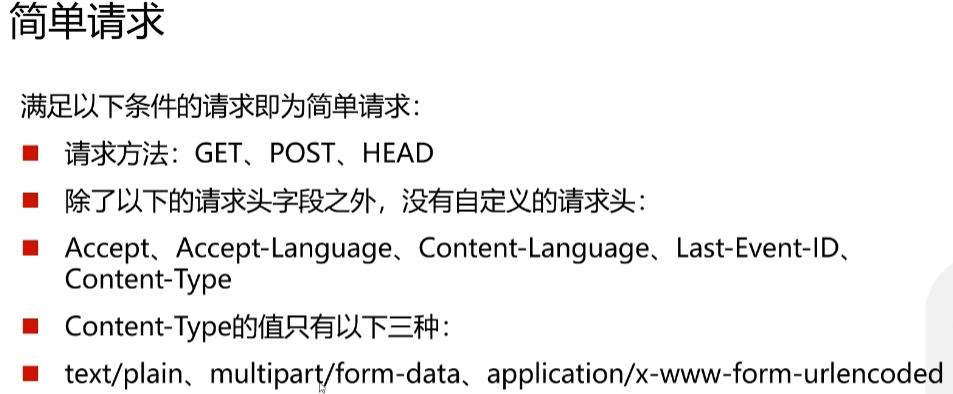
- CORS 将请求分为两类:简单请求和非简单请求,分别对跨域通信提供了支持
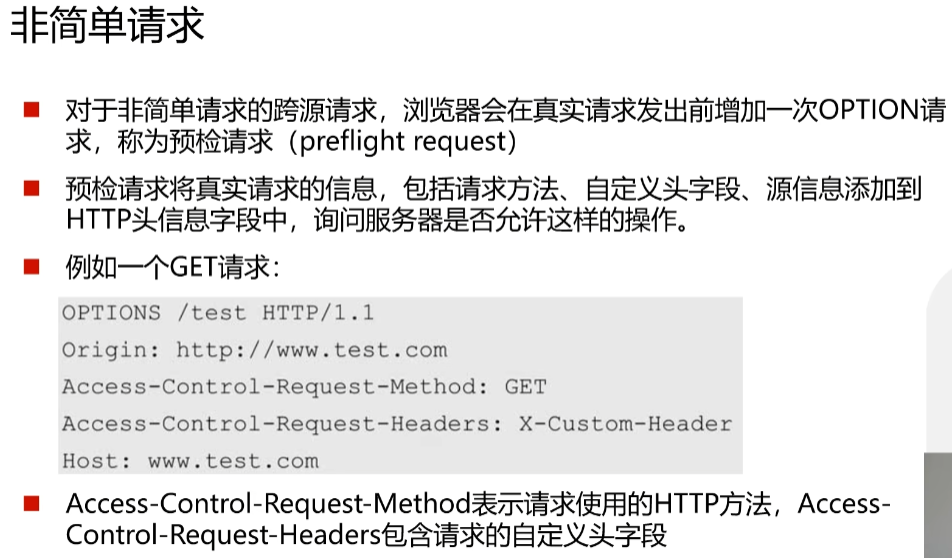
只需要在后端框架中加上跨域方法即可,并在前端进行如下配置
- 安装命令:
npm install --save axios vue-axios
// main.js
import axios from "axios"
import VueAxios from "vue-axios"

axios.defaults.baseURL = "http://localhost:5000" // 后端端口
createApp(App)
.use(VueAxios, axios)
.mount('#app')
<!-- Hello.vue -->
<script>
export default {
  data() {
    return {
      message: "Hello!", // 数据
    };
  },
  created: function () {
    this.$http({ // this.$http 代替了 axios
      method: "get",
      url: "/json",
    }).then(function (response) {
      console.log(response); // 打印接收的数据(仅 JSON 或者 [JSON1, JSON2, ...])
    });
  },
  mounted: function () {
    console.log("APP 被挂载");
  },
  components: {}, // 引用其他组件
};
</script>
⑦ Vue Rounter 路由
- 安装命令:
npm install vue-router@4 - 下面是基本路由的配置(其实还有嵌套路由、动态路由、拦截器等)
// main.js
import router from './router'

createApp(App)
.use(router)
.mount('#app')
// index.js
import { createWebHistory, createRouter } from "vue-router";
import Discover from "./Discover.vue";
import Friends from "./Friends.vue";
import My from "./My.vue";

const routes = [
  { path: "/", redirect: "/discover" }, // 首页重定向至 discover
  { path: "/discover", component: Discover },
  { path: "/friends", component: Friends },
  { path: "/my", component: My },
];

const router = createRouter({
  history: createWebHistory(),
  routes,
});

export default router;
<!-- Hello.vue -->
<template>
  <font-awesome-icon icon="fa-solid fa-camera-retro" />
  <h1>{{ message }}</h1>
  <h2>APP 组件</h2>
  <router-link to="/discover">发现音乐</router-link>
  <router-link to="/my">我的音乐</router-link>
  <router-link to="/friends">关注</router-link>
  <!-- 声明路由占位标签,用于渲染组件 -->
  <router-view></router-view>
</template>
⑧ 状态管理器 Vuex
- 作用:用于管理分散在 Vue 各个组件中的数据,即组件之间的数据共享
- 安装命令:
npm install vuex@next
PS:看不懂,跳过
⑨ 前端数据模拟 MockJS
- 作用:用于模拟服务器响应(包括字符串、图片、链接等)
- 安装命令:
npm install mockjs
// main.js
import "./mock" // mock 数据时需要加上

// mock 数据时 axios 需要去掉
// axios.defaults.baseURL = "http://localhost:5000"
createApp(App)
// .use(VueAxios, axios)
.mount('#app')
// index.js
/*
Mock.mock(rurl, rtype, template)
rurl = 需要拦截的 URL
rtype = 需要拦截的 Ajax 请求类型,例如 GET、POST、PUT、DELETE 等
template = 数据模板
*/

import Mock from "mockjs";

Mock.mock("/json", "get", {
  code: 0,
  message: "ok",
  data: {
    //需要返回的参数
    "list|10": [
      {
        id: "@natural(100,200)", // 100-200之间的随机整数
        city: "@county(true)", // 随机省市区
        "moblie|1": [
          // 数组中的号码随机返回一个
          "13531544954",
          "13632250649",
          "15820292420",
          "15999905612",
        ],
        name: "@cname", // 随机返回名字
        state: "@integer(0,1)", // 随机返回 0/1(用户性别)
        "company|1": [
          // 与手机号码同理
          "广州某有限公司",
          "深圳某有限公司",
          "佛山某有限公司",
          "惠州某有限公司",
        ],
        "address|1": ["中山路3号", "教育路10号", "民兴路9号", "北京路23号"],
      },
    ],
  },
});
<!-- Hello.vue -->
<script>
import axios from "axios";

export default {
  data() {
    return {
      message: "Hello!", // 数据
    };
  },
  created: function () {
    axios({
      method: "get",
      url: "/json",
    }).then((response) => {
      console.log(response);
    });
  },
  mounted: function () {
    axios({
      method: "get",
      url: "/json",
    }).then(function (response) {
      console.log(response);
    });
  },
  components: {}, // 引用其他组件
};
</script>
项目实战(VUE 3)
参考项目:
- Vue-Vben-Admin 框架【使用,在线 Demo】
- Element Plus UI【使用】
- vue-element-admin【未使用】
- V3 Admin Vite【未使用】
技术栈:
- 前端:TypeScript + Vue3 + VueRouter + Vuex + Vue-Vben-Admin + Element Plus UI
- 项目构建工具:Vite + Pnpm
- 数据模拟:MockJS
构建项目:
- 获取项目代码:
git clone https://github.com/anncwb/vue-vben-admin.git - 下载前端所需库:
pnpm install - 运行前端项目:
pnpm serve - 打包前端项目:
pnpm build
目录详情
代码分层讲解【只记录重点】
- src
- router
- routes
- modoules【自定义的功能全放里面】
- index.ts【根路由,启动时的页面】
- routes
- views【路由加载的页面】
- router
运行程序首先进入 http://localhost:5173/#/login
点击登入跳转到 http://localhost:5173/#/dashboard/analysis
在权限管理,可切换权限,查看前端权限与后端权限
前端权限 菜单显示的功能【括号表示路由】:
- 【dashboard】Dashboard:http://localhost:5173/#/dashboard/xxx
- 【demo】权限管理:http://localhost:5173/#/permission/xxx
- 【demo】功能:http://localhost:5173/#/feat/xxx
- 【demo-page】页面:http://localhost:5173/#/page-demo/xxx
- 【demo】组件:http://localhost:5173/#/comp/xxx
- 【demo】图表:http://localhost:5173/#/charts/xxx
- 【demo-iframe】外部页面:http://localhost:5173/#/frame/xxx
- 【demo】多级菜单:http://localhost:5173/#/level/xxx
- 【demo】系统管理:http://localhost:5173/#/system/xxx
- 【demo】图像编辑器:http://localhost:5173/#/flow/xxx
- 【form-design】表单设计:http://localhost:5173/#/form-designer/xxx
- 【demo】引导页:http://localhost:5173/#/setup/xxx
- 【about】关于:http://localhost:5173/#/about/xxx
后端权限 菜单显示的功能:
- 【dashboard】Dashboard:http://localhost:5173/#/dashboard/xxx
- 【demo】权限管理:http://localhost:5173/#/permission/xxx
- 【demo】多级菜单:http://localhost:5173/#/level/xxx
- 【demo】系统管理:http://localhost:5173/#/system/xxx
- 【demo-iframe】外部页面:http://localhost:5173/#/frame/xxx
修改页面
计划:
- 修改 logo 图标和名称
- 隐藏 header 功能
- 增加一个菜单,及一个页面
- 隐藏其他菜单
① 修改 logo 图标和名称
ICON 网站:https://iconify.design/
图标位置:vue-vben-admin\src\components\Application\src\AppLogo.vue 第 7 行
ico 位置:vue-vben-admin\index.html 第 12 行和第 143 行
名称位置:vue-vben-admin.env
② 隐藏 header 功能
隐藏 header 功能:vue-vben-admin\src\layouts\default\header\index.vue 注释 action 部分
修改 header 的 UserDropDown 部分:vue-vben-admin\mock\sys\user.ts 修改用户 1 信息
修改 header 的 UserDropDown 部分:vue-vben-admin\src\settings\siteSetting.ts 修改 DOC_URL 为个人文章
恢复项目配置的颜色选项:vue-vben-admin\src\layouts\default\setting\SettingDrawer.tsx 把注释都取消掉
③ 增加一个菜单,及一个页面
- 创建文字引用:vue-vben-admin\src\locales\lang\zh-CN\routes\demo.ts 自行添加
new:{
    Drama: '剧本',
    GeneratePic: '生成图像',
    VITS: '语音',
    Cutout: '抠图',
    Music: '背景音乐',
    Perform: '整体演示',
},
- 先添加页面
- 创建文件夹:vue-vben-admin\src\views\demo\drama
- 创建文件:index.vue
<template>
  <h1> {{ message }} </h1>
</template>
<script lang="ts">
  import { defineComponent } from 'vue';
  export default defineComponent({
    data() {
      return {
        message: 'Hello!', // 数据
      };
    },
    created: function () {
      console.log('APP 被创建');
    },
    mounted: function () {
      console.log('APP 被挂载');
    },
    components: {}, // 引用其他组件
  });
</script>
- 再添加路由
- 创建文件:vue-vben-admin\src\router\routes\modules\demo\drama.ts
import type { AppRouteModule } from '/@/router/types';

import { LAYOUT } from '/@/router/constant';
import { t } from '/@/hooks/web/useI18n';

const drama: AppRouteModule = {
  path: '/drama', // 需要修改
  name: 'Drama', // 需要修改
  component: LAYOUT,
  redirect: '/drama/index', // 需要修改
  meta: {
    orderNo: 1, // 越小越上层
    hideChildrenInMenu: true, // 默认隐藏子菜单
    icon: 'teenyicons:git-compare-outline', // 图标
    title: t('routes.demo.new.Drama'), // 名字
  },
  children: [
    {
      path: 'index',
      name: 'DramaPage', // 需要修改
      component: () => import('/@/views/demo/drama/index.vue'), // 需要修改
      meta: {
        affix: true, // 设为固定栏
        title: t('routes.demo.new.Drama'), // 名字
        icon: 'teenyicons:git-compare-outline', // 图标
      },
    },
  ],
};

export default drama;
- 主页设为剧本页【失败】
- 修改主路由:vue-vben-admin\src\enums\pageEnum.ts 的
BASE_HOME = '/drama',(似乎没作用) - 删除 dashboard.ts 文件(因为它占用了菜单栏,且如何修改都还是占用)
- 修改主路由:vue-vben-admin\src\enums\pageEnum.ts 的
④ 隐藏其他菜单
举例 -- 隐藏关于菜单:vue-vben-admin\src\router\routes\modules\about.ts 的 meta 中添加 hideMenu: true,
功能完善
计划:
- 剧本
- 生成图片
- 语音
- 抠图
- 背景音乐
- 综合演示
① 剧本
- 修改页面
② 生成图片
- 创建文件:vue-vben-admin\src\views\demo\generatepic + index.vue
- 创建文件:vue-vben-admin\src\router\routes\modules\demo\generatepic.ts
- 修改页面
③ 语音
- 创建文件:vue-vben-admin\src\views\demo\vits + index.vue
- 创建文件:vue-vben-admin\src\router\routes\modules\demo\vits.ts
- 修改页面
④ 抠图
- 创建文件:vue-vben-admin\src\views\demo\cutout + index.vue
- 创建文件:vue-vben-admin\src\router\routes\modules\demo\cutout.ts
- 修改页面
⑤ 背景音乐
- 创建文件:vue-vben-admin\src\router\routes\modules\demo\music.ts
- 修改页面
- 内嵌外部网页:https://mubert.com/render 【失败】
- 添加跨域:vue-vben-admin\mock\sys\menu.ts 的 linkRoute 部分(似乎没作用)
- 添加外链
⑥ 综合演示
- 创建文件:vue-vben-admin\src\views\demo\perform + index.vue
- 创建文件:vue-vben-admin\src\router\routes\modules\demo\perform.ts
- 修改页面
修复与再次完善
- 登入成功自动跳转自 http://localhost:5173/#/dashboard/analysis ,但我已经删除该文件(dashboard.ts)与修改 pageEnum.ts 文件依然如此
- 如果实在不能自动跳转到 http://localhost:5173/#/drama/index ,那么考虑将 404 页面跳转到这个页面
- 结合后端完成项目

 浙公网安备 33010602011771号