Java多线程学习(Day02)
目录
线程实现:
方式一:继承Thread类
/**
 * TODO
 * @author 清莲孤舟
 * @CreateDate 2023/9/17/9:28
 * 创建线程的方式一:通过继承Thread类实现
 */
//继承Thread类
public class demo01 extends Thread {
//重写run方法
    @Override
    public void run() {
        for (int i = 0; i < 20; i++) {
            System.out.println("副线程"+i);
        }
    }
//main主线程
    public static void main(String[] args) {
        demo01 demo01 = new demo01();
        //start方法启用线程
        demo01.start();
        //run()方法启用线程
        demo01.run();
        for (int i = 0; i < 20; i++) {
            System.out.println("主线程"+i);
        }
    }
}
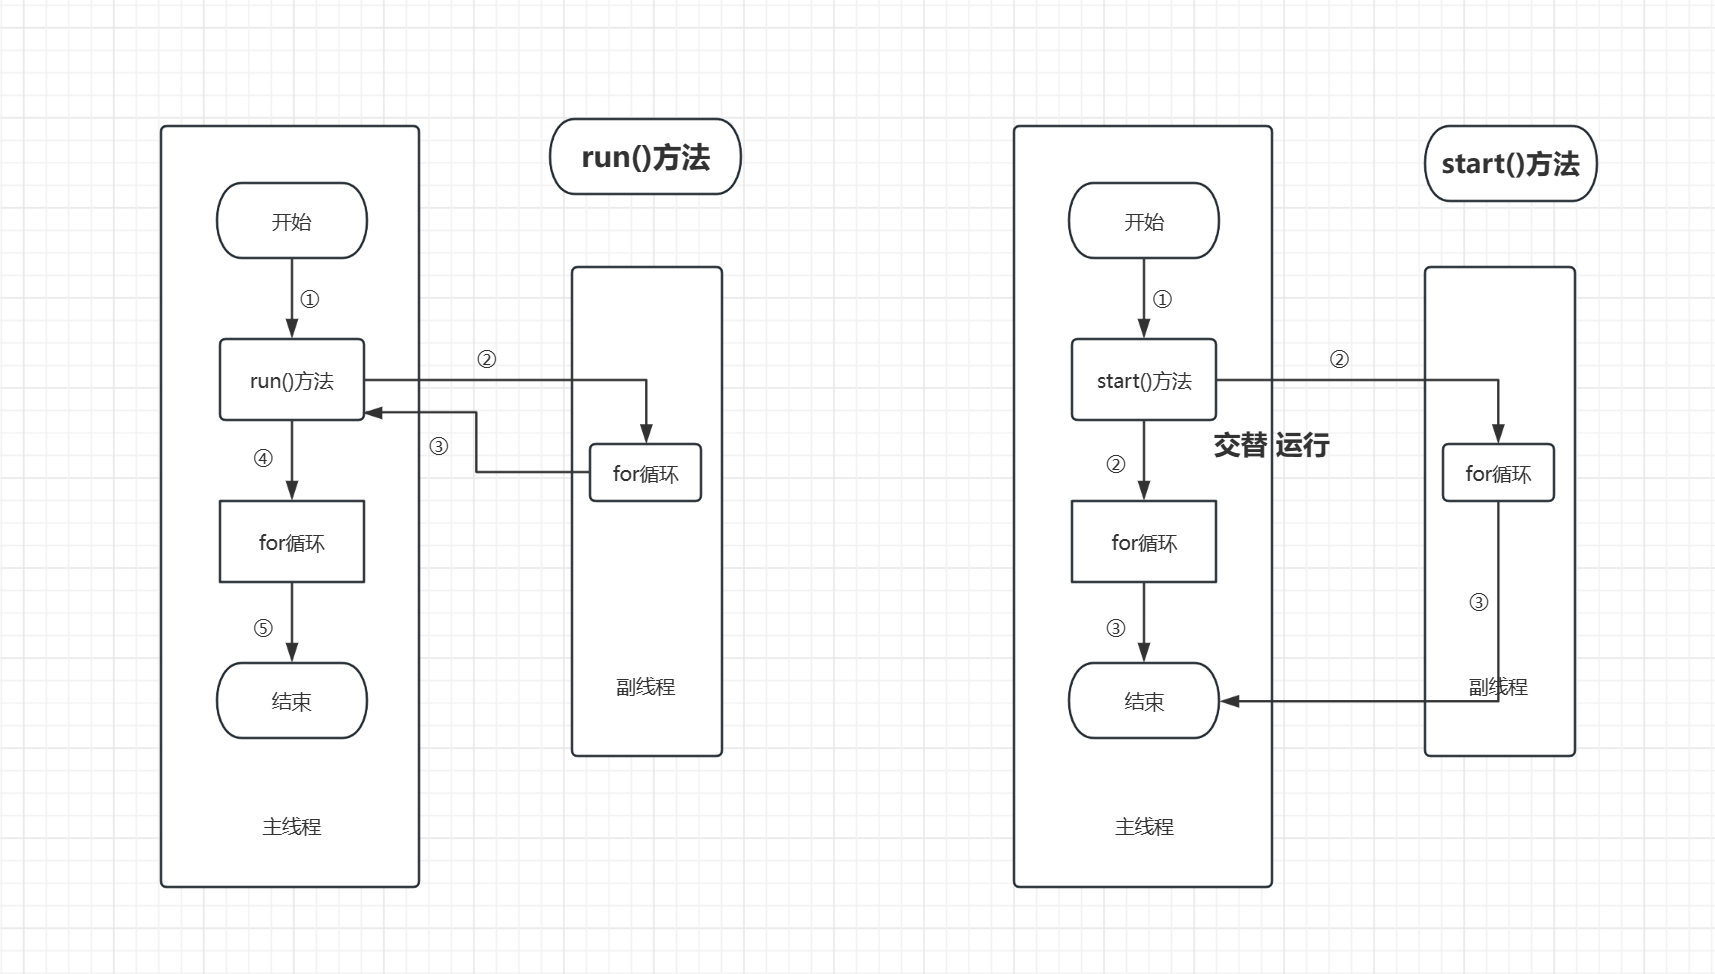
我们先调用run方法运行(注意run()方法在主函数中的顺序):
副线程0    副线程1    副线程2    副线程3    副线程4    副线程5    副线程6    副线程7    副线程8    副线程9
副线程10    副线程11    副线程12    副线程13    副线程14    副线程15    副线程16    副线程17    副线程18    副线程19

主线程0    主线程1    主线程2    主线程3    主线程4    主线程5    主线程6    主线程7    主线程8    主线程9
主线程10    主线程11    主线程12    主线程13    主线程14    主线程15    主线程16    主线程17    主线程18    主线程19
可以看出程序先运行完run线程再运行main主线程。符合程序按序执行的规制。同理如果将run()方法放在主函数的最后,那么先输出的将是"主线程"随后是"副线程"。
接下来我们调用start()方法:
主线程0    副线程0    主线程1    主线程2    主线程3    主线程4    副线程1    主线程5    主线程6    主线程7    副线程2    主线程8    主线程9    主线程10   主线程11   主线程12   副线程3
主线程13   主线程14   主线程15   主线程16   主线程17   主线程18   主线程19   副线程4    副线程5    副线程6    副线程7    副线程8    副线程9    副线程10   副线程11   副线程12   副线程13
副线程14   副线程15   副线程16   副线程17   副线程18   副线程19
显而易见程序并不是按序执行的,而是交替并行的。这便是上节中介绍的并发,在一段时间内交替完成。
(PS:如果你在运行时发现输出结果并不是交替的,那么请将for循环次数增加,20次循环对于你的电脑来说太简单了)

方式二:实现Runnable接口(重点)
/**
 * TODO
 * @author Cooper
 * @CreateDate 2023/9/17/10:26
 * 创建线程方式二:实现Runnable接口
 */
public class demo02 implements Runnable{
//   同样的重写run()方法
    @Override
    public void run() {
        for (int i = 0; i < 20; i++) {
            System.out.print("副线程"+i+"\t");
        }
    }
    public static void main(String[] args) {
        demo02 demo02 = new demo02();
//        创建线程对象,通过线程对象开启线程
        Thread thread = new Thread(demo02);
        thread.start();
//      可以简写为该写法new Thread(demo02).start();
        for (int i = 0; i < 20; i++) {
            System.out.print("主线程"+i+"\t");
        }
    }
}
源码解析:
//Runnable源码 只有一个run()方法
public interface Runnable {
    public abstract void run();
}
//Thread方法 需要传入一个实现Runnable的对象
public Thread(Runnable target) {
    init(null, target, "Thread-" + nextThreadNum(), 0);
}
运行结果:
主线程0    副线程0    主线程1    副线程1    主线程2    主线程3    主线程4    主线程5    副线程2    主线程6
主线程7    主线程8    副线程3    主线程9    副线程4    主线程10    主线程11    主线程12    主线程13    主线程14
主线程15    主线程16    主线程17    副线程5    主线程18    副线程6    副线程7    主线程19    副线程8    副线程9
副线程10    副线程11    副线程12    副线程13    副线程14    副线程15    副线程16    副线程17    副线程18    副线程19
线程并发案例:
这里使用狂神的案例:
 1 /**
 2  * TODO
 3  *
 4  * @author Cooper
 5  * @CreateDate 2023/9/17/10:42
 6  */
 7 public class demo03 implements Runnable{
 8     private int TicketNumber = 10;
 9     @Override
10     public void run() {
11         while (true){
12             if(TicketNumber==0){
13                 break;
14             }
15             try {
16                 //线程暂停200ms
17                 Thread.sleep(200);
18             } catch (InterruptedException e) {
19                 e.printStackTrace();
20             }
21             //Thread.currentThread().getName()获取当前线程的名字
22             System.out.println(Thread.currentThread().getName()+"===>拿到了第"+TicketNumber--+"票");
23         }
24     }
25     public static void main(String[] args) {
26         demo03 ticket = new demo03();
27         new Thread(ticket,"小张").start();
28         new Thread(ticket,"小李").start();
29         new Thread(ticket,"小王").start();
30     }
31 }
运行结果:
小李===>拿到了第8票
小张===>拿到了第10票
小王===>拿到了第9票
小王===>拿到了第6票
小李===>拿到了第7票
小张===>拿到了第7票
小李===>拿到了第3票
小王===>拿到了第4票
小张===>拿到了第5票
小李===>拿到了第2票
小王===>拿到了第2票
小张===>拿到了第2票
小张===>拿到了第1票
小王===>拿到了第1票
小李===>拿到了第1票
此时我们发现了一些问题--->同一张票被两个人拿到了! 这就是线程不安全,数据紊乱。后序我们将通过线程同步解决这个问题。
方式三:实现callable接口(了解即可)
 1 import java.util.ArrayList;
 2 import java.util.List;
 3 import java.util.concurrent.*;
 4 /**
 5  * TODO
 6  *
 7  * @author Cooper
 8  * @CreateDate 2023/9/17/14:52
 9  */
10 public class demo04 implements Callable<List<String>> {
11     @Override
12     public List<String> call() throws Exception {
13         List<String> result = new ArrayList<>();
14         for (int i = 0; i < 5; i++) {
15             result.add(Thread.currentThread().getName()+"===>"+i);
16             System.out.print(Thread.currentThread().getName()+"===>"+i+"\t");
17         }
18         return result;
19     }
20     public static void main(String[] args) throws ExecutionException, InterruptedException {
21         demo04 test1 = new demo04();
22         demo04 test2 = new demo04();
23         demo04 test3 = new demo04();
24 //        创建服务开启三个线程
25         ExecutorService service = Executors.newFixedThreadPool(3);
26         System.out.println("运行中:");
27 //        提交执行
28         Future<List<String>> r1 = service.submit(test1);
29         Future<List<String>> r2 = service.submit(test2);
30         Future<List<String>> r3 = service.submit(test3);
31 //        获取结果
32         List<String> result1 = r1.get();
33         List<String> result2 = r2.get();
34         List<String> result3 = r3.get();
35         System.out.println();
36
37         System.out.println("运行结束:");
38         System.out.println(result1);
39         System.out.println(result2);
40         System.out.println(result3);
41 //        关闭服务
42         service.shutdown();
43     }
44 }
运行结果:
运行中:
pool-1-thread-2===>0    pool-1-thread-1===>0    pool-1-thread-2===>1    pool-1-thread-3===>0
pool-1-thread-2===>2    pool-1-thread-1===>1    pool-1-thread-2===>3    pool-1-thread-1===>2
pool-1-thread-3===>1    pool-1-thread-1===>3    pool-1-thread-2===>4    pool-1-thread-1===>4
pool-1-thread-3===>2    pool-1-thread-3===>3    pool-1-thread-3===>4
运行结束:
[pool-1-thread-1===>0, pool-1-thread-1===>1, pool-1-thread-1===>2, pool-1-thread-1===>3, pool-1-thread-1===>4]
[pool-1-thread-2===>0, pool-1-thread-2===>1, pool-1-thread-2===>2, pool-1-thread-2===>3, pool-1-thread-2===>4]
[pool-1-thread-3===>0, pool-1-thread-3===>1, pool-1-thread-3===>2, pool-1-thread-3===>3, pool-1-thread-3===>4]
本文来自博客园,作者:Lollipop_pro,转载请注明原文链接:https://www.cnblogs.com/CooperCode/p/17709026.html
posted on 2023-09-17 16:16 Lollipop_pro 阅读(126) 评论(0) 收藏 举报


 浙公网安备 33010602011771号