

SpringCloud+Eureka+Seata1.3.0分布式事务部署及应用
背景
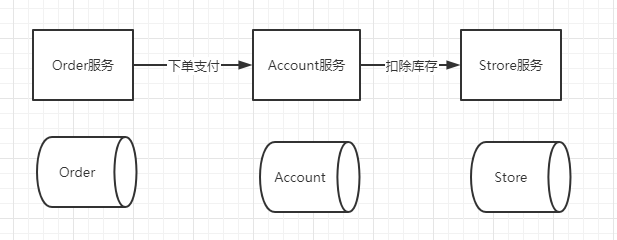
在微服务架构下,每个服务都可以有各自的数据库,我的公司项目就是从单体架构转为SpringCloud+Eureka的架构,所以在一个订单系统中,需要调用账户服务完成支付,账户支付完成后又需要调库存服务去维护库存数据。这里是通过Feign接口调用的服务,所以如果我在扣库存的时候出现异常事务回滚了,只有订单服务知道库存服务出现问题,订单服务可以回滚,但是账户那边的事务不能回滚,因为它是被调用者,不知道其他服务事务是否提交成功。这就是分布式事务的问题了,后来我们引入了Seata分布式事务来解决这个问题。
概念
- XID:一个全局事务的唯一标识,由ip:port:sequence组成
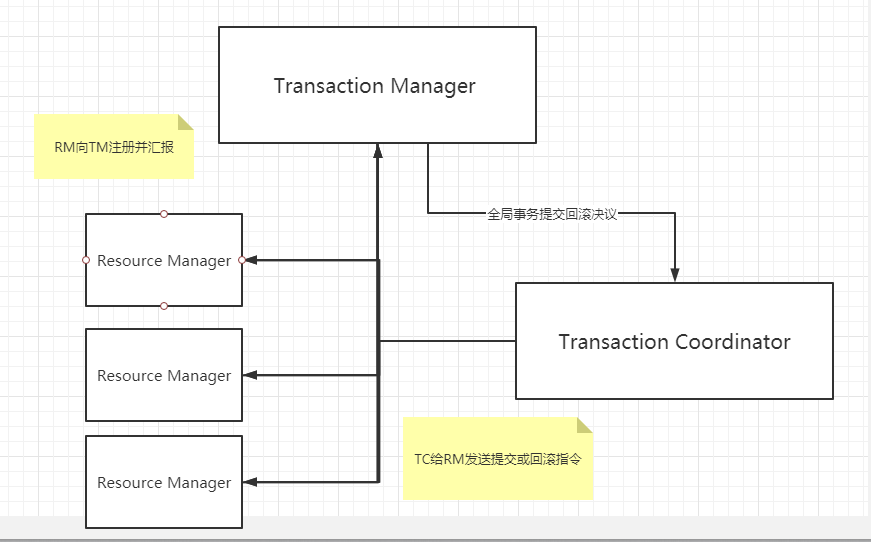
- Transaction Coordinator (TC): 事务协调器,维护全局事务的运行状态,负责协调并驱动全局事务的提交或回滚。
- Transaction Manager (TM): 控制全局事务的边界,负责开启一个全局事务,并最终发起全局提交或全局回滚的决议。
- Resource Manager (RM): 控制分支事务,负责分支注册、状态汇报,并接收事务协调器的指令,驱动分支(本地)事务的提交和回滚。
全局事务生命周期
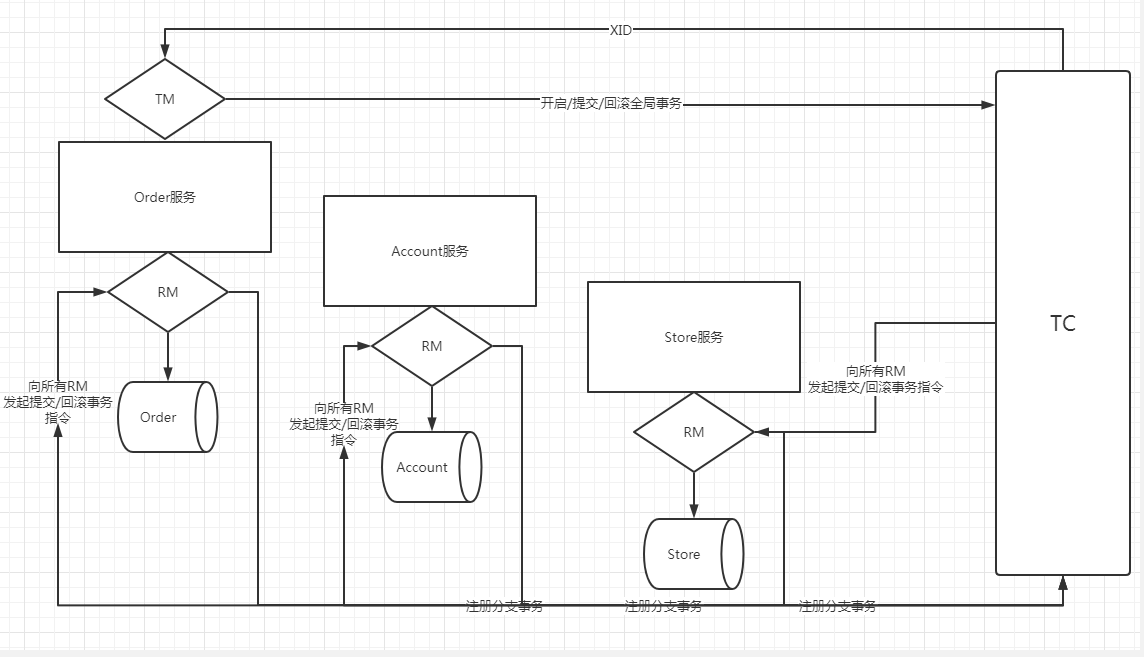
1.TM向TC申请开启一个全局事务并生成一个全局XID;
2.XID在微服务链路的上下文传播;
3.RM向TC注册分支事务,纳入全局XID的管辖下;
4.TM向TC发起全局事务提交/回滚决议;
5.TC调度XID管辖下的所有分支事务完成提交/回滚。
实战
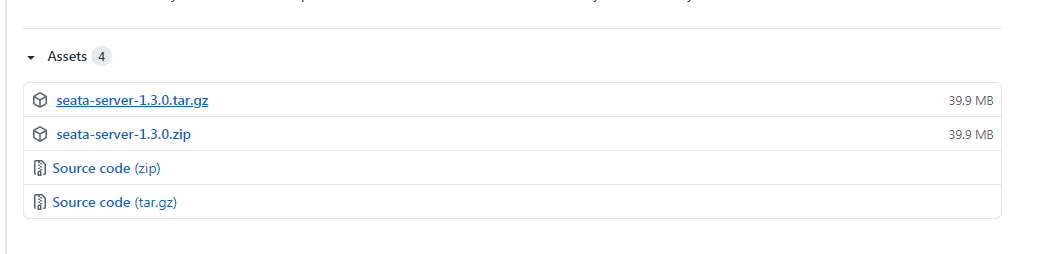
下载地址:https://github.com/seata/seata/releases
找到1.3.0包下载,我这里是linux环境部署,所以下载tar.gz。
解压完之后进入/seata/conf目录,打开file.conf文件配置。
## transaction log store, only used in seata-server
service{
  ##取一个名字
  vgroup_mapping.fsp_tx_group = "seata-server-ta"
  ##服务器地址
  default.grouplist = "127.0.0.1:8091"
  disableGlobalTransaction = false
}
store {
  ## store mode: file、db、redis
  mode = "db"

  ## file store property
  file {
    ## store location dir
    dir = "sessionStore"
    # branch session size , if exceeded first try compress lockkey, still exceeded throws exceptions
    maxBranchSessionSize = 16384
    # globe session size , if exceeded throws exceptions
    maxGlobalSessionSize = 512
    # file buffer size , if exceeded allocate new buffer
    fileWriteBufferCacheSize = 16384
    # when recover batch read size
    sessionReloadReadSize = 100
    # async, sync
    flushDiskMode = async
  }

  ## database store property
  ##配置你的数据库
  db {
    ## the implement of javax.sql.DataSource, such as DruidDataSource(druid)/BasicDataSource(dbcp)/HikariDataSource(hikari) etc.
    datasource = "druid"
    ## mysql/oracle/postgresql/h2/oceanbase etc.
    dbType = "mysql"
    driverClassName = "com.mysql.jdbc.Driver"
    url = "jdbc:mysql://127.0.0.1:3306/seata?useUnicode=true&useSSL=false&characterEncoding=utf8&serverTimezone=Asia/Shanghai"
    user = "root"
    password = "root"
    minConn = 5
    maxConn = 30
    globalTable = "global_table"
    branchTable = "branch_table"
    lockTable = "lock_table"
    queryLimit = 100
    maxWait = 5000
  }

  ## redis store property
  redis {
    host = "127.0.0.1"
    port = "6379"
    password = ""
    database = "0"
    minConn = 1
    maxConn = 10
    queryLimit = 100
接着配置registry.conf:
registry {
  # file 、nacos 、eureka、redis、zk、consul、etcd3、sofa
  # 这里用eureka
  type = "eureka"

  nacos {
    application = "seata-server"
    serverAddr = "127.0.0.1:8848"
    group = "SEATA_GROUP"
    namespace = ""
    cluster = "default"
    username = ""
    password = ""
  }
  # 配置你的eureka
  eureka {
    serviceUrl = "http://root:root@192.168.1.120:18000/eureka/"
    application = "seata-server-ta"
    weight = "1"
  }
  redis {
    serverAddr = "localhost:6379"
    db = 0
    password = ""
    cluster = "default"
    timeout = 0
  }
  zk {
    cluster = "default"
    serverAddr = "127.0.0.1:2181"
    sessionTimeout = 6000
    connectTimeout = 2000
    username = ""
    password = ""
  }
  consul {
    cluster = "default"
    serverAddr = "127.0.0.1:8500"
  }
  etcd3 {
    cluster = "default"
    serverAddr = "http://localhost:2379"
  }
  sofa {
    serverAddr = "127.0.0.1:9603"
    application = "default"
    region = "DEFAULT_ZONE"
    datacenter = "DefaultDataCenter"
    cluster = "default"
    group = "SEATA_GROUP"
    addressWaitTime = "3000"
  }
  # 配置file.conf
  file {
    name = "file.conf"
  }
}
然后我们要建一个叫"seata-server"的数据库,执行下列脚本建表。
SET NAMES utf8mb4;
SET FOREIGN_KEY_CHECKS = 0;

-- ----------------------------
-- Table structure for branch_table
-- ----------------------------
DROP TABLE IF EXISTS `branch_table`;
CREATE TABLE `branch_table`  (
  `branch_id` bigint(20) NOT NULL,
  `xid` varchar(128) CHARACTER SET utf8 COLLATE utf8_general_ci NOT NULL,
  `transaction_id` bigint(20) NULL DEFAULT NULL,
  `resource_group_id` varchar(32) CHARACTER SET utf8 COLLATE utf8_general_ci NULL DEFAULT NULL,
  `resource_id` varchar(256) CHARACTER SET utf8 COLLATE utf8_general_ci NULL DEFAULT NULL,
  `lock_key` varchar(128) CHARACTER SET utf8 COLLATE utf8_general_ci NULL DEFAULT NULL,
  `branch_type` varchar(8) CHARACTER SET utf8 COLLATE utf8_general_ci NULL DEFAULT NULL,
  `status` tinyint(4) NULL DEFAULT NULL,
  `client_id` varchar(64) CHARACTER SET utf8 COLLATE utf8_general_ci NULL DEFAULT NULL,
  `application_data` varchar(2000) CHARACTER SET utf8 COLLATE utf8_general_ci NULL DEFAULT NULL,
  `gmt_create` datetime(0) NULL DEFAULT NULL,
  `gmt_modified` datetime(0) NULL DEFAULT NULL,
  PRIMARY KEY (`branch_id`) USING BTREE,
  INDEX `idx_xid`(`xid`) USING BTREE
) ENGINE = InnoDB CHARACTER SET = utf8 COLLATE = utf8_general_ci ROW_FORMAT = Dynamic;

-- ----------------------------
-- Table structure for global_table
-- ----------------------------
DROP TABLE IF EXISTS `global_table`;
CREATE TABLE `global_table`  (
  `xid` varchar(128) CHARACTER SET utf8 COLLATE utf8_general_ci NOT NULL,
  `transaction_id` bigint(20) NULL DEFAULT NULL,
  `status` tinyint(4) NOT NULL,
  `application_id` varchar(32) CHARACTER SET utf8 COLLATE utf8_general_ci NULL DEFAULT NULL,
  `transaction_service_group` varchar(32) CHARACTER SET utf8 COLLATE utf8_general_ci NULL DEFAULT NULL,
  `transaction_name` varchar(128) CHARACTER SET utf8 COLLATE utf8_general_ci NULL DEFAULT NULL,
  `timeout` int(11) NULL DEFAULT NULL,
  `begin_time` bigint(20) NULL DEFAULT NULL,
  `application_data` varchar(2000) CHARACTER SET utf8 COLLATE utf8_general_ci NULL DEFAULT NULL,
  `gmt_create` datetime(0) NULL DEFAULT NULL,
  `gmt_modified` datetime(0) NULL DEFAULT NULL,
  PRIMARY KEY (`xid`) USING BTREE,
  INDEX `idx_gmt_modified_status`(`gmt_modified`, `status`) USING BTREE,
  INDEX `idx_transaction_id`(`transaction_id`) USING BTREE
) ENGINE = InnoDB CHARACTER SET = utf8 COLLATE = utf8_general_ci ROW_FORMAT = Dynamic;

-- ----------------------------
-- Table structure for lock_table
-- ----------------------------
DROP TABLE IF EXISTS `lock_table`;
CREATE TABLE `lock_table`  (
  `row_key` varchar(128) CHARACTER SET utf8 COLLATE utf8_general_ci NOT NULL,
  `xid` varchar(96) CHARACTER SET utf8 COLLATE utf8_general_ci NULL DEFAULT NULL,
  `transaction_id` mediumtext CHARACTER SET utf8 COLLATE utf8_general_ci NULL,
  `branch_id` mediumtext CHARACTER SET utf8 COLLATE utf8_general_ci NULL,
  `resource_id` varchar(256) CHARACTER SET utf8 COLLATE utf8_general_ci NULL DEFAULT NULL,
  `table_name` varchar(32) CHARACTER SET utf8 COLLATE utf8_general_ci NULL DEFAULT NULL,
  `pk` varchar(36) CHARACTER SET utf8 COLLATE utf8_general_ci NULL DEFAULT NULL,
  `gmt_create` datetime(0) NULL DEFAULT NULL,
  `gmt_modified` datetime(0) NULL DEFAULT NULL,
  PRIMARY KEY (`row_key`) USING BTREE
) ENGINE = InnoDB CHARACTER SET = utf8 COLLATE = utf8_general_ci ROW_FORMAT = Dynamic;

SET FOREIGN_KEY_CHECKS = 1;
然后在你参与全局事务的所有数据库中加入undo_log这张表(order,account,store):
-- 注意此处0.3.0+ 增加唯一索引 ux_undo_log
CREATE TABLE `undo_log` (
  `id` bigint(20) NOT NULL AUTO_INCREMENT,
  `branch_id` bigint(20) NOT NULL,
  `xid` varchar(100) NOT NULL,
  `context` varchar(128) NOT NULL,
  `rollback_info` longblob NOT NULL,
  `log_status` int(11) NOT NULL,
  `log_created` datetime NOT NULL,
  `log_modified` datetime NOT NULL,
  `ext` varchar(100) DEFAULT NULL,
  PRIMARY KEY (`id`),
  UNIQUE KEY `ux_undo_log` (`xid`,`branch_id`)
) ENGINE=InnoDB AUTO_INCREMENT=1 DEFAULT CHARSET=utf8;
然后就是去bin目录执行“seata-server.sh”命令启动我们的seata服务器了,启动完就可以在Eureka注册表上看到它了。

接着我们就要到项目中使用它了,首先要引入以下依赖:
<!--seata-->
<dependency>
    <groupId>com.alibaba.cloud</groupId>
    <artifactId>spring-cloud-alibaba-seata</artifactId>
    <version>1.5.0.RELEASE</version>
    <exclusions>
        <exclusion>
            <artifactId>seata-all</artifactId>
            <groupId>io.seata</groupId>
        </exclusion>
    </exclusions>
</dependency>
<dependency>
    <groupId>io.seata</groupId>
    <artifactId>seata-all</artifactId>
    <version>1.3.0</version>
</dependency>
接着在项目的resource目录加入file.conf和registry.conf两个文件:
file.conf:
transport {
  # tcp udt unix-domain-socket
  type = "TCP"
  #NIO NATIVE
  server = "NIO"
  #enable heartbeat
  heartbeat = true
  #thread factory for netty
  thread-factory {
    boss-thread-prefix = "NettyBoss"
    worker-thread-prefix = "NettyServerNIOWorker"
    server-executor-thread-prefix = "NettyServerBizHandler"
    share-boss-worker = false
    client-selector-thread-prefix = "NettyClientSelector"
    client-selector-thread-size = 1
    client-worker-thread-prefix = "NettyClientWorkerThread"
    # netty boss thread size,will not be used for UDT
    boss-thread-size = 1
    #auto default pin or 8
    worker-thread-size = 8
  }
  shutdown {
    # when destroy server, wait seconds
    wait = 3
  }
  serialization = "seata"
  compressor = "none"
}

service {
  #vgroup->rgroup
  // 你配置的名字
  vgroupMapping.fsp_tx_group = "seata-server-ta"
  #only support single node
  // seata服务器地址
  default.grouplist = "192.168.1.196:8091"
  #degrade current not support
  enableDegrade = false
  #disable
  disable = false
  #unit ms,s,m,h,d represents milliseconds, seconds, minutes, hours, days, default permanent
  max.commit.retry.timeout = "-1"
  max.rollback.retry.timeout = "-1"
  disableGlobalTransaction = false
}

client {
  async.commit.buffer.limit = 10000
  lock {
    retry.internal = 10
    retry.times = 30
  }
  report.retry.count = 5
  tm.commit.retry.count = 1
  tm.rollback.retry.count = 1
}

transaction {
  undo.data.validation = true
  undo.log.serialization = "jackson"
  undo.log.save.days = 7
  #schedule delete expired undo_log in milliseconds
  undo.log.delete.period = 86400000
  undo.log.table = "undo_log"
}

support {
  ## spring
  spring {
    # auto proxy the DataSource bean
    datasource.autoproxy = false
  }
}
registry.conf:
registry {
  type = "eureka"
   eureka {
     // eureka地址
      serviceUrl = "http://root:root@192.168.1.120:18000/eureka/"
      application = "payment"
      weight = "1"
    }
  file {
    name = "file.conf"
  }

}

config {
  # file、nacos 、apollo、zk
  type = "file"
  file {
    name = "file.conf"
  }
}
接着我们还要配置数据源代理,因为seata是有自己的代理,所以我们这里要配置seata代理:
/**
 * 数据源代理
 * @author wangzhongxiang
 */
@Configuration
public class DataSourceConfiguration {

    @Bean
    @ConfigurationProperties(prefix = "spring.datasource")
    public DataSource druidDataSource(){
        DruidDataSource druidDataSource = new DruidDataSource();
        return druidDataSource;
    }

    @Primary
    @Bean("dataSource")
    public DataSourceProxy dataSource(DataSource druidDataSource){
        return new DataSourceProxy(druidDataSource);
    }

    @Bean
    public SqlSessionFactory sqlSessionFactory(DataSourceProxy dataSourceProxy)throws Exception{
        SqlSessionFactoryBean sqlSessionFactoryBean = new SqlSessionFactoryBean();
        sqlSessionFactoryBean.setDataSource(dataSourceProxy);
        sqlSessionFactoryBean.setMapperLocations(new PathMatchingResourcePatternResolver()
        .getResources("classpath*:/mapper/*.xml"));
        sqlSessionFactoryBean.setTransactionFactory(new SpringManagedTransactionFactory());
        return sqlSessionFactoryBean.getObject();
    }

}
然后在启动类上把数据源自动配置过滤掉:
@SpringBootApplication(exclude = DataSourceAutoConfiguration.class)
参与全局事务的服务都要按照以上配置,也就是order,account,store都要配置。
然后到这里我们就可以使用我们的@GlobalTransactional开启全局事务啦!
按照这里,我们直接在Order服务的业务接口加上“@GlobalTransactional(name = "fsp-create-order",rollbackFor = Exception.class)”,name一般命名按你的业务来,只要添加了这个注解,就从这里开启了全局事务了。
