在上一篇文章中,我们讲解了怎样创建一个Photoshop滤
镜的项目,以及如何为滤镜嵌入PIPL资源使滤镜可以被PS识别和加载。并且我们已经建立了一个最简单最基本的滤镜框架。在这篇文章中,我们将细化滤镜和
PS之间的调用流程,我们将为滤镜引入一个对话框资源,使用户可以对滤镜进行自定义参数的配置。并且我们将看到当用户从不同菜单位置发起滤镜调用时的流程
区别,然后我们还将为我们的滤镜参数引入PS脚本描述系统的读写支持,将我们的参数存入PS的脚本系统中,并在以后的调用中读取出这些参数。
(1)设计我们的滤镜参数。
我们的滤镜完成的是一个最基本的任务,仅仅是“填充”,因此我们可以对填充的颜色进行配置,此外,我们还可以设置填充颜色的不透明度。因此我们引入下面的参数,把它定义为一个struct,包括一个RGB填充色,和一个不透明度(0~100):
//======================================
// 定义我们的参数
//======================================
typedef struct _MYPARAMS
{
COLORREF fillColor; //填充颜色
int opacity; //百分比(0~100)
} MYPARAMS;
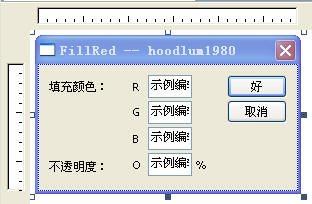
(2) 现在我们添加一个对话框资源。编辑对话框模块如下所示。然后我们对主要控件设置控件ID。
【注意】编辑资源文件后,由于VC将会重写rc文件,因此在编译项目前,我们还需要手工打开rc文件,自己重新添加#include "FillRed.pipl"。
否则编译好的滤镜将无法被PS正确识别和加载到滤镜菜单。

(3)下面我们为该对话框添加窗口过程。为此我们为项目添加 ParamDlg.h 和 ParamDlg.cpp文件。
【注意】由于窗口过程位于我们的DLL中,因此我们必须把窗口过程声明为DLL导出函数,以便让系统知道该函数的地址。
关于窗口过程的编写则完全属于 windows
编程领域的内容(这方面的知识可以参考相关书籍),这里我们不详细介绍怎样写窗口过程。但值得一提的是,我在这里引入了一个PS中的UI特性,即PS中例
如它的字体设置对话框,当鼠标悬停在控件前面的Lable(Static标签)上方时,光标形状可以改变为特殊光标,按下并左右拖动鼠标,则相关控件的值
就会根据鼠标移动方向自动增加或减小,类似slider控件的效果。因此我在窗口过程中为它加入了这个特性,这会使得窗口过程的代码看起来稍显复杂一些,
不过这个功能(可能是PS发明的?)很有趣也很新颖。为此我还引入了一个自定义的光标文件。具体代码不贴出了,请参考项目源代码中的
ParamDlg.cpp文件中的代码。
(4)在第一篇文章的基础上,我们需要改写FillRed.cpp中的一些代码。
因为现在我们引入了不透明度参数,不透明度的算法是:(opacity = 0~ 100)
结果值 = 输入值 * (1- opacity*0.01) + 填充颜色 * opacity*0.01;
(a)对DoStart 和 DoContinue:我们需要知道原图中原来的颜色,因此我们的 inRect 和
inHiPlane 将不在为空矩形。这体现在 DoStart 和 DoContinue 函数中,我们对inRect 和 inHiPlane
修改为和 outRect , outHiPlane 一致,这样PS就会把原图数据通过 inData 发送给我们。
(b)当用户点击滤镜菜单时,将从 parameter 调用开始,这样我们就在这里设置一个标记,表示需要显示对话框。
(c)当用户点击“最近滤镜”菜单时,将从 prepare
调用开始,这样表示我们不需要显示对话框,而是直接取此前的缓存参数。为此我们引入 ReadParams 和 WriteParams
函数。即使用PS提供的回调函数集使我们的参数和PS Scripting System进行交换数据。
下面我们主要看一下DoContinue函数发生的变化。主要是对算法进行了改动,对 inRect ,
inHiPlane 这两个数据进行了变动,以请求PS发送数据。在DoStart()函数中设置了第一个贴片,对inRect 和 inHiPlane
的改动是同样的。同时,在DoStart函数中, 根据事先设置过的标志,来决定是否显示对话框。

 Code_DoStart_And_DoContinue
//DLLMain
BOOL APIENTRY DllMain( HMODULE hModule,
DWORD ul_reason_for_call,
LPVOID lpReserved
)
{
dllInstance = static_cast<HINSTANCE>(hModule);
if (ul_reason_for_call == DLL_PROCESS_ATTACH || ul_reason_for_call == DLL_THREAD_ATTACH)
{
//在DLL被加载时,初始化我们的参数!
gParams.fillColor = RGB(0, 0, 255);
gParams.opacity = 100;
}
return TRUE;
}
#ifdef _MANAGED
#pragma managed(pop)
#endif
//===================================================================================================
//------------------------------------ 滤镜被ps调用的函数 -------------------------------------------
//===================================================================================================
DLLExport void PluginMain(const int16 selector, void * filterRecord, int32 *data, int16 *result)
{
gData = data;
gResult = result;
gFilterRecord = (FilterRecordPtr)filterRecord;
if (selector == filterSelectorAbout)
sSPBasic = ((AboutRecord*)gFilterRecord)->sSPBasic;
else
sSPBasic = gFilterRecord->sSPBasic;
switch (selector)
{
case filterSelectorAbout:
DoAbout();
break;
case filterSelectorParameters:
DoParameters();
break;
case filterSelectorPrepare:
DoPrepare();
break;
case filterSelectorStart:
DoStart();
break;
case filterSelectorContinue:
DoContinue();
break;
case filterSelectorFinish:
DoFinish();
break;
default:
*gResult = filterBadParameters;
break;
}
}
//显示关于对话框
void DoAbout()
{
AboutRecord *aboutPtr = (AboutRecord*)gFilterRecord;
PlatformData *platform = (PlatformData*)(aboutPtr->platformData);
HWND hwnd = (HWND)platform->hwnd;
MessageBox(hwnd, "FillRed Filter: 填充颜色 -- by hoodlum1980", "关于 FillRed", MB_OK);
}
//这里准备参数,就这个滤镜例子来说,我们暂时不需要做任何事
void DoParameters()
{
//parameter调用说明,用户点击的是原始菜单,要求显示对话框
m_ShowUI = TRUE;
//设置参数地址
if(gFilterRecord->parameters == NULL)
gFilterRecord->parameters = (Handle)(&gParams);
}
//在此时告诉PS(宿主)滤镜需要的内存大小
void DoPrepare()
{
if(gFilterRecord != NULL)
{
gFilterRecord->bufferSpace = 0;
gFilterRecord->maxSpace = 0;
//设置参数地址
if(gFilterRecord->parameters == NULL)
gFilterRecord->parameters = (Handle)(&gParams);
}
}
//inRect : 滤镜请求PS发送的矩形区域。
//outRect : 滤镜通知PS接收的矩形区域。
//filterRect : PS通知滤镜需要处理的矩形区域。
//由于我们是使用固定的红色进行填充,实际上我们不需要请求PS发送数据
//所以这里可以把inRect设置为NULL,则PS不向滤镜传递数据。
void DoStart()
{
BOOL showDialog;
if(gFilterRecord == NULL)
return;
//从Scripting System 中读取参数值到gParams中。
OSErr err = ReadParams(&showDialog);
//是否需要显示对话框
if(!err && showDialog)
{
PlatformData* platform = (PlatformData*)(gFilterRecord->platformData);
HWND hWndParent = (HWND)platform->hwnd;
//显示对话框
int nResult = DialogBoxParam(dllInstance, MAKEINTRESOURCE(IDD_PARAMDLG),hWndParent,(DLGPROC)ParamDlgProc, 0);
if(nResult == IDCANCEL)
{
//选择了取消
ZeroPsRect(&gFilterRecord->inRect);
ZeroPsRect(&gFilterRecord->outRect);
ZeroPsRect(&gFilterRecord->maskRect);
WriteParams();
//注意: (1)如果通知 PS 用户选择了取消,将使PS不会发起 Finish调用!
// (2)只要 start 调用成功,则PS保证一定发起 Finish 调用。
*gResult = userCanceledErr;
return;
}
}
//我们初始化第一个Tile,然后开始进行调用
m_Tile.left = gFilterRecord->filterRect.left;
m_Tile.top = gFilterRecord->filterRect.top;
m_Tile.right = min(m_Tile.left + TILESIZE, gFilterRecord->filterRect.right);
m_Tile.bottom = min(m_Tile.top + TILESIZE, gFilterRecord->filterRect.bottom);
//设置inRect, outRect
//ZeroPsRect(&gFilterRecord->inRect); //我们不需要PS告诉我们原图上是什么颜色,因为我们只是填充
CopyPsRect(&m_Tile, &gFilterRecord->inRect);//现在我们需要请求和outRect一样的区域
CopyPsRect(&m_Tile, &gFilterRecord->outRect);
//请求全部通道(则数据为interleave分布)
gFilterRecord->inLoPlane = 0;
gFilterRecord->inHiPlane = (gFilterRecord->planes -1);;
gFilterRecord->outLoPlane = 0;
gFilterRecord->outHiPlane = (gFilterRecord->planes -1);
}
//这里对当前贴片进行处理,注意如果用户按了Esc,下一次调用将是Finish
void DoContinue()
{
int index; //像素索引
if(gFilterRecord == NULL)
return;
//定位像素
int planes = gFilterRecord->outHiPlane - gFilterRecord->outLoPlane + 1; //通道数量
//填充颜色
uint8 r = GetRValue(gParams.fillColor);
uint8 g = GetGValue(gParams.fillColor);
uint8 b = GetBValue(gParams.fillColor);
int opacity = gParams.opacity;
uint8 *pDataIn = (uint8*)gFilterRecord->inData;
uint8 *pDataOut = (uint8*)gFilterRecord->outData;
//扫描行宽度(字节)
int stride = gFilterRecord->outRowBytes;
//我们把输出矩形拷贝到 m_Tile
CopyPsRect(&gFilterRecord->outRect, &m_Tile);
for(int j = 0; j< (m_Tile.bottom - m_Tile.top); j++)
{
for(int i = 0; i< (m_Tile.right - m_Tile.left); i++)
{
index = i*planes + j*stride;
//为了简单明了,我们默认把图像当作RGB格式(实际上不应这样做)
pDataOut[ index ] =
(uint8)((pDataIn[ index ]*(100-opacity) + r*opacity)/100); //Red
pDataOut[ index+1 ] =
(uint8)((pDataIn[ index+1 ]*(100-opacity) + g*opacity)/100); //Green
pDataOut[ index+2 ] =
(uint8)((pDataIn[ index+2 ]*(100-opacity) + b*opacity)/100); //Blue
}
}
//判断是否已经处理完毕
if(m_Tile.right >= gFilterRecord->filterRect.right && m_Tile.bottom >= gFilterRecord->filterRect.bottom)
{
//处理结束
ZeroPsRect(&gFilterRecord->inRect);
ZeroPsRect(&gFilterRecord->outRect);
ZeroPsRect(&gFilterRecord->maskRect);
return;
}
//设置下一个tile
if(m_Tile.right < gFilterRecord->filterRect.right)
{
//向右移动一格
m_Tile.left = m_Tile.right;
m_Tile.right = min(m_Tile.right + TILESIZE, gFilterRecord->filterRect.right);
}
else
{
//向下换行并回到行首处
m_Tile.left = gFilterRecord->filterRect.left;
m_Tile.right = min(m_Tile.left + TILESIZE, gFilterRecord->filterRect.right);
m_Tile.top = m_Tile.bottom;
m_Tile.bottom = min(m_Tile.bottom + TILESIZE, gFilterRecord->filterRect.bottom);
}
//ZeroPsRect(&gFilterRecord->inRect);
CopyPsRect(&m_Tile, &gFilterRecord->inRect);//现在我们需要请求和outRect一样的区域
CopyPsRect(&m_Tile, &gFilterRecord->outRect);
//请求全部通道(则数据为interleave分布)
gFilterRecord->inLoPlane = 0;
gFilterRecord->inHiPlane = (gFilterRecord->planes -1);;
gFilterRecord->outLoPlane = 0;
gFilterRecord->outHiPlane = (gFilterRecord->planes -1);
}
//处理结束,这里我们暂时什么也不需要做
void DoFinish()
{
//清除需要显示UI的标志
m_ShowUI = FALSE;
//记录参数
WriteParams();
} (5)从PS Scripting System中读写我们的参数,我们为项目添加 ParamsScripting.h
和 ParamsScripting.cpp,代码如下。引入ReadParams 和 WriteParams 方法,该节主要涉及 PS
的描述符回调函数集,比较复杂,但在这里限于精力原因,我也不做更多解释了。具体可以参考我以前发布的相关随笔中有关讲解PS回调函数集的一篇文章以及代
码注释。其相关代码如下:

 Code_ParamsScripting.cpp
#include "stdafx.h"
#include "ParamsScripting.h"
#include <stdio.h>
OSErr ReadParams(BOOL* showDialog)
{
OSErr err = noErr;
PIReadDescriptor token = NULL; //读操作符
DescriptorKeyID key = NULL; //uint32,即char*,键名
DescriptorTypeID type = NULL;
int32 flags = 0;
int32 intValue; //接收返回值
char text[128];
//需要读取的keys
DescriptorKeyIDArray keys = { KEY_FILLCOLOR, KEY_OPACITY, NULL };
if (showDialog != NULL)
*showDialog = m_ShowUI;
// For recording and playback 用于录制和播放动作
PIDescriptorParameters* descParams = gFilterRecord->descriptorParameters;
if (descParams == NULL)
return err;
ReadDescriptorProcs* readProcs = gFilterRecord->descriptorParameters->readDescriptorProcs;
if (readProcs == NULL)
return err;
if (descParams->descriptor != NULL)
{
//打开描述符token
token = readProcs->openReadDescriptorProc(descParams->descriptor, keys);
if (token != NULL)
{
while(readProcs->getKeyProc(token, &key, &type, &flags) && !err)
{
switch (key)
{
case KEY_FILLCOLOR: //读取填充颜色
err = readProcs->getIntegerProc(token, &intValue);
if (!err) gParams.fillColor = intValue;
break;
case KEY_OPACITY: //读取不透明度
err = readProcs->getIntegerProc(token, &intValue);
if (!err) gParams.opacity = intValue;
break;
default:
err = readErr;
break;
}
}
//关闭描述符token
err = readProcs->closeReadDescriptorProc(token);
//释放描述符
gFilterRecord->handleProcs->disposeProc(descParams->descriptor);
descParams->descriptor = NULL;
}
//播放动作时的选项,是否需要显示对话框
*showDialog = descParams->playInfo == plugInDialogDisplay;
}
return err;
}
//写参数
OSErr WriteParams()
{
OSErr err = noErr;
PIWriteDescriptor token = NULL;
PIDescriptorHandle h;
PIDescriptorParameters* descParams = gFilterRecord->descriptorParameters;
if (descParams == NULL)
return err;
WriteDescriptorProcs* writeProcs = gFilterRecord->descriptorParameters->writeDescriptorProcs;
if (writeProcs == NULL)
return err;
//打开写描述符token
token = writeProcs->openWriteDescriptorProc();
if (token != NULL)
{
//写入填充颜色
writeProcs->putIntegerProc(token, KEY_FILLCOLOR, (int32)gParams.fillColor);
//写入不透明度
writeProcs->putIntegerProc(token, KEY_OPACITY, (int32)gParams.opacity);
//释放描述符
gFilterRecord->handleProcs->disposeProc(descParams->descriptor);
//关闭token
writeProcs->closeWriteDescriptorProc(token, &h);
//恢复描述符
descParams->descriptor = h;
//录制选项
descParams->recordInfo = plugInDialogOptional;
}
else
{
return errMissingParameter;
}
return err;
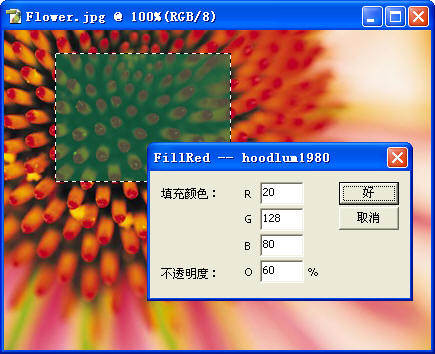
} (6)这样我们就完整支持了参数读写,我们可以在执行滤镜时,点击“好”按钮,即可将参数更新到PS脚本系统,下次调用时
会自动从脚本系统中读取上一次的参数值,并使用读取出的值初始化对话框。而当我们点击“最近滤镜”命令时,滤镜将会采用脚本系统中的参数,并且不显示对话
框。

(7)下面是源代码的下载链接:
https://files.cnblogs.com/hoodlum1980/FillRed.rar
【注意】为了节省空间,提供源码时,我将覆盖以前的项目版本,也就是说在原有基础上增量更新而不再保留历史版本。
(8)总结:
这一节主要讲解为滤镜引入自定义参数以及相关的对话框资源,然后为参数增加PS脚本系统的读写支持。
到目前为止,这个滤镜已经具有比较完整的框架了,也能够被动作录制和回放。
(a)但美中不足的是,对“动作录制和回放”的支持还不够完备,我们将看到当把滤镜录制为动作时,其对话框选项的勾选框是
没有的,也就是我们没法设置对话框显示的“显示”,“不显示”,“安静”三种模式,这是因为我们还没有为滤镜引入必须的事件,描述符键等相关的“术语”
(aete)资源。
(b)我们还希望为滤镜的对话框引入“预览”机制,即我们希望在对话框上显示一小块图片供用户预览效果,这样用户就可以根据视觉反馈方便的调节滤镜参数。
在此后,我们将有可能进一步讲解PS的回调函数集,例如如何让PS为我们申请内存,如何更新PS的进度条,如何更完善的处理用户交互,以及引入“预览”支持,引入aete资源等相关内容。
(9)最后更新:把RGB三个通道共用一个不透明度参数,调整为可以单独每个通道的合成不透明度。因此对话框做了相应修改。
我的相关文章:
《怎样编写一个Photoshop滤镜(1)》


 浙公网安备 33010602011771号