
SSM 框架整合 配置文件相关梳理
文章目录
引言
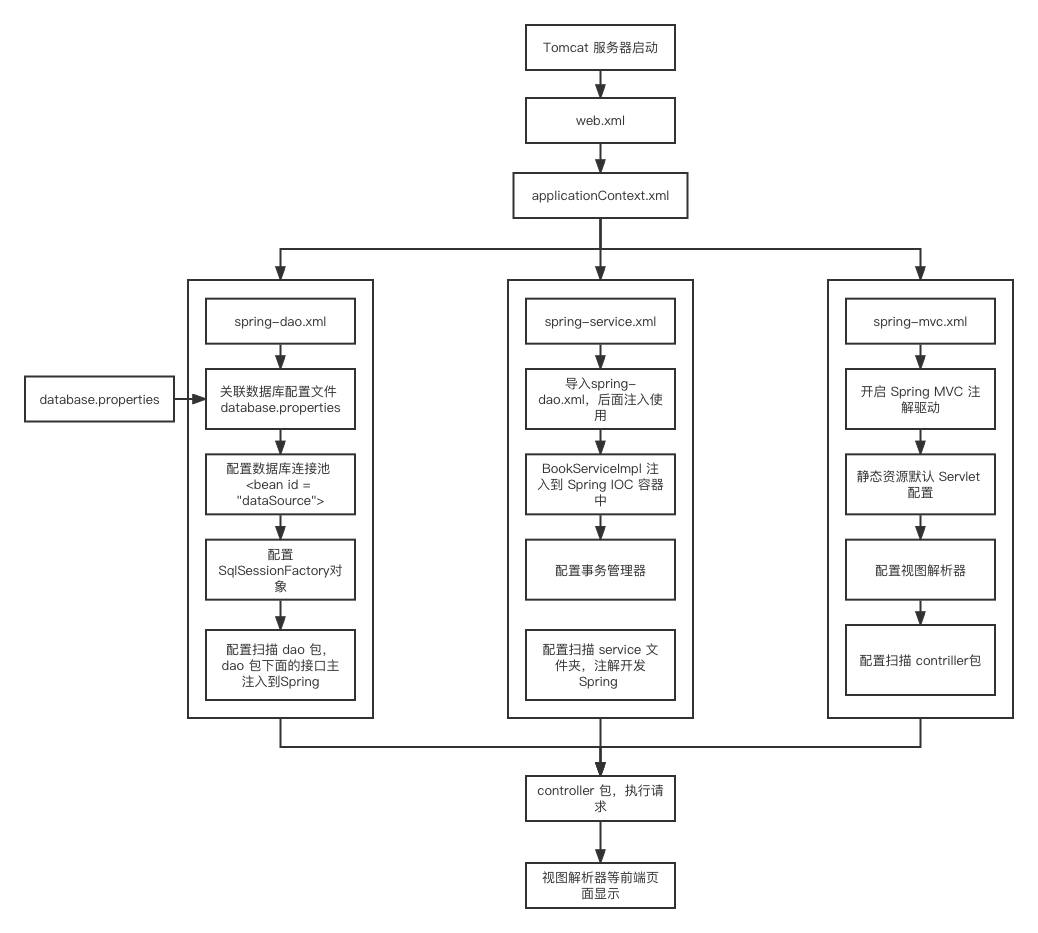
关于 SSM 的整合开发,需要配置的地方虽然不多,但是混合在一起有时难以很好的区分,于是绘制简易的流程图进行梳理
关于六个配置文件中的详细代码
web.xml
<?xml version="1.0" encoding="UTF-8"?>
<web-app xmlns="http://xmlns.jcp.org/xml/ns/javaee"
         xmlns:xsi="http://www.w3.org/2001/XMLSchema-instance"
         xsi:schemaLocation="http://xmlns.jcp.org/xml/ns/javaee http://xmlns.jcp.org/xml/ns/javaee/web-app_4_0.xsd"
         version="4.0">

    <!--DispatcherServlet-->
    <!--Servlet 启动的时候,会解析这个 web.xml 这里引入 Spring 的核心配置文件,就可以使用 Spring 进行开发了-->
    <servlet>
        <servlet-name>DispatcherServlet</servlet-name>
        <servlet-class>org.springframework.web.servlet.DispatcherServlet</servlet-class>
        <init-param>
            <param-name>contextConfigLocation</param-name>
            <!--一定要注意:我们这里加载的是总的配置文件,之前被这里坑了!-->
            <param-value>classpath:applicationContext.xml</param-value>
        </init-param>
        <load-on-startup>1</load-on-startup>
    </servlet>
    <servlet-mapping>
        <servlet-name>DispatcherServlet</servlet-name>
        <url-pattern>/</url-pattern>
    </servlet-mapping>

    <!--encodingFilter-->
    <filter>
        <filter-name>encodingFilter</filter-name>
        <filter-class>
            org.springframework.web.filter.CharacterEncodingFilter
        </filter-class>
        <init-param>
            <param-name>encoding</param-name>
            <param-value>utf-8</param-value>
        </init-param>
    </filter>
    <filter-mapping>
        <filter-name>encodingFilter</filter-name>
        <url-pattern>/*</url-pattern>
    </filter-mapping>

    <!--Session过期时间-->
    <session-config>
        <session-timeout>15</session-timeout>
    </session-config>

</web-app>
applicationContext.xml
<?xml version="1.0" encoding="UTF-8"?>
<beans xmlns="http://www.springframework.org/schema/beans"
       xmlns:xsi="http://www.w3.org/2001/XMLSchema-instance"
       xsi:schemaLocation="http://www.springframework.org/schema/beans
       http://www.springframework.org/schema/beans/spring-beans.xsd">

    <!--将所有的配置文件集成到 Spring 里面-->
    <import resource="spring-dao.xml"/>
    <import resource="spring-service.xml"/>
    <import resource="spring-mvc.xml"/>

</beans>
spring-dao.xml
<?xml version="1.0" encoding="UTF-8"?>
<beans xmlns="http://www.springframework.org/schema/beans"
       xmlns:xsi="http://www.w3.org/2001/XMLSchema-instance"
       xmlns:context="http://www.springframework.org/schema/context"
       xsi:schemaLocation="http://www.springframework.org/schema/beans
       http://www.springframework.org/schema/beans/spring-beans.xsd
       http://www.springframework.org/schema/context
       https://www.springframework.org/schema/context/spring-context.xsd">

    <!--整合数据库-->
    <!--1、关联数据库配置文件-->
    <context:property-placeholder location="classpath:database.properties"/>

    <!--连接池 下面会在 spring-service 里面的事务管理中,需要把这个 dataSource 注入进去,-->
    <bean id="dataSource" class="com.mchange.v2.c3p0.ComboPooledDataSource">
        <property name="driverClass" value="${jdbc.driver}"/>
        <property name="jdbcUrl" value="${jdbc.url}"/>
        <property name="user" value="${jdbc.username}"/>
        <property name="password" value="${jdbc.password}"/>

        <!-- c3p0连接池的私有属性 -->
        <property name="maxPoolSize" value="30"/>
        <property name="minPoolSize" value="10"/>
        <!-- 关闭连接后不自动commit -->
        <property name="autoCommitOnClose" value="false"/>
        <!-- 获取连接超时时间 -->
        <property name="checkoutTimeout" value="10000"/>
        <!-- 当获取连接失败重试次数 -->
        <property name="acquireRetryAttempts" value="2"/>
    </bean>


    <!-- 3.配置SqlSessionFactory对象 -->
    <bean id="sqlSessionFactory" class="org.mybatis.spring.SqlSessionFactoryBean">
        <!-- 注入数据库连接池 -->
        <property name="dataSource" ref="dataSource"/>
        <!-- 配置MyBaties全局配置文件:mybatis-config.xml -->
        <property name="configLocation" value="classpath:mybatis-config.xml"/>
    </bean>

    <!-- 4.配置扫描Dao接口包,动态实现Dao接口注入到spring容器中 -->
    <!--这个操作可以将 sqlSessionFactory 放在 Sprng 容器中;也是可以把 Dao 下面的 BookMapper 放在容器中-->
    <!--解释 :https://www.cnblogs.com/jpfss/p/7799806.html-->
    <bean class="org.mybatis.spring.mapper.MapperScannerConfigurer">
        <!-- 注入sqlSessionFactory -->
        <property name="sqlSessionFactoryBeanName" value="sqlSessionFactory"/>
        <!-- 给出需要扫描Dao接口包 -->
        <property name="basePackage" value="com.luobin.dao"/>
    </bean>
</beans>
spring-service.xml
<?xml version="1.0" encoding="UTF-8"?>
<beans xmlns="http://www.springframework.org/schema/beans"
       xmlns:xsi="http://www.w3.org/2001/XMLSchema-instance"
       xmlns:context="http://www.springframework.org/schema/context"
       xsi:schemaLocation="http://www.springframework.org/schema/beans
   http://www.springframework.org/schema/beans/spring-beans.xsd
   http://www.springframework.org/schema/context
   http://www.springframework.org/schema/context/spring-context.xsd">

    <!-- 扫描service相关的bean -->
    <!--
        创建spring项目的时候在xml配置文件中都会配置这个标签,配置完这个标签后,
        spring就会去自动扫描base-package对应的路径或者该路径的子包下面的java文件,
        如果扫描到文件中带有@Service,@Component,@Repository,@Controller等这些注解的类,
        则把这些类注册为bean;
    -->
    <context:component-scan base-package="com.luobin.service" />

    <import resource="classpath:spring-dao.xml"/> <!--// 解决 bookMapper 的爆红操作-->

    <!--BookServiceImpl注入到IOC容器中-->
    <bean id="BookServiceImpl" class="com.luobin.service.BookServiceImpl">
        <property name="bookMapper" ref="bookMapper"/>
    </bean>

    <!-- 配置事务管理器 因为在增删改的操作的时候,需要事务的支持 -->
    <bean id="transactionManager" class="org.springframework.jdbc.datasource.DataSourceTransactionManager">
        <!-- 注入数据库连接池 -->
        <property name="dataSource" ref="dataSource" />
    </bean>

</beans>
spring-mvc.xml
<?xml version="1.0" encoding="UTF-8"?>
<beans xmlns="http://www.springframework.org/schema/beans"
       xmlns:xsi="http://www.w3.org/2001/XMLSchema-instance"
       xmlns:context="http://www.springframework.org/schema/context"
       xmlns:mvc="http://www.springframework.org/schema/mvc"
       xsi:schemaLocation="http://www.springframework.org/schema/beans
   http://www.springframework.org/schema/beans/spring-beans.xsd
   http://www.springframework.org/schema/context
   http://www.springframework.org/schema/context/spring-context.xsd
   http://www.springframework.org/schema/mvc
   https://www.springframework.org/schema/mvc/spring-mvc.xsd">

    <!-- 配置SpringMVC -->
    <!-- 1.开启SpringMVC注解驱动 -->
    <mvc:annotation-driven />

    <!-- 2.静态资源默认servlet配置-->
    <mvc:default-servlet-handler/>

    <!-- 3.配置jsp 显示ViewResolver视图解析器 -->
    <bean class="org.springframework.web.servlet.view.InternalResourceViewResolver">
        <property name="viewClass" value="org.springframework.web.servlet.view.JstlView" />
        <property name="prefix" value="/WEB-INF/jsp/" />
        <property name="suffix" value=".jsp" />
    </bean>

    <!-- 4.扫描web相关的bean -->
    <!--因为是 MVC 的配置文件,本质上面就是对于请求的分发,这里说明控制器在什么位置方便,让 Spring 知道去什么位置找到控制器并且执行相关的代码-->
    <context:component-scan base-package="com.luobin.controller" />

</beans>
database.properties
jdbc.driver=com.mysql.jdbc.Driver
jdbc.url=jdbc:mysql://localhost:3306/ssmbuild?useSSL=true&useUnicode=true&characterEncoding=utf8&serverTimezone=Asia/Shanghai
jdbc.username=root
jdbc.password=111111

 浙公网安备 33010602011771号