基于Identity Server4的OAuth 2.0授权总结(1)- Authorization Server
OAuth2.0是当下比较流行的开放授权协议。之前有写过一篇博客详细介绍过。Open Id Connect协议基于OAuth 2.0做了进一步加强,加入了更多的功能。
对于前后端分离架构下的Web应用整个OAuth授权过程如下:
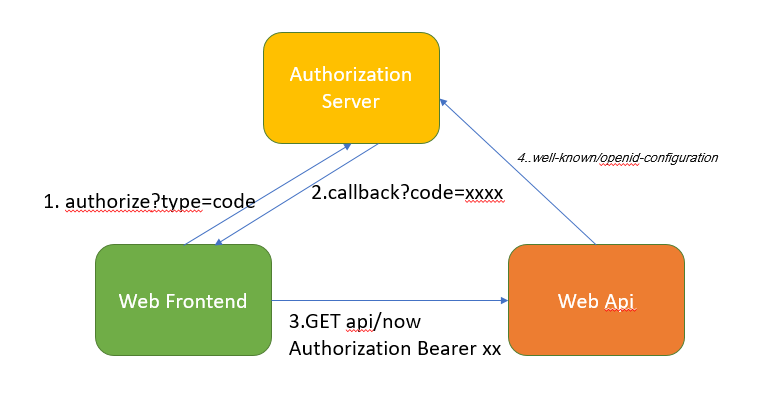
图中的Authroization Server部分主要利用Identity Server4这个组件来实现。Identity Server 4是.NET Core平台下对OAuth 2.0和Open ID Connect协议的开源实现。以Nuget包的形式提供给用户。因此我们的Web应用只需引入Nuget包,然后进行相关配置即可具备Authorization Server的能力。
基本概念
在开始配置Authorization Server前,我们需要了解一些基本概念:
IdentityToken(id_token)
通过OAuth认证后,Authorization Server颁发给客户端用来描述用户的基本信息的JWT。
AccessToken(access_token)
通过OAuth认证后,Authorization Server颁发给客户端用于后续访问资源时使用的令牌(也为JWT格式)。令牌描述了用户标识,可以访问的资源的Scope,令牌本身的安全相关(有效期,签名等等)的信息。
IdentityResource
用来定义在认证的过程中存储在IdentityToken中的信息。每个IdentityResource可以包含多个ClaimType(描述用户的attribute)。在授权时客户端通过scope指明需要获取那些IdentityResource。(比如:标准IdentityResource openid包含sub claim type。即用户Id)
ApiResource
用来定义Authorization Server所保护的Api资源,可以将Api进一步划分为多个Scope(如果未划分则整个Api资源只有一个Scope,即Api资源本身)。同时,我们可以针对scope配置所包含的claim信息。在申请授权时,通过scope参数指明需要获取哪些Scope的权限。获取的Scope的信息最后会存储在AccessToken中供api服务器验证,Scope所包含的用户Claim也会包含在access token中。
Client
定义通过Authorization Server进行授权的客户端。可以对客户端的授权请求进行配置:Authorization Mode, Secret, Client Id, Redirect Url, allowed scope
基本上了解上述基本概念,就可以配置好IdentityServer了。配置可以通过代码或者配置的形式。
首先看看通过代码的形式:
public class Config
    {
        public static IEnumerable<ApiResource> GetAllApiResources()
        {
            return new ApiResource[]
            {
                new ApiResource("api","Web Api"),//定义单scope api resource
            };
        }

        public static IEnumerable<IdentityResource> GetAllIdentityResource()
        {
            return new IdentityResource[]
            {
                new IdentityResources.OpenId(),//用户标识
            };
        }

        public static IEnumerable<Client> GetAllClients()
        {
            return new List<Client>
            {
                new Client
                {
                    ClientId = "spa",
                    RequireConsent = false,
                    AllowedGrantTypes = GrantTypes.Code,//使用授权码模式。
                    RequireClientSecret = false,//指明在获取accesstoken是是否需要通过secret验证。如果是SPA,所有代码都暴露在浏览器端。没有意义。故此处设为false.
                    AllowAccessTokensViaBrowser = true,//指明可以通过浏览器来传递access token,其实授权码模式是不会通过浏览器URL来传递access token的,只有隐式模式才会有。
                    RedirectUris = new List<string>{"http://localhost:3000/callback.html"},
                    AllowedScopes = new List<string>{"api", IdentityServerConstants.StandardScopes.OpenId},//允许请求api和openid这两个scope
            AlwaysIncludeUserClaimsInIdToken = true, //在id_token中包含所有用户的claim.如果该选项设为false,则id_token中始终只包含claim sub.完整用户信息需要通过userInfo接口获取
                },
            };
        }
    }
在ConfigureService中配置依赖注入:public void ConfigureServices(IServiceCollection services) { builder.AddInMemoryClients(Config.GetAllClients()); builder.AddInMemoryApiResources(Config.GetAllApiResources()); builder.AddInMemoryIdentityResources(Config.GetAllIdentityResource()); }
在看看通过配置文件模式:
// 定义Client
"Clients": [
      {
        "ClientId": "spa",
        "RequireConsent": false,
        "AllowedGrantTypes": [ "authorization_code" ],
        "RequireClientSecret": false,
        "AllowAccessTokensViaBrowser": true,"RedirectUris": [ "http://localhost:3000/callback.html" ],
     "AllowedScopes": [ "api", "openid" ],
     },
//定义Api Resource
"Apis": [
  {
    "Name": "api",
    "DisplayName": "Web Api",
],
//定义Identity Resource
"Identity": [
  { "Name": "openid", "UserClaims": [ "sub" ] }
],
在ConfigureService中配置依赖注入:
builder.AddInMemoryClients(Configuration.GetSection("OAuth:Clients"));
builder.AddInMemoryApiResources(Configuration.GetSection("OAuth:Apis"));
builder.AddInMemoryIdentityResources(Configuration.GetSection("OAuth:Identity"));
另外,还需要做一些其他依赖注入和中间件的配置。具体体现在Startup中的ConfigureService和Configure方法中:
ConfigureService方法中注册依赖
var builder = services.AddIdentityServer(option =>
{
    option.UserInteraction.LoginUrl = "/account/login"; //配置登录界面
});
builder.AddDeveloperSigningCredential();//添加签名证书,用于对各种token进行签名。开发模式下是会在应用工作目录下生成一个tempKey.rsa的文件用于存储秘钥信息。
Configure添加中间件
app.UseIdentityServer();
Login界面
上面的代码配置了一个LoginUrl,Login界面是由开发者实现,毕竟每个网站需要做出不一样的Login界面。在Identity Server4内部的Login处理流程如下:


 浙公网安备 33010602011771号