

======================= **基础知识** =======================
关键字 : #define / #undef / #ifdef / #ifndef //注意与typedef / inline之间差别;
#define 标识符 替换列表(替换列表可以是数,字符串字面量,标点符号,运算符,标识符,关键字,字符常量。注意:替换列表是可以为空的)
是预处理器处理的单元实体之一(因此,预处理器只是简单的进行替换,并不涉及到编译);
定义的宏以后的代码都可以使用这个宏,直到#undef 取消这个宏定义
宏表达式没有任何的“调用”开销, 宏表达式可以嵌套, 但是不能出现递归;
宏展开使源程序变长,函数调用不会;
另外要注意,宏定义中的返回值,因为有时候宏定义是没有返回值的,但是对于printf 函数,是有返回值的,这里要注意程序中对于返回值的使用;
字符串宏定义:
#define STR(str) #str
##符号是记号粘黏符号,将前后的字符粘黏起来。
#define CONNECT(a,b) a##b
int CONNECT(a,1); //int a1;
a1 = 2;

#define LOG(frm,args...){\
printf(frm,##args);\                     //##连接符加了以后对于空参数,可以通过编译
}


 1 #include <iostream>
 2 using namespace std;
 3
 4 #ifdef DEBUG
 5 #define TRY_DEF1(frm, args...) printf(frm, #args)
 6 #define TRY_DEF2(frm, args...) printf(frm, ##args)
 7 #else
 8 #define TRY_DEF1(frm, args...)
 9 #define TRY_DEF2(frm, args...)
10 #endif
11
12 int main()
13 {
14     TRY_DEF1("here is # sample");
15     TRY_DEF2("here is ## sample");
16     return 0;
17 }
多行定义: 使用 / 作为连接符;
#define MAX(X,Y) do { \
语句1; \
语句2; \
/* 注释的写法 */ \
} while(0) /* (no trailing ; ) */ \
条件编译:
#ifdef WINDOWS
......
......
#endif
#ifdef LINUX
......
......
#endif
可变参数定义 + 条件编译:
#ifdef DEBUG
#define logmsg(frm, args...) printf(frm, ##args)
#else
#define logmsg(frm, args...)
#endif

#define TEST_FUNC(func, arg, a...) vector<int> arg(nums);\
    start = clock();\
    func(arg, ##a);\
    elapseTime = (double (clock() - start)) / CLOCKS_PER_SEC;\
    printf("after %s, time is %f\n", #func, elapseTime);\
    for(auto x : arg)  len += logmsg("%4d", x);\
    logmsg("\n");
预定义宏
__FUNCTION__ 函数名称
宏定义中一些注意点:
1. 宏定义值时替换,要注意一些运算作为参数,所以最好都加()
define MAX(a, b)  ((a) > (b) ? (a) : (b))

 //  对于 MAX(1+2,value) 则替换成:( (1 + 2) > (value) ? (1 + 2) : (value)

#define doit(m, n) for (int i = 0; i < (n); ++i) { m += 1;}
2. 宏定义值时替换合法标识符
#define 0x 100 //不可以
======================= **代码演示** =======================
1. 简单宏定义操作:
#define MALLOC(type, x) (type*)malloc(sizeof(type)*x)
#define FREE(p) (free(p), p=NULL)
#define LOG(s) printf("[%s] {%s:%d} %s \n", __DATE__, __FILE__,__LINE__, s)
#define FOREACH(i, m) for(i=0; i<m; i++)
======================= **应用场景** =======================
1. 对于固定的结构的展开,可以通过宏定义实现;CPP 有些反射功能也是可以通过宏定义实现的;
 1 #include <stdio.h>
 2 //该宏可以方便定义结构体,并给结构体命名。
 3 //省去每次在定义结构体时,都要重复地写上
 4 //typedef struct ....之类的相同代码
 5 #define STRUCT(type) \
 6     typedef struct _tag_##type type;\
 7     struct _tag_##type
 8
 9 //定义结构体,并命名为Student
10 STRUCT(Student)
11 {
12     char* name;int id;
13 };
14 int main()
15 {
16     Student s1;
17     Student s2;
18     s1.name = "s1";
19     s1.id = 1;
20     s2.name = "s2";
21     s2.id = 2;
22     printf("s1.name = %s\n",s1.name);
23     printf("s1.id = %d\n",s1.id);
24     printf("s2.name = %s\n",s2.name);
25     printf("s2.id = %d\n",s2.id);
26     return 0;
27 }
2. 定义UnitTest 前置文件;
 1 ////////////////////////////////////HEAD FILE//////////////////////////////////
 2 #ifndef _UNITTEST_H
 3 #define _UNITTEST_H
 4
 5 ////////////////////DEFINE THE PRINT COLOR////////////////////
 6 #define COLOR(msg,code) "\033[0;1;" #code "m" msg "\033[0m"
 7 #define RED(msg) COLOR(msg,31)
 8 #define GREEN(msg) COLOR(msg,32)
 9 #define YELLOW(msg) COLOR(msg,33)
10 #define BLUE(msg) COLOR(msg,34)
11 #define MAGENTA(msg) COLOR(msg,35)
12 #define CYAN(msg) COLOR(msg,36)
13 #define WHITE(msg) COLOR(msg,37)
14
15
16 #define EXPECT(a,comp,b){\
17     if(!((a) comp (b)))\
18     {\
19         printf("%s%s,%d,%s :",MAGENTA("["),__FILE__,__LINE__,RED("error"));\
20         printf("Expected:(%s) %s (%s), actual: %s VS %s%s\n",\
21                 #a,#comp,#b,#a,#b,MAGENTA("]"));\
22     }\
23 }\
24
25 #define EXPECT_EQ(a,b) EXPECT(a,==,b)
26 #define EXPECT_NE(a,b) EXPECT(a,!=,b)
27 #define EXPECT_LE(a,b) EXPECT(a,<=,b)
28 #define EXPECT_LT(a,b) EXPECT(a,<,b)
29 #define EXPECT_GE(a,b) EXPECT(a,>=,b)
30 #define EXPECT_GT(a,b) EXPECT(a,>,b)
31
32 ////////////////////
33 #define TEST(a,b)
34 void FUNC_##a_##b();
35 __attribute__((constructor))
36 void reg_##a_##b()
37 {
38     add_test_func(FUNC_##a_##b,#a ".");
39 }
40 void FUNC_##a_##b()
41
42 #endif //UNITTEST_H
43
44 /////////////////////////////////////////CPP FILE//////////////////////////////////
45 #include "UnitTest.h"
46 #include <iostream>
47 using namespace std;
48
49 __attribute__((constructor))
50 void test()
51 {
52     printf("test:hello kaikeba\n");
53 }
54
55
56 int main()
57 {
58     EXPECT_EQ(13,32542);
59     return 0;
60 }
3. 防御式声明: 在多重包含情况下,不会重复插入;这个其实最常见
1 <x.h>
2 #ifndef __X_H__
3 #define __X_H__
4 extern int i;
5 #endif //__X_H__
6 <x.c>
7 int i;
4. 将某个库函数包装成自定义接口,而只允许用户调用自定义接口,禁止直接调用库函数:
其中“#define malloc”是为了防止用户直接调用库函数malloc,只要包含了这个定义,就不能直接调用库函数malloc,而只能调用自定义函数MALLOC,如果用户要调用库函数malloc编译器会发生错误;
自定义安全的内存分配器接口:
 1 自定义安全的内存分配器接口:
 2
 3 /*
 4 ** 定义一个不易发生错误的内存分配器
 5 */
 6 #include <stdlib.h>
 7
 8 #define malloc                         //防止直接调用malloc!
 9 #define MALLOC(num, type)   (type *)alloc((num) * sizeof(type))
10 extern void *alloc(size_t size);
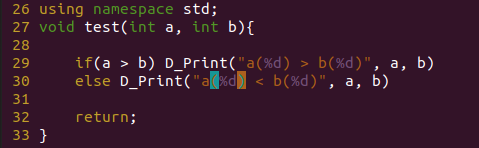
5. 在实际使用中,如果考虑到当前宏定义在判断语句中;
 1 //#include "debug.h"
 2 #include <iostream>
 3 #ifdef DEBUG
 4 #define D_Print(frm, args...)\
 5 {\
 6 printf("file %s, FUNC %s, LINE %d", __FILE__,__FUNCTION__, __LINE__);\
 7         printf(frm, ##args);\
 8 }
 9 #else
10 {\
11 #define D_Print(frm, args...)\
12 }
13 #endif
14
15 using namespace std;
16 void test(int a, int b){
17
18     if(a > b) D_Print("a(%d) > b(%d)\n", a, b);  //这里一般只有一句时候会省略大括号
19     else D_Print("a(%d) < b(%d)\n", a, b);
20
21     return;
22 }
23
24 int main()
25 {
26     int a = 0, b = 0;
27     scanf("%d%d", &a, &b);
28     test(a, b);
29     return 0;
30 }
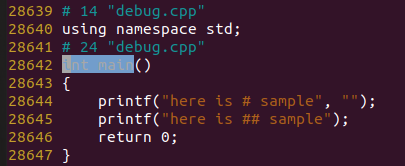
上面的程序在预处理以后,会变成下面形式;

上面处理以后,大括号后面还有一个分号(;), 这会被认为是大括号后面+一句空语句, 就会报错;

简单修改的话, 可以去掉括号;
或者在程序中加大括号:
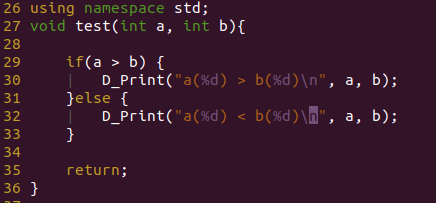
但是这两种方式,都不怎么符合C/C++ 中使用;所以有下面的一种方案:使用do-while 在宏定义中(也是在linux 原码中常用的一种方式),而且这种方式在很多地方也有使用;
 1 //#include "debug.h"
 2 #include <iostream>
 3 #ifdef DEBUG
 4 #define D_Print(frm, args...)\
 5 do{\
 6 printf("file %s, FUNC %s, LINE %d", __FILE__,__FUNCTION__, __LINE__);\
 7         printf(frm, ##args);\
 8 }while(0)
 9 #else
10 do{\
11 #define D_Print(frm, args...)\
12 }while(0)
13 #endif
14
15 using namespace std;
16 void test(int a, int b){
17
18     if(a > b) D_Print("a(%d) > b(%d)\n", a, b);
19     else D_Print("a(%d) < b(%d)\n", a, b);
20     return;
21 }
22
23 int main()
24 {
25     int a = 0, b = 0;
26     scanf("%d%d", &a, &b);
27     test(a, b);
28     return 0;
29 }
预处理以后是下面的形式;

完美解决了D_print 对标 printf 的使用。

 浙公网安备 33010602011771号