认识docker以及常用操作
一、docker是什么
Docker 是一个开源项目,诞生于 2013 年初,最初是 dotCloud 公司内部的一个业余项目。它基于 Google 公司推出的 Go 语言实现。 项目后来加入了 Linux 基金会,遵从了 Apache 2.0 协议,项目代码在GitHub 上进行维护。Docker 自开源后受到广泛的关注和讨论,以至于 dotCloud 公司后来都改名为 Docker Inc。Redhat 已经在其 RHEL6.5 中集中支持 Docker;Google 也在其 PaaS 产品中广泛应用。
Docker 项目的目标是实现轻量级的操作系统虚拟化解决方案。 Docker 的基础是 Linux 容器(LXC)等技术。在 LXC 的基础上 Docker 进行了进一步的封装,让用户不需要去关心容器的管理,使得操作更为简便。用户操作 Docker 的容器就像操作一个快速轻量级的虚拟机一样简单。Docker 可以让开发者打包他们的应用以及依赖包到一个轻量级、可移植的容器中,然后发布到任何流行的 Linux 机器上,也可以实现虚拟化。容器是完全使用沙箱机制,相互之间不会有任何接口(类似 iPhone 的 app),更重要的是容器性能开销极低。
Docker采用 C/S架构 Docker daemon 作为服务端接受来自客户的请求,并处理这些请求(创建、运行、分发容器)。 客户端和服务端既可以运行在一个机器上,也可通过 socket 或者RESTful API 来进行通信。
Docker daemon 一般在宿主主机后台运行,等待接收来自客户端的消息。 Docker 客户端则为用户提供一系列可执行命令,用户用这些命令实现跟 Docker daemon 交互。
二、docker的优点
在云时代,开发者创建的应用必须要能很方便地在网络上传播,也就是说应用必须脱离底层物理硬件的限制; 同时必须满足“任何时间任何地点”可获取可使用的特点。因此,开发者们需要一种新型的创建分布式应用程序的方式,快速分发部署,而这正是 Docker 所能够提供的最大优势。Docker 提供了一种更为聪明的方式,通过容器来打包应用、解耦应用和运行平台。这意味着迁移的时候,只需要在新的服务器上启动需要的容器就可以了, 无论新旧服务器是否是同一类别的平台。这无疑帮助我们节约了大量的宝贵时间,并降低部署过程出现问题的风险。
对于开发和运维人员来说,最梦寐以求的效果可能就是一次创建和配置,之后可以在任意地方、任意时间让应用正常运行,而 Docker 恰恰可以实现这一中级目标。具体来说,在开发和运维过程中,Docker 具有以下几个方面的优势:
更快的交付和部署:
使用 Docker,开发人员可以使用镜像来快速构建一套标准的开发环境;开发完之后,测试和运维人员可以直接使用完全相同的环境来部署代码。只要是开发测试过的代码,就可以确保在生产环境无缝运行。Docker 可以快速创建和删除容器,实现快速迭代,节约开发、测试及部署的时间。
更高效的利用资源:
运行 Docker 容器不需要额外的虚拟化管理程序的支持,Docker 是内核级的虚拟化, 可以实现更高的性能,同时对资源的额外需求很低,与传统的虚拟机方式相比,Docker 的性能要提高 1~ 2 个数量级。
更轻松的迁移和扩展:
Docker 容器几乎可以在任意的平台上运行,包括物理机、虚拟机、公有云、私有云、个人电脑等等,同时支持主流的操作系统发行版本。这种兼容性能让用户可以在不同的平台之间轻松的迁移应用。
更轻松的管理和更新:
使用 Dockerfile,只需要小小的配置修改,就可以替代以往大量的更新工作。所有的修改都以增量的方式被分发和更新,从而实现自动化并且高效的容器管理。
注意:docker虽然有在部署时有诸多的便利,但十分不推荐将数据直接保存在docker中。一种解决方案是使用docker运行数据库管理程序,但数据则另用服务器保存。
三、Docker与虚拟化
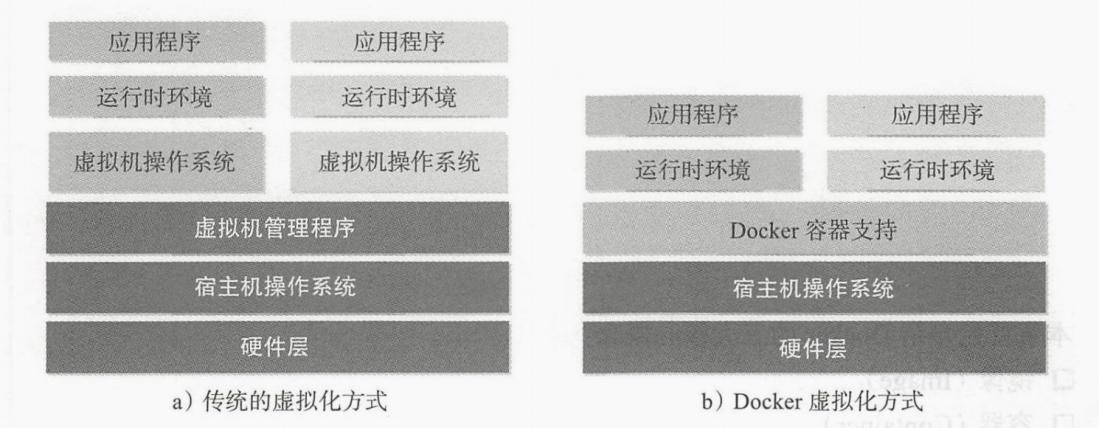
Docker 以及其他容器技术,都属于操作系统虚拟化范畴,操作系统细腻化最大的特点就是不需要额外的supervisor 支持。Docker 虚拟化方式之所以有众多优势,跟操作系统虚拟化技术自身的设计和实现分不开。传统方式是在硬件层面实现虚拟化,需要有额外的虚拟机管理应用和虚拟机操作系统层。Docker 容器时在操作系统层面实现虚拟化,直接复用本地主机的操作系统,因此更加轻量级。
四、docker与虚拟机比较
作为一种轻量级的虚拟化方式,Docker 在运行应用上跟传统的虚拟机的方式相比具有如下显著优势:
- Docker 容器启动很快,启动和停止可以实现秒级,相比传统的虚拟机方式(分钟级)要快速很多。
- Docker 容器对系统资源需求很少,一台主机上可以同时运行数千个 Docker 容器。
- Docker 通过类似 git 设计理念的操作来方便用户获取、分发和更新应用镜像,存储复用,增量更新。
- Docker 通过 Dockerfile 支持灵活的自动化创建和部署机制,可以提高工作效率,并标准化流程。
| *特性* | *容器* | *虚拟机* |
|---|---|---|
| 启动速度 | 秒级 | 分钟级 |
| 性能 | 接近原生 | 较好 |
| 内存 | MB 级 | GB 级 |
| 硬盘适应 | MB 级 | GB 级 |
| 运行密度 | 单台主机支持上千个 | 单台主机支持几个 |
| 隔离性 | 安全隔离 | 完全隔离 |
| 迁移 | 优秀 | 一般 |
五、docker三大概念
镜像(Image)
创建容器的模板,是一个静态的概念。通过镜像可以启动多个容器。能够被导出成文件传输至不同主机。
容器(Container)
镜像是静态的定义,容器是镜像运行时的实体。容器可以被创建、启动、停止、删除、暂停等。
仓库(Repository)
用来保存镜像的仓库。当我们构建好自己的镜像之后,需要存放在仓库中,当我们需要启动一个镜像时,可以在仓库中下载下来。
六、docker安装
Docker 引擎是使用 Docker 容器的核心组件,可以在主流的操作系统和云平台上使用,包括 Linux 操作系统、MacOSS 和 Windows 系统上。用户可以访问 Docker 官网(https://www.docker.com/get-started)去获取 Docker 安装包。
安装前环境准备
Docker 目前支持 CentOS 7 及以后版本。系统的要求跟 Ubuntu 情况类似,64 位操作系统,内核至少是 3.10以上。
查看内核:
# 方式一:
[root@localhost ~ ]# uname -a
Linux localhost.localdomain 3.10.0-1127.19.1.el7.x86_64 #1 SMP Tue Aug 25 17:23:54 UTC 2020 x86_64 x86_64 x86_64 GNU/Linux

# 方式二:
[root@localhost ~ ]# cat /proc/version
Linux version 3.10.0-1127.19.1.el7.x86_64 (mockbuild@kbuilder.bsys.centos.org) (gcc version 4.8.5 20150623 (Red Hat 4.8.5-39) (GCC) ) #1 SMP Tue Aug 25 17:23:54 UTC 2020
1、更新系统软件。
如果内核等级较低,内核也要一起升级,这步操作应该在系统刚安装完执行,生产环境不要执行,切记切记!
yum update -y --exclud=kernel*
# --exclud 排除相关软件包。
2、更换系统yum源。
- 使用官方源。
yum install -y yum-utils

yum-config-manager --add-repo \
    https://download.docker.com/linux/centos/docker-ce.repo
- 官方服务器在国外,如果比较慢,可以用阿里云镜像。
# 备份原来 YUN 源
cp /etc/yum.repos.d/CentOS-Base.repo /etc/yum.repos.d/CentOS-Base.repo.bak

# 更换 YUM 源
curl -o	/etc/yum.repos.d/CentOS-Base.repo https://mirrors.aliyun.com/repo/Centos-7.repo
安装docker-ce
yum install -y docker-ce
查看是否安装成功。
[root@localhost ~ ]# docker run hello-world
Unable to find image 'hello-world:latest' locally
latest: Pulling from library/hello-world
0e03bdcc26d7: Pull complete
Digest: sha256:e7c70bb24b462baa86c102610182e3efcb12a04854e8c582838d92970a09f323
Status: Downloaded newer image for hello-world:latest

Hello from Docker!
This message shows that your installation appears to be working correctly.

To generate this message, Docker took the following steps:
 1. The Docker client contacted the Docker daemon.
 2. The Docker daemon pulled the "hello-world" image from the Docker Hub.
    (amd64)
 3. The Docker daemon created a new container from that image which runs the
    executable that produces the output you are currently reading.
 4. The Docker daemon streamed that output to the Docker client, which sent it
    to your terminal.

To try something more ambitious, you can run an Ubuntu container with:
 $ docker run -it ubuntu bash

Share images, automate workflows, and more with a free Docker ID:
 https://hub.docker.com/

For more examples and ideas, visit:
 https://docs.docker.com/get-started/
设置开机自启动。
systemctl enable --now docker
查看docker信息。
docker info
安装前如果有旧版docker一定要先卸载再安装,否则会报错。
# 卸载旧版
yum remove docker \
              docker-client \
              docker-client-latest \
              docker-common \
              docker-latest \
              docker-latest-logrotate \
              docker-logrotate \
              docker-engine
获取帮助信息
使用--help选项可获取帮助信息。
# 获取docker帮助信息。
docker --help

# 获取某个子命令帮助信息。
docker images --help
七、镜像常用操作
获取镜像
镜像是运行容器的模板,官方 Docker Hub 仓库已经提供了许多镜像共开发者使用。如果我们需要获取某个镜像则可以去 docker 仓库下载所需的镜像。
格式:
docker pull [镜像仓库URL]/[命名空间名称]/[仓库名称]:[镜像版本号]
实例:
docker pull docker.io/library/busybox:latest
默认URL : docker.io
命名空间: library
仓库名称:busybox
版本号: latest

# 不指定则为默认仓库URL
docker pull busybox:latest
# 可以直接使用docker run,如果本地没有镜像会自动去仓库拉取。
[root@localhost ~ ]# docker run hello-world
Unable to find image 'hello-world:latest' locally
latest: Pulling from library/hello-world
0e03bdcc26d7: Pull complete
Digest: sha256:e7c70bb24b462baa86c102610182e3efcb12a04854e8c582838d92970a09f323
Status: Downloaded newer image for hello-world:latest
。。。省略。。。
下载的时候,我们可以看到有若干层组成,像 0e03bdcc26d7 这样的字符串是层的唯一 ID(实际上,完整的 ID 包括 256 比特, 64 个十六进制字符组成)。使用 docker pull 命令下载中会获取并输出镜像的各层信息。当不同的镜像包括相同的层的时候,本地仅存一份内容,减小存储空间。
查看镜像基本信息
使用 docker images 或 docker images ls 命令可以列举本地主机上已有镜像的基本信息。
[root@localhost ~ ]# docker images
REPOSITORY          TAG                 IMAGE ID            CREATED             SIZE
nginx-2             v1                  dc1178ad9ae1        17 hours ago        131MB
busybox             latest              dc3bacd8b5ea        8 days ago          1.23MB
mysql               latest              dd7265748b5d        11 days ago         545MB
hello-world         latest              bf756fb1ae65        11 months ago       13.3kB
| 字段 | 含义 |
|---|---|
| REPOSITORY | 仓库名称 |
| TAG | 版本号(latest:表示最新的版本) |
| IMAGE ID | 镜像ID |
| CREATED | 时间段 |
| SIZE | 镜像文件的体积 |
其中镜像的 ID 信息十分重要,它唯一标识了镜像。在使用镜像 ID 的时候,一般可以使用该 ID 的前若干个字符组成的可区分串来替代完整的 ID。
TAG 信息用于标记来自同一个仓库的不同镜像。TAG 在同一个仓库中是唯一的。
镜像大小信息只是表示了该镜像的逻辑体积大小,实际上由于相同的镜像层本地只会存储一份,物理上占用 的存储空间会小于各镜像逻辑体积之和。
常用选项:
-a : 显示所有的镜像(包括临时镜像文件)。
root@localhost ~ ]# docker images -a
REPOSITORY                TAG             IMAGE ID            CREATED             SIZE
<none>                    <none>          ab9924336485       10 hours ago        913MB
<none>                    <none>          c0fe586306a8       28 hours ago        913MB
centos7/nginx             v1              cc39a9a08eea       2 days ago          571MB
-q : 只显示镜像ID。
[root@localhost ~ ]# docker images -q
ab9924336485
c0fe586306a8
cc39a9a08eea
--digests=true|false:列出镜像的数字摘要值。
[root@localhost ~ ]# docker images --digests=true
REPOSITORY       TAG        DIGEST       IMAGE ID            CREATED             SIZE
registry.cn-shanghai.aliyuncs.com/sepzhan/zmc   v1                  sha256:a078c591c52e2f6404fe8930ee2f0b308746d6c19cd2cbb3a94a1919e7168910   2400030cc4a7      10 hours ago        913MB
查看镜像详细信息
使用 docker inspect 命令获取镜像的详细信息,包括 PID、作者、架构等等。
[root@localhost ~ ]# docker inspect nginx_2:v1
[
    {
        "Id": "sha256:2c45f814f15baad983b0825585331ccab975d559c92a3e0d8618a351910264c8",
        "RepoTags": [
            "nginx_2:v1",
            "nginx_3:v1"
        ],
        "RepoDigests": [],
        "Parent": "",
        "Comment": "Imported from -",
        "Created": "2020-12-02T03:05:35.99589032Z",
        。。。省略。。。
选项:
-f : 可以使用golang的模板获取所需信息。
# 查看镜像完整ID
[root@localhost ~ ]# docker inspect -f '{{.Id}}' nginx
sha256:bc9a0695f5712dcaaa09a5adc415a3936ccba13fc2587dfd76b1b8aeea3f221c
为镜像添加tag
为了方便后续工作中使用特定的镜像,还可以使用 docker tag 命令来为本地的镜像添加标签、修改镜像名称和版本号。
格式:
docker tag [原镜像仓库url]/[原镜像命名空间]/[原镜像仓库名称]:[版本号] \
					[新镜像仓库url]/[新镜像命名空间]/[新镜像仓库名称]:[版本号]
实例:
# 修改镜像名与TAG
[root@localhost ~ ]# docker tag nginx_2:v1 nginx_3:v1
[root@localhost ~ ]# docker images
REPOSITORY          TAG                 IMAGE ID            CREATED             SIZE
nginx_2             v1                  2c45f814f15b        58 seconds ago      131MB
nginx_3             v1                  2c45f814f15b        58 seconds ago      131MB

docker tag nginx:1.19.2   registry.cn-hangzhou.aliyuncs.com/alvinos/py15-nginx:1.19.2
修改tag后,源镜像还会存在,ID则为同一个,在删除镜像时若指定的是ID则会删除所有匹配到ID的镜像,若指定的是镜像名称:版本则仅删除指定名称的单个镜像。
查看镜像构建历史
格式:
docker history [镜像名字:镜像版本号 | 镜像ID]
实例:
[root@localhost ~ ]# docker history nginx:latest
IMAGE               CREATED             CREATED BY                                      SIZE                COMMENT
bc9a0695f571        7 days ago          /bin/sh -c #(nop)  CMD ["nginx" "-g" "daemon…   0B
<missing>           7 days ago          /bin/sh -c #(nop)  STOPSIGNAL SIGQUIT           0B
<missing>           7 days ago          /bin/sh -c #(nop)  EXPOSE 80                    0B
<missing>           7 days ago          /bin/sh -c #(nop)  ENTRYPOINT ["/docker-entr…   0B
<missing>           7 days ago          /bin/sh -c #(nop) COPY file:0fd5fca330dcd6a7…   1.04kB
。。。省略。。。
搜索镜像
在 docker 中搜索镜像主要使用 Search 子命令,默认只搜索 Docker Hub 官方镜像仓库中的镜像。
格式:
docker search [option] [所搜索的镜像名称] [keyword]
实例:
[root@Centos7 docker]# docker search python
NAME                             DESCRIPTION                                     STARS               OFFICIAL            AUTOMATED
python                           Python is an interpreted, interactive, objec…   5661                [OK]
django                           Django is a free web application framework, …   1021                [OK]
pypy                             PyPy is a fast, compliant alternative implem…   256                 [OK]
nikolaik/python-nodejs           Python with Node.js                             55                                      [OK]
joyzoursky/python-chromedriver   Python with Chromedriver, for running automa…   54                                      [OK]
输出信息:
| 字段 | 含义 |
|---|---|
| NAME | 仓库名称 |
| DESCRIPTION | 描述 |
| STARS | 收藏个数 |
| OFFICIAL | 是否是官方镜像 |
| AUTOMATED | 是否是自构建的镜像 |
常用选项:
-f : 过滤
# 搜索被收藏超过 300 个的并且关键词包括 Python 的镜像
docker search -f stars=300 python

# 搜索官方提供的带有 Redis 关键字的镜像
docker search -f is-official=true redis
NAME        DESCRIPTION              STARS            OFFICIAL            AUTOMATED
redis      Redis is an open source key-value store that…   8792                [OK]
--no-trunc: 不截断输出结果。
--limit: 限制输出结果。
删除镜像
使用docker rmi命令,相当于docker image rm命令。
格式:
docker rmi [option] [镜像名称:版本号 | 镜像ID]
实例:
[root@localhost ~ ]# docker images
REPOSITORY      TAG                 IMAGE ID            CREATED             SIZE
nginx_2          v1                 2c45f814f15b        32 minutes ago      131MB
nginx_3          v1                 2c45f814f15b        32 minutes ago      131MB
nginx            latest             bc9a0695f571        7 days ago          133MB

[root@localhost ~ ]# docker rmi nginx_3:v1
Untagged: nginx_3:v1
[root@localhost ~ ]# docker images
REPOSITORY      TAG                 IMAGE ID            CREATED              SIZE
nginx_2          v1                  2c45f814f15b        32 minutes ago      131MB
nginx            latest              bc9a0695f571        7 days ago          133MB
选项:
-f : 强制删除。镜像已经运行为容器则无法删除,可以使用-f强制删除。
[root@localhost ~ ]# docker ps
CONTAINER ID        IMAGE               COMMAND                  CREATED             STATUS              PORTS                   NAMES
9bf5ef44a314        nginx               "/docker-entrypoint.…"   51 minutes ago      Up 51 minutes       0.0.0.0:32770->80/tcp   funny_northcutt
[root@localhost ~ ]# docker rmi nginx:latest
Error response from daemon: conflict: unable to remove repository reference "nginx:latest" (must force) - container b1bc639c450e is using its referenced image bc9a0695f571
[root@localhost ~ ]# docker rmi -f nginx:latest
Untagged: nginx:latest
[root@localhost ~ ]# docker images
REPOSITORY          TAG                 IMAGE ID            CREATED             SIZE
nginx_2             v1                  2c45f814f15b        38 minutes ago      131MB
<none>              <none>              bc9a0695f571        7 days ago          133MB
清理镜像
使用一段时间之后,docker 会产生很多临时镜像文件,以及一些没有被使用的镜像, 我们可以通过 docker image prune 命令来进行清理。
格式:
docker image prune [选项]
选项:
- -a:清理所有没有当前使用的镜像,不仅是临时镜像。
- -f:强制删除。同rmi删除。
推送镜像
push将本地镜像推送到网上的个人的私有仓库中,例如阿里云的私有仓库。
格式:
docker push [镜像仓库URL]/[命名空间名称]/[仓库名称]:[版本号]
实例:
1、先登录私有仓库。
docker login --username=“登录名,最好纯英文” 仓库URL
2、将镜像改名。
# 私有仓库名最好设置为镜像名,在私有仓库内只能查看版本,而没有镜像名。
docker tag 本地镜像名 [镜像仓库URL]/[命名空间名称]/[仓库名称]:[版本号]
3、推送镜像,push一次只能推送一个镜像。
[root@Centos7 docker]# docker push registry.cn-hangzhou.aliyuncs.com/alvinos/py15-nginx:1.19.2
The push refers to repository [registry.cn-hangzhou.aliyuncs.com/alvinos/py15-nginx]
908cf8238301: Pushed
eabfa4cd2d12: Pushed
60c688e8765e: Pushed
f431d0917d41: Pushed
07cab4339852: Pushed
1.19.2: digest: sha256:794275d96b4ab96eeb954728a7bf11156570e8372ecd5ed0cbc7280313a27d19 size: 1362
构建镜像
构建镜像一般有三种情况,基于容器导入、基于本地模板导入、基于 Dockerfile 创建,本节主讲基于容器保存镜像和本地保存镜像文件导入。
1、保存容器为镜像
格式:
docker commit [选项] [容器ID | 容器名称:版本号]
选项:
- -a : 指定作者。
- -m : 简介。
- -p : 保存镜像时,容器暂停运行。
实例:
[root@localhost ~ ]# docker commit -a 'chirou' -m 'nginx_demo' -p 50cf6c577510
sha256:94738e2585944aa455e0c3e1bb174fba02dc18ea17135811d1b874ea0beaab7e
[root@localhost ~ ]# docker images
REPOSITORY               TAG             IMAGE ID            CREATED             SIZE
<none>                  <none>           94738e258594       4 seconds ago		 133MB

# 使用inspect查看详细信息。
[root@localhost ~ ]# docker inspect 94738e258594 | grep chirou
        "Author": "chirou",
[root@localhost ~ ]# docker inspect 94738e258594 | grep nginx_demo
        "Comment": "nginx_demo",
2、导入与导出容器
某些时候,需要将容器或镜像保存成文件从一个系统迁移到另外一个系统,此时可以使用 Docker 的导入和导出功能,这也是Docker 自身提供的一个重要特性。导出的文件是一个tar包,可以通过压缩命令进行压缩,然后进行传输。
export和import
export将容器导出到标准输出,可以使用输出重定向或-o选项至文件中。
格式:
docker export [容器名或ID] > [文件名称]
实例:将nginx容器导出。
[root@localhost ~ ]# docker export nginx > export_nginx.tar
import 是将export导出的文件导入为镜像,可以自定义导入的镜像名称和版本号。
import虽然可以导入save保存的文件但是导入后无法运行。
格式:
docker import [文件名称] [自定义镜像名称]:[版本号]
实例:将上面导出的文件导入。
[root@localhost ~ ]# docker import export_nginx.tar import_nginx:v1
87b71baffd0c8e5b2b98884caee97a9d3abcee444e9bad10c865db0daaafa024

[root@localhost ~ ]# docker images
REPOSITORY             TAG              IMAGE ID            CREATED             SIZE
import_nginx           v1              87b71baffd0c        44 seconds ago      131MB
nginx                 latest           bc9a0695f571        10 days ago         133MB

# 通过export导出的文件,使用import导入后无法直接运行。
[root@localhost mnt ]# docker run -d import_nginx:v1
docker: Error response from daemon: No command specified.
可以看到,通过export导出的容器文件,再使用import导入后,SIZE是要比源镜像小的。这是因为export导出的是容器,并没有源镜像的全部内容,比如会丢失构建历史记录和元数据信息等文件,相当于仅保存容器当时的快照状态,这会导致export导出的文件无法直接通过run命令运行,解决方法:
运行时通过-it选项,给容器分配一个伪终端。
docker run -dit import_nginx:v1 sh
推荐使用commit来保存容器,然后再使用save保存,能避免上述问题。
3、导入与导出镜像
save和load
save能将镜像完整的保存下来,包括镜像ID和构建历史。一样可用输出重定向或-o选项保存至tar包中,并且save支持将多个镜像保存至一个tar包中。
格式:
docker save [镜像名或ID ...] > [压缩包名称]
docker save -o [压缩包名称] [镜像名称或ID ...]
实例:
# 不指定版本号则默认为latest,表示最新版。
[root@localhost ~ ]# docker save busybox nginx > box_nginx.tar
[root@localhost ~ ]# ll
-rw-r--r--  1 root root 138553344 12月  5 19:30 box_nginx.tar
load是将save保存的镜像文件载入为镜像。save保存时若使用镜像ID保存镜像,导入时则没有镜像名称,load在导入时也不能自定义镜像名称,可以在导入后使用docker tag命令修改。
格式:
docker load < [压缩包名称]
<相当于-i选项,指定导入的文件,默认是STDIN。
实例:
[root@localhost ~ ]# docker save dc3bacd8b5ea bc9a0695f571 > box_nginx.tar

# 将原镜像删除
[root@localhost ~ ]# docker rmi bc9a0695f571 dc3bacd8b5ea
# 载入镜像
[root@localhost ~ ]# docker load < box_nginx.tar
Loaded image ID: sha256:bc9a0695f5712dcaaa09a5adc415a3936ccba13fc2587dfd76b1b8aeea3f221c
Loaded image ID: sha256:dc3bacd8b5ea796cea5d6070c8f145df9076f26a6bc1c8981fd5b176d37de843

# 此时ID还是原来的,但tag信息都为none
[root@localhost ~ ]# docker images
<none>              <none>              bc9a0695f571        10 days ago         133MB
<none>              <none>              dc3bacd8b5ea        11 days ago        1.23MB
八、容器常用操作
查看容器
ps
该子命令能查看当前正在运行的容器。
实例:
[root@localhost ~ ]# docker ps
CONTAINER ID     IMAGE     COMMAND     CREATED      STATUS       PORTS           NAMES
b1a13dfe7105    nginx     "/docker-entrypoint.…"   3 seconds ago    Up 2 seconds        0.0.0.0:32774->80/tcp   reverent_maxwell
如果要查看已停止的容器则使用 -a 选项。该选项能查看所有容器,包括正在运行和已经停止的。
# 先停止该容器。
[root@localhost ~ ]# docker stop reverent_maxwell
[root@localhost ~ ]# docker ps -a
CONTAINER ID     IMAGE      COMMAND          CREATED      STATUS      PORTS      NAMES
b1a13dfe7105   nginx     "/docker-entrypoint.…"   2 minutes ago     Exited (0) 6  conds ago          reverent_maxwell
-q:仅显示ID信息。
[root@localhost ~ ]# docker ps -aq
b1a13dfe7105
inspect
该子命令能查看该容器详细信息。
[root@localhost ~ ]# docker inspect b1a13dfe7105
[
    {
        "Id": "b1a13dfe71056d8c02fb90e52a503bbedc60301f62e9c49604fa86c2258fd310",
        "Created": "2020-12-05T12:18:17.241753416Z",
        "Path": "/docker-entrypoint.sh",
        "Args": [
            "nginx",
            "-g",
            "daemon off;"
        。。。省略行。。。
同样支持 -f 选项过滤指定信息。
[root@localhost ~ ]# docker inspect -f '{{.Id}}' b1a13dfe7105
b1a13dfe71056d8c02fb90e52a503bbedc60301f62e9c49604fa86c2258fd310
查看容器日志
格式:
docker logs [option] [容器名称或ID]
- -f:跟踪日志输出。类似tail -f命令。
- --since:显示某个开始时间的所有日志。
- -t:显示时间戳。
- --tail N:仅列出最新N条容器日志。
实例:
[root@localhost ~ ]# docker logs b1a13dfe7105
/docker-entrypoint.sh: /docker-entrypoint.d/ is not empty, will attempt to perform configuration
/docker-entrypoint.sh: Looking for shell scripts in /docker-entrypoint.d/
/docker-entrypoint.sh: Launching /docker-entrypoint.d/10-listen-on-ipv6-by-default.sh
10-listen-on-ipv6-by-default.sh: Getting the checksum of /etc/nginx/conf.d/default.conf
显示时间戳:
[root@localhost ~ ]# docker logs -t b1a13dfe7105
2020-12-05T12:18:17.500960288Z /docker-entrypoint.sh: /docker-entrypoint.d/ is not empty, will attempt to perform configuration
2020-12-05T12:18:17.500995723Z /docker-entrypoint.sh: Looking for shell scripts in /docker-entrypoint.d/
。。。省略行。。。
仅查看3条日志:
# 仅查看3条日志。
[root@localhost ~ ]# docker logs --tail 3 b1a13dfe7105
192.168.112.1 - - [05/Dec/2020:13:46:53 +0000] "GET /favicon.ico HTTP/1.1" 404 153 "http://192.168.112.129:32775/" "Mozilla/5.0 (Windows NT 6.1; Win64; x64; rv:83.0) Gecko/20100101 Firefox/83.0" "-"
192.168.112.1 - - [05/Dec/2020:13:46:54 +0000] "GET / HTTP/1.1" 304 0 "-" "Mozilla/5.0 (Windows NT 6.1; Win64; x64; rv:83.0) Gecko/20100101 Firefox/83.0" "-"
192.168.112.1 - - [05/Dec/2020:13:46:55 +0000] "GET / HTTP/1.1" 304 0 "-" "Mozilla/5.0 (Windows NT 6.1; Win64; x64; rv:83.0) Gecko/20100101 Firefox/83.0" "-"
查看2020年12月5日之后的日志:
# 日期格式不能错误。
[root@localhost ~ ]# docker logs --since="2020-12-04" b1a13dfe7105
/docker-entrypoint.sh: /docker-entrypoint.d/ is not empty, will attempt to perform configuration
/docker-entrypoint.sh: Looking for shell scripts in /docker-entrypoint.d/
/docker-entrypoint.sh: Launching /docker-entrypoint.d/10-listen-on-ipv6-by-default.sh
10-listen-on-ipv6-by-default.sh: Getting the checksum of /etc/nginx/conf.d/default.conf
10-listen-on-ipv6-by-default.sh: Enabled listen on IPv6 in /etc/nginx/conf.d/default.conf
/docker-entrypoint.sh: Launching /docker-entrypoint.d/20-envsubst-on-templates.sh
/docker-entrypoint.sh: Configuration complete; ready for start up
/docker-entrypoint.sh: /docker-entrypoint.d/ is not empty, will attempt to perform configuration
。。。省略行。。。
运行容器
docker run能将一个镜像运行为容器。容器当中至少有一个进程运行在前台。
格式:
docker run [选项] [镜像名称|镜像ID] [容器启动后内部执行的命令]
选项:
-d : 以守护进程的方式运行。
-p : 指定端口映射。
# 格式
docker run -p 宿主主机端口:容器向外暴露的端口 [镜像名称:tag | 镜像ID]
docker run -d -p 8899:80 nginx:1.19.2
-P : 随机端口映射。
docker run -d -P nginx:1.19.2
--name: 指定容器的名称,同一台宿主主机上的docker名称不能重复。
docker run -d --name 自定义容器名 -P nginx:1.19.2
--rm:当一个容器停止后,就立即删除。
docker run -d --rm nginx:1.19.2
-v: 映射存储卷,可以映射文件及文件夹。
映射后在宿主机文件内的修改都会映射到容器内的文件中。
docker run -d -v 宿主机文件路径:容器内文件路径 nginx:1.19.2
-i : 打开标准输出。
-t : 创建一个伪准端。通常与-i选项一起使用。
# 运行容器后执行bash命令。
docker run -ditP nginx bash
-e : 在容器内设置一个环境变量。
docker run -d -e NGINX_NAME=nginx nginx:1.19.2
--network 指定网络模式,下篇再讲docker网络。
--link:链接到另一个容器。
-h:指定容器内的主机名。
停止、启动、重启容器
stop能将一个正在运行的容器停止。
docker stop [容器名称 | 容器ID]
start将被stop停止的容器启动。
docker start [容器名称 | 容器ID]
restart重启容器。
当修改了容器内某些配置文件后,可以使用此命令使配置生效。
docker restart [容器名称 | 容器ID]
进入容器
在使用容器的过程中,我们难免需要进入容器进行排查问题。下面来介绍进入容器的四种方式。
1、attach
通过管道,连接容器内PID=1的进程,容器至少有一个进程运行前台。attach 是最早 docker 官方推出的进入容器的命令了,不过使用该命令有一个问题。当多个窗口同时使用该命令进入该容器时,所有的窗口都会同步显示。如果有一个窗口阻塞了,那么其他窗口也无法再进行操作,当所有窗口退出时,容器结束。
docker attach [容器名或ID]
2、exec
继attach 之后,exec 是官方推出的有一个新的进入容器的命令,这也是目前推荐使用的进入容器的方式。这个命令相当于在容器中执行一个命令。
docker exec [参数] [容器名或ID] [命令]
实例:
[root@localhost ~ ]# docker exec -it reverent_maxwell sh
用这种方式相当于进入该容器,并且在退出时不会将容器也停止。
退出容器可使用exit命令或Ctrl+d快捷键。
3、nsenter
进入容器中,但不进入容器内的进程。Nsenter 是 Linux 提供的命令。需要配合 docker inspect 来使用(早期没有 exec 命令时,企业当中最长用的方式之一),Docker 是用 golang 语言开发,所以它也支持 go 语言的模板语法。
[root@localhost ~ ]# nsenter --target $( docker inspect -f {{.State.Pid}} nginxv1 ) --mount --uts --ipc --net --pid
mesg: ttyname failed: No such device root@6f99ae8757f7:/#
4、ssh
在镜像(或容器) 中安装 SSH Server,这样就能保证多人进入容器且相互之间不受干扰了,相信大家在当前的生产环境中(没有使用 Docker 的情况)也是这样做的。但是使用了 Docker 容器之后不建议使用 ssh 进入到 Docker 容器内。
复制文件
复制命令类似于 Linux 系统中的 scp 命令,是将宿主主机上的内容上传到容器中,也可能是将容器中的文件下载到宿主主机中。
从容器内复制文件到宿主主机。
docker cp [容器ID:容器内文件路径] 宿主主机路径
从宿主主机复制文件到容器。
docker cp 宿主主机路径 [容器ID:容器内文件路径]
实例:
# 复制到容器内根目录。
[root@localhost ~ ]# docker cp conf.d/ b1a13dfe7105:/
# 使用exec在容器内执行ls命令。
[root@localhost ~ ]# docker exec b1a13dfe7105 ls /
bin
boot
conf.d
删除容器
stop命令仅仅是将容器停止,若要删除容器则使用docker rm子命令。
格式:
docker rm [option] [镜像名称或ID]
rm能删除已停止的容器,对于正在运行的容器可以使用-f选项强制删除,一般不推荐直接将一个正在运行的容器强制删除。
实例:
# 查看正在运行的容器。
[root@localhost ~ ]# docker ps
CONTAINER ID        IMAGE               COMMAND                  CREATED             STATUS              PORTS                NAMES
1a9b4ae8766b        nginx               "/docker-entrypoint.…"   About an hour ago   Up About an hour    0.0.0.0:80->80/tcp   pedantic_hopper
# 直接使用rm无法删除。
[root@localhost ~ ]# docker rm 1a9b4ae8766b
Error response from daemon: You cannot remove a running container 1a9b4ae8766b9266f0e5256df1ac56b9647483815f60b447ae9f15d6c3355dec. Stop the container before attempting removal or force remove
# 使用-f选项可以强制删除。
[root@localhost ~ ]# docker rm -f 1a9b4ae8766b
1a9b4ae8766b
使用docker ps -a与rm和stop命令配合,可以达到一个批量处理容器的方式:
# 停止所有正在运行的容器
docker stop $(docker ps)

# 删除所有容器,包括正在运行的容器
docker rm -f $(docker ps -a)
九、Dockerfile构建镜像
Dockerfile 由一行行命令语句组成, 并且支持以#开头的注释行。一般而言, Dockerfile 主体内容分为四部分:基础镜像信息、 维护者信息、 镜像操作指令和容器启动时执行指令。
Docker 以从上到下的顺序运行 Dockerfile 的指令。为了指定基本映像,第一条指令必须是 FROM。一个声明以#字符开头则被视为注释。可以在 Docker 文件中使用 RUN,CMD,FROM,EXPOSE,ENV 等指令。
| 指令 | 含义 |
|---|---|
| FROM | 指定基础镜像,必须为第一个命令 |
| MAINTAINER | 维护者信息 |
| RUN | 构建镜像docker build时执行的命令 |
| ADD | 将本地文件添加到容器中,tar 类型文件会自动解压(网络压缩资源不会被解压) |
| COPY | 功能类似ADD,但是是不会自动解压文件,也不能访问网络资源 |
| CMD | 在docker run时会执行的命令,如果存在多个则仅最后一个生效。 |
| LABEL | 用于为镜像添加元数据 |
| ENV | 设置环境变量 |
| EXPOSE | 指定于外界交互的端口 |
| VOLUME | 用于指定持久化目录 |
| WORKDIR | 工作目录,类似于cd命令 |
| ARG | 用于指定传递给构建运行时的变量 |
| ONBUILD | 用于设置镜像触发器 |
FROM
格式:
	FROM <image>
    FROM <image>:<tag>
    FROM <image>@<digest>
示例:
	FROM mysql:5.6
注: tag 或 digest 是可选的,如果不使用这两个值时,会使用 latest 版本的基础镜像
MAINTAINER
格式:
	MAINTAINER <name>
示例:
    MAINTAINER Jasper Xu MAINTAINER sorex@163.com
    MAINTAINER Jasper Xu <sorex@163.com>
RUN
RUN 用于在镜像容器中执行命令,一个Dockerfile文件内可以有多个RUN其有以下两种命令执行方式:
shell 执行
	格式:RUN <command>
exec 执行
	格式:RUN ["executable", "param1", "param2"]
	示例:
		 RUN ["executable", "param1", "param2"]
		 RUN apk update RUN ["/etc/execfile", "arg1", "arg1"]
注: RUN 指令创建的中间镜像会被缓存,并会在下次构建中使用。如果不想使用这些缓存镜像,可以在构建 时指定--no-cache 参数,如:docker build --no-cache
ADD
格式:
    ADD <src>... <dest>
    ADD ["<src>",... "<dest>"] 用于支持包含空格的路径
示例:
    ADD hom* /mydir/	# 添加所有以"hom"开头的文件
    ADD hom?.txt /mydir/	# ? 替代一个单字符,例如:"home.txt"
    ADD test relativeDir/	# 添加 "test" 到 `WORKDIR`/relativeDir/ ADD test /absoluteDir/	# 添加 "test" 到 /absoluteDir/
COPY
指令:COPY
功能描述:复制文件到镜像中。
语法:COPY < src>… < dest>|[“< src>”,… “< dest>”]
提示:指令逻辑和 ADD 十分相似,同样 Docker Daemon 会从编译目录寻找文件或目录,dest 为镜像中的绝对路径或者相对于 WORKDIR 的路径。
CMD
格式:
    CMD ["executable","param1","param2"] (执行可执行文件,优先)
    CMD ["param1","param2"] (设置了 ENTRYPOINT,则直接调用 ENTRYPOINT 添加参数)
    CMD command param1 param2 (执行 shell 内部命令)
示例:
    CMD echo "This is a test." | wc -
    CMD ["/usr/bin/wc","--help"]
    注:	CMD 不同于 RUN,CMD 用于指定在容器启动时所要执行的命令,而 RUN 用于指定镜像构建时所要执行的命令。
LABEL
格式:
	LABEL <key>=<value> <key>=<value> <key>=<value> ...
示例:
	LABEL version="1.0" description="这是一个 Web 服务器" by="IT 笔录"
注:
使用 LABEL 指定元数据时,一条 LABEL 指定可以指定一或多条元数据,指定多条元数据时不同元数据之间通过空格分
隔。推荐将所有的元数据通过一条 LABEL 指令指定,以免生成过多的中间镜像。
ENV
格式:
	ENV <key> <value>
	#<key>之后的所有内容均会被视为其<value>的组成部分,因此,一次只能设置一个变量
	ENV <key>=<value> ...
	#可以设置多个变量,每个变量为一个"<key>=<value>"的键值对,如果<key>中包含空格,可以使用\来进行转义,也可以通过""来进行标示;另外,反斜线也可以用于续行
示例:
    ENV myName John Doe
    ENV myDog Rex The Dog
    ENV myCat=fluffy
EXPOSE
格式:
	EXPOSE <port> [<port>...]
示例:
    EXPOSE 80 443
    EXPOSE 8080
    EXPOSE 11211/tcp 11211/udp
注:
EXPOSE 并不会让容器的端口访问到主机。要使其可访问,需要在 docker run 运行容器时通过-p 来发布这些端口,或通过-P 参数来发布 EXPOSE 导出的所有端口
VOLUME
格式:
	VOLUME ["/path/to/dir"]
示例:
    VOLUME ["/data"]
    VOLUME ["/var/www", "/var/log/apache2", "/etc/apache2"]

注:
# 1、卷可以容器间共享和重用。
# 2、容器并不一定要和其它容器共享卷。
# 3、修改卷后会立即生效。
# 4、对卷的修改不会对镜像产生影响。
# 5、卷会一直存在,直到没有任何容器在使用它。
WORKDIR
格式:
	WORKDIR /path/to/workdir
示例:
    WORKDIR /a		(这时工作目录为/a)
    WORKDIR b	(这时工作目录为/a/b)
    WORKDIR c	(这时工作目录为/a/b/c)
注:
通过 WORKDIR 设置工作目录后,Dockerfile 中其后的命令 RUN、CMD、ENTRYPOINT、ADD、COPY
等命令都会在该目录下执行。在使用 docker run 运行容器时,可以通过-w 参数覆盖构建时所设置的工作目录。
ARG
格式:
	ARG <name>[=<default value>]
示例:
	ARG site
	ARG build_user=www
ONBUILD
格式:
示例:
    ONBUILD ADD . /app/src
    ONBUILD RUN /usr/local/bin/python-build --dir /app/src
注:
当所构建的镜像被用做其它镜像的基础镜像,该镜像中的触发器将会被钥触发。
构建镜像build
在 Dockerfile 文件的存放目录下,使用docker build子命令执行构建动作。
格式:
docker build -t [自定义镜像名称:tag] .
-t:是指定镜像名称和tag。
点.代表本次执行的上下文路径。
上下文路径,是指 docker 在构建镜像,有时候想要使用到本机的文件(比如复制),docker build 命令得知这个路径后,会将路径下的所有内容打包。
由于 docker 的运行模式是 C/S。我们本机是 C,docker 引擎是 S。实际的构建过程是在 docker 引擎下完成的,所以这个时候无法用到我们本机的文件。这就需要把我们本机的指定目录下的文件一起打包提供给 docker 引擎使用。
如果未说明最后一个参数,那么默认上下文路径就是 Dockerfile 所在的位置。
注意:上下文路径下不要放无用的文件,因为会一起打包发送给 docker 引擎,如果文件过多会造成过程缓慢。
构建镜像实例
构建一个Django容器
1、在宿主机上安装好python3以及Django。
yum install -y python3
pip3 install django -i https://mirrors.aliyun.com/pypi/simple --trusted-host aliyun.com/pypi/simple
2、创建一个app项目。
django-admin startproject app
cd app
django-admin startapp application
3、修改settings.py文件。
cd app
[root@localhost app ]# vim settings.py

。。。省略行。。。
# 在中括号内插入'*'
ALLOWED_HOSTS = ['*']

。。。省略行。。。

# 将以下几行注释掉。
DATABASES = {
#    'default': {
#        'ENGINE': 'django.db.backends.sqlite3',
#        'NAME': BASE_DIR / 'db.sqlite3',
#    }
}
。。。省略行。。。
4、在宿主机系统上测试运行。
cd ..
python3 manage.py runserver 0.0.0.0:8000
5、编辑Dockerfile文件
[root@localhost ~ ]# vim Dockerfile

# 基于python3.6构建Django
FROM python:3.6
# 安装Django
RUN pip3 install django==2.2.2 -i https://mirrors.aliyun.com/pypi/simple/ --trusted-host mirrors.aliyun.com/pypi/simple/
# 将宿主机生成的app目录复制到镜像内。
COPY app /root/
# 镜像启动为容器后,在容器内启动Django。
CMD cd /root && python3 manage.py runserver 0.0.0.0:8000
6、构建镜像。
docker build -t python3/django:v1 .
7、启动镜像,指定映射端口。
docker run -dit -p 3800:8000 python3/django:v1
8、测试可正常访问。
[root@localhost ~ ]# curl 127.0.0.1:3800

<!doctype html>
<html>
    <head>
        <meta charset="utf-8">
        <title>Django: the Web framework for perfectionists with deadlines.</title>
        <meta name="viewport" content="width=device-width, initial-scale=1">
        <link rel="stylesheet" type="text/css" href="/stat
        。。。省略行。。。
构建一个NGINX容器
1、在宿主机上配置好nginx的yum源文件。
更换yum源。
vim nginx.repo
[nginx-stable]
name=nginx stable repo
baseurl=http://nginx.org/packages/centos/$releasever/$basearch/
gpgcheck=1
enabled=1
gpgkey=https://nginx.org/keys/nginx_signing.key
module_hotfixes=true

[nginx-mainline]
name=nginx mainline repo
baseurl=http://nginx.org/packages/mainline/centos/$releasever/$basearch/
gpgcheck=1
enabled=0
gpgkey=https://nginx.org/keys/nginx_signing.key
module_hotfixes=true
2、编辑Dockerfile文件。
[root@localhost ~ ]# vim Dockerfile

# 指定依赖镜像
FROM centos:7

# 安装nginx基础环境。
RUN yum install -y  yum-utils
# 将yum源文件复制到镜像内。
ADD nginx.repo /etc/yum.repos.d/
# 建立yum元数据缓存
RUN yum makecache
# 安装nginx
RUN yum install -y nginx

# 容器启动时启动nginx
CMD nginx -g 'daemon off;'
3、构建镜像
docker build -t centos7/nginx:v1 .
4、运行镜像为容器。
docker run -d -p 8888:80 --name my_nginx centos7/nginx:v1
5、测试是否能访问。
[root@localhost ~ ]# curl 127.0.0.1:8888
<!DOCTYPE html>
<html>
<head>
<title>Welcome to nginx!</title>
<style>
    body {
        width: 35em;
        margin: 0 auto;
        font-family: Tahoma, Verdana, Arial, sans-serif;
        。。。省略行。。。
使用NGINX代理Django
1、本地创建default.conf文件。
vim default.conf
server {
    listen       80;
    server_name  localhost;

    #charset koi8-r;
    #access_log  /var/log/nginx/host.access.log  main;

    location / {
        proxy_pass http://192.168.112.129:3800/;
        index  index.html index.htm;
    }

}
2、将本地文件复制到容器中。
docker cp default.conf my_nginx:/etc/nginx/conf.d/
3、重启容器。
docker restart my_nginx
4、测试访问nginx
[root@localhost ~ ]# curl 127.0.0.1:8888

<!doctype html>
<html>
    <head>
        <meta charset="utf-8">
        <title>Django: the Web framework for perfectionists with deadlines.</title>
        <meta name="viewport" content="width=device-width, initial-scale=1">
        <link rel="stylesheet" type="text/css" href="/static/admin/css/fonts.css">
        <style type="text/css">
将以上镜像上传到镜像仓库
1、登录仓库。
docker login --username=sepzhan registry.cn-shanghai.aliyuncs.com

registry.cn-hangzhou.aliyuncs.com/dock_tst/test_cr:[镜像版本号]
2、更改镜像名。
# django改为v1
docker tag python3_django:v1 registry.cn-shanghai.aliyuncs.com/sepzhan/zmc:v1
# nginx改为v2
docker tag centos7/nginx:v1 registry.cn-shanghai.aliyuncs.com/sepzhan/zmc:v2
3、推送镜像至仓库。
# 推送Django镜像
docker push registry.cn-shanghai.aliyuncs.com/sepzhan/zmc:v1
# 推送nginx镜像
docker push registry.cn-shanghai.aliyuncs.com/sepzhan/zmc:v2

 浙公网安备 33010602011771号