源码角度分析多线程并发情况下数据异常回滚方案
一、 多线程并发情况下数据异常回滚解决方案
在需要多个没有前后顺序的数据操作情况下,一般我们可以选择使用并发的形式去操作,以提高处理的速度,但并发情况下,我们使用 @Transactional 还能解决事务回滚问题吗。
例如有下面表结构:
CREATE TABLE `test` (
  `id` int NOT NULL AUTO_INCREMENT,
  `name` varchar(255) DEFAULT NULL,
  `thread_name` varchar(255) DEFAULT NULL,
  PRIMARY KEY (`id`)
) ENGINE=InnoDB DEFAULT CHARSET=utf8mb4 COLLATE=utf8mb4_0900_ai_ci;
假如需要进行两个写操作,并且写没有先后顺序之分,我们可以开个线程并发去写,这里以 JdbcTemplate 操作为例,使用其他DB工具也是一样的效果,例如:
@Service
public class TestService {

    @Resource
    JdbcTemplate jdbcTemplate;

    @Transactional(rollbackFor = Exception.class)
    public void test() {
        // 放入子线程
        CompletableFuture.runAsync(() -> {
            jdbcTemplate.update("insert into test(name,thread_name) value(? , ?)"
                    , new Object[]{LocalDateTime.now().toString(), Thread.currentThread().getName()});
        });
        // ....其他操作...
        jdbcTemplate.update("insert into test(name,thread_name) value(? , ?)"
                , new Object[]{LocalDateTime.now().toString(), Thread.currentThread().getName()});
        // ....其他操作...
    }
}
数据库成功写入了两条数据,假如在做其他操作时,发生了异常:
@Service
public class TestService {

    @Resource
    JdbcTemplate jdbcTemplate;

    @Transactional(rollbackFor = Exception.class)
    public void test() {
        // 放入子线程
        CompletableFuture.runAsync(() -> {
            jdbcTemplate.update("insert into test(name,thread_name) value(? , ?)"
                    , new Object[]{LocalDateTime.now().toString(), Thread.currentThread().getName()});
        });
        // ....其他操作...
        jdbcTemplate.update("insert into test(name,thread_name) value(? , ?)"
                , new Object[]{LocalDateTime.now().toString(), Thread.currentThread().getName()});
        // ....其他操作...
        int a = 1 / 0;
    }
}
运行后可以看到已经抛出了异常:
查看数据库:

发现还是写入了一条数据,线程中的操作并没有回滚,但主线程的回滚了,既然一个回滚一个没有回滚肯定用的不是同一个数据库连接,这里源码看下 JdbcTemplate 从哪里获取的数据库连接:
进到JdbcTemplate 的 update(String sql, @Nullable Object... args) 方法中:
调用了当前类的 update(String sql, @Nullable PreparedStatementSetter pss) 方法中,最终调用的是当前类的 update(final PreparedStatementCreator psc, @Nullable final PreparedStatementSetter pss) 方法: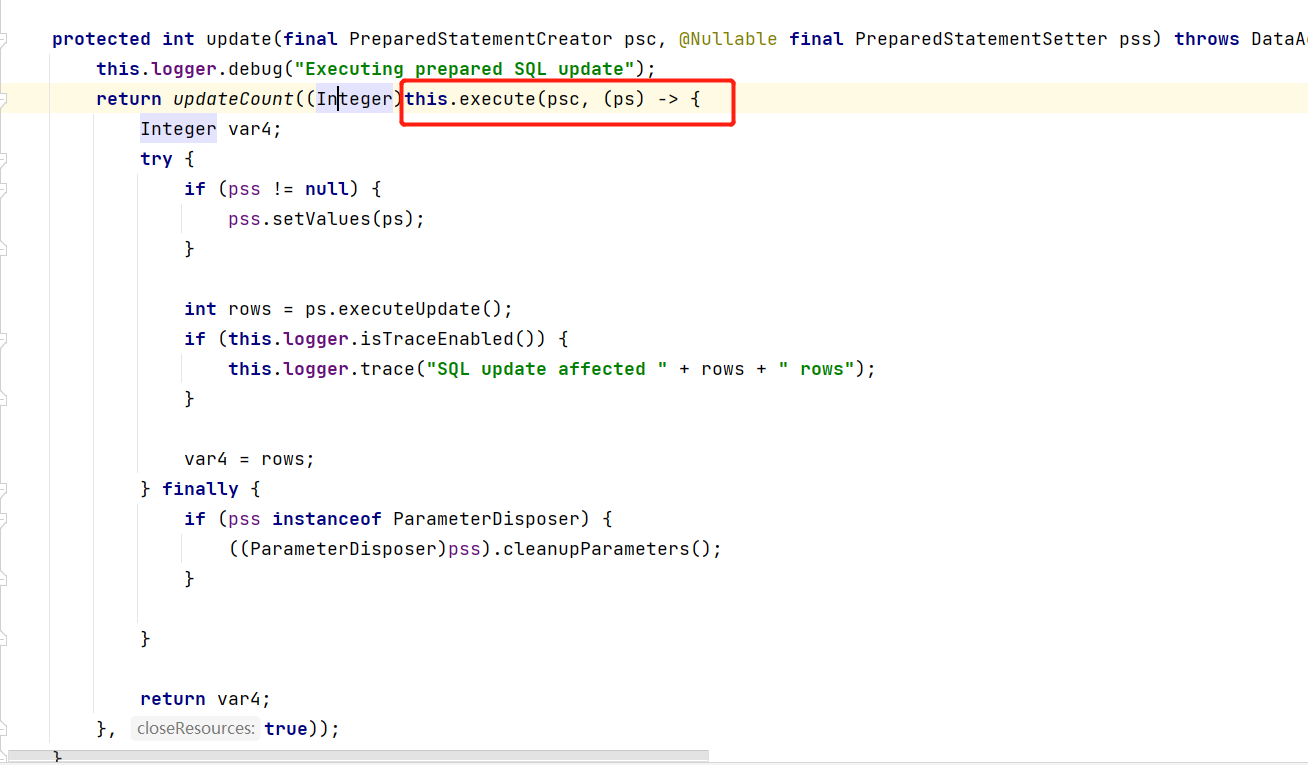
这里主要使用了 execute(StatementCallback<T> action) 方法,进到该方法中:
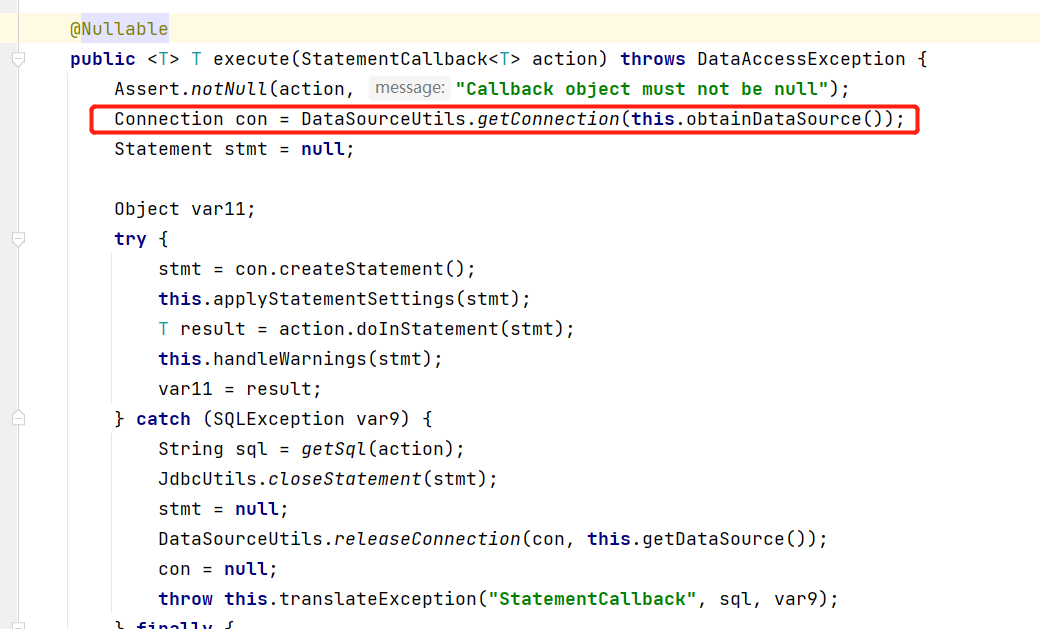
这里可以看出通过 DataSourceUtils.getConnection 方法获取数据库连接,进到该方法中:
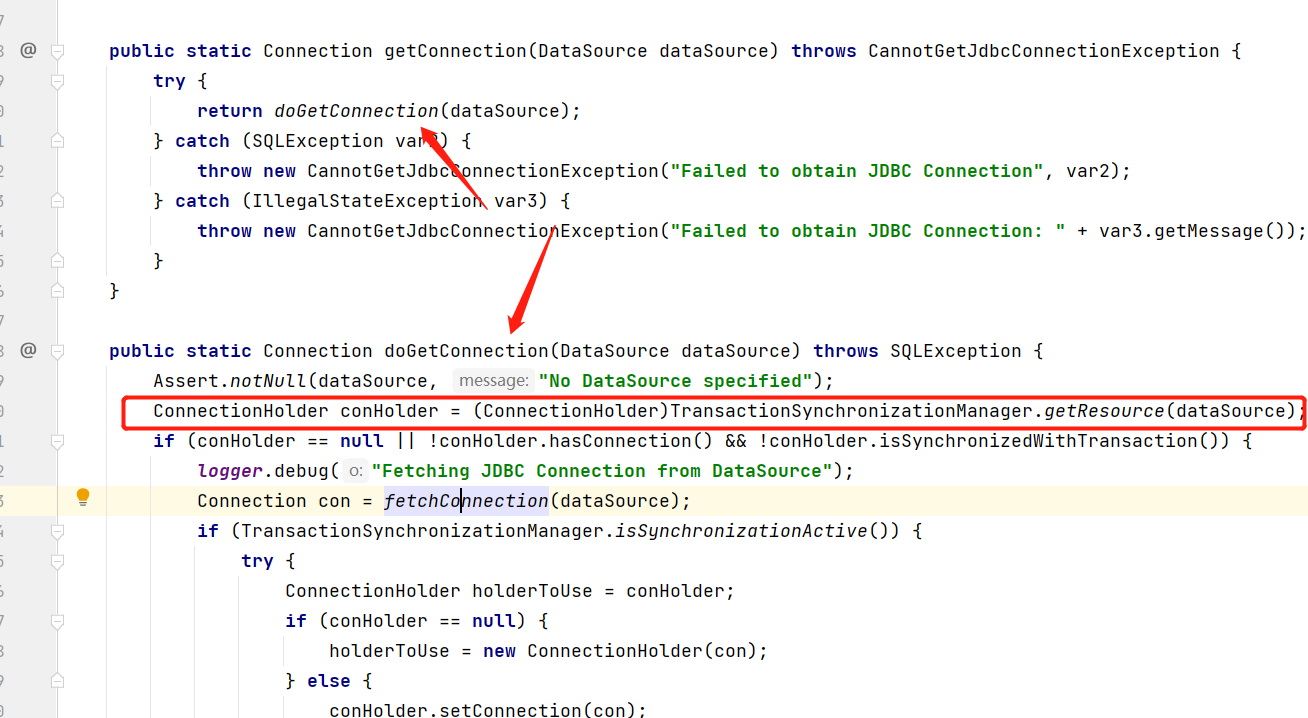
这里看到 TransactionSynchronizationManager 是不是有点熟悉,在本专栏前面讲解@Transactional 声明式事务执行源码分析时,其中开启事务的逻辑中,就是使用 TransactionSynchronizationManager 获取的数据库连接,如果对这部分还不了解,可以看下下面这篇文章:
其实在String生态中,获取数据库连接基本都默认使用了 TransactionSynchronizationManager。
这里也来看下当 @Transactional 注解情况下开启事务时获取连接的逻辑,在DataSourceTransactionManager 下的 doGetTransaction 方法下:
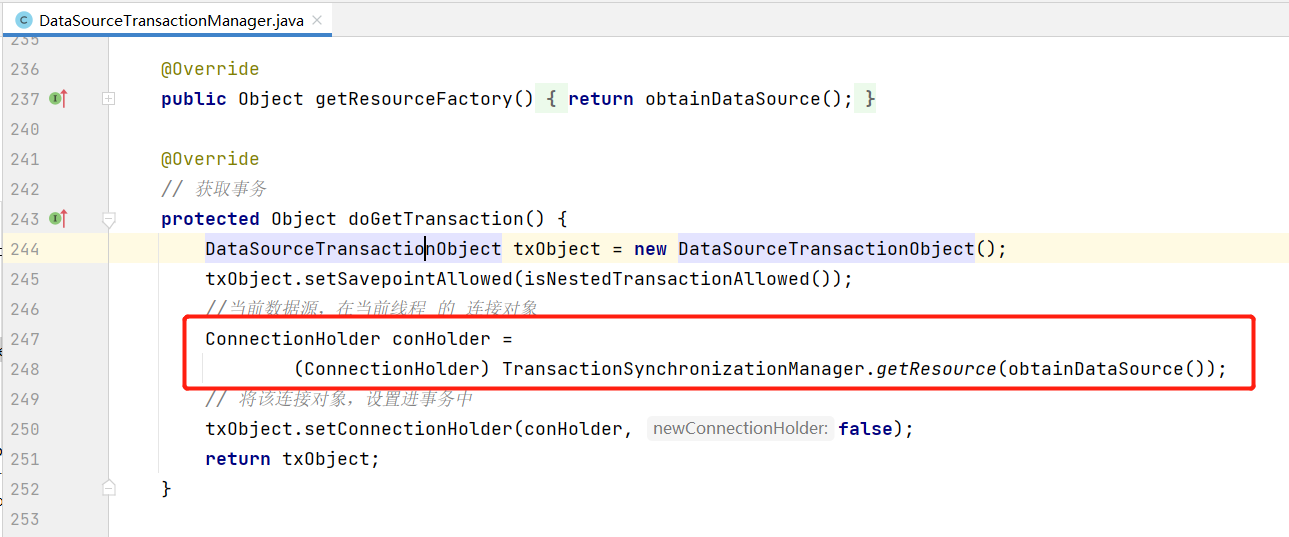
可以看到这里同样也是使用的 TransactionSynchronizationManager 获取连接。
下面看下TransactionSynchronizationManager 都做了啥,进到 getResource 方法:

这里又触发了 doGetResource 方法,进入到该方法下:
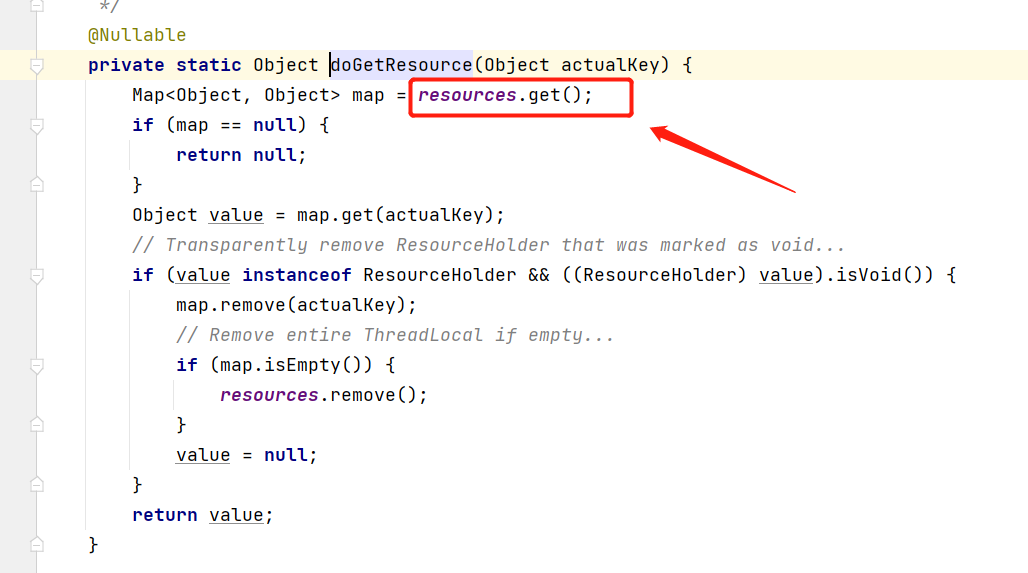
这里明显从 resources 中获取的,看下 resources 到底是个啥:

是一个 ThreadLocal ,现在是不是就明白了,在没有多线程的情况下,开启事务时就将拿到的连接放到了当前的 ThreadLocal 中,后面其他组件执行数据操作,同样先从ThreadLocal 中取连接,这样都在一个连接中操作,自然也可以进行回滚,由于上面我们是单独开启了线程,线程中的操作尝试获取 ThreadLocal中的连接,但获取不到,所以只能获取一个新的连接操作,导致了声明事务时的连接和实际操作时的连接不一致,从而无法进行回滚。
现在找到了问题的原因我们怎么解决呢?
既然是因为 ThreadLocal 导致的连接不同,那我们在开启线程时,就给它补充确实的信息,获取连接是用的 TransactionSynchronizationManager ,那添加同样也用 TransactionSynchronizationManager,通过观察 TransactionSynchronizationManager 的 Api,获取连接句柄可以使用 :
ConnectionHolder conHolder = (ConnectionHolder) TransactionSynchronizationManager.getResource(dataSource);其中key就是当前数据源,绑定句柄可以使用:
TransactionSynchronizationManager.bindResource(dataSource, conHolder);移除句柄可以使用 :
TransactionSynchronizationManager.unbindResource(dataSource);下面对前面的程序进行改造:
@Service
public class TestService {

    @Resource
    JdbcTemplate jdbcTemplate;

    @Resource
    DataSource dataSource;

    @Transactional(rollbackFor = Exception.class)
    public void test() {
        // 获取当前线程的句柄
        ConnectionHolder conHolder = (ConnectionHolder) TransactionSynchronizationManager.getResource(dataSource);
        // 放入子线程
        CompletableFuture.runAsync(() -> {
            // 子线程绑定
            TransactionSynchronizationManager.bindResource(dataSource, conHolder);
            jdbcTemplate.update("insert into test(name,thread_name) value(? , ?)"
                    , new Object[]{LocalDateTime.now().toString(), Thread.currentThread().getName()});
            // 解绑
            TransactionSynchronizationManager.unbindResource(dataSource);
        });
        // ....其他操作...
        jdbcTemplate.update("insert into test(name,thread_name) value(? , ?)"
                , new Object[]{LocalDateTime.now().toString(), Thread.currentThread().getName()});
        // ....其他操作...
        int a = 1 / 0;
    }
}
再次运行:

已经出现异常,查看数据库:

数据成功回滚了!
假入异常是出现在子线程的还可以回滚吗,下面开始实验一下:
@Service
public class TestService {

    @Resource
    JdbcTemplate jdbcTemplate;

    @Resource
    DataSource dataSource;

    @Transactional(rollbackFor = Exception.class)
    public void test() {
        // 获取当前线程的句柄
        ConnectionHolder conHolder = (ConnectionHolder) TransactionSynchronizationManager.getResource(dataSource);
        // 放入子线程
        CompletableFuture.runAsync(() -> {
            // 子线程绑定
            TransactionSynchronizationManager.bindResource(dataSource, conHolder);
            jdbcTemplate.update("insert into test(name,thread_name) value(? , ?)"
                    , new Object[]{LocalDateTime.now().toString(), Thread.currentThread().getName()});
            int a = 1 / 0;
            // 解绑
            TransactionSynchronizationManager.unbindResource(dataSource);
        });
        // ....其他操作...
        jdbcTemplate.update("insert into test(name,thread_name) value(? , ?)"
                , new Object[]{LocalDateTime.now().toString(), Thread.currentThread().getName()});
        // ....其他操作...
    }
}
运行后,查看数据:

发现没有出现回滚现象,这是因为异常在子线程的 Runnable 中,父线程没有感知到异常,怎么让父线程感知呢,我们可以加个在数据处理最后加个 join ,如果再出现异常就抛到父线程了:
@Service
public class TestService {

    @Resource
    JdbcTemplate jdbcTemplate;

    @Resource
    DataSource dataSource;

    @Transactional(rollbackFor = Exception.class)
    public void test() {
        // 获取当前线程的句柄
        ConnectionHolder conHolder = (ConnectionHolder) TransactionSynchronizationManager.getResource(dataSource);
        // 放入子线程
        CompletableFuture future = CompletableFuture.runAsync(() -> {
            // 子线程绑定
            TransactionSynchronizationManager.bindResource(dataSource, conHolder);
            jdbcTemplate.update("insert into test(name,thread_name) value(? , ?)"
                    , new Object[]{LocalDateTime.now().toString(), Thread.currentThread().getName()});
            int a = 1 / 0;
            // 解绑
            TransactionSynchronizationManager.unbindResource(dataSource);
        });
        // ....其他操作...
        jdbcTemplate.update("insert into test(name,thread_name) value(? , ?)"
                , new Object[]{LocalDateTime.now().toString(), Thread.currentThread().getName()});
        // ....其他操作...
        future.join();
    }
}
运行后,可以看到异常已经抛出来了:

查看数据库:

数据也成功回滚了。
二、延伸:MVC 子线程获取 Request 信息
看完上面事务的过程,同理在 MVC 中,假如原本是在主线程跑的,后面有需求需要放在子线程中优化,但是其中有从 ThreadLocal 中获取 Request 信息,此时就可以和上面一个做法解决问题,如:
@RestController
@RequestMapping("/test3")
public class RequestController {

    @GetMapping("/test")
    public void test(){
        // 获取句柄
        ServletRequestAttributes att = (ServletRequestAttributes) RequestContextHolder
                .getRequestAttributes();
        CompletableFuture.runAsync(()->{
            // 绑定
            RequestContextHolder.setRequestAttributes(att);

            ServletRequestAttributes attributes = (ServletRequestAttributes) RequestContextHolder
                    .getRequestAttributes();

            HttpServletRequest request = attributes.getRequest();
            System.out.println(request.getHeader("token"));
            // 解绑
            RequestContextHolder.resetRequestAttributes();
        }).join();
    }
}
SpringTx 源码解析 - @Transactional 声明式事务执行原理
一、Spring @Transactional 声明式事务执行原理
@Transactional 是 Spring 框架中用于声明事务的注解,可以标注在方法或类上。当标注在类上时,表示该类的所有public方法都将支持事务。当标注在方法上时,表示该方法将在一个事务内执行。
@Transactional 的执行原理依赖于 AOP ,因此在看本篇文章时,最好对 AOP 的原理有所了解,如果不了解,可以看下下面两篇文章:
下面一起开始源码的分析。
二、@EnableTransactionManagement
在普通的 Spring 项目中,开启声明式事务的支持需要使用 @EnableTransactionManagement 注解,该注解在 SpringBoot 中会自动调用,可以从该注解入手,看到底做了啥事情:
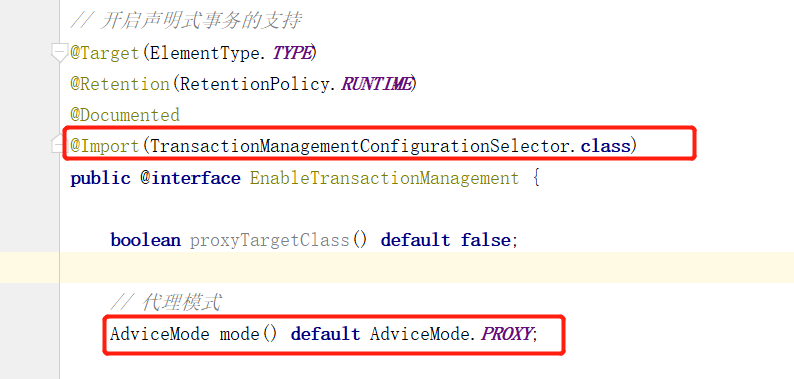
注意注解中代理模式默认为 PROXY ,同时还使用 @Import 引入了 TransactionManagementConfigurationSelector 类,看下该类的继承关系:
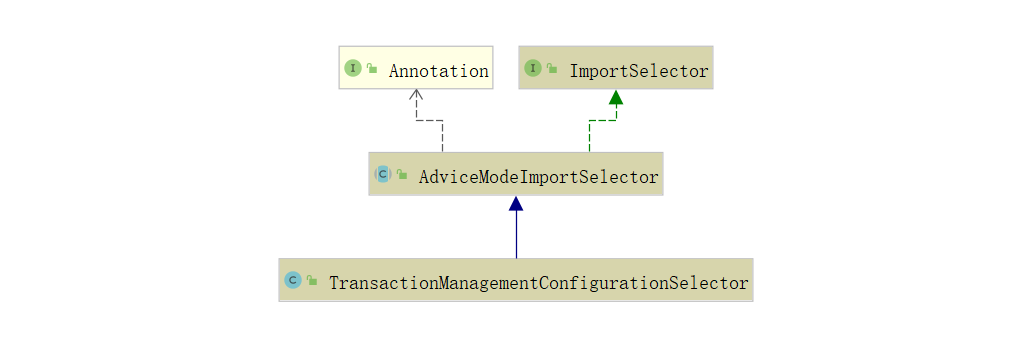
有实现 ImportSelector 选择注入器,因此先找到 selectImports(AnnotationMetadata importingClassMetadata) 方法,在 AdviceModeImportSelector 类下:
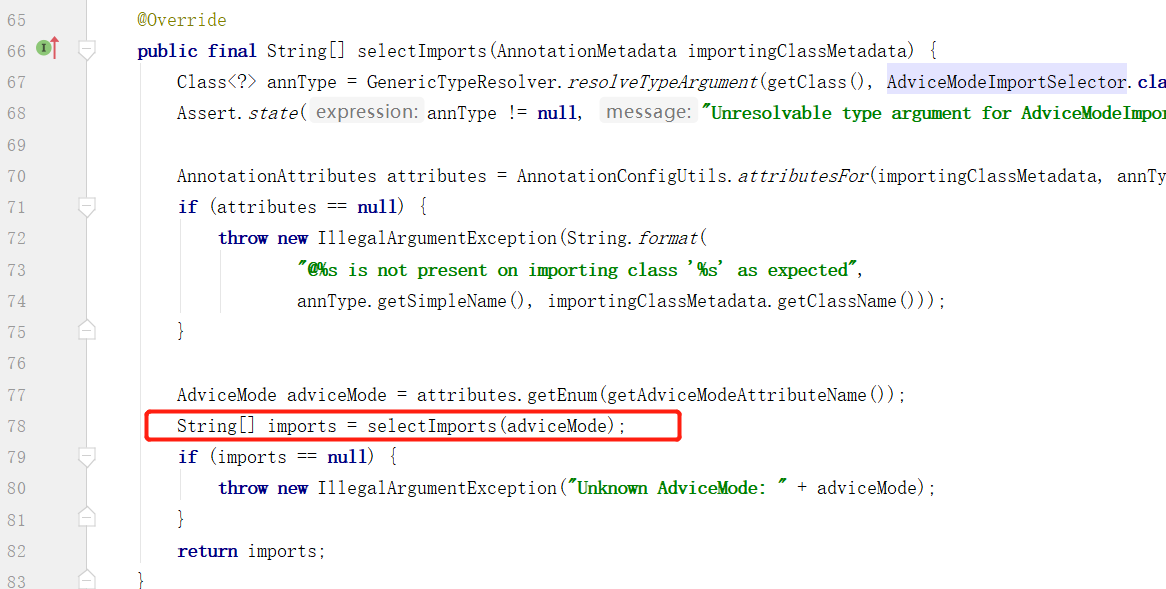
这里又使用了子类的selectImports方法的结果注入了 Spring 容器,就是TransactionManagementConfigurationSelector 类下的 selectImports 方法:
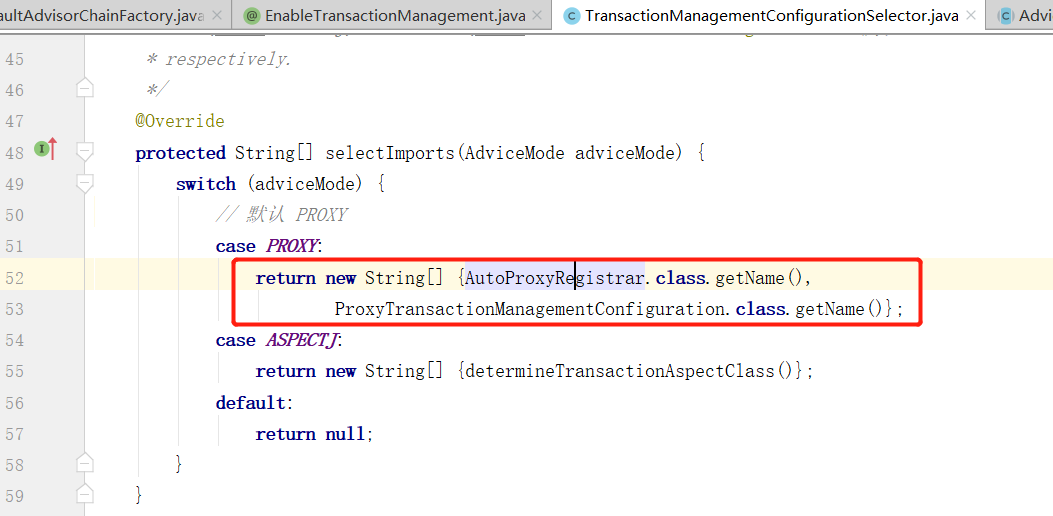
从上面注解中可以得到默认为 PROXY 模式,因此会注入AutoProxyRegistrar 和 ProxyTransactionManagementConfiguration 这里主要分析下 ProxyTransactionManagementConfiguration 配置类:
@Configuration(proxyBeanMethods = false)
@Role(BeanDefinition.ROLE_INFRASTRUCTURE)
// 事务代理配置
public class ProxyTransactionManagementConfiguration extends AbstractTransactionManagementConfiguration {

	@Bean(name = TransactionManagementConfigUtils.TRANSACTION_ADVISOR_BEAN_NAME)
	@Role(BeanDefinition.ROLE_INFRASTRUCTURE)
	// 事务切面
	public BeanFactoryTransactionAttributeSourceAdvisor transactionAdvisor(
			TransactionAttributeSource transactionAttributeSource, TransactionInterceptor transactionInterceptor) {
		// 创建事务切面增强器
		BeanFactoryTransactionAttributeSourceAdvisor advisor = new BeanFactoryTransactionAttributeSourceAdvisor();
		// 设置事务属性解析器
		advisor.setTransactionAttributeSource(transactionAttributeSource);
		// 设置
		advisor.setAdvice(transactionInterceptor);
		if (this.enableTx != null) {
			advisor.setOrder(this.enableTx.<Integer>getNumber("order"));
		}
		return advisor;
	}

	@Bean
	@Role(BeanDefinition.ROLE_INFRASTRUCTURE)
	// 事务属性解析器
	public TransactionAttributeSource transactionAttributeSource() {
		// 创建一个注解事务属性解析器
		return new AnnotationTransactionAttributeSource();
	}

	@Bean
	@Role(BeanDefinition.ROLE_INFRASTRUCTURE)
	// 事务拦截器
	public TransactionInterceptor transactionInterceptor(TransactionAttributeSource transactionAttributeSource) {
		// 创建事务拦截器
		TransactionInterceptor interceptor = new TransactionInterceptor();
		// 设置事务属性拦截器
		interceptor.setTransactionAttributeSource(transactionAttributeSource);
		if (this.txManager != null) {
			// 设置事务管理器
			interceptor.setTransactionManager(this.txManager);
		}
		return interceptor;
	}

}
该配置类中声明了三个非常重要的对象:

BeanFactoryTransactionAttributeSourceAdvisor :是Advisor 的子类,该类也是源码分析的关键点,由于其属于 Advisor 的子类,因此在 AOP 扫描 Advisor 增强器时会被扫描到,执行后续 AOP 的逻辑。

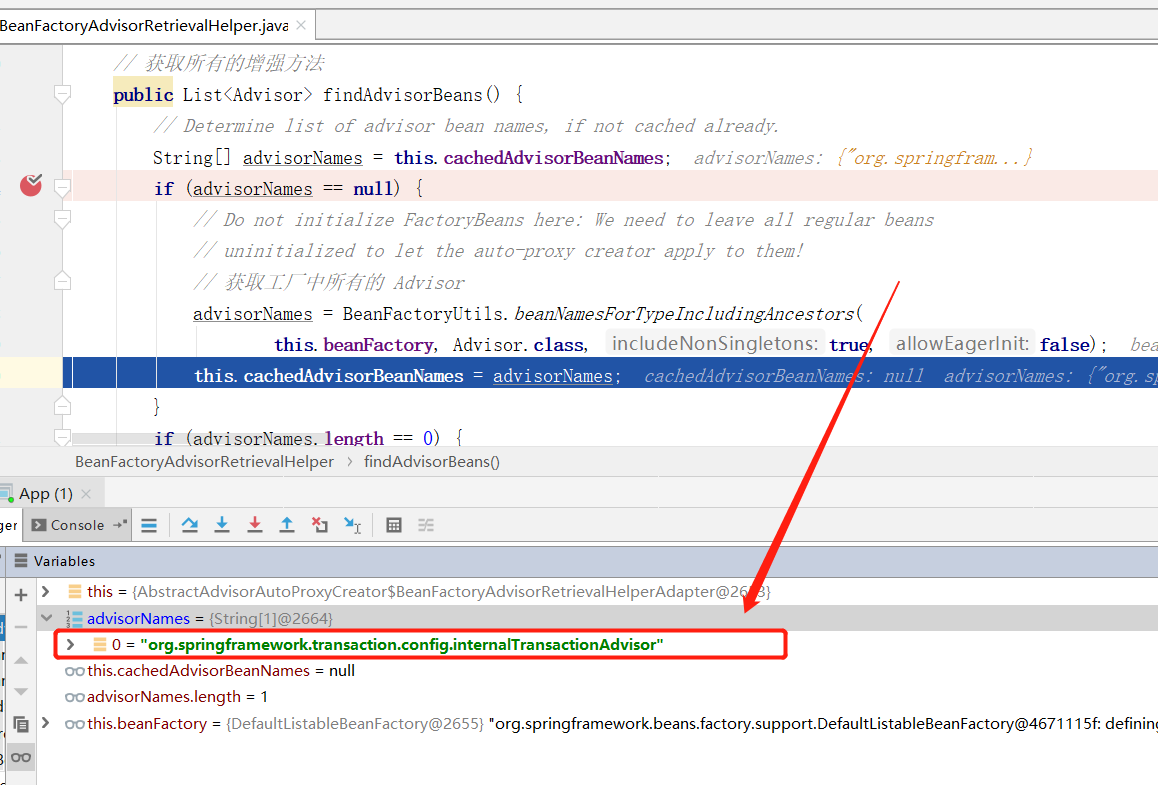
注意该类在Spring 中注册的名称为:org.springframework.transaction.config.internalTransactionAdvisor
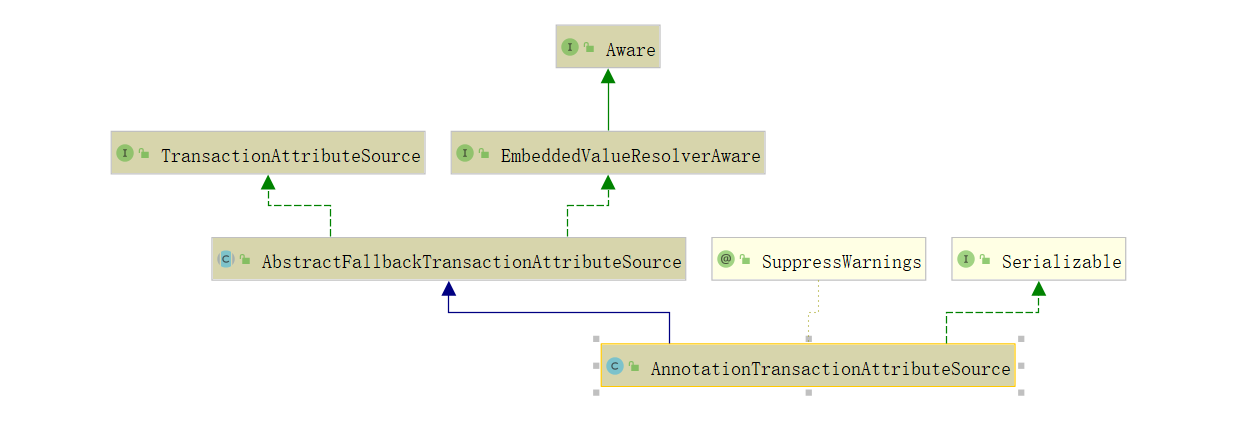
TransactionAttributeSource :事务属性解析器,这里实例为 AnnotationTransactionAttributeSource ,主要在 AOP 中匹配Advisor 增强器时用到,一方面判断是否带有 @Transactional 注解,另一方面对注解中的参数进行解析包装。

TransactionInterceptor: 事务拦截器,是 MethodInterceptor 的子类,因此在AOP中也是最终触发执行逻辑的类,其中包含了事务的开启、提交、回滚等。
三、事务切面增强器的扫描过程
下面我们从 AOP 的执行逻辑中 AbstractAdvisorAutoProxyCreator 类下的 getAdvicesAndAdvisorsForBean 方法进行分析,主要实现了Advices 切面增强方法的扫描和匹配过程。
这里的处理过程在上篇 AOP 的文章中有分析过,因此这里主要对BeanFactoryTransactionAttributeSourceAdvisor 的扫描和匹配过程进行分析,如果对这块不了解的话,建议看下前面的 AOP 分析的文章:
下面看到该方法中:
protected Object[] getAdvicesAndAdvisorsForBean(
		Class<?> beanClass, String beanName, @Nullable TargetSource targetSource) {
	//获取增强方法
	List<Advisor> advisors = findEligibleAdvisors(beanClass, beanName);
	//判断是否为空
	if (advisors.isEmpty()) {
		//如果为空,返回一个空数组
		return DO_NOT_PROXY;
	}
	//如果不为空,转化为数组然后返回
	return advisors.toArray();
}
使用 findEligibleAdvisors 方法获取到匹配的增强方法,也就是切面方法,看到该方法中:
protected List<Advisor> findEligibleAdvisors(Class<?> beanClass, String beanName) {
	//获取所有的增强方法
	List<Advisor> candidateAdvisors = findCandidateAdvisors();
	//从所有的增强方法中匹配适合该 bean 的增强方法
	List<Advisor> eligibleAdvisors = findAdvisorsThatCanApply(candidateAdvisors, beanClass, beanName);
	//对匹配后的增强方法进行扩展
	extendAdvisors(eligibleAdvisors);
	//判断是否为空
	if (!eligibleAdvisors.isEmpty()) {
		//如果不为空,进行排序
		eligibleAdvisors = sortAdvisors(eligibleAdvisors);
	}
	//返回处理后的增强方法
	return eligibleAdvisors;
}
这里通过 findCandidateAdvisors 方法获取到所有的切面方法,然后使用 findAdvisorsThatCanApply 方法匹配出符合该 beanName 的切面方法,首先看到 findCandidateAdvisors 方法,在 AbstractAdvisorAutoProxyCreator 类下:

这里又调用了 BeanFactoryAdvisorRetrievalHelper 类下的 findAdvisorBeans 方法:
public List<Advisor> findAdvisorBeans() {
	// Determine list of advisor bean names, if not cached already.
	String[] advisorNames = this.cachedAdvisorBeanNames;
	if (advisorNames == null) {
		// Do not initialize FactoryBeans here: We need to leave all regular beans
		// uninitialized to let the auto-proxy creator apply to them!
		// 获取工厂中所有的 Advisor
		advisorNames = BeanFactoryUtils.beanNamesForTypeIncludingAncestors(
				this.beanFactory, Advisor.class, true, false);
		this.cachedAdvisorBeanNames = advisorNames;
	}
	if (advisorNames.length == 0) {
		return new ArrayList<>();
	}

	List<Advisor> advisors = new ArrayList<>();
	for (String name : advisorNames) {
		if (isEligibleBean(name)) {
			if (this.beanFactory.isCurrentlyInCreation(name)) {
				if (logger.isTraceEnabled()) {
					logger.trace("Skipping currently created advisor '" + name + "'");
				}
			}
			else {
				try {
					// 从工厂中获取对象实例
					advisors.add(this.beanFactory.getBean(name, Advisor.class));
				}
				catch (BeanCreationException ex) {
					Throwable rootCause = ex.getMostSpecificCause();
					if (rootCause instanceof BeanCurrentlyInCreationException) {
						BeanCreationException bce = (BeanCreationException) rootCause;
						String bceBeanName = bce.getBeanName();
						if (bceBeanName != null && this.beanFactory.isCurrentlyInCreation(bceBeanName)) {
							if (logger.isTraceEnabled()) {
								logger.trace("Skipping advisor '" + name +
										"' with dependency on currently created bean: " + ex.getMessage());
							}
							// Ignore: indicates a reference back to the bean we're trying to advise.
							// We want to find advisors other than the currently created bean itself.
							continue;
						}
					}
					throw ex;
				}
			}
		}
	}
	return advisors;
}
这里从工厂中获取到了所有的 Advisor 类型的 beanName ,后面直接从工厂中获取到了对应的实例对象。
前面说 BeanFactoryTransactionAttributeSourceAdvisor 实现了 Advisor ,因此这里 advisors 列表中也带有 BeanFactoryTransactionAttributeSourceAdvisor 类型的实例对象。
四、事务切面增强器的匹配过程
下面再回到 findEligibleAdvisors 方法中,已经通过 findCandidateAdvisors 方法获取到 Advisor 切面增强方法了,下面通过 findAdvisorsThatCanApply 匹配出符合当前 beanName 的 Advisor,看到该方法中:
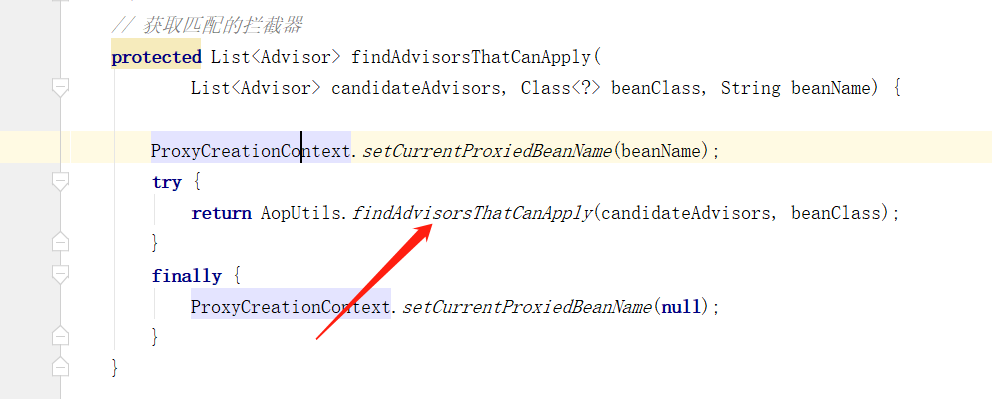
这里又调用了 AopUtils.findAdvisorsThatCanApply 方法,继续看到该方法下:
public static List<Advisor> findAdvisorsThatCanApply(List<Advisor> candidateAdvisors, Class<?> clazz) {
	if (candidateAdvisors.isEmpty()) {
		return candidateAdvisors;
	}
	// 创建一个合适的 Advisor 的集合 eligibleAdvisors
	List<Advisor> eligibleAdvisors = new ArrayList<>();
	//循环所有的Advisor
	for (Advisor candidate : candidateAdvisors) {
		// 判断切面是否匹配
		//如果Advisor是 IntroductionAdvisor 引介增强 可以为目标类 通过AOP的方式添加一些接口实现
		if (candidate instanceof IntroductionAdvisor && canApply(candidate, clazz)) {
			eligibleAdvisors.add(candidate);
		}
	}
	//是否有引介增强
	boolean hasIntroductions = !eligibleAdvisors.isEmpty();
	for (Advisor candidate : candidateAdvisors) {
		//如果是IntroductionAdvisor类型的话 则直接跳过
		if (candidate instanceof IntroductionAdvisor) {
			// already processed
			continue;
		}
		// 判断切面是否匹配
		if (canApply(candidate, clazz, hasIntroductions)) {
			eligibleAdvisors.add(candidate);
		}
	}
	return eligibleAdvisors;
}
这里对 Advisor 判断是否为 IntroductionAdvisor 引介增强类型,前面看到 BeanFactoryTransactionAttributeSourceAdvisor 的继承树关系,并没有实现 IntroductionAdvisor接口 ,因此最后会使用 canApply 方法进行匹配,再看到 canApply 方法中:
public static boolean canApply(Advisor advisor, Class<?> targetClass, boolean hasIntroductions) {
	if (advisor instanceof IntroductionAdvisor) {
		// IntroductionAdvisor,根据类过滤器,进行匹配
		//如果是 IntroductionAdvisor 的话,则调用IntroductionAdvisor类型的实例进行类的过滤
		//这里是直接调用的ClassFilter的matches方法
		return ((IntroductionAdvisor) advisor).getClassFilter().matches(targetClass);
	}
	// 通常情况下 Advisor 都是 PointcutAdvisor 类型
	else if (advisor instanceof PointcutAdvisor) {
		PointcutAdvisor pca = (PointcutAdvisor) advisor;
		// 从Advisor中获取Pointcut的实现类 就是是AspectJExpressionPointcut
		return canApply(pca.getPointcut(), targetClass, hasIntroductions);
	}
	else {
		// It doesn't have a pointcut so we assume it applies.
		return true;
	}
}
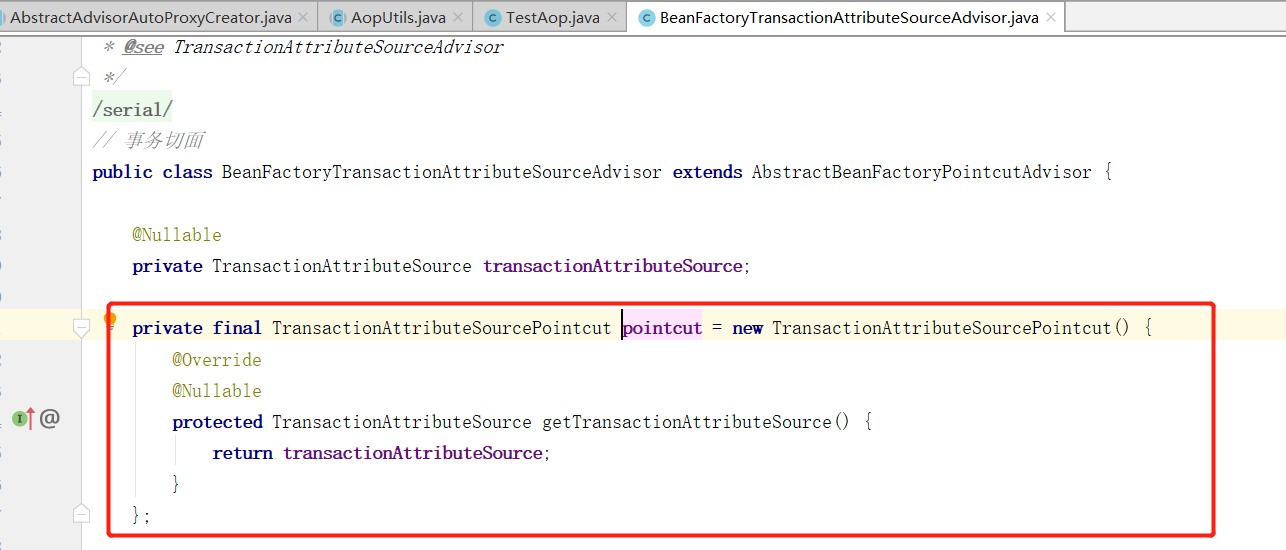
这里根据不同的类型走不同的匹配方式,再看下 BeanFactoryTransactionAttributeSourceAdvisor 的继承树关系,其中有实现 PointcutAdvisor 接口,因此会进入到 canApply(Pointcut pc, Class<?> targetClass, boolean hasIntroductions) 方法中,注意这里第一个 Pointcut 参数是通过 pca.getPointcut() 获取到的,在 BeanFactoryTransactionAttributeSourceAdvisor 中就是 TransactionAttributeSourcePointcut 对象:

下面看到 canApply(Pointcut pc, Class<?> targetClass, boolean hasIntroductions) 方法中:
public static boolean canApply(Pointcut pc, Class<?> targetClass, boolean hasIntroductions) {
	Assert.notNull(pc, "Pointcut must not be null");

	//进行切点表达式的匹配最重要的就是 ClassFilter 和 MethodMatcher这两个方法的实现。
	//首先进行ClassFilter的matches方法校验
	//首先这个类要在所匹配的规则下
	if (!pc.getClassFilter().matches(targetClass)) {
		return false;
	}

	MethodMatcher methodMatcher = pc.getMethodMatcher();
	// 通过切点的方法匹配策略 进行匹配
	if (methodMatcher == MethodMatcher.TRUE) {
		// No need to iterate the methods if we're matching any method anyway...
		return true;
	}
	// 如果当前 MethodMatcher 也是IntroductionAwareMethodMatcher类型,则转为该类型
	IntroductionAwareMethodMatcher introductionAwareMethodMatcher = null;
	if (methodMatcher instanceof IntroductionAwareMethodMatcher) {
		introductionAwareMethodMatcher = (IntroductionAwareMethodMatcher) methodMatcher;
	}

	Set<Class<?>> classes = new LinkedHashSet<>();
	if (!Proxy.isProxyClass(targetClass)) {
		// 目标对象没有采用jdk动态代理,则要么是cglib代理,要么没有代理,获取到没有代理的原始类
		classes.add(ClassUtils.getUserClass(targetClass));
	}
	// 获取到目标类的所有的超类接口
	classes.addAll(ClassUtils.getAllInterfacesForClassAsSet(targetClass));

	for (Class<?> clazz : classes) {
		// 获取目标类即接口的方法,只要有一个方法满足切点条件,即视为切点可以匹配
		Method[] methods = ReflectionUtils.getAllDeclaredMethods(clazz);
		// 只要有一个方法能匹配到就返回true
		//MethodMatcher 中有两个 matches 方法。
		// boolean matches(Method method, Class<?> targetClass) 用于静态的方法匹配
		// boolean matches(Method method, Class<?> targetClass, Object... args) 用于运行期动态的进行方法匹配
		for (Method method : methods) {
			// 如果 MethodMatcher 是IntroductionAwareMethodMatcher类型,则使用该类型的方法进行匹配
			// 否则使用 MethodMatcher.matches() 方法进行匹配
			if (introductionAwareMethodMatcher != null ?
					introductionAwareMethodMatcher.matches(method, targetClass, hasIntroductions) :
					methodMatcher.matches(method, targetClass)) {
				return true;
			}
		}
	}

	return false;
}
该方法首先使用 ClassFilter 对类进行匹配是否符合,如果不符合直接跳过,这里先看下 TransactionAttributeSourcePointcut 中 getClassFilter 获取的是哪个对象:

从 TransactionAttributeSourcePointcut 的构造函数中可以看出具体对象为 TransactionAttributeSourceClassFilter 类型,下面看到 TransactionAttributeSourceClassFilter 类下的 matches(Class<?> clazz) 方法:
public boolean matches(Class<?> clazz) {
	// 判断是否属于 TransactionalProxy 或 TransactionManager 或 PersistenceExceptionTranslator
	if (TransactionalProxy.class.isAssignableFrom(clazz) ||
			TransactionManager.class.isAssignableFrom(clazz) ||
			PersistenceExceptionTranslator.class.isAssignableFrom(clazz)) {
		// 如果是返回 false 不尽兴匹配
		return false;
	}
	// 匹配判断
	TransactionAttributeSource tas = getTransactionAttributeSource();
	return (tas == null || tas.isCandidateClass(clazz));
}
这里如果是 TransactionalProxy 或 TransactionManager 或 PersistenceExceptionTranslator 类直接返回 false 不进行后面的匹配,再接着获取到一个 TransactionAttributeSource 对象,从前面 ProxyTransactionManagementConfiguration 类中可以看出,主要为AnnotationTransactionAttributeSource类型实例,因此进到该类下的 isCandidateClass 方法中:
public boolean isCandidateClass(Class<?> targetClass) {
	// 遍历事务注解析器
	for (TransactionAnnotationParser parser : this.annotationParsers) {
		// 是否可解析
		if (parser.isCandidateClass(targetClass)) {
			return true;
		}
	}
	return false;
}
这里遍历了所有的事务解析器,这些解析器怎么来的呢,看到 AnnotationTransactionAttributeSource 的构造方法中:
public AnnotationTransactionAttributeSource(boolean publicMethodsOnly) {
	this.publicMethodsOnly = publicMethodsOnly;
	if (jta12Present || ejb3Present) {
		this.annotationParsers = new LinkedHashSet<>(4);
		this.annotationParsers.add(new SpringTransactionAnnotationParser());
		if (jta12Present) {
			this.annotationParsers.add(new JtaTransactionAnnotationParser());
		}
		if (ejb3Present) {
			this.annotationParsers.add(new Ejb3TransactionAnnotationParser());
		}
	}
	else {
		this.annotationParsers = Collections.singleton(new SpringTransactionAnnotationParser());
	}
}
这里主要对 SpringTransactionAnnotationParser 类进行分析,下面可以看到 SpringTransactionAnnotationParser 类下的 isCandidateClass 方法中:
public boolean isCandidateClass(Class<?> targetClass) {
	// 检查类是否带有 @Transactional 注解
	return AnnotationUtils.isCandidateClass(targetClass, Transactional.class);
}
主要就是检查类是否带有 @Transactional 注解。
下面再回到 canApply(Pointcut pc, Class<?> targetClass, boolean hasIntroductions) 方法中,继续向下看会通过 pc.getMethodMatcher() 获取到一个 MethodMatcher 对象,这里看下 TransactionAttributeSourcePointcut 的继承关系图:
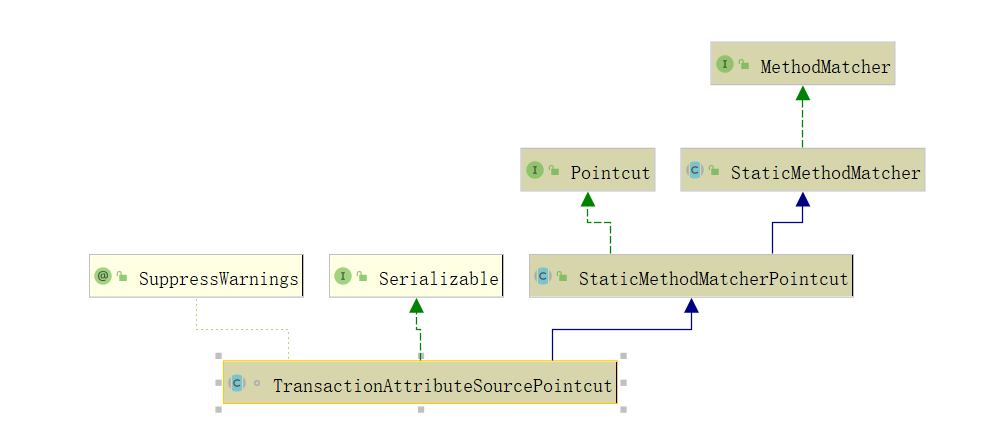
可以看到 TransactionAttributeSourcePointcut 就是 MethodMatcher 类型, 但 TransactionAttributeSourcePointcut 没有重写 getMethodMatcher() 方法,实现触发的StaticMethodMatcherPointcut 类下的 getMethodMatcher() 方法:
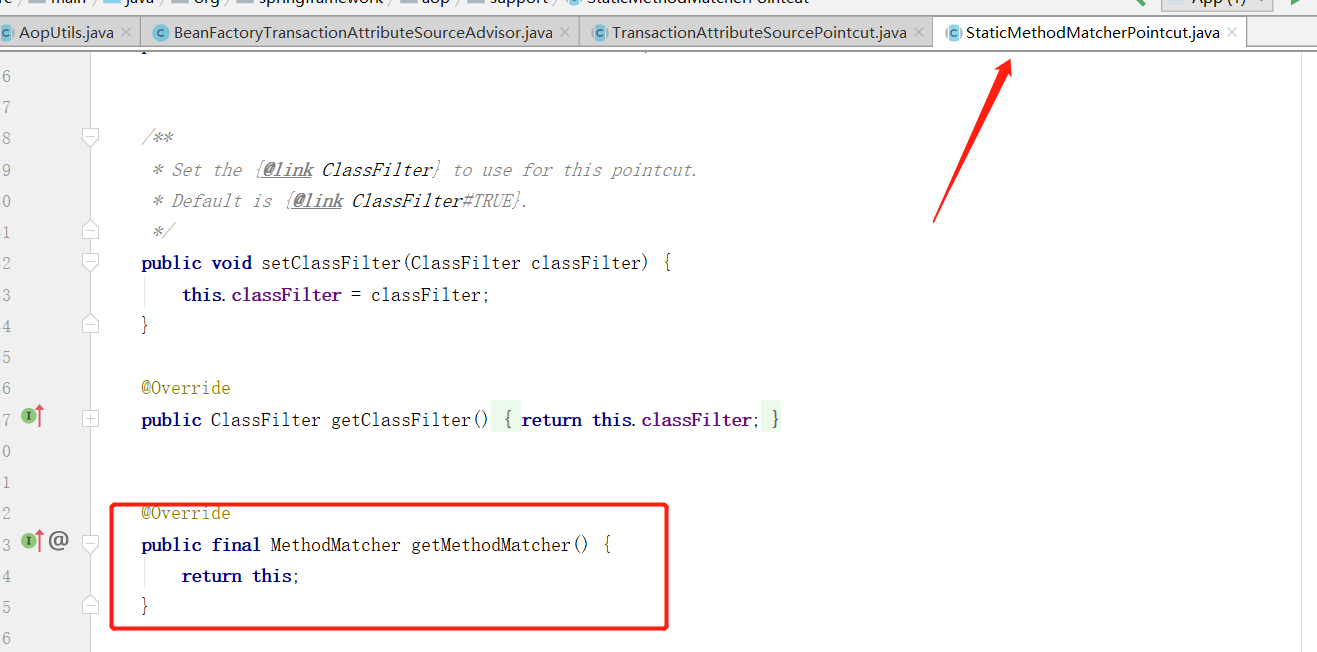
这里直接返回的自身,因此这里MethodMatcher 对象就是自身 TransactionAttributeSourcePointcut 。
下面再回到 canApply(Pointcut pc, Class<?> targetClass, boolean hasIntroductions) 方法中,最后通过反射获取到类下的方法,由于这里不属于introductionAwareMethodMatcher类型,会通过 methodMatcher.matches 判断是否符合,下面看到 TransactionAttributeSourcePointcut 类下的 matches(Method method, Class<?> targetClass) 方法中:
public boolean matches(Method method, Class<?> targetClass) {
	TransactionAttributeSource tas = getTransactionAttributeSource();
	// 如果存在事务信息则返回true
	return (tas == null || tas.getTransactionAttribute(method, targetClass) != null);
}
上面已经分析过了 TransactionAttributeSource 主要为 AnnotationTransactionAttributeSource类型实例,因此看到该类下的 getTransactionAttribute 方法中:
主要实现在父类的 AbstractFallbackTransactionAttributeSource 类中:
public TransactionAttribute getTransactionAttribute(Method method, @Nullable Class<?> targetClass) {
	// 如果是 Object 类型,直接返回 null
	if (method.getDeclaringClass() == Object.class) {
		return null;
	}
	// First, see if we have a cached value.
	// 生成缓存 key
	Object cacheKey = getCacheKey(method, targetClass);
	// 从缓存中获取
	TransactionAttribute cached = this.attributeCache.get(cacheKey);
	// 缓存中存在
	if (cached != null) {
		// Value will either be canonical value indicating there is no transaction attribute,
		// or an actual transaction attribute.
		if (cached == NULL_TRANSACTION_ATTRIBUTE) {
			return null;
		}
		else {
			return cached;
		}
	}
	else {
		//缓存中不存在

		// We need to work it out.
		// 判断是否为事务方法,是的话获取事务属性
		TransactionAttribute txAttr = computeTransactionAttribute(method, targetClass);
		// Put it in the cache.
		// 不存在事务
		if (txAttr == null) {
			this.attributeCache.put(cacheKey, NULL_TRANSACTION_ATTRIBUTE);
		}
		else {
			// 存在事务的话
			// 获取方法名称
			String methodIdentification = ClassUtils.getQualifiedMethodName(method, targetClass);
			if (txAttr instanceof DefaultTransactionAttribute) {
				DefaultTransactionAttribute dta = (DefaultTransactionAttribute) txAttr;
				dta.setDescriptor(methodIdentification);
				dta.resolveAttributeStrings(this.embeddedValueResolver);
			}
			if (logger.isTraceEnabled()) {
				logger.trace("Adding transactional method '" + methodIdentification + "' with attribute: " + txAttr);
			}
			this.attributeCache.put(cacheKey, txAttr);
		}
		return txAttr;
	}
}
这里对事物属性进行了缓存,看下缓存中不存在的情况,通过 computeTransactionAttribute 方法,尝试解析事物属性,也就是解析 @Transactional 中的属性,下面看到该方法中:
protected TransactionAttribute computeTransactionAttribute(Method method, @Nullable Class<?> targetClass) {
	// Don't allow no-public methods as required.
	if (allowPublicMethodsOnly() && !Modifier.isPublic(method.getModifiers())) {
		return null;
	}

	// The method may be on an interface, but we need attributes from the target class.
	// If the target class is null, the method will be unchanged.
	Method specificMethod = AopUtils.getMostSpecificMethod(method, targetClass);

	// First try is the method in the target class.
	// 首先尝试检测方法是否符合
	TransactionAttribute txAttr = findTransactionAttribute(specificMethod);
	// 如果存在则返回
	if (txAttr != null) {
		return txAttr;
	}

	// Second try is the transaction attribute on the target class.
	// 检测方法所在类上是否符合
	txAttr = findTransactionAttribute(specificMethod.getDeclaringClass());
	if (txAttr != null && ClassUtils.isUserLevelMethod(method)) {
		return txAttr;
	}

	if (specificMethod != method) {
		// Fallback is to look at the original method.
		txAttr = findTransactionAttribute(method);
		if (txAttr != null) {
			return txAttr;
		}
		// Last fallback is the class of the original method.
		txAttr = findTransactionAttribute(method.getDeclaringClass());
		if (txAttr != null && ClassUtils.isUserLevelMethod(method)) {
			return txAttr;
		}
	}

	return null;
}
这里会先尝试从方法上取获取 @Transactional 注解,不存在的话再去检测方法所在类上是否符合,这里主要看下方法层面的 findTransactionAttribute(Method method) 方法:

这里又触发了 determineTransactionAttribute 方法,继续看到该方法中:
protected TransactionAttribute determineTransactionAttribute(AnnotatedElement element) {
	// 遍历事务解析器
	for (TransactionAnnotationParser parser : this.annotationParsers) {
		// 使用解析器解析事务信息
		TransactionAttribute attr = parser.parseTransactionAnnotation(element);
		if (attr != null) {
			return attr;
		}
	}
	return null;
}
这里又使用了前面提到的 TransactionAnnotationParser 解析器,还是主要看 SpringTransactionAnnotationParser,进到 SpringTransactionAnnotationParser 类下的 parseTransactionAnnotation 方法中:
public TransactionAttribute parseTransactionAnnotation(AnnotatedElement element) {
	// 寻找目标上的 @Transactional 注解信息
	AnnotationAttributes attributes = AnnotatedElementUtils.findMergedAnnotationAttributes(
			element, Transactional.class, false, false);
	if (attributes != null) {
		// 解析注解中的参数属性,包装到  TransactionAttribute 对象中
		return parseTransactionAnnotation(attributes);
	}
	else {
		return null;
	}
}
这里首先尝试获取方法上的 @Transactional 注解,如果存在的话则使用 parseTransactionAnnotation 方法解析参数,进到 parseTransactionAnnotation 方法中:
protected TransactionAttribute parseTransactionAnnotation(AnnotationAttributes attributes) {
	RuleBasedTransactionAttribute rbta = new RuleBasedTransactionAttribute();
	// 事务的传播方式
	Propagation propagation = attributes.getEnum("propagation");
	rbta.setPropagationBehavior(propagation.value());
	// 事务隔离级别
	Isolation isolation = attributes.getEnum("isolation");
	rbta.setIsolationLevel(isolation.value());
	// 超时时间
	rbta.setTimeout(attributes.getNumber("timeout").intValue());
	String timeoutString = attributes.getString("timeoutString");
	Assert.isTrue(!StringUtils.hasText(timeoutString) || rbta.getTimeout() < 0,
			"Specify 'timeout' or 'timeoutString', not both");
	rbta.setTimeoutString(timeoutString);
	// 事务读写性
	rbta.setReadOnly(attributes.getBoolean("readOnly"));
	// 可选的限定描述符,指定使用的事务管理器
	rbta.setQualifier(attributes.getString("value"));
	rbta.setLabels(Arrays.asList(attributes.getStringArray("label")));
	// 回滚的类型
	List<RollbackRuleAttribute> rollbackRules = new ArrayList<>();
	for (Class<?> rbRule : attributes.getClassArray("rollbackFor")) {
		rollbackRules.add(new RollbackRuleAttribute(rbRule));
	}
	// 回滚的类名称
	for (String rbRule : attributes.getStringArray("rollbackForClassName")) {
		rollbackRules.add(new RollbackRuleAttribute(rbRule));
	}
	// 不回滚的类型
	for (Class<?> rbRule : attributes.getClassArray("noRollbackFor")) {
		rollbackRules.add(new NoRollbackRuleAttribute(rbRule));
	}
	// 不回滚的类名称
	for (String rbRule : attributes.getStringArray("noRollbackForClassName")) {
		rollbackRules.add(new NoRollbackRuleAttribute(rbRule));
	}
	rbta.setRollbackRules(rollbackRules);

	return rbta;
}
分别解析出注解中的属性信息,并包装为 TransactionAttribute 类型对象。
下面再回到 getTransactionAttribute 方法中,通过 computeTransactionAttribute 方法获取到事务的属性信息后,如果结果不为空的话进行属性的补充后直接将属性信息返回给了 TransactionAttributeSourcePointcut 中的 matches 方法,这里如果结果不为空返回就是为 true ,也就是匹配符合条件了。

五、事务拦截器的触发过程
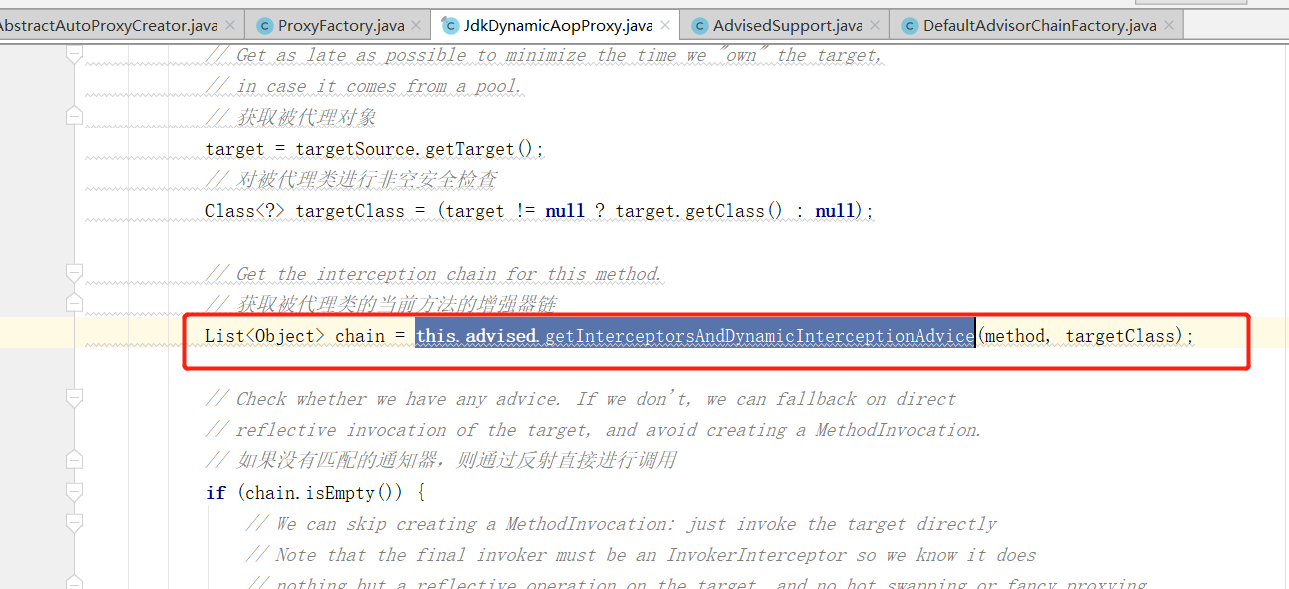
在 AOP 中查找完匹配的增强方法后,如果存在会创建一个代理对象放入 Spring 容器中,在代理对象执行时,先根据 Advisor 生成一个 Advice 类型的增强器链,这里以 JDK 动态代理为例,在 JdkDynamicAopProxy 类中 invoke 方法下触发的 this.advised.getInterceptorsAndDynamicInterceptionAdvice :
其中从 Advisor 中获取 Advice 对象的逻辑在DefaultAdvisorAdapterRegistry类下的 getInterceptors 方法中:
public MethodInterceptor[] getInterceptors(Advisor advisor) throws UnknownAdviceTypeException {
	List<MethodInterceptor> interceptors = new ArrayList<>(3);
	Advice advice = advisor.getAdvice();
	if (advice instanceof MethodInterceptor) {
		interceptors.add((MethodInterceptor) advice);
	}
	for (AdvisorAdapter adapter : this.adapters) {
		if (adapter.supportsAdvice(advice)) {
			interceptors.add(adapter.getInterceptor(advisor));
		}
	}
	if (interceptors.isEmpty()) {
		throw new UnknownAdviceTypeException(advisor.getAdvice());
	}
	return interceptors.toArray(new MethodInterceptor[0]);
}
增强切面方法的执行主要在 ReflectiveMethodInvocation 类下的 proceed() 中:
public Object proceed() throws Throwable {
	// 该方法为 jdk的AOP实现的核心
	// We start with an index of -1 and increment early.
	// 从拦截器链条的尾部向头部进行递归执行
	if (this.currentInterceptorIndex == this.interceptorsAndDynamicMethodMatchers.size() - 1) {
		return invokeJoinpoint();
	}
	// 获取下一个要执行的拦截器
	Object interceptorOrInterceptionAdvice =
			this.interceptorsAndDynamicMethodMatchers.get(++this.currentInterceptorIndex);

	// 如果通知器为 动态方法匹配拦截器,则还需要方法是否匹配的验证
	if (interceptorOrInterceptionAdvice instanceof InterceptorAndDynamicMethodMatcher) {
		// Evaluate dynamic method matcher here: static part will already have
		// been evaluated and found to match.
		InterceptorAndDynamicMethodMatcher dm =
				(InterceptorAndDynamicMethodMatcher) interceptorOrInterceptionAdvice;
		//获取被代理的对象类型
		Class<?> targetClass = (this.targetClass != null ? this.targetClass : this.method.getDeclaringClass());
		//进行动态匹配
		if (dm.methodMatcher.matches(this.method, targetClass, this.arguments)) {
			return dm.interceptor.invoke(this);
		}
		//如果动态匹配失败,递归进行proceed
		//不匹配就不执行当前的拦截器
		else {
			// Dynamic matching failed.
			// Skip this interceptor and invoke the next in the chain.
			return proceed();
		}
	}
	//如果不是增强器,只是一般的拦截器
	else {
		// It's an interceptor, so we just invoke it: The pointcut will have
		// been evaluated statically before this object was constructed.
		// 获取通知,并进行执行
		return ((MethodInterceptor) interceptorOrInterceptionAdvice).invoke(this);
	}
}
这里会顺序执行 MethodInterceptor 类型的 invoke 方法 ,从前面的分析可以知道 BeanFactoryTransactionAttributeSourceAdvisor 中的 Advice 为 TransactionInterceptor,而 TransactionInterceptor 又实现了MethodInterceptor ,因此这里看到 TransactionInterceptor 类的 invoke 方法下:
public Object invoke(MethodInvocation invocation) throws Throwable {
	// Work out the target class: may be {@code null}.
	// The TransactionAttributeSource should be passed the target class
	// as well as the method, which may be from an interface.
	Class<?> targetClass = (invocation.getThis() != null ? AopUtils.getTargetClass(invocation.getThis()) : null);

	// Adapt to TransactionAspectSupport's invokeWithinTransaction...
	// 调用父类的 方法
	return invokeWithinTransaction(invocation.getMethod(), targetClass, invocation::proceed);
}
这里又调用了父类 TransactionAspectSupport 下的 invokeWithinTransaction 方法,下面主要看到该方法中:
protected Object invokeWithinTransaction(Method method, @Nullable Class<?> targetClass,
		final InvocationCallback invocation) throws Throwable {

	// If the transaction attribute is null, the method is non-transactional.
	// 获取事务属性源,如果为空则表示不存在事物
	TransactionAttributeSource tas = getTransactionAttributeSource();
	// 获取前面解析出来 @Transactional 注解的属性
	final TransactionAttribute txAttr = (tas != null ? tas.getTransactionAttribute(method, targetClass) : null);
	// 根据事物属性获取对应的事物管理器,一般为 DataSourceTransactionManager
	final TransactionManager tm = determineTransactionManager(txAttr);
	// 是否存在 反应式事务
	if (this.reactiveAdapterRegistry != null && tm instanceof ReactiveTransactionManager) {
		....省略...
	}

	PlatformTransactionManager ptm = asPlatformTransactionManager(tm);
	// 获取目标方法唯一标识,如 com.xx.XX.xx
	final String joinpointIdentification = methodIdentification(method, targetClass, txAttr);
	// 根据条件执行目标增强
	if (txAttr == null || !(ptm instanceof CallbackPreferringPlatformTransactionManager)) {
		// Standard transaction demarcation with getTransaction and commit/rollback calls.
		// 判断是否有必要创建一个事物,根据事物传播行为决定,如果需要则新建事务信息,还会保存至 ThreadLocal 中
		TransactionInfo txInfo = createTransactionIfNecessary(ptm, txAttr, joinpointIdentification);

		// 返回值
		Object retVal;
		try {
			// This is an around advice: Invoke the next interceptor in the chain.
			// This will normally result in a target object being invoked.
			// 切面向下执行,如果没有事务切面了,就执行业务方法
			retVal = invocation.proceedWithInvocation();
		}
		catch (Throwable ex) {
			// target invocation exception
			// 业务方法执行报错,回滚
			completeTransactionAfterThrowing(txInfo, ex);
			throw ex;
		}
		finally {
			// 清除当前事务
			cleanupTransactionInfo(txInfo);
		}

		if (retVal != null && vavrPresent && VavrDelegate.isVavrTry(retVal)) {
			// Set rollback-only in case of Vavr failure matching our rollback rules...
			TransactionStatus status = txInfo.getTransactionStatus();
			if (status != null && txAttr != null) {
				retVal = VavrDelegate.evaluateTryFailure(retVal, txAttr, status);
			}
		}
		// 提交事务
		commitTransactionAfterReturning(txInfo);
		// 如果方法正常执行,则必提交事务成功
		return retVal;
	}

	else {
	     ....省略...
	}
}
这里会获取到前面拿到前面解析出来 @Transactional 注解的属性,并获取到事物管理器,一般为 DataSourceTransactionManager ,后面我们也主要看该类型的事务操作过程。
其中里面几个重要的方法: createTransactionIfNecessary 方法主要开启事务,completeTransactionAfterThrowing 方法回滚事务,commitTransactionAfterReturning 方法提交事务。
五、开启事务的过程
看到 TransactionAspectSupport 类下的 createTransactionIfNecessary 方法:
protected TransactionInfo createTransactionIfNecessary(@Nullable PlatformTransactionManager tm,
		@Nullable TransactionAttribute txAttr, final String joinpointIdentification) {

	// If no name specified, apply method identification as transaction name.
	if (txAttr != null && txAttr.getName() == null) {
		txAttr = new DelegatingTransactionAttribute(txAttr) {
			@Override
			public String getName() {
				return joinpointIdentification;
			}
		};
	}

	TransactionStatus status = null;
	if (txAttr != null) {
		if (tm != null) {
			// 从事务管理器里面,获取事务状态,此处会开启事务,整个流程的重点
			status = tm.getTransaction(txAttr);
		}
		else {
			if (logger.isDebugEnabled()) {
				logger.debug("Skipping transactional joinpoint [" + joinpointIdentification +
						"] because no transaction manager has been configured");
			}
		}
	}
	// 创建事务信息对象,记录新老事务信息
	return prepareTransactionInfo(tm, txAttr, joinpointIdentification, status);
}
再看到 tm.getTransaction 方法中,如果事务不存在就开启一个事务:
public final TransactionStatus getTransaction(@Nullable TransactionDefinition definition)
		throws TransactionException {

	// Use defaults if no transaction definition given.
	TransactionDefinition def = (definition != null ? definition : TransactionDefinition.withDefaults());

	// 获取事务对象,本质上,是将当前线程的数据库连接对象,与事务相关联
	Object transaction = doGetTransaction();
	boolean debugEnabled = logger.isDebugEnabled();

	// 首次进入,connectionHolder为空,不存在事务
	// 如果事务已经存在
	if (isExistingTransaction(transaction)) {
		// Existing transaction found -> check propagation behavior to find out how to behave.
		// 处理已经存在的事务
		return handleExistingTransaction(def, transaction, debugEnabled);
	}

	// Check definition settings for new transaction.
	// 默认事务无超时设置
	if (def.getTimeout() < TransactionDefinition.TIMEOUT_DEFAULT) {
		throw new InvalidTimeoutException("Invalid transaction timeout", def.getTimeout());
	}

	// No existing transaction found -> check propagation behavior to find out how to proceed.
	// 不存在事务,且事务传播属性为 强制时,抛错
	if (def.getPropagationBehavior() == TransactionDefinition.PROPAGATION_MANDATORY) {
		throw new IllegalTransactionStateException(
				"No existing transaction found for transaction marked with propagation 'mandatory'");
	}
	// 如果事务隔离级别为 requered,requires_new,nested, 则加入事务
	else if (def.getPropagationBehavior() == TransactionDefinition.PROPAGATION_REQUIRED ||
			def.getPropagationBehavior() == TransactionDefinition.PROPAGATION_REQUIRES_NEW ||
			def.getPropagationBehavior() == TransactionDefinition.PROPAGATION_NESTED) {
		// 挂起
		SuspendedResourcesHolder suspendedResources = suspend(null);
		if (debugEnabled) {
			logger.debug("Creating new transaction with name [" + def.getName() + "]: " + def);
		}
		try {
			// 创建新事务
			return startTransaction(def, transaction, debugEnabled, suspendedResources);
		}
		catch (RuntimeException | Error ex) {
			resume(null, suspendedResources);
			throw ex;
		}
	}
	else {
		// Create "empty" transaction: no actual transaction, but potentially synchronization.
		if (def.getIsolationLevel() != TransactionDefinition.ISOLATION_DEFAULT && logger.isWarnEnabled()) {
			logger.warn("Custom isolation level specified but no actual transaction initiated; " +
					"isolation level will effectively be ignored: " + def);
		}
		boolean newSynchronization = (getTransactionSynchronization() == SYNCHRONIZATION_ALWAYS);
		return prepareTransactionStatus(def, null, true, newSynchronization, debugEnabled, null);
	}
}
这里首先通过 doGetTransaction 方法获取事务对象,前提有事务的话,本质就是去 ThreadLocal 中获取连接句柄,看到 DataSourceTransactionManager 类下 doGetTransaction 方法:
protected Object doGetTransaction() {
	DataSourceTransactionObject txObject = new DataSourceTransactionObject();
	txObject.setSavepointAllowed(isNestedTransactionAllowed());
	//当前数据源,在当前线程 的 连接对象
	ConnectionHolder conHolder =
			(ConnectionHolder) TransactionSynchronizationManager.getResource(obtainDataSource());
	// 将该连接对象,设置进事务中
	txObject.setConnectionHolder(conHolder, false);
	return txObject;
}
其中 TransactionSynchronizationManager.getResource 就是去 ThreadLocal 中获取:
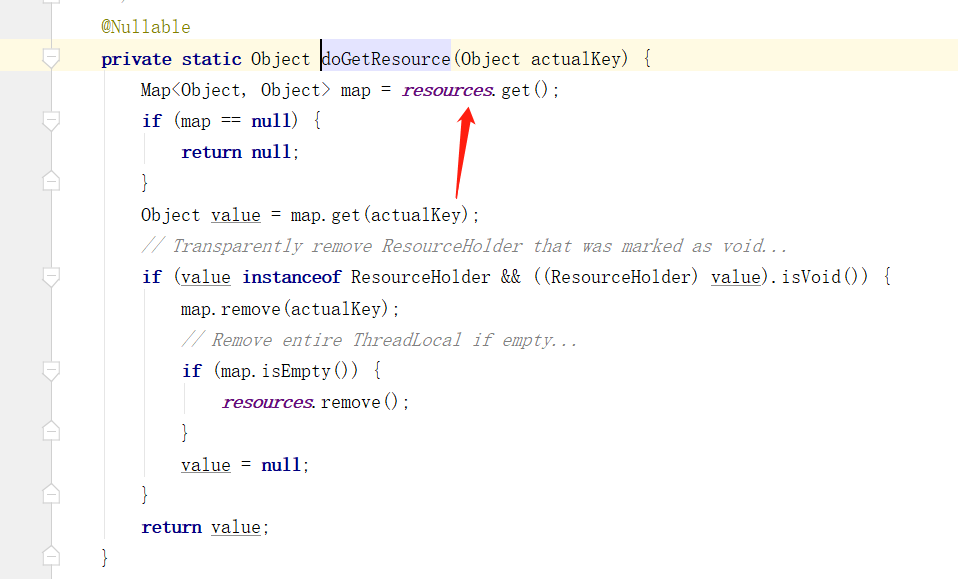

下面回到 getTransaction 方法中,如果不存在事务的话,下面通过 startTransaction 方法开启事务,看到该方法中:
private TransactionStatus startTransaction(TransactionDefinition definition, Object transaction,
		boolean debugEnabled, @Nullable SuspendedResourcesHolder suspendedResources) {

	boolean newSynchronization = (getTransactionSynchronization() != SYNCHRONIZATION_NEVER);
	// 创建事务状态信息,封装一些事务对象的信息,记录事务状态
	// 该事务标志为 新事务
	DefaultTransactionStatus status = newTransactionStatus(
			definition, transaction, true, newSynchronization, debugEnabled, suspendedResources);
	// 开启事务,
	// jdbc: transaction -> DataSourceTransactionObject jta: JtaTransactionObject
	// jms: transaction-> JmsTransactionObject  jca: CciLocalTransactionObject
	doBegin(transaction, definition);
	// 开启事务后,改变事务状态
	prepareSynchronization(status, definition);
	return status;
}
再看到 doBegin 方法中,来到 DataSourceTransactionManager 类下的方法:
protected void doBegin(Object transaction, TransactionDefinition definition) {
	DataSourceTransactionObject txObject = (DataSourceTransactionObject) transaction;
	Connection con = null;

	try {
		// 如果之前没有连接,则新建连接
		if (!txObject.hasConnectionHolder() ||
				txObject.getConnectionHolder().isSynchronizedWithTransaction()) {
			// 此处是 从连接池获取连接,算是应用层底层与上层的交界处
			Connection newCon = obtainDataSource().getConnection();
			if (logger.isDebugEnabled()) {
				logger.debug("Acquired Connection [" + newCon + "] for JDBC transaction");
			}
			// 将首次创建的连接,保存至 connectionHolder,connectionHolder 由 ThreadLocal实现
			txObject.setConnectionHolder(new ConnectionHolder(newCon), true);
		}

		txObject.getConnectionHolder().setSynchronizedWithTransaction(true);
		// 从当前事务,获取连接,一个事务下,用的同一个连接
		con = txObject.getConnectionHolder().getConnection();

		Integer previousIsolationLevel = DataSourceUtils.prepareConnectionForTransaction(con, definition);
		txObject.setPreviousIsolationLevel(previousIsolationLevel);
		// 设置事务的可读状态
		txObject.setReadOnly(definition.isReadOnly());

		// Switch to manual commit if necessary. This is very expensive in some JDBC drivers,
		// so we don't want to do it unnecessarily (for example if we've explicitly
		// configured the connection pool to set it already).
		// 有事务的环境,如果设置了自动提交,则会自动切换到 手动提交
		if (con.getAutoCommit()) {
			txObject.setMustRestoreAutoCommit(true);
			if (logger.isDebugEnabled()) {
				logger.debug("Switching JDBC Connection [" + con + "] to manual commit");
			}
			// 关闭连接得自动提交,这一步实际上就开启了事务
			con.setAutoCommit(false);
		}

		// 设置事务只读状态
		prepareTransactionalConnection(con, definition);
		txObject.getConnectionHolder().setTransactionActive(true);

		int timeout = determineTimeout(definition);
		if (timeout != TransactionDefinition.TIMEOUT_DEFAULT) {
			txObject.getConnectionHolder().setTimeoutInSeconds(timeout);
		}

		// Bind the connection holder to the thread.
		// 如果是新创建的事务
		if (txObject.isNewConnectionHolder()) {
			// 就 建立 当前线程,和 数据库连接的绑定关系
			TransactionSynchronizationManager.bindResource(obtainDataSource(), txObject.getConnectionHolder());
		}
	}

	catch (Throwable ex) {
		if (txObject.isNewConnectionHolder()) {
			DataSourceUtils.releaseConnection(con, obtainDataSource());
			txObject.setConnectionHolder(null, false);
		}
		throw new CannotCreateTransactionException("Could not open JDBC Connection for transaction", ex);
	}
}
获取到数据库连接后,通过 con.setAutoCommit(false) 将自动提交关闭,实际上就已经开启了事务。
在最后 TransactionSynchronizationManager.bindResource 就是将当前连接句柄存放发到前面提到的 resources ThreadLocal 中:
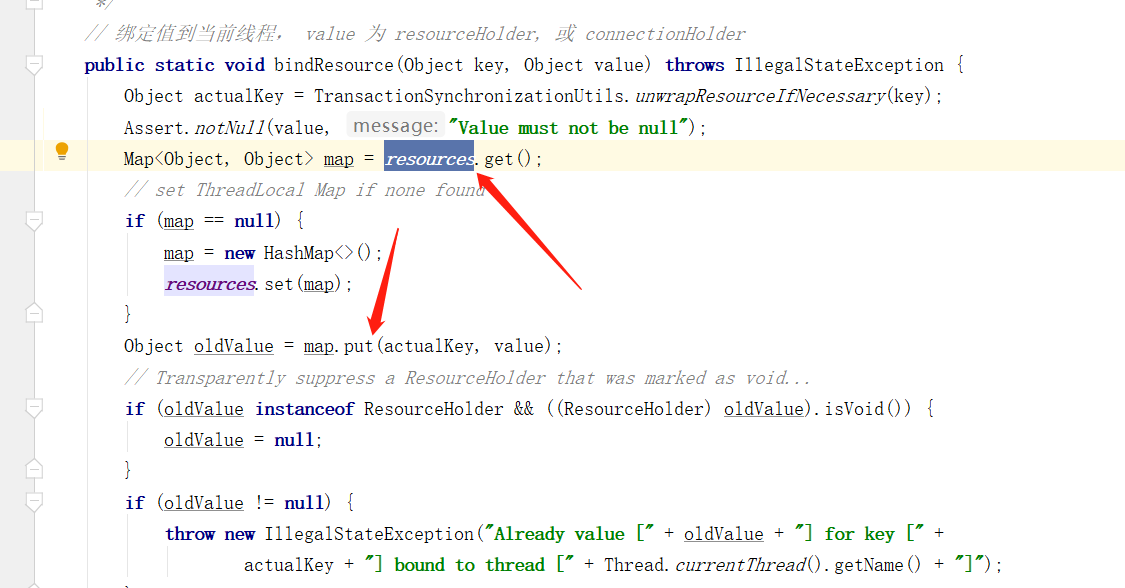
六、回滚事务过程
看到 TransactionAspectSupport 类下的 completeTransactionAfterThrowing 方法:
protected void completeTransactionAfterThrowing(@Nullable TransactionInfo txInfo, Throwable ex) {
	if (txInfo != null && txInfo.getTransactionStatus() != null) {
		if (logger.isTraceEnabled()) {
			logger.trace("Completing transaction for [" + txInfo.getJoinpointIdentification() +
					"] after exception: " + ex);
		}
		// 异常回滚
		if (txInfo.transactionAttribute != null && txInfo.transactionAttribute.rollbackOn(ex)) {
			try {
				//调用 事务管理器进行 回滚操作
				txInfo.getTransactionManager().rollback(txInfo.getTransactionStatus());
			}
			catch (TransactionSystemException ex2) {
				logger.error("Application exception overridden by rollback exception", ex);
				ex2.initApplicationException(ex);
				throw ex2;
			}
			catch (RuntimeException | Error ex2) {
				logger.error("Application exception overridden by rollback exception", ex);
				throw ex2;
			}
		}
		// 否则提交该事务
		else {
			// We don't roll back on this exception.
			// Will still roll back if TransactionStatus.isRollbackOnly() is true.
			try {
				txInfo.getTransactionManager().commit(txInfo.getTransactionStatus());
			}
			catch (TransactionSystemException ex2) {
				logger.error("Application exception overridden by commit exception", ex);
				ex2.initApplicationException(ex);
				throw ex2;
			}
			catch (RuntimeException | Error ex2) {
				logger.error("Application exception overridden by commit exception", ex);
				throw ex2;
			}
		}
	}
}
如果设置了 rollbackOn 参数,会异常类型判断是否符合,不符合直接提交事务。
如果符合则获取到事务管理器进行 回滚操作,看到 rollback 方法中:
public final void rollback(TransactionStatus status) throws TransactionException {
	if (status.isCompleted()) {
		throw new IllegalTransactionStateException(
				"Transaction is already completed - do not call commit or rollback more than once per transaction");
	}

	DefaultTransactionStatus defStatus = (DefaultTransactionStatus) status;
	// 回滚
	processRollback(defStatus, false);
}
再看到 processRollback 方法中:
private void processRollback(DefaultTransactionStatus status, boolean unexpected) {
	try {
		boolean unexpectedRollback = unexpected;

		try {
			triggerBeforeCompletion(status);
			// 内嵌事务,则去除回滚点
			if (status.hasSavepoint()) {
				if (status.isDebug()) {
					logger.debug("Rolling back transaction to savepoint");
				}
				status.rollbackToHeldSavepoint();
			}
			// 当前事务为新事务
			else if (status.isNewTransaction()) {
				if (status.isDebug()) {
					logger.debug("Initiating transaction rollback");
				}
				// 则执行回滚
				doRollback(status);
			}
			else {
				...省略...
			}
		}
		catch (RuntimeException | Error ex) {
			triggerAfterCompletion(status, TransactionSynchronization.STATUS_UNKNOWN);
			throw ex;
		}
		// 触发后置通知
		triggerAfterCompletion(status, TransactionSynchronization.STATUS_ROLLED_BACK);

		// Raise UnexpectedRollbackException if we had a global rollback-only marker
		if (unexpectedRollback) {
			throw new UnexpectedRollbackException(
					"Transaction rolled back because it has been marked as rollback-only");
		}
	}
	finally {
		cleanupAfterCompletion(status);
	}
}
主要回滚逻辑在 doRollback 方法中,看到DataSourceTransactionManager 类下的该方法:
protected void doRollback(DefaultTransactionStatus status) {
	DataSourceTransactionObject txObject = (DataSourceTransactionObject) status.getTransaction();
	Connection con = txObject.getConnectionHolder().getConnection();
	if (status.isDebug()) {
		logger.debug("Rolling back JDBC transaction on Connection [" + con + "]");
	}
	try {
		// 通过数据库实现回滚
		con.rollback();
	}
	catch (SQLException ex) {
		throw translateException("JDBC rollback", ex);
	}
}
获取到数据库连接后,通过 con.rollback() 进行事务的回滚。
七、提交事务的过程
看到TransactionAspectSupport 类下的 commitTransactionAfterReturning 方法中:
protected void commitTransactionAfterReturning(@Nullable TransactionInfo txInfo) {
	if (txInfo != null && txInfo.getTransactionStatus() != null) {
		if (logger.isTraceEnabled()) {
			logger.trace("Completing transaction for [" + txInfo.getJoinpointIdentification() + "]");
		}
		// 调用事务管理器提交该事务
		txInfo.getTransactionManager().commit(txInfo.getTransactionStatus());
	}
}
这里使用了事务管理器的 commit 方法,看到该方法下:
public final void commit(TransactionStatus status) throws TransactionException {
	if (status.isCompleted()) {
		throw new IllegalTransactionStateException(
				"Transaction is already completed - do not call commit or rollback more than once per transaction");
	}

	DefaultTransactionStatus defStatus = (DefaultTransactionStatus) status;
	if (defStatus.isLocalRollbackOnly()) {
		if (defStatus.isDebug()) {
			logger.debug("Transactional code has requested rollback");
		}
		processRollback(defStatus, false);
		return;
	}

	if (!shouldCommitOnGlobalRollbackOnly() && defStatus.isGlobalRollbackOnly()) {
		if (defStatus.isDebug()) {
			logger.debug("Global transaction is marked as rollback-only but transactional code requested commit");
		}
		processRollback(defStatus, true);
		return;
	}

	// 处理事务提交操作
	processCommit(defStatus);
}
再看到 processCommit 方法下:
private void processCommit(DefaultTransactionStatus status) throws TransactionException {
	try {
		boolean beforeCompletionInvoked = false;

		try {
			boolean unexpectedRollback = false;
			prepareForCommit(status);
			triggerBeforeCommit(status);
			triggerBeforeCompletion(status);
			beforeCompletionInvoked = true;
			// 内嵌事务
			if (status.hasSavepoint()) {
				if (status.isDebug()) {
					logger.debug("Releasing transaction savepoint");
				}
				// 不提交,只是将 savepoint 清除
				unexpectedRollback = status.isGlobalRollbackOnly();
				status.releaseHeldSavepoint();
			}
			// 当前事务为新事务
			else if (status.isNewTransaction()) {
				if (status.isDebug()) {
					logger.debug("Initiating transaction commit");
				}
				unexpectedRollback = status.isGlobalRollbackOnly();
				// 提交事务
				doCommit(status);
			}
			else if (isFailEarlyOnGlobalRollbackOnly()) {
				unexpectedRollback = status.isGlobalRollbackOnly();
			}

			// Throw UnexpectedRollbackException if we have a global rollback-only
			// marker but still didn't get a corresponding exception from commit.
			if (unexpectedRollback) {
				throw new UnexpectedRollbackException(
						"Transaction silently rolled back because it has been marked as rollback-only");
			}
		}
		catch (UnexpectedRollbackException ex) {
			// can only be caused by doCommit
			triggerAfterCompletion(status, TransactionSynchronization.STATUS_ROLLED_BACK);
			throw ex;
		}
		catch (TransactionException ex) {
			// can only be caused by doCommit
			if (isRollbackOnCommitFailure()) {
				doRollbackOnCommitException(status, ex);
			}
			else {
				triggerAfterCompletion(status, TransactionSynchronization.STATUS_UNKNOWN);
			}
			throw ex;
		}
		catch (RuntimeException | Error ex) {
			if (!beforeCompletionInvoked) {
				triggerBeforeCompletion(status);
			}
			doRollbackOnCommitException(status, ex);
			throw ex;
		}

		// Trigger afterCommit callbacks, with an exception thrown there
		// propagated to callers but the transaction still considered as committed.
		try {
			triggerAfterCommit(status);
		}
		finally {
			triggerAfterCompletion(status, TransactionSynchronization.STATUS_COMMITTED);
		}

	}
	finally {
		cleanupAfterCompletion(status);
	}
}
这里的判断逻辑和回滚的逻辑差不多,主要提交逻辑在 doCommit 方法中,看到 DataSourceTransactionManager 类下该方法:
protected void doCommit(DefaultTransactionStatus status) {
	DataSourceTransactionObject txObject = (DataSourceTransactionObject) status.getTransaction();
	Connection con = txObject.getConnectionHolder().getConnection();
	if (status.isDebug()) {
		logger.debug("Committing JDBC transaction on Connection [" + con + "]");
	}
	try {
		// 通过数据库连接,实现事务提交
		con.commit();
	}
	catch (SQLException ex) {
		throw translateException("JDBC commit", ex);
	}
}
获取到数据库连接后,通过 con.commit() 进行事务的提交。


【推荐】国内首个AI IDE,深度理解中文开发场景,立即下载体验Trae
【推荐】编程新体验,更懂你的AI,立即体验豆包MarsCode编程助手
【推荐】抖音旗下AI助手豆包,你的智能百科全书,全免费不限次数
【推荐】轻量又高性能的 SSH 工具 IShell:AI 加持,快人一步
· 分享一个免费、快速、无限量使用的满血 DeepSeek R1 模型,支持深度思考和联网搜索!
· 使用C#创建一个MCP客户端
· 基于 Docker 搭建 FRP 内网穿透开源项目(很简单哒)
· ollama系列1:轻松3步本地部署deepseek,普通电脑可用
· 按钮权限的设计及实现
2020-12-11 重构!重构!重构!