SpringBoot应用项目插件开发☞Jar包热更新
模块化开发---实现模块的动态加载与卸载
在工作中,由于我是主要负责直播APP的运营活动开发,这些活动代码有几个特性
- 活动周期短,通常只是一个节日、一个星期、十天、一个月等,所以导致代码用于运行的时间短,活动下线代码就废弃了。
- 活动规则总是根据收益和效果频繁变化,所以导致代码频繁修改和部署上线。
- 活动小而多,导致开发快上线多。
- 活动最好支持新旧版本同时在线,以便新版开放之前旧版正常使用。
- 活动之间没有联系,但是会有一些共同服务依赖,比如获取用户信息、发放奖励、推送提醒等。
针对这些,会带来两个问题
- 代码只用一段时间,但类还是会被JVM加载且Spring管理的bean无法回收,占用内存。
- 频繁修改代码和新的活动上线导致部署次数过多,可能影响其它活动,耗时并且不够灵活。
有什么好的办法可以解决呢?最先想到的是使用配置+Conditional来控制Spring是否注册Bean,但是效果不是很好。
如果能够把每个活动的代码单独打成一个jar包,在主项目运行时直接加载到JVM进行使用,并且可以注入其它的SpringBean,等到活动下线时就把它从JVM卸载,岂不美哉。
1、动态模块实现原理
Java的自定义ClassLoader和Spring的父子ApplicationContext就提供了这样的功能。
流程图:

1、新建Spring Boot项目test-project,分成两个module,把共享给模块的代码放到project-api。
2、project-server模块引入dynamic-module依赖,启动类加上自动配置注解并指定jar包存放目录。
3、开发模块test-module,引入dynamic-module和project-api,重写ModuleConfig类进行配置,并将类名写入META-INF/services/cn.zhh.dynamic_module.ModuleConfig文件提供SPI加载。同时实现Handler接口声明Spring组件。
4、将test-module打成jar包,使用dynamic-module提供的HTTP接口上传。
5、上传成功后dynamic-module根据ModuleConfig子类和Handler实现完成Class加载和Bean注册,生成对应的Module对象和Handler对象并管理起来。
6、project-server可以根据moduleName和handlerName调用module的handler了。
7、使用dynamic-module提供的HTTP接口查询模块信息或者卸载模块。
8、project-server重启会触发jar包存放目录下的所有模块自动加载注册。
下面看下核心的自定义ClassLoader类和自定义ApplicationContext类以及动态加载卸载过程。
完整代码和使用案例都可以在github找到:https://github.com/zhouhuanghua/dynamic-module
2、自定义ClassLoader
这里扩展了一个功能,默认的ClassLoader.loadClass方法是双亲委派模式,我们对它进行覆盖,针对配置的指定类可以直接自己加载,这样每个模块就可以使用不同版本相同名字的Class了。
-
-
class ModuleClassLoader extends URLClassLoader {
-
-
public static final String[] DEFAULT_EXCLUDED_PACKAGES = new String[]{"java.", "javax.", "sun.", "oracle."};
-
-
private final Set<String> excludedPackages;
-
-
private final Set<String> overridePackages;
-
-
public ModuleClassLoader(URL url, ClassLoader parent) {
-
super(new URL[]{url}, parent);
-
this.excludedPackages = Sets.newHashSet(Arrays.asList(DEFAULT_EXCLUDED_PACKAGES.clone()));
-
this.overridePackages = Sets.newHashSet();
-
}
-
-
public void addExcludedPackages(Set<String> excludedPackages) {
-
this.excludedPackages.addAll(excludedPackages);
-
}
-
-
public void addOverridePackages(Set<String> overridePackages) {
-
this.overridePackages.addAll(overridePackages);
-
}
-
-
-
protected Class<?> loadClass(String name, boolean resolve) throws ClassNotFoundException {
-
Class<?> result = null;
-
synchronized (ModuleClassLoader.class) {
-
if (isEligibleForOverriding(name)) {
-
if (log.isInfoEnabled()) {
-
log.info("Load class for overriding: {}", name);
-
}
-
result = loadClassForOverriding(name);
-
}
-
if (Objects.nonNull(result)) {
-
// 链接类
-
if (resolve) {
-
resolveClass(result);
-
}
-
return result;
-
}
-
}
-
// 使用默认类加载方式
-
return super.loadClass(name, resolve);
-
}
-
-
private Class<?> loadClassForOverriding(String name) throws ClassNotFoundException {
-
// 查找已加载的类
-
Class<?> result = findLoadedClass(name);
-
if (Objects.isNull(result)) {
-
// 加载类
-
result = findClass(name);
-
}
-
return result;
-
}
-
-
private boolean isEligibleForOverriding(final String name) {
-
checkNotNull(name, "name is null");
-
return !isExcluded(name) && any(overridePackages, name::startsWith);
-
}
-
-
protected boolean isExcluded(String className) {
-
checkNotNull(className, "className is null");
-
for (String packageName : this.excludedPackages) {
-
if (className.startsWith(packageName)) {
-
return true;
-
}
-
}
-
return false;
-
}
-
-
}
3、自定义ApplicationContext
使用基于注解配置的方式。暂时不需要扩展其它功能。
-
class ModuleApplicationContext extends AnnotationConfigApplicationContext {
-
-
}
4、动态加载
创建ModuleClassLoader,指定jar包路径和父加载器。
采用SPI的方式读取ModuleConfig数据。
创建ModuleApplicationContext,指定父上下文、类加载器、扫描包路径,执行refresh。
-
-
class ModuleLoader implements ApplicationContextAware {
-
-
/**
-
* 注入父applicationContext
-
*/
-
-
private ApplicationContext applicationContext;
-
-
/**
-
* 加载模块
-
*
-
* @param jarPath jar包路径
-
* @return Module
-
*/
-
public Module load(Path jarPath) {
-
if (log.isInfoEnabled()) {
-
log.info("Start to load module: {}", jarPath);
-
}
-
ModuleClassLoader moduleClassLoader;
-
try {
-
moduleClassLoader = new ModuleClassLoader(jarPath.toUri().toURL(), applicationContext.getClassLoader());
-
} catch (MalformedURLException e) {
-
throw new ModuleRuntimeException("create ModuleClassLoader exception", e);
-
}
-
List<ModuleConfig> moduleConfigList = new ArrayList<>();
-
ServiceLoader.load(ModuleConfig.class, moduleClassLoader).forEach(moduleConfigList::add);
-
if (moduleConfigList.size() != 1) {
-
throw new ModuleRuntimeException("module config has and only has one");
-
}
-
ModuleConfig moduleConfig = moduleConfigList.get(0);
-
moduleClassLoader.addOverridePackages(moduleConfig.overridePackages());
-
ClassLoader currentClassLoader = Thread.currentThread().getContextClassLoader();
-
try {
-
// 把当前线程的ClassLoader切换成模块的
-
Thread.currentThread().setContextClassLoader(moduleClassLoader);
-
ModuleApplicationContext moduleApplicationContext = new ModuleApplicationContext();
-
moduleApplicationContext.setParent(applicationContext);
-
moduleApplicationContext.setClassLoader(moduleClassLoader);
-
moduleApplicationContext.scan(moduleConfig.scanPackages().toArray(new String[0]));
-
moduleApplicationContext.refresh();
-
if (log.isInfoEnabled()) {
-
log.info("Load module success: name={}, version={}, jarPath={}", moduleConfig.name(), moduleConfig.version(), jarPath);
-
}
-
return new Module(jarPath, moduleConfig, moduleApplicationContext);
-
} catch (Throwable e) {
-
log.error(String.format("Load module exception, jarPath=%s", jarPath), e);
-
CachedIntrospectionResults.clearClassLoader(moduleClassLoader);
-
throw new ModuleRuntimeException("create ModuleApplicationContext exception", e);
-
} finally {
-
// 还原当前线程的ClassLoader
-
Thread.currentThread().setContextClassLoader(currentClassLoader);
-
}
-
}
-
-
}
生成Module对象后,还要收集它的Handler并管理起来
-
private Map<String, Handler> scanHandlers() {
-
Map<String, Handler> handlers = Maps.newHashMap();
-
// find Handler in module
-
for (Handler handler : moduleApplicationContext.getBeansOfType(Handler.class).values()) {
-
String handlerName = handler.name();
-
if (!StringUtils.hasText(handlerName)) {
-
throw new ModuleRuntimeException("scanHandlers handlerName is null");
-
}
-
checkState(!handlers.containsKey(handlerName), "Duplicated handler %s found by: %s",
-
Handler.class.getSimpleName(), handlerName);
-
handlers.put(handlerName, handler);
-
}
-
if (log.isInfoEnabled()) {
-
log.info("Scan handlers finish: {}", String.join(",", handlers.keySet()));
-
}
-
return ImmutableMap.copyOf(handlers);
-
}
5、动态卸载
- 关闭ApplicationContext。
- 清除ClassLoader并关闭(Class卸载的条件很苛刻,这个需要多加监控)。
- 删除jar文件。
-
public void destroy() throws Exception {
-
if (log.isInfoEnabled()) {
-
log.info("Destroy module: name={}, version={}", moduleConfig.name(), moduleConfig.version());
-
}
-
// close spring context
-
closeApplicationContext(moduleApplicationContext);
-
// clean class loader
-
clearClassLoader(moduleApplicationContext.getClassLoader());
-
// delete jar file
-
Files.deleteIfExists(jarPath);
-
}
-
-
private void closeApplicationContext(ConfigurableApplicationContext applicationContext) {
-
checkNotNull(applicationContext, "applicationContext is null");
-
try {
-
applicationContext.close();
-
} catch (Exception e) {
-
log.error("Failed to close application context", e);
-
}
-
}
-
-
private void clearClassLoader(ClassLoader classLoader) throws IOException {
-
checkNotNull(classLoader, "classLoader is null");
-
// Introspector缓存BeanInfo类来获得更好的性能。卸载时刷新所有Introspector的内部缓存。
-
Introspector.flushCaches();
-
// 从已经使用给定类加载器加载的缓存中移除所有资源包
-
ResourceBundle.clearCache(classLoader);
-
// clear the introspection cache for the given ClassLoader
-
CachedIntrospectionResults.clearClassLoader(classLoader);
-
// close
-
if (classLoader instanceof URLClassLoader) {
-
((URLClassLoader) classLoader).close();
-
}
-
}
先写这么多吧。。。主要是思路。
完整代码和使用案例都可以在github找到:https://github.com/zhouhuanghua/dynamic-module
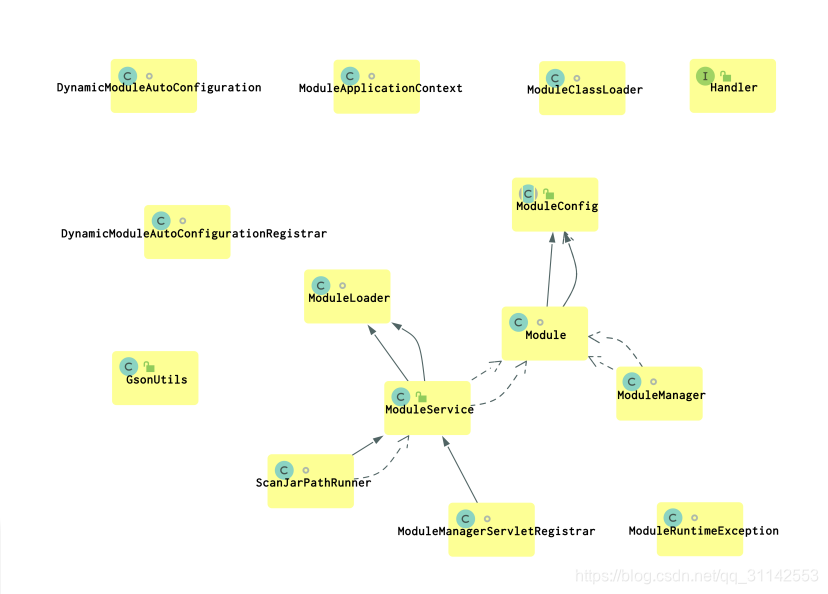
附上dynamic-module的类图

SpringBoot应用项目插件开发☞Jar包热更新
一、应用场景
你参与开发的项目已经部署到Tomcat中对外发布了,项目中有一个支付功能,你默认走的是微信支付,假如你有好好地进行系统软件设计的话,那这个支付功能必然不是面向某个具体应用而实现的,而应该是面向抽象(面向接口编程)。也就是支付功能被抽取到了统一的接口中,微信支付实现该接口的具体做法就是调用微信支付接口,支付宝同理,其他支付实现也一样;
这样一来,系统在现有微信支付功能上就可以很容易的扩展出支付宝支付的功能了。话又说回来了,假如我们开发了一个jar包,这个jar包功能很简单,就是支付宝支付功能的实现,那我们要怎么快速升级系统功能呢?以下有两种可选方式:
1、主应用(模块)pom中引入这个jar包的依赖,且这个jar包做成starter(springboot自动装配启动包,springboot3.0之前都是在META-INF/spring.factories中进行配置,SPI的高级扩展),使用这种方式不好的地方就是你需要定制你的jar包,而且主应用中还要进行依赖,完事后你需要重新编译打包,打完包后还需要重新部署,总之就是很繁琐(这里不涉及DevOps,如果是CI/CD模式,这篇文章可以不用往下看了,因为大部分项目都是独立给用户部署的,不可能搞什么开发运维一体化)。当然另外一种基于SPI的方式跟这种比没什么区别就不在说了。
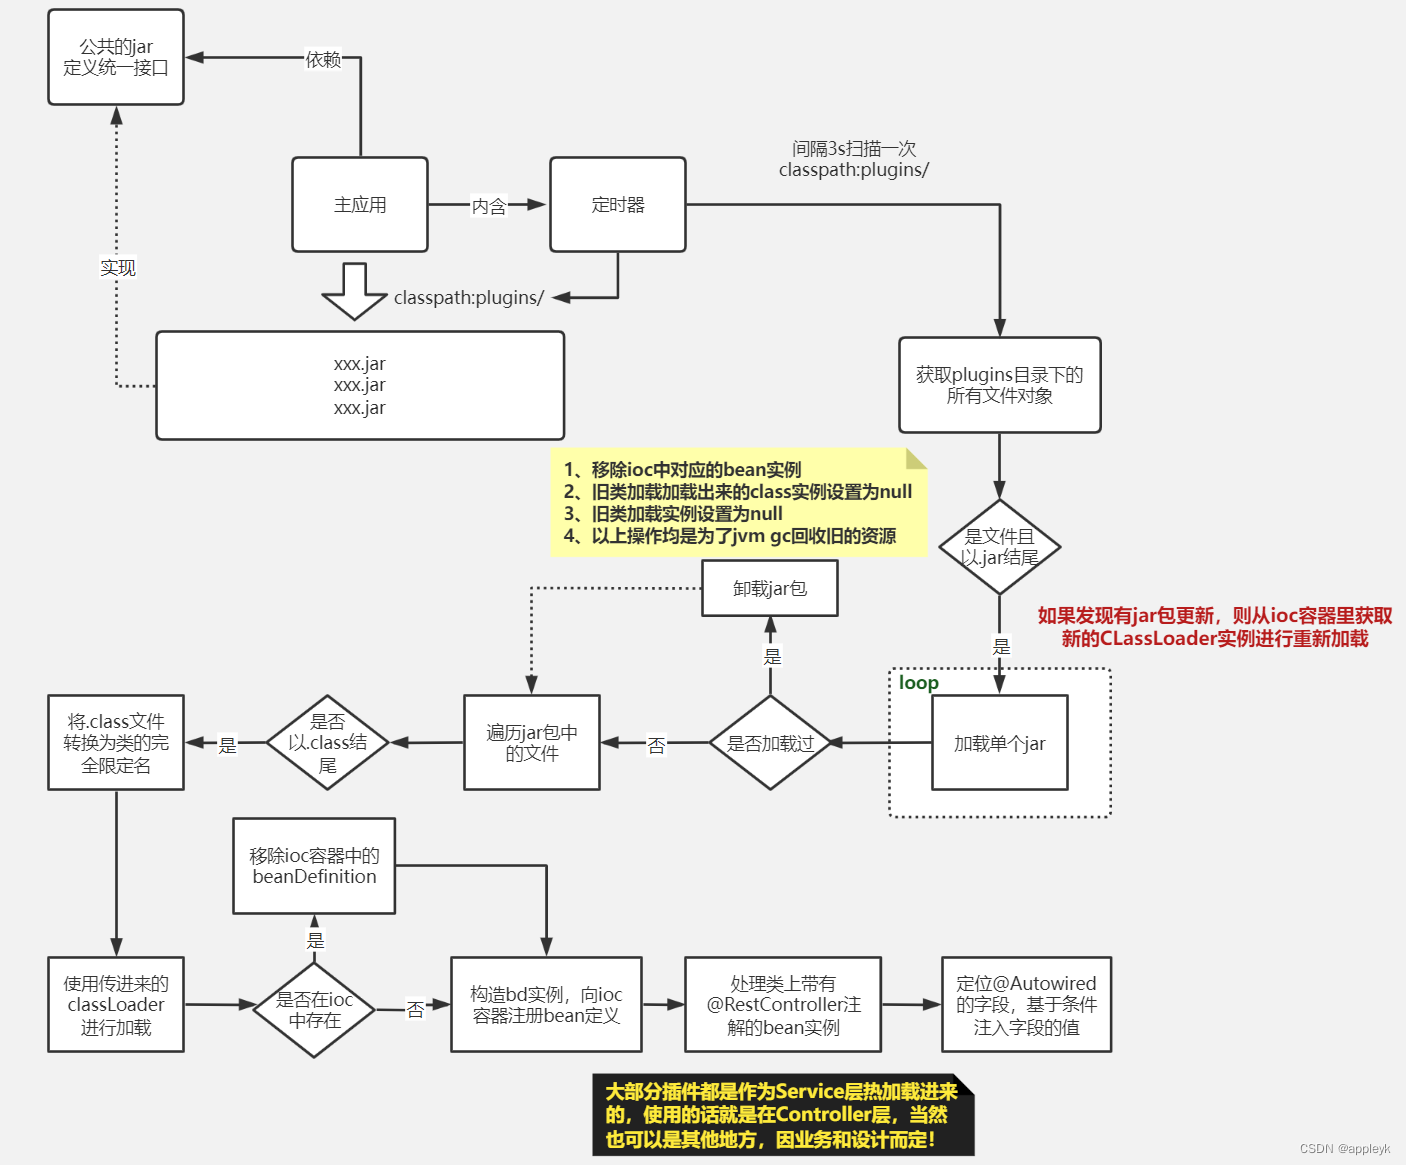
2、基于JVM类加器的原理,在主应用中实现自定义的ClassLoader,通过监听指定目录下的*.jar文件的修改,再配合我们自定义的类加载器去完成加载/卸载(热替换),顺带将jar包中符合Spring Bean条件的类的BeanDefinition注册到Spring IOC容器中,注册的同时也要动态的更新对应bean实例中@Autowired修饰的属性值,这样一来,我们开发好的jar包,只需要传到指定的目录下,整个系统无需重启即可动态的"扩展"出支付宝支付的功能出来。整个流程简化版的图如下:

二、核心代码☞HotClassLoader
代码注释很全,一看就明白,目前功能还很单一,只是测试DEMO阶段,待大量测试和改良,秉着开源精神,代码全部放开(主要是实现思路很有意思),最后会附上Gitee代码仓库地址。
-
import com.appleyk.util.SpringBeanUtils;
-
import lombok.extern.slf4j.Slf4j;
-
import org.springframework.beans.factory.annotation.Autowired;
-
import org.springframework.core.annotation.AnnotationUtils;
-
import org.springframework.stereotype.Component;
-
import org.springframework.stereotype.Service;
-
import org.springframework.util.ClassUtils;
-
import org.springframework.util.CollectionUtils;
-
import org.springframework.util.ResourceUtils;
-
import org.springframework.web.bind.annotation.RestController;
-
import java.io.File;
-
import java.io.IOException;
-
import java.lang.reflect.Field;
-
import java.net.*;
-
import java.util.*;
-
import java.util.jar.JarEntry;
-
import java.util.jar.JarFile;
-
import java.util.stream.Collectors;
-
-
/**
-
* <p>自定义类加载器,主要用来加载指定目录下的所有以.jar结尾的文件</p>
-
*
-
* @author appleyk
-
* @version V.0.1.1
-
* @blob https://blog.csdn.net/appleyk
-
* @github https://github.com/kobeyk
-
* @date created on 下午9:16 2022/11/23
-
*/
-
-
public class HotClassLoader extends URLClassLoader {
-
-
/**设定插件默认放置的路径*/
-
private static final String PLUGINS_DIR = "classpath:plugins";
-
/**jar更新时间键值对,通过value来判断jar包是否被修改了*/
-
private static final Map<String,Long> jarUpdateTime;
-
/**jar包对应的类加载器,即1个jar包对应1个类加载器,但是1个类加载器可以对应N个jar包*/
-
private static final Map<String,HotClassLoader> jarClassLoaders;
-
/**jar包中类的完全限定名键值对,即1个jar包包含N个class*/
-
private static final Map<String, List<String>> jarClassName;
-
-
static {
-
jarUpdateTime = new HashMap<>(16);
-
jarClassLoaders = new HashMap<>(16);
-
jarClassName = new HashMap<>(16);
-
}
-
-
public HotClassLoader(ClassLoader parent) {
-
super(new URL[0],parent);
-
}
-
-
/**
-
* 一次性加载plugins目录下的所有jar(这个可以放在定时扫描中,n秒执行一次)
-
* 但是前提必须是jar包有更新,也就是第一次是全量加载,后面扫描只会基于更新的jar做热替换
-
*/
-
public static void loadAllJar() throws Exception{
-
File file = null;
-
/** 首先先判断classpath下plugins是否存在,如果不存在,帮用户创建 */
-
try{
-
file = ResourceUtils.getFile(PLUGINS_DIR);
-
}catch (Exception e){
-
String classesPath = ClassUtils.getDefaultClassLoader().getResource("").getPath();
-
String pluginsDir = classesPath+"plugins";
-
file = new File(pluginsDir);
-
if (!file.exists()){
-
/**不存在就创建*/
-
file.mkdirs();
-
}
-
}
-
-
/** 如果存在,遍历目录下面的所有子文件对象*/
-
File[] files = file.listFiles();
-
if (files == null || files.length == 0){
-
log.info("no plugins resource need loading...");
-
return;
-
}
-
List<String> updatedJars = new ArrayList<>();
-
for (File childFile : files) {
-
String name = childFile.getName();
-
/**如果子文件对象是文件夹,则不处理*/
-
if (childFile.isDirectory()){
-
log.warn("not support the folder of " + name);
-
continue;
-
}
-
/**如果文件不以jar结尾,也不处理*/
-
if (!name.endsWith(".jar")){
-
log.warn("not support the plugin file of " + name);
-
continue;
-
}
-
/**构建jar类路径*/
-
String jarPath = String.format("%s/%s",PLUGINS_DIR,name);
-
long lastModifyTime = childFile.getAbsoluteFile().lastModified();
-
if (Objects.equals(lastModifyTime,jarUpdateTime.get(jarPath))){
-
continue;
-
}
-
/**将修改过的jar路径保存起来s*/
-
System.out.println(String.format("%s changed, need to reload",jarPath));
-
updatedJars.add(jarPath);
-
}
-
-
if (updatedJars.size() == 0){
-
System.out.println("There are no Jars to update !");
-
return;
-
}
-
-
/**
-
* 如果本次扫描发现有jar包更新,则从ioc容器里取出新的classLoader实例以加载这些jar包中的class
-
* 这个地方很巧妙。即同一批次更新的jar包会使用用同一个类加载器去加载,这就避免了类加载器不会平白无故的多出很多!
-
* 为什么这里要重新加载呢?我们知道,判断类对象在JVM中是否独有一份并不取决于它的完全限定名,即com.appleyk.xxx
-
* 是唯一的,还取决于把它载入JVM内存中的类加载器是不是同一个,也就是同样是User.class,我们可以让它在JVM中存在多份,
-
* 这个只需要用不同的用户自定义类加载器实例去loadClass即可实现,话又说回来,如果不是需要热更新正常情况下我们肯定不会这么做的!
-
* 这里使用新的类加载对象去加载这一批更新的jar包的目的就是实现Class的热卸载和热替换。
-
* 具体怎么做的,可以细看loadJar方法的实现,最好一边调试一边看,效果最佳!
-
*/
-
HotClassLoader classLoader = SpringBeanUtils.getBean(HotClassLoader.class);
-
for (String updatedJar : updatedJars) {
-
loadJar(updatedJar,classLoader);
-
}
-
}
-
-
/**
-
* 使用指定的类加载加载单个jar文件中的所有class文件到JVM中,同时向Spring IOC容器中注入BD
-
* @param jarPath jar类路径,格式如:classpath:plugins/xxxx.jar
-
* @param classLoader 类加载器
-
*/
-
public static void loadJar(String jarPath,HotClassLoader classLoader) throws Exception{
-
/**先尝试从jar更新时间map中取出jarPath的更新时间*/
-
Long lastModifyTime = jarUpdateTime.get(jarPath);
-
/**如果等于0L,说明这个jar包还处于加载中,直接退出*/
-
if (Objects.equals(lastModifyTime,0L)){
-
log.warn("HotClassLoader.loadJar loading ,please not repeat the operation, jarPath = {}", jarPath);
-
return;
-
}
-
-
/**拿到jar文件对象*/
-
File file = jarPath.startsWith("classpath:") ? ResourceUtils.getFile(jarPath) : new File(jarPath);
-
/**为了保险,还是判断下jarPath(有可能是外部传进来的非法jarPath)是否存在*/
-
if (!file.exists()) {
-
log.warn("HotClassLoader.loadJar fail file not exist, jarPath = {}", jarPath);
-
return;
-
}
-
-
/**获取真实物理jarPath文件的修改时间*/
-
long currentJarModifyTime = file.getAbsoluteFile().lastModified();
-
/**如果通过对比发现jar包没有做任何修改,则不予重新加载,退出*/
-
if(Objects.equals(lastModifyTime,currentJarModifyTime)){
-
log.warn("HotClassLoader.loadJar current version has bean loaded , jarPath = {}", jarPath);
-
return;
-
}
-
-
/**获取新的类加载器*/
-
if (classLoader == null){
-
classLoader = SpringBeanUtils.getBean(HotClassLoader.class);
-
}
-
-
/**
-
* 如果jar包做了修改,则进行卸载流程
-
* 用户自定义类加载器加载出来的Class被JVM回收的三个苛刻条件分别是:
-
* 1、Class对应的所有的实例在JVM中不存在,即需要手动设置clzInstance = null;
-
* 2、加载该类的ClassLoader在JVM中不存在,即需要手动设置classLoader = null;
-
* 3、Class对象没有在任何地方被引用,比如不能再使用反射API,即需要手动设置class = null;
-
*/
-
if (jarUpdateTime.containsKey(jarPath)){
-
unloadJar(jarPath);
-
}
-
-
/**保存或更新当前jarPath的类加载器*/
-
jarClassLoaders.put(jarPath,classLoader);
-
-
try {
-
if (jarPath.startsWith("classpath:")) {
-
classLoader.addURL(new URI(jarPath).toURL());
-
} else {
-
classLoader.addURL(file.toURI().toURL());
-
}
-
-
} catch (MalformedURLException e) {
-
throw new IllegalArgumentException("通过url 添加 jar 失败");
-
}
-
-
/**开始(重新)加载前,初始化jarPth的更新时间为0*/
-
jarUpdateTime.put(jarPath, 0L);
-
-
List<String> classNameList = new ArrayList<>();
-
/** 遍历 jar 包中的类 */
-
try (JarFile jarFile = new JarFile(file.getAbsolutePath())) {
-
List<JarEntry> jarEntryList = jarFile.stream().sequential().collect(Collectors.toList());
-
for (JarEntry jarEntry : jarEntryList) {
-
String jarName = jarEntry.getName();
-
if (!jarName.endsWith(".class")) {
-
continue;
-
}
-
/**类的完全限定名处理*/
-
String className = jarName.replace(".class", "").replace("/", ".");
-
boolean beanExist = SpringBeanUtils.contains(className);
-
/**如果存在,更新*/
-
if(beanExist){
-
SpringBeanUtils.removeBean(className);
-
}
-
/**使用指定的类加载器加载该类*/
-
Class<?> clz = classLoader.loadClass(className, false);
-
-
/**
-
* 这个地方要反射一下,判断下,clazz上是否有注解(@Service、@Component等)
-
* 并不是所有的类都要注入到spring ioc容器中
-
*/
-
boolean withBean =
-
AnnotationUtils.findAnnotation(clz, Service.class) != null
-
|| AnnotationUtils.findAnnotation(clz, Component.class) != null;
-
if (withBean){
-
/**将class包装成BeanDefinition注册到Spring容器中*/
-
SpringBeanUtils.registerBean(className, clz);
-
/**
-
* 动态替换bean,这个地方从常用的角度来看,我们只需处理@Controller类,
-
* 给@AutoWired修饰的类字段做替换即可
-
*/
-
doAutowired(className, clz);
-
}
-
classNameList.add(className);
-
}
-
} catch (IOException | ClassNotFoundException e) {
-
throw new IllegalArgumentException("jar包解析失败");
-
}
-
-
/** 记录jarPath包含的所有的类 */
-
jarClassName.put(jarPath, classNameList);
-
-
/** 记录jarPath的更新时间 */
-
jarUpdateTime.put(jarPath, currentJarModifyTime);
-
}
-
-
/**卸载指定jar*/
-
private static void unloadJar(String jarPath) throws Exception{
-
/** 校验文件是否存在*/
-
File file = ResourceUtils.getFile(jarPath);
-
if (!file.exists()) {
-
log.warn("HotClassLoader.loadJar fail file not exist, jarPath = {}", jarPath);
-
return;
-
}
-
List<String> classNameList = jarClassName.get(jarPath);
-
if(CollectionUtils.isEmpty(classNameList)){
-
log.warn("HotClassLoader.loadJar fail,the jar no class, jarPath = {}", jarPath);
-
return;
-
}
-
-
HotClassLoader oldClassLoader = jarClassLoaders.get(jarPath);
-
/** 遍历移除spring中对应的bean,移除引用 */
-
for (String className : classNameList) {
-
boolean beanExist = SpringBeanUtils.contains(className);
-
if(beanExist){
-
/**把旧的类实例移除,切断对象引用*/
-
SpringBeanUtils.removeBean(className);
-
}
-
/**把旧的类加载器加载的Class对象置为null*/
-
Class<?> oldClz = oldClassLoader.loadClass(className, false);
-
oldClz = null;
-
}
-
/** 移除jarPath */
-
jarUpdateTime.remove(jarPath);
-
/**关闭类加载,然后切断引用*/
-
if (oldClassLoader!=null){
-
oldClassLoader.close();
-
oldClassLoader = null;
-
}
-
}
-
-
/**
-
* 处理bean的自动注入(手动)
-
* 这一块代码逻辑稍显复杂,但是还好,有spring源码基础的小伙伴一定不陌生!
-
* 这块的逻辑思路主要是借鉴了nacos的源码:
-
* nacos不仅是配置中心还是服务注册与发现中心,其作为配置中心的时候,我们知道,
-
* 项目中的Bean类中只要使用了@NacosValue注解去修饰属性字段,那么,一旦我们在
-
* nacos的web端修改了指定配置属性字段的值并保存后,那么项目端无需重启,
-
* 就可以获取到最新的配置值,它是怎么做到的呢? 首先抛开tcp连接不说,就说更新这块,
-
* 那必然是先通过网络请求拿到nacos数据库中最新的配置值(值改变了会触发回调),然后
-
* 找到这个字段所在的bean,然后再定位到bean实例的属性字段,然后通过反射set新值,
-
* 也就是内存中保存的是旧值,然后运维或开发人员在nacos端修改了某项配置值,
-
* 然后会通知App端进行值更新,App端获取到新的值后,会找到该值所在的beans,
-
* 然后通过反射修改这些beans中的这个字段的值,修改成功后,内存中的旧值就被“热替换”了!
-
*/
-
private static void doAutowired(String className,Class clz){
-
Map<String, Object> beanMap = SpringBeanUtils.getBeanMap(RestController.class);
-
if (beanMap == null || beanMap.size() == 0){
-
return;
-
}
-
/**拿到clz的接口*/
-
Class[] clzInterfaces = clz.getInterfaces();
-
beanMap.forEach((k,v)->{
-
Class<?> cz = v.getClass();
-
/**拿到class所有的字段(private,protected,public,但不包括父类的)*/
-
Field[] declaredFields = cz.getDeclaredFields();
-
if (declaredFields == null || declaredFields.length == 0){
-
return;
-
}
-
/**遍历字段,只处理@Autowired注解的字段值的注入*/
-
for (Field declaredField : declaredFields) {
-
if (!declaredField.isAnnotationPresent(Autowired.class)){
-
return;
-
}
-
/**推断下字段类型是否是接口(如果是接口的话,注入的条件稍显"复杂"些)*/
-
boolean bInterface = declaredField.getType().isInterface();
-
/**拿到字段的类型完全限定名*/
-
String fieldTypeName = declaredField.getType().getName();
-
-
/**设置字段可以被修改,这一版本,先不考虑多态bean的情况,下一个版本完善时再考虑*/
-
declaredField.setAccessible(true);
-
try{
-
/**如果字段的类型非接口并且字段的类的完全限定名就等于clz的名,那就直接setter设置*/
-
if (!bInterface && fieldTypeName == clz.getName()){
-
declaredField.set(v,SpringBeanUtils.getBean(className,clz));
-
}
-
/**如果字段类型是接口,还得判断下clz是不是实现了某些接口,如果是,得判断两边接口类型是否一致才能注入值*/
-
if (bInterface){
-
if (clzInterfaces !=null || clzInterfaces.length > 0){
-
for (Class inter : clzInterfaces) {
-
if (fieldTypeName == inter.getName()){
-
declaredField.set(v,SpringBeanUtils.getBean(className,clz));
-
break;
-
}
-
}
-
}
-
}
-
}catch (IllegalAccessException e){
-
throw new IllegalArgumentException(e);
-
}
-
}
-
});
-
}
-
-
-
protected Class<?> loadClass(String name, boolean resolve) throws ClassNotFoundException {
-
if(name.startsWith("java.")){
-
return ClassLoader.getSystemClassLoader().loadClass(name);
-
}
-
Class<?> clazz = findLoadedClass(name);
-
if (clazz != null) {
-
if (resolve) {
-
return loadClass(name);
-
}
-
return clazz;
-
}
-
return super.loadClass(name, resolve);
-
}
-
-
}
三、效果演示
视频地址:这边建议直接去B站看高清的:jar包热更新_哔哩哔哩_bilibili
jar包热更新
四、代码仓库
Gitee:springboot-plugins: 动态加载jar和卸载jar

目前只有一个master分支,其功能较为单一,后续有精力的话会继续开分支进行探究和完善。


