SpringBoot 之 spring-boot-load 模块

正常情况下 classloader 只能找到 jar 里面当前目录或者文件类里面的 *.class 文件。为了能够加载嵌套 jar 里面的资源之前都是把嵌套 jar 里面的 class 文件和应用的 class 文件打包为一个 jar,这样就不存在嵌套 jar 了,但是这样做就不能很清晰的知道应用到底依赖了哪些东西,哪些是应用自己的,另外多个 jar 里面的 class 可能内容不一样但是文件名却一样。springboot 中 spring-boot-loader 就是为优雅解决这个问题而诞生的。

spring-boot-loader 模块允许我们使用 java -jar archive.jar 运行包含嵌套依赖 jar 的 jar 或者 war 文件,它提供了三种类启动器 (JarLauncher, WarLauncher and PropertiesLauncher),这些类启动器的目的一样都是为了能够加载嵌套在 jar 里面的资源(比如 class 文件,配置文件等)。[Jar|War] Launcher 固定去查找当前 jar 的 lib 目录里面的嵌套 jar 文件里面的资源。

从本篇文章开始,记录学习 SpringBoot 框架在实践,源码方面的知识,本节是第一篇,因此不涉及相关复杂知识的学习。众所周知,随着微服务的广泛流行,Spring 系列的 SpringBoot 和 SpringCloud 的应用也更受欢迎,那么请跟随我的脚本来一步步解开 SpringBoot 她神秘的面纱

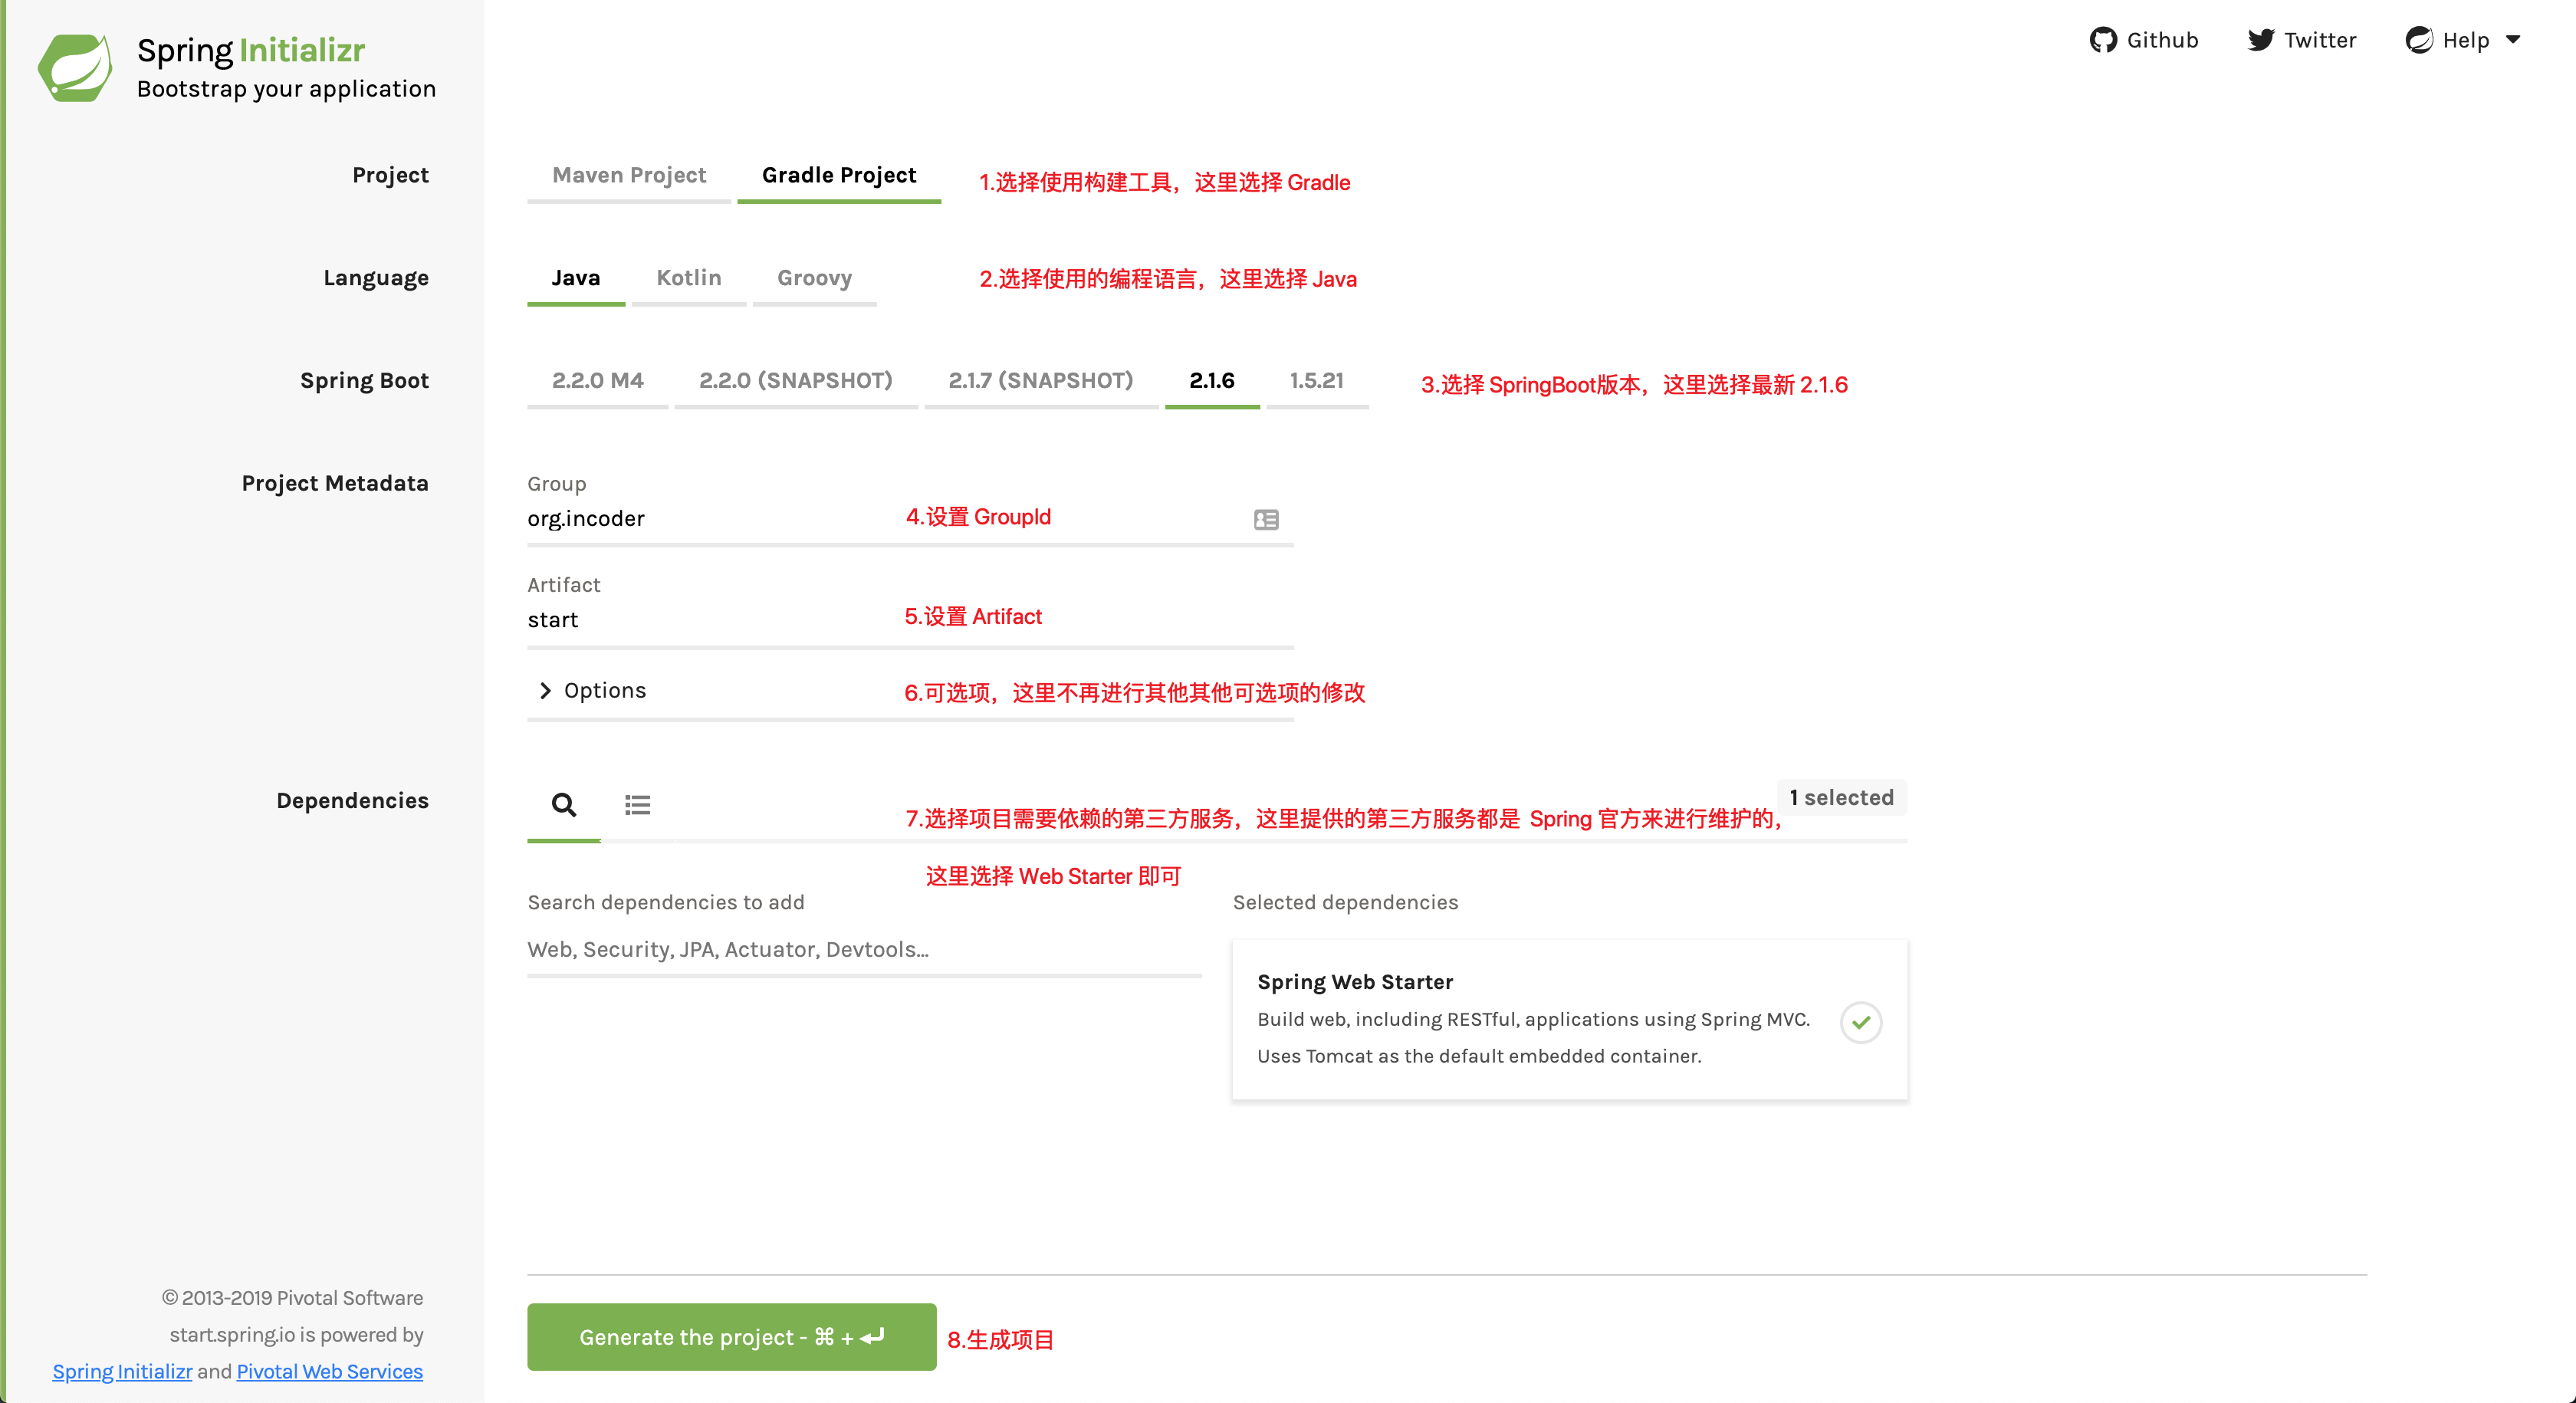
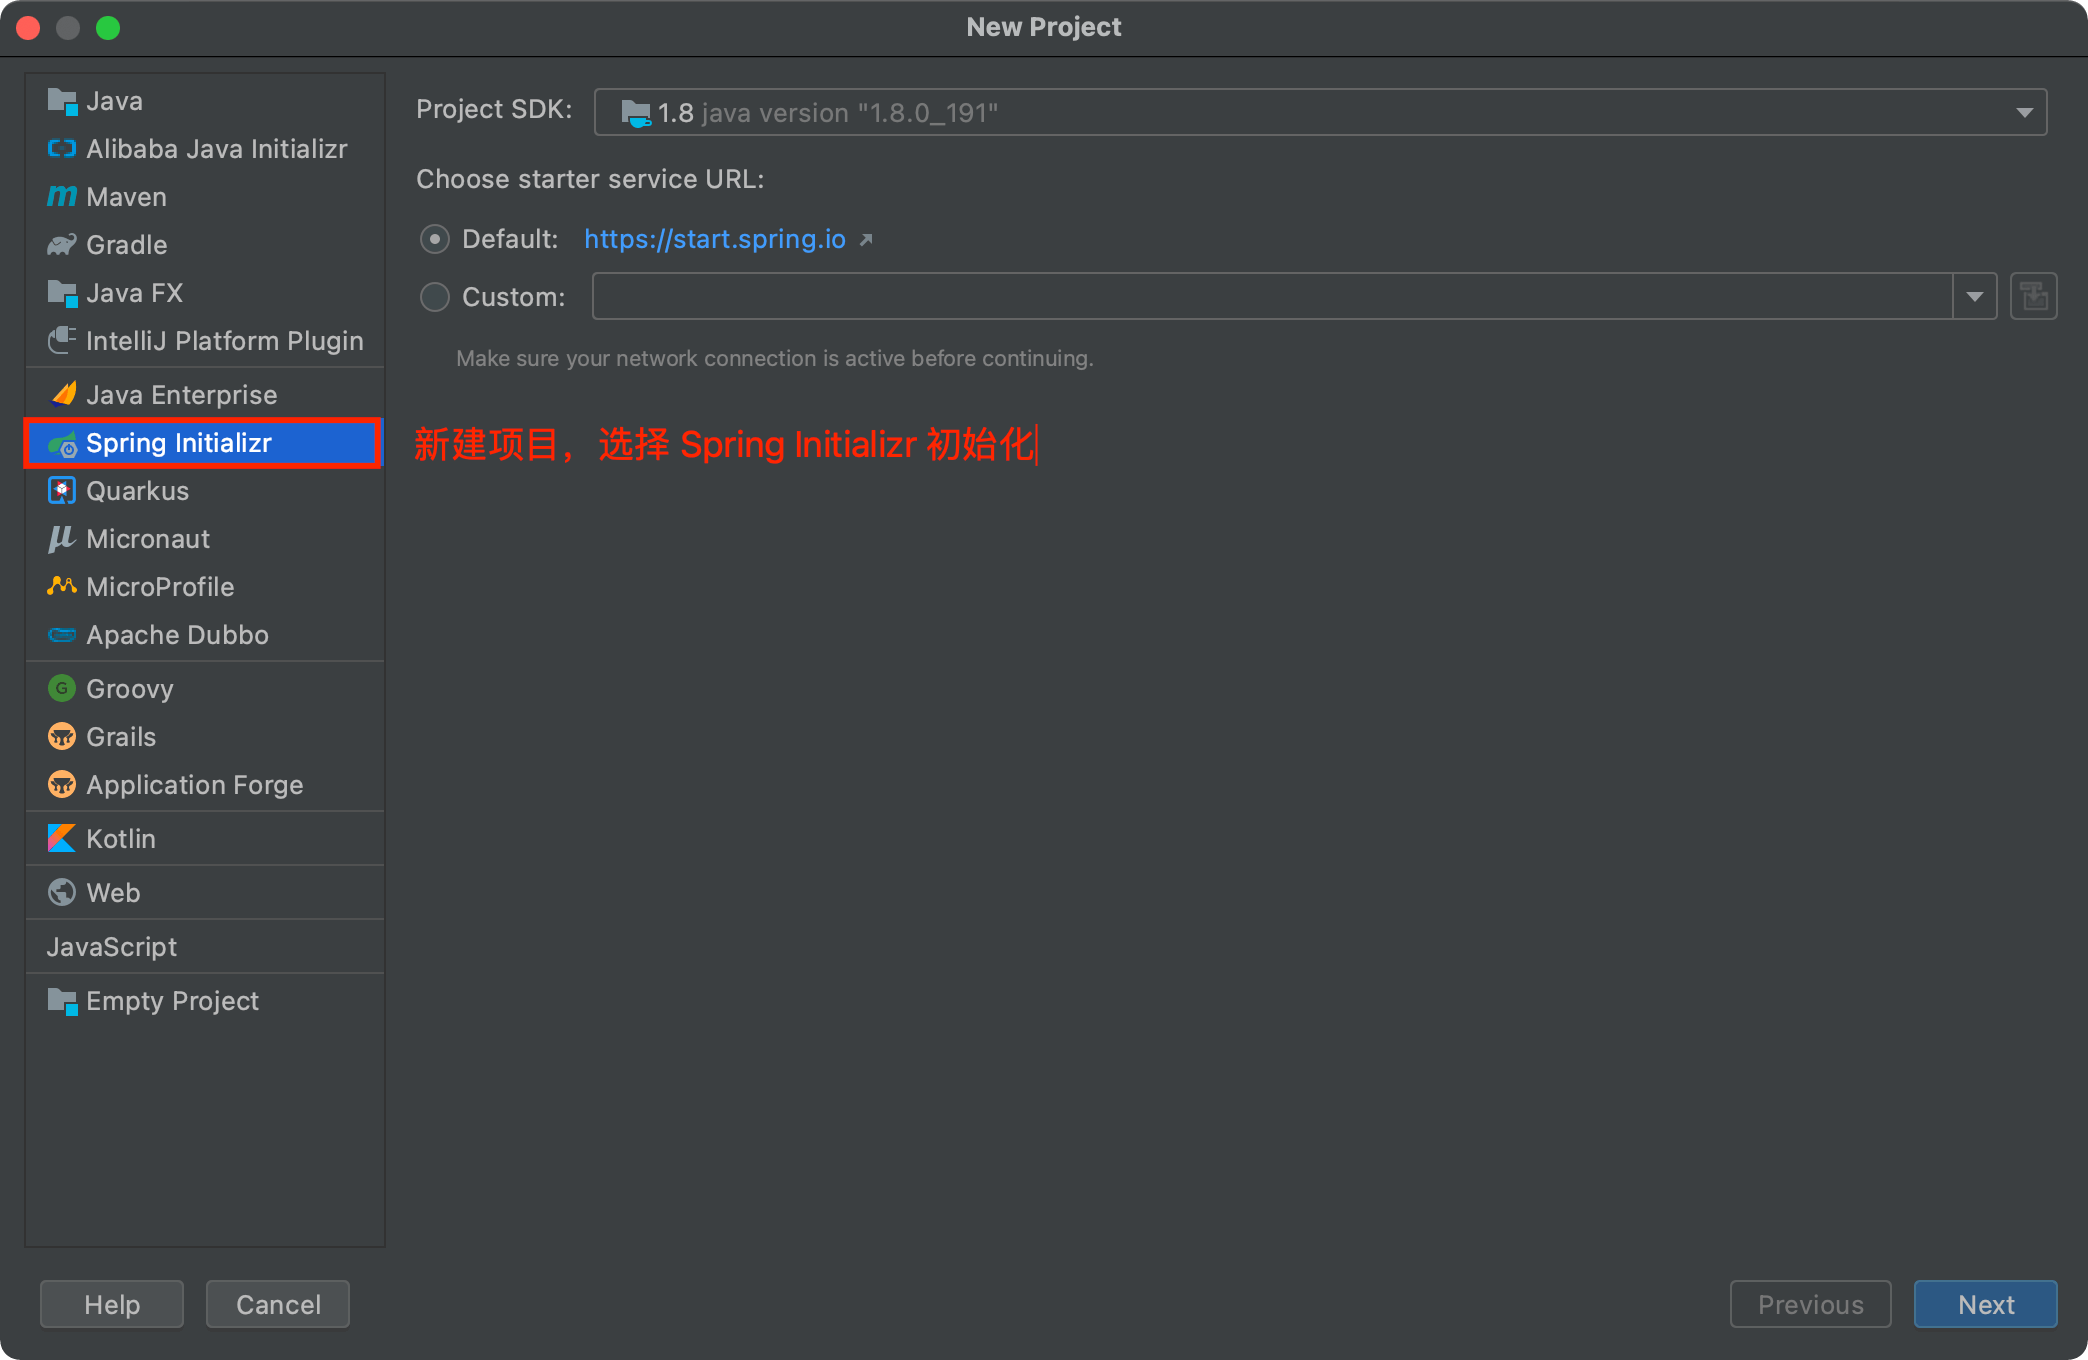
熟悉后端服务开发的小伙伴,在使用 SpringBoot 时一定会有这样的感受,咦,以前繁琐的配置,现在都不用再去配置一大堆东西了,以前跑起来一个 demo,感觉真是千辛万苦,错一步就 game over,以前服务基本都是已 war 包的形式运行在 Tomcat 中,而现在,你基本不需要手动写太多的代码,一个应用服务就可以运行起来,其次现在应用基本已 jar 包方式直接运行,虽然本质还是运行在 Tomcat 中,但现在 jar 包中已经有了服务运行的基础环境,可以直接使用 jar 相关的运行命令就可以运行起服务。好了,废话了这么多,先看看我们如何运行起一个 DEMO 应用。

环境及版本

  • SpringBoot Version:2.1.6.RELEASE
  • System:macOS Mojave
  • JDK Version:1.8
  • Gradle:5.4.1
  • IDE:IntelliJ IDEA

本系列应用使用如上环境,其次应用包管理,小伙伴可以选择自己熟悉的 Maven 进行管理,而这里都使用 Gradle 进行管理

Demo

Spring Initializr

为了让开发者快速上手,官方提供了一建生成 SpringBoot 项目,你按需选择你需要的依赖即可。操作步骤如下截图
spring-initializ

IDEA Init

IDEA 分为四步完成初始

  1. 选择 Spring Initializr 初始化向导
  2. 填写项目坐标信息,构建工具,版本,报名等
  3. 选择需要的组件(会自动添加依赖)
  4. 选择项目存放路径

Spring 运行

命令

macOS or Linux

1
2
# 项目路径下(spring-start)
gradlew bootRun
 

Windows

1
2
# 项目路径下(spring-start)
./gradlew bootRun
 

运行说明

spring-running-logo

Spring 打包

jar 分析

springboot-deploy-jar-unzip

目录说明

1
2
3
4
5
6
7
8
9
10
11
12
13
14
15
16
17
18
19
20
21
22
23
24
25
26
27
project/
├── BOOT-INF/                                                                   
│   ├── classes                                 # 当前项目结果文件放置在 classes 路径下
│   │   │   └── application.properties          # 项目中配置文件
│   │   ├── org/                                # 项目中 java 路径下,编译成 class 文件路径
│   │   ├── static/                             # 项目中 resources 路径下的静态文件夹
│   │   └── templates/                          # 项目中 resources 路径下的模板文件夹
│   └── lib/                                    # 项目所依赖的第三方 jar(Tomcat,SpringBoot 等)
├── META-INF/                                                                   
│   └── MANIFEST.MF                             # 清单文件,用于描述可执行 jar 的一些基本信息
└── org/springframework/boot/loader/            # jar 包启动相关的引导
    ├── archive/
    ├── data
    ├── ExectableArchiveLauncher.class
    ├── jar/
    ├── JarLauncher.class
    ├── LaunchedURLClassLoader.class
    ├── LaunchedURLClassLoader$UseFastConnectionExceptionsEnumeration.class
    ├── Launcher.class
    ├── MainMethodRunner.class
    ├── PropertiesLauncher.class
    ├── PropertiesLauncher$1.class
    ├── PropertiesLauncher$ArchiveEntryFilter.class
    ├── PropertiesLauncher$PrefixMatchingArchiveFilter.class
    ├── PropertiesLauncher$ArchiveEntryFilter.class
    ├── util/
    └── WarLauncher.class


MANIFEST.MF

1
2
3
4
5
6
7
Manifest-Version: 1.0                                       # 清单版本号
Start-Class: org.incoder.start.SpringbootStartApplication   # 项目 main 方法所在的类
Spring-Boot-Classes: BOOT-INF/classes/                      # 项目相关代码在打包后 jar 中的路径
Spring-Boot-Lib: BOOT-INF/lib/                              # 项目中所依赖的第三方 jar 在打包后 jar 中的路径
Spring-Boot-Version: 2.1.6.RELEASE                          # 项目  SpringBoot 版本
Main-Class: org.springframework.boot.loader.JarLauncher     # 当前 jar 文件的执行入口类(main 方法所在的类)
回车换行(在清单文件中,必须有,否则会出错)
 

org/springframework/…… 目录

项目中引入的第三方 jar 中并不包含 org/springframework/boot/loader 内容,那这个目录是从哪里来的呢?

寻找最终发现是项目中我们的 build.gradle 文件中,引入的 org.springframework.boot:spring-boot-gradle-plugin 依赖,而这个依赖位于 classpath 下,说明引入的这个插件 仅仅 是在项目构建时才起作用,当项目进行打包后,并不会把插件包打入到项目的依赖库中,也就是 BOOT-INF/lib/ 路径下

如何去研究在 org/springframework/boot/loader 下的源码内容呢?
最好的方式是在项目的依赖中导入 org.springframework.boot:spring-boot-loader 依赖

原则上,在项目开发过程中是不需要引入 org.springframework.boot:spring-boot-loader 依赖,这里只是为了方便阅读源码进行学习

Spring 其他

配置文件格式

配置文件学习可参考 SpringBoot(四)配置文件

常用命令

gradle tasks

表示获取当前工程可用的 gradle tasks 命令

Application tasks
  • bootRun:Runs this project as a Spring Boot application.(以 bootJar 的形式运行当前项目)
Build tasks
  • bootJar:Assembles an executable jar archive containing the main classes and their dependencies.(装配一个可执行的 jar(自包含的 jar 包,不依赖其他容器) 归档,这个归档 jar 中包含了所需的依赖以及主类等)
Run jar
1
java -jar jar-name.jar
 
Other
1
2
# 解压 jar 到当前 start 目录下
unzip start-0.0.1-SNAPSHOT.jar -d ./start
 

我们在开发过程中,使用 java -jar you-jar-name.jar 命令来启动应用,它是如何启动?以及它如何去寻找 .class 文件并执行这些文件?本节就带着这两个问题,让我们一层层解开 SpringBoot 项目的 jar 启动过程,废话不多说,跟着我的脚步一起去探索 spring-boot-load 的秘密。

在 SpringBoot(一)初识 已经解释了为什么在编译后的 jar 中根目录存在 org/springframework/boot/loader 内容,以及为了方便学习研究,我们需要在项目的依赖中导入 org.springframework.boot:spring-boot-loader 依赖。同时我们在解压的 you-jar-name.jar 文件中,查看对应的清单文件 MANIFEST.MF 内容,其中明确指出了应用的入口 org.springframework.boot.loader.JarLauncher 因此我们就从 JarLauncher 开始一步步深入

spring-boot-loader-jarlauncher

spring-boot-loader-jarlauncher


结构

先用 Diagrams 来表述 JarLauncher 类之间的结构及方法等相关信息

jarlauncher

jarlauncher


从 Diagrams 可知

  • 继承关系:JarLauncher extends ExecutableArchiveLauncher extends Launcher
  • 启动入口:JarLauncher main 方法

关于图上图标含义,这里就不再赘述,烦请移步 IntelliJ IDEA Icon reference

流程分析

jar 规范

对于 Java 标准的 jar 文件来说,规定在一个 jar 文件中,我们必须要将指定 main.class 的类直接放置在文件的顶层目录中(也就是说,它不予许被嵌套),否则将无法加载,对于 BOOT-INF/class/ 路径下的 class 因为不在顶层目录,因此也是无法直接进行加载, 而对于 BOOT-INF/lib/ 路径的 jar 属于嵌套的(Fatjar),也是不能直接加载,因此 Spring 要想启动加载,就需要自定义实现自己的类加载器去加载。

关于 jar 官方标准说明请移步

源码分析

main 方法

根据清单文件 MANIFEST.MF 中 Main-Class 的描述,我们知道入口类就是 JarLauncher;先看下这个类的 javadoc 介绍

1
2
3
4
5
6
7
8
9
10
11
/**
 * {@link Launcher} for JAR based archives. This launcher assumes that dependency jars are
 * included inside a {@code /BOOT-INF/lib} directory and that application classes are
 * included inside a {@code /BOOT-INF/classes} directory.
 * 
 * 用于基于JAR的归档。这个启动程序假设依赖jar包含在{@code /BOOT-INF/lib}目录中,
 * 应用程序类包含在{@code /BOOT-INF/classes}目录中
 *
 * @author Phillip Webb
 * @author Andy Wilkinson
 */
 

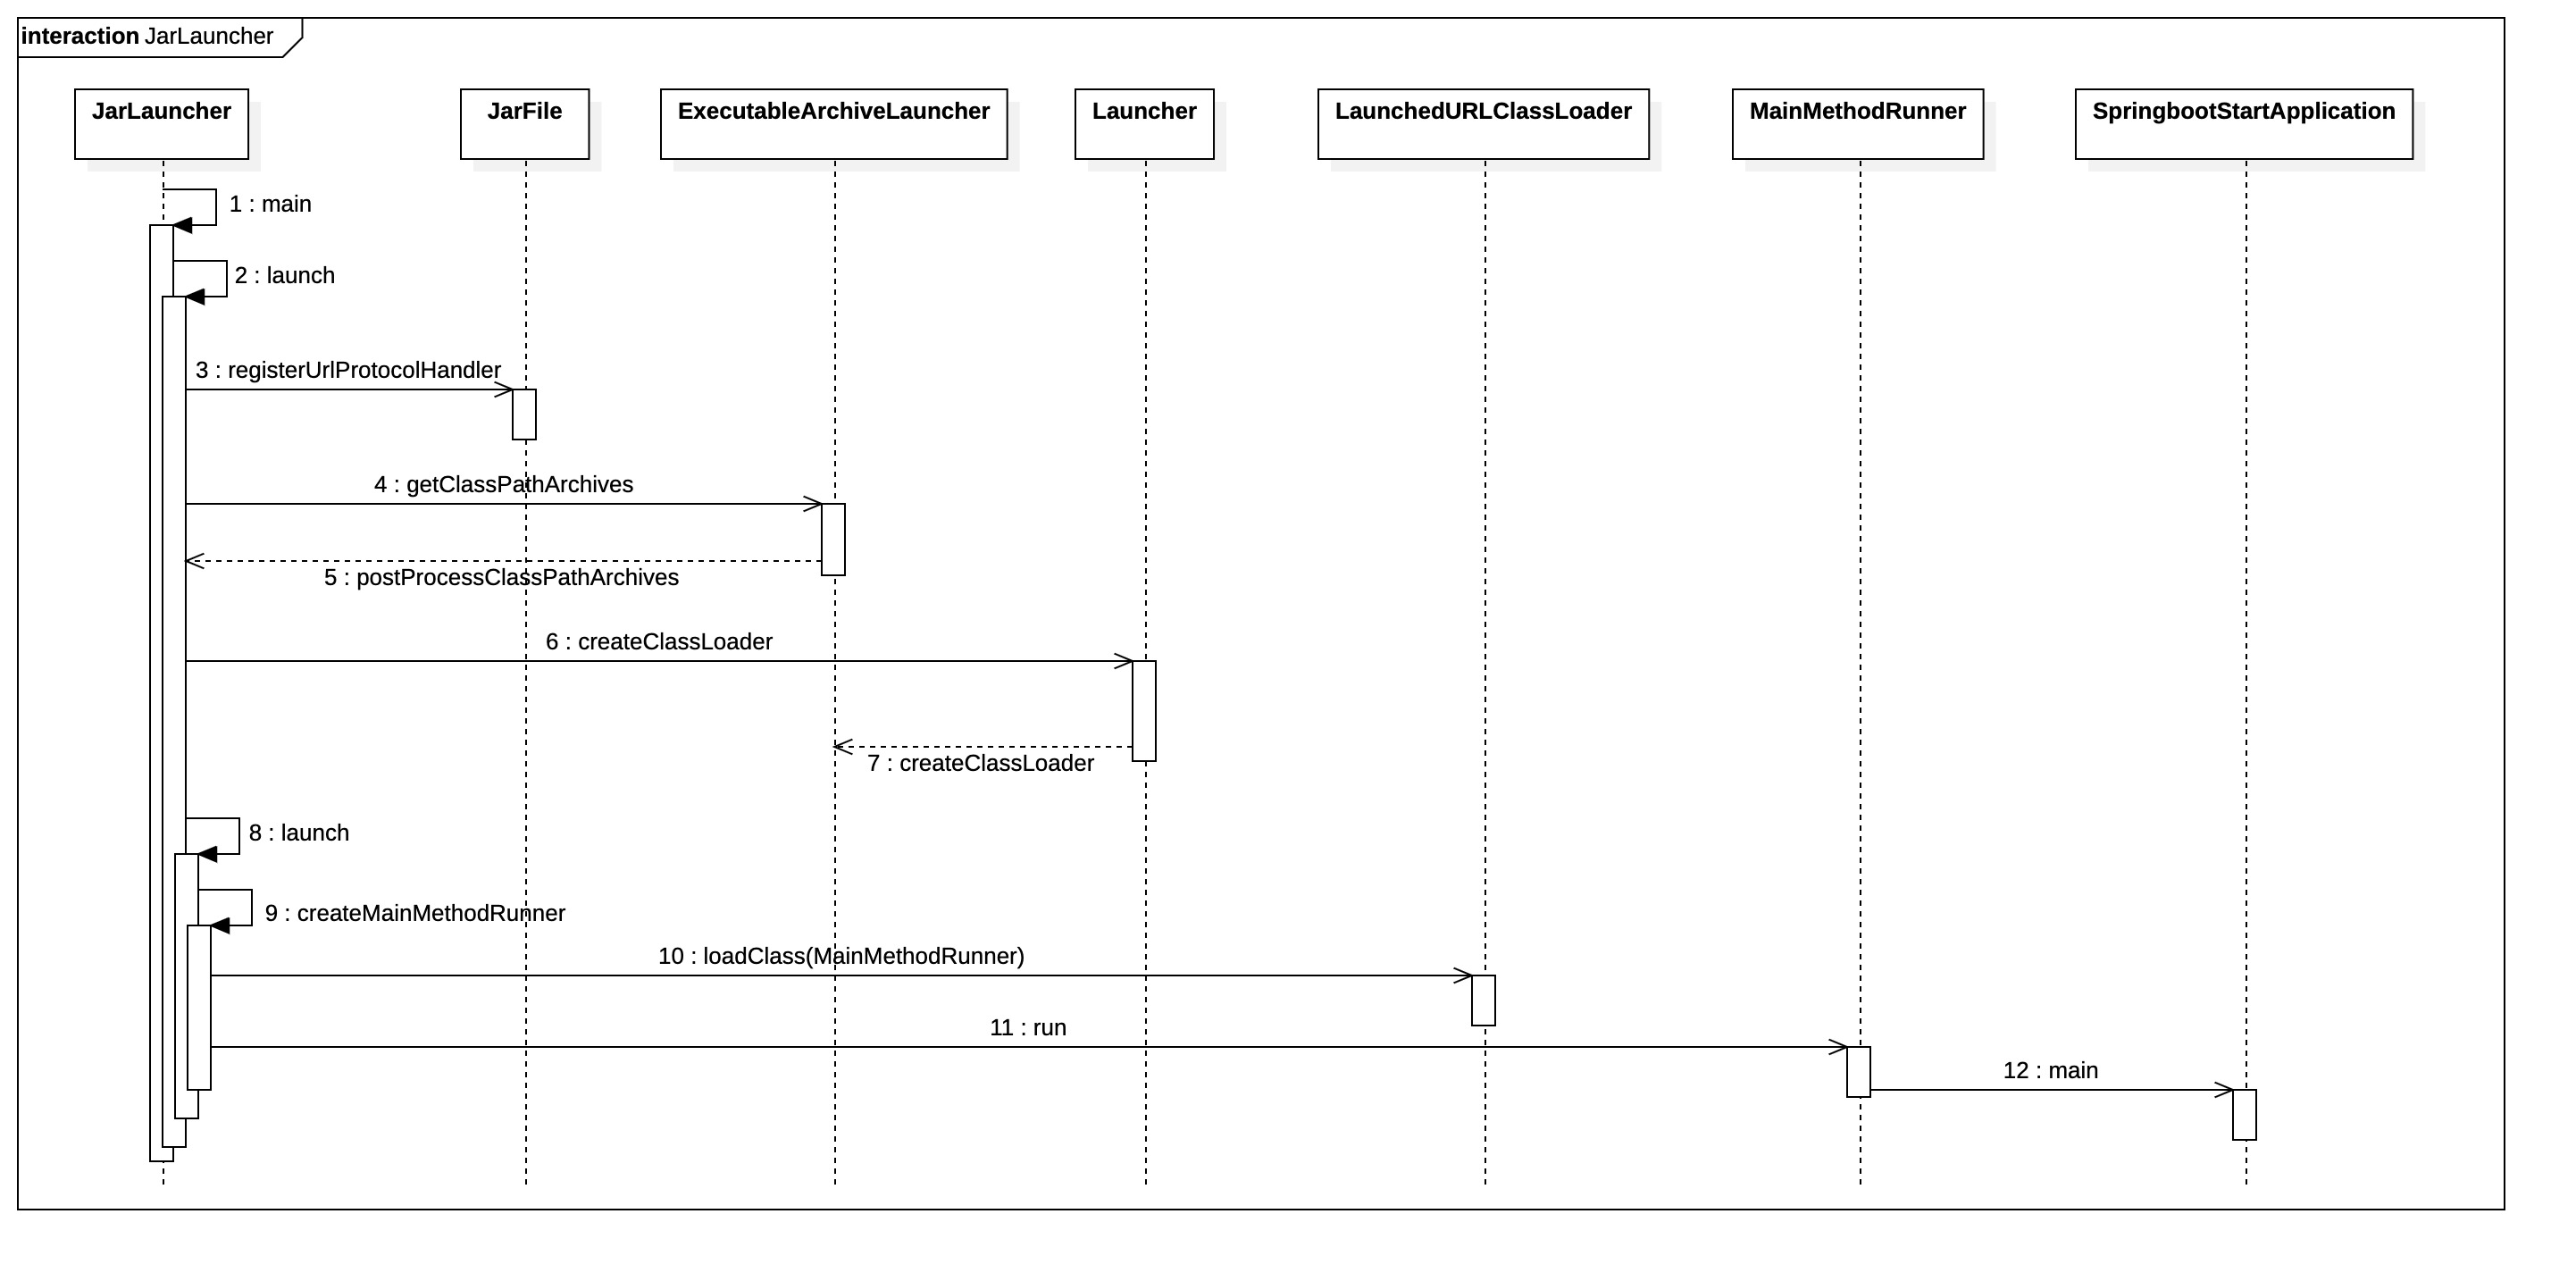
紧接着,要进行源码分析,那肯定是找到入口,一步步深入,那么对于 JarLauncher 就是它的 main 方法了

1
2
3
4
public static void main(String[] args) throws Exception {
    // launch 方法是调用父类 Launcher 的 launch 方法
    new JarLauncher().launch(args);
}
 

那我们去看一看 Launcher 的 launch 方法

1
2
3
4
5
6
7
8
9
10
11
12
13
14
15
16
17
18
19
/**
 * Launch the application. This method is the initial entry point that should be
 * called by a subclass {@code public static void main(String[] args)} method.
 * 
 * 启动一个应用,这个方法应该被初始的入口点,这个入口点应该是一个Launcher的子类的 
 * public static void main(String[] args)这样的方法调用
 *
 * @param args the incoming arguments
 * @throws Exception if the application fails to launch
 */
protected void launch(String[] args) throws Exception {
    // 1. 注册一些 URL的属性
    JarFile.registerUrlProtocolHandler();
    // 2. 创建类加载器(LaunchedURLClassLoader),加载得到集合要么是BOOT-INF/classes/
    //    或者BOOT-INF/lib/的目录或者是他们下边的class文件或者jar依赖文件
    ClassLoader classLoader = createClassLoader(getClassPathArchives());
    // 3. 启动给定归档文件和完全配置的类加载器的应用程序
    launch(args, getMainClass(), classLoader);
}
 

getClassPathArchives 方法

launch 方法的第一步的相关内容比较简单,这里不做过多说明,主要后面两步,我们先看第二步,创建一个类加载器(ClassLoader),其中 getClassPathArchives () 方法是一个抽象方法,具体的实现有(ExecutableArchiveLauncher 和 PropertiesLauncher ,因为我们研究的 JarLauncher 是继承 ExecutableArchiveLauncher ,因此我们这里看 ExecutableArchiveLauncher 类中 getClassPathArchives () 方法的实现)我们要看看这个方法中它做了什么

1
2
3
4
5
6
7
8
9
10
11
@Override
protected List<Archive> getClassPathArchives() throws Exception {
    // 得到一个Archive的集合(BOOT-INF/classes/)和(BOOT-INF/lib/)目录所有的文件
    //     a. this.archive 中当前类的 archive 是怎么来的?
    //     b. getNestedArachives()是如何获得一个嵌套的 jar 归档?
    //     c. this::isNestedArchive 这个方法引用它做了什么?
    List<Archive> archives = new ArrayList<>(this.archive.getNestedArchives(this::isNestedArchive));
    // 一个事后处理的方法
    postProcessClassPathArchives(archives);
    return archives;
}
 

this.archive 位于当前类 ExecutableArchiveLauncher 的构造方法中

1
2
3
4
5
6
7
8
9
10
11
12
13
14
15
16
17
18
19
20
21
22
23
24
25
26
27
28
29
30
31
public ExecutableArchiveLauncher() {
    try {
        // 调用 createArchive() 方法得到Archive
        this.archive = createArchive();
    }
    catch (Exception ex) {
        throw new IllegalStateException(ex);
    }
}

/
// 紧接着我们查看 createArchive() 方法都做了什么                //
/

// Launcher.class 中的 createArchive()方法
// 得到我们运行文件的Archive相关的信息
protected final Archive createArchive() throws Exception {
    ProtectionDomain protectionDomain = getClass().getProtectionDomain();
    CodeSource codeSource = protectionDomain.getCodeSource();
    URI location = (codeSource != null) ? codeSource.getLocation().toURI() : null;
    String path = (location != null) ? location.getSchemeSpecificPart() : null;
    if (path == null) {
	    throw new IllegalStateException("Unable to determine code source archive");
    }
    // 返回我们要执行的jar文件的绝对路径(java -jar xxx.jar中 xxx.jar的绝对路径)
    File root = new File(path);
    if (!root.exists()) {
	    throw new IllegalStateException("Unable to determine code source archive from " + root);
    }
    return (root.isDirectory() ? new ExplodedArchive(root) : new JarFileArchive(root));
}
 

对于 getNestedArachives () 方法,它是 Archive 的接口

1
2
3
4
5
6
7
8
9
10
11
12
13
14
15
16
17
18
19
20
21
22
23
24
25
26
27
/**
 * Returns nested {@link Archive}s for entries that match the specified filter.
 * 
 * 返回与过滤器相匹配的嵌套归档文件
 * 
 * @param filter the filter used to limit entries
 * @return nested archives
 * @throws IOException if nested archives cannot be read
 */
List<Archive> getNestedArchives(EntryFilter filter) throws IOException;

/
// 紧接着我们查看 getNestedArchives() 的实现                   //
/

// 这里的参数 EntryFilter类型中有一个 matches(Entry entry) 方法,
// 这也是this::isNestedArchive所对应的实际方法
@Override
public List<Archive> getNestedArchives(EntryFilter filter) throws IOException {
    List<Archive> nestedArchives = new ArrayList<>();
    for (Entry entry : this) {
        if (filter.matches(entry)) {
            nestedArchives.add(getNestedArchive(entry));
        }
    }
    return Collections.unmodifiableList(nestedArchives);
}
 

而 this::isNestedArchive 方法引用,我们查看 isNestedArchive 抽象方法

1
2
3
4
5
6
7
8
9
10
11
12
13
14
15
16
17
18
19
20
21
22
23
24
25
/**
 * Determine if the specified {@link JarEntry} is a nested item that should be added
 * to the classpath. The method is called once for each entry.
 * 
 * 确定指定的{@link JarEntry}是否是应该添加到类路径的嵌套项。对每个条目调用该方法一次
 * 
 * @param entry the jar entry
 * @return {@code true} if the entry is a nested item (jar or folder)
 */
protected abstract boolean isNestedArchive(Archive.Entry entry);

/
// 紧接着我们查看 isNestedArchive() 实现                      //
/

// JarLauncher.class 中的 isNestedArchive()方法
@Override
protected boolean isNestedArchive(Archive.Entry entry) {
    // 如果是目录判断是不是BOOT-INF/classes/目录
    if (entry.isDirectory()) {
        return entry.getName().equals(BOOT_INF_CLASSES);
    }
    // 如果是文件判断文件的前缀是不是BOOT-INF/lib/开头
    return entry.getName().startsWith(BOOT_INF_LIB);
}
 

createClassLoader 方法

把符合条件的 Archives 作为参数传入到 createClassLoader () 方法,创建一个类加载器,我们跟进去,查看 createClassLoader () 方法

1
2
3
4
5
6
7
8
9
10
11
12
13
14
15
16
17
18
19
20
21
22
23
24
25
26
27
28
29
30
31
32
33
34
35
36
37
38
39
40
41
42
43
44
45
/**
 * Create a classloader for the specified archives.
 *
 * 创建一个所指定归档文件的类加载器
 *
 * @param archives the archives
 * @return the classloader
 * @throws Exception if the classloader cannot be created
 */
protected ClassLoader createClassLoader(List<Archive> archives) throws Exception {
    List<URL> urls = new ArrayList<>(archives.size());
    // 遍历传进来的 archives,将每一个 Archive 的 URL(归档文件在磁盘上的完整路径)添加到 urls 集合中
    for (Archive archive : archives) {
        urls.add(archive.getUrl());
    }
    // 
    return createClassLoader(urls.toArray(new URL[0]));
}


/**
 * Create a classloader for the specified URLs.
 *
 * 创建指定 URL 的类加载器
 *
 * @param urls the URLs
 * @return the classloader
 * @throws Exception if the classloader cannot be created
 */
protected ClassLoader createClassLoader(URL[] urls) throws Exception {
    // 这里的 LaunchedURLClassLoader 是 SpringBoot loader 给我们提供的一个全新的类加载器
    // 参数 urls 是 class 文件或者资源配置文件的路径地址
    // 参数 getClass().getClassLoader() 是应用类加载器
    return new LaunchedURLClassLoader(urls, getClass().getClassLoader());
}


/**
 * Create a new {@link LaunchedURLClassLoader} instance.
 * @param urls the URLs from which to load classes and resources
 * @param parent the parent class loader for delegation
 */
public LaunchedURLClassLoader(URL[] urls, ClassLoader parent) {
    super(urls, parent);
}
 

super () 方法是调用父类的方法,这样一层层跟进去,最终到了 JDK 的 ClassLoader 类,它也是所有类加载器的顶类

launch 方法

launch 方法的第二个参数,getMainClass () 是一个抽象方法

1
2
3
4
5
6
7
8
9
10
11
12
13
14
15
16
17
18
19
20
21
22
23
24
/**
 * Returns the main class that should be launched.
 * @return the name of the main class
 * @throws Exception if the main class cannot be obtained
 */
protected abstract String getMainClass() throws Exception;

/
// 紧接着我们查看 getMainClass() 实现                         //
/

@Override
protected String getMainClass() throws Exception {
    Manifest manifest = this.archive.getManifest();
    String mainClass = null;
    if (manifest != null) {
        // 获取到 Manifest 文件中属性为`Start-Class`对应的值,也就是当前项目工程启动的类的完整路径
        mainClass = manifest.getMainAttributes().getValue("Start-Class");
    }
    if (mainClass == null) {
        throw new IllegalStateException("No 'Start-Class' manifest entry specified in " + this);
    }
    return mainClass;
}
 

接着我们看 launch 方法

1
2
3
4
5
6
7
8
9
10
11
12
13
14
15
16
17
18
19
20
21
22
23
24
25
26
27
28
29
30
31
/**
 * Launch the application given the archive file and a fully configured classloader.
 *
 * 加载指定存档文件和完全配置的类加载器的应用程序
 *
 * @param args the incoming arguments
 * @param mainClass the main class to run
 * @param classLoader the classloader
 * @throws Exception if the launch fails
 */
protected void launch(String[] args, String mainClass, ClassLoader classLoader) throws Exception {
    // 将应用的加载器换成了自定义的 LaunchedURLClassLoader 加载器,然后入到线程类加载器中
    // 最终在未来的某个地方,通过线程的上下文中取出类加载进行加载
    Thread.currentThread().setContextClassLoader(classLoader);
    // 创建一个主方法运行器运行
    createMainMethodRunner(mainClass, args, classLoader).run();
}

/**
 * Create the {@code MainMethodRunner} used to launch the application.
 *
 * 创建一个 MainMethodRunner 用于启动这个应用
 *
 * @param mainClass the main class
 * @param args the incoming arguments
 * @param classLoader the classloader
 * @return the main method runner
 */
protected MainMethodRunner createMainMethodRunner(String mainClass, String[] args, ClassLoader classLoader) {
    return new MainMethodRunner(mainClass, args);
}
 

返回一个 MainMethodRunner 对象,我们紧接着去看看这个对象,

1
2
3
4
5
6
7
8
9
10
11
12
13
14
15
16
17
18
19
20
21
22
23
24
25
26
27
28
29
30
31
32
33
34
35
36
37
38
39
/**
 * Utility class that is used by {@link Launcher}s to call a main method. The class
 * containing the main method is loaded using the thread context class loader.
 * 
 * 被 Launcher 使用来调用 main 方法的辅助类,使用线程类加载来加载包含 main 方法的类
 *
 * @author Phillip Webb
 * @author Andy Wilkinson
 */
public class MainMethodRunner {

    private final String mainClassName;

    private final String[] args;

    /**
     * Create a new {@link MainMethodRunner} instance.
     * @param mainClass the main class
     * @param args incoming arguments
     */
    public MainMethodRunner(String mainClass, String[] args) {
        this.mainClassName = mainClass;
        this.args = (args != null) ? args.clone() : null;
    }

    // 关键方法
    public void run() throws Exception {
        // 获取到当前线程上下文的类加载器,实际就是 springboot 自定义的加载器(LaunchedURLClassLoader)
        // 加载 this.mainClassName所对应的类,实际也就是清单文件中对应 Start-Class 属性的类
        Class<?> mainClass = Thread.currentThread().getContextClassLoader().loadClass(this.mainClassName);
        // 通过反射获取到 main 方法和参数
        Method mainMethod = mainClass.getDeclaredMethod("main", String[].class);
        // 调用目标方法运行
        // invoke 方法参数一:是被调用方法所在对象,这里为 null,原因是我们所调用的目标方法是一个静态方法
        // invoke 方法参数二:被调用方法所接收的参数
        mainMethod.invoke(null, new Object[] { this.args });
    }

}
 

到此为止,invoke 方法成功调用,那么我们项目中的 main 方法就执行了,这时我们的所编写的 springboot 应用就正式的启动了。那么关于 springboot 的 loader 加载过程已经分析完

总结

summary-jarlauncher

summary-jarlauncher


从 jar 规范的角度出发,我们深入分析了 springboot 项目启动的整个过程,这个过程到底对不对,我们口说无凭,需要实际检验我们分析
首先,我们先思考,项目的应用启动入口是不是必须是 main.class 方法,以及为什么要默认这么做?
其次,我们再思考,在编辑器中通过图标运行启动程序(或者是通过命令启动程序),比较将程序编译成 jar 包,然后通过命令启动程序他们之间是否相同,如果不同请解释为什么?

问题一

项目的应用启动入口可以不是 main.class 方法,只是为什么会默认为 main.class 方法,原因是在 springboot 的 MainMethodRunner 类的 run 方法中,是固定写死的 main ,为什么要这么写,答案是,我们可以在编辑器中已右键或其他图标启动的方式快速启动 springboot 项目(就像是在运行一个 Java 的 main 方法一样,不再向之前需要乱七八糟各种的配置)。

问题二

答案是不相同,我们可以在项目的应用启动 main.class 方法中,打印出加载类 System.out.println (项目启动加载类 + SpringbootStartApplication.class.getClassLoader ()); ,这样就可以检验我们的分析是否正确。分别使用两种不同的方式

  • 方式一:在编辑器中之间运行(右键,或者控制台输入命令 gradle bootRun)或者使用 IDEA 上的运行应用运行按钮,结果如下
    1
    项目启动加载类sun.misc.Launcher$AppClassLoader@18b4aac2
     
  • 方式二:先编译成 jar 包,然后通过 java -jar build-name.jar 命令运行
    1
    项目启动加载类org.springframework.boot.loader.LaunchedURLClassLoader@439f5b3d
     

通过打印出来的信息,可以验证我们的分析,方式一的运行,实际上是应用类加载器启动,而方式二是 spring-boot-load 包中自定义的 LaunchedURLClassLoader 来启动项目

在实际的生产开发中,有时我们的分析需要进行验证(或者找问题),而此时服务又部署在生成环境或者非本机上,通常用的方式是看应用的日志输出,在日志中去定位问题,而有时我们需要断点的方式去找问题,那该如何去操作呢?对于这个问题,在实际开发中是有方法去处理,请看下篇《SpringBoot(三) JDWP 远程调用》

在 SpringBoot 系列的第二篇文章中,已经详细分析了 SpringBoot 的启动过程,那么这篇文章,我们通过源码调试的方式来验证我们的分析,首先我们在控制台中输入 java 命令,可用输出 JDK 给我们提供了一些命令,其中 -agentlib 命令就是本篇文章所介绍,用于我们进行源码调试

springboot-java-agentlib
我们继续查看 -agentlib 详细的命令说明,输入 java -agentlib:jdwp=help 查看帮助文档
springboot-java-agentlib-help

远程

1
2
3
# 在远程机器上添加代理模式的方式启动
# 使用 socket 协议来进行远程调试,当服务启动就开始在 6666 端口等待连接
java -agentlib:jdwp=transport=dt_socket,server=y,address=6666 -jar start-1.0-SNAPSHOT.jar
 

本机

在本机上,我们直接使用 IDEA 编辑器,新建一个 Remote 应用服务,运行,创建步骤如下 9 步骤
springboot-java-remote

请我一杯咖啡吧!

gradle 的打包 task

在使用 gradle 构建 springboot 的项目时,可以查看当前项目由那些 gradle 的任务,我们在 springboot 的初始化页面 构建一个简单的 springboot 项目,然后在本地我们用 vscode 打开,执行./gradlew task 得到如下输出:

1
2
3
4
5
6
7
8
9
10
11
12
13
14
15
16
17
18
19
20
21
22
23
24
25
26
27
28
29
30
31
32
33
34
35
36
37
38
39
40
41
42
43
44
45
46
47
48
49
50
51
52
53
54
55
56
57
58
59
60
61
62
> Task :tasks

------------------------------------------------------------
Tasks runnable from root project
------------------------------------------------------------

Application tasks
-----------------
bootRun - Runs this project as a Spring Boot application.

Build tasks
-----------
assemble - Assembles the outputs of this project.
bootJar - Assembles an executable jar archive containing the main classes and their dependencies.
build - Assembles and tests this project.
buildDependents - Assembles and tests this project and all projects that depend on it.
buildNeeded - Assembles and tests this project and all projects it depends on.
classes - Assembles main classes.
clean - Deletes the build directory.
jar - Assembles a jar archive containing the main classes.
testClasses - Assembles test classes.

Build Setup tasks
-----------------
init - Initializes a new Gradle build.
wrapper - Generates Gradle wrapper files.

Documentation tasks
-------------------
javadoc - Generates Javadoc API documentation for the main source code.

Help tasks
----------
buildEnvironment - Displays all buildscript dependencies declared in root project 'spring-lecture'.
components - Displays the components produced by root project 'spring-lecture'. [incubating]
dependencies - Displays all dependencies declared in root project 'spring-lecture'.
dependencyInsight - Displays the insight into a specific dependency in root project 'spring-lecture'.
dependencyManagement - Displays the dependency management declared in root project 'spring-lecture'.
dependentComponents - Displays the dependent components of components in root project 'spring-lecture'. [incubating]
help - Displays a help message.
model - Displays the configuration model of root project 'spring-lecture'. [incubating]
projects - Displays the sub-projects of root project 'spring-lecture'.
properties - Displays the properties of root project 'spring-lecture'.
tasks - Displays the tasks runnable from root project 'spring-lecture'.

Verification tasks
------------------
check - Runs all checks.
test - Runs the unit tests.

Rules
-----
Pattern: clean<TaskName>: Cleans the output files of a task.
Pattern: build<ConfigurationName>: Assembles the artifacts of a configuration.
Pattern: upload<ConfigurationName>: Assembles and uploads the artifacts belonging to a configuration.

To see all tasks and more detail, run gradlew tasks --all

To see more detail about a task, run gradlew help --task <task>

BUILD SUCCESSFUL in 2s
1 actionable task: 1 executed
 

【bootJar - Assembles an executable jar archive containing the main classes and their dependencies.】
这里就是将整个工程打包,生成一个自包含的 jar 包。
我们可以将当前工程下的 build/libs 下的 jar 包删除,然后执行: ./gradlew bootJar
就会重新生成 jar 包。jar 包名字:工程名字 - 版本号.jar, 这个 jar 包我们可以直接用 java 运行:
bootjar.png

bootjar.png

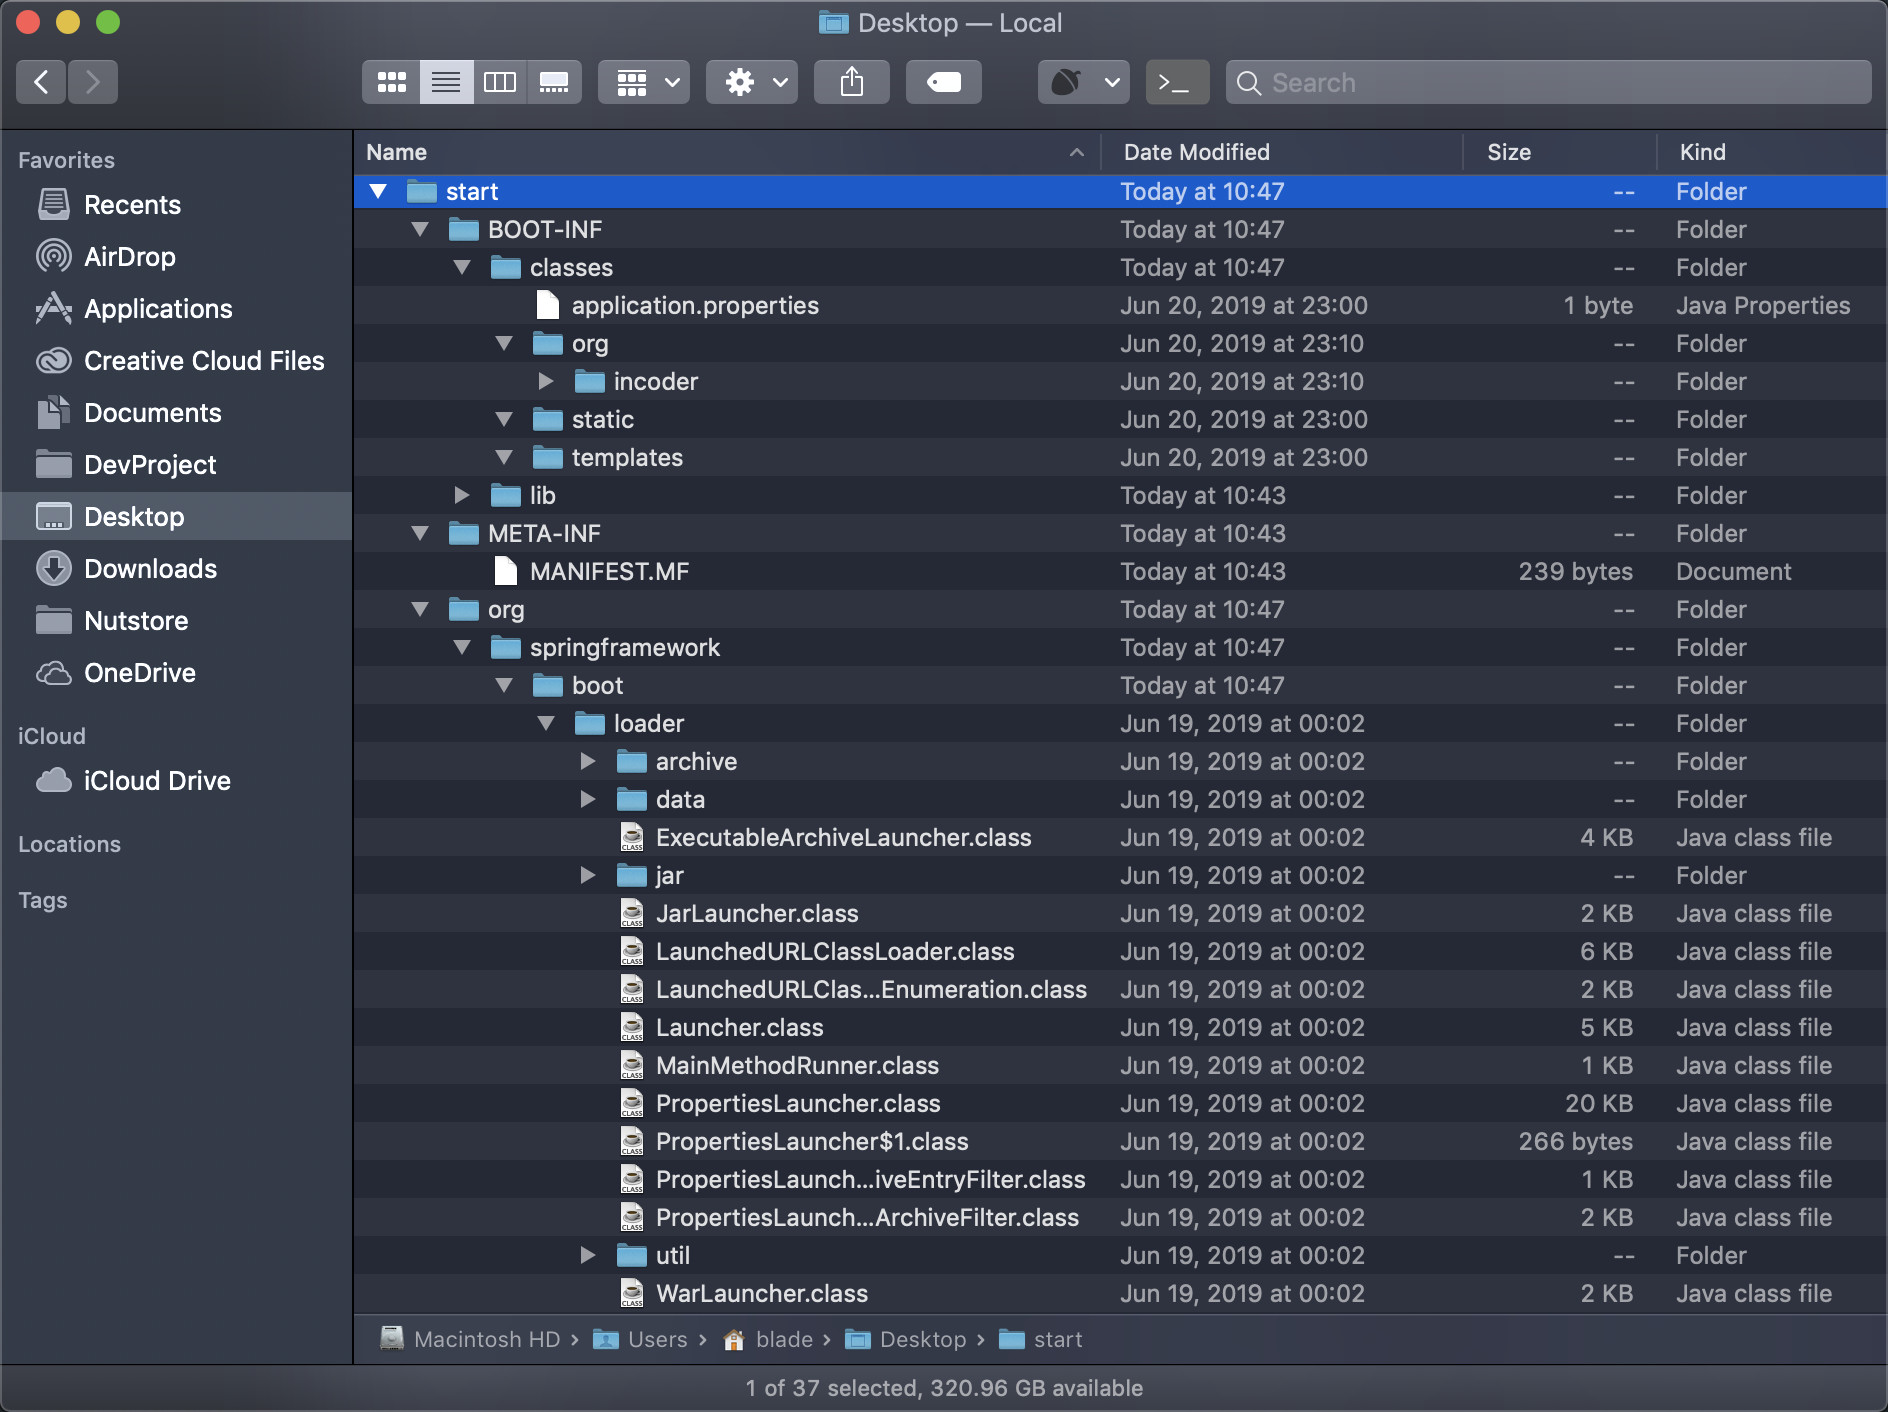
这个 jar 是一个自包含的,里边包含了运行的所有依赖,使用 jar 命令对其解压,查看内部有哪些内容:

1
2
3
4
jar -xvf spring-lecture-0.0.1-SNAPSHOT.jar
 BOOT-INF
 META-INF
 org
 

jar 包目录结构

解压后有三个目录: BOOT-INF、 META-INF、org

BOOT-INF/classes 里边是我们自己的工程的代码以及配置文件, BOOT-INF/lib 里边是所有的依赖:
bootjar1.png

bootjar1.png


META-INF 下面有一个 MANIFEST.MF 文件,里边的内容如下:

1
2
3
4
5
6
Manifest-Version: 1.0
Start-Class: com.tdl.springlecture.SpringLectureApplication
Spring-Boot-Classes: BOOT-INF/classes/
Spring-Boot-Lib: BOOT-INF/lib/
Spring-Boot-Version: 2.1.5.RELEASE
Main-Class: org.springframework.boot.loader.JarLauncher
 

此文件指定了入口文件,Main-Class 是开始启动的类,Start-Class 是我们自己写的包含 main 方法的全称。
库依赖路径,class 文件路径,Spring-Boot 的版本,Manifest 的版本。Main-Class 和 Start-Class 之间的关系后续介绍。
PS:Main-Class: org.springframework.boot.loader.JarLauncher 在文件的结尾处又要换行,不然无法启动。

org 目录是 spring 提供的一些 class 文件。
bootjar2.png

bootjar2.png


其中就有 Main-Class: org.springframework.boot.loader.JarLauncher。

这里有个疑问,就是 org 目录下 JarLauncher 这些 class 文件是从哪里来的,我们在工程里边搜索压根搜索不到,如果想看这些类的源码其实可以引入相关的依赖【org.springframework.boot:spring-boot-loader】
bootjar3.png

bootjar3.png

在 JarLauncher 的源码中我们看到了 BOOT-INF/classes/、BOOT-INF/lib/ 这些熟悉的路径,源码面前无虚假。

Launcher for JAR based archives. This launcher assumes that dependency jars are included inside a /BOOT-INF/lib directory and that application classes are included inside a /BOOT-INF/classes directory.

基于 jar 的启动器,启动器假设 jar 包的依赖在 /BOOT-INF/lib 目录下,应用的 class 在 / BOOT-INF/classes 目录内。

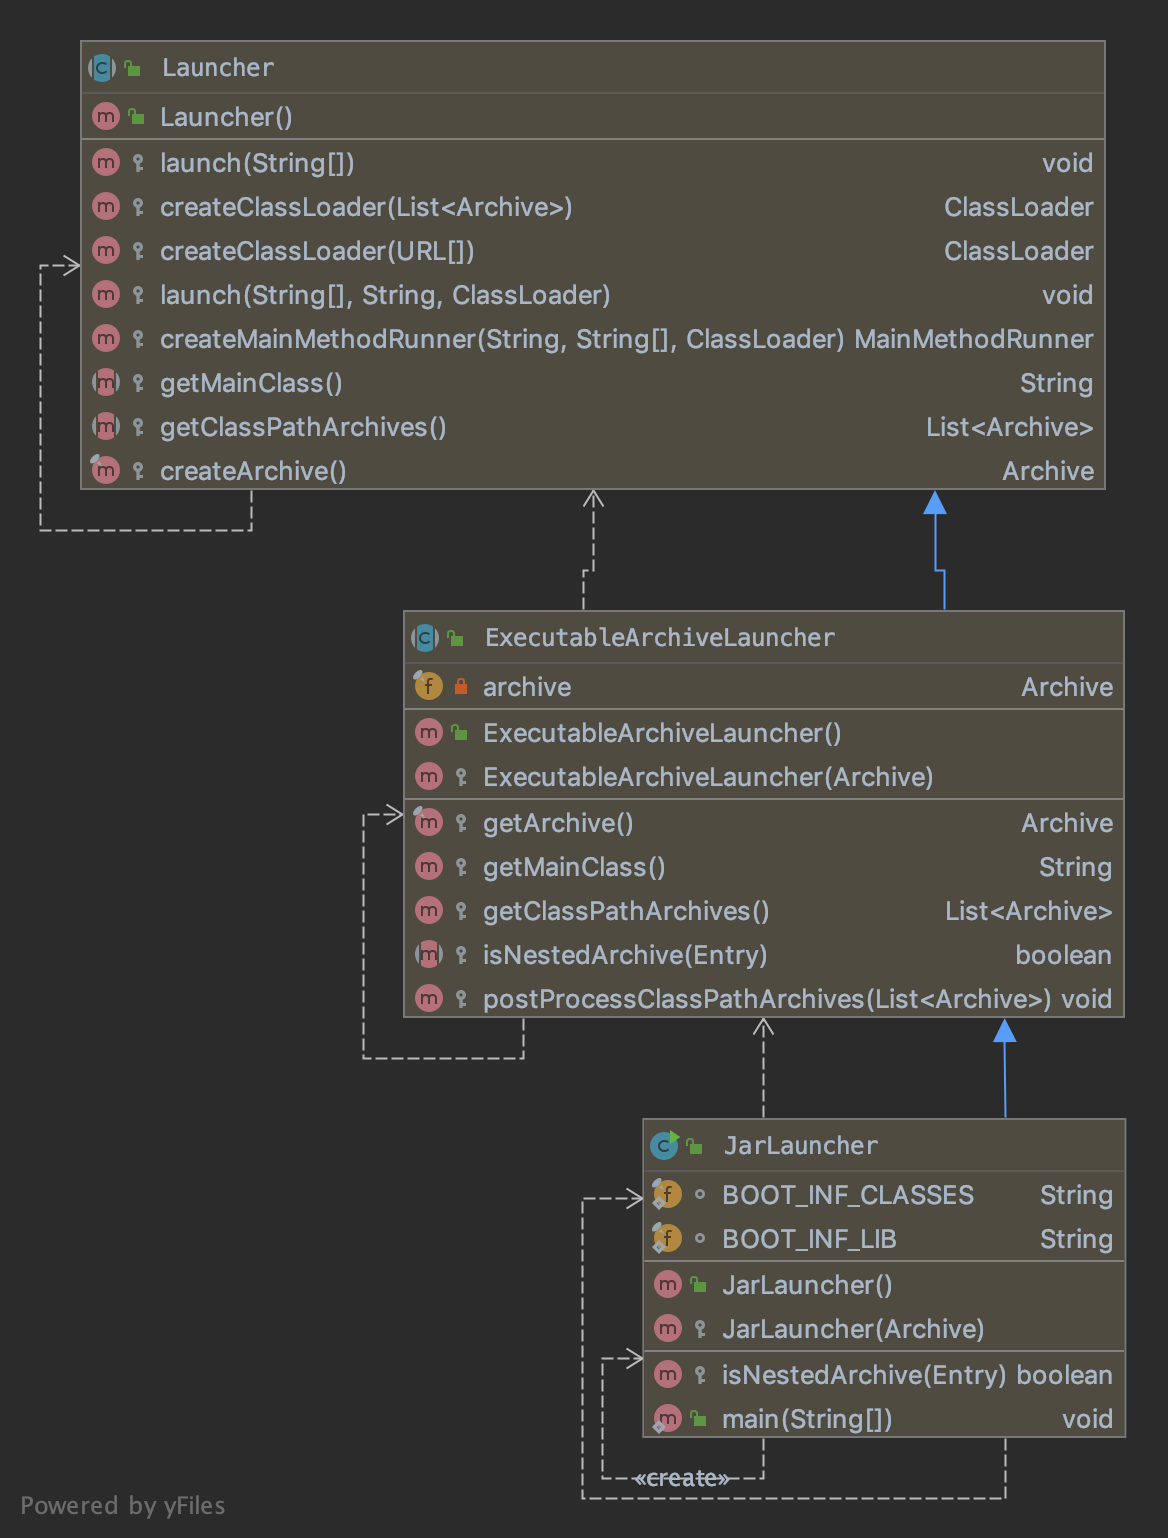
JarLauncher 的继承体系结构与源码分析:

bootjar4.png

bootjar4.png


ExecutableArchiveLauncher 下面有 JarLauncher 和 WarLauncher,我们只看 JarLauncher。
JarLauncher 由于是启动类,肯定有 main 方法:

1
2
3
public static void main(String[] args) throws Exception {
  new JarLauncher().launch(args);
}
 

这里记事本实例化了一个 JarLauncher 的实例,然后调了父类 Launcher 的 launch 方法:

1
2
3
4
5
6
7
8
9
10
11
12
13
/**
 * Launch the application. This method is the initial entry point that should be
 * called by a subclass {@code public static void main(String[] args)} method.
 * @param args the incoming arguments
 * @throws Exception if the application fails to launch
 */
 启动一个应用,这个方法应该被初始的入口点,这个入口点应该是一个Launcher的子类的 public static void main(String[] args)这样的方法调用
protected void launch(String[] args) throws Exception {
  JarFile.registerUrlProtocolHandler();//不重要略过,只是注册一些关于url的属性
  //构建一个类加载器,我么先看一下getClassPathArchives方法做了什么
  ClassLoader classLoader = createClassLoader(getClassPathArchives());
  launch(args, getMainClass(), classLoader);
}
 

getClassPathArchives():

1
2
3
4
5
6
7
/**
 * Returns the archives that will be used to construct the class path.
 * @return the class path archives
 * @throws Exception if the class path archives cannot be obtained
 */
 Launcher的一个抽象方法,返回用来构建class path的归档文件
protected abstract List<Archive> getClassPathArchives() throws Exception;
 

getClassPathArchives 的子类实现位于 ExecutableArchiveLauncher:

1
2
3
4
5
6
7
@Override
protected List<Archive> getClassPathArchives() throws Exception {
	List<Archive> archives = new ArrayList<>(
			this.archive.getNestedArchives(this::isNestedArchive));
	postProcessClassPathArchives(archives);
	return archives;
}
 
this.archive位于ExecutableArchiveLauncher的构造器当中:
1
2
3
4
5
6
7
8
9
10
11
12
13
14
15
16
17
18
19
20
21
22
23
24
25
  public ExecutableArchiveLauncher() {
		try {
			this.archive = createArchive();
		}
		catch (Exception ex) {
			throw new IllegalStateException(ex);
		}
	}
  //createArchive方法的作用是返回我们要执行的jar文件的绝对路径(java -jar xxx.jar中 xxx.jar的绝对路径):
  protected final Archive createArchive() throws Exception {
  ProtectionDomain protectionDomain = getClass().getProtectionDomain();
  CodeSource codeSource = protectionDomain.getCodeSource();
  URI location = (codeSource != null) ? codeSource.getLocation().toURI() : null;
  String path = (location != null) ? location.getSchemeSpecificPart() : null;
  if (path == null) {
    throw new IllegalStateException("Unable to determine code source archive");
  }
  File root = new File(path);
  if (!root.exists()) {
    throw new IllegalStateException(
        "Unable to determine code source archive from " + root);
  }
  return (root.isDirectory() ? new ExplodedArchive(root)
      : new JarFileArchive(root));
}
 

然后【this.archive.getNestedArchives】是做的什么事情呢?
它 Archive 类里边

1
2
3
4
5
6
7
8
/**
 * Returns nested {@link Archive}s for entries that match the specified filter.
 * @param filter the filter used to limit entries
 * @return nested archives
 * @throws IOException if nested archives cannot be read
 */
 根据过滤器filter返回嵌套的归档文件
List<Archive> getNestedArchives(EntryFilter filter) throws IOException;
 

getNestedArchives 实现类 JarFileArchive:

1
2
3
4
5
6
7
8
9
10
11
@Override
	public List<Archive> getNestedArchives(EntryFilter filter) throws IOException {
		List<Archive> nestedArchives = new ArrayList<>();
    // JarFileArchive实现了 Iterable<Archive.Entry>
		for (Entry entry : this) {
			if (filter.matches(entry)) {
				nestedArchives.add(getNestedArchive(entry));
			}
		}
		return Collections.unmodifiableList(nestedArchives);
	}
 

这里我们就要看一下过滤器是过滤的那些归档,切到 ExecutableArchiveLauncher 的 isNestedArchive:

1
2
3
4
5
6
7
8
9
10
11
12
13
14
15
16
17
18
19
20
ExecutableArchiveLauncher的对isNestedArchive的抽象:
/**
 * Determine if the specified {@link JarEntry} is a nested item that should be added
 * to the classpath. The method is called once for each entry.
 * @param entry the jar entry
 * @return {@code true} if the entry is a nested item (jar or folder)
 */
 判断指定的JarEntry是不是一个嵌套的,如果是嵌套的需要添加到classpath下边,这个方法对于每个entry只被调用一次。
protected abstract boolean isNestedArchive(Archive.Entry entry);

JarLauncher的实现:
@Override
protected boolean isNestedArchive(Archive.Entry entry) {
  //如果是目录判断是不是BOOT-INF/classes/目录
  if (entry.isDirectory()) {
    return entry.getName().equals(BOOT_INF_CLASSES);
  }
  //如果是文件判断文件的前缀是不是BOOT-INF/lib/开头
  return entry.getName().startsWith(BOOT_INF_LIB);
}
 

这里做一下补充:规范要求,jar 文件的里边的启动类,必须是位于目录的顶层结构中,启动类不能位于嵌套的 jar 里边。
我们看到 jar 包的 org 目录下边的 JarLauncher 是在顶层目录的结构里边,是可以被加载的,而 BOOT-INF/lib/ 里边的 jar 属于嵌套的(FatJar),同样 BOOT-INF/classes/ 里边的类
没有在 jar 目录的顶层结构同样无法加载执行,spring 要想加载执行他们需要做一些工作,后续我们会介绍,其实是 spring 自定义了自己的类加载器去加载。
回到 Launcher 的 launch 方法

1
2
3
4
5
protected void launch(String[] args) throws Exception {
		JarFile.registerUrlProtocolHandler();
		ClassLoader classLoader = createClassLoader(getClassPathArchives());
		launch(args, getMainClass(), classLoader);
	}
 

getClassPathArchives () 得到集合要么是 BOOT-INF/classes/ 或者 BOOT-INF/lib/ 的目录或者是他们下边的 class 文件或者 jar 依赖文件,
紧接着我们进入 createClassLoader 方法:

1
2
3
4
5
6
7
8
9
10
11
12
13
14
15
16
17
18
19
20
21
22
23
24
25
26
27
28
/**
 * Create a classloader for the specified archives.
 * @param archives the archives
 * @return the classloader
 * @throws Exception if the classloader cannot be created
 */
// 为指定为归档文件创建类加载器,archives是我们拿到的所有的要加载的归档,返回一个spring定义的一个自定义加载器
protected ClassLoader createClassLoader(List<Archive> archives) throws Exception {
  List<URL> urls = new ArrayList<>(archives.size());
  for (Archive archive : archives) {
    urls.add(archive.getUrl());
  }
  //将所有归档文件的url统一放在一个集合里边
  return createClassLoader(urls.toArray(new URL[0]));
}

/**
	 * Create a classloader for the specified URLs.
	 * @param urls the URLs
	 * @return the classloader
	 * @throws Exception if the classloader cannot be created
	 */
   //为指定的url创建一个类加载器
	protected ClassLoader createClassLoader(URL[] urls) throws Exception {
    //自定义类加载器需要指定父加载器,getClass()是Launcher.clas 得到Launcher类的类加载器,即appClassLoader,系统类加载器
		return new LaunchedURLClassLoader(urls, getClass().getClassLoader());
	}
 

LaunchedURLClassLoader 继承了 URLClassLoader:

1
2
3
4
5
6
7
8
9
10
/**
 * Create a new {@link LaunchedURLClassLoader} instance.
 * @param urls the URLs from which to load classes and resources
 * @param parent the parent class loader for delegation
 */
public LaunchedURLClassLoader(URL[] urls, ClassLoader parent) {
   //直接调用了URLClassLoader的构造器
	super(urls, parent);
}
 

URLClassLoader 的说明:
This class loader is used to load classes and resources from a search path of URLs referring to both JAR files and directories. Any URL that ends with a ‘/‘ is assumed to refer to a directory. Otherwise, the URL is assumed to refer to a JAR file which will be opened as needed.
The AccessControlContext of the thread that created the instance of URLClassLoader will be used when subsequently loading classes and resources.
The classes that are loaded are by default granted permission only to access the URLs specified when the URLClassLoader was created.
这个类加载器用来加载类和资源,这些资源是通过搜索一个 jar 文件或者一个目录,任何一个以 “/” 结尾的会认为是一个目录,否则会认为是一个 jar 文件。

到现在【 ClassLoader classLoader = createClassLoader (getClassPathArchives ());】得到了自定义的类加载器,接下来的【launch (args, getMainClass (), classLoader);】
进行加载,getMainClass () 是用来找到我们自定义的含有 main 方法的 class 的名字,即 com.twodragonlake.boot.MyApplication
我们看一下在 ExecutableArchiveLauncher 里边的实现:

1
2
3
4
5
6
7
8
9
10
11
12
13
14
15
16
@Override
protected String getMainClass() throws Exception {
  //得到Manifest的封装
  Manifest manifest = this.archive.getManifest();
  String mainClass = null;
  if (manifest != null) {
    //我们知道,在我们解压的bootJar出来的jar包里边有一个目录里是/META-INF/下边的文件是MANIFEST.MF,里边是key-value对,
    // manifest.getMainAttributes()就是拿到所有的key-value对,这里取的是Start-Class,即“com.twodragonlake.boot.MyApplication”这个字符串
    mainClass = manifest.getMainAttributes().getValue("Start-Class");
  }
  if (mainClass == null) {
    throw new IllegalStateException(
        "No 'Start-Class' manifest entry specified in " + this);
  }
  return mainClass;
}
 

返回到我们的主流承诺,进入到 Launcher.launch () 方法的实现:

1
2
3
4
5
6
7
8
9
10
11
12
13
14
15
16
17
18
19
20
21
22
23
24
25
26
27
28
/**
 * Launch the application given the archive file and a fully configured classloader.
 * @param args the incoming arguments
 * @param mainClass the main class to run
 * @param classLoader the classloader
 * @throws Exception if the launch fails
 */
protected void launch(String[] args, String mainClass, ClassLoader classLoader)
    throws Exception {
      //当前线程的上下文类加载器模式是系统类加载器,此处将线程山下文类加载器设置为spring自定义的LaunchedURLClassLoader
      //此处是set了LaunchedURLClassLoader,后边在某个时刻一定会get出来使用,去加载类,惯用套路
  Thread.currentThread().setContextClassLoader(classLoader);
  createMainMethodRunner(mainClass, args, classLoader).run();
}

/**
 * Create the {@code MainMethodRunner} used to launch the application.
 * @param mainClass the main class
 * @param args the incoming arguments
 * @param classLoader the classloader
 * @return the main method runner
 */
 //创建一个MainMethodRunner用来驱动运用
protected MainMethodRunner createMainMethodRunner(String mainClass, String[] args,
    ClassLoader classLoader) {
  return new MainMethodRunner(mainClass, args);
}
 

MainMethodRunner 的 doc:
Utility class that is used by Launchers to call a main method. The class containing the main method is loaded using the thread context class loader.
工具类,用来执行一个 main 方法,包含 main 方法的类是由线程上下文类加载器加载(线程山下文类加载器是 LaunchedURLClassLoader)

构造函数:

1
2
3
4
5
6
public MainMethodRunner(String mainClass, String[] args) {
  //我们应用的含有main方法的启动类的权限定名,即,com.twodragonlake.boot.MyApplication
  this.mainClassName = mainClass;
  //参数
  this.args = (args != null) ? args.clone() : null;
}
 

接下来是重点,我们创建了一个 MainMethodRunner,之后执行的是它的 run 方法:

1
2
3
4
5
6
7
8
9
10
11

public void run() throws Exception {
   //获取线程上下文类加载(LaunchedURLClassLoader),然后执行LaunchedURLClassLoader的loadClass方法,参数this.mainClassName是com.twodragonlake.boot.MyApplication
   //即有自定义的类加载器LaunchedURLClassLoader加载我们自定义的启动类com.twodragonlake.boot.MyApplication。
	Class<?> mainClass = Thread.currentThread().getContextClassLoader()
			.loadClass(this.mainClassName);
       //得到com.twodragonlake.boot.MyApplication的main方法
	Method mainMethod = mainClass.getDeclaredMethod("main", String[].class);
   //执行com.twodragonlake.boot.MyApplication的main方法。invoke方法之所以传递的第一个参数是null,是因为main方法是一个static的,不属于某个对象。
	mainMethod.invoke(null, new Object[] { this.args });
}
 

这里有个点就是 其实我们的 com.twodragonlake.boot.MyApplication 的 main 方法,不用非得名字是 main,只不过是 spring 规定的是 main,因为 spring 的代码里边写死是 main,spring 之所以规定方法名字必须是 main 的原因
是我们可能使用 idea 直接右单击运行我们的应用,,所以 2 者结合进行兼容,规定名字必须是 main。

验证

我们修改 MyApplication 的 main 方法加入一行打印 MyApplication 的加载器的代码;

1
2
3
4
5
6
7
8
@SpringBootApplication
public class MyApplication {
    public static void main(String[] args) {
      //打印MyApplication的类加载器
        System.out.println("MyApplication classloader: "+MyApplication.class.getClassLoader());
        SpringApplication.run(MyApplication.class,args);
    }
}
 

使用如下两种方式运行:

  • 直接用 idea 右单击运行 main 方法
  • 使用 gradle bootJar 打成 jar 包,然后使用 java -jar spring_lecture-1.0-SNAPSHOT.jar 运行

他们打印的结果是一样的吗?
使用 idea 打印的结果是:
MyApplication classloader: sun.misc.Launcher$AppClassLoader@18b4aac2
即使用应用类加载器加载的。
使用 java -jar spring_lecture-1.0-SNAPSHOT.jar 运行的结果是:
MyApplication classloader: org.springframework.boot.loader.LaunchedURLClassLoader@5197848c
使用 LaunchedURLClassLoader 加载的。


posted @ 2024-07-01 10:33  CharyGao  阅读(19)  评论(0编辑  收藏  举报