APISIX、APISIX Dashboard 搭建、路由配置及插件使用
APISIX、APISIX Dashboard 搭建、路由配置及插件使用 - CSDN 博客
部署
官方文档
https://apisix.apache.org/zh/docs/apisix/getting-started
官方文档中文
快速部署
官方 git 开源项目下有中文说明,可以通过 docker 等形式快速启动 apisix 及 dashboard,还带中文版的说明。
github
 https://github.com/apache/apisix/blob/master/docs/zh/latest/getting-started.md
gitee
根据以上文档直接 clone 项目到服务器,通过 docker 或者 docker-compose 启动即可 (记得确认端口号)
参考文档,gitee 极速下载,克隆项目(此版本下有中文说明) clone https://gitee.com/mirrors/apisix
参考此说明部署:
docs/zh/latest/getting-started.md
APISIX Dashboard
已在上一部中同时被启动
配置文件位置
example/dashboard_conf/conf.yaml
账号密码
在上述配置文件中
-
users: # yamllint enable rule:comments-indentation
-
- username: admin # username and password for login `manager api`
-
password: ******xxxx
-
- username: user
-
password: ******xxx
APISIX Dashboard 使用
主要通过 APISIX Dashboard
以下填写的域名,需要解析到 APISIX 服务器,APISIX 端口最好映射 80、443
路由配置
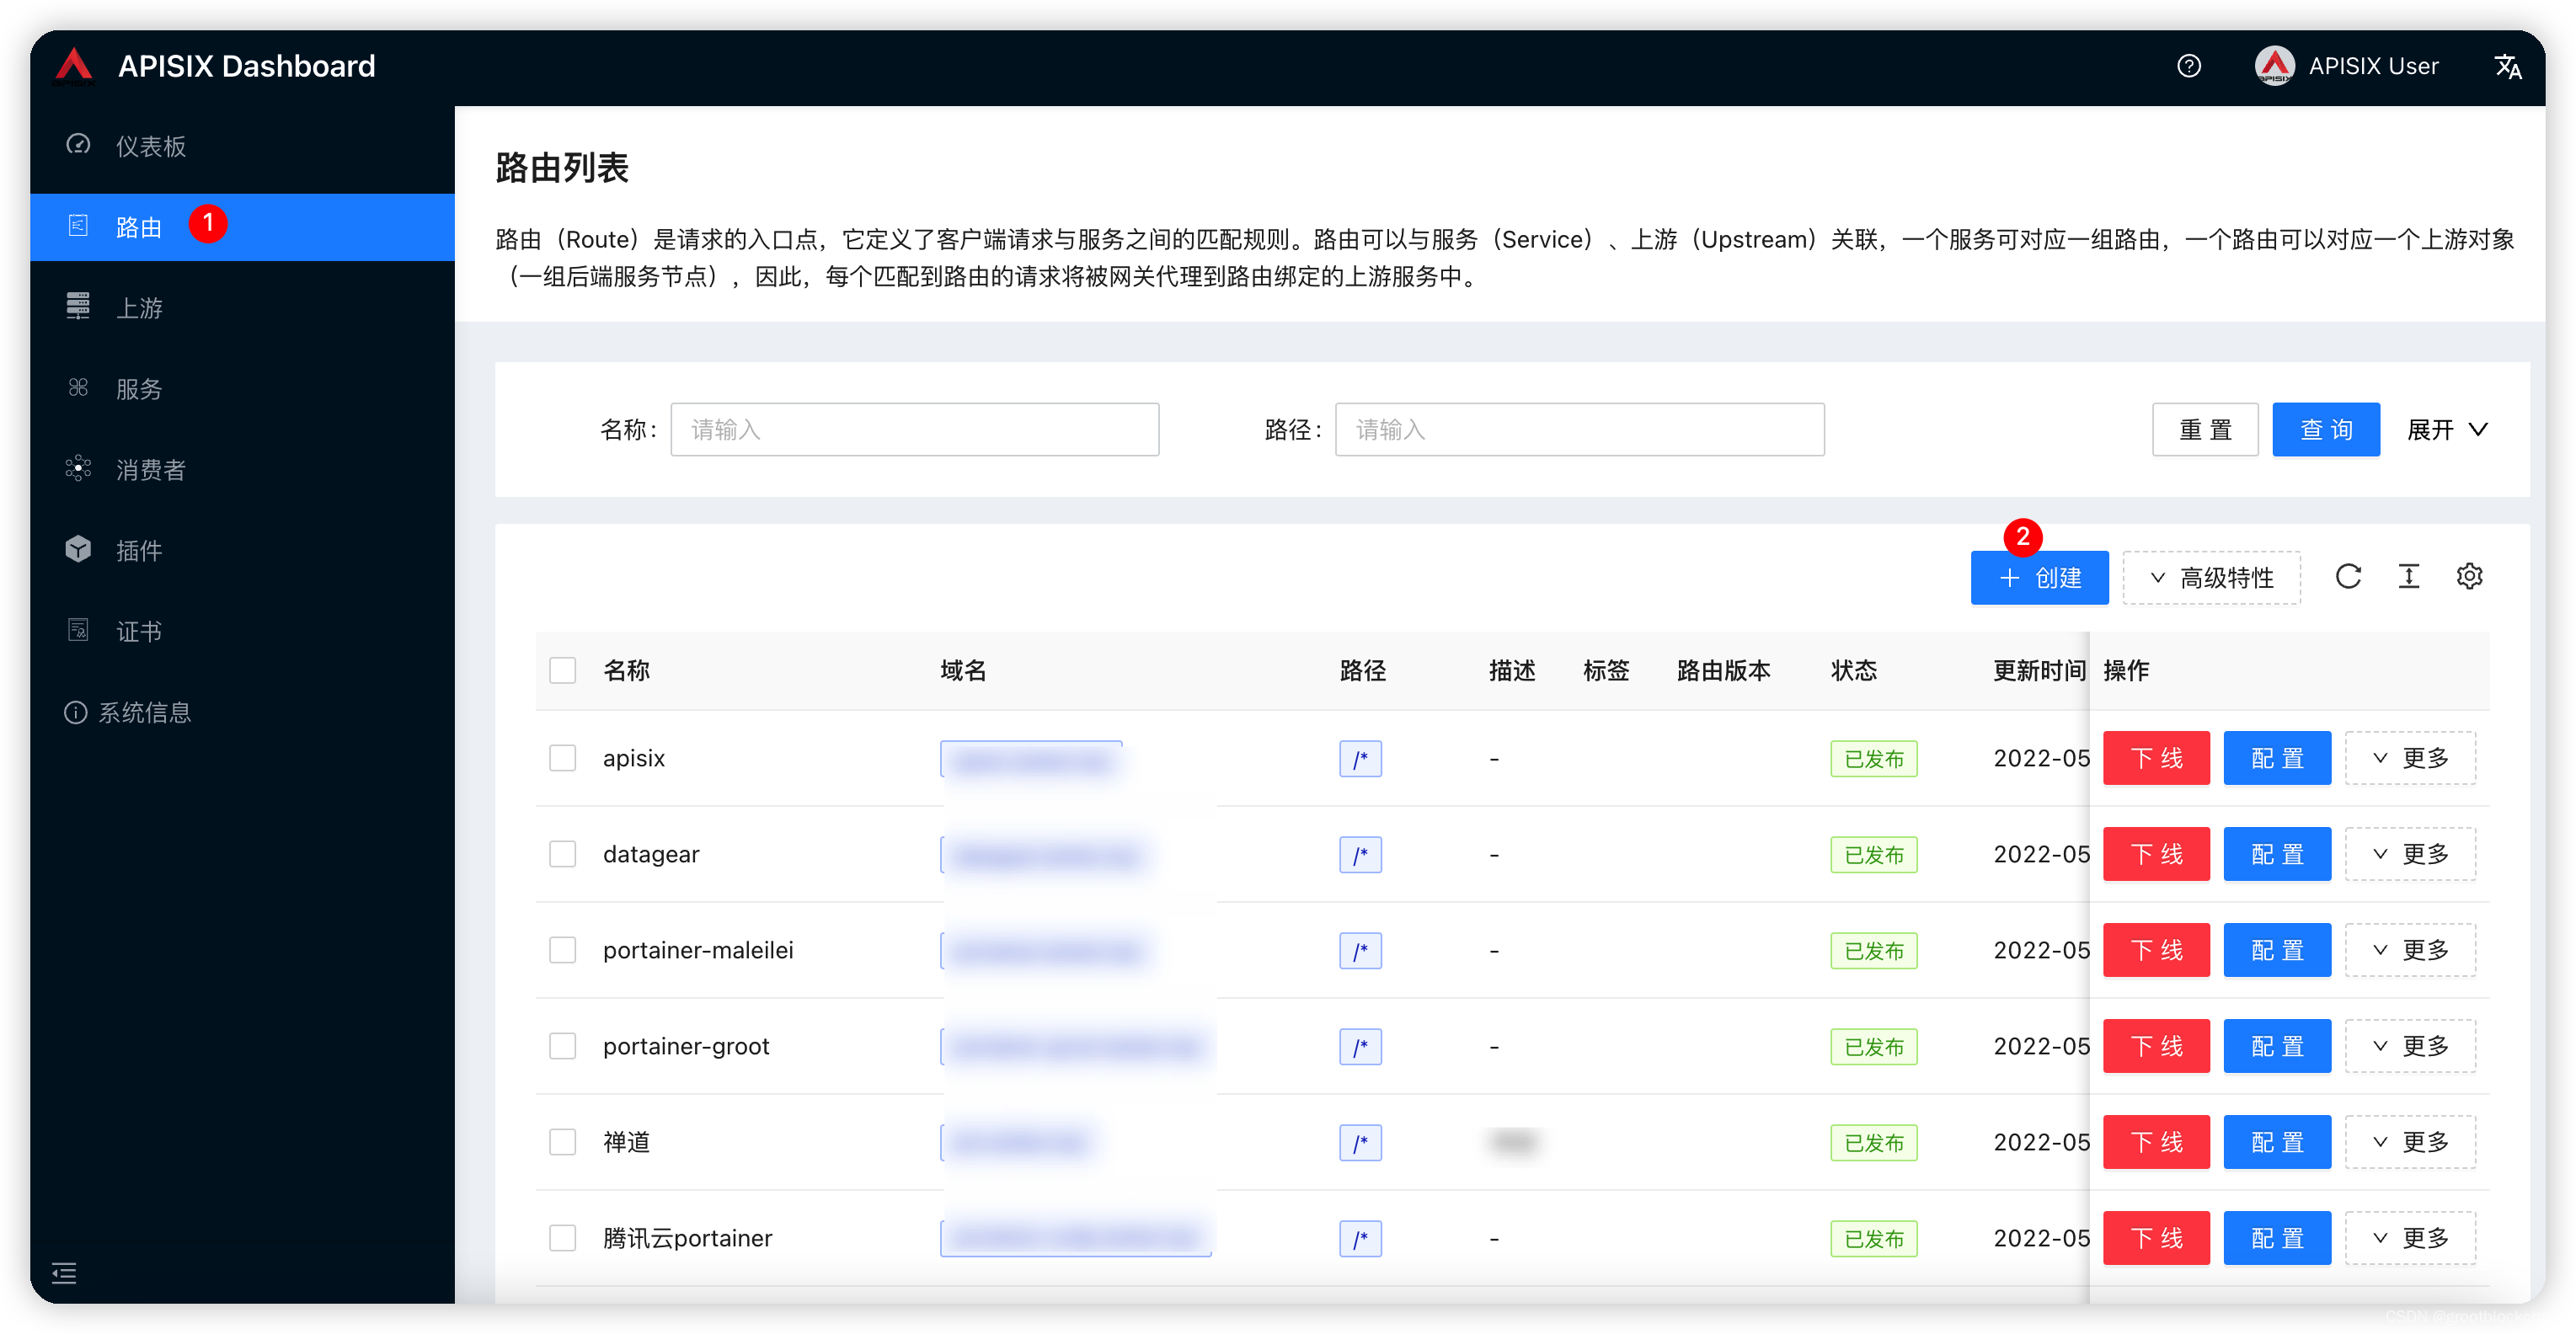
填写路由规则
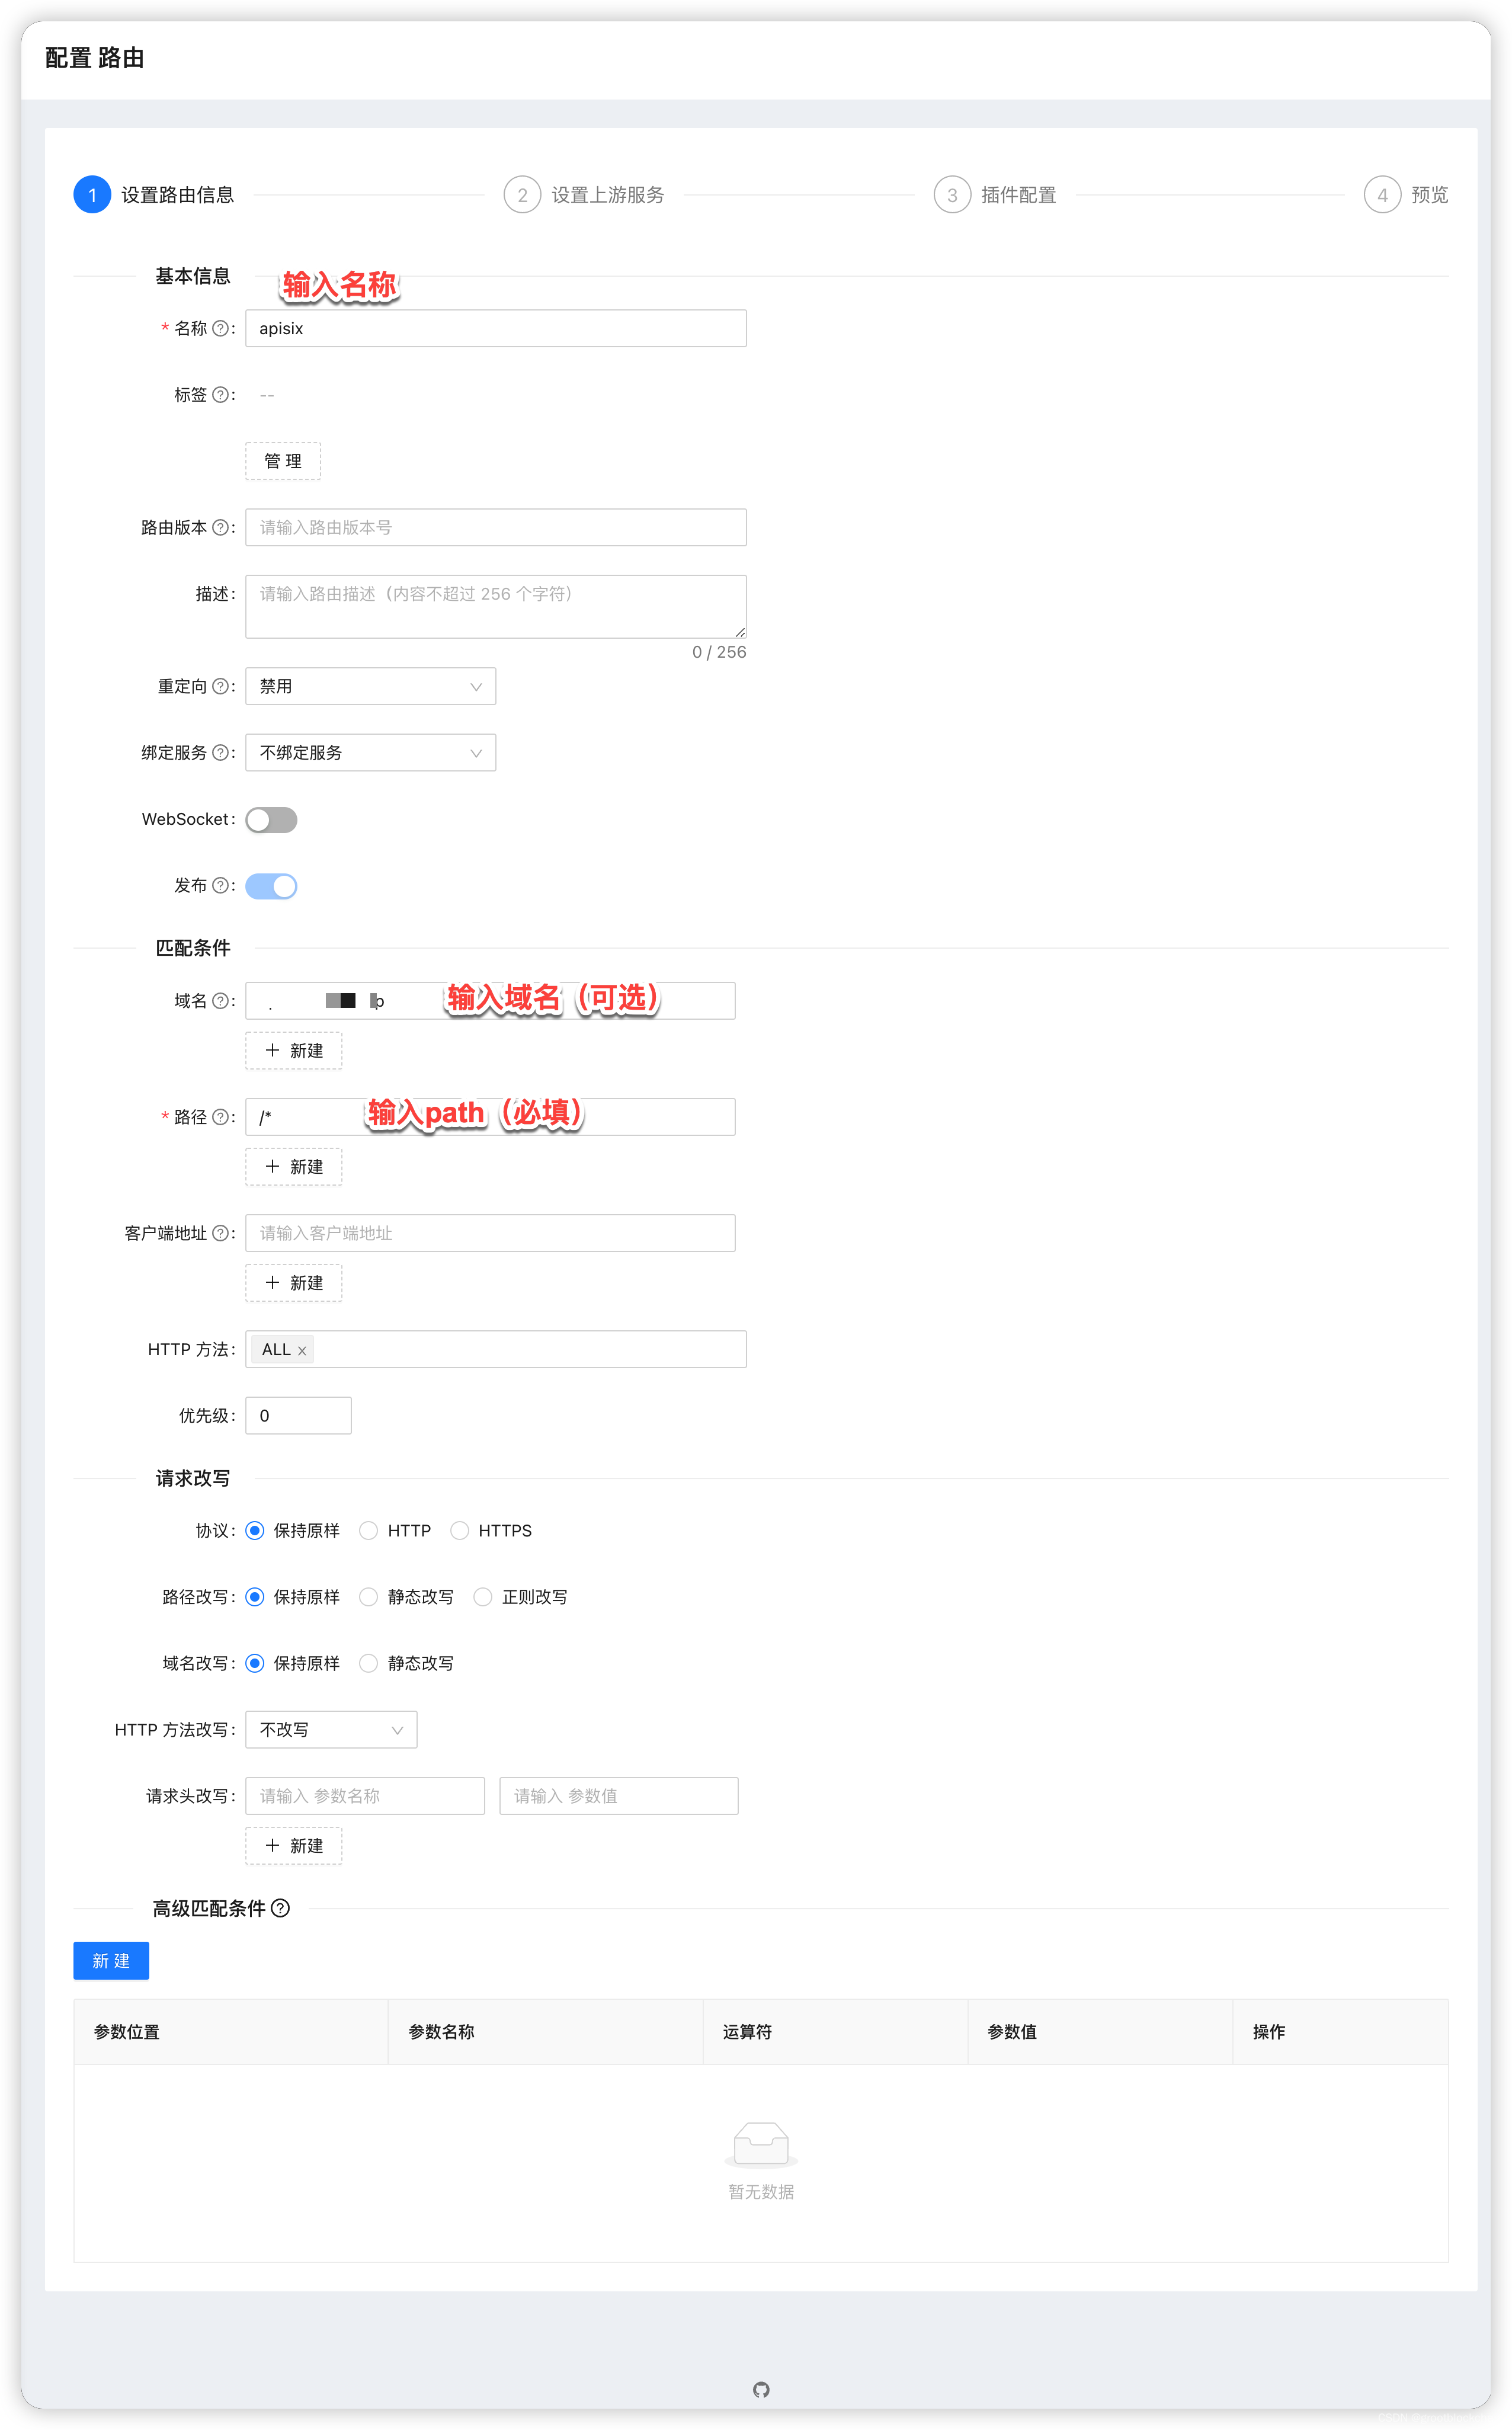
填完上述信息点下一步
配置上游服务
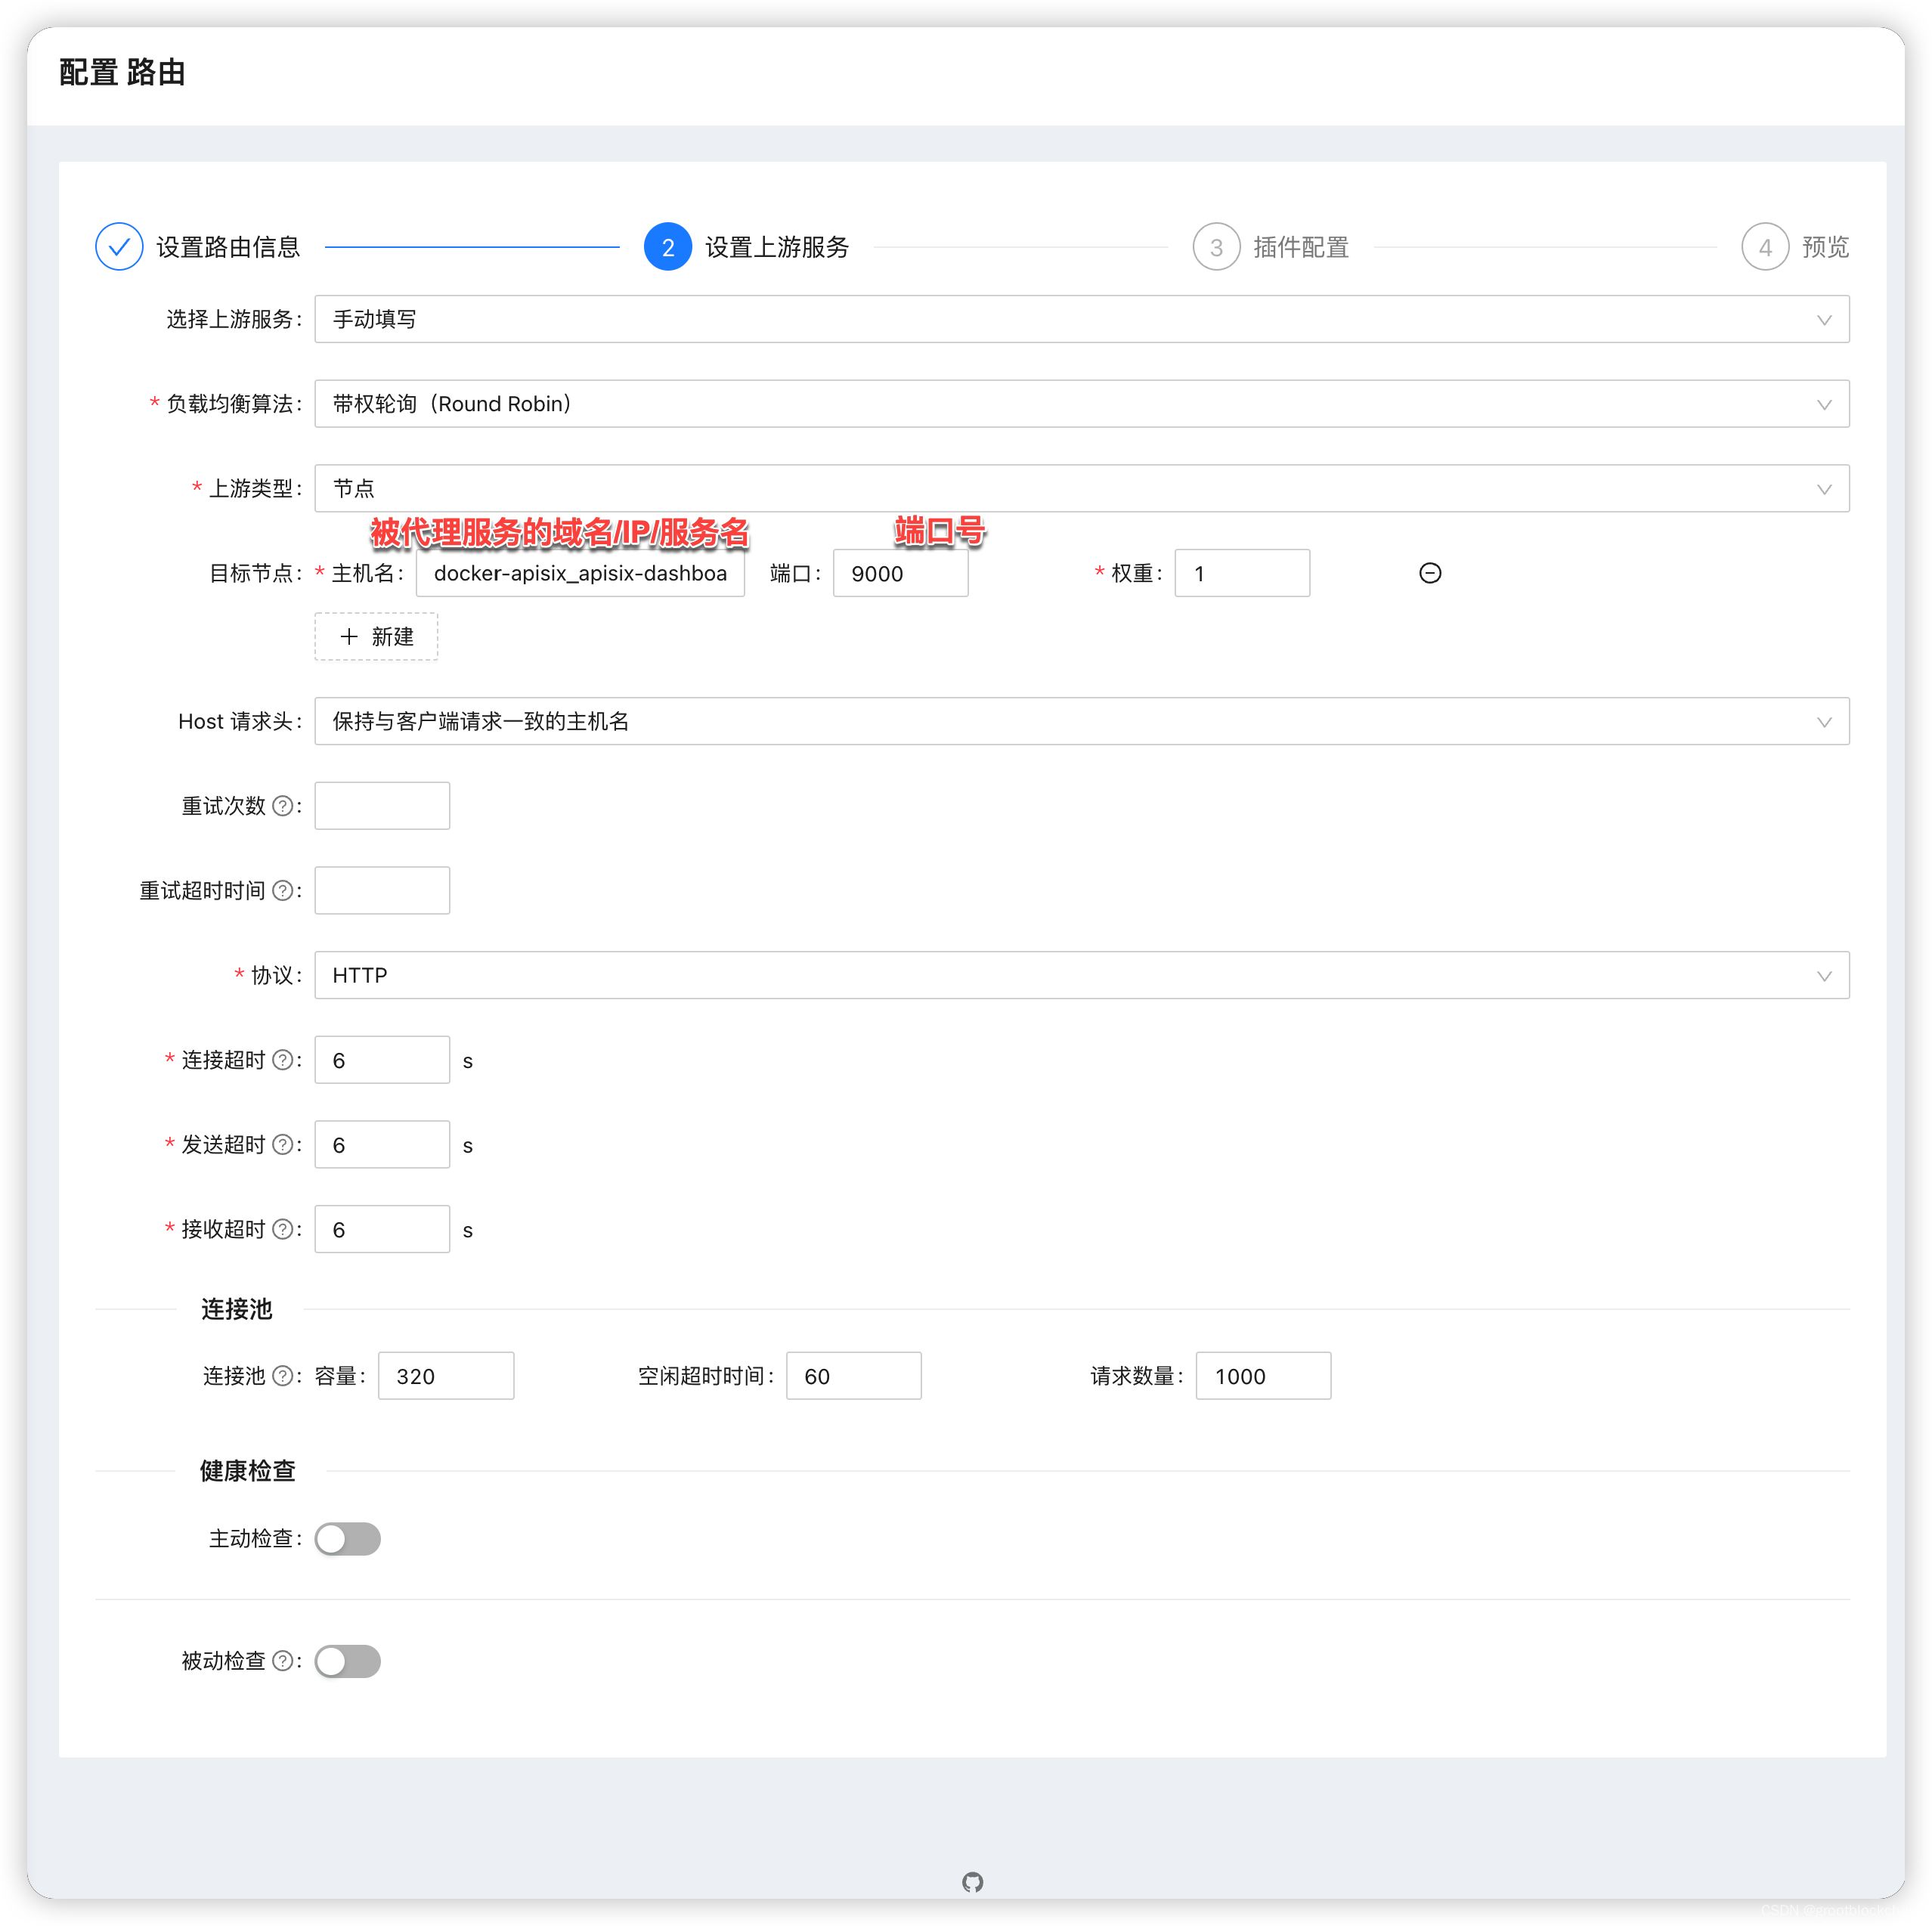
不使用插件的情况下,下一步,下一步完成 即可。
插件使用
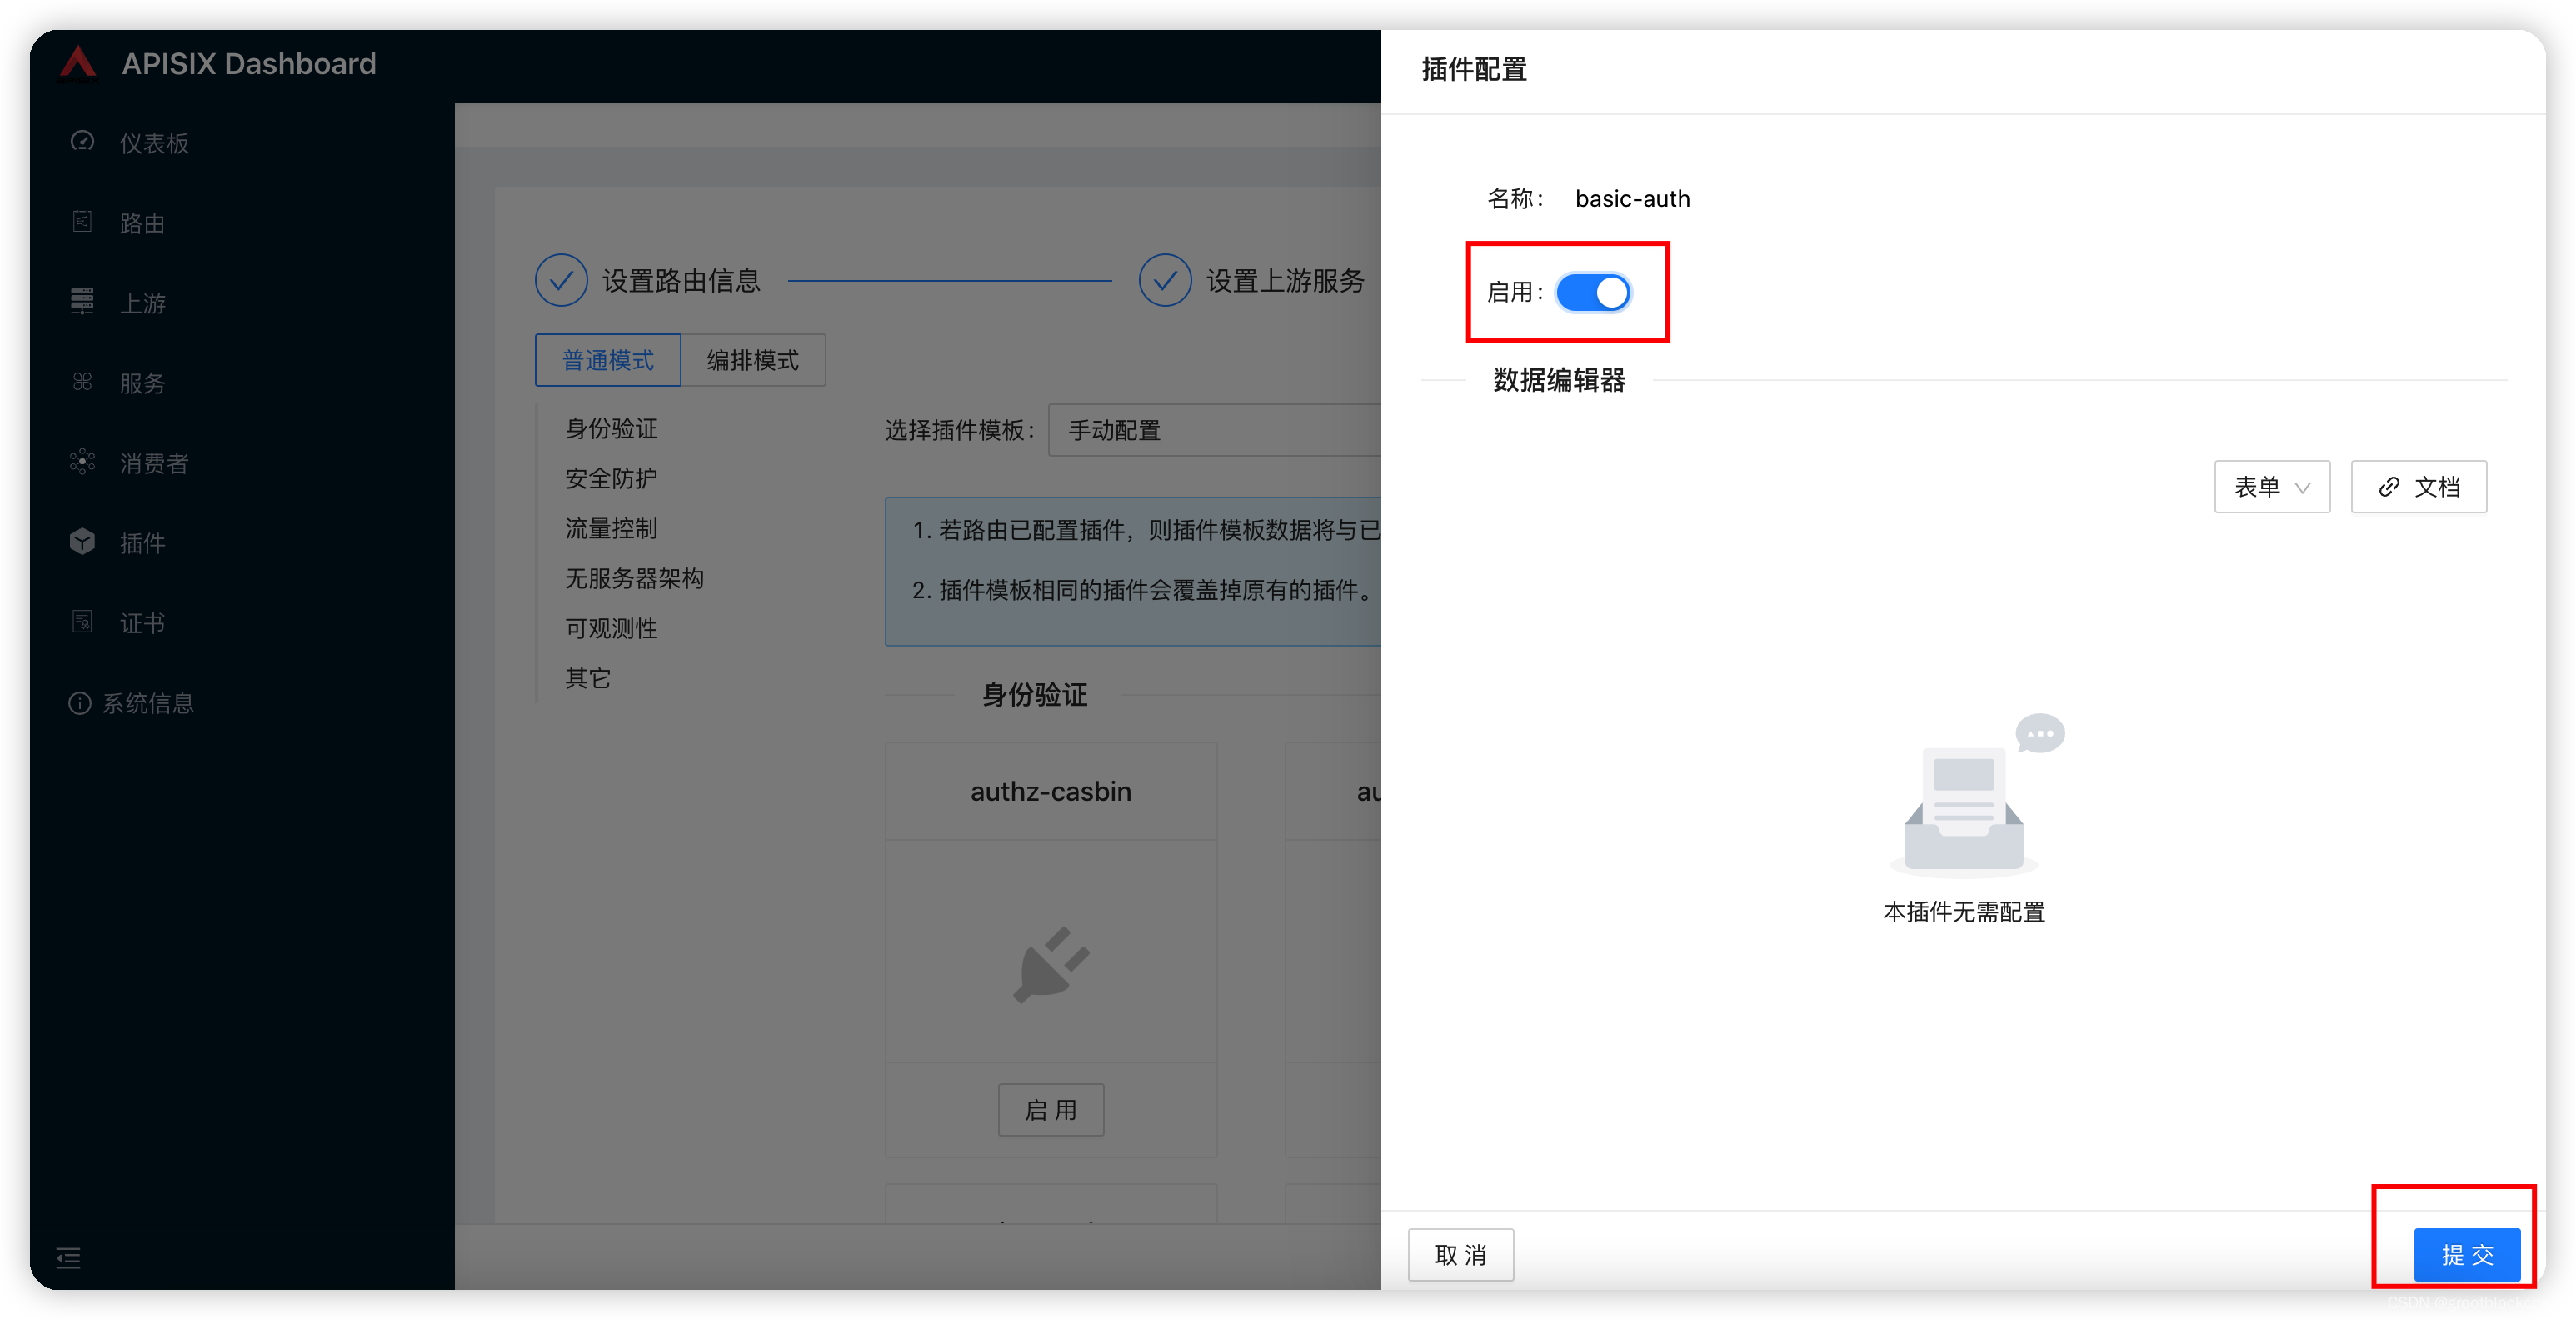
basic-auth
:适用于简单的登录校验
:basic-auth是一个认证插件,它需要与consumer一起配合才能工作。添加 Basic Authentication 到一个
service或route。 然后consumer将其用户名和密码添加到请求头中以验证其请求。
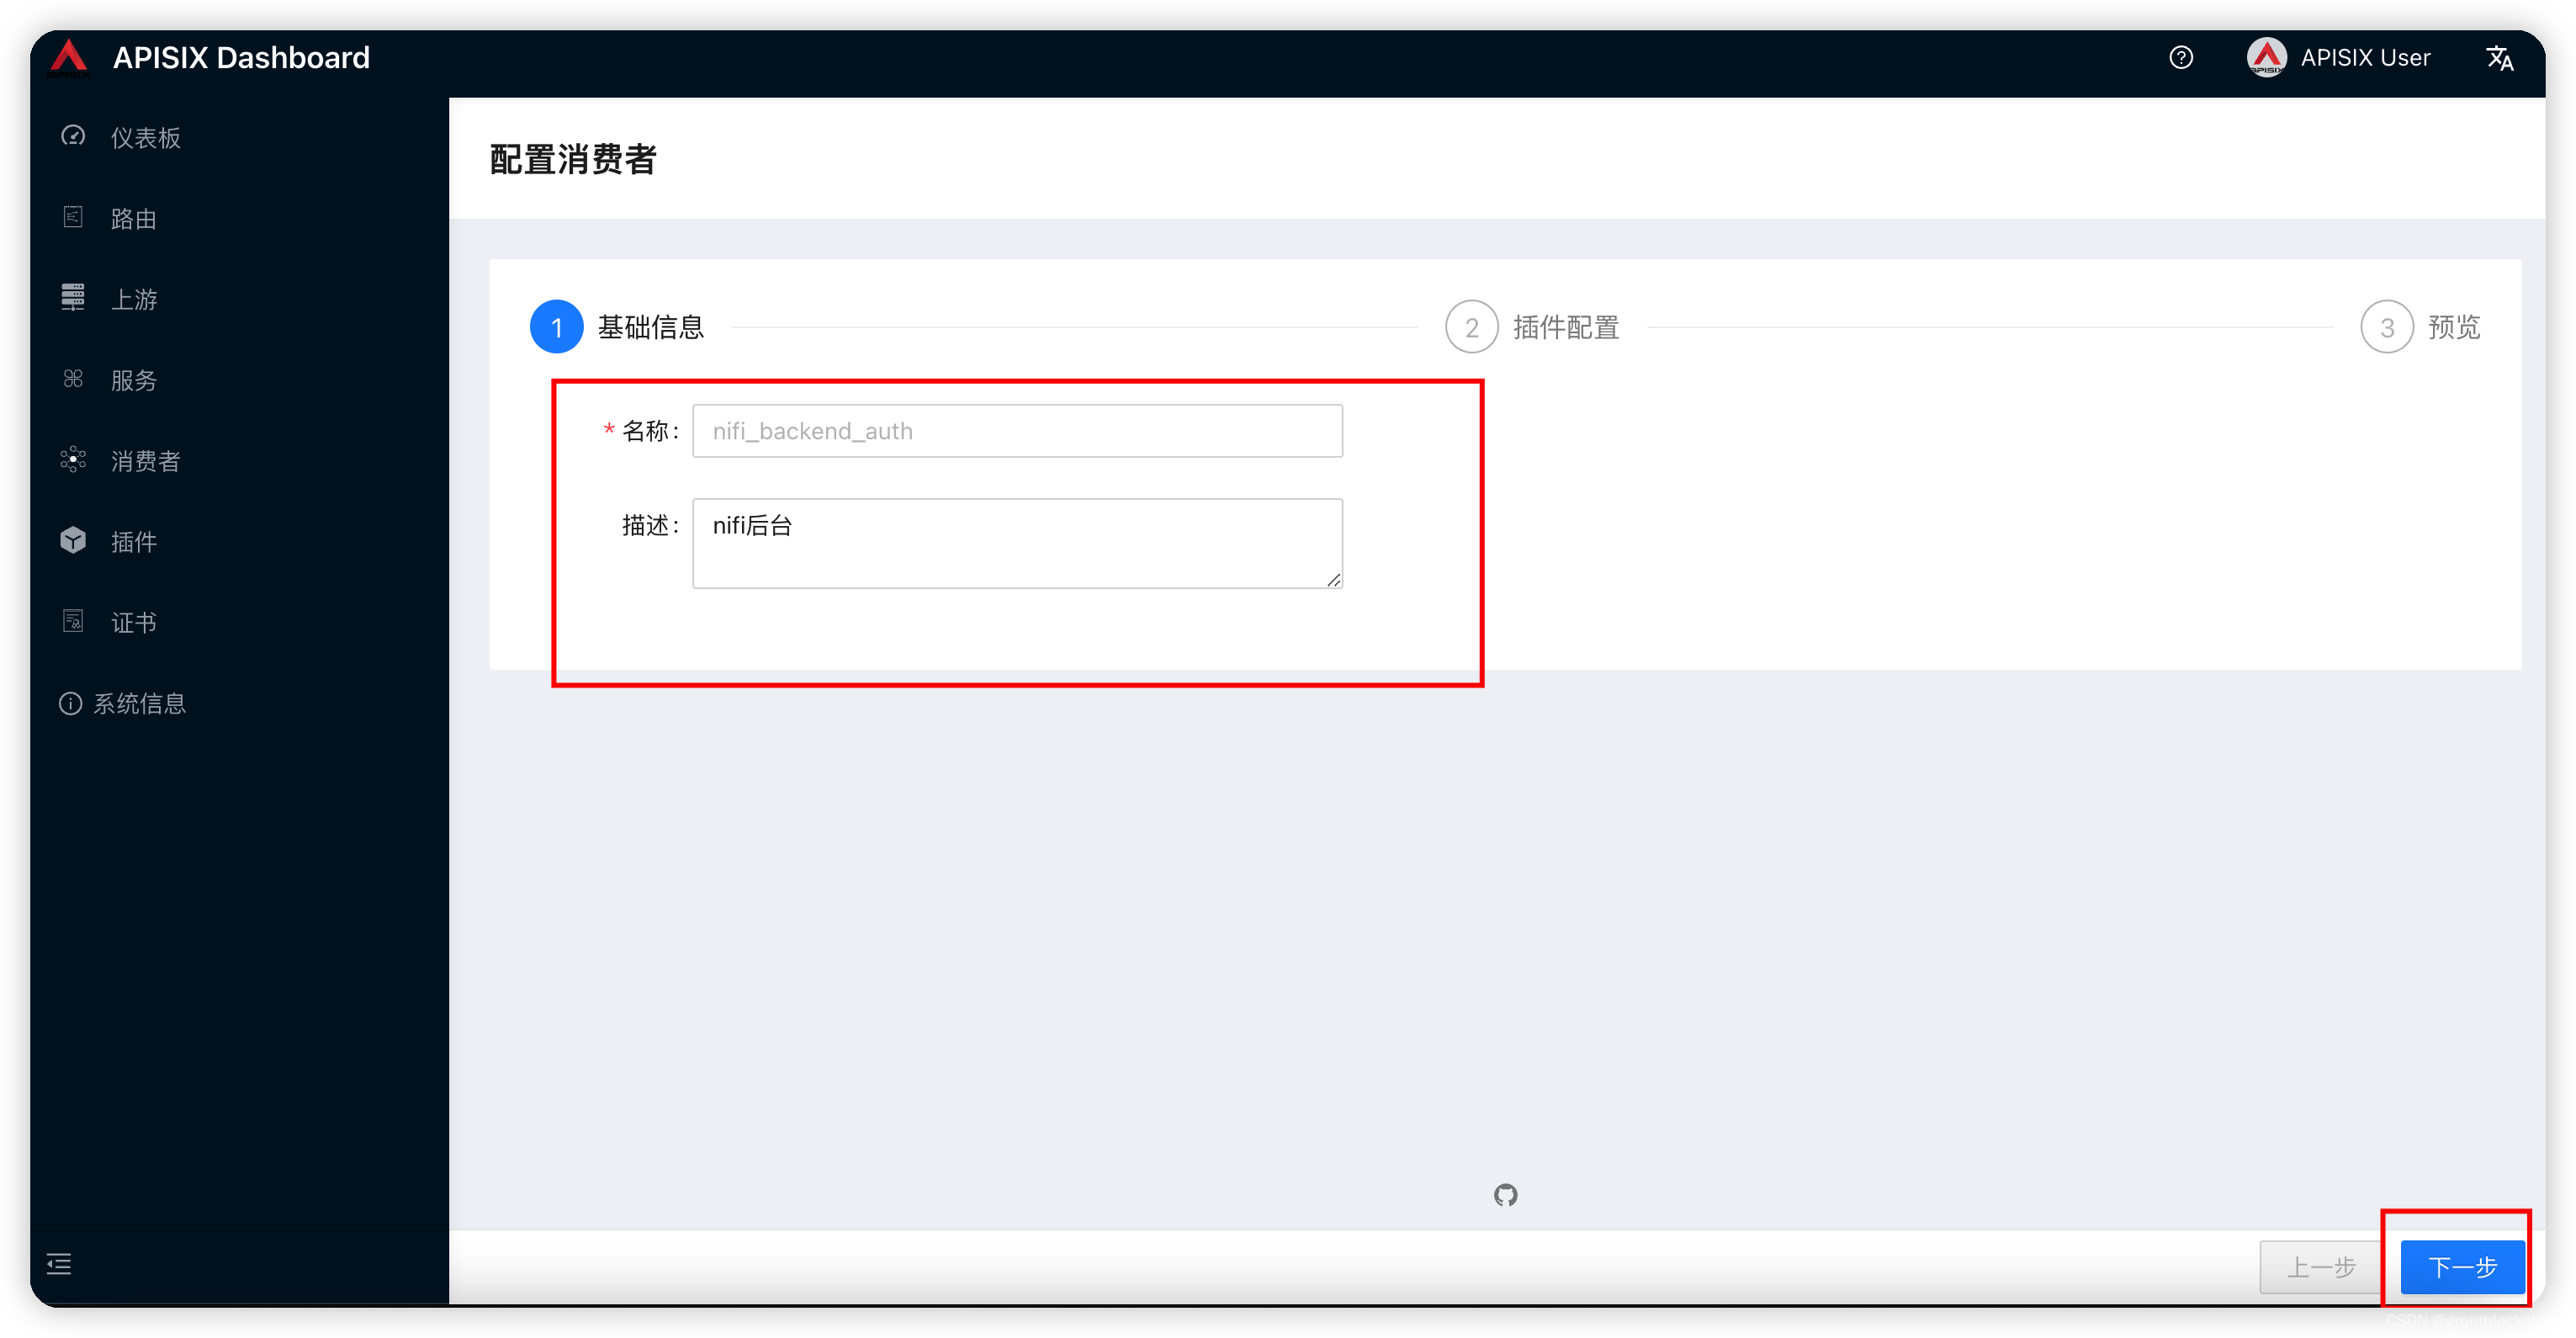
创建消费者
consumer
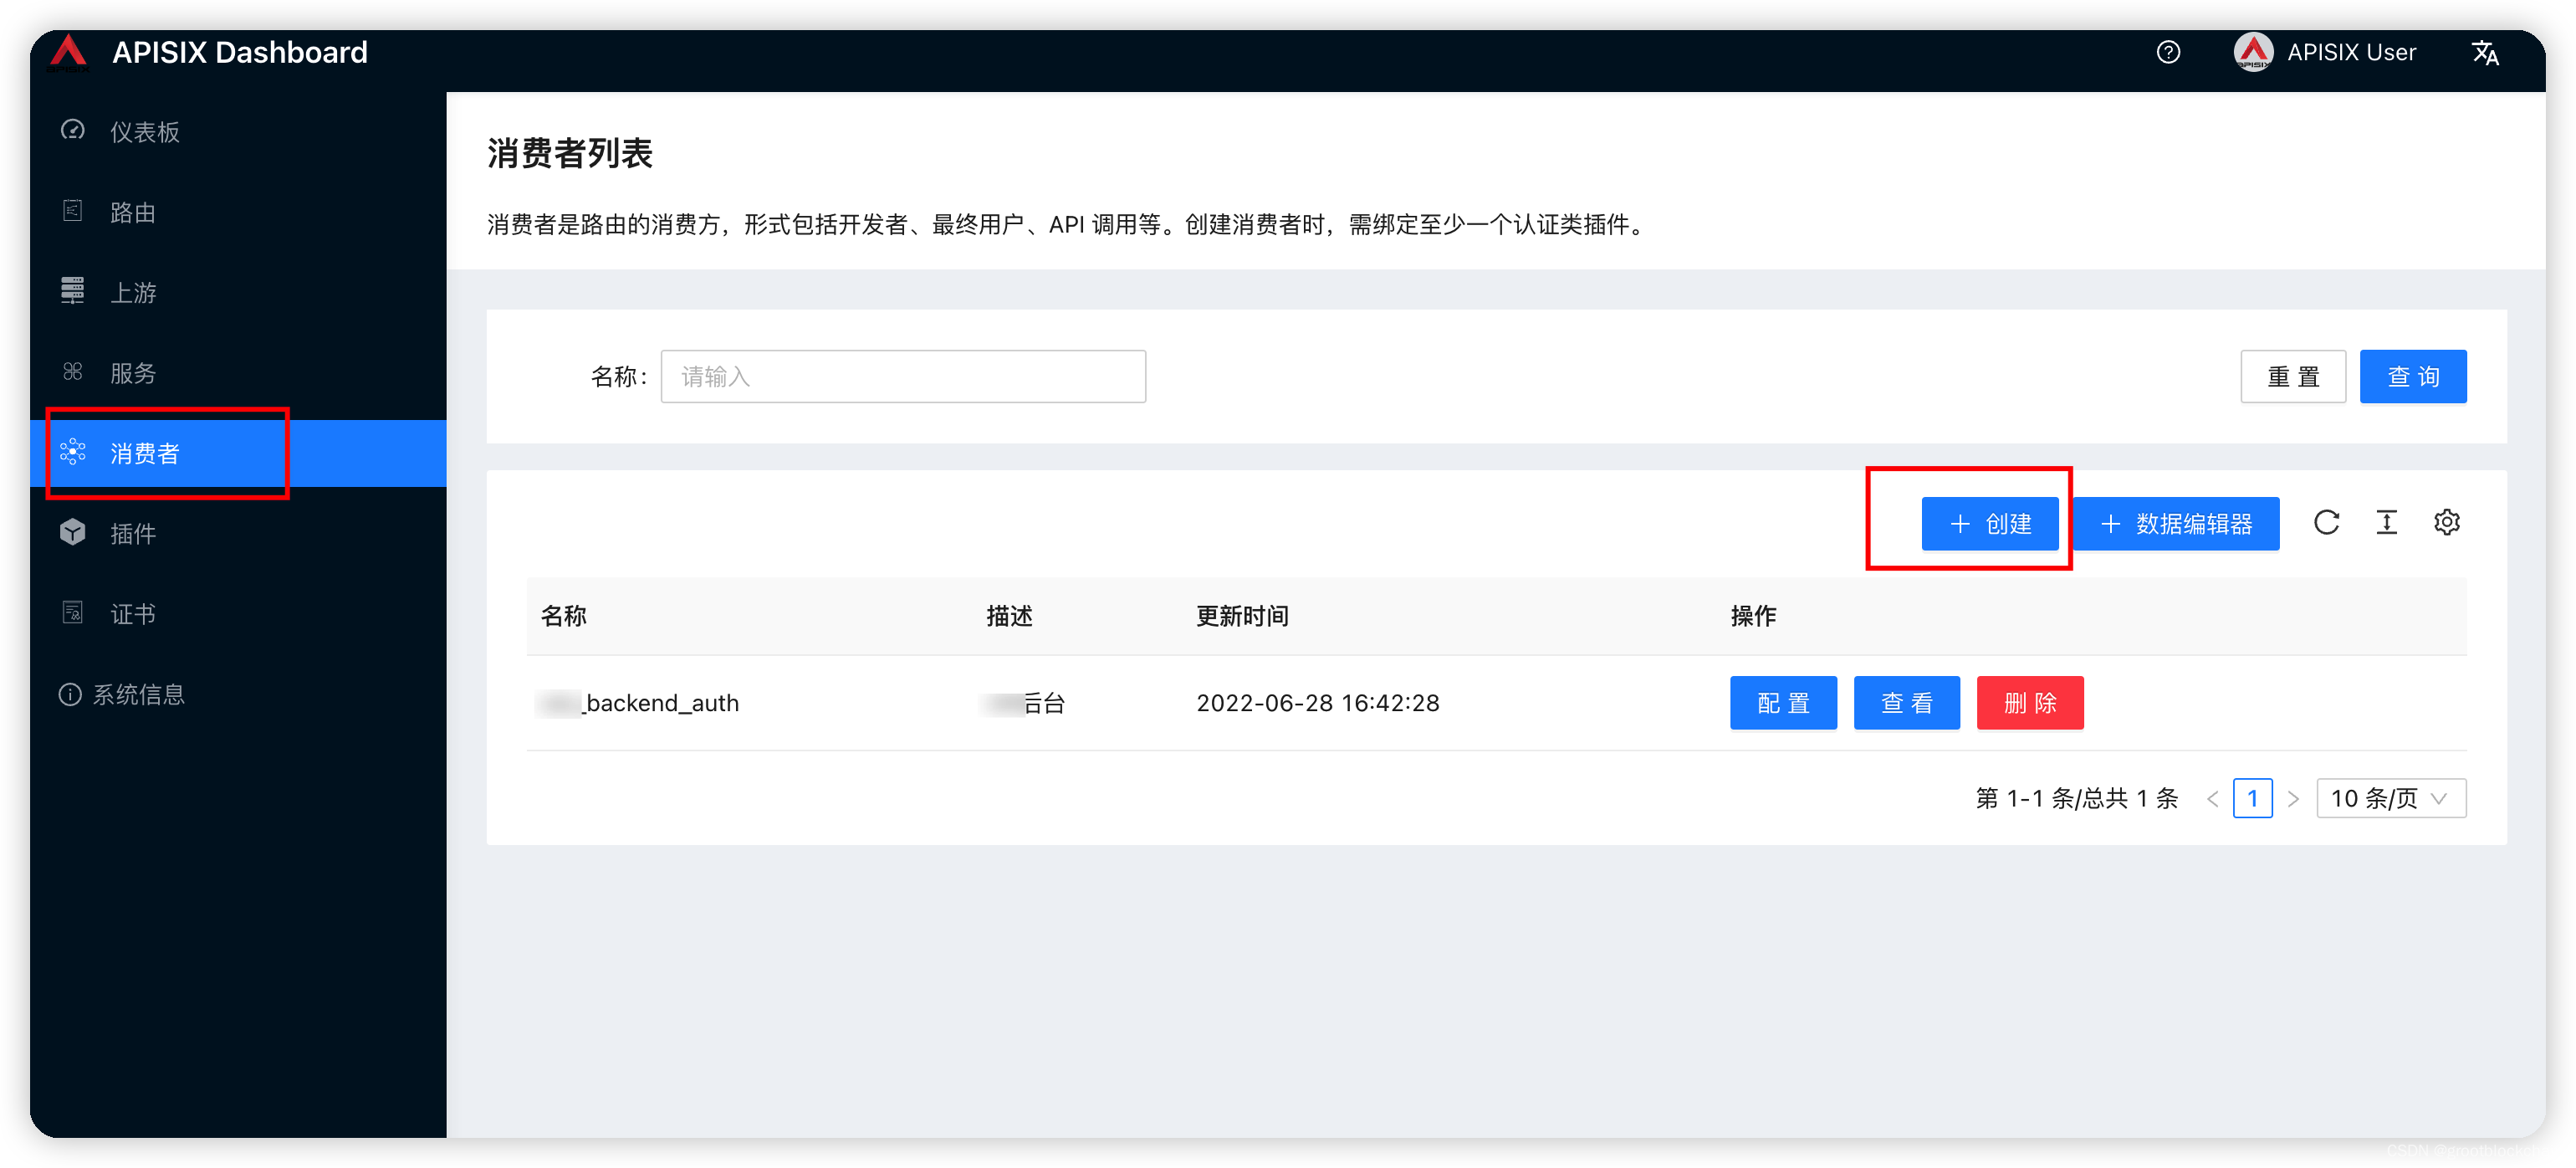
填写消费者名称及描述,点下一步
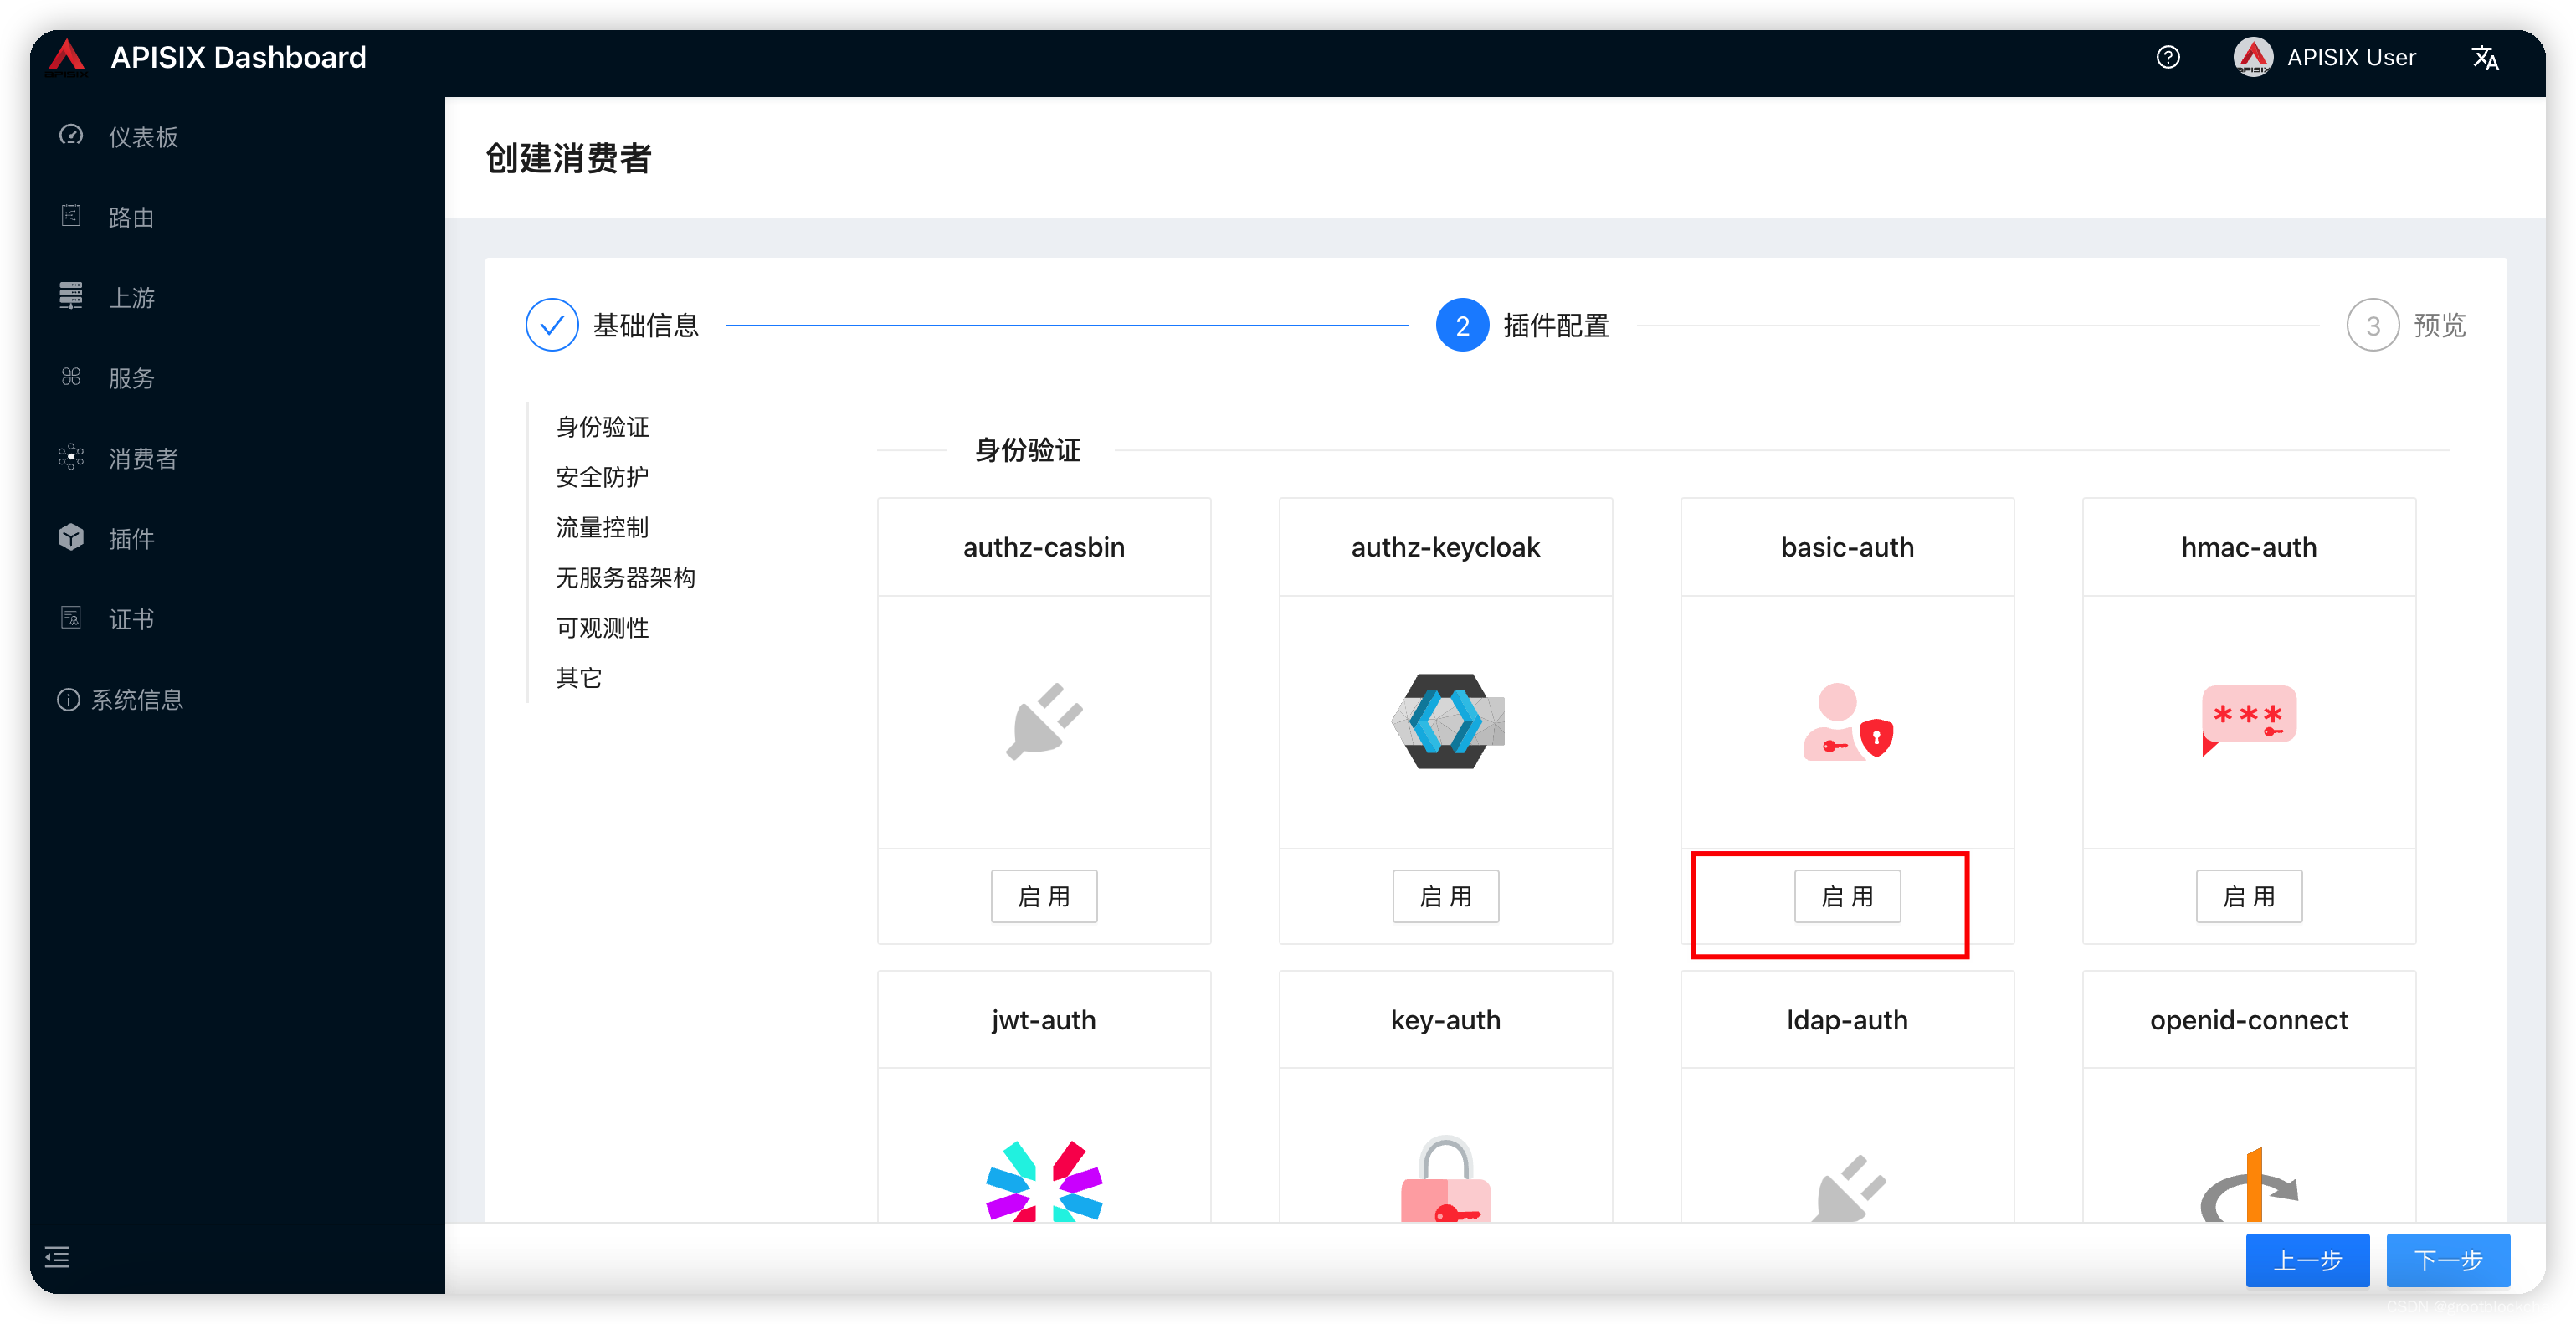
进入插件页面,启用 basic-auth
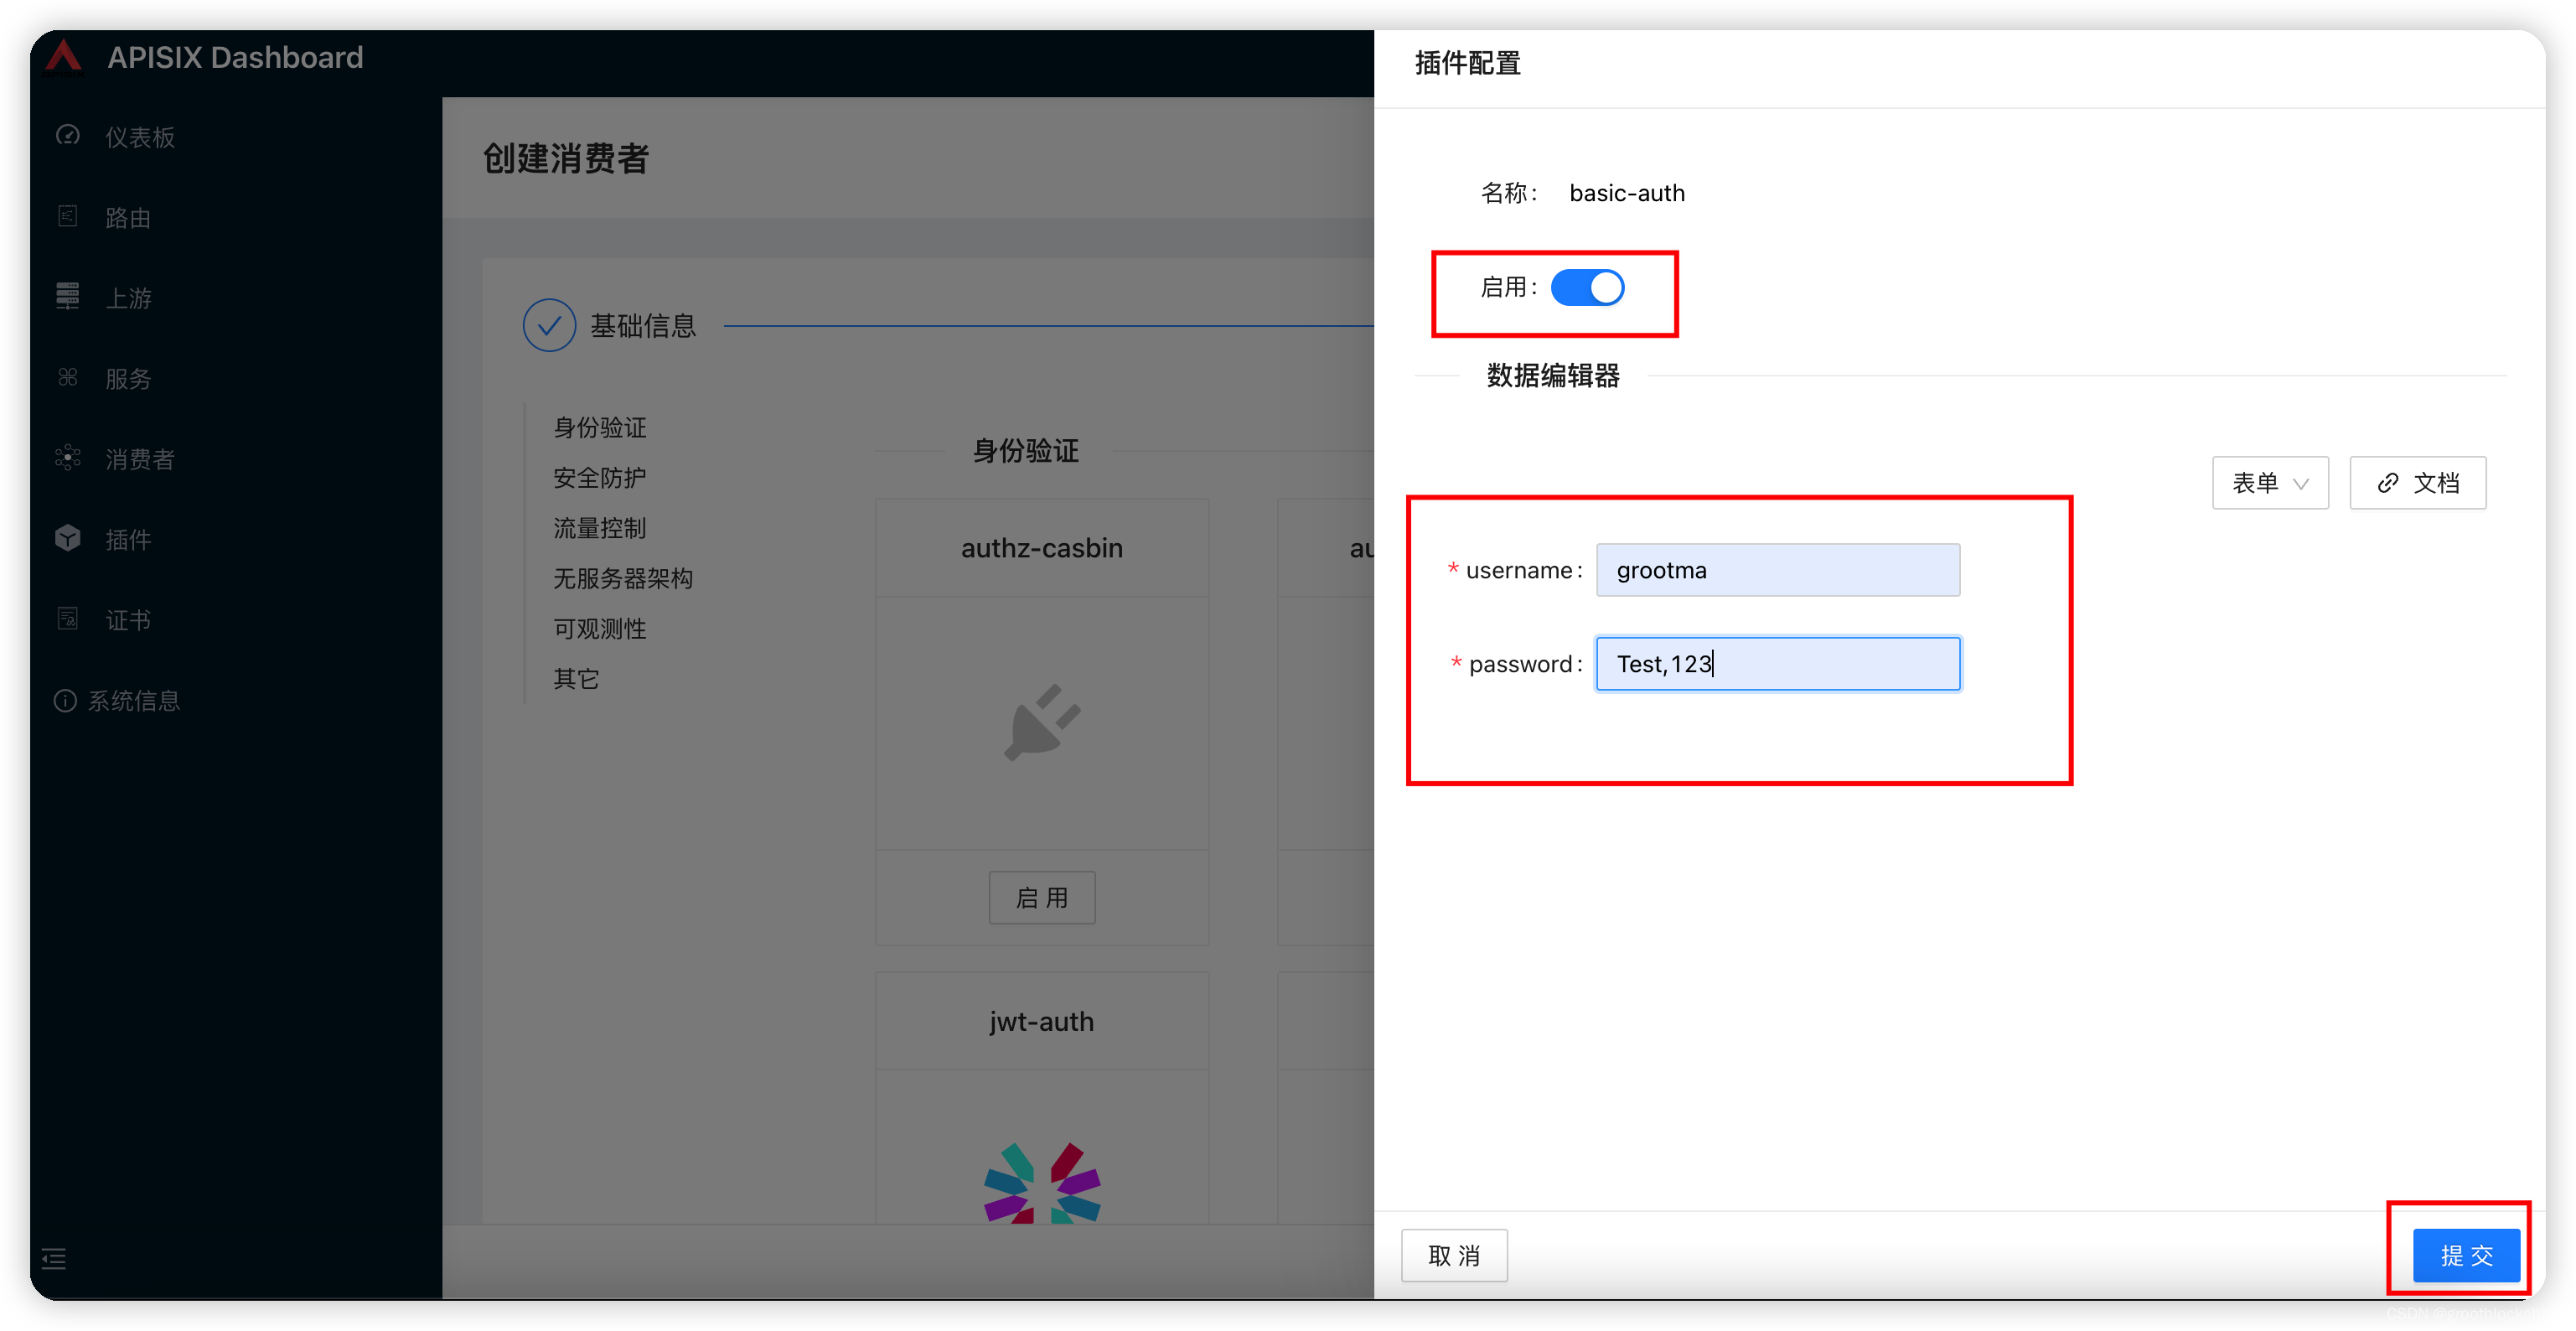
 输入用户名密码,启用插件,提交
点下一步预览,提交即可。
启用 basic-auth
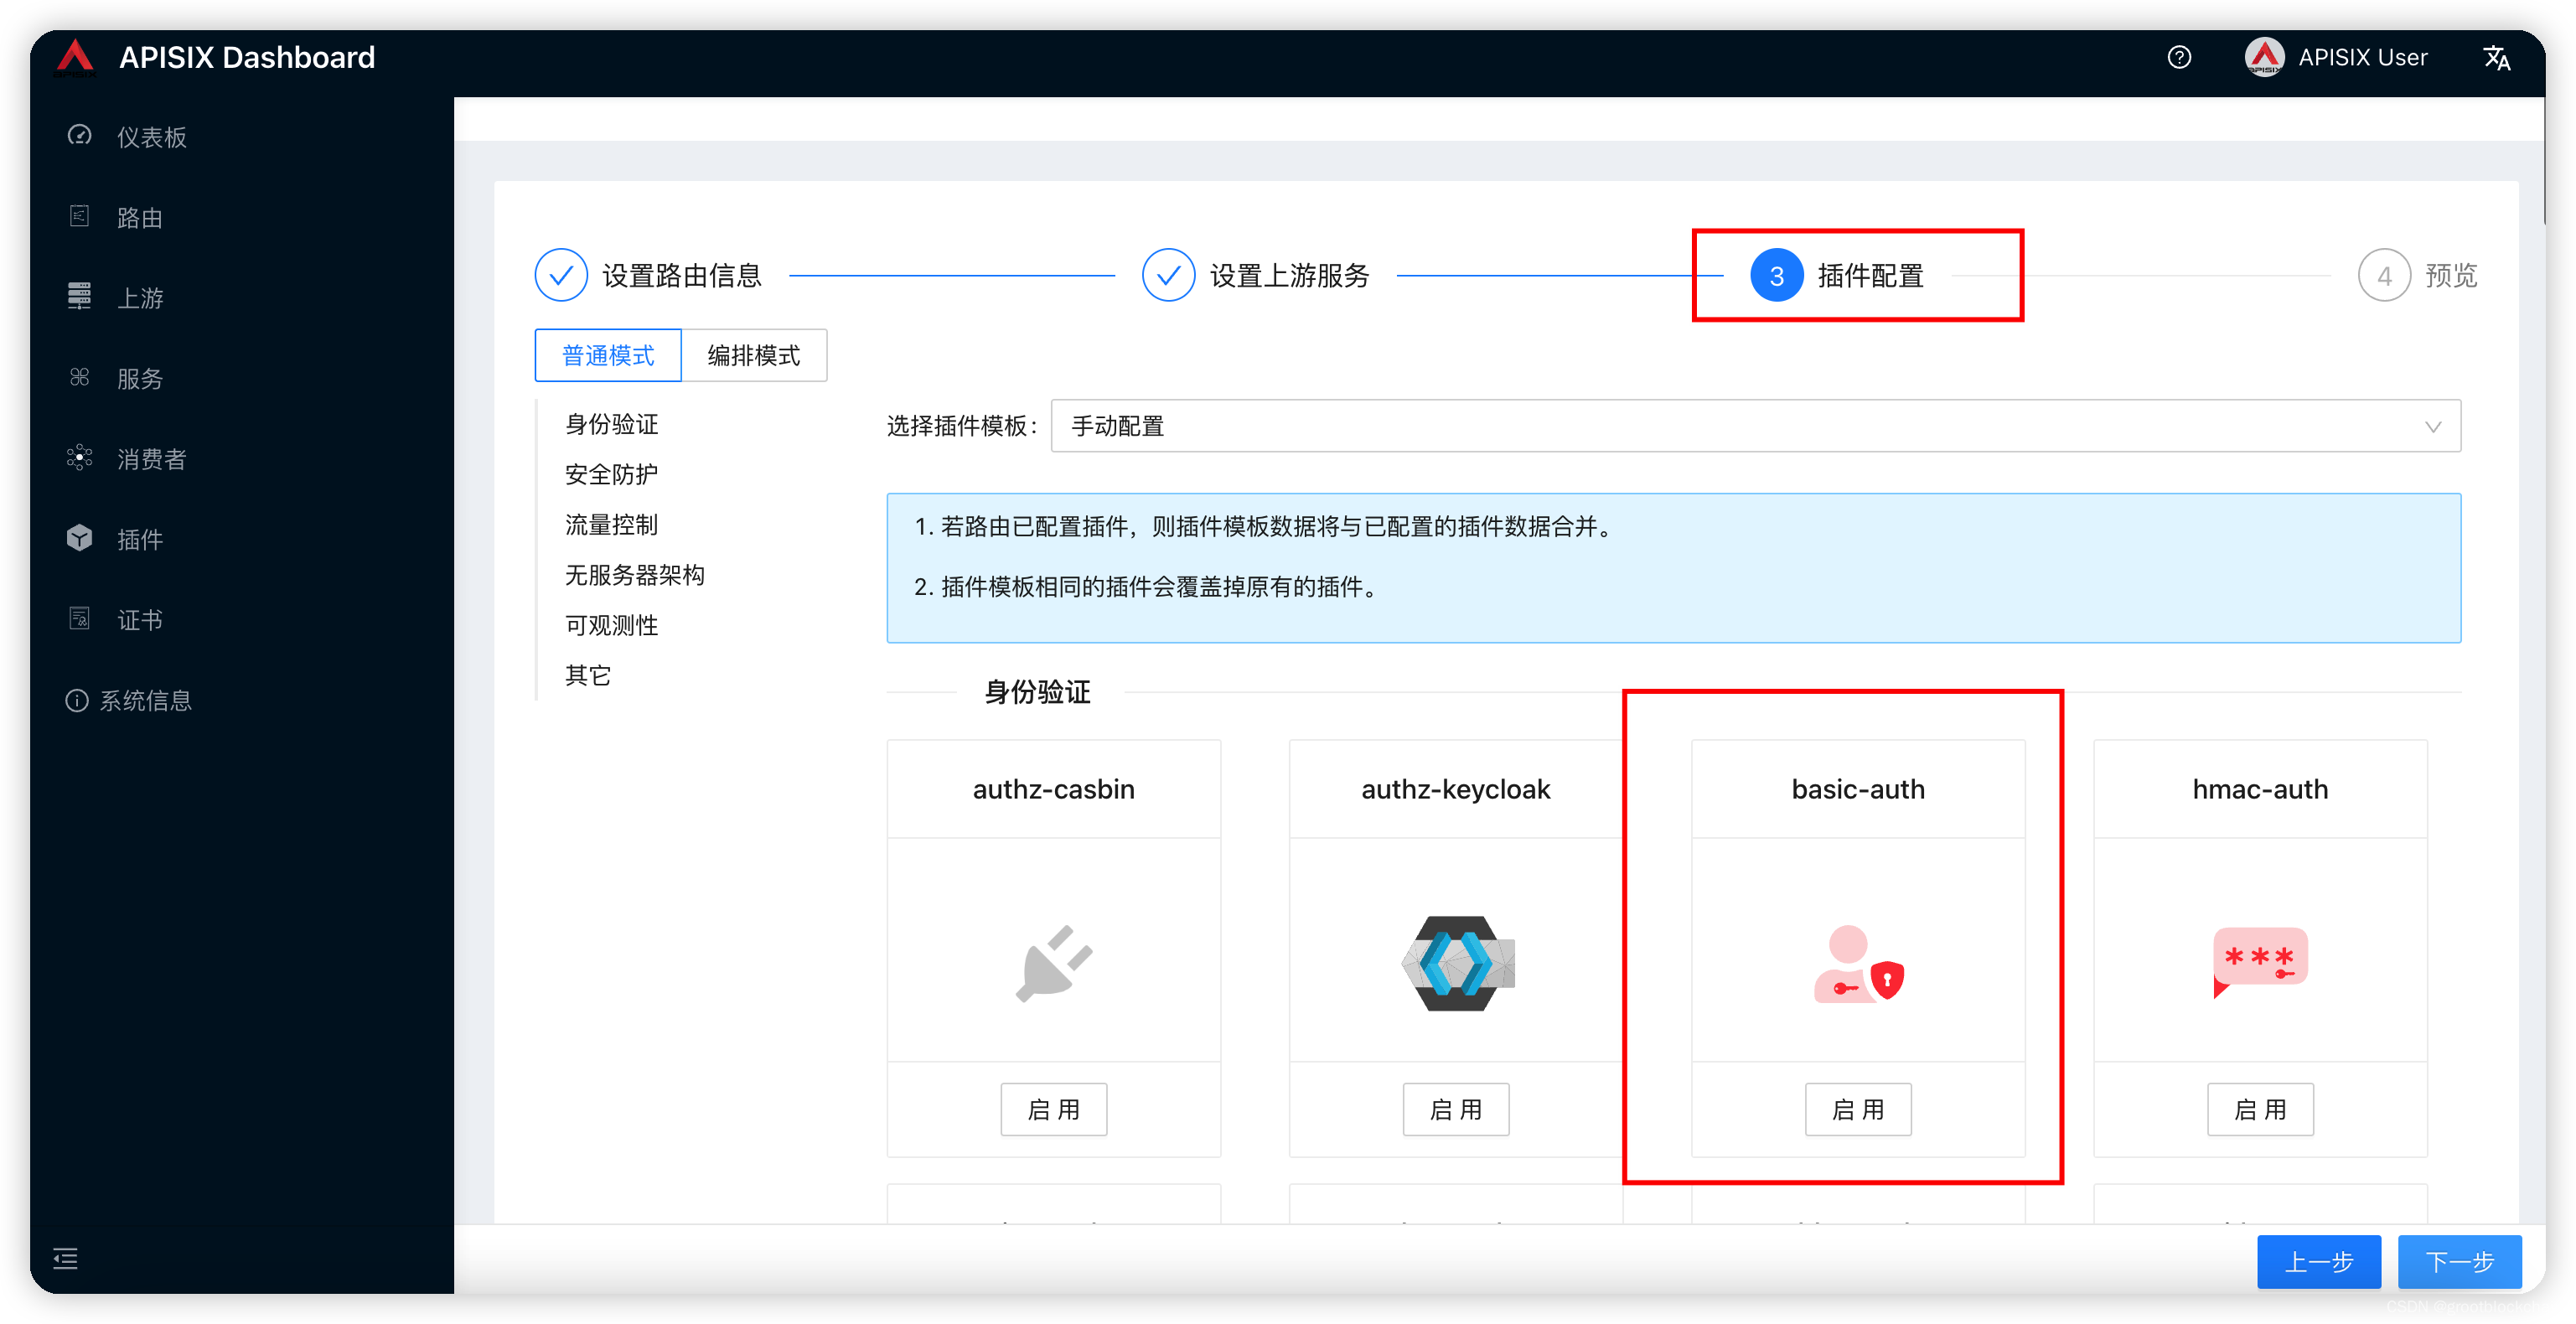
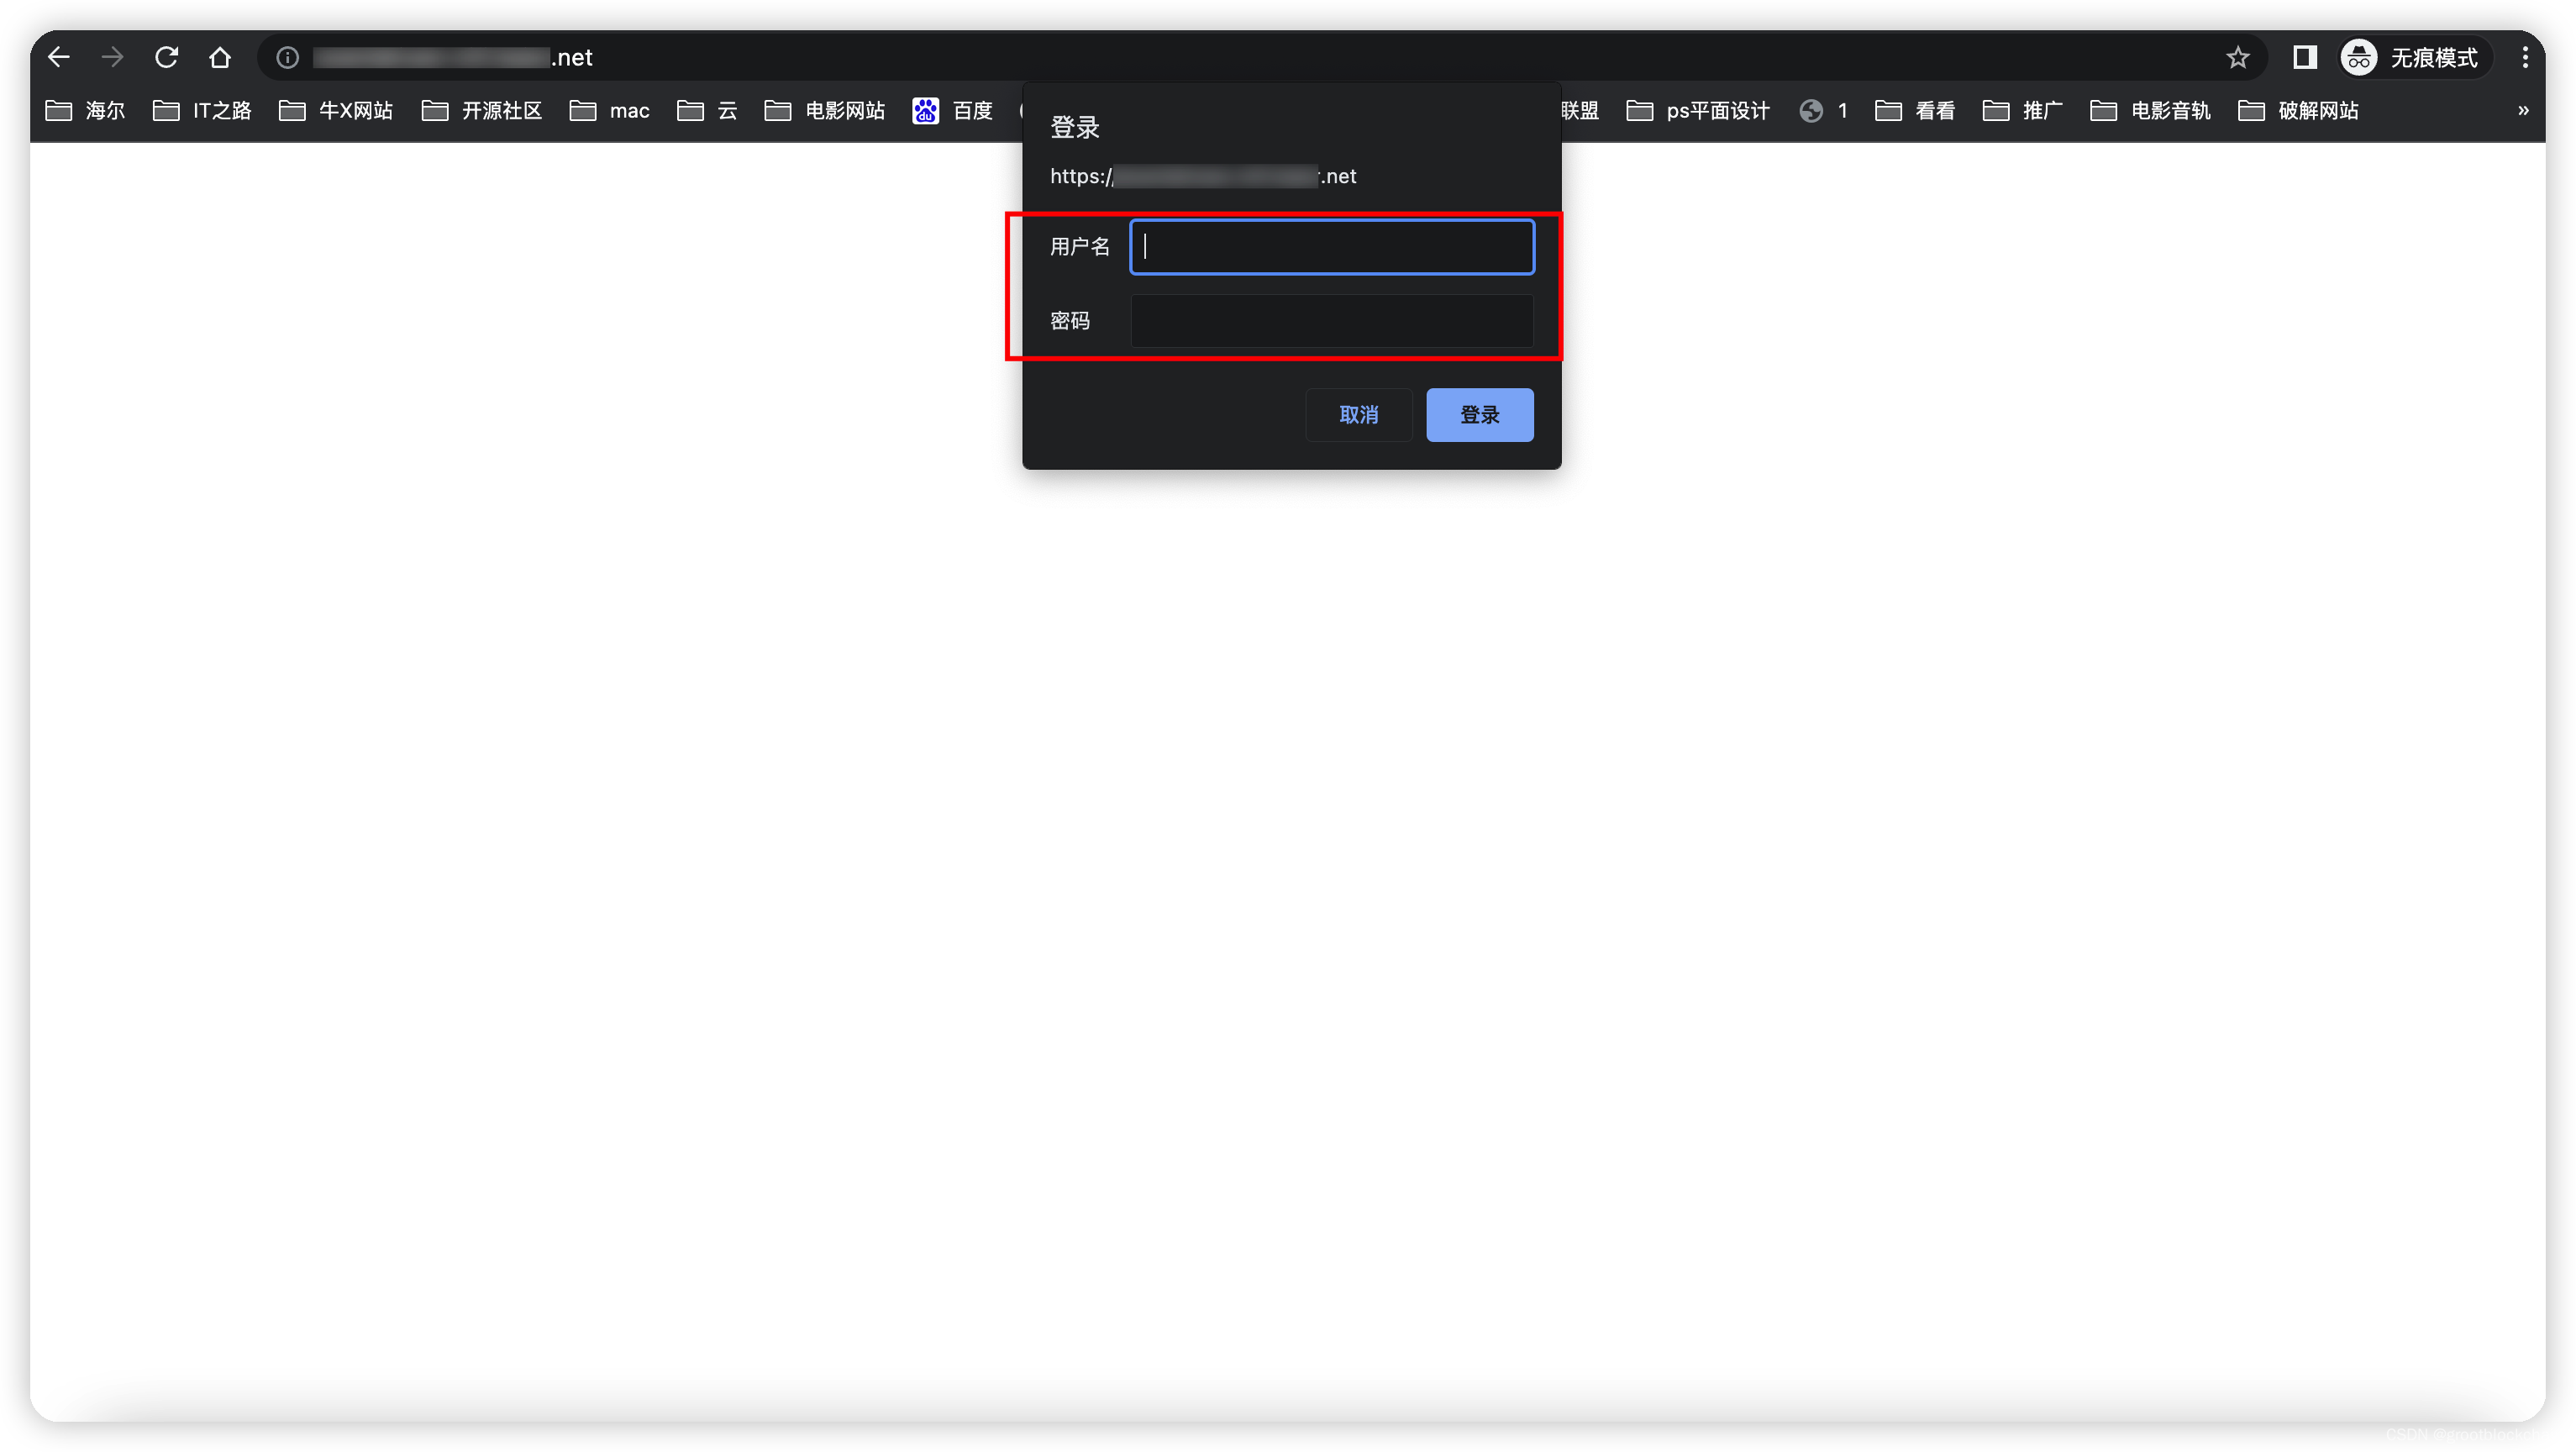
在需要启用登录认证的路由配置时启用 basic-auth 插件即可
这样打开此路由时就需要输入用户名密码校验了
其他很多插件也是依赖消费者 basic-auth 的,使用方式雷同,待后续补充 。
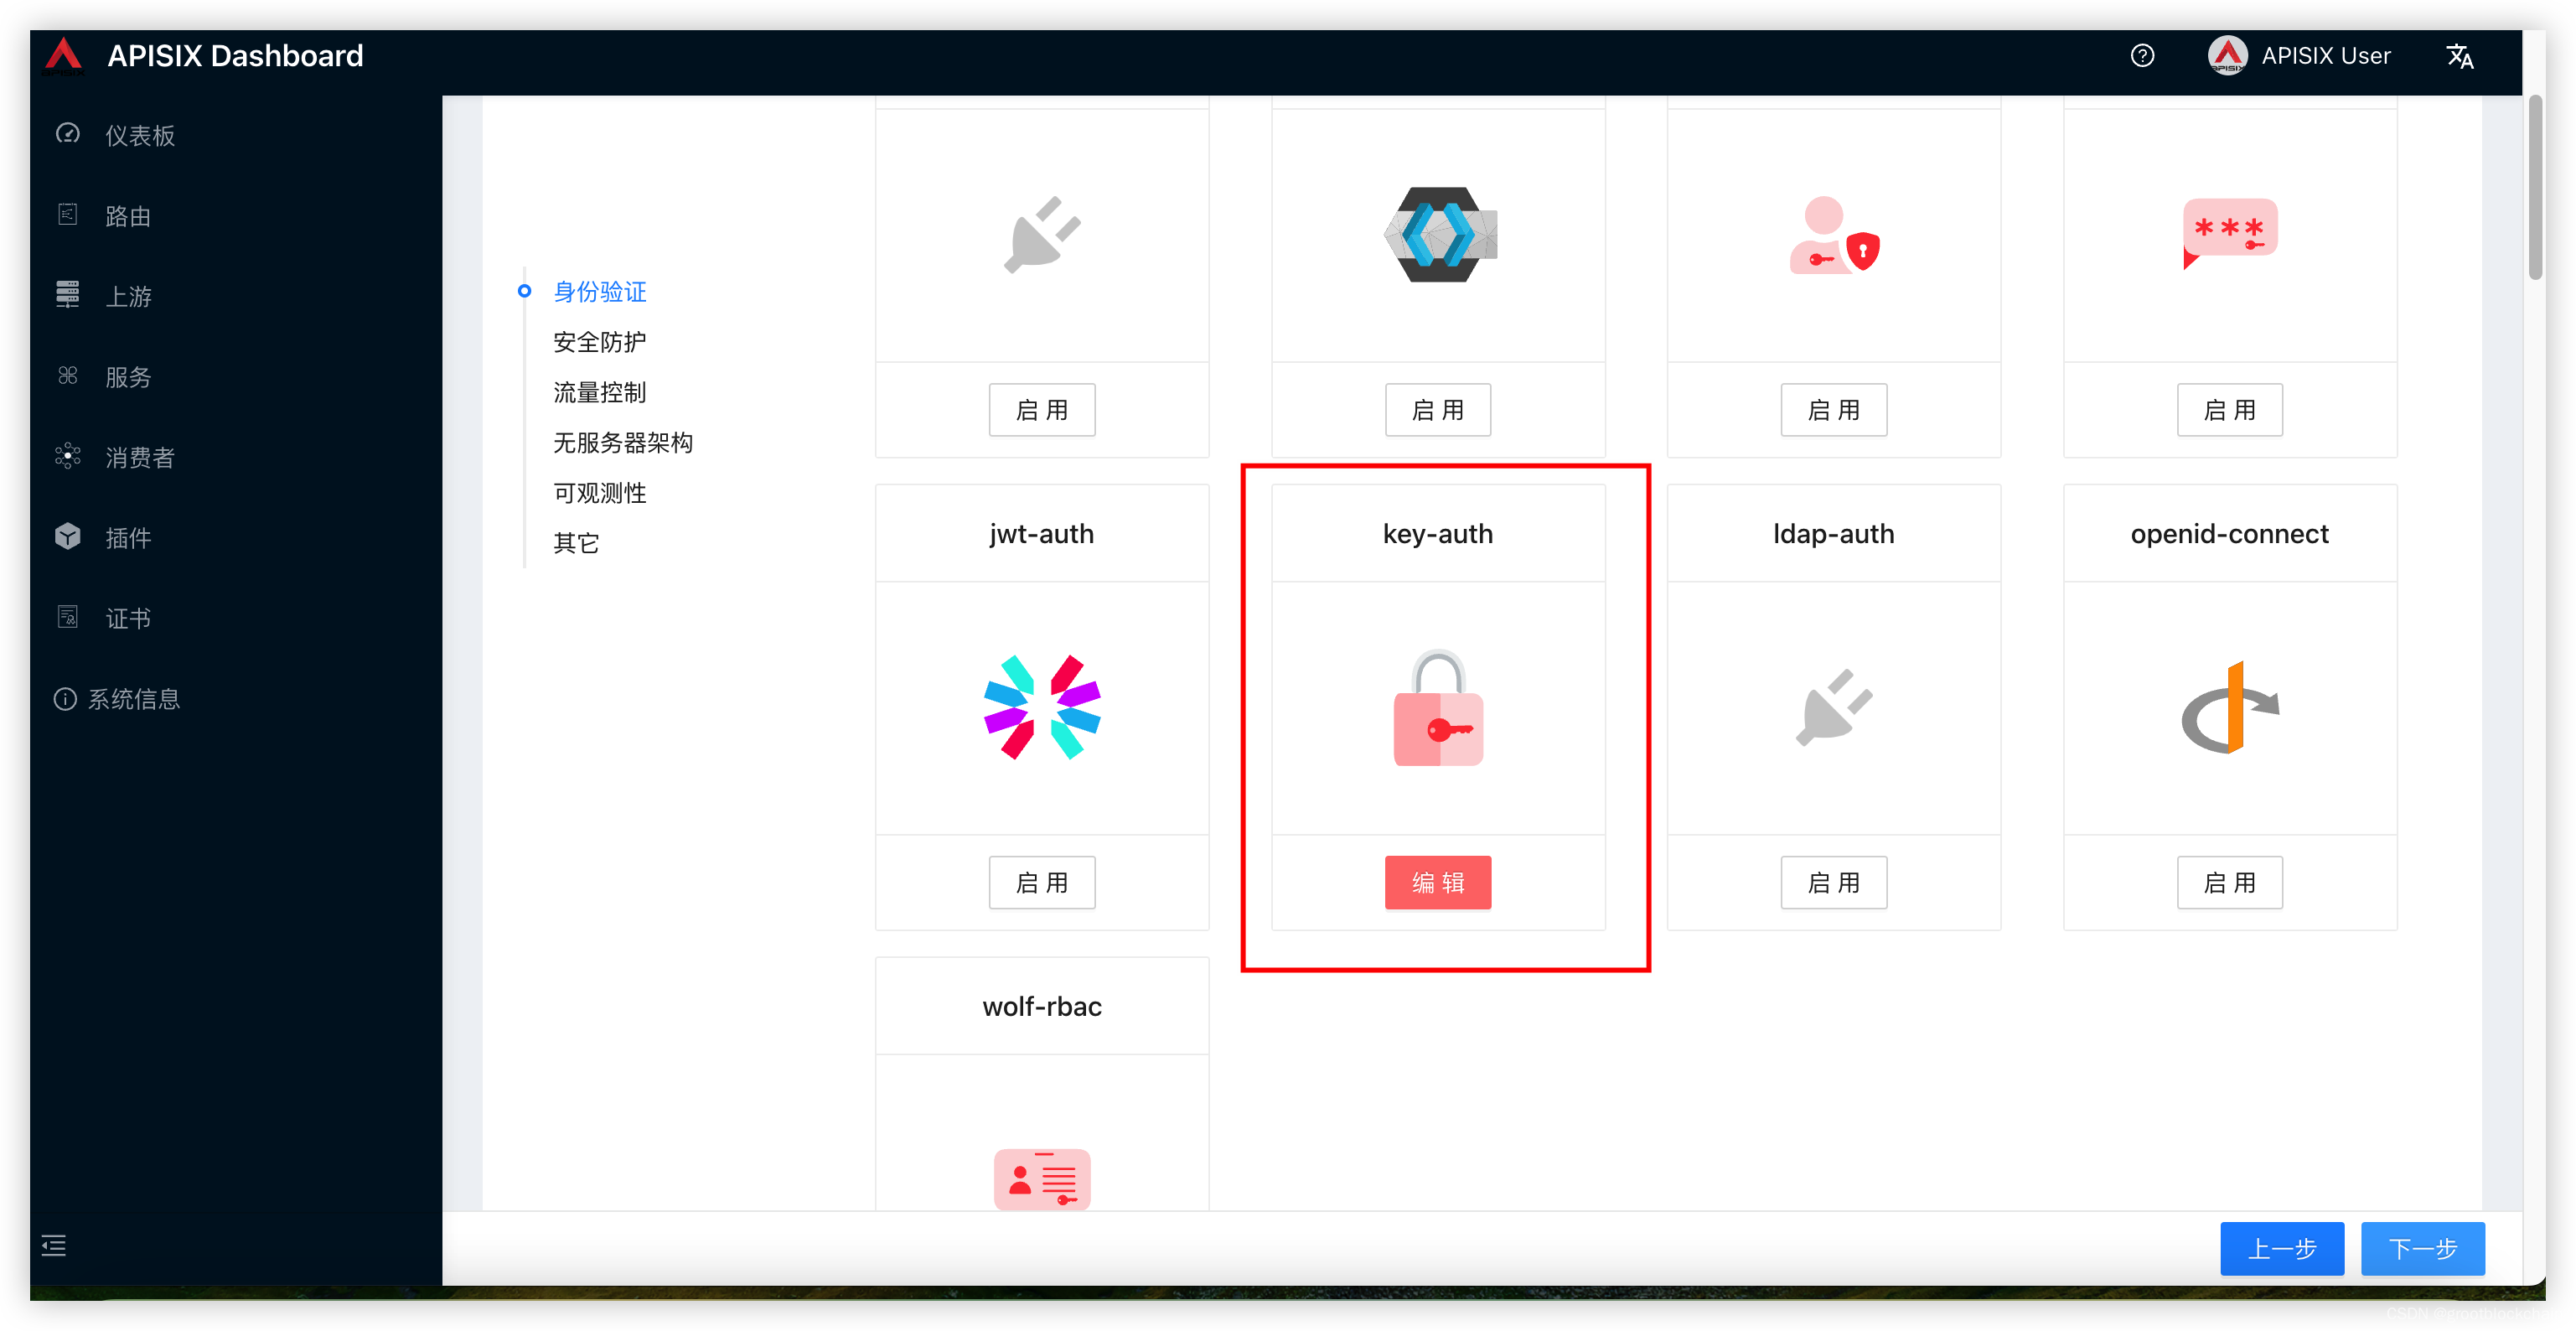
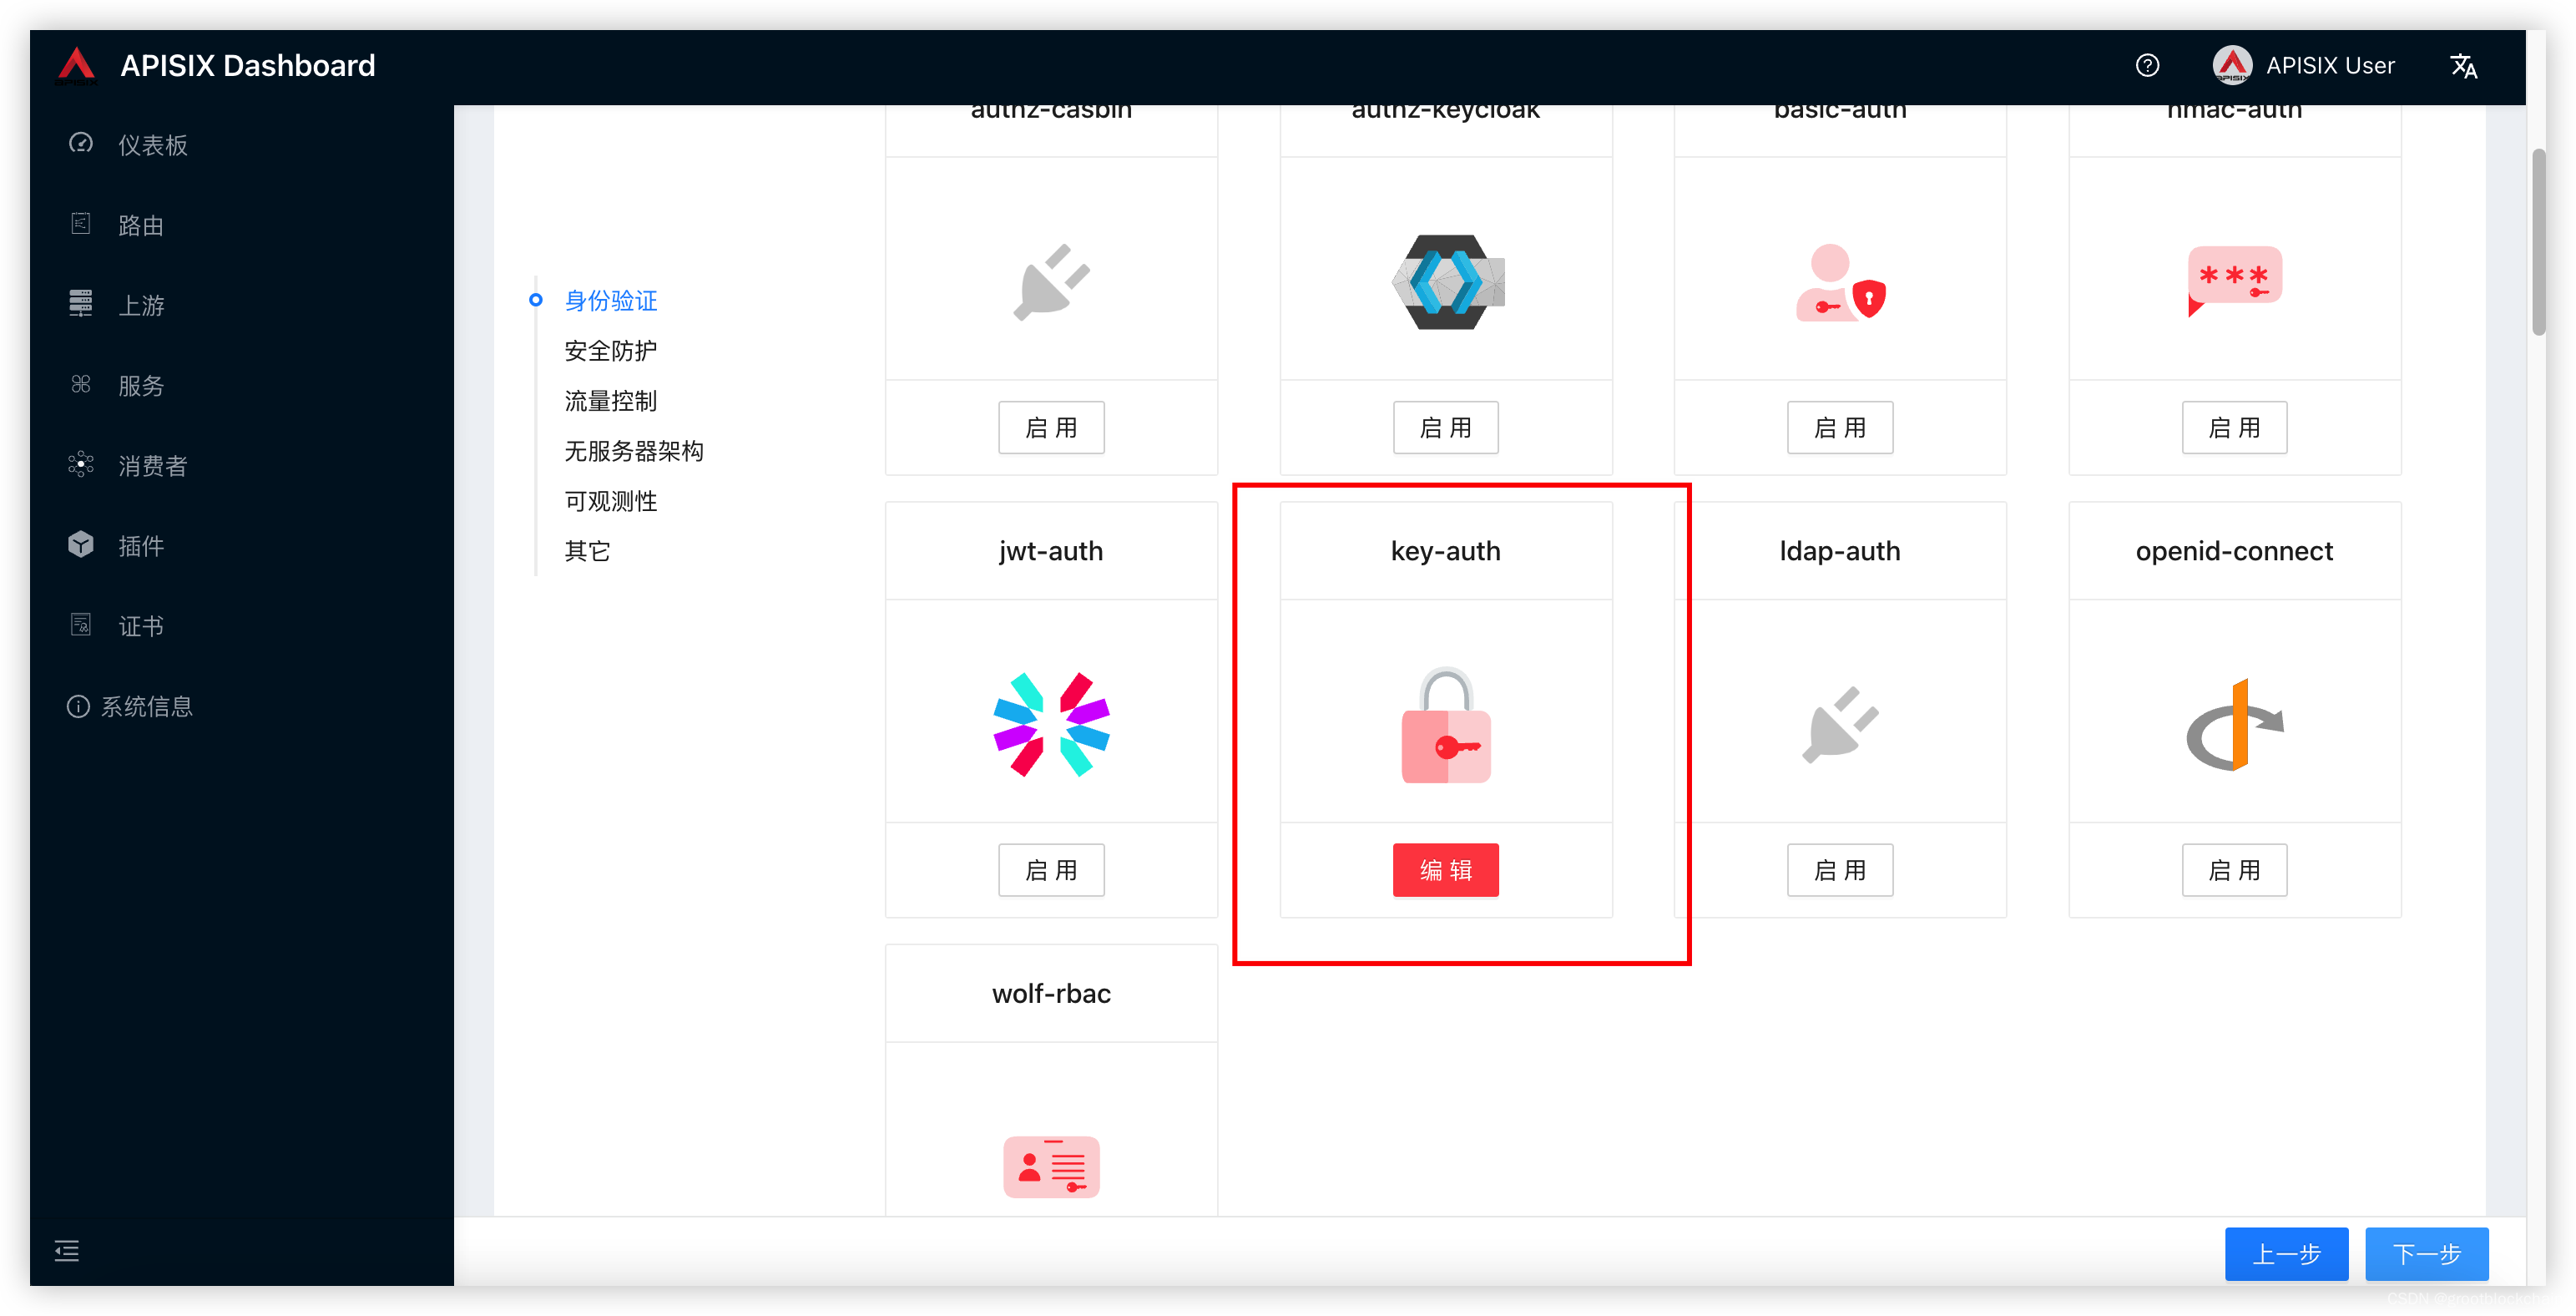
key-auth
The
key-authPlugin is used to add an authentication key (API key) to a Route or a Service.This works well with a Consumer. Consumers of the API can then add their key to the query string or the header to authenticate their requests.
key-auth 插件用于向 Route 或 Service 添加身份验证密钥(API 密钥)。 这适用于消费者。然后,API 的使用者可以将他们的密钥添加到查询字符串或标头中以验证他们的请求。
创建消费者
consumer
填写消费者名称及描述,点下一步
启用 key-auth
输入密钥
-
{
-
"disable": false,
-
"key": "qu38uhiauth7j&84"
-
}
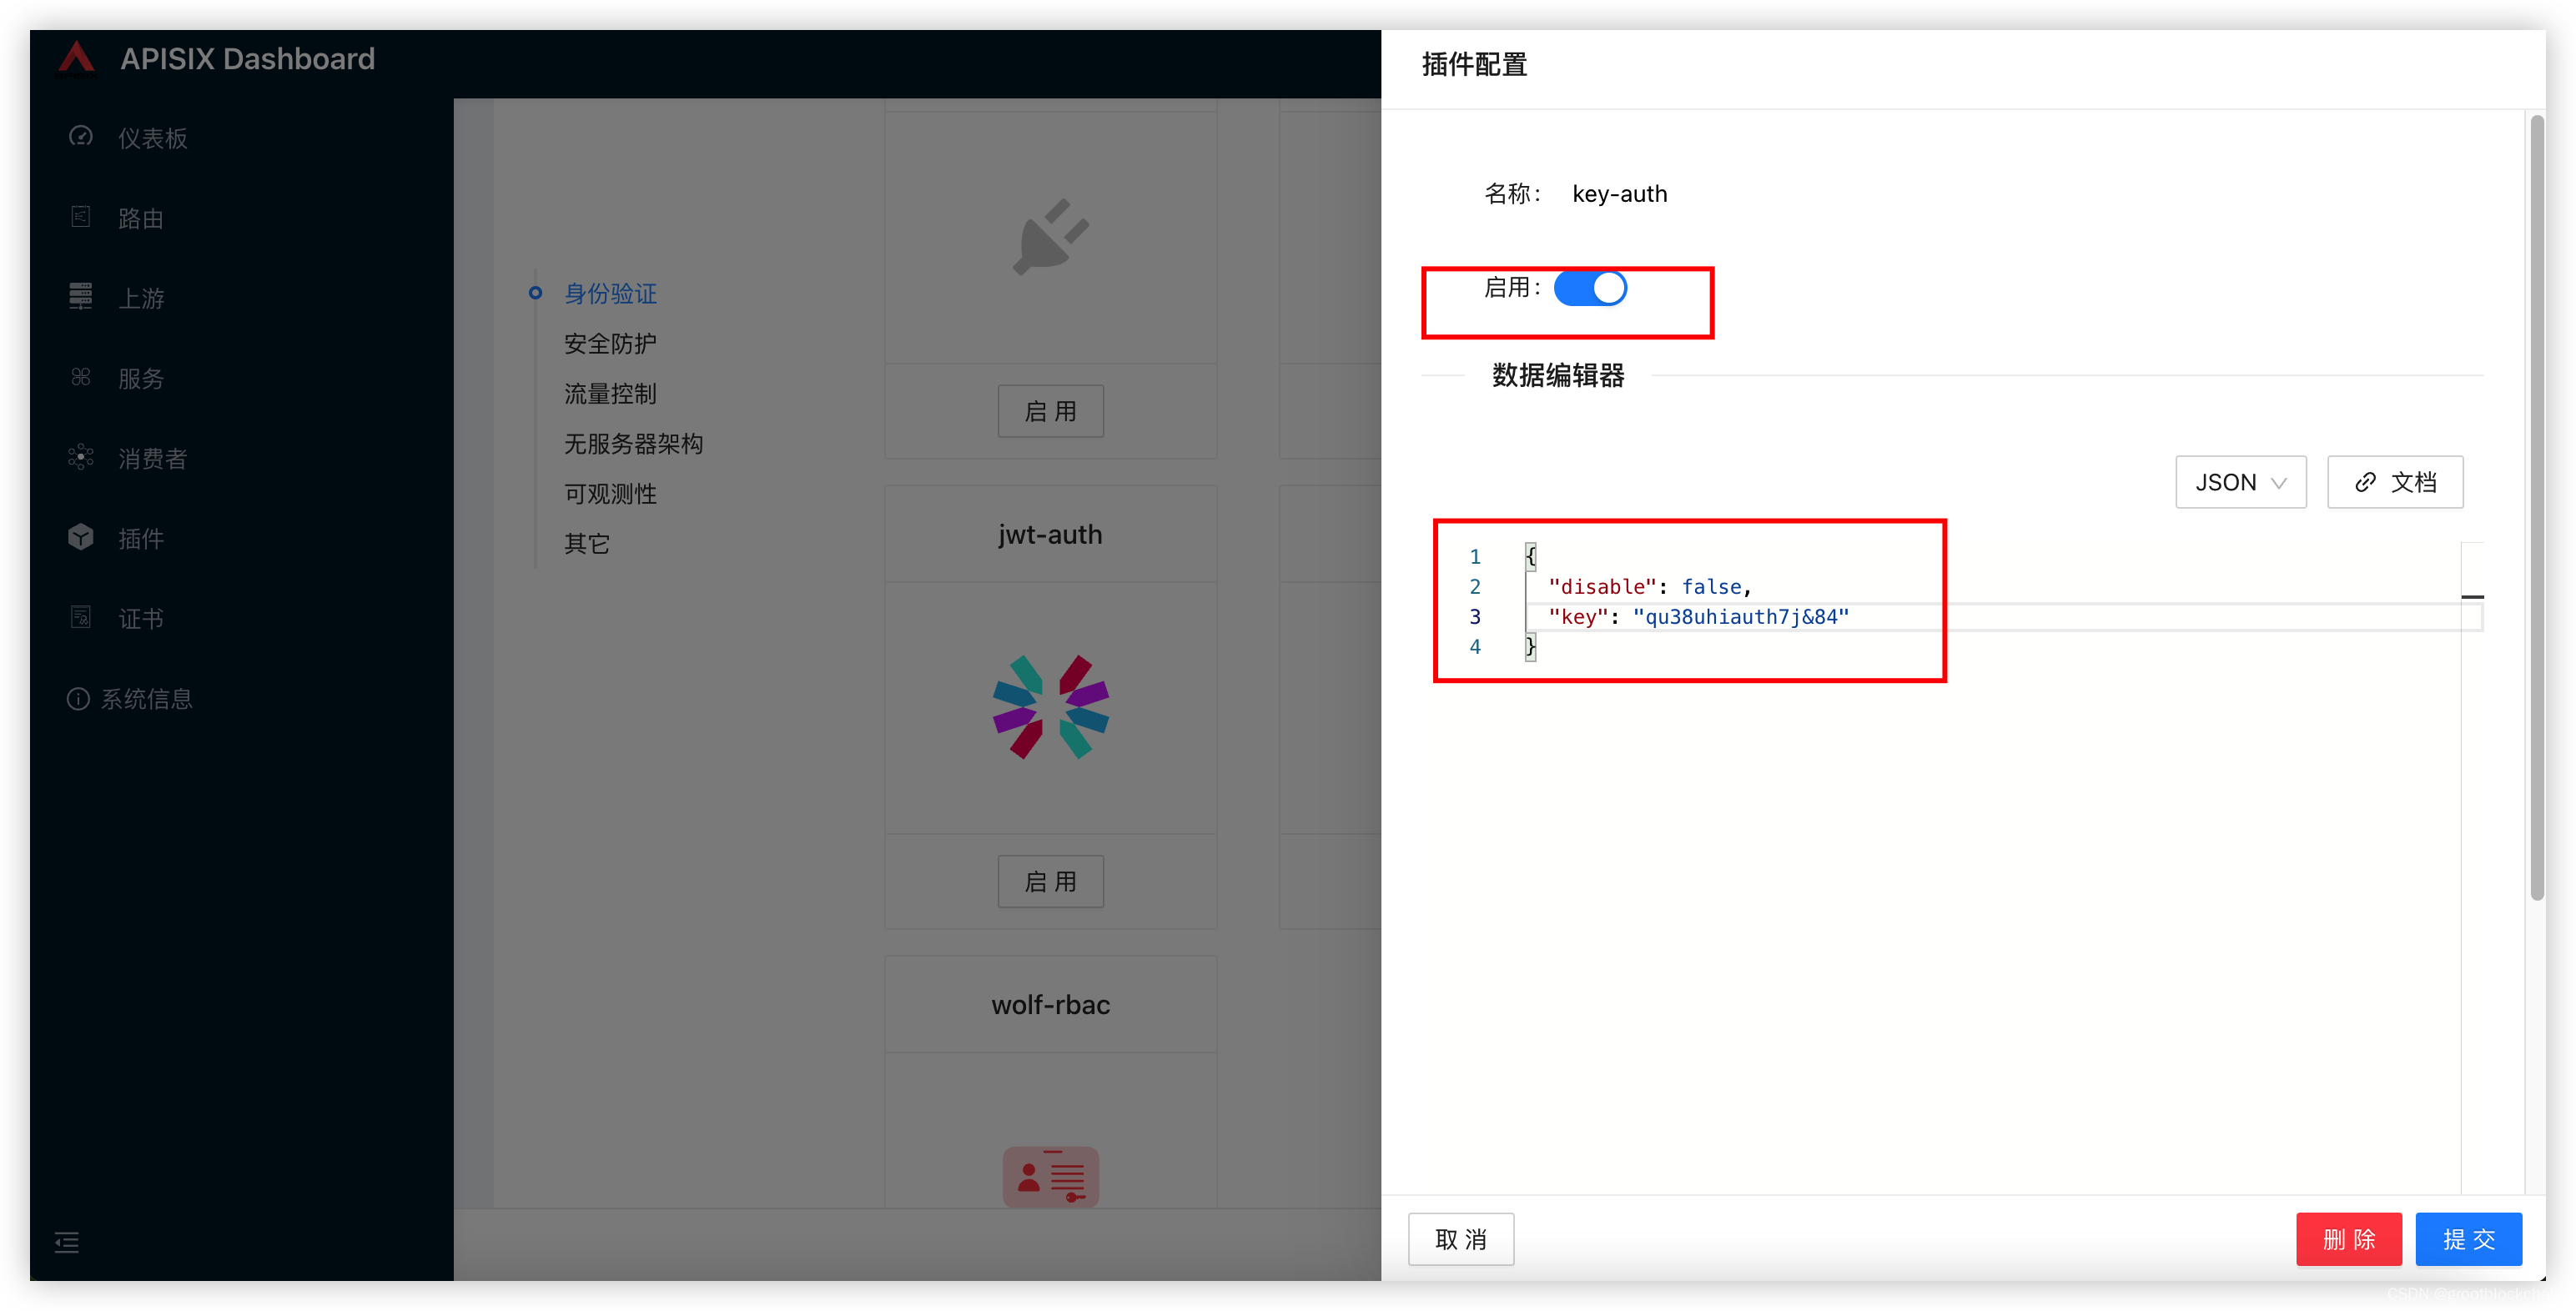
提交,下一步,提交,ok 配置消费者完成
配置路由并启用 key-auth
这里无需填写内容
点击启动按钮,下边文字不用输入,会自动生成

提交,下一步,提交,ok
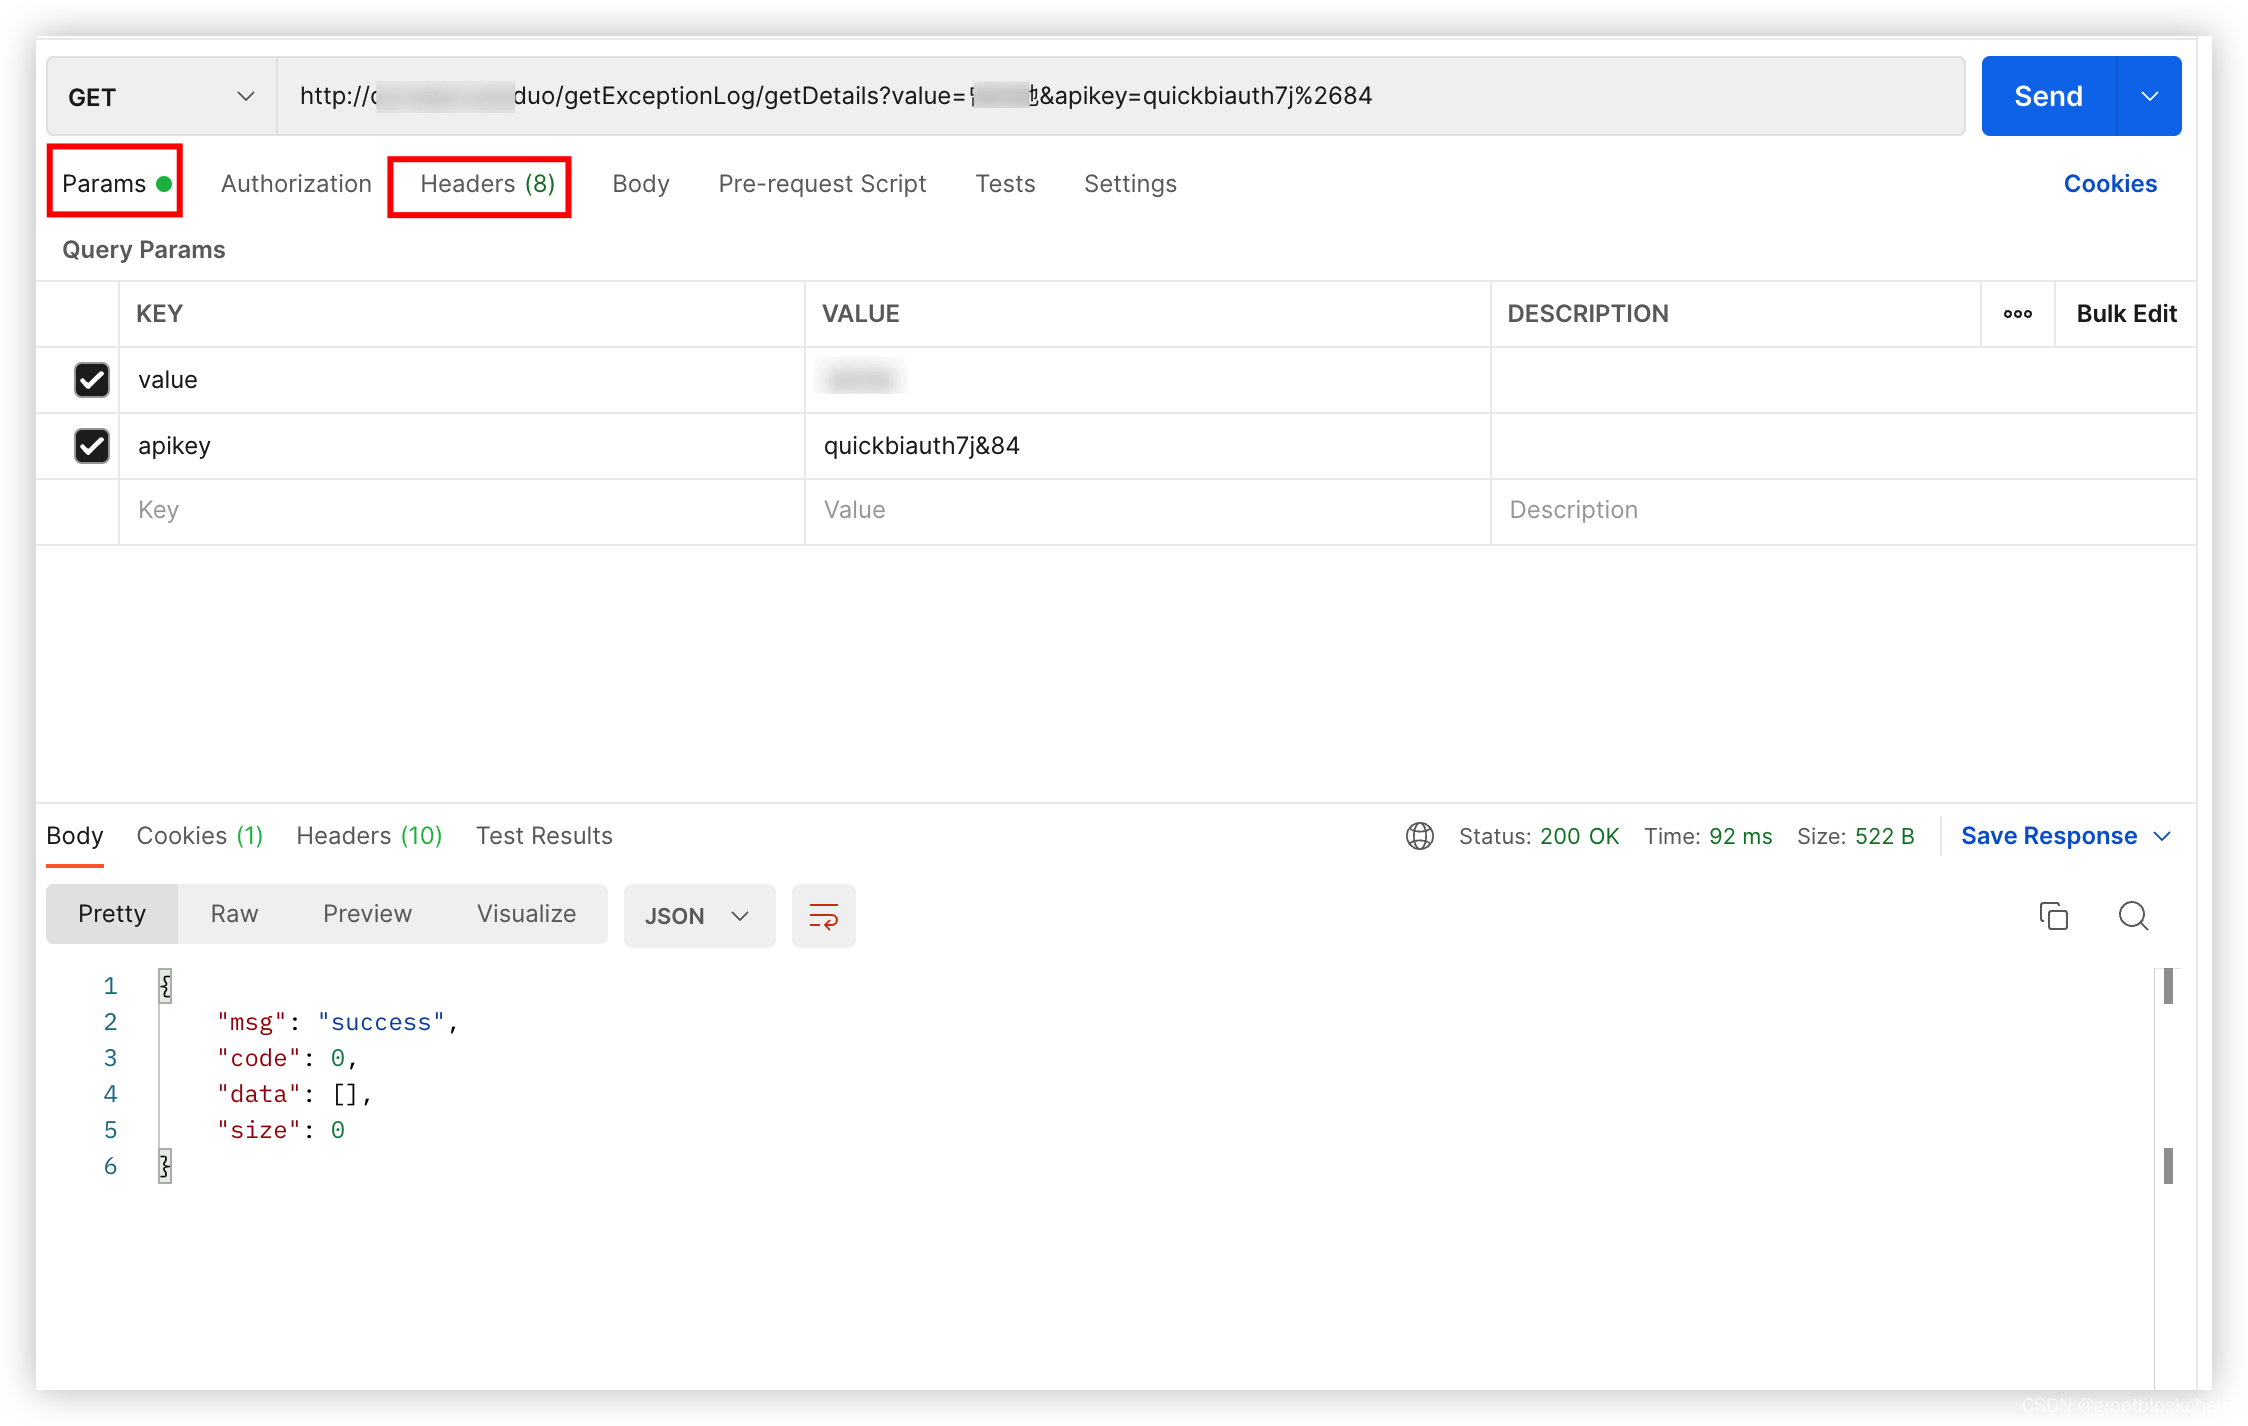
API 中使用
在 param 或者 header 里增加
apikey=qu38uhiauth7j&84 即可
成功返回如下:
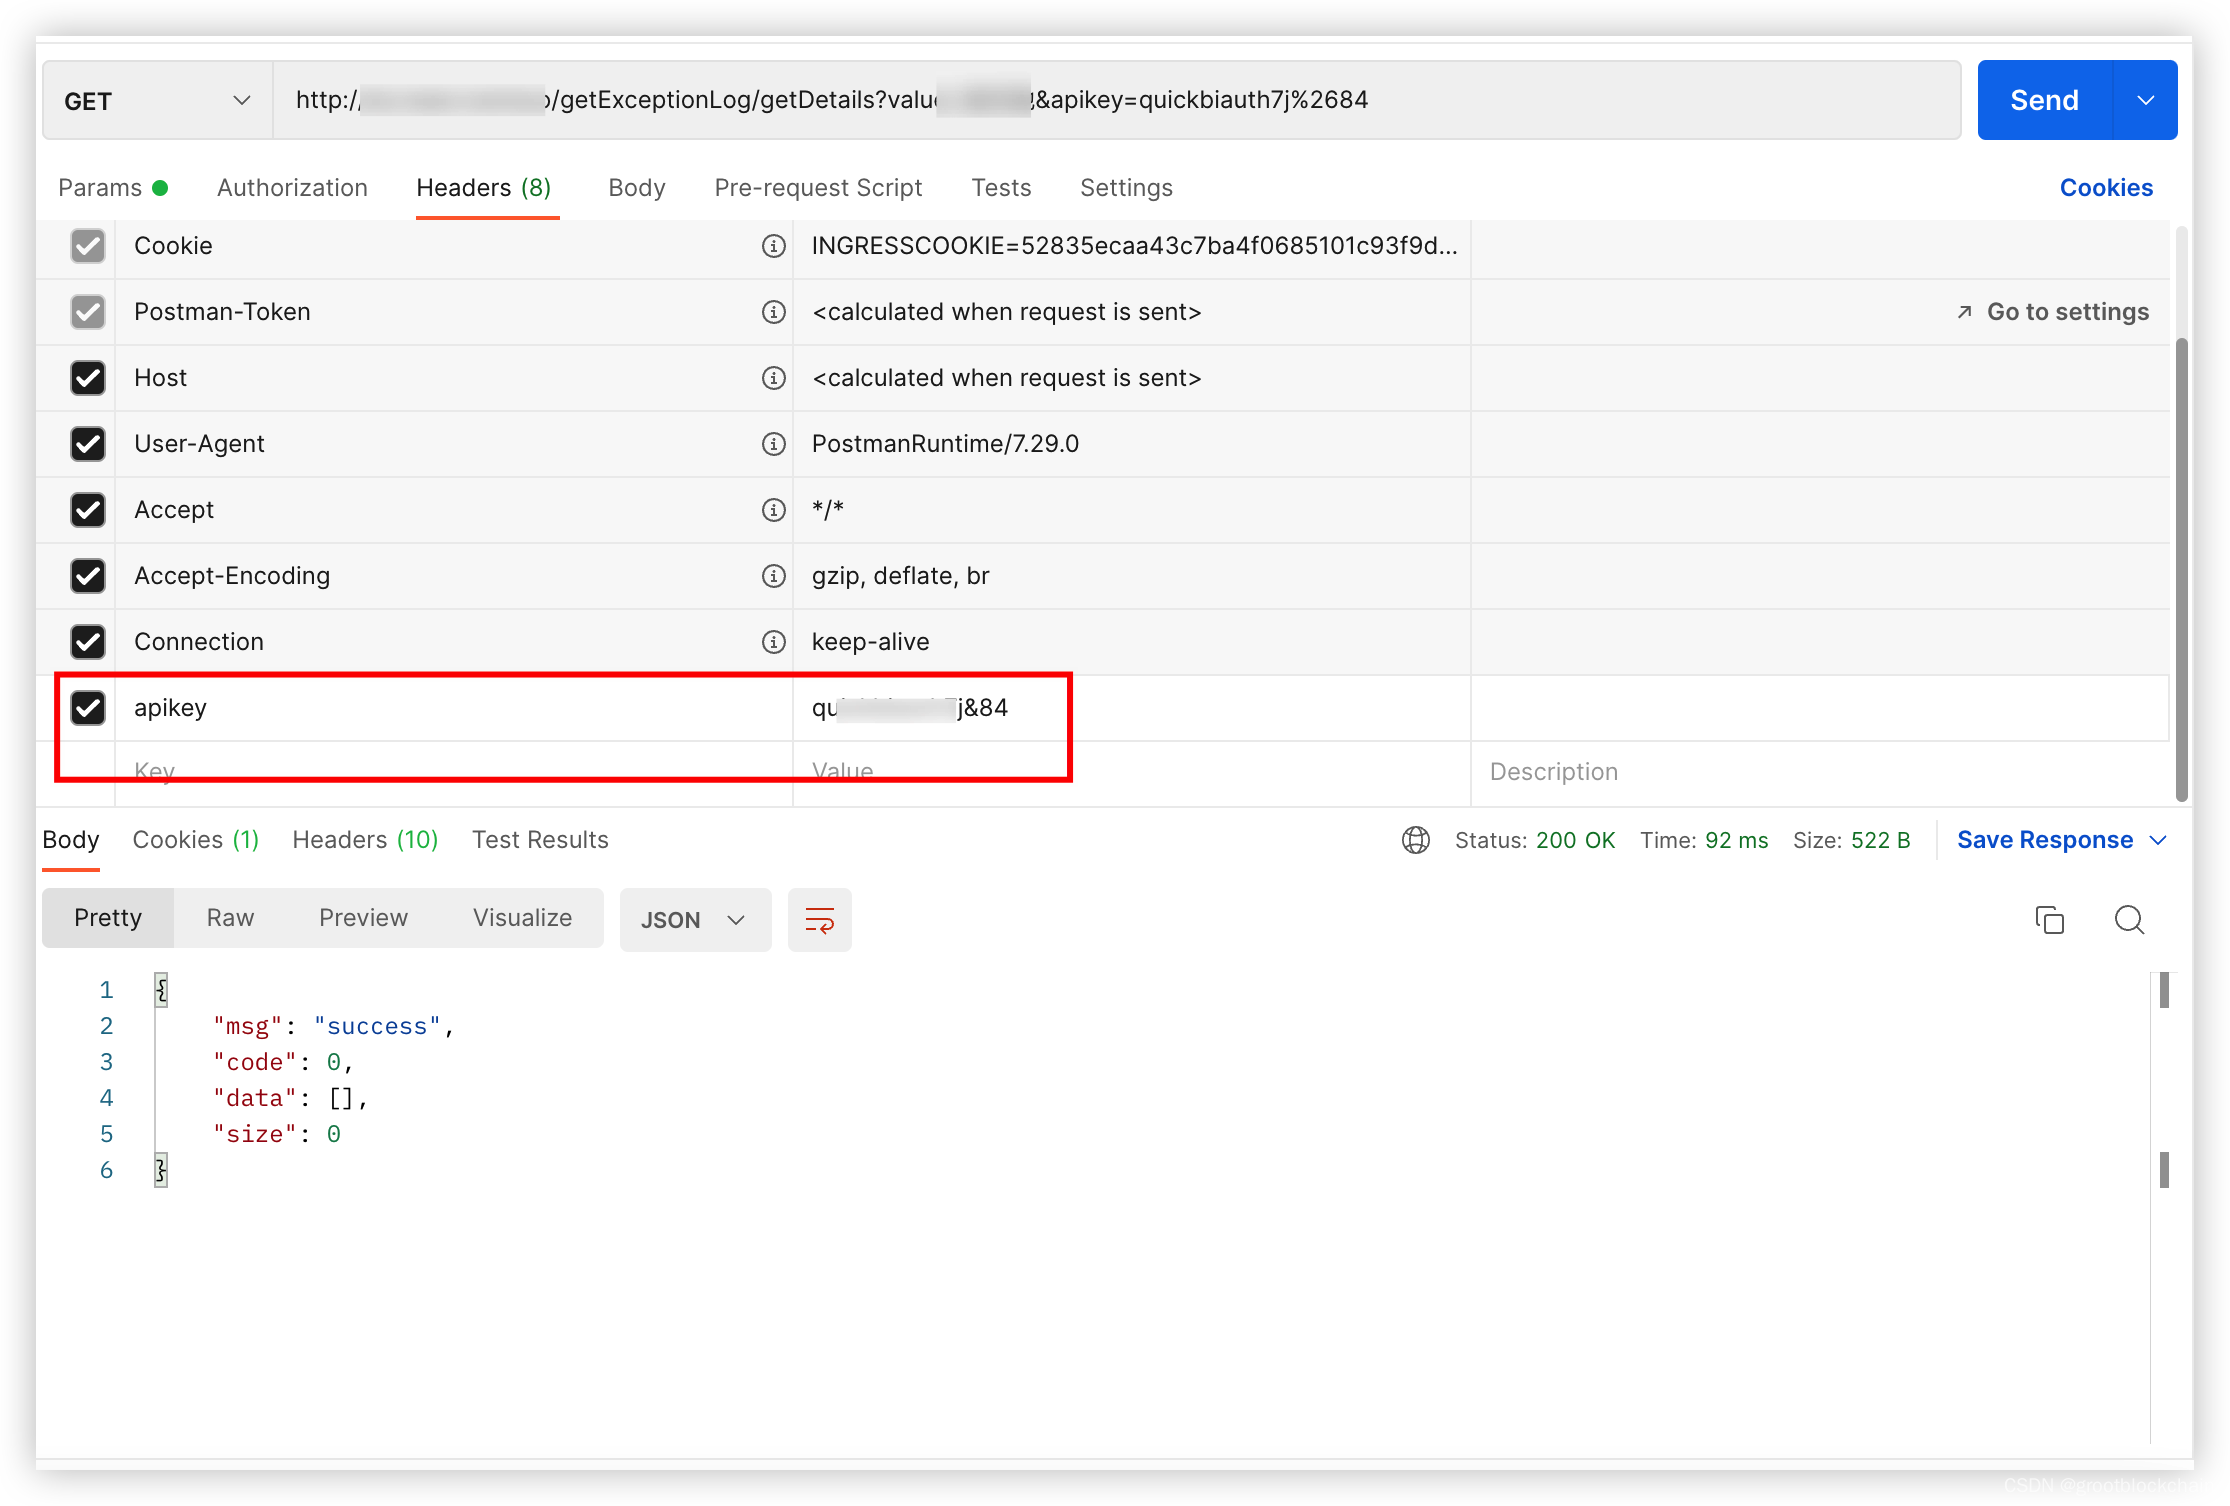
否则未检测到正确的 apikey 时网关返回 401

安装 apisix
先下载 apisix 的镜像文件
在 docker 的镜像库搜一下docker search apisix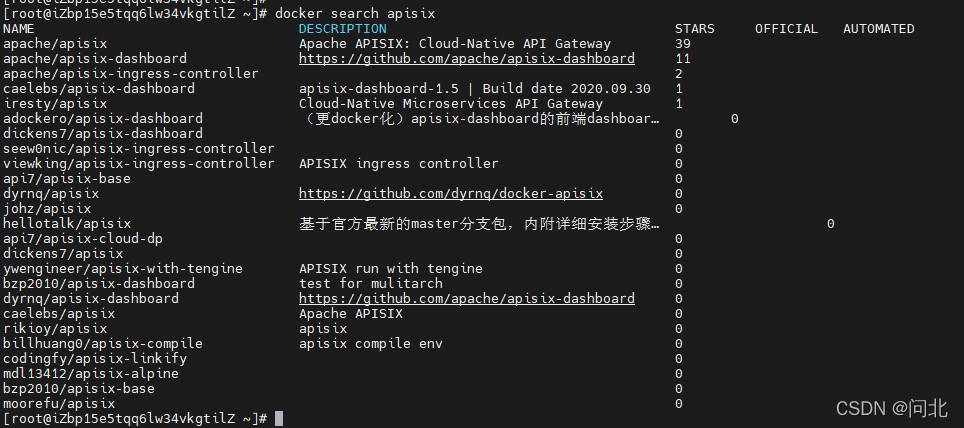
第一个就是,如果要下载最新版的,直接执行 docker pull apache/apisix 即可。选择其他版本的话需要访问 https://hub.docker.com/r/apache/apisix/tags,我是用的 2.10.0-alpine 版本。
启动 etcd
下载完之后不着急启动,因为 apisix 依赖 etcd(apisix2.x 版本好像依赖 etcd3.4 以上版本),所以要先保证 etcd 启动。参考官网安装 etcd
我这里显示 etcd 已经启动。另外如果你的是外网可以访问的,那 etcd 一定要开启授权模式,相应的下面在安装 dashboard 时配置 etcd 时要配置 etcd 的用户名密码。
创建配置文件
然后,在宿主机本地创建 apisix 的配置文件 config.yaml。下面的 key 修改为自己的,这个 key 是调用 apisix 的 admin 相关 API 需要传的,如果不改会有一个默认的在源码里写死的,如果你部署在公网上会导致被别人攻击,因为知道这个 key 就可以随意调用你的 API 操作 apisix,我的就被攻击过,莫名被配置了好多路由,路由的结果是执行一些脚本,我发现后下线并删除了这些路由。
apisix:
  admin_key:
    -
      name: admin
      key: zZ2Trn0WFjk3k34hjsdaReplrVUekVz  # using fixed API token has security risk, please update it when you deploy to production environment
      role: admin
etcd:
  host:                           # it's possible to define multiple etcd hosts addresses of the same etcd cluster.
    - "http://yourip:2379"     # multiple etcd address, if your etcd cluster enables TLS, please use https scheme,
                                  # e.g. https://127.0.0.1:2379.
  prefix: /apisix                 # apisix configurations prefix
  timeout: 300
启动 apisix
创建完后执行如下命令,启动容器:docker run -d -p 9080:9080 -v /usr/local/apisix/conf/config.yaml:/usr/local/apisix/conf/config.yaml apache/apisix:2.10.0-alpine
-v 后面的路径是你宿主机内的配置文件路径,冒号后面的路径是固定的
查看是否启动成功,执行 docker ps -a
可以看到状态为 Up,表示启动成功了
浏览器访问 http://yourip:9080 / 显示 404,表示启动成功。
安装 dashboard
下载镜像
同样,先下载镜像,我下的 2.9.0 版本的
创建配置文件
然后创建配置文件 conf.yaml
conf:
  listen:
    host: 0.0.0.0         # the address on which the `Manager API` should listen.
                          # The default value is 0.0.0.0, if want to specify, please enable it.
                          # This value accepts IPv4, IPv6, and hostname.
    port: 9000            # The port on which the `Manager API` should listen.

  allow_list:             # If we don't set any IP list, then any IP access is allowed by default.
  etcd:
    endpoints:            # supports defining multiple etcd host addresses for an etcd cluster
      - 172.19.60.179:2379
    username: "root"  #如果没开启授权,可以注掉
    password: "123456" #如果没开启授权,可以注掉
authentication:
  secret:
    zQ5w5jkLDh3jZpywJ3sskrw6Yv633ruq
  expire_time: 3600     # jwt token expire time, in second
  users:                # yamllint enable rule:comments-indentation
    - username: admin
      password: password
    - username: user
      password: password
注意,上面的 password 要自定义,不要设置的太简单,尤其时你部署后是在公网上,太简单容易被破解,遭到攻击。
启动 dashboard
docker run -d -p 9000:9000 -v /usr/local/apisix-dashboard/conf/conf.yaml:/usr/local/apisix-dashboard/conf/conf.yaml apache/apisix-dashboard:2.9.0docker ps -a 查看
然后浏览器访问 http://yourip:9000/
如下启动成功。
APISIX 整合 nacos_apisix 集成 nacos-CSDN 博客
官方参考:基于 Nacos 的服务发现
一。部署 nacos
docker-compose 部署单机版 nacos
standalone-derby.yaml 文件如下
-
version: "2"
-
services:
-
nacos:
-
image: nacos:1.4.2
-
container_name: nacos-standalone
-
environment:
-
- PREFER_HOST_MODE=hostname
-
- MODE=standalone
-
- NACOS_AUTH_ENABLE=true
-
volumes:
-
- ./standalone-logs/:/home/nacos/logs
-
- ./init.d/custom.properties:/home/nacos/init.d/custom.properties
-
ports:
-
- "8848:8848"
-
- "9848:9848"
二。配置 APISIX, 添加 nacos
修改 config.yaml,添加如下配置
-
discovery:
-
nacos:
-
host:
-
- "http://nacos:nacos@localhost:8848"
-
fetch_interval: 30 # default 30 sec
-
weight: 100 # default 100
-
timeout:
-
connect: 2000 # default 2000 ms
-
send: 2000 # default 2000 ms
-
read: 5000 # default 5000 ms
重启 apisix
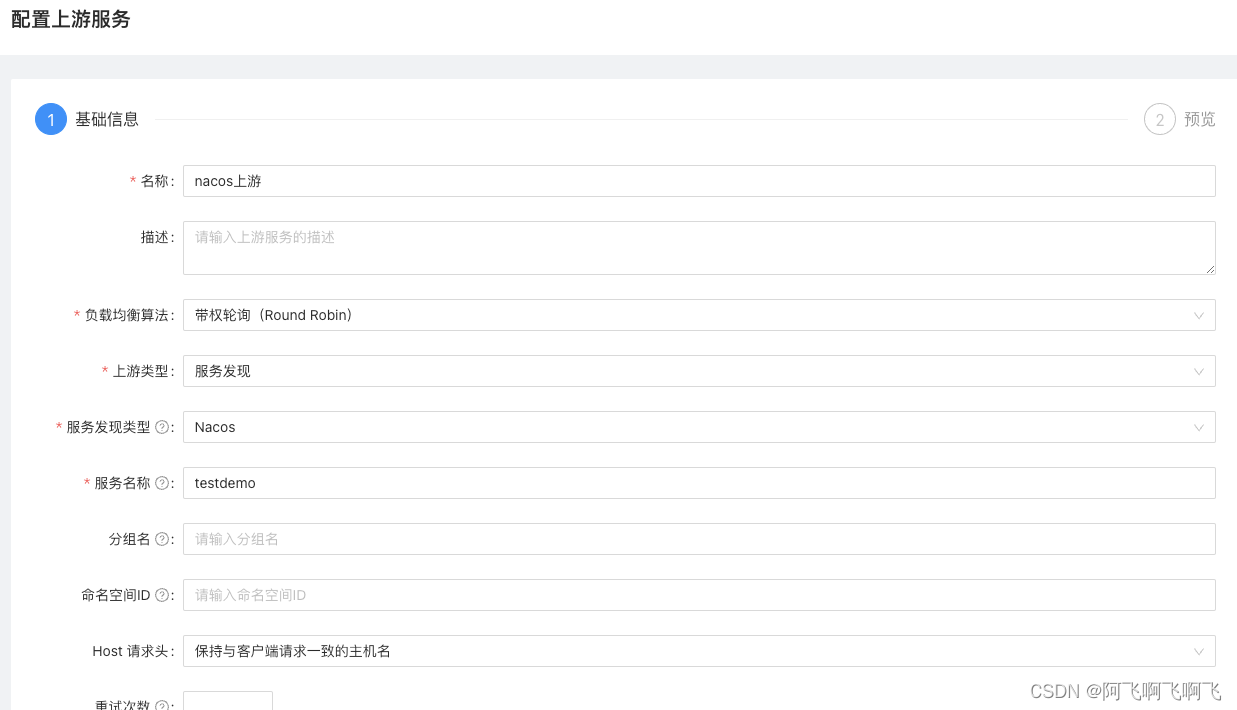
三。添加上游
四。测试
我的路由配置 url 拦截是 /test/*


 浙公网安备 33010602011771号