Maven高级11:跳过测试的三种手段;(maven在package或者install等的时候,跳过test不去执行测试用例)(PS:本篇博客中的【使用配置跳过测试】并没有实测成功)

一:跳过测试,简介;(测试很重要,为什么有时我们要跳过呐; )

说明:

(1)场景1:自己的整体功能模块还在开发,并没有开发完;;;但是,项目经理已经把测试模块给做好了(PS:自己干的活究竟OK与否,项目经理说了算;具体来说,项目经理写好测试用例后,我们把代码提交后,项目经理跑一下测试用例,如果没问题,那么自己的这个活就是OK的);;;那么,此时测试模块肯定是跑不了的;;;那么此时,我们就可能需要跳过测试;

(2)场景2:某个模块还没开发完,那么这个模块的测试,当然要跳过;

(3)场景3:我们更新了某个功能,但是这个更新却导致其他功能出错了;;;但是,目前,自己只想先把这个更新的功能给调试好,其他报错的功能我们想后面再解决;;;那么此时,对于其他的报错的功能就可以先跳过测试;

(4)场景4:当我们把所有的模块都开发完了,然后正常在(利用Maven)打包的时候其会进行测试的;;;不过,我们已经明确的测试过了,确认功能都是OK的了;;;那么,此时我们打包的时候,就不希望其再经历测试了,因为太耽误时间了(PS:实际项目中,测试一般还是需要花费几十分钟甚至更长的时间的);;;那么,此时也可以跳过测试;

(5)友情提示:测试工作很重要,不要轻易跳过测试;;;;;只是,对于某些我们确认完全可控的情况下,跳过测试也是可以合理的去使用的,不要滥用;


二:跳过测试,演示;(全部跳过)

在【Maven基础14:生命周期与插件;】中介绍了maven的生命周期;

说明:

(1)比如我们执行compile,其实不会经过测试的;;;但是,如果我们执行package或者install的话,其默认是经过测试的;

(2)即,如果我们要跳过测试的话,其实就是关闭声明周期中的test这个点而已;

1.跳过测试,方式一:使用IDEA提供的快捷键【Toggle 'Skip Tests'Mode】,去跳过测试;


比如,我们package的时候,可以发现其已经跳过测试了;

2.跳过测试,方式二:创建一个goal,在这个goal中,跳过测试;

……………………………………………………

PS:有关Maven的goal的内容,可以参考下篇博客【附加:maven的goal;(未完成,别看~~~)】;

3.跳过测试,方式三:使用配置跳过测试;(PS:这个,可能因为自己的原因,并没有实测OK)

为此,我们在【ssm】的pom.xml配置文件中,进行如下配置;

 
  1. <!-- 配置跳过测试-->
  2. <plugin>
  3. <groupId>org.apache.maven</groupId>
  4. <artifactId>maven-surefire-plugin</artifactId>
  5. <version>2.4.2</version>
  6. <configuration>
  7. <skipTests>true</skipTests>
  8. </configuration>
  9. </plugin>
 

说明:

(1)配置内容说明; 

(2)是不是因为maven版本的问题;;;或者说,maven有多个测试的插件,而自己并没有确认当前maven使用的是哪个插件,因为自己没有配置对;;;;;;所以,上面配置的跳过测试,似乎没有生效~~


有时,我们也可以跳过部分测试,只测试一些我们最担心的核心的部分;


三:跳过测试,演示;(部分跳过)

说明:

(1)PS:这儿的内容,并没有经过实测; 

(2)比如,一共有5000个测试用例,我们需要测试其中的4998个,而只想跳过其中的两个,那么对于这种情况,使用<exclude>是比较好的;

Maven高级11:跳过测试的三种手段;(maven在package或者install等的时候,跳过test不去执行测试用例)(PS:本篇博客中的【使用配置跳过测试】并没有实测成功)

一:【环境配置,多环境配置】是什么意思;

说明:

(1)很简单,就是这个意思:如数据库等配置信息,【自己在自己电脑上开发时,有一种配置】,【想要测试的时候,在测试服务器上有一种配置】,【后来实际部署的时候,在生产环境上又有另一种配置】

(2)以前,自己在开发的时候,比如数据库的配置信息,自己习惯这么做:

          ● 自己会在配置文件中写一套开发环境的配置,也写一套生产环境的配置;

          ● 自己开发的时候,会把生产环境的配置给注释掉,使用开发环境的配置;

          ● 然后,等到要把项目部署到生产环境的时候,自己会把开发环境的配置给注释掉,把生产环境的配置给放开;

(3)善良且好心(PS:褒义)的maven,对此,也提供了一个解决方案,即【环境配置,多环境配置】;利用maven提供的这个手段,可以很好的帮助我们来应对多环境的配置;


二:配置多环境;

这儿还是以上篇博客【Maven高级9:资源配置,资源加载属性值;】中的,创建的testttt.properties配置文件;;;;;为此,我们创建一个【ceshihaha】配置项,以这个配置项为例,去演示;

1.首先,在【ssm】(这个啥具体业务也没做的父工程)的pom.xml中,去定义多环境的配置信息;

 
  1. <!--创建多环境-->
  2. <profiles>
  3. <!--定义具体的环境:生产环境-->
  4. <profile>
  5. <id>produce_env</id><!--定义环境对应的唯一名称id-->
  6. <!--定义该环境中,具体的配置属性的值-->
  7. <properties>
  8. <ceshihaha>This is produce configuration value</ceshihaha>
  9. </properties>
  10. </profile>
  11. <!--定义具体的环境:开发环境-->
  12. <profile>
  13. <id>develop_env</id><!--定义环境对应的唯一名称id-->
  14. <properties>
  15. <ceshihaha>This is develop configuration value</ceshihaha>
  16. </properties>
  17. </profile>
  18. </profiles>
 

说明:

(1)内容说明;

2.在配置文件中,让配置项去使用我们配置的信息;

3.然后,创建【基于maven某个命令 “操作“ 】,让其在进行“操作”的时候,选用对应的配置信息;

声明:我们在【Maven基础9:IDEA中配置Maven;创建Maven工程;(IDEA中,maven的一些操作;创建一个【基于maven某个命令 “操作“ 】;)】介绍了,创建一个【基于maven某个命令 “操作“ 】;这儿我们就创建一个启动这个项目的“操作”,让其可以在启动项目时候,选择具体的配置;

(1)创建一个“操作”:install【ssm】,基于开发环境的配置信息; 

PS:下面的指令写全应该是【mvn install -P develop_env】,我们省略了mvn;

(2)创建一个“操作”:install【ssm】,基于生产环境的配置信息; 

4.效果验证;

(1)开发环境;

(2)生产环境;

5.补充:设置某个配置,为默认配置; 

 
  1. <!--设置该配置项,为默认配置项-->
  2. <activation>
  3. <activeByDefault>true</activeByDefault>
  4. </activation>
 

PS:经过实测,是OK的;

一:跳过测试,简介;(测试很重要,为什么有时我们要跳过呐; )

说明:

(1)场景1:自己的整体功能模块还在开发,并没有开发完;;;但是,项目经理已经把测试模块给做好了(PS:自己干的活究竟OK与否,项目经理说了算;具体来说,项目经理写好测试用例后,我们把代码提交后,项目经理跑一下测试用例,如果没问题,那么自己的这个活就是OK的);;;那么,此时测试模块肯定是跑不了的;;;那么此时,我们就可能需要跳过测试;

(2)场景2:某个模块还没开发完,那么这个模块的测试,当然要跳过;

(3)场景3:我们更新了某个功能,但是这个更新却导致其他功能出错了;;;但是,目前,自己只想先把这个更新的功能给调试好,其他报错的功能我们想后面再解决;;;那么此时,对于其他的报错的功能就可以先跳过测试;

(4)场景4:当我们把所有的模块都开发完了,然后正常在(利用Maven)打包的时候其会进行测试的;;;不过,我们已经明确的测试过了,确认功能都是OK的了;;;那么,此时我们打包的时候,就不希望其再经历测试了,因为太耽误时间了(PS:实际项目中,测试一般还是需要花费几十分钟甚至更长的时间的);;;那么,此时也可以跳过测试;

(5)友情提示:测试工作很重要,不要轻易跳过测试;;;;;只是,对于某些我们确认完全可控的情况下,跳过测试也是可以合理的去使用的,不要滥用;


二:跳过测试,演示;(全部跳过)

在【Maven基础14:生命周期与插件;】中介绍了maven的生命周期;

说明:

(1)比如我们执行compile,其实不会经过测试的;;;但是,如果我们执行package或者install的话,其默认是经过测试的;

(2)即,如果我们要跳过测试的话,其实就是关闭声明周期中的test这个点而已;

1.跳过测试,方式一:使用IDEA提供的快捷键【Toggle 'Skip Tests'Mode】,去跳过测试;


比如,我们package的时候,可以发现其已经跳过测试了;

2.跳过测试,方式二:创建一个goal,在这个goal中,跳过测试;

……………………………………………………

PS:有关Maven的goal的内容,可以参考下篇博客【附加:maven的goal;(未完成,别看~~~)】;

3.跳过测试,方式三:使用配置跳过测试;(PS:这个,可能因为自己的原因,并没有实测OK)

为此,我们在【ssm】的pom.xml配置文件中,进行如下配置;

 
  1. <!-- 配置跳过测试-->
  2. <plugin>
  3. <groupId>org.apache.maven</groupId>
  4. <artifactId>maven-surefire-plugin</artifactId>
  5. <version>2.4.2</version>
  6. <configuration>
  7. <skipTests>true</skipTests>
  8. </configuration>
  9. </plugin>
 

说明:

(1)配置内容说明; 

(2)是不是因为maven版本的问题;;;或者说,maven有多个测试的插件,而自己并没有确认当前maven使用的是哪个插件,因为自己没有配置对;;;;;;所以,上面配置的跳过测试,似乎没有生效~~


有时,我们也可以跳过部分测试,只测试一些我们最担心的核心的部分;


三:跳过测试,演示;(部分跳过)

说明:

(1)PS:这儿的内容,并没有经过实测; 

(2)比如,一共有5000个测试用例,我们需要测试其中的4998个,而只想跳过其中的两个,那么对于这种情况,使用<exclude>是比较好的;

一:本篇博客介绍的maven的【资源配置,资源加载属性值】 ,到底是什么;

1.maven提供的【属性】这个手段, 管理的还算是【maven自己的东西】;

在【Maven高级7:属性;】中,介绍了maven提供的【属性】这个手段;【属性】这个手段主要作用就是,方便统一管理和维护依赖版本和插件版本;同时,也方便我们获取一些内置属性、setting属性、系统属性和环境变量属性;

可以看到,【属性】管理的【依赖和插件的版本、内置属性、setting属性、系统属性和环境变量属性】都还可以认为是【由于有了maven,而产生的一下东西】;;;即,【maven的属性这手段】管理的还算是【maven自己的东西】;

2.但是,maven自我感觉良好,有种【达则兼济天下】的心;

但是,工程中,还有很多其他属性;比如我们在配置文件中,设置的一些属性;(PS:因为,自己写的这个demo项目很小,没有属性的配置文件,所以,自己临时创建了一个)

可以这样认为:maven自认为自己很牛逼;maven设定了一种机制,然后我们的项目可以使用这个机制,把项目中一些“不算是maven自己的东西的”属性,也交给maven统一管理;


二:maven的【资源配置,资源加载属性值】:演示;

1.第一步:在【ssm】这个父工程的pom.xml文件中定义属性,并属性文件中引用;

2.第二步:在【ssm】这个父工程的pom.xml文件中,去配置资源文件;

3.此时,就可以观察到效果了;

4.补充说明1:使用【${project.basedir}】项目基础路径,去简化配置;

【${project.basedir}】是在【Maven高级7:属性;】中,介绍的一个内置属性,就是项目的基础路径;其会找项目的所有子工程,其既代表【ssm_controller】也代表【ssm_service】也代表【ssm_dao】也代表【ssm_pojo】;

5.补充说明2:test测试目录下也有配置文件,自然我们也可以去配置test目录的属性文件;


三:maven的【资源配置,资源加载属性值】:summary;

说明:

(1)本篇博客介绍的内容,在实际中是基本不会选择使用的;

说明:

(1) 在实际开发中,具体的版本命名规范,都是公司或者团队定好的,我们要做的就是遵照执行就是了;


说明:

(1)即,我们的项目还没开发完呐,但是我们又想告诉别人,我们还是做了一些东西的;那么,就可以打一个SNAPSHOT版;(也就是说,这个版本是:没有开发完毕,未脱手,未截稿的版本;即,这个版本还不是一个成品)

(2)如果我们的项目已经开发完了(起码本阶段是开发完了),已经是一个成品了,就可以发布一个RELEASE版;

          ● 可以发现,我们使用的Spring的模块,一般都是RELEASE版本;

          ● 但是,可以发现在Spring的仓库中,也会发现很多不是RELEASE版的版本;即,抢先尝鲜版;

          ● 对于,尝鲜版可以这样理解:我新做了一些东西,但不保证其是没问题的;;我只是,先发布出来,让大家体验一下;


其实,我们可以发现,那些大厂和提供开源jar包的组织,其版本命名规则,虽然是按照上面的规则来写的;但是在具体上,也是存在很大差别的; 

Maven中央仓库的检索网站:【 Maven Central Repository Search】;

即,各个企业具体的版本命名规则,都可能是不同的;  


那么,自然对于自己所在公司开发的项目来说,公司极大概率会相对严格的规定好版本的设置方式,作为团队成员的自己,遵照执行就行了; 

一:maven的【属性】简介;为什么需要【属性】这种手段;


二:属性演示;

在【ssm】工程的pom.xml文件中,进行如下设置;

 
  1. <?xml version="1.0" encoding="UTF-8"?>
  2. <project xmlns="http://maven.apache.org/POM/4.0.0"
  3. xmlns:xsi="http://www.w3.org/2001/XMLSchema-instance"
  4. xsi:schemaLocation="http://maven.apache.org/POM/4.0.0 http://maven.apache.org/xsd/maven-4.0.0.xsd">
  5. <modelVersion>4.0.0</modelVersion>
  6.  
  7. <groupId>com.wgy</groupId>
  8. <artifactId>ssm</artifactId>
  9. <version>1.0-SNAPSHOT</version>
  10.  
  11. <!--说明,该工程就是用于构建管理的-->
  12. <packaging>pom</packaging>
  13.  
  14. <!--管理的工程列表;这儿没有顺序关系,前后顺序无所谓;-->
  15. <modules>
  16. <module>../ssm_pojo</module>
  17. <module>../ssm_dao</module>
  18. <module>../ssm_service</module>
  19. <module>../ssm_controller</module>
  20. </modules>
  21.  
  22.  
  23. <!--0.Maven国内阿里云镜像-->
  24. <repositories>
  25. <repository>
  26. <id>aliyun</id>
  27. <name>aliyun</name>
  28. <url>https://maven.aliyun.com/repository/public</url>
  29. </repository>
  30. </repositories>
  31.  
  32.  
  33. <!--定义自定义属性-->
  34. <properties>
  35. <!--里面具体的属性名称可以随便写,但最好做到见名知意;;;一般,我们习惯用【技术名称.version】的方式去命名-->
  36. <spring.version>5.2.6.RELEASE</spring.version>
  37. <jackson.version>2.11.0</jackson.version>
  38. <mybatis.version>3.5.4</mybatis.version>
  39. <mybatis-spring.version>2.0.3</mybatis-spring.version>
  40. <mysql.version>8.0.23</mysql.version>
  41. <druid.version>1.1.14</druid.version>
  42. <tomcat7-maven-plugin.version>2.1</tomcat7-maven-plugin.version>
  43. </properties>
  44.  
  45. <!--声明:此处进行依赖管理-->
  46. <dependencyManagement>
  47.  
  48. <!--里面是具体的依赖-->
  49. <dependencies>
  50. <!--0.添加【自己的工程模块】的依赖-->
  51. <dependency><!--具体来说,【ssm_dao】会使用我们自己上传到本地仓库的ssm_pojo-->
  52. <groupId>com.wgy</groupId>
  53. <artifactId>ssm_pojo</artifactId>
  54. <version>${version}</version>
  55. </dependency>
  56. <dependency><!--具体来说,【ssm_service】会使用我们自己上传到本地仓库的ssm_dao-->
  57. <groupId>com.wgy</groupId>
  58. <artifactId>ssm_dao</artifactId>
  59. <version>${version}</version>
  60. </dependency>
  61. <dependency><!--具体来说,【ssm_controller】会使用我们自己上传到本地仓库的ssm_service-->
  62. <groupId>com.wgy</groupId>
  63. <artifactId>ssm_service</artifactId>
  64. <version>${version}</version>
  65. </dependency>
  66.  
  67.  
  68. <!--1.1Spring-webmvc依赖--><!--具体来说,【ssm_controller】会使用-->
  69. <dependency>
  70. <groupId>org.springframework</groupId>
  71. <artifactId>spring-webmvc</artifactId>
  72. <version>${spring.version}</version>
  73. </dependency>
  74. <!--1.2引入Spring-context依赖--><!--具体来说,【ssm_service,ssm_dao】会使用-->
  75. <dependency>
  76. <groupId>org.springframework</groupId>
  77. <artifactId>spring-context</artifactId>
  78. <version>${spring.version}</version>
  79. </dependency>
  80.  
  81. <!--2.JSON序列化工具包jackson--><!--具体来说,【ssm_controller】会使用-->
  82. <dependency>
  83. <groupId>com.fasterxml.jackson.core</groupId>
  84. <artifactId>jackson-core</artifactId>
  85. <version>${jackson.version}</version>
  86. </dependency>
  87. <dependency>
  88. <groupId>com.fasterxml.jackson.core</groupId>
  89. <artifactId>jackson-databind</artifactId>
  90. <version>${jackson.version}</version>
  91. </dependency>
  92. <dependency>
  93. <groupId>com.fasterxml.jackson.core</groupId>
  94. <artifactId>jackson-annotations</artifactId>
  95. <version>${jackson.version}</version>
  96. </dependency>
  97.  
  98. <!--3.Mybatis与Spring整合,所需的依赖--><!--具体来说,【ssm_dao】会使用-->
  99. <dependency>
  100. <groupId>org.springframework</groupId>
  101. <artifactId>spring-jdbc</artifactId>
  102. <version>${spring.version}</version>
  103. </dependency>
  104. <dependency>
  105. <groupId>org.mybatis</groupId>
  106. <artifactId>mybatis</artifactId>
  107. <version>${mybatis.version}</version>
  108. </dependency>
  109. <dependency>
  110. <groupId>org.mybatis</groupId>
  111. <artifactId>mybatis-spring</artifactId>
  112. <version>${mybatis-spring.version}</version>
  113. </dependency>
  114. <dependency>
  115. <groupId>mysql</groupId>
  116. <artifactId>mysql-connector-java</artifactId>
  117. <version>${mysql.version}</version>
  118. </dependency>
  119. <dependency>
  120. <groupId>com.alibaba</groupId>
  121. <artifactId>druid</artifactId>
  122. <version>${druid.version}</version>
  123. </dependency>
  124.  
  125. </dependencies>
  126.  
  127. </dependencyManagement>
  128.  
  129.  
  130. <!--构建-->
  131. <build>
  132. <pluginManagement>
  133. <!--设置插件-->
  134. <plugins>
  135. <!--使用Tomcat具体的插件-->
  136. <plugin><!--具体来说,【ssm_controller】会使用Tomcat插件-->
  137. <groupId>org.apache.tomcat.maven</groupId>
  138. <artifactId>tomcat7-maven-plugin</artifactId>
  139. <version>${tomcat7-maven-plugin.version}</version>
  140. </plugin>
  141. </plugins>
  142. </pluginManagement>
  143. </build>
  144. </project>
 

说明:

(1)改动内容,说明;

(2)其实,就是通过【<properties>】标签,去自定义属性;

(3)然后,上面定义好属性后,在下面对应的版本出,替换为对应的属性即可;

(4)【自己的工程模块】的依赖(ssm_pojo,ssm_dao,ssm_service这些)的版本;

          ● 对于【自己的工程模块】的依赖(ssm_pojo,ssm_dao,ssm_service这些),因为我们强烈建议(而且,在实际开发中,团队大概率会强制开发者这么做)父工程和子工程版本保持一致;所以,【ssm】的版本和【ssm_pojo,ssm_dao,ssm_service,ssm_controller】的版本是一致的;

          ● 那么自然,【ssm_pojo,ssm_dao,ssm_service,ssm_controller】这些模块打成的jar的版本,也会和【ssm】的版本保持一致;

          ● 所以,maven提供了一种机制,对于【ssm_pojo,ssm_dao,ssm_service,ssm_controller】这些模块的版本,我们不用在【<properties>】标签,去自定义属性;而是,可以直接使用【ssm】工程的版本;

          ● PS:自己心里要清楚,父工程和子工程的版本问题,我们一定要尽量遵守【父工程和子工程版本保持一致】的策略,并且要知道【某个依赖到底有没有,关键是要看远程仓库、或者私有仓库、或者本地仓库中,有这个依赖才行】;;;;这些都OK以后,才能如上面那般丝滑~~~

经过实测,经过我们上面一通设置后,项目还是OK的;说明,我们运用maven中的【属性】这个手段的时候,是OK的;


三:附加:maven中的属性;

1.自定义属性;

说明:

(1)自定义属性,是使用的最多的,也是我们上面演示的;

(2)自定义属性,就相当于定义一个变量,然后我们再去使用这个变量;方便统一维护和管理;

2.内置属性;

说明:

(1)内置属性;

3.setting属性;

说明:

(1)就是,我们想读取maven的setting配置文件中的属性时候,就可以利用上面的方式去直接读取;

4.Java系统属性;

说明:

(1)比如,自己的机器是Windows系统;java的系统属性有很多,这些系统属性也可以作为maven属性去使用,被称为java系统属性;

(2)我们可以打开Windows系统的cmd命令行,使用【mvn help:system】去查询;

(3)除了系统属性之外,通过上面的打开Windows系统的cmd命令行,使用【mvn help:system】去查询;还会查询环境变量属性;

5.环境变量属性;

说明:

(1)比如classpath等环境变量的属性;

一:继承引入:资源依赖的问题和解决;

1.【多个工程,组成一个项目】时,资源依赖的问题; 

2.解决策略

(1)我们可以新创一个工程ssm,这个工程的作用就是管理【ssm_controller、ssm_service、ssm_dao、ssm_pojo】这些工程的资源依赖;

(2)即,我们在ssm中写明spring-context,并注明版本;然后,在【ssm_service】和【ssm_dao】中使用spring-context的时候,就只写spring-context就行了,而就不用再写版本了;

          ● 同时,如果【ssm_dao】不想用【ssm】中定的5.1.9,而是想用5.2.0;那么,在【ssm_dao】引入spring-context的时候,再设置上5.2.0的版本;这样以后,【ssm_dao】就可以使用5.2.0版本了;

          ● 自然,如果【ssm_dao】想引入一个【没有在ssm中引入的依赖】,【ssm_dao】自己在自己的工程中引入,也是可以的~~

(3)正好,我们在【Maven高级5:聚合;(使用聚合技术,来管理多个“使用maven管理的工程”)】中,介绍【聚合】的时候,创建了【ssm】工程;;;我们同样,可以使用这个工程,来实现【继承】这个maven功能;(PS:在实际开发中,这样是一般大都采用的做法吧~)


二:继承演示;

1.设置父工程和子工程:把【ssm_controller、ssm_service、ssm_dao、ssm_pojo】设为【ssm】的子工程;

(1)把【ssm_pojo】设为【ssm】的子工程;

 
  1. <?xml version="1.0" encoding="UTF-8"?>
  2. <project xmlns="http://maven.apache.org/POM/4.0.0"
  3. xmlns:xsi="http://www.w3.org/2001/XMLSchema-instance"
  4. xsi:schemaLocation="http://maven.apache.org/POM/4.0.0 http://maven.apache.org/xsd/maven-4.0.0.xsd">
  5. <modelVersion>4.0.0</modelVersion>
  6.  
  7.  
  8. <!--定义该【ssm_pojo】工程的,父工程-->
  9. <parent>
  10. <groupId>com.wgy</groupId>
  11. <artifactId>ssm</artifactId>
  12. <version>1.0-SNAPSHOT</version>
  13. <!--相对位置,要填写父工程的pom文件-->
  14. <relativePath>../ssm/pom.xml</relativePath>
  15. </parent>
  16.  
  17.  
  18. <!--上面,指定了该工程的父工程;;;因为,子工程和父工程应该属于同一个组织id,所以【ssm_pojo】的groupId是可以不写的-->
  19. <!-- <groupId>com.wgy</groupId>-->
  20. <artifactId>ssm_pojo</artifactId>
  21. <!--同时,上面,指定了该工程的父工程;;子工程和父工程版本尽量应该要保持一致,所以【ssm_pojo】的version是可以不写的-->
  22. <!-- <version>1.0-SNAPSHOT</version>-->
  23.  
  24.  
  25. </project>
 

说明:

(1)设置【ssm_pojo】工程的父工程为【ssm】;

(2)其中<relativePath>要设置父工程的pom文件;因为【ssm】工程和【ssm_pojo】工程在同一目录,所以这儿,【ssm_pojo】的pom.xml通过【../】就可以找到【ssm】;(PS:其实对于其中的具体细节,自己不是特别清晰的)

……………………………………………………


(2)把【ssm_dao】设为【ssm】的子工程;

……………………………………………………


(3)把【ssm_service】设为【ssm】的子工程;

……………………………………………………


(4)把【ssm_controller】设为【ssm】的子工程;

2.在【ssm】这个父工程的pom.xml中,引入【ssm_controller、ssm_service、ssm_dao、ssm_pojo】这些子工程中,需要使用的依赖;

 
  1. <?xml version="1.0" encoding="UTF-8"?>
  2. <project xmlns="http://maven.apache.org/POM/4.0.0"
  3. xmlns:xsi="http://www.w3.org/2001/XMLSchema-instance"
  4. xsi:schemaLocation="http://maven.apache.org/POM/4.0.0 http://maven.apache.org/xsd/maven-4.0.0.xsd">
  5. <modelVersion>4.0.0</modelVersion>
  6.  
  7. <groupId>com.wgy</groupId>
  8. <artifactId>ssm</artifactId>
  9. <version>1.0-SNAPSHOT</version>
  10.  
  11. <!--说明,该工程就是用于构建管理的-->
  12. <packaging>pom</packaging>
  13.  
  14. <!--管理的工程列表;这儿没有顺序关系,前后顺序无所谓;-->
  15. <modules>
  16. <module>../ssm_pojo</module>
  17. <module>../ssm_dao</module>
  18. <module>../ssm_service</module>
  19. <module>../ssm_controller</module>
  20. </modules>
  21.  
  22.  
  23. <!--0.Maven国内阿里云镜像-->
  24. <repositories>
  25. <repository>
  26. <id>aliyun</id>
  27. <name>aliyun</name>
  28. <url>https://maven.aliyun.com/repository/public</url>
  29. </repository>
  30. </repositories>
  31.  
  32.  
  33. <!--声明:此处进行依赖管理-->
  34. <dependencyManagement>
  35.  
  36. <!--里面是具体的依赖-->
  37. <dependencies>
  38. <!--0.添加【自己的工程模块】的依赖-->
  39. <dependency><!--具体来说,【ssm_dao】会使用我们自己上传到本地仓库的ssm_pojo-->
  40. <groupId>com.wgy</groupId>
  41. <artifactId>ssm_pojo</artifactId>
  42. <version>1.0-SNAPSHOT</version>
  43. </dependency>
  44. <dependency><!--具体来说,【ssm_service】会使用我们自己上传到本地仓库的ssm_dao-->
  45. <groupId>com.wgy</groupId>
  46. <artifactId>ssm_dao</artifactId>
  47. <version>1.0-SNAPSHOT</version>
  48. </dependency>
  49. <dependency><!--具体来说,【ssm_controller】会使用我们自己上传到本地仓库的ssm_service-->
  50. <groupId>com.wgy</groupId>
  51. <artifactId>ssm_service</artifactId>
  52. <version>1.0-SNAPSHOT</version>
  53. </dependency>
  54.  
  55.  
  56. <!--1.1Spring-webmvc依赖--><!--具体来说,【ssm_controller】会使用-->
  57. <dependency>
  58. <groupId>org.springframework</groupId>
  59. <artifactId>spring-webmvc</artifactId>
  60. <version>5.2.6.RELEASE</version>
  61. </dependency>
  62. <!--1.2引入Spring-context依赖--><!--具体来说,【ssm_service,ssm_dao】会使用-->
  63. <dependency>
  64. <groupId>org.springframework</groupId>
  65. <artifactId>spring-context</artifactId>
  66. <version>5.2.6.RELEASE</version>
  67. </dependency>
  68.  
  69. <!--2.JSON序列化工具包jackson--><!--具体来说,【ssm_controller】会使用-->
  70. <dependency>
  71. <groupId>com.fasterxml.jackson.core</groupId>
  72. <artifactId>jackson-core</artifactId>
  73. <version>2.11.0</version>
  74. </dependency>
  75. <dependency>
  76. <groupId>com.fasterxml.jackson.core</groupId>
  77. <artifactId>jackson-databind</artifactId>
  78. <version>2.11.0</version>
  79. </dependency>
  80. <dependency>
  81. <groupId>com.fasterxml.jackson.core</groupId>
  82. <artifactId>jackson-annotations</artifactId>
  83. <version>2.11.0</version>
  84. </dependency>
  85.  
  86. <!--3.Mybatis与Spring整合,所需的依赖--><!--具体来说,【ssm_dao】会使用-->
  87. <dependency>
  88. <groupId>org.springframework</groupId>
  89. <artifactId>spring-jdbc</artifactId>
  90. <version>5.2.6.RELEASE</version>
  91. </dependency>
  92. <dependency>
  93. <groupId>org.mybatis</groupId>
  94. <artifactId>mybatis</artifactId>
  95. <version>3.5.4</version>
  96. </dependency>
  97. <dependency>
  98. <groupId>org.mybatis</groupId>
  99. <artifactId>mybatis-spring</artifactId>
  100. <version>2.0.3</version>
  101. </dependency>
  102. <dependency>
  103. <groupId>mysql</groupId>
  104. <artifactId>mysql-connector-java</artifactId>
  105. <version>8.0.23</version>
  106. </dependency>
  107. <dependency>
  108. <groupId>com.alibaba</groupId>
  109. <artifactId>druid</artifactId>
  110. <version>1.1.14</version>
  111. </dependency>
  112.  
  113. </dependencies>
  114.  
  115. </dependencyManagement>
  116.  
  117.  
  118. <!--构建-->
  119. <build>
  120. <pluginManagement>
  121. <!--设置插件-->
  122. <plugins>
  123. <!--使用Tomcat具体的插件-->
  124. <plugin><!--具体来说,【ssm_controller】会使用Tomcat插件-->
  125. <groupId>org.apache.tomcat.maven</groupId>
  126. <artifactId>tomcat7-maven-plugin</artifactId>
  127. <version>2.1</version>
  128. </plugin>
  129. </plugins>
  130. </pluginManagement>
  131. </build>
  132. </project>
 

说明:

(1)使用【<dependencyManagement><dependencies></dependencies></dependencyManagement>】,引入在【ssm_controller、ssm_service、ssm_dao、ssm_pojo】中,需要使用的依赖;

          ● 声明:(没试,我感觉肯定100%是这样的):比如【ssm_service】要用到A依赖,我们没在【ssm】中引入,而是在【ssm_service】中引入并设置版本,应该也是可以的;

3.然后,【ssm_controller、ssm_service、ssm_dao、ssm_pojo这些子工程中:需要引入】并且【ssm这个父工程中,已经引入并设置版本的】依赖:那么,在【ssm_controller、ssm_service、ssm_dao、ssm_pojo这些子工程】中,就可以(而且最好建议如此)不用设置版本了;

这儿只贴了【ssm_dao】工程的,其他子工程的就懒得贴了~~

说明:

(1)(实测)如果,某个依赖在ssm这个父工程中,已经设置过了;;;然后,我们在【ssm_controller】这个子工程中,仍然设置了版本,并且和父工程不一致;;;;那么,【ssm_controller】使用的将是自己设置的那个版本;

(2)这样一来,我们通过父工程,就很容易维护和管理所有子工程的依赖版本,便于维护;

(3)【ssm_controller】中Tomcat插件的版本,也可以不写版本;


三:启动工程,看一看我们上面一通设置后,项目还是不是OK的; 

我们这个项目是一个web项目;但是,因为【ssm】工程不是一个web工程;而,【ssm_controller】才是那个直面表现层的web工程,所以,此时针对这个项目,我们还是要启动【ssm_controller】;

启动【ssm_controller】,发现项目是OK的;


四:继承Summary;

(1)maven是一款很好的项目构建工具:maven是一款很好的项目构建工具,其提供了很多手段来帮助我们构建项目;

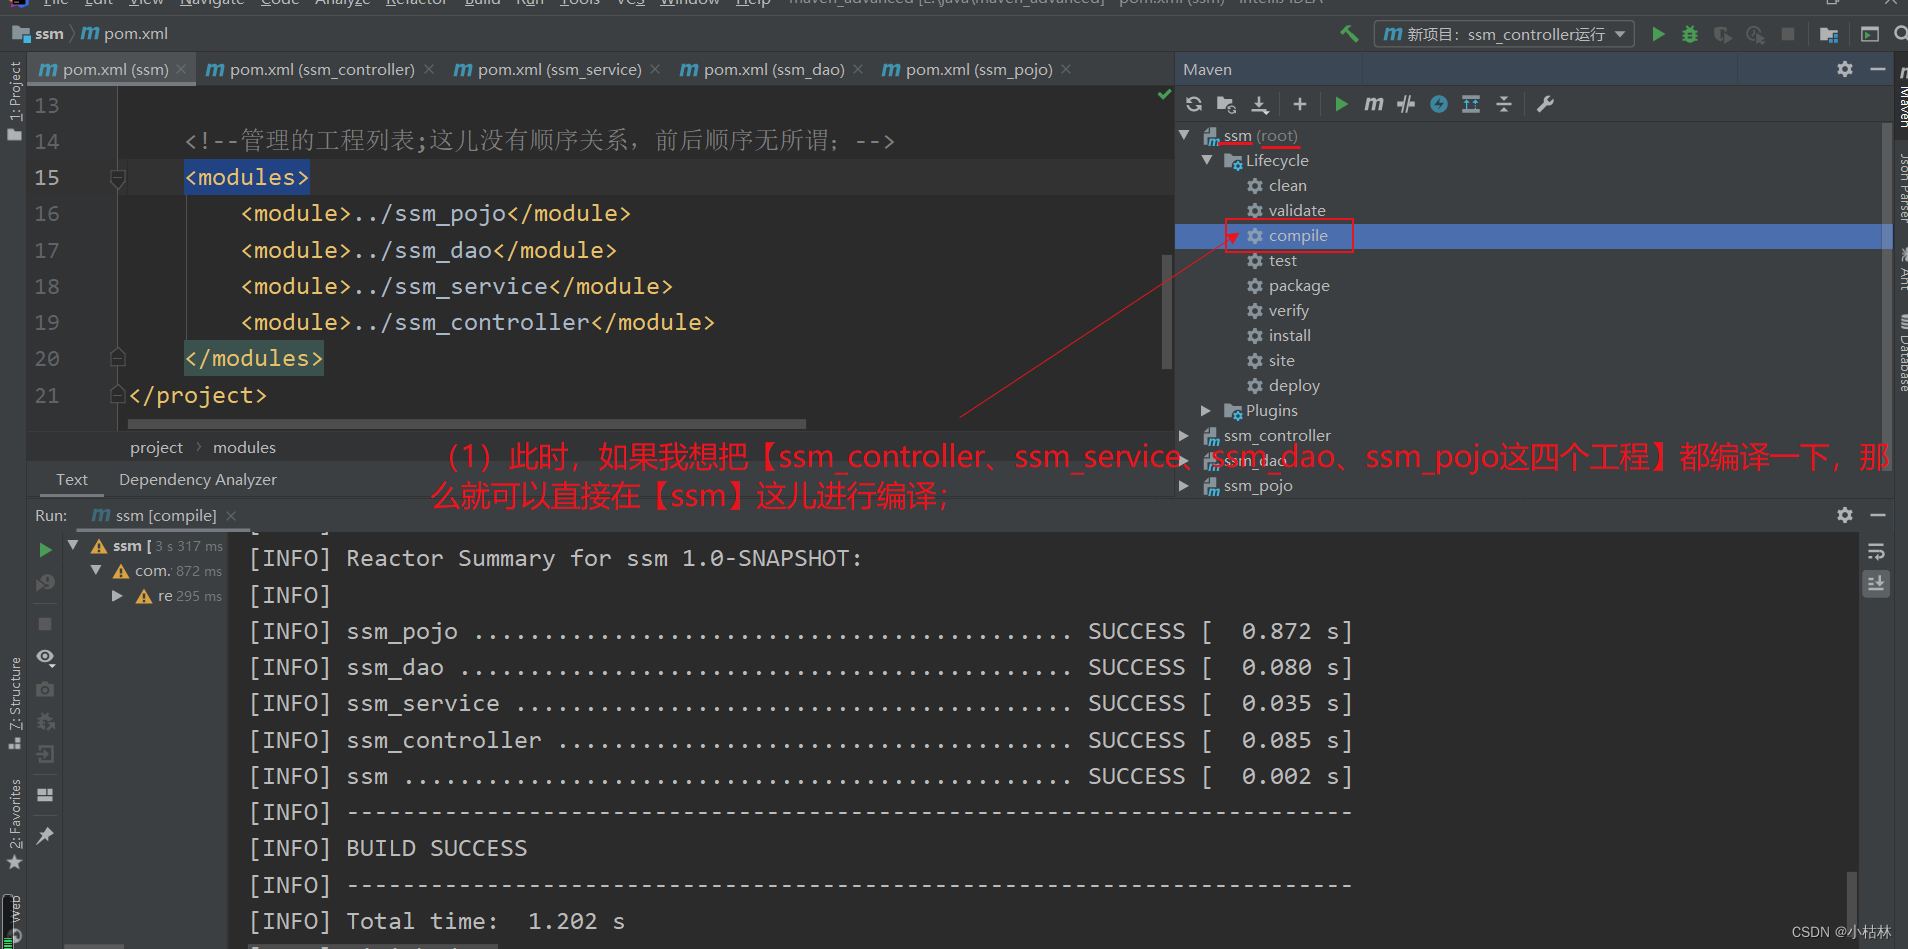
(2)maven中的【聚合】这种手段:上篇博客【Maven高级5:聚合;(使用聚合技术,来管理多个“使用maven管理的工程”)】介绍的【聚合】就是手段之一,聚合的主要作用是:一个项目有很多工程的时候,我们可以通过聚合来帮助快速构建项目;

          ● 即我们创建一个什么具体业务也没实现的工程【ssm】;然后,让其管理【ssm_controller、ssm_service、ssm_dao、ssm_pojo这四个工程】;

          ● 这样一来,如果我们想编译或者install【ssm_controller、ssm_service、ssm_dao、ssm_pojo这四个工程】,我们就可以在【ssm】操作,十分方便和快捷;

(3)maven中的【继承】这种手段:本篇博客介绍的【继承】也是手段之一;继承的主要作用就是,让子工程能够使用父工程中的配置(我们这儿演示的,具体就是依赖和插件);

          ● 即我们创建一个什么具体业务也没实现的工程【ssm】;然后,把【ssm】设为【ssm_controller、ssm_service、ssm_dao、ssm_pojo这四个工程】的父工程;

          ● 这样一来,我们就可以在【ssm】中配置依赖;那么在【ssm_controller、ssm_service、ssm_dao、ssm_pojo这四个工程】中使用依赖的时候,就可以不用再指定版本了;

          ● 其可以解决不同子工程(或称模块),版本不一致的问题;

(4)【聚合】和】继承的区别:声明:我们为了应用【聚合】和【继承】,是可以放到两个工程中的;比如,我们可以创建【ssm】为载体来应用【聚合】,然后创建【ssm1】为载体来应用【继承】;

          ● 只是,在实际开发中,我们一般采用的做法是,只创建一个工程为载体,去应用【聚合】和【继承】;

零:什么是聚合;

为什么需要聚合的基本逻辑为:【我们把项目拆成了多个模块(其实就是多个使用maven管理的工程)】→【这四个模块我们都会发布到本地仓库中去】→【如果此时,ssm_dao更新了,然后我们也重新install上传到本地仓库了】→【然后,使用到ssm_dao的ssm_service,使用的就是新的ssm_dao】→【但是可能出现这种情况:后来,当我们install ssm_service的时候,才发现ssm_service并不能适配和使用“更新后的ssm_dao”】→【为此,一个比较好的解决策略是:ssm_controller、ssm_service、ssm_dao、ssm_pojo这四个模块进行统一管理】→【即,可以增加一个模块,这个模块统一管理这四个模块;只要这个模块执行,那四个模块就会一块执行;;;比如,只要这个模块编译,那四个模块都跟着编译;只要这个模块安装,那四个模块都跟着安装】→【即,有了这个统一管理模块后,我们就可以快速构建,执行命令也会比较简单】;

上面的这种工作机制,就叫是聚合;


显然,此时【maven_advanced】已经不需要了;可以把【maven_advanced】给去掉了;


一:创建【ssm】工程;(我们将使用该工程,来统一管理ssm_controller、ssm_service、ssm_dao、ssm_pojo这四个工程)

【ssm】工程,不是实现某种业务的工程,其就是为了管理ssm_controller、ssm_service、ssm_dao、ssm_pojo这四个工程的;


二:设置【ssm】工程,让其变成一个【专门用于作管理的工程】; 

 
  1. <?xml version="1.0" encoding="UTF-8"?>
  2. <project xmlns="http://maven.apache.org/POM/4.0.0"
  3. xmlns:xsi="http://www.w3.org/2001/XMLSchema-instance"
  4. xsi:schemaLocation="http://maven.apache.org/POM/4.0.0 http://maven.apache.org/xsd/maven-4.0.0.xsd">
  5. <modelVersion>4.0.0</modelVersion>
  6.  
  7. <groupId>com.wgy</groupId>
  8. <artifactId>ssm</artifactId>
  9. <version>1.0-SNAPSHOT</version>
  10.  
  11. <!--说明,该工程就是用于构建管理的-->
  12. <packaging>pom</packaging>
  13.  
  14. <!--管理的工程列表;这儿没有顺序关系,前后顺序无所谓;-->
  15. <modules>
  16. <module>../ssm_pojo</module>
  17. <module>../ssm_dao</module>
  18. <module>../ssm_service</module>
  19. <module>../ssm_controller</module>
  20. </modules>
  21. </project>
 

说明:

(1)【<packaging>pom</packaging>】,表示【ssm】这个工程的作用就是一个用于构建管理的工程;

(2)然后通过【<modules><module>***</module></modules>】,来设置,【ssm】工程要管理哪些工程;

(3)一个并不是十分清晰的点:和【Maven高级1、2、3、4:模块拆分思想;把项目拆成pojo、Dao、Service、Controller四个模块;】中的【ssm_controller】项目中的web.xml,其中配置的applicationContext.xml的路径一样;

          ●【ssm_controller】、【ssm_service】、【ssm_dao】这三个spring工程,我们都创建在了同一目录下;

然后,【ssm_controller】中的web.xml,要想找到【ssm_service的,applicationContext-service.xml】和【ssm_dao的,applicationContext-dao.xml】,就需要在classpath后面设置*;

至于,为什么这样是OK的,里面的细节,自己其实不是很清楚的;

          ● 这儿,ssm工程,在引用【ssm_controller】、【ssm_service】、【ssm_dao】、【ssm_pojo】的时候,采取了【..】的做法;

emmm,其实对其中的细节自己并不清楚;;;说到底,还是对maven编译项目,把项目上传到本地仓库等等的细节内容,不了解;


三:设置【ssm】工程后,实际效果;

1.实际效果; 

通过这个效果,更能够体味到maven这个构建工具的作用;

2.几点声明;

(1)声明1:【ssm_controller、ssm_service、ssm_dao、ssm_pojo】的构建顺序,与在ssm的pom.xml中的书写顺序无关;

(2)声明2:<packaging>的pom、jar、war,说明;


可以看到,聚合是一个很好的手段,我们只要操作【ssm】,【ssm_controller、ssm_service、ssm_dao、ssm_pojo】就会跟着联动;以后,子工程更多的时候,更能够感受到聚合带来的方便;

一:模块拆分,简介; 

(1)拆分理解(PS:这儿的理解可能存在偏差、甚至是错误):当一个规模比较大的项目来的时候,为了能够更好的组织团队人员、更好的有条理的去开发这个项目,为了更有利项目的扩展和维护;我们往往会,对这个项目进行拆分,拆成多个模块;

          ● 就我们这儿演示来看,我们拆分出的一个模块和以前接触的项目是一样的;即,每一个模块,都是一个在物理意义上独立的项目;

          ● 只是,我们把一个大项目,拆成多个模块(也就是多个小项目)后;;;这些模块,都是使用maven管理的;;;然后,我们就可以使用maven,对这些项目进行一些物理上的配置,把这些模块(也就是多个小项目),在逻辑上给组织成为一个大项目;

(2)拆分说明;

          ● 然后,上图所示的【ssm】可以认为是主模块;主模块中,什么都不放;

          ● 在后面的【ssm_controller】、【ssm_service】等模块中,开发具体的功能;这些模块通力合作,来完成整个工程;

(3)声明:这儿的拆分,仅仅是演示了拆分:

          ● 我们这儿演示的拆分,是根据Controller、Service、Dao的结构去拆的;而没有按照【在实际分布式项目中,根据如用户模块、商品模块的方式】去拆的;

          ● 即,我们这儿演示的maven拆分,仅仅是演示了拆分的思想而已;;;只要明白了这个思想,在实际中就可以根据具体的业务去灵活的运用;


二:演示项目准备:maven_advanced项目,简介;(PS:这儿的内容过于简单,没必要细看)

项目说明:

(1)本演示项目的主要目的是,演示使用Maven时,如何拆分项目; 

(2)所以,本项目的内容十分简单,但也是一个包含了全流程的项目;同时,为了契合课程的内容,该项目没有使用【本机安装的Tomcat】,而是使用的【Tomcat插件】;

(3)关于该项目的构建,可以参考【(17)SSM开发书评网】、【Maven基础11:Tomcat插件;】中的内容;

(1)为了演示,准备了一个逻辑空间,创建了一一个演示用的User表:

(2)项目内容;

(3)pom.xml;

 
  1. <?xml version="1.0" encoding="UTF-8"?>
  2. <project xmlns="http://maven.apache.org/POM/4.0.0"
  3. xmlns:xsi="http://www.w3.org/2001/XMLSchema-instance"
  4. xsi:schemaLocation="http://maven.apache.org/POM/4.0.0 http://maven.apache.org/xsd/maven-4.0.0.xsd">
  5. <modelVersion>4.0.0</modelVersion>
  6.  
  7. <groupId>com.wgy</groupId>
  8. <artifactId>maven_advanced</artifactId>
  9. <version>1.0-SNAPSHOT</version>
  10. <packaging>war</packaging>
  11.  
  12. <!--0.Maven国内阿里云镜像-->
  13. <repositories>
  14. <repository>
  15. <id>aliyun</id>
  16. <name>aliyun</name>
  17. <url>https://maven.aliyun.com/repository/public</url>
  18. </repository>
  19. </repositories>
  20.  
  21. <dependencies>
  22. <!--1.引入Spring-webmvc依赖-->
  23. <dependency>
  24. <groupId>org.springframework</groupId>
  25. <artifactId>spring-webmvc</artifactId>
  26. <version>5.2.6.RELEASE</version>
  27. </dependency>
  28.  
  29. <!--2.引入JSON序列化工具包jackson-->
  30. <dependency>
  31. <groupId>com.fasterxml.jackson.core</groupId>
  32. <artifactId>jackson-core</artifactId>
  33. <version>2.11.0</version>
  34. </dependency>
  35. <dependency>
  36. <groupId>com.fasterxml.jackson.core</groupId>
  37. <artifactId>jackson-databind</artifactId>
  38. <version>2.11.0</version>
  39. </dependency>
  40. <dependency>
  41. <groupId>com.fasterxml.jackson.core</groupId>
  42. <artifactId>jackson-annotations</artifactId>
  43. <version>2.11.0</version>
  44. </dependency>
  45.  
  46.  
  47.  
  48. <!--3.Mybatis与Spring整合,所需的依赖-->
  49. <dependency>
  50. <groupId>org.springframework</groupId>
  51. <artifactId>spring-jdbc</artifactId>
  52. <version>5.2.6.RELEASE</version>
  53. </dependency>
  54. <dependency>
  55. <groupId>org.mybatis</groupId>
  56. <artifactId>mybatis</artifactId>
  57. <version>3.5.4</version>
  58. </dependency>
  59. <dependency>
  60. <groupId>org.mybatis</groupId>
  61. <artifactId>mybatis-spring</artifactId>
  62. <version>2.0.3</version>
  63. </dependency>
  64. <dependency>
  65. <groupId>mysql</groupId>
  66. <artifactId>mysql-connector-java</artifactId>
  67. <version>8.0.23</version>
  68. </dependency>
  69. <dependency>
  70. <groupId>com.alibaba</groupId>
  71. <artifactId>druid</artifactId>
  72. <version>1.1.14</version>
  73. </dependency>
  74.  
  75. </dependencies>
  76.  
  77. <!--构建-->
  78. <build>
  79. <!--设置插件-->
  80. <plugins>
  81. <!--使用Tomcat具体的插件-->
  82. <plugin>
  83. <groupId>org.apache.tomcat.maven</groupId>
  84. <artifactId>tomcat7-maven-plugin</artifactId>
  85. <version>2.1</version>
  86. </plugin>
  87. </plugins>
  88. </build>
  89.  
  90. </project>
 

(4)applicationContext.xml;

 
  1. <?xml version="1.0" encoding="UTF-8"?>
  2. <beans xmlns="http://www.springframework.org/schema/beans"
  3. xmlns:mvc="http://www.springframework.org/schema/mvc"
  4. xmlns:context="http://www.springframework.org/schema/context"
  5. xmlns:xsi="http://www.w3.org/2001/XMLSchema-instance"
  6. xmlns:task="http://www.springframework.org/schema/task"
  7. xsi:schemaLocation="
  8. http://www.springframework.org/schema/beans
  9. http://www.springframework.org/schema/beans/spring-beans.xsd
  10. http://www.springframework.org/schema/context
  11. http://www.springframework.org/schema/context/spring-context.xsd
  12. http://www.springframework.org/schema/task
  13. http://www.springframework.org/schema/task/spring-task.xsd
  14. http://www.springframework.org/schema/mvc
  15. http://www.springframework.org/schema/mvc/spring-mvc.xsd">
  16. <!--Spring 开启组件扫描-->
  17. <context:component-scan base-package="com.wgy"></context:component-scan>
  18. <!--开启spring MVC注解模式-->
  19. <mvc:annotation-driven/>
  20. <!--将图片/JS/CSS等静态资源排除在外,这样做可提高Spring MVC对url的处理效率-->
  21. <mvc:default-servlet-handler/>
  22.  
  23.  
  24. <bean id="dataSource" class="com.alibaba.druid.pool.DruidDataSource">
  25. <property name="driverClassName" value="com.mysql.cj.jdbc.Driver"/>
  26. <property name="url" value="jdbc:mysql://localhost:3306/test_maven?useSSL=false&amp;useUnicode=true&amp;characterEncoding=UTF-8&amp;serverTimezone=Asia/Shanghai&amp;allowPublicKeyRetrieval=true"/>
  27. <property name="username" value="root"/>
  28. <property name="password" value="12345"/>
  29. <property name="initialSize" value="10"/>
  30. <property name="maxActive" value="20"/>
  31. </bean>
  32.  
  33. <bean id="sessionFactory" class="org.mybatis.spring.SqlSessionFactoryBean">
  34. <property name="dataSource" ref="dataSource"/>
  35. <property name="mapperLocations" value="classpath:mappers/*.xml"/>
  36. <property name="configLocation" value="classpath:mybatis-config.xml"/>
  37. </bean>
  38.  
  39. <bean class="org.mybatis.spring.mapper.MapperScannerConfigurer">
  40. <property name="basePackage" value="com.wgy.dao"/>
  41. </bean>
  42. </beans>
 

(5)pojo:User;

 
  1. package com.wgy.pojo;
  2.  
  3. public class User {
  4. private Integer id;
  5. private String name;
  6.  
  7. public User() {
  8. }
  9.  
  10. public User(Integer id, String name) {
  11. this.id = id;
  12. this.name = name;
  13. }
  14.  
  15. public Integer getId() {
  16. return id;
  17. }
  18.  
  19. public void setId(Integer id) {
  20. this.id = id;
  21. }
  22.  
  23. public String getName() {
  24. return name;
  25. }
  26.  
  27. public void setName(String name) {
  28. this.name = name;
  29. }
  30. }
 

(6)Dao:UserDao,User.xml,mybatis-config.xml;

 
  1. package com.wgy.dao;
  2.  
  3. import org.apache.ibatis.annotations.Param;
  4. import org.springframework.stereotype.Repository;
  5.  
  6. @Repository
  7. public interface UserDao {
  8. /**
  9. * 查询方法
  10. * @param id
  11. * @return
  12. */
  13. public String selectById(Integer id);
  14.  
  15. /**
  16. * 插入方法
  17. *
  18. * @param name
  19. * @return
  20. */
  21. public void insert(String name);
  22. }
 
 
  1. <?xml version="1.0" encoding="UTF-8"?>
  2. <!DOCTYPE mapper
  3. PUBLIC "-//mybatis.org//DTD Mapper 3.0//EN"
  4. "http://mybatis.org/dtd/mybatis-3-mapper.dtd">
  5. <mapper namespace="com.wgy.dao.UserDao">
  6. <select id="selectById" parameterType="Integer" resultType="String">
  7. select name from user where id = #{value}
  8. </select>
  9.  
  10. <insert id="insert" parameterType="String">
  11. insert into user(name) values (#{value})
  12. </insert>
  13. </mapper>
 
 
  1. <?xml version="1.0" encoding="UTF-8"?>
  2. <!DOCTYPE configuration
  3. PUBLIC "-//mybatis.org//DTD Config 3.0//EN"
  4. "http://mybatis.org/dtd/mybatis-3-config.dtd">
  5. <configuration>
  6.  
  7. <settings>
  8. <setting name="mapUnderscoreToCamelCase" value="true"/>
  9. </settings>
  10.  
  11. </configuration>
 

(7)Service:UserService,UserServiceImpl;

 
  1. package com.wgy.service;
  2.  
  3. public interface UserService {
  4. public String selectName(Integer id);
  5.  
  6. public void insertName(String name);
  7. }
 
 
  1. package com.wgy.service.impl;
  2.  
  3. import com.wgy.dao.UserDao;
  4. import com.wgy.service.UserService;
  5. import org.springframework.beans.factory.annotation.Autowired;
  6. import org.springframework.stereotype.Service;
  7.  
  8. @Service
  9. public class UserServiceImpl implements UserService {
  10. @Autowired
  11. UserDao userDao;
  12.  
  13. public String selectName(Integer id) {
  14. String name = userDao.selectById(id);
  15. return name;
  16. }
  17.  
  18. public void insertName(String name) {
  19. userDao.insert(name);
  20. }
  21. }
 

(8)Controller:TestController;

 
  1. package com.wgy.controller;
  2.  
  3. import com.wgy.service.UserService;
  4. import org.springframework.beans.factory.annotation.Autowired;
  5. import org.springframework.stereotype.Controller;
  6. import org.springframework.web.bind.annotation.GetMapping;
  7. import org.springframework.web.bind.annotation.PathVariable;
  8. import org.springframework.web.bind.annotation.RestController;
  9.  
  10. @RestController
  11. public class TestController {
  12.  
  13. @Autowired
  14. UserService userService;
  15.  
  16. /**
  17. * 查询方法
  18. * @return
  19. */
  20. @GetMapping("/test/t1/{id}")
  21. public String test1(@PathVariable("id") Integer id) {
  22. String name = userService.selectName(id);
  23. return name;
  24. }
  25.  
  26. /**
  27. * 更新方法
  28. *
  29. * @return
  30. */
  31. @GetMapping("/test/t2/{name}")
  32. public void test2(@PathVariable("name") String name) {
  33. userService.insertName(name);
  34. }
  35.  
  36. }
 

(9)测试:查询和更新都可以;

演示项目准备好了,就可以愉快的开始了解Maven拆分了,把上面的项目拆成多个项目了;

针对上面的项目,我主要是拆成【ssm_controller】、【ssm_service】、【ssm_dao】、【ssm_pojo】这四部分;


三:根据原项目,拆出【ssm_pojo】;

1.创建【ssm_pojo】工程;

2.【ssm_pojo】工程,编写内容;

3.【ssm_pojo】工程,编译一下,看是否OK;

至此,根据原项目,拆分出的【ssm_pojo】模块,OK了;


四:根据原项目,拆出【ssm_dao】;(需要使用到【ssm_pojo】)

1.创建【ssm_dao】工程;

2.【ssm_dao】工程,编写内容;

(1)内容概述;

……………………………………………………


(2)pom.xml;

 
  1. <?xml version="1.0" encoding="UTF-8"?>
  2. <project xmlns="http://maven.apache.org/POM/4.0.0"
  3. xmlns:xsi="http://www.w3.org/2001/XMLSchema-instance"
  4. xsi:schemaLocation="http://maven.apache.org/POM/4.0.0 http://maven.apache.org/xsd/maven-4.0.0.xsd">
  5. <modelVersion>4.0.0</modelVersion>
  6.  
  7. <groupId>com.wgy</groupId>
  8. <artifactId>ssm_dao</artifactId>
  9. <version>1.0-SNAPSHOT</version>
  10.  
  11.  
  12.  
  13. <!--0.Maven国内阿里云镜像-->
  14. <repositories>
  15. <repository>
  16. <id>aliyun</id>
  17. <name>aliyun</name>
  18. <url>https://maven.aliyun.com/repository/public</url>
  19. </repository>
  20. </repositories>
  21.  
  22. <dependencies>
  23. <!--因为,【ssm_dao】需要使用到【ssm_pojo】中的User,所以,我们引入【ssm_pojo】-->
  24. <dependency>
  25. <groupId>com.wgy</groupId>
  26. <artifactId>ssm_pojo</artifactId>
  27. <version>1.0-SNAPSHOT</version>
  28. </dependency>
  29.  
  30.  
  31. <!--1.引入Spring-webmvc依赖-->
  32. <dependency>
  33. <groupId>org.springframework</groupId>
  34. <artifactId>spring-context</artifactId>
  35. <version>5.2.6.RELEASE</version>
  36. </dependency>
  37.  
  38.  
  39. <!--3.Mybatis与Spring整合,所需的依赖-->
  40. <dependency>
  41. <groupId>org.springframework</groupId>
  42. <artifactId>spring-jdbc</artifactId>
  43. <version>5.2.6.RELEASE</version>
  44. </dependency>
  45. <dependency>
  46. <groupId>org.mybatis</groupId>
  47. <artifactId>mybatis</artifactId>
  48. <version>3.5.4</version>
  49. </dependency>
  50. <dependency>
  51. <groupId>org.mybatis</groupId>
  52. <artifactId>mybatis-spring</artifactId>
  53. <version>2.0.3</version>
  54. </dependency>
  55. <dependency>
  56. <groupId>mysql</groupId>
  57. <artifactId>mysql-connector-java</artifactId>
  58. <version>8.0.23</version>
  59. </dependency>
  60. <dependency>
  61. <groupId>com.alibaba</groupId>
  62. <artifactId>druid</artifactId>
  63. <version>1.1.14</version>
  64. </dependency>
  65.  
  66. </dependencies>
  67. </project>
 

说明:

(1)因为【ssm_dao】需要使用到【ssm_pojo】的User类等;所以,我们需要在【ssm_dao】中引入【ssm_pojo】; 

(2)因为这个项目中对象,也需要使用Spring的Ioc管理,所以这个项目也需要是一个spring项目,自然我们引入了【spring-webmvc】依赖;

          ● 其实,【ssm_dao】对于spring的需求,仅仅是【使用Ioc管理对象】和【mybatis与spring整合】;所以,我们也可以不引入【spring-webmvc】这个覆盖面很大的依赖,而是引入【spring-context】;(具体可以参考【Spring IoC容器与Bean管理4:使用XML方式实现Spring IoC预一:Spring IoC初体验一:IoC容器完成【对象的实例化】;】)

(3)然后,因为要【mybatis与spring整合】,所以相关MySQL,mybatis,mybatis与spring整合的依赖,都要引入;

(4)然后,因为使用了druid连接池,所以druid依赖也要引入;

……………………………………………………


(3)applicationContext.xml,UserDao,User.xml,mybatis-config,和【maven_advanced】项目相比没有变化;

3.【ssm_dao】工程,编译一下,看是否OK;

因为,我们在【ssm_dao】中引入了【ssm_pojo】; 所以,为了让【ssm_dao】这个使用maven管理的项目,能够找到【ssm_pojo】这个同样使用maven管理的项目的jar包;我们要记得把【ssm_pojo】给上传到本地仓库中去;

……………………………………………………


五:根据原项目,拆出【ssm_service】;(需要使用到【ssm_dao】)

1.创建【ssm_service】工程;

2.【ssm_service】工程,编写内容;


(1)内容概述;

……………………………………………………


(2)pom.xml;

 
  1. <?xml version="1.0" encoding="UTF-8"?>
  2. <project xmlns="http://maven.apache.org/POM/4.0.0"
  3. xmlns:xsi="http://www.w3.org/2001/XMLSchema-instance"
  4. xsi:schemaLocation="http://maven.apache.org/POM/4.0.0 http://maven.apache.org/xsd/maven-4.0.0.xsd">
  5. <modelVersion>4.0.0</modelVersion>
  6.  
  7. <groupId>com.wgy</groupId>
  8. <artifactId>ssm_service</artifactId>
  9. <version>1.0-SNAPSHOT</version>
  10.  
  11. <!--0.Maven国内阿里云镜像-->
  12. <repositories>
  13. <repository>
  14. <id>aliyun</id>
  15. <name>aliyun</name>
  16. <url>https://maven.aliyun.com/repository/public</url>
  17. </repository>
  18. </repositories>
  19.  
  20. <dependencies>
  21.  
  22. <dependency>
  23. <groupId>com.wgy</groupId>
  24. <artifactId>ssm_dao</artifactId>
  25. <version>1.0-SNAPSHOT</version>
  26. </dependency>
  27. <!--1.引入Spring-webmvc依赖-->
  28. <dependency>
  29. <groupId>org.springframework</groupId>
  30. <artifactId>spring-context</artifactId>
  31. <version>5.2.6.RELEASE</version>
  32. </dependency>
  33.  
  34. </dependencies>
  35. </project>
 

说明:

(1)因为【ssm_service】要用到【ssm_dao】中的内容,所以,我们需要在【ssm_service】中引入【ssm_dao】;;;自然,我们要记得把【ssm_dao】工程打包上传到本地仓库,否则【ssm_service】会找不到的;


 (2)因为这个项目中对象,也需要使用Spring的Ioc管理,所以这个项目也需要是一个spring项目,自然我们引入了【spring-webmvc】依赖;

          ● 其实,【ssm_dao】对于spring的需求,仅仅是【使用Ioc管理对象】和【mybatis与spring整合】;所以,我们也可以不引入【spring-webmvc】这个覆盖面很大的依赖,而是引入【spring-context】;(具体可以参考【Spring IoC容器与Bean管理4:使用XML方式实现Spring IoC预一:Spring IoC初体验一:IoC容器完成【对象的实例化】;】)

……………………………………………………


(3)applicationContext.xml;

 
  1. <?xml version="1.0" encoding="UTF-8"?>
  2. <beans xmlns="http://www.springframework.org/schema/beans"
  3. xmlns:mvc="http://www.springframework.org/schema/mvc"
  4. xmlns:context="http://www.springframework.org/schema/context"
  5. xmlns:xsi="http://www.w3.org/2001/XMLSchema-instance"
  6. xmlns:task="http://www.springframework.org/schema/task"
  7. xsi:schemaLocation="
  8. http://www.springframework.org/schema/beans
  9. http://www.springframework.org/schema/beans/spring-beans.xsd
  10. http://www.springframework.org/schema/context
  11. http://www.springframework.org/schema/context/spring-context.xsd
  12. http://www.springframework.org/schema/task
  13. http://www.springframework.org/schema/task/spring-task.xsd
  14. http://www.springframework.org/schema/mvc
  15. http://www.springframework.org/schema/mvc/spring-mvc.xsd">
  16. <!--Spring 开启组件扫描-->
  17. <context:component-scan base-package="com.wgy"></context:component-scan>
  18. <!--开启spring MVC注解模式-->
  19. <mvc:annotation-driven/>
  20.  
  21.  
  22. </beans>
 

……………………………………………………


(4) UserService,UserServiceImpl和【maven_advanced】项目相比没有变化;

……………………………………………………


(5)多个Spring工程,配置文件不能重名;


说明:

(1)有关SpringBoot项目在启动的时候,多配置文件的时候如何选择,可以参考【附加:Spring Boot项目:多个配置文件介绍;启动项目时候,怎么选择指定配置文件;】;可以获得一些启发;

(2)后面,我们运行整个项目的时候,【ssm_dao】和【ssm_service】这两个SpringMVC工程,是需要同时运行的;所以,这两个工程的配置文件,是不能重名的;;;为了,更加清晰明了,这两个工程的配置文件改名如下;

3.【ssm_service】工程,编译一下,看是否OK;

说明:

(1)这儿主要演示的是Maven项目拆分,所以这个spring项目比较简陋,比如service写好之后该及时测试一下;我们这儿就省略了;


六:根据原项目,拆出【ssm_controller】;(需要使用到【ssm_service】)

1.创建【ssm_controller】工程;

…………………………………………

然后,可以参考【(17)SSM开发书评网】、【Maven基础11:Tomcat插件;】中的内容,把这个项目,设为web工程;

2.【ssm_controller】工程,编写内容;

(1)内容概述;

……………………………………………………


(2)pom.xml;

 
  1. <?xml version="1.0" encoding="UTF-8"?>
  2. <project xmlns="http://maven.apache.org/POM/4.0.0"
  3. xmlns:xsi="http://www.w3.org/2001/XMLSchema-instance"
  4. xsi:schemaLocation="http://maven.apache.org/POM/4.0.0 http://maven.apache.org/xsd/maven-4.0.0.xsd">
  5. <modelVersion>4.0.0</modelVersion>
  6.  
  7. <groupId>com.wgy</groupId>
  8. <artifactId>ssm_controller</artifactId>
  9. <version>1.0-SNAPSHOT</version>
  10. <packaging>war</packaging>
  11.  
  12. <!--0.Maven国内阿里云镜像-->
  13. <repositories>
  14. <repository>
  15. <id>aliyun</id>
  16. <name>aliyun</name>
  17. <url>https://maven.aliyun.com/repository/public</url>
  18. </repository>
  19. </repositories>
  20.  
  21. <dependencies>
  22.  
  23. <dependency>
  24. <groupId>com.wgy</groupId>
  25. <artifactId>ssm_service</artifactId>
  26. <version>1.0-SNAPSHOT</version>
  27. </dependency>
  28.  
  29. <!--1.引入Spring-webmvc依赖-->
  30. <dependency>
  31. <groupId>org.springframework</groupId>
  32. <artifactId>spring-webmvc</artifactId>
  33. <version>5.2.6.RELEASE</version>
  34. </dependency>
  35.  
  36. <!--2.引入JSON序列化工具包jackson-->
  37. <dependency>
  38. <groupId>com.fasterxml.jackson.core</groupId>
  39. <artifactId>jackson-core</artifactId>
  40. <version>2.11.0</version>
  41. </dependency>
  42. <dependency>
  43. <groupId>com.fasterxml.jackson.core</groupId>
  44. <artifactId>jackson-databind</artifactId>
  45. <version>2.11.0</version>
  46. </dependency>
  47. <dependency>
  48. <groupId>com.fasterxml.jackson.core</groupId>
  49. <artifactId>jackson-annotations</artifactId>
  50. <version>2.11.0</version>
  51. </dependency>
  52.  
  53. </dependencies>
  54.  
  55. <!--构建-->
  56. <build>
  57. <!--设置插件-->
  58. <plugins>
  59. <!--使用Tomcat具体的插件-->
  60. <plugin>
  61. <groupId>org.apache.tomcat.maven</groupId>
  62. <artifactId>tomcat7-maven-plugin</artifactId>
  63. <version>2.1</version>
  64. </plugin>
  65. </plugins>
  66. </build>
  67.  
  68. </project>
 

说明:

(1)因为【ssm_controller】要用到【ssm_service】中的内容,所以,我们需要在【ssm_controller】中引入【ssm_service】;;;自然,我们要记得把【ssm_service】工程打包上传到本地仓库,否则【ssm_controller】会找不到的;

(2)因为这个【ssm_controller】工程,是为了表现层使用的,所以这个工程必须是一个web工程;所以,我们一定要引入【spring-webmvc】依赖(PS:引入【spring-webmvc】后,其自动包含【spring-context】);而不能仅仅引入【spring-context】了;;;;能懂哈~~~

(3)然后,因为【ssm_controller】工程是需要发布的,所以需要Tomcat插件;同时,这个工程打包方式需要设为war;

……………………………………………………


(3)applicationContext-controller.xml配置文件;

 
  1. <?xml version="1.0" encoding="UTF-8"?>
  2. <beans xmlns="http://www.springframework.org/schema/beans"
  3. xmlns:mvc="http://www.springframework.org/schema/mvc"
  4. xmlns:context="http://www.springframework.org/schema/context"
  5. xmlns:xsi="http://www.w3.org/2001/XMLSchema-instance"
  6. xmlns:task="http://www.springframework.org/schema/task"
  7. xsi:schemaLocation="
  8. http://www.springframework.org/schema/beans
  9. http://www.springframework.org/schema/beans/spring-beans.xsd
  10. http://www.springframework.org/schema/context
  11. http://www.springframework.org/schema/context/spring-context.xsd
  12. http://www.springframework.org/schema/task
  13. http://www.springframework.org/schema/task/spring-task.xsd
  14. http://www.springframework.org/schema/mvc
  15. http://www.springframework.org/schema/mvc/spring-mvc.xsd">
  16. <!--Spring 开启组件扫描-->
  17. <context:component-scan base-package="com.wgy"></context:component-scan>
  18. <!--开启spring MVC注解模式-->
  19. <mvc:annotation-driven/>
  20. <!--将图片/JS/CSS等静态资源排除在外,这样做可提高Spring MVC对url的处理效率-->
  21. <mvc:default-servlet-handler/>
  22.  
  23. </beans>
 

……………………………………………………


(4) web.xml;

 
  1. <?xml version="1.0" encoding="UTF-8"?>
  2. <web-app xmlns="http://xmlns.jcp.org/xml/ns/javaee"
  3. xmlns:xsi="http://www.w3.org/2001/XMLSchema-instance"
  4. xsi:schemaLocation="http://xmlns.jcp.org/xml/ns/javaee http://xmlns.jcp.org/xml/ns/javaee/web-app_3_1.xsd"
  5. version="3.1">
  6.  
  7. <servlet>
  8. <servlet-name>springmvc</servlet-name>
  9. <servlet-class>org.springframework.web.servlet.DispatcherServlet</servlet-class>
  10. <init-param>
  11. <param-name>contextConfigLocation</param-name>
  12. <param-value>classpath*:applicationContext-*.xml</param-value>
  13. </init-param>
  14. <load-on-startup>0</load-on-startup>
  15. </servlet>
  16. <servlet-mapping>
  17. <servlet-name>springmvc</servlet-name>
  18. <url-pattern>/</url-pattern>
  19. </servlet-mapping>
  20. </web-app>
 

说明

(1)【ssm_controller】中的applicationContext-controller.xml配置文件,加载【ssm_service】和【ssm_dao】工程配置文件的策略:加载配置文件需要修改一下,指定一下项目启动的时候,

          ● 说明1: 很容易知道(这也是自己以前就知道的知识点),项目在编译后,其配置文件的的位置是:即【resources目录下的applicationContext.xml配置文件】就是在【代码编译后的class文件目录的,根目录下】的;

所以,在web.xml中,通过【classpath*:applicationContext-*.xml】是能够找到【applicationContext.xml配置文件】的;

          ● 说明2:然后,【ssm_controller】、【ssm_service】、【ssm_dao】这三个spring工程,都是由有spring配置文件的;而且其名字是存在差异的;所以,在写路径的时候,用了*来表示,其就能很好的匹配到对应格式的配置文件;

          ● 说明3:然后,【ssm_controller】、【ssm_service】、【ssm_dao】这三个spring工程,我们都创建在了同一目录下;

然后,【ssm_controller】中的web.xml,要想找到【ssm_service的,applicationContext-service.xml】和【ssm_dao的,applicationContext-dao.xml】,就需要在classpath后面设置*;

至于,为什么这样是OK的,里面的细节,自己其实不是很清楚的;

3.【ssm_controller】工程,编译一下,看是否OK;

……………………………………………………


然后,把这个工程发布到Tomcat中去,看是否OK;参考【Maven基础9:IDEA中配置Maven;创建Maven工程;(IDEA中,maven的一些操作;创建一个【基于maven某个命令 “操作“ 】;)】去创建一个快捷操作;

(PS:上面记得Apply)

……………………………………………………


测试结果,是OK的;


一:依赖范围; 

1.依赖范围简介; 

说明:

(1)主程序范围(主代码),测试范围(测试代码);

(2)

          ● 我们引入junit依赖的时候,一般只会在测试中使用到;

          ● 我们引入servlet依赖的时候,千万不能把其打进jar(或者war)包中去;(主要原因是Tomcat服务器中已经有个Servlet了;可以参考【附加:【Servlet】和【Spring MVC】的关系;【Servlet】体系简述;】)

          ● 我们引入jdbc依赖的时候,标准做法是设置成runtime;(自然,我们不配,让其默认为compile也不是不可以)


2.依赖范围,演示; 


二:依赖范围,具有传递性;

1.依赖范围的传递性,举例; 

(1)举例1;


(2) 举例2;


(3)举例3; 


(4)举例4; 


2.依赖范围的传递性,总结;

还行,挺容易理解的;

一:生命周期,简介;

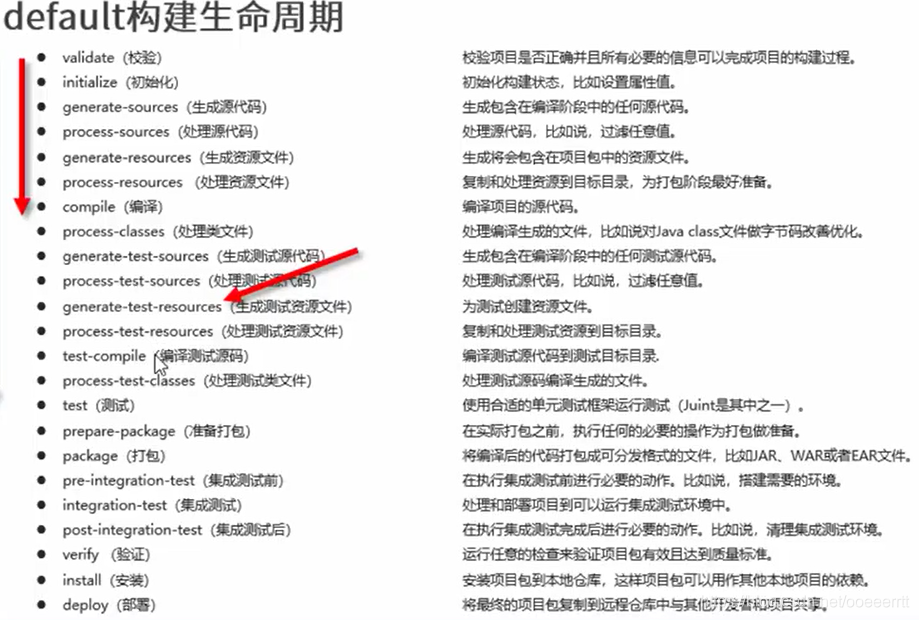
引例:maven项目构建生命周期:之:【核心工作】default生命周期;(这也是我们最常见的工作,对应的生命周期) 

项目的操作过程,称之为构建;在构建的时候,有对应的生命周期;

(1)比如,我们要想test测试,那么就肯定会经历compile(编译)、test-compile(测试代码编译)的过程;

(2)比如,我们想要package(打包),那么就肯定会经历compile(编译)、test-compile(测试代码编译)、test(测试)的过程;

(3)比如,我们想要install(项目发布到本地仓库),那么就肯定会经历compile(编译)、test-compile(测试代码编译)、test(测试)、package(打包)的过程;

0.maven项目构建生命周期:三种工作对应的生命周期,简介;

声明(这儿的理解,可能存在偏差,甚至是错误哦):可以这样认为:(1)maven可以做三类事:【清理工作】、【核心工作】、【产生报告,发布站点】;(2)maven想要做这三类事,都会调用一系列的事件;(3)自然,maven做这三类事,就分别有不同的生命周期;(比如,上面的【核心工作】生命周期,就是maven做核心工作时,对应的生命周期)

(1)maven项目构建生命周期:之:【清理工作】对应的生命周期;

(2)maven项目构建生命周期:之:【核心工作】对应的生命周期;

(3)maven项目构建生命周期:之:【产生报告】对应的生命周期;

1.maven项目构建生命周期:之:【清理工作】clean生命周期;

(1)maven做清理工作,就对应的是clean生命周期;

(2)clean声明周期中,需要调用pre-clean、clean、post-clean这三个事件;

2.maven项目构建生命周期:之:【核心工作】default生命周期;(这也是我们最常见工作,对应的生命周期) 

(1)maven做核心工作时,对应的就是default声明周期;

(2)可以看到,default声明周期中,需要调用很多事件,其中就包括需要我们着重了解的compile、test-compile、test、package、install等;

3.maven项目构建生命周期:之:【产生报告】site生命周期; 

(1)maven做产生报告、发布站点工作,就对应的是site生命周期;

(2)site声明周期中,需要调用pre-site、site、post-site、site-deploy这四个事件;


(1)比如,我们执行【test】,那么其会执行从【validate】到【test】的所有事件;

(2)这些事件具体的执行,就需要依靠插件了;


二:插件;

1.插件简介; 

(1)默认情况下,我们执行不同的工作,对应的生命周期中,具体执行到某个事件时,该做哪些动作(做这些事情的时候,会调用一些,maven指定好的插件);默认情况下,maven都是安排好的;

(2)但是,我们也可以自己去配插件,以实现,在某个生命周期的某个事件时,让其额外的做一些其他动作;(也就是说,在生命周期的某个事件时,在maven默认的安排之外,多执行一个(或多个)其他插件;)

2.maven中的插件; 

(1)通过【Maven – Available Plugins】可以去看下maven中有些插件;

(2)可以看到,在【一:生命周期,简介;】介绍的maven的三种生命周期中,只用到了maven所有插件的一部分;

(3)这儿以,打包类插件中的【source】这个打源码的插件为例,来演示【在maven生命周期的某个阶段,做一些maven安排之外的动作,也就是这儿的source打源码】


打开【source】链接,可以看下该插件的详细介绍; 

3.以【source】插件为例,演示自己去配置插件; 

在【web03】项目中,配置【source】插件;

 
  1. <plugin>
  2. <groupId>org.apache.maven.plugins</groupId>
  3. <artifactId>maven-source-plugin</artifactId>
  4. <version>2.2.1</version>
  5. <executions>
  6. <execution>
  7. <goals>
  8. <goal>jar</goal>
  9. </goals>
  10. <phase>generate-test-resources</phase>
  11. </execution>
  12. </executions>
  13. </plugin>
 

4.以【source】插件为例,演示自己去配置插件:效果; 

(1)演示1;

……………………………………………………

(2)演示2;

……………………………………………………

(3)演示3;

……………………………………………………

(4)演示4;

一:配置依赖;


二:依赖传递;

1.什么是依赖传递;

比如,我们在【Maven基础6、7、8:maven的常用命令;】创建了一个maven工程【project-java】,并且使用了【mvn install】,将前面打好的jar包(或者是war包)发布到本地仓库;(好处是:当我们把工程安装到本地仓库后,开发的其他项目也就可以引用这个打包好的jar包了);所以,我们在【Maven基础11:Tomcat插件;】创建的【web03】工程就可以引入【project-java】了;

2.直接依赖与间接依赖;

3.依赖传递的冲突问题;

应对策略:

比如,对于【web03】来说,直接在其pom.xml中直接引入的依赖就是1度资源,后面的以此类推;

          ● 路径优先:比如直接依赖就比间接依赖优先;间接的越深优先级越低;

          ● 声明优先:如果两个同级的依赖冲突了,谁先配置谁优先;

          ● 特殊优先:如果在同一个pom.xml中,不小心某个依赖写了两次,那么后写的生效;

4.可选依赖; 

(1)可选依赖是什么意思?


(2)可选依赖,具体可以这样做;

然后,记得重新调用下maven的install命令,重新打包上传到本地仓库;


(3)附加:对于那些我们不能控制的项目,如何设置;

这就涉及到了下面的【排除依赖】;

5.排除依赖;

(1)对于那些,不归我们控制的依赖,自然可以使用排除依赖; 


我们在排除依赖的时候,不需要指定版本;


(2)对于那些,我们能够控制的依赖,自然也可以使用排除依赖; 

自然,比如【web03】引用【project-java】的时候,就可以排除【project-java】用到的junit;


(3)可选依赖和排除依赖:区别;

可选依赖:是自己控制自己;别人引用自己的时候,如果不希望别人看到自己使用了哪个依赖,就可以设置可选依赖;

排除依赖:是我引用别人的依赖时,如果不想看到【别人依赖,使用了某个依赖】,就可以设置排除依赖;

一:比照着【Maven工程目录结构】,创建一个工程;

Demo类:

 
  1. package com.itheima;
  2.  
  3.  
  4. public class Demo{
  5. public String say(String name){
  6. System.out.println("hello "+name);
  7. return "hello "+name;
  8. }
  9. }


DemoTest类:

 
  1. package.com.itheima;
  2. import org.junit.Test;
  3. import org.junit.Assert;
  4.  
  5.  
  6. public class DemoTest{
  7. @Test
  8. public void testSay(){
  9. Demo d = new Demo();
  10. String ret = d.say("maven");
  11. Assert.assertEquals(ret,"hello maven");
  12. }
  13. }
 

(1)Assert断言,即对某种情况进行判断的语言;Assert.assertEquals(预计值,真实值):判断预计值和真实值是否一致;


pom.xml:

 
  1. <?xml version="1.0" encoding="UTF-8"?>
  2. <project xmlns="http://maven.apache.org/POM/4.0.0"
  3. xmlns:xsi="http://www.w3.org/2001/XMLSchema-instance"
  4. xsi:schemaLocation="http://maven.apache.org/POM/4.0.0 http://maven.apache.org/xsd/maven-4.0.0.xsd">
  5. <modelVersion>4.0.0</modelVersion>
  6.  
  7. <groupId>com.itheima</groupId>
  8. <artifactId>project</artifactId>
  9. <version>1.0-SNAPSHOT</version>
  10.  
  11.  
  12. <packaging>jar</packaging>
  13.  
  14.  
  15.  
  16. <dependencies>
  17. <dependency>
  18. <groupId>junit</groupId>
  19. <artifactId>junit</artifactId>
  20. <version>4.12</version>
  21. </dependency>
  22. </dependencies>
  23.  
  24.  
  25. </project>
 

(1)内容说明;

……………………………………………………

至此,我们就比照着【Maven工程目录结构】,创建了一个工程;


二:Maven常用命令;(mvn compile;mvn test;mvn package;mvn clean;mvn install;)

(1)在工程的pom.xml所在目录,通过命令行窗口,执行【mvn compile】命令,去编译项目;

(2)上面编译的东西,我们不想要了;执行【mvn clean】命令,去清除编译的内容(也就是target了);


(3)使用【mvn test】命令,去测试所有测试类中的代码;

(4)使用【mvn package】,进行项目打包;

5.使用【mvn install】,将前面打好的jar包(或者是war包)发布到本地仓库;(好处是:当我们把工程安装到本地仓库后,开发的其他项目也就可以引用这个打包好的jar包了);


三:使用【mvn  archetype:generate】指令,创建maven结构的工程;

其实,maven也提供了【mvn  archetype:generate】指令,来帮助我们创建Maven结构的工程;可以采用如下面的一步到位的方式,也可以采用【Maven九:Maven的常用命令;】中逐步设置的方式;

1.java工程(非web) 

mvn archetype:generate -DgroupId=com.itheima -DartifactId=java-project -DarchetypeArtifactId=maven-archetype-quickstart -Dversion=0.0.1-snapshot -DinteractiveMode=false

2.java工程(web); 

mvn archetype:generate -DgroupId=com.itheima -DartifactId=web-project -DarchetypeArtifactId=maven-archetype-webapp -Dversion=0.0.1-snapshot -DinteractiveMode=false

这儿的内容其实还好,没必要记忆,主要是理解一下maven提供了一个原生的【mvn  archetype:generate】指令,其可以创建maven结构的工程;就行了;


0:本专栏内容说明;-CSDN博客

一、pom文件格式


  1. <!-- Maven pom对象模型版本号 -->
  2. <modelVersion></modelVersion>
  3. <!-- 打包方式,web工程打包为war,java工程打包为jar(默认) -->
  4. <packaging></packaging>
  5.  
  6. <!-- 组织id -->
  7. <groupId></groupId>
  8. <!-- 项目id -->
  9. <artifactId></artifactId>
  10. <!-- 版本号:release(完成版)snapshot(开发版) -->
  11. <version></version>
  12.  
  13. <!-- 项目名称 -->
  14. <name></name>
  15. <!-- 项目描述 -->
  16. <description></description>
  17.  
  18. <!-- 项目运行依赖的资源 -->
  19. <dependencies>
  20. <dependencie></dependencie>
  21. </dependencies>
  22.  
  23. <!-- 项目构建 -->
  24. <build>
  25. <!-- 项目插件 -->
  26. <plugins>
  27. <plugin></plugin>
  28. </plugins>
  29. </build>


二、maven命令

        mvn complie 编译源代码

        mvn deploy 发布项目(私服)

        mvn test 运行测试单元

        mvn clean 清除编译结果

        mvn package 将项目工程打包成JAR或者其他格式的包

        mvn assembly 自定义打包

        mvn install 将打包的程序放入仓库


三、mvn创建工程模板


  1. mvn archetype:generate
  2. -DgroupId=com.star
  3. -DartifactId=maven-stu
  4. -DarchetypeArtifactId=maven-archetype-quickstart # 工程模板
  5. -DinteractiveMode=false


四、依赖管理

1、依赖传递

        依赖具有传递性。

        直接依赖:在当前项目中通过依赖配置建立的依赖关系。

        间接依赖:被资源的资源如果依赖其他资源,当前项目间接依赖其他资源。


2、依赖冲突问题

        路径优先:当依赖中出现相同的资源时,层级越深,优先级越低,层级越浅,优先级越高。

        生命优先:当资源在相同层级被依赖时,配置顺序靠前的覆盖顺序配置靠后的。

        特殊优先:当同级配置了相同资源的不同版本,后配置的覆盖先配置的。


3、可选依赖

        可选依赖指对外隐藏当前依赖的资源--不透明

 
  1. <dependency>
  2. <groupId></groupId>
  3. <artifactId></artifactId>
  4. <version></version>
  5. <!-- 隐藏当前依赖的资源 -->
  6. <optional>true</optional>
  7. </dependency>


4、排除依赖

        排除依赖指主动断开依赖的资源,并排除的资源无需指定版本。

 
  1. <dependency>
  2. <groupId></groupId>
  3. <artifactId></artifactId>
  4. <version></version>
  5. <!-- 排除依赖 -->
  6. <exclusions>
  7. <exclusion>
  8. <groupId>org.hamcrest</groupId>
  9. <artifactId>hamcrest-core</artifactId>
  10. </exclustion>
  11. </exclusions>
  12. </dependency>


5、依赖作用范围

        依赖的jar默认情况可以在任何地方使用,可以通过scope标签设定其作用范围。

        作用范围:

                主程序范围有效

                测试程序范围有效

                是否参与打包

compile(默认) 主代码有效 测试代码有效 打包有效
test 主代码无效 测试代码有效 打包无效
provided 主代码有效 测试代码有效 打包无效
runtime 主代码无效 测试代码无效 打包有效


五、maven生命周期与插件

1、生命周期


2、插件


  1. <build>
  2. <!-- 插件 -->
  3. <plugins>
  4. <plugin>
  5. <groupId>org.apache.maven.plugins</group>
  6. <artifactId>maven-source-plugin</artifactId>
  7. <version>2.2.1</version>
  8. <!-- 插件的执行器 -->
  9. <executions>
  10. <execution>
  11. <!-- 插件的执行类型 -->
  12. <goals>
  13. <goal>jar</goal>
  14. </goals>
  15. <!-- 插件的生命周期 -->
  16. <phase>generate-test-resources</phase>
  17. </execution>
  18. <executions>
  19. </plugin>
  20. </plugins>
  21. </build>


六、多模块聚合

        构建用于一次性管理多个maven工程,只保留pom文件。

 
  1. <!-- 定义工程用于构建管理 -->
  2. <packaging>pom</packaging>
  3.  
  4. <!-- 管理的工程列表 -->
  5. <modules>
  6. <module>../module1</module>
  7. <module>../module2</module>
  8. </modules>
 

        注:参与聚合操作的模块最终执行顺序与模块间的依赖关系有关,与配置顺序无关。


七、多模块继承

1、构建管理工程

 
  1. <!-- 声明此处进行依赖管理 -->
  2. <dependencyManagement>
  3. <!-- 项目运行依赖的资源 -->
  4. <dependencies>
  5. <dependencie></dependencie>
  6. </dependencies>
  7. </dependencyManagement>
  8.  
  9. <!-- 声明此处进行插件管理 -->
  10. <pluginManagement>
  11. <!-- 项目运行使用的插件 -->
  12. <plugins>
  13. <plugin></plugin>
  14. </plugins>
  15. </pluginManagement>


2、构建被管理工程

 
  1. <!-- 声明父工程 -->
  2. <parent>
  3. <groupId></groupId>
  4. <artifactId></artifactId>
  5. <version></version>
  6. <!-- 父工程相对路径 -->
  7. <relativePath>../ssm/pom.xml</relativePath>
  8. </parent>
 

        注:子工程应该与父工程的组织id、版本号相同,故不建议写。

        注:如果父工程中存在版本号,子工程的dependencie和plugin无需指定版本号


3、可以继承的资源


4、继承和聚合对比:

        作用:

                聚合用于快速构建项目。

                继承用于快速配置。

        相同点:

                聚合与继承的pom.xml文件打包方式均为pom,可以将两种关系制作到同一个pom文件中。

                聚合与继承均属于设计性模块,并无实际的模块内容。

        不同点:

                集合实在当前模块中配置关系,聚合可以感知参与聚合的模块有哪些。

                聚合时在子模块中配置关系,父模块无法感知那些子模块继承了自己。


八、属性

1、定义属性


  1. <properties>
  2. <spring.version>5.1.9.REPLEASE</spring.version>
  3. </properties>
 

        注:spring.version 属性名 5.1.9.REPLEASE 属性值


2、使用属性

 
  1. <dependency>
  2. <groupId></groupId>
  3. <artifactId></artifactId>
  4. <version>${spring.version}</version>
  5. </dependency>


3、属性类别

        ①自定义属性

                properties中定义的属性

        ②内置属性

                ${basedir}

                ${version}

        ③Setting属性

                使用Maben配置文件setting.xml中的标签属性

                ${settings.localRepository}

        ④Java系统属性

                ${user.home}

        ⑤环境变量属性


九、配置资源文件

 
  1. <!-- 指定资源文件路径 -->
  2. <resources>
  3. <resource>
  4. <directory>ssm_dao/src/main/resources</directory>
  5. <filtering>true</filtering>
  6. </resource>
  7. </resources>


十、多环境配置

1、创建多环境


  1. <!-- 创建多环境(开发环境和测试环境直接切换) -->
  2. <profiles>
  3. <profile>
  4. <!-- 环境名称 -->
  5. <id>pro_env</id>
  6. <!-- 环境中使用的属性值 -->
  7. <properties>
  8. <jdbc.url>jdbc:mysql://172.0.0.1:3306/ssm_db</jdbc.url>
  9. </properties>
  10. <!-- 设置默认启动 -->
  11. <activation>
  12. <activeByDefault>true</activeByDefault>
  13. </activetion>
  14. </profile>
  15. <profile>
  16. <id>dev_env</id>
  17. <properties>
  18. <jdbc.url>jdbc:mysql://172.0.0.2:3306/ssm_db</jdbc.url>
  19. </properties>
  20. </profile>
  21. </profiles>


2、使用指定环境

mvn install -P 环境名称


十一、跳过测试环节

1、点击取消test


2、mvn install -D shipTests


3、通过配置跳过


  1. <plugin>
  2. <artifactId>maven-surefire-plugin</artifactId>
  3. <version>2.22.1</version>
  4. <configuration>
  5. <!-- 跳过测试 -->
  6. <skipTests>true</skipTests>
  7. <!-- 包含指定的测试用例 -->
  8. <includes>
  9. <incude>**/User*Test.java</inlude>
  10. </includes>
  11. <!-- 排除指定的测试用例 -->
  12. <excludes>
  13. <exclude>**、User*TestCase.java</exclude>
  14. </excludes>
  15. </configuration>
  16. </plugin>
 
posted @ 2024-03-26 10:59  CharyGao  阅读(3765)  评论(0编辑  收藏  举报