
Spring Security OAuth2登录+四种授权模式
Spring Security OAuth2登录
概述
OAuth 2.0 不是身份认证协议。
什么是身份认证?身份认证是解决“你是谁?”的问题。身份认证会告诉应用当前用户是谁以及是否在使用此应用。实际中可能还会告诉你用户的名称,邮箱,手机号等。
如果对 OAuth 2.0 进行扩展,使得授权服务器和受保护资源发出的信息能够传达与用户以及他们的身份认证上下文有关的信息,我们就可以为客户端提供用于用户安全登录的所有信息。这种基于OAuth 2.0授权协议而构建的身份认证方式主要优点:
- 用户在授权服务器上执行身份认证, 最终用户的原始凭据不会通过 OAuth 2.0 协议传送到客户端应用。
- 允许用户在运行时执行同意决策。
- 用户还可以将其他受保护 API 与他的身份信息的访问权限一起授权出去。通过一个调用,应用就可以知道用户是否已登录,如何称呼用户,用户的手机号,邮箱等。
本文我们将通过OAuth 2.0 授权码模式安全的传递授权服务用户信息,并登录到客户端应用。
本文您将学到:
-
搭建基本的授权服务和客户端服务
-
自定义授权服务器访问令牌,添加角色信息
-
自定义授权服务器用户信息端点
-
客户端服务使用
GrantedAuthoritiesMapper做权限映射 -
客户端服务自定义OAuth2UserService实现解析多层Json数据
OAuth2授权服务器
本节我们将使用Spring Authorization Server搭建一个授权服务器。除此之外我们还将会自定义access_token和自定义用户信息端点。
maven
<dependency>
  <groupId>org.springframework.boot</groupId>
  <artifactId>spring-boot-starter-security</artifactId>
  <version>2.6.7</version>
</dependency>

<dependency>
  <groupId>org.springframework.security</groupId>
  <artifactId>spring-security-oauth2-authorization-server</artifactId>
  <version>0.3.1</version>
</dependency>

<dependency>
  <groupId>org.springframework.boot</groupId>
  <artifactId>spring-boot-starter-web</artifactId>
  <version>2.6.7</version>
</dependency>
配置
首先通过application.yml配置服务端口8080:
server:
  port: 8080
接下来我们将创建OAuth2ServerConfig配置类,定义OAuth2 授权服务所需特定Bean。首先我们注册一个OAuth2客户端:
@Bean
public RegisteredClientRepository registeredClientRepository() {
  RegisteredClient registeredClient = RegisteredClient.withId(UUID.randomUUID().toString())
    .clientId("relive-client")
    .clientSecret("{noop}relive-client")
    .clientAuthenticationMethods(s -> {
      s.add(ClientAuthenticationMethod.CLIENT_SECRET_POST);
      s.add(ClientAuthenticationMethod.CLIENT_SECRET_BASIC);
    })
    .authorizationGrantType(AuthorizationGrantType.AUTHORIZATION_CODE)
    .authorizationGrantType(AuthorizationGrantType.REFRESH_TOKEN)
    .redirectUri("http://127.0.0.1:8070/login/oauth2/code/messaging-client-authorization-code")
    .scope(OidcScopes.PROFILE)
    .clientSettings(ClientSettings.builder()
                    .requireAuthorizationConsent(true)
                    .requireProofKey(false)
                    .build())
    .tokenSettings(TokenSettings.builder()
                   .accessTokenFormat(OAuth2TokenFormat.SELF_CONTAINED)
                   .idTokenSignatureAlgorithm(SignatureAlgorithm.RS256)/
                   .accessTokenTimeToLive(Duration.ofSeconds(30 * 60))
                   .refreshTokenTimeToLive(Duration.ofSeconds(60 * 60))
                   .reuseRefreshTokens(true)
                   .build())
    .build();
  return new InMemoryRegisteredClientRepository(registeredClient);
}以上将OAuth2客户端存储在内存中,如果您需要使用数据库持久化,请参考文章将JWT与Spring Security OAuth2结合使用。指定OAuth2客户端信息如下:
- clientId: relive-client
- clientSecret: relive-client
- redirectUri: http://127.0.0.1:8070/login/oauth2/code/messaging-client-authorization-code
- scope: profile
接下来让我们配置OAuth2授权服务其他默认配置,并对未认证的授权请求重定向到登录页面:
@Bean
@Order(Ordered.HIGHEST_PRECEDENCE)
public SecurityFilterChain authorizationServerSecurityFilterChain(HttpSecurity http) throws Exception {
  OAuth2AuthorizationServerConfiguration.applyDefaultSecurity(http);

  return http
    .exceptionHandling(exceptions -> exceptions.
                       authenticationEntryPoint(new LoginUrlAuthenticationEntryPoint("/login")))
    .build();
}
授权服务器token令牌格式使用JWT RFC 7519,所以我们需要用于令牌的签名密钥,让我们生成一个RSA密钥:
@Bean
public JWKSource<SecurityContext> jwkSource() {
  RSAKey rsaKey = Jwks.generateRsa();
  JWKSet jwkSet = new JWKSet(rsaKey);
  return (jwkSelector, securityContext) -> jwkSelector.select(jwkSet);
}

static class Jwks {

  private Jwks() {
  }

  public static RSAKey generateRsa() {
    KeyPair keyPair = KeyGeneratorUtils.generateRsaKey();
    RSAPublicKey publicKey = (RSAPublicKey) keyPair.getPublic();
    RSAPrivateKey privateKey = (RSAPrivateKey) keyPair.getPrivate();
    return new RSAKey.Builder(publicKey)
      .privateKey(privateKey)
      .keyID(UUID.randomUUID().toString())
      .build();
  }
}

static class KeyGeneratorUtils {

  private KeyGeneratorUtils() {
  }

  static KeyPair generateRsaKey() {
    KeyPair keyPair;
    try {
      KeyPairGenerator keyPairGenerator = KeyPairGenerator.getInstance("RSA");
      keyPairGenerator.initialize(2048);
      keyPair = keyPairGenerator.generateKeyPair();
    } catch (Exception ex) {
      throw new IllegalStateException(ex);
    }
    return keyPair;
  }
}
接下来我们将自定义access_token 访问令牌,并在令牌中添加角色信息:
@Configuration(proxyBeanMethods = false)
public class AccessTokenCustomizerConfig {

    @Bean
    public OAuth2TokenCustomizer<JwtEncodingContext> tokenCustomizer() {
        return (context) -> {
            if (OAuth2TokenType.ACCESS_TOKEN.equals(context.getTokenType())) {
                context.getClaims().claims(claim -> {
                    claim.put("role", context.getPrincipal().getAuthorities().stream()
                            .map(GrantedAuthority::getAuthority).collect(Collectors.toSet()));
                });
            }
        };
    }
}
可以看到Spring Security为我们提供了OAuth2TokenCustomizer用于扩展令牌信息,我们从OAuth2TokenContext获取到当前用户信息,并从中提取Authorities权限信息添加到JWT的claim。
下面我们将创建Spring Security配置类,配置授权服务基本的认证能力。
@Configuration(proxyBeanMethods = false)
public class DefaultSecurityConfig {

    @Bean
    public SecurityFilterChain defaultSecurityFilterChain(HttpSecurity http) throws Exception {
        http.authorizeRequests()
                .antMatchers("/userInfo")
                .access("hasAnyAuthority('SCOPE_profile')")
                .mvcMatchers("/userInfo")
                .access("hasAuthority('SCOPE_profile')")
                .anyRequest().authenticated()
                .and()
                .formLogin(Customizer.withDefaults())
                .oauth2ResourceServer(OAuth2ResourceServerConfigurer::jwt);
        return http.build();
    }

    @Bean
    public JwtDecoder jwtDecoder(JWKSource<SecurityContext> jwkSource) {
        return OAuth2AuthorizationServerConfiguration.jwtDecoder(jwkSource);
    }

    @Bean
    public UserDetailsService users() {
        UserDetails user = User.withDefaultPasswordEncoder()
                .username("admin")
                .password("password")
                .roles("ADMIN")
                .build();
        return new InMemoryUserDetailsManager(user);
    }
}在上述配置类中,我们做了以下几件事。1.启用Form认证方式;2.配置登录用户名密码;3.使用oauth2ResourceServer()配置JWT验证,并声明JwtDecoder;4.保护/userInfo端点需要profile权限进行访问。
此时我们还需要创建Controller类,用于提供给OAuth2客户端服务获取用户信息:
@RestController
public class UserInfoController {

    @PostMapping("/userInfo")
    public Map<String, Object> getUserInfo(@AuthenticationPrincipal Jwt jwt) {
        return Collections.singletonMap("data", jwt.getClaims());
    }
}
我们将用户信息使用以下JSON格式返回:
{
  "data":{
    "sub":"admin"
    ...
  }
}
OAuth2客户端服务
本节将使用Spring Security配置OAuth2客户端登录;并且我们将使用GrantedAuthoritiesMapper映射权限信息;还将通过自定义实现OAuth2UserService替换原有DefaultOAuth2UserService,用于解析多层JSON 用户信息数据。
maven
<dependency>
  <groupId>org.springframework.boot</groupId>
  <artifactId>spring-boot-starter-web</artifactId>
  <version>2.6.7</version>
</dependency>
<dependency>
  <groupId>org.springframework.boot</groupId>
  <artifactId>spring-boot-starter-security</artifactId>
  <version>2.6.7</version>
</dependency>
<dependency>
  <groupId>org.springframework.boot</groupId>
  <artifactId>spring-boot-starter-oauth2-client</artifactId>
  <version>2.6.7</version>
</dependency>

<dependency>
  <groupId>org.springframework.boot</groupId>
  <artifactId>spring-boot-starter-thymeleaf</artifactId>
  <version>2.6.7</version>
</dependency>
配置
首先我们指定客户端服务端口号8070,并配置OAuth2客户端相关信息:
server:
  port: 8070
  servlet:
    session:
      cookie:
        name: CLIENT-SESSION

spring:
  security:
    oauth2:
      client:
        registration:
          messaging-client-authorization-code:
            provider: client-provider
            client-id: relive-client
            client-secret: relive-client
            authorization-grant-type: authorization_code
            redirect-uri: "{baseUrl}/login/oauth2/code/{registrationId}"
            scope: profile
            client-name: messaging-client-authorization-code
        provider:
          client-provider:
            authorization-uri: http://127.0.0.1:8080/oauth2/authorize
            token-uri: http://127.0.0.1:8080/oauth2/token
            user-info-uri: http://127.0.0.1:8080/userInfo
            user-name-attribute: data.sub
            user-info-authentication-method: form
接下来配置Spring Security相关Bean,首先我们先启用Form表单认证和OAuth2登录能力:
@Bean
SecurityFilterChain securityFilterChain(HttpSecurity http) throws Exception {
  http.authorizeHttpRequests()
    .anyRequest()
    .authenticated()
    .and()
    .formLogin(from -> {
      from.defaultSuccessUrl("/home");
    })
    .oauth2Login(Customizer.withDefaults())
    .csrf().disable();
  return http.build();
}
这里我们指定认证成功后重定向到/home路径下。
下面我们使用GrantedAuthoritiesMapper映射用户权限:
@Bean
GrantedAuthoritiesMapper userAuthoritiesMapper() {
  //角色映射关系,授权服务器ADMIN角色对应客户端OPERATION角色
  Map<String, String> roleMapping = new HashMap<>();
  roleMapping.put("ROLE_ADMIN", "ROLE_OPERATION");
  return (authorities) -> {
    Set<GrantedAuthority> mappedAuthorities = new HashSet<>();
    authorities.forEach(authority -> {
      if (OAuth2UserAuthority.class.isInstance(authority)) {
        OAuth2UserAuthority oauth2UserAuthority = (OAuth2UserAuthority) authority;
        Map<String, Object> userAttributes = oauth2UserAuthority.getAttributes();
        List<String> role = (List) userAttributes.get("role");
        role.stream().map(roleMapping::get)
          .filter(StringUtils::hasText)
          .map(SimpleGrantedAuthority::new)
          .forEach(mappedAuthorities::add);
      }
    });
    return mappedAuthorities;
  };
}上述将OAuth2授权服务ADMIN角色映射为客户端角色OPERATION。当然你同样可以扩展为数据库操作,那么需要你维护授权服务角色与客户端服务角色映射表,这里将不展开。
GrantedAuthoritiesMapper作为权限映射器在OAuth2登录,CAS登录,SAML和LDAP多方使用。
GrantedAuthoritiesMapper在OAuth2LoginAuthenticationProvider中源码如下:
@Override
public Authentication authenticate(Authentication authentication) throws AuthenticationException {
    OAuth2LoginAuthenticationToken loginAuthenticationToken = (OAuth2LoginAuthenticationToken) authentication;
    //...省略部分源码

    /* map authorities */
    Collection<? extends GrantedAuthority> mappedAuthorities = this.authoritiesMapper
      .mapAuthorities(oauth2User.getAuthorities());
    /* map authorities */

    OAuth2LoginAuthenticationToken authenticationResult = new OAuth2LoginAuthenticationToken(
      loginAuthenticationToken.getClientRegistration(), loginAuthenticationToken.getAuthorizationExchange(),
      oauth2User, mappedAuthorities, accessToken, authorizationCodeAuthenticationToken.getRefreshToken());
    authenticationResult.setDetails(loginAuthenticationToken.getDetails());
    return authenticationResult;
}所以当我们自定义实现GrantedAuthoritiesMapper后,OAuth2 登录成功后将映射后的权限信息存储在认证信息Authentication的子类OAuth2LoginAuthenticationToken中,在后续流程中需要时获取。
接下来将实现OAuth2UserService自定义DefaultJsonOAuth2UserService类。当然Spring Security提供了DefaultOAuth2UserService,那么为什么不使用它呢?原因很简单,首先让我们回顾授权服务器返回用户信息格式:
{
  "data":{
    "sub":"admin"
    ...
  }
}
不错,用户信息嵌套data字段中,而DefaultOAuth2UserService处理用户信息响应时并没有处理这个格式,以下是DefaultOAuth2UserService源码:
public OAuth2User loadUser(OAuth2UserRequest userRequest) throws OAuth2AuthenticationException {
        Assert.notNull(userRequest, "userRequest cannot be null");
        if (!StringUtils.hasText(userRequest.getClientRegistration().getProviderDetails().getUserInfoEndpoint().getUri())) {
            OAuth2Error oauth2Error = new OAuth2Error("missing_user_info_uri", "Missing required UserInfo Uri in UserInfoEndpoint for Client Registration: " + userRequest.getClientRegistration().getRegistrationId(), (String)null);
            throw new OAuth2AuthenticationException(oauth2Error, oauth2Error.toString());
        } else {
            String userNameAttributeName = userRequest.getClientRegistration().getProviderDetails().getUserInfoEndpoint().getUserNameAttributeName();
            if (!StringUtils.hasText(userNameAttributeName)) {
                OAuth2Error oauth2Error = new OAuth2Error("missing_user_name_attribute", "Missing required \"user name\" attribute name in UserInfoEndpoint for Client Registration: " + userRequest.getClientRegistration().getRegistrationId(), (String)null);
                throw new OAuth2AuthenticationException(oauth2Error, oauth2Error.toString());
            } else {
                RequestEntity<?> request = (RequestEntity)this.requestEntityConverter.convert(userRequest);
               /* 获取用户信息 */
              ResponseEntity<Map<String, Object>> response = this.getResponse(userRequest, request);
                //在这里直接获取响应体信息,默认此userAttributes包含相关用户信息,并没有解析多层JSON
                Map<String, Object> userAttributes = (Map)response.getBody();
               /* 获取用户信息 */
                Set<GrantedAuthority> authorities = new LinkedHashSet();
                authorities.add(new OAuth2UserAuthority(userAttributes));
                OAuth2AccessToken token = userRequest.getAccessToken();
                Iterator var8 = token.getScopes().iterator();

                while(var8.hasNext()) {
                    String authority = (String)var8.next();
                    authorities.add(new SimpleGrantedAuthority("SCOPE_" + authority));
                }

                return new DefaultOAuth2User(authorities, userAttributes, userNameAttributeName);
            }
        }
    }
而最后创建DefaultOAuth2User时,你可能会收到以下错误信息
Missing attribute 'sub' in attributes通过上面源码,Spring Security 所希望返回的用户信息格式:
{
  "sub":"admin",
  ...
}
但是实际中,我们开发时通常会统一返回响应格式。例如:
{
  "code":200,
  "message":"success",
  "data":{
    "sub":"admin",
    ...
  }
}
下面我们是我们通过以userNameAttributeName以 . 为分割符,提取用户信息实现,以下只展示部分代码,其余代码和DefaultOAuth2UserServicey源码相同。
首先我们新建工具类JsonHelper用于解析Json
@Slf4j
public class JsonHelper {
    private static final JsonHelper.MapTypeReference MAP_TYPE = new JsonHelper.MapTypeReference();

    private static ObjectMapper mapper;

    private JsonHelper() {
    }

    static {
        mapper = new ObjectMapper();
        mapper.configure(DeserializationFeature.FAIL_ON_UNKNOWN_PROPERTIES, false);
    }

    public static JsonNode getFirstNode(final JsonNode node, final String path) {
        JsonNode resultNode = null;
        if (path != null) {
            resultNode = getElement(node, path);
        }
        return resultNode;
    }

    public static JsonNode getElement(final JsonNode json, final String name) {
        if (json != null && name != null) {
            JsonNode node = json;
            for (String nodeName : name.split("\\.")) {
                if (node != null) {
                    if (nodeName.matches("\\d+")) {
                        node = node.get(Integer.parseInt(nodeName));
                    } else {
                        node = node.get(nodeName);
                    }
                }
            }
            if (node != null) {
                return node;
            }
        }
        return null;
    }


    public static Map<String, Object> parseMap(String json) {
        try {
            return mapper.readValue(json, MAP_TYPE);
        } catch (JsonProcessingException e) {
            log.error("Cannot convert json to map");
        }
        return null;
    }

    private static class MapTypeReference extends TypeReference<Map<String, Object>> {
        private MapTypeReference() {
        }
    }
}
新建DefaultJsonOAuth2UserService实现OAuth2UserService,添加多层JSON提取用户信息逻辑:
public class DefaultJsonOAuth2UserService implements OAuth2UserService<OAuth2UserRequest, OAuth2User> {

    //...

    @Override
    public OAuth2User loadUser(OAuth2UserRequest userRequest) throws OAuth2AuthenticationException {
        //...省略部分代码
        RequestEntity<?> request = this.requestEntityConverter.convert(userRequest);
        ResponseEntity<JsonNode> response = getResponse(userRequest, request);
        JsonNode responseBody = response.getBody();

        //多层JSON提取用户信息属性
        Map<String, Object> userAttributes = new HashMap<>();
        if (userNameAttributeName.contains(".")) {
          String firstNodePath = userNameAttributeName.substring(0, userNameAttributeName.lastIndexOf("."));
          userAttributes = this.extractUserAttribute(responseBody, firstNodePath);
          userNameAttributeName = userNameAttributeName.substring(firstNodePath.length() + 1);
        } else {
          userAttributes = JsonHelper.parseMap(responseBody.toString());
        }

        //...省略部分代码
    }
}
如您需要参考详细代码,请查阅文末源码链接获取。
最后我们创建Controller类,使用thymeleaf引擎构建首页信息,不同权限信息看到首页列表结果不同:
@Controller
public class HomeController {

    private static Map<String, List<String>> articles = new HashMap<>();

    static {
        articles.put("ROLE_OPERATION", Arrays.asList("Java"));
        articles.put("ROLE_SYSTEM", Arrays.asList("Java", "Python", "C++"));
    }

    @GetMapping("/home")
    public String home(Authentication authentication, Model model) {
        String authority = authentication.getAuthorities().iterator().next().getAuthority();
        model.addAttribute("articles", articles.get(authority));
        return "home";
    }
}
测试
我们启动服务后,访问http://127.0.0.1:8070/login, 登录成功后,您将会看到:
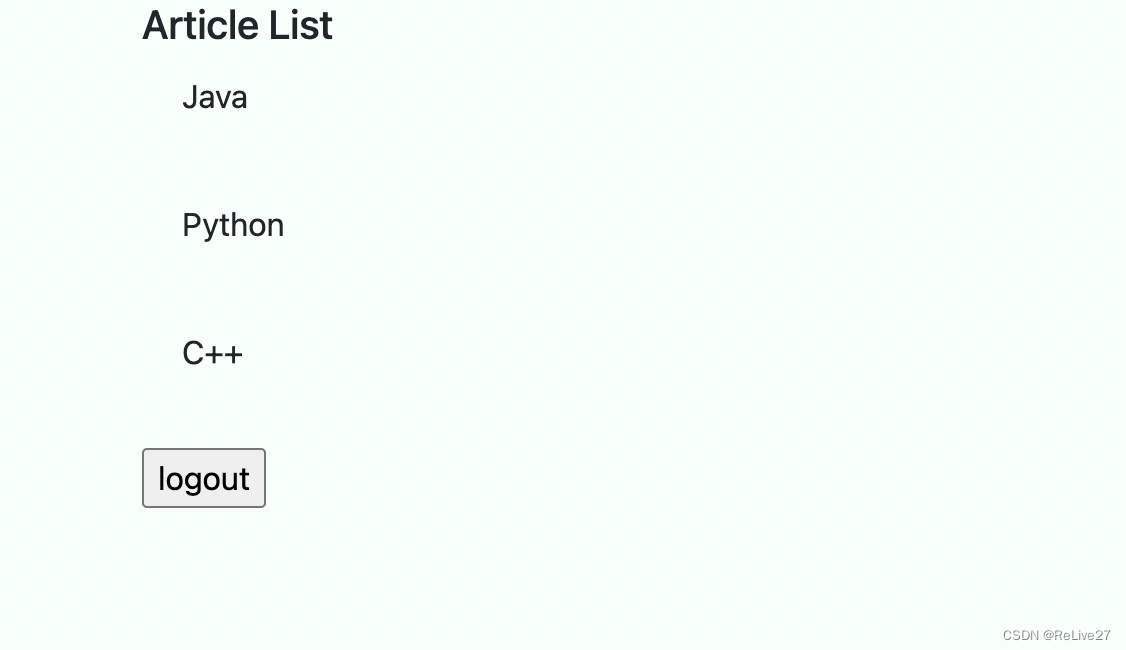
之后我们退出登录,使用OAuth2 方式登录,您将会看到不同信息:

结论
我们使用OAuth2.0 授权协议上构建身份认证证明是可行的。但是我们不能忽略在这之间的陷阱。
-
令牌本身并不传递有关身份认证事件的信息。令牌可能是直接颁发给客户端的,使用的是无须用户交互的 OAuth 2.0 客户端凭据模式。
-
客户端都无法从访问令牌中得到关于用户及其登录状态的信息。OAuth 2.0 访问令牌的目标受众是资源服务器。(在本文中我们使用JWT访问令牌,通过自定义访问令牌信息使客户端服务获取用户权限等信息,但是OAuth2.0 协议中并没有定义访问令牌格式,我们仅是使用了JWT的特性来做到这一点。)
-
客户端可以出示访问令牌给资源服务获取用户信息,所以很容易就认为只要拥有一个有效的访问令牌,就能证明用户已登录,这一思路仅在某些情况下是正确的,即用户在授权服务器上完成身份认证,刚生成访问令牌的时候。(因为访问令牌有效期可能远长与身份认证会话有效期)
-
基于OAuth2.0的用户信息API的最大问题是,不同身份提供者实现用户信息API必然不同。用户的唯一标识可能是“user_id",也可能是“sub”。
所以我们需要统一的OAuth2.0为基础的标准身份认证协议。OpenID Connect 是一个开放标准,它定义了一种使用 OAuth 2.0 执行用户身份认证的互通方式。这将在后续文章中介绍它。
与往常一样,本文中使用的源代码可在 GitHub 上获得。
Spring Security OAuth2登录_oauth2完整登录-CSDN博客
上一篇文章:Spring Security + OAuth2.0项目搭建:https://blog.csdn.net/qq_42402854/article/details/123057625
接着认识 Oauth2的四种授权模式。
一、Oauth2认证服务
在项目中,我们采用将用户,客户端,token等数据保存在数据库中。
1、认证服务具体配置
1.1 YML配置文件
server:
  port: 18091

# jsp配置
spring:
  application:
    # 服务实例名,每个服务名必须唯一
    name: OAUTH-SERVER
  datasource:
    driver-class-name: com.mysql.cj.jdbc.Driver
    url: jdbc:mysql://localhost:3306/security_authority?useUnicode=true;characterEncoding=utf8;useSSL=true;serverTimezone=GMT
    username: root
    password: 123456
    main:
      allow-bean-definition-overriding: true #允许我们自己覆盖spring放入到IOC容器的对象

# mybatis配置
mybatis:
  configuration:
    map-underscore-to-camel-case: true
  mapper-locations: classpath:mybatis/mapper/*.xml

logging:
  level:
    com.charge.learn.springsecurity.oauth2.parent.oauth.dao: debug

eureka:
  instance:
    # 服务主机名称
    hostname: localhost
  client:
    service-url:
      defaultZone: http://admin:1qaz2wsx@${eureka.instance.hostname}:18090/eureka/
1.2 SpringSecurity配置类
@Configuration
@EnableWebSecurity
@EnableGlobalMethodSecurity(securedEnabled = true) // 开启SpringSecurity权限注解
public class WebSecurityConfig extends WebSecurityConfigurerAdapter {

	@Autowired
	private SysUserService userService;

	// 密码解析器注入IOC容器
	@Bean
	public BCryptPasswordEncoder passwordEncoder() {
		return new BCryptPasswordEncoder();
	}

	// 指定认证对象的来源
	@Override
	public void configure(AuthenticationManagerBuilder auth) throws Exception {
		auth.userDetailsService(userService).passwordEncoder(passwordEncoder());
	}

	// SpringSecurity配置信息
	@Override
	public void configure(HttpSecurity http) throws Exception {
		// 这里简单点,使用默认的认证页面
		http.authorizeRequests()
				.anyRequest().authenticated() //所有资源必须授权后访问
				.and()
				.formLogin()
				.loginProcessingUrl("/login")
				.permitAll() //指定认证页面可以匿名访问
				.and()
				.csrf()//关闭跨站请求防护
				.disable();
	}

	/**
	 * AuthenticationManager对象在OAuth2认证服务中要使用,提前注入IOC容器中,即就变成了 Oauth2授权认证。只给授权码模式使用,其他模式可以不写
	 * @return
	 * @throws Exception
	 */
	@Bean
	@Override
	public AuthenticationManager authenticationManagerBean() throws Exception {
		return super.authenticationManagerBean();
	}
}
1.3 OAuth2授权配置类
@Configuration
@EnableAuthorizationServer
public class OauthServerConfig extends AuthorizationServerConfigurerAdapter {

    //数据库连接池对象
    @Autowired
    private DataSource dataSource;

    //认证业务对象
    @Autowired
    private SysUserService userService;

    //授权模式专用对象
    @Autowired
    private AuthenticationManager authenticationManager;

    //客户端信息来源
    @Bean
    public JdbcClientDetailsService jdbcClientDetailsService(){
        return new JdbcClientDetailsService(dataSource);
    }

    //token保存策略
    @Bean
    public TokenStore tokenStore(){
        return new JdbcTokenStore(dataSource);
    }

    //授权信息保存策略
    @Bean
    public ApprovalStore approvalStore(){
        return new JdbcApprovalStore(dataSource);
    }

    //授权码模式数据来源
    @Bean
    public AuthorizationCodeServices authorizationCodeServices(){
        return new JdbcAuthorizationCodeServices(dataSource);
    }

    //指定客户端信息的数据库来源
    @Override
    public void configure(ClientDetailsServiceConfigurer clients) throws Exception {
        clients.withClientDetails(jdbcClientDetailsService());
    }

    //检查token的策略
    @Override
    public void configure(AuthorizationServerSecurityConfigurer security) throws Exception {
        security.allowFormAuthenticationForClients(); // 可接受form表单提交
        security.checkTokenAccess("permitAll()"); // 允许校验 token,匿名访问
    }

    /**
     * OAuth2的主配置信息,将上面所有配置都整合注册进来
     * @param endpoints
     * @throws Exception
     */
    @Override
    public void configure(AuthorizationServerEndpointsConfigurer endpoints) throws Exception {
        endpoints
                .userDetailsService(userService) // 刷新 token, 不配置的话,刷新token是使用不了的
                .approvalStore(approvalStore())
                .authenticationManager(authenticationManager) //认证管理器
                .authorizationCodeServices(authorizationCodeServices()) //授权码服务
                .tokenStore(tokenStore()); //令牌管理服务
    }

}
1.3.1 默认端点 URL
框架默认的URL链接有如下几个:
- /oauth/authorize : 授权端点
- /auth/token : 令牌端点
- /oauth/confirm_access :用户确认授权提交的端点
- /oauth/error : 授权服务错误信息端点。
- /oauth/check_token :用于资源服务访问的令牌进行解析的端点。
- /oauth/token_key : 使用Jwt令牌需要用到的提供公有密钥的端点。
需要注意的是,这几个授权端点应该被Spring Security保护起来只供授权用户访问。
也可以通过 pathMapping()方法来自定义端点URL地址来替代默认端点 URL。
   @Override
    public void configure(AuthorizationServerEndpointsConfigurer endpoints) throws Exception {
        endpoints
                //.pathMapping("/oauth/confirm_access","/customer/confirm_access")//定制授权同意页面
                .authenticationManager(authenticationManager)//认证管理器
。。。
    }
1.4 用户和角色
用户和角色/权限的类和使用数据库认证授权一样。这里简单截几个图。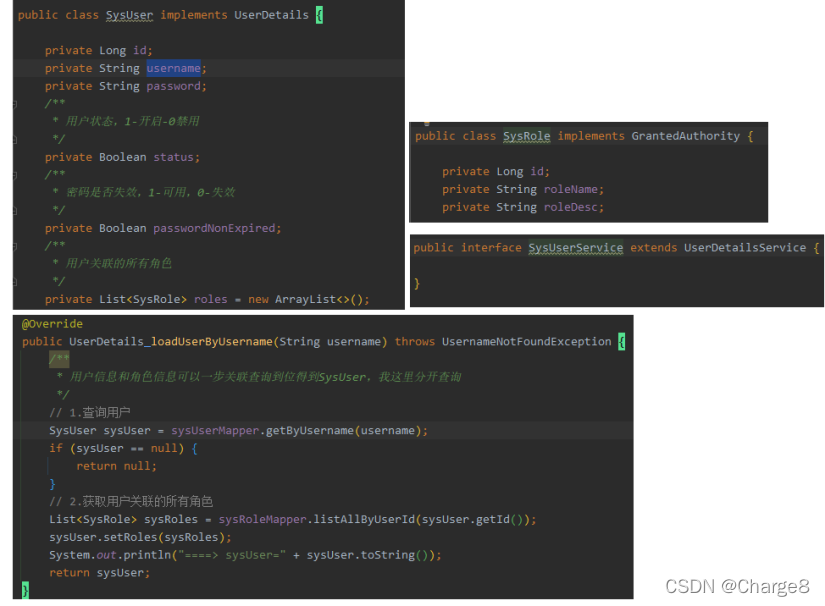
注意:这里必须将用户和角色类放到公共模板中,认证服务和资源服务使用的是同一个用户和角色对象。否则会报 token反序列化问题。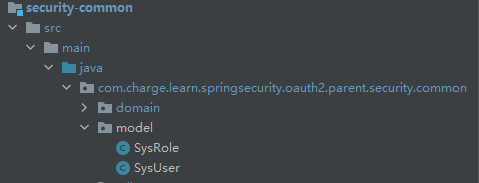
1.5 启动类
@SpringBootApplication
@MapperScan("com.charge.learn.springsecurity.oauth2.parent.oauth.dao")
@EnableEurekaClient
public class OAuthServerApplication {

    public static void main(String[] args) {
        SpringApplication.run(OAuthServerApplication.class, args);
    }
}
启动项目,ok。
在 oauth_client_details表中插入一条数据:
INSERT INTO `oauth_client_details`(`client_id`, `resource_ids`, `client_secret`, `scope`, `authorized_grant_types`, `web_server_redirect_uri`, `authorities`, `access_token_validity`, `refresh_token_validity`, `additional_information`, `autoapprove`)
VALUES ('charge8_all', 'order_source_api', '$2a$10$CYX9OMv0yO8wR8rE19N2fOaXDJondci5uR68k2eQJm50q8ESsDMlC', 'read,write', 'client_credentials,implicit,authorization_code,refresh_token,password', 'http://www.baidu.com', NULL, NULL, NULL, NULL, 'false');
2、四种授权模式
OAuth2定义了四种授权方式,其实是代表了OAuth授权第三方的不同互信程度。
四种授权模式(authorization grant):
- Authorization code Grant:授权码模式,推荐使用
- Implicit Grant:隐藏/简化模式,不推荐使用
- Resource Owner Password Credentials Grant:密码模式
- Client Credentials Grant:客户端模式
客户端(第三方应用)必须得到资源所有者(用户)的同意授权(authorization grant)以后,才能向客户端颁发令牌(access token)。客户端通过令牌,就可以访问资源服务器,请求数据。
注意:不管哪一种授权方式,第三方应用申请令牌之前,都必须先到系统备案,说明自己的身份,然后会拿到两个身份识别码:客户端 ID(client ID)和客户端密钥(client secret)。这是为了防止令牌被滥用,没有备案过的第三方应用,是不会拿到令牌的。
图来自参考文章。
2.1 授权码模式
授权码(authorization code)方式:指的是第三方应用先申请一个授权码,然后再用该授权码获取令牌。
授权码只能使用一次。
授权码通过前端传送,令牌则是储存在后端,而且所有与资源服务器的通信都在后端完成。这样的前后端分离,可以避免令牌泄漏。
授权码模式是 OAuth2中安全性最高,应用场景最广泛的模式,它适用于那些有后端的 Web 应用。常见的微信,QQ等第三方登录也可采用这种方式实现。
一般流程: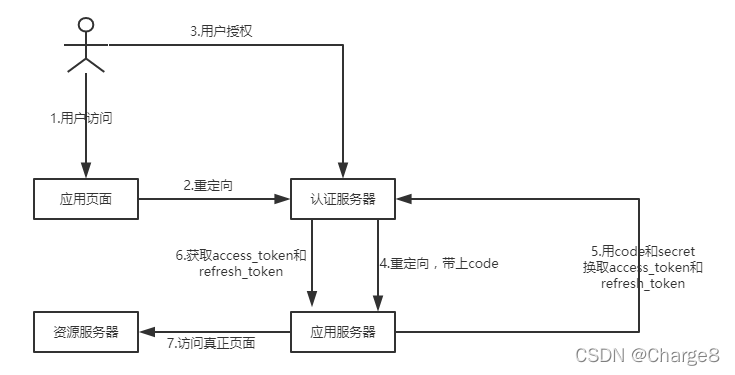
第一步: A 网站跳转 B 网站
A 网站提供一个链接,用户点击后就会跳转到 B 网站,进行授权用户数据给 A 网站使用。
跳转链接URL如下:
http://localhost:18091/oauth/authorize?response_type=code&client_id=charge8_all参数说明:
- response_type参数:表示要求返回授权码(code),
- client_id参数:客户端id,让 B 网站知道是谁在请求,
- redirect_uri参数:是 B 网站接受或拒绝请求后的跳转网址,即回调地址,
- scope参数:表示要求的授权范围(读,写)。
之后会调转到登录接口,输入用户名密码。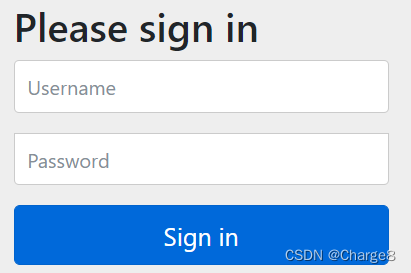
第二步:B 网站会要求用户登录,并询问是否同意给予 A 网站授权
用户跳转后,B 网站会要求用户登录,然后询问是否同意给予 A 网站授权。
用户表示同意,这时 B 网站就会跳转到回调地址(redirect_uri参数指定的网址)。跳转时会携带一个授权码,传给 A 网站。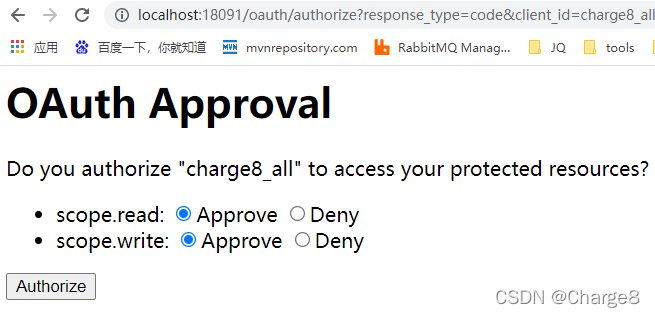
回调地址URL:
- code参数:表示授权码。
注意:这个回调地址应该回调给 A系统, code就是授权码。授权码只能使用一次。
测试时,报错oauth_code表的authentication数据内容超过大小了,这里把它改成 longblob类型即可。
第三步:A 网站通过授权码向 B 网站请求令牌
A 网站拿到授权码以后,就可以在后端,向 B 网站请求令牌(access token)。
后端申请令牌URL如下: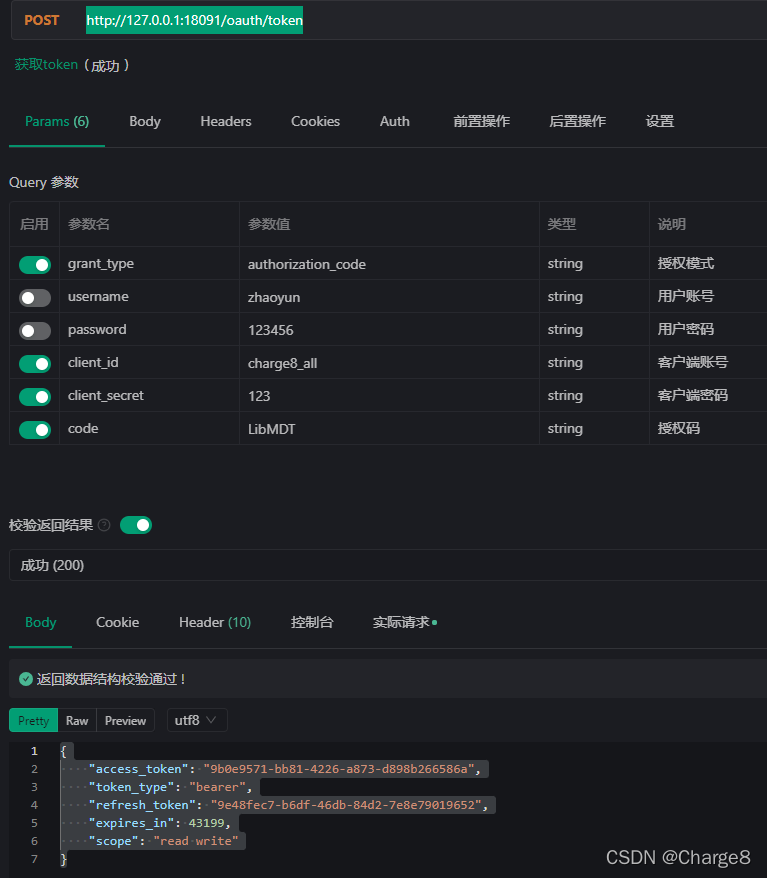
参数说明:
- client_id参数:客户端id
- client_secret参数:客户端秘钥,用来让 B 网站确认 A 的身份(client_secret参数是保密的,因此只能在后端发请求),
- grant_type参数:值是AUTHORIZATION_CODE,表示采用的授权方式是授权码,
- code参数:是上一步拿到的授权码,
- redirect_uri参数:是令牌颁发后的回调网址。一定和申请授权码时用的redirect_uri一致。数据在数据库,可以不填。
第四步:B 网站颁发令牌
B 网站收到请求令牌以后,就会颁发令牌。具体做法是向 redirect_uri指定的网址,发送一段 JSON 数据。如上图。access_token字段就是令牌,A 网站在后端拿到了令牌,就可以访问资源服务了。
当再次点击时,会报错,说明code只能使用一次。
{
    "error": "invalid_grant",
    "error_description": "Invalid authorization code: LibMDT"
}
2.2 简化模式
简化模式整个过程没有授权码这个中间步骤,允许直接向前端颁发令牌,即token直接暴露在浏览器。所以又称为(授权码)“隐藏式”(implicit)。
简化模式适用于纯前端页面应用,没有后端。
所谓纯静态页面应用,也就是应用没有在服务器上执行代码的权限(通常是把代码托管在别人的服务器上),只有前端 JS 代码的控制权。
这种方式把令牌直接传给前端,是很不安全的。
因此,只能用于一些安全要求不高的场景,并且令牌的有效期必须非常短,通常就是会话期间(session)有效,浏览器关掉,令牌就失效了。
一般流程: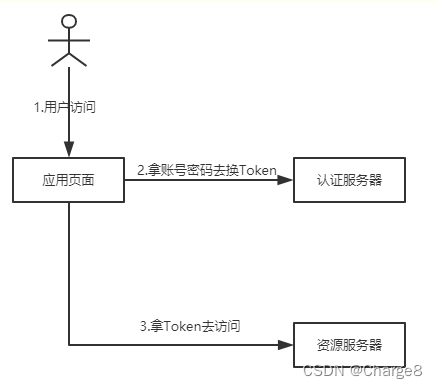
第一步:A 网站跳转 B 网站
A 网站提供一个链接,要求用户跳转到 B 网站,进行授权用户数据给 A 网站使用。
跳转链接URL如下:
http://localhost:18091/oauth/authorize?response_type=token&client_id=charge8_all参数说明:
- response_type参数:为token,表示要求直接返回令牌。
之后会调转到登录接口,输入用户名密码。
第二步:B 网站会要求用户登录,并询问是否同意给予 A 网站授权
用户跳转后,B 网站会要求用户登录,然后询问是否同意给予 A 网站授权。
用户表示同意,这时 B 网站就会跳转到回调地址(redirect_uri参数指定的网址)。跳转时,并且把令牌作为 URL 参数,传给 A 网站。
由于上面用户已经登录过了,所以这里直接返回了token。如果是新窗口,还是需要登录(同上)之后才会返回了token。
回调地址URL:
https://www.baidu.com/#access_token=9b0e9571-bb81-4226-a873-d898b266586a&token_type=bearer&expires_in=42784&scope=read%20write- token参数:就是令牌,直接向前端(A 网站)颁发令牌。
注意:令牌的位置是 URL 锚点(fragment),而不是查询字符串(querystring),这是因为 OAuth 2.0 允许跳转网址是 HTTP 协议,因此存在"中间人攻击"的风险,而浏览器跳转时,锚点不会发到服务器,就减少了泄漏令牌的风险。
2.3 密码模式
密码模式,用户把自己用户名和密码直接告诉客户端(客户端不得储存密码),客户端使用这些信息申请令牌。
这种方式需要用户给出自己的用户名/密码,显然风险很大,因此只适用于其他授权方式都无法采用的情况,而且必须是用户高度信任的应用。
一般流程: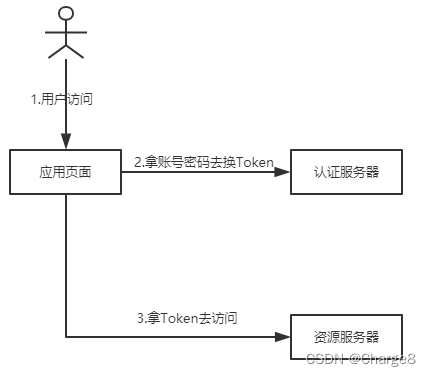
第一步:A 应用向 B 应用发出请求令牌。
A 应用要求用户提供 B 应用的用户名和密码。拿到信息以后,A 应用就直接向 B 应用请求令牌。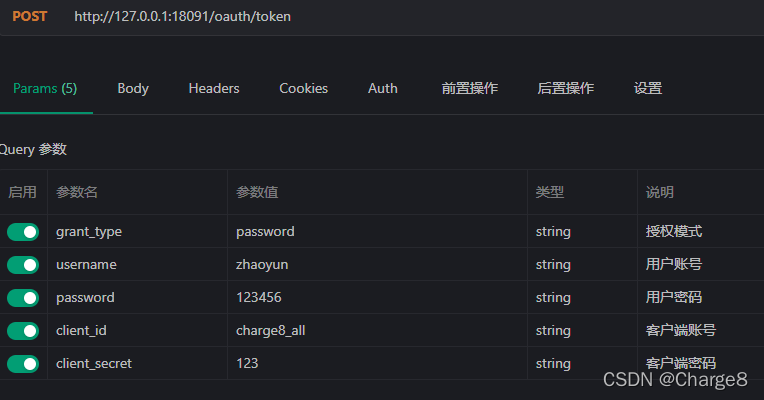
参数说明:
- grant_type参数:是授权方式,这里的password表示"密码式",
- username参数:是 B 的用户名,
- password参数:是 B 的用户密码。
- client_id参数:客户端id
- client_secret参数:客户端秘钥
第二步:B 网站验证用户身份,并直接颁发令牌
B 网站验证用户身份通过后,直接颁发令牌。注意:这时不需要跳转,而是把令牌放在 JSON 数据里面,作为 HTTP 回应, A 因此拿到令牌。
{
    "access_token": "9b0e9571-bb81-4226-a873-d898b266586a",
    "token_type": "bearer",
    "refresh_token": "9e48fec7-b6df-46db-84d2-7e8e79019652",
    "expires_in": 42294,
    "scope": "read write"
}
2.4 客户端模式
客户端模式就是直接对客户端进行身份验证,验证通过后,颁发token。
这种模式其实有点不太属于OAuth2的范畴了。客户端(A 网站)完全脱离用户,以自己的身份去向 B 网站申请 token。
换言之,用户无需具备B服务的使用权也可以。完全是A服务与B服务内部的交互,与用户无关了。
适用于没有前端,没有用户界面的后端模块。
一般流程: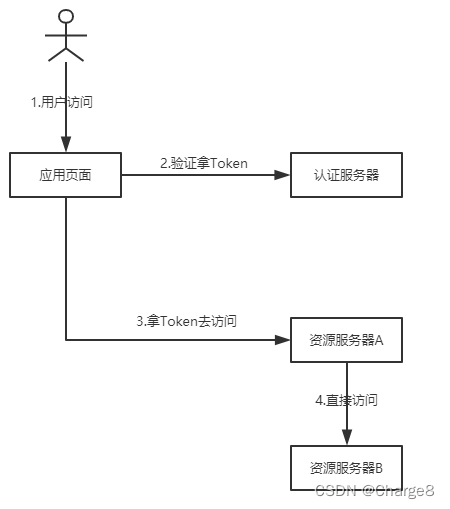
第一步:A 应用向 B 应用发出请求令牌。
A 应用向 B 应用发出请求令牌。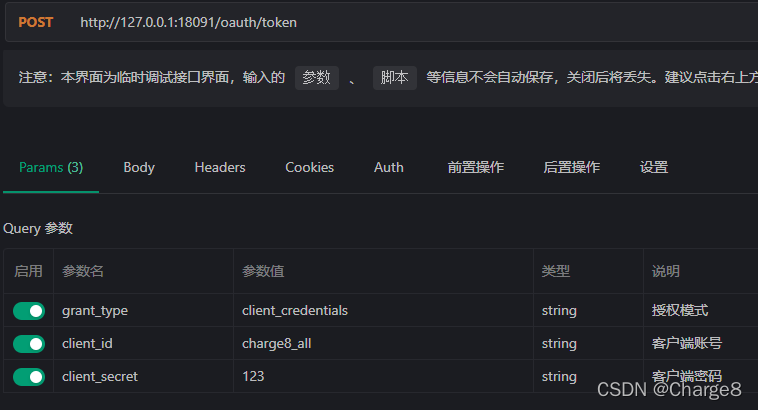
参数说明:
- grant_type参数:值为client_credentials表示采用凭证式,
- client_id参数:客户端id,
- client_secret参数:客户端秘钥,用来让 B 确认 A 的身份。
第二步:B 应用验证通过以后,直接返回令牌。
B 应用验证通过以后,直接返回令牌。
{
    "access_token": "d68df8cc-8643-44e2-ae17-1e85933100d6",
    "token_type": "bearer",
    "expires_in": 43199,
    "scope": "read write"
}
这种方式给出的令牌,是针对第三方应用的,而不是针对用户的,即有可能多个用户共享同一个令牌。
3、令牌的使用
3.1 更新令牌
令牌的有效期到了,如果让用户重新走一遍上面的流程,再申请一个新的令牌,很可能体验不好,而且也没有必要。OAuth 2.0 允许用户自动更新令牌。
注意:除了客户端模式,其他几个模式都可以刷新 token。
首先,需要开启刷新token,OAuth2授权配置类中加上它:
- .userDetailsService(userService) // 刷新 token, 不配置的话,刷新token是使用不了的
重启认证服务。
令牌到期前,用户使用 refresh token 发一个请求,去更新令牌。
这里使用密码模式令牌来测试,刷新 token。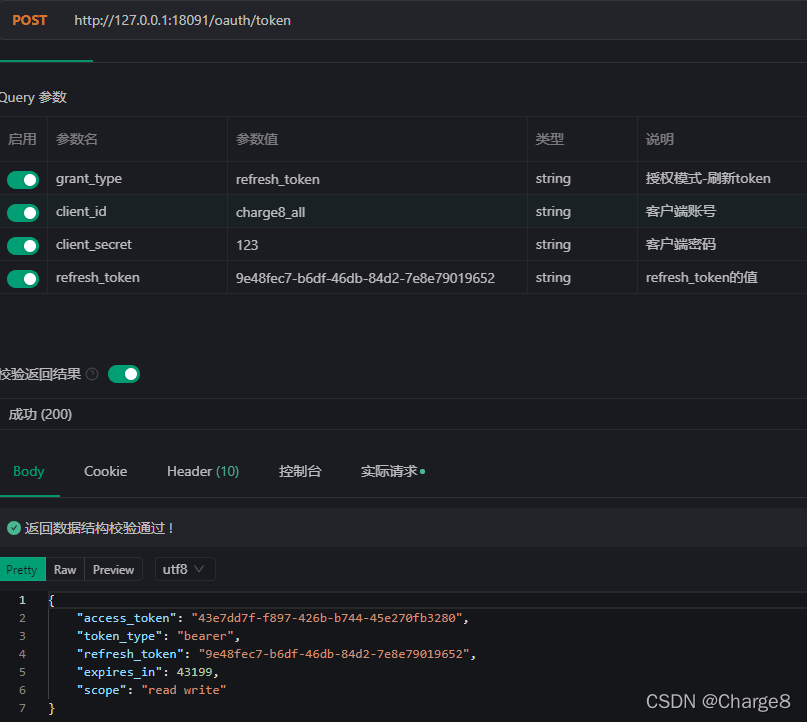
参数说明:
- grant_type参数:值为refresh_token表示要求更新令牌,
- client_id参数:客户端id
- client_secret参数:客户端秘钥,用来让 B 确认 A 的身份,
- refresh_token参数:就是用于更新令牌的令牌。
B 网站验证通过以后,就会颁发新的令牌。就可以通过新的令牌来访问资源服务。
3.2 检查token
/oauth/check_token端点,此接口没有允许,默认是不允许访问。
报错如下:
{
    "timestamp": "2022-02-23T15:37:14.715+0000",
    "status": 401,
    "error": "Unauthorized",
    "message": "Unauthorized",
    "path": "/oauth/check_token"
}
所以我们需要设置该接口允许访问。
方式1:
// AuthorizationServerConfigurerAdapter

	@Override
    public void configure(AuthorizationServerSecurityConfigurer oauthServer) throws Exception {
        //允许表单认证
        oauthServer.allowFormAuthenticationForClients();
        oauthServer.checkTokenAccess("permitAll()");
    }
方法2:
security.oauth2.authorization.check-token-access=permitAll()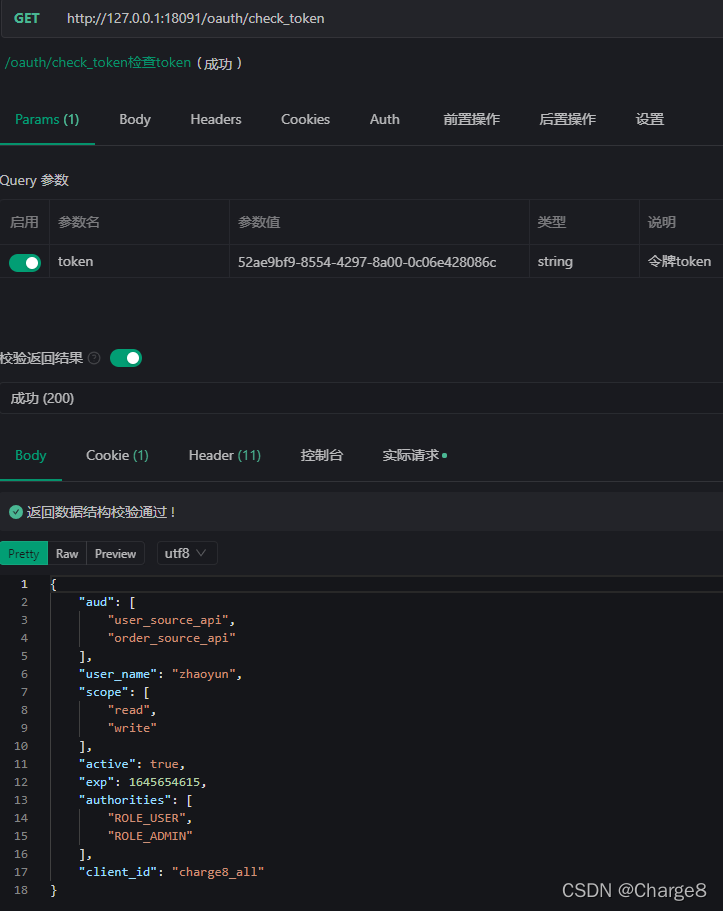
3.3 通过令牌请求资源服务
A 应用拿到令牌(access token)以后,就可以向 B 引用请求API 数据了,每个 API 请求都必须带有令牌。
具体做法:
方式一:
需要将令牌添加在请求头,key为Authorization,值为Bearer xxxtoken格式,再次访问,发现获取到了资源。
方式二:
在API请求跟上参数?access_token=xxxtoken
二、资源服务器
1、资源服务器配置
资源服务器配置比较简单,这里说明一下重要配置。
1.1 OAuth2授权配置类
@Configuration
@EnableResourceServer
@EnableGlobalMethodSecurity(securedEnabled = true) // 开启SpringSecurity权限注解
public class OauthSourceConfig extends ResourceServerConfigurerAdapter {

    @Autowired
    private DataSource dataSource;

    /**
     * 指定token的持久化策略
     * InMemoryTokenStore表示将token存储在内存
     * Redis表示将token存储在redis中
     * JdbcTokenStore存储在数据库中
     * @return
     */
    @Bean
    public TokenStore jdbcTokenStore(){
        return new JdbcTokenStore(dataSource);
    }

    /**
     * 指定当前资源的id和存储方案
     * @param resources
     * @throws Exception
     */
    @Override
    public void configure(ResourceServerSecurityConfigurer resources) throws Exception {
        resources.resourceId("order_source_api")//资源ID
                .tokenStore(jdbcTokenStore());//令牌策略
    }

    @Override
    public void configure(HttpSecurity http) throws Exception{
        //一般固定写法
        http.authorizeRequests()
                //指定不同请求方式访问资源所需要的权限,一般查询是read,其余是write。
                .antMatchers(HttpMethod.GET, "/**").access("#oauth2.hasScope('read')")
                .antMatchers(HttpMethod.POST, "/**").access("#oauth2.hasScope('write')")
                .antMatchers(HttpMethod.PATCH, "/**").access("#oauth2.hasScope('write')")
                .antMatchers(HttpMethod.PUT, "/**").access("#oauth2.hasScope('write')")
                .antMatchers(HttpMethod.DELETE, "/**").access("#oauth2.hasScope('write')")
                .and()
                .headers().addHeaderWriter((request, response) -> {
            response.addHeader("Access-Control-Allow-Origin", "*");//允许跨域
            if (request.getMethod().equals("OPTIONS")) {//如果是跨域的预检请求,则原封不动向下传达请求头信息
                response.setHeader("Access-Control-Allow-Methods", request.getHeader("Access-Control-Request-Method"));
                response.setHeader("Access-Control-Allow-Headers", request.getHeader("Access-Control-Request-Headers"));
            }
        });
    }


}
1.2 controller
@RestController
@RequestMapping("/order")
public class OrderController {

    @Secured({"ROLE_USER","ROLE_ORDER"})
    @RequestMapping(value = "/findOrder", method = {RequestMethod.GET, RequestMethod.POST})
    public String findOrder(){

        Authentication authentication = SecurityContextHolder.getContext().getAuthentication();
        System.out.println("SecurityContextHolder.getContext().getAuthentication() ->" + authentication.toString());
        return " findOrder成功!" + authentication.toString();
    }

    @Secured({"ROLE_ADMIN","ROLE_ORDER"})
    @RequestMapping(value = "/updateOrder", method = RequestMethod.POST)
    public String updateOrder(){

        Authentication authentication = SecurityContextHolder.getContext().getAuthentication();
        System.out.println("SecurityContextHolder.getContext().getAuthentication() ->" + authentication.toString());
        return " updateOrder成功!" + authentication.toString();
    }

}
2、通过令牌访问
携带令牌访问,令牌需要添加在请求头,key为Authorization,值为Bearer xxxtoken格式。
参考文章:
- OAuth2的四种授权模式:https://www.cnblogs.com/Innocent-of-Dabber/p/11009811.html
- SpringSecurity OAuth2 资源服Token反序列化解析失败:https://blog.csdn.net/CSDN877425287/article/details/120663052
一.OAuth2介绍
1.1 OAuth2是什么 怎么用
OAuth2是目前最流行的授权协议,用来授权第三方应用,获取用户数据。举个例子:快递员想要进入小区,有3种方式。1是业主远程开门,2是业主告诉门禁密码,3是使用令牌(Oauth2)。如图: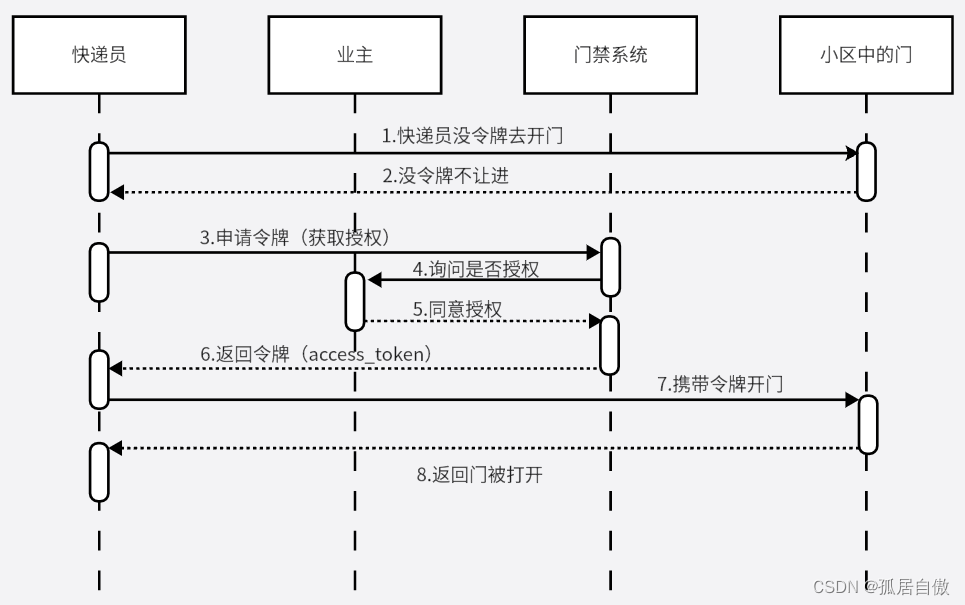
令牌和密码的区别:令牌相当于火车票,密码相当于是钥匙。
令牌是短期的,自动失效。密码是长期有效。令牌是可以撤销的,撤销立即生效。密码一般不允许他们撤销。令牌有权限范围,如车票座位为10车A15座。密码一般是完整权限。
第三方登录演示(网易云客户端利用QQ扫码登录)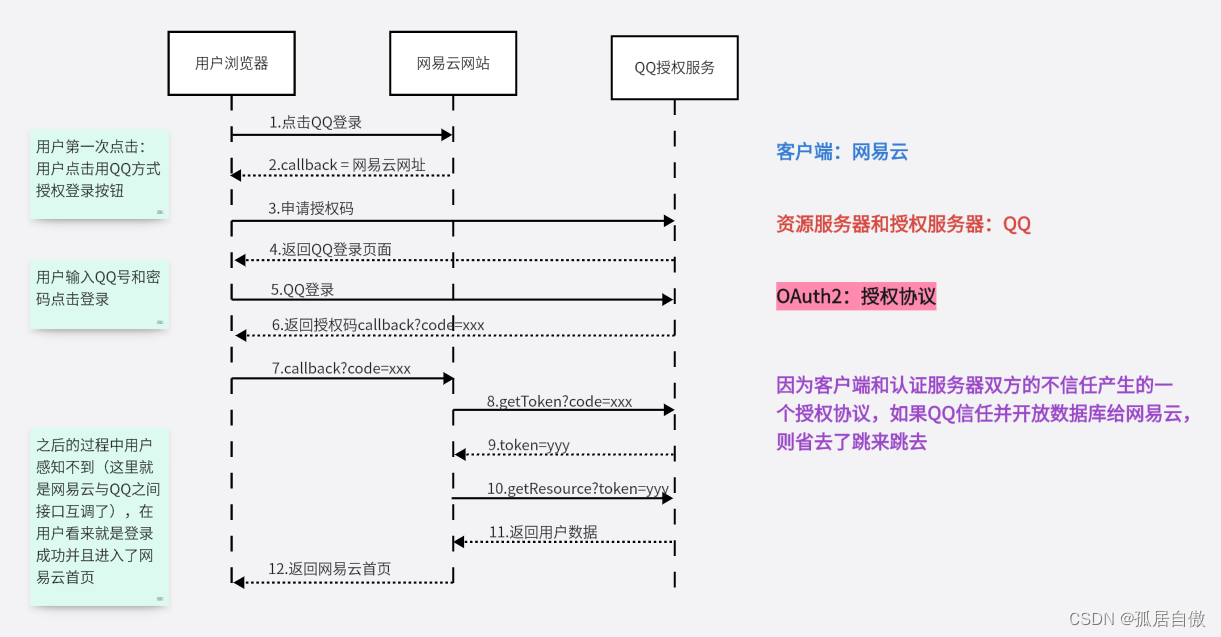
网易云客使用QQ扫码登录中Oauth2协议各个角色扮演者
Rrsource Owner: 用户Client: 网易云Authorization Server: QQResource Server: QQUser Agent: 浏览器
Oauth2.0与1.0的区别:
OAuth2.0有4种授权模式。优缺点:1.去掉签名,改用SSL(HTTPS)确保安全性。2.所有的token不再有对应的secret存在,签名过程简洁,这也直接导致OAuth2.0不能兼容老版本。3.能更好的支持不是基于浏览器的应用。4.OAuth2.0的访问令牌是"短命的",且可以刷新令牌。OAuth1.0只有一种授权模式。优缺点:用的是http协议,申请RequestToken过程中,容易把攻击者调包。2.攻击者调包后的目的是为了仿造回调地址,拿到用户的accessToken。
Oauth2授权模式:
授权码模式:最完整和严谨的授权模式,第三方平台登录都是该模式。安全性最高。简化模式:省略授权码阶段,客户端是纯静态页面采用该模式。安全性高。密码模式:把用户名密码告诉客户端,对客户端高度信任,比如客户端和认证服务器是同一公司。安全性一般。客户端模式:直接因客户端名义申请令牌,很少有。安全性最差。
1.2 为什么要用OAuth2
cookie是不能跨域的,前后端分离分布式架构实现多系统SSO非常困难。移动端应用没有cookie,所以对于移动端支持不友好。token基于header传递,部分解决了CSRF攻击。token比sessionID大,客户端存储在Local Storage中,可以直接被JS读取。
二.OAuth2实战
2.1 搭建项目
首先创建两个项目 一个是授权项目 一个是资源项目授权项目目录(java-skill-point)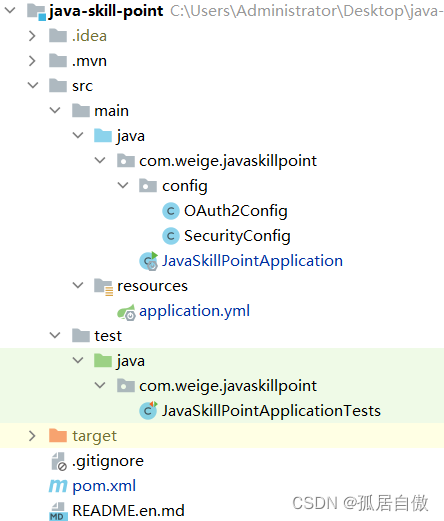
pom.xml文件这里要注意springboot与springcloud的版本号
<?xml version="1.0" encoding="UTF-8"?>
<project xmlns="http://maven.apache.org/POM/4.0.0" xmlns:xsi="http://www.w3.org/2001/XMLSchema-instance"
         xsi:schemaLocation="http://maven.apache.org/POM/4.0.0 https://maven.apache.org/xsd/maven-4.0.0.xsd">
    <modelVersion>4.0.0</modelVersion>
    <parent>
        <groupId>org.springframework.boot</groupId>
        <artifactId>spring-boot-starter-parent</artifactId>
        <version>2.2.1.RELEASE</version>
        <relativePath/> <!-- lookup parent from repository -->
    </parent>
    <groupId>com.weige</groupId>
    <artifactId>java-skill-point</artifactId>
    <version>0.0.1-SNAPSHOT</version>
    <name>java-skill-point</name>
    <description>java-skill-point</description>
    <properties>
        <java.version>1.8</java.version>
        <spring-cloud.version>Hoxton.SR5</spring-cloud.version>
    </properties>
    <dependencies>
        <!--Springboot项目自带 -->
        <dependency>
            <groupId>org.springframework.boot</groupId>
            <artifactId>spring-boot-starter</artifactId>
        </dependency>
        <dependency>
            <groupId>org.springframework.boot</groupId>
            <artifactId>spring-boot-starter-test</artifactId>
            <scope>test</scope>
        </dependency>
        <!--Springboot Web项目 -->
        <dependency>
            <groupId>org.springframework.boot</groupId>
            <artifactId>spring-boot-starter-web</artifactId>
        </dependency>

        <!--lombok -->
        <dependency>
            <groupId>org.projectlombok</groupId>
            <artifactId>lombok</artifactId>
            <version>1.18.22</version>
        </dependency>

        <!-- hutool  -->
        <dependency>
            <groupId>cn.hutool</groupId>
            <artifactId>hutool-all</artifactId>
            <version>5.7.20</version>
        </dependency>

        <dependency>
            <groupId>org.springframework.cloud</groupId>
            <artifactId>spring-cloud-starter-oauth2</artifactId>
        </dependency>

        <dependency>
            <groupId>org.springframework.cloud</groupId>
            <artifactId>spring-cloud-starter-security</artifactId>
        </dependency>

    </dependencies>

    <dependencyManagement>
        <dependencies>
            <dependency>
                <groupId>org.springframework.cloud</groupId>
                <artifactId>spring-cloud-dependencies</artifactId>
                <version>${spring-cloud.version}</version>
                <type>pom</type>
                <scope>import</scope>
            </dependency>
        </dependencies>
    </dependencyManagement>

    <build>
        <plugins>
            <plugin>
                <groupId>org.springframework.boot</groupId>
                <artifactId>spring-boot-maven-plugin</artifactId>
            </plugin>
        </plugins>
    </build>

</project>
application.yml文件
server:
  port: 8888
OAuth2Config文件
package com.weige.javaskillpoint.config;
import org.springframework.beans.factory.annotation.Autowired;
import org.springframework.context.annotation.Bean;
import org.springframework.context.annotation.Configuration;
import org.springframework.security.authentication.AuthenticationManager;
import org.springframework.security.oauth2.config.annotation.configurers.ClientDetailsServiceConfigurer;
import org.springframework.security.oauth2.config.annotation.web.configuration.AuthorizationServerConfigurerAdapter;
import org.springframework.security.oauth2.config.annotation.web.configuration.EnableAuthorizationServer;
import org.springframework.security.oauth2.config.annotation.web.configurers.AuthorizationServerEndpointsConfigurer;
import org.springframework.security.oauth2.config.annotation.web.configurers.AuthorizationServerSecurityConfigurer;
import org.springframework.security.oauth2.provider.token.TokenStore;
import org.springframework.security.oauth2.provider.token.store.InMemoryTokenStore;
@Configuration
@EnableAuthorizationServer
public class OAuth2Config extends AuthorizationServerConfigurerAdapter {
@Autowired
private AuthenticationManager authenticationManager;
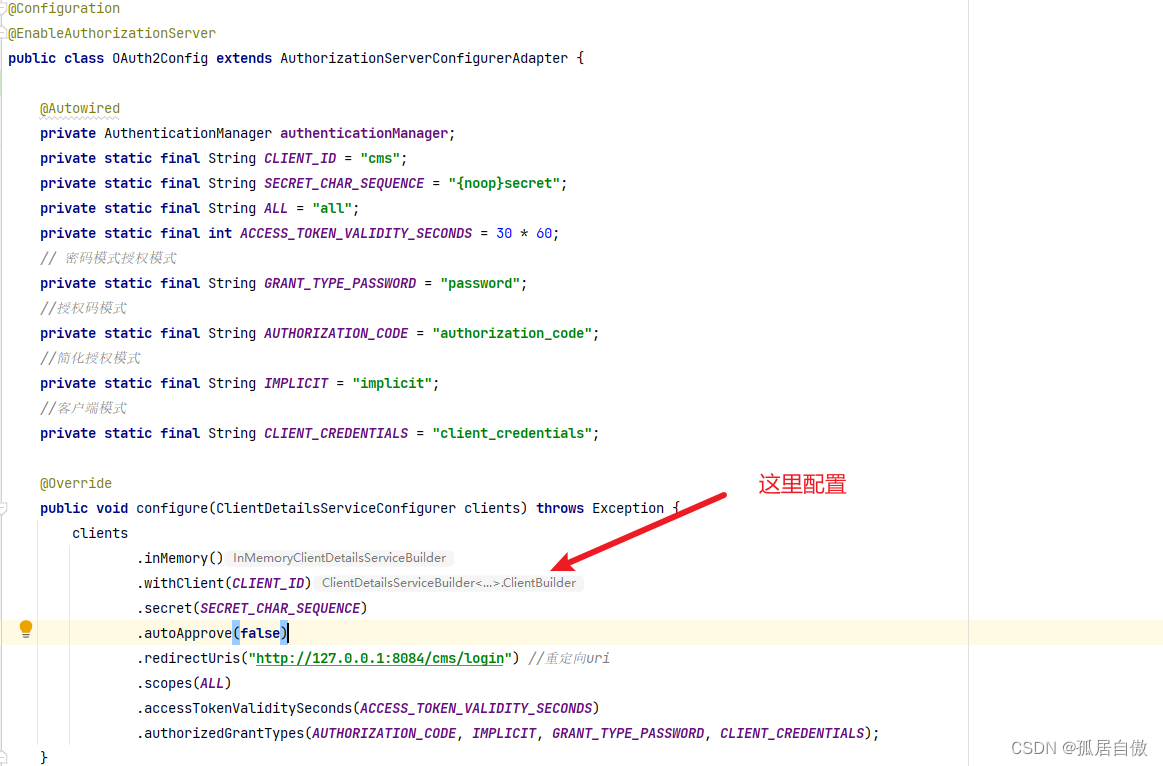
private static final String CLIENT_ID = "cms";
private static final String SECRET_CHAR_SEQUENCE = "{noop}secret";
private static final String ALL = "all";
private static final int ACCESS_TOKEN_VALIDITY_SECONDS = 30 * 60;
// 密码模式授权模式
private static final String GRANT_TYPE_PASSWORD = "password";
//授权码模式
private static final String AUTHORIZATION_CODE = "authorization_code";
//简化授权模式
private static final String IMPLICIT = "implicit";
//客户端模式
private static final String CLIENT_CREDENTIALS = "client_credentials";
@Override
public void configure(ClientDetailsServiceConfigurer clients) throws Exception {
clients
.inMemory()
.withClient(CLIENT_ID)
.secret(SECRET_CHAR_SEQUENCE)
.autoApprove(false)
.redirectUris("http://127.0.0.1:8084/cms/login") //重定向uri
.scopes(ALL)
.accessTokenValiditySeconds(ACCESS_TOKEN_VALIDITY_SECONDS)
.authorizedGrantTypes(AUTHORIZATION_CODE, IMPLICIT, GRANT_TYPE_PASSWORD, CLIENT_CREDENTIALS);
}
@Override
public void configure(AuthorizationServerEndpointsConfigurer endpoints) throws Exception {
endpoints.authenticationManager(authenticationManager).tokenStore(memoryTokenStore());
}
/**
* 认证服务器的安全配置
*
* @param security
* @throws Exception
*/
@Override
public void configure(AuthorizationServerSecurityConfigurer security) throws Exception {
security
// 开启/oauth/check_token验证端口认证权限访问,checkTokenAccess("isAuthenticated()")设置授权访问
.checkTokenAccess("permitAll()")
//允许表单认证
.allowFormAuthenticationForClients();
}
@Bean
public TokenStore memoryTokenStore() {
return new InMemoryTokenStore();
}
}SecurityConfig文件
package com.weige.javaskillpoint.config;
import org.springframework.context.annotation.Bean;
import org.springframework.context.annotation.Configuration;
import org.springframework.core.annotation.Order;
import org.springframework.security.authentication.AuthenticationManager;
import org.springframework.security.config.annotation.authentication.builders.AuthenticationManagerBuilder;
import org.springframework.security.config.annotation.web.builders.HttpSecurity;
import org.springframework.security.config.annotation.web.builders.WebSecurity;
import org.springframework.security.config.annotation.web.configuration.EnableWebSecurity;
import org.springframework.security.config.annotation.web.configuration.WebSecurityConfigurerAdapter;
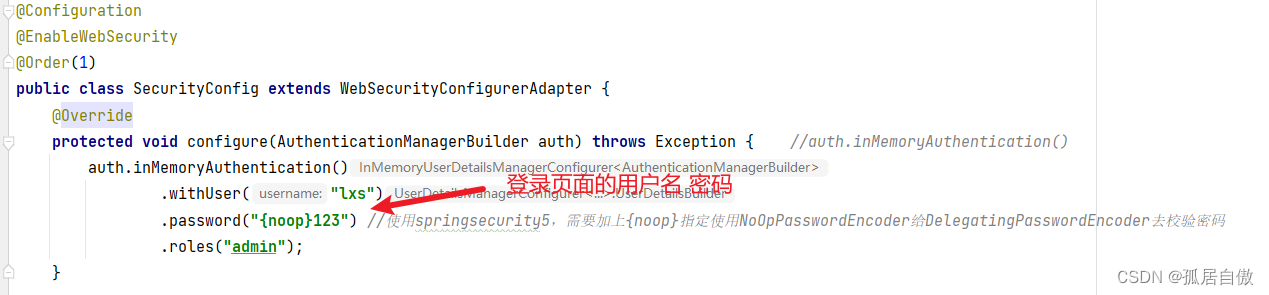
@Configuration
@EnableWebSecurity
@Order(1)
public class SecurityConfig extends WebSecurityConfigurerAdapter {
@Override
protected void configure(AuthenticationManagerBuilder auth) throws Exception { //auth.inMemoryAuthentication()
auth.inMemoryAuthentication()
.withUser("lxs")
.password("{noop}123") //使用springsecurity5,需要加上{noop}指定使用NoOpPasswordEncoder给DelegatingPasswordEncoder去校验密码
.roles("admin");
}
@Override
public void configure(WebSecurity web) throws Exception {
//解决静态资源被拦截的问题
// web.ignoring().antMatchers("/asserts/**");
}
@Override
protected void configure(HttpSecurity http) throws Exception {
http
.formLogin().permitAll()
.and().logout().logoutUrl("/logout").logoutSuccessUrl("/")
.and().authorizeRequests().antMatchers("/oauth/**", "/login/**", "/logout/**", "/api/**").permitAll()
.anyRequest().authenticated()
// 关闭跨域保护;
.and().csrf().disable();
}
@Bean
@Override
public AuthenticationManager authenticationManagerBean() throws Exception {
return super.authenticationManagerBean();
}
}授权认证项目代码码完了 接下来给大家介绍代码的含义 重点是OAuth2Config与SecurityConfig两个类OAuth2Config代码介绍: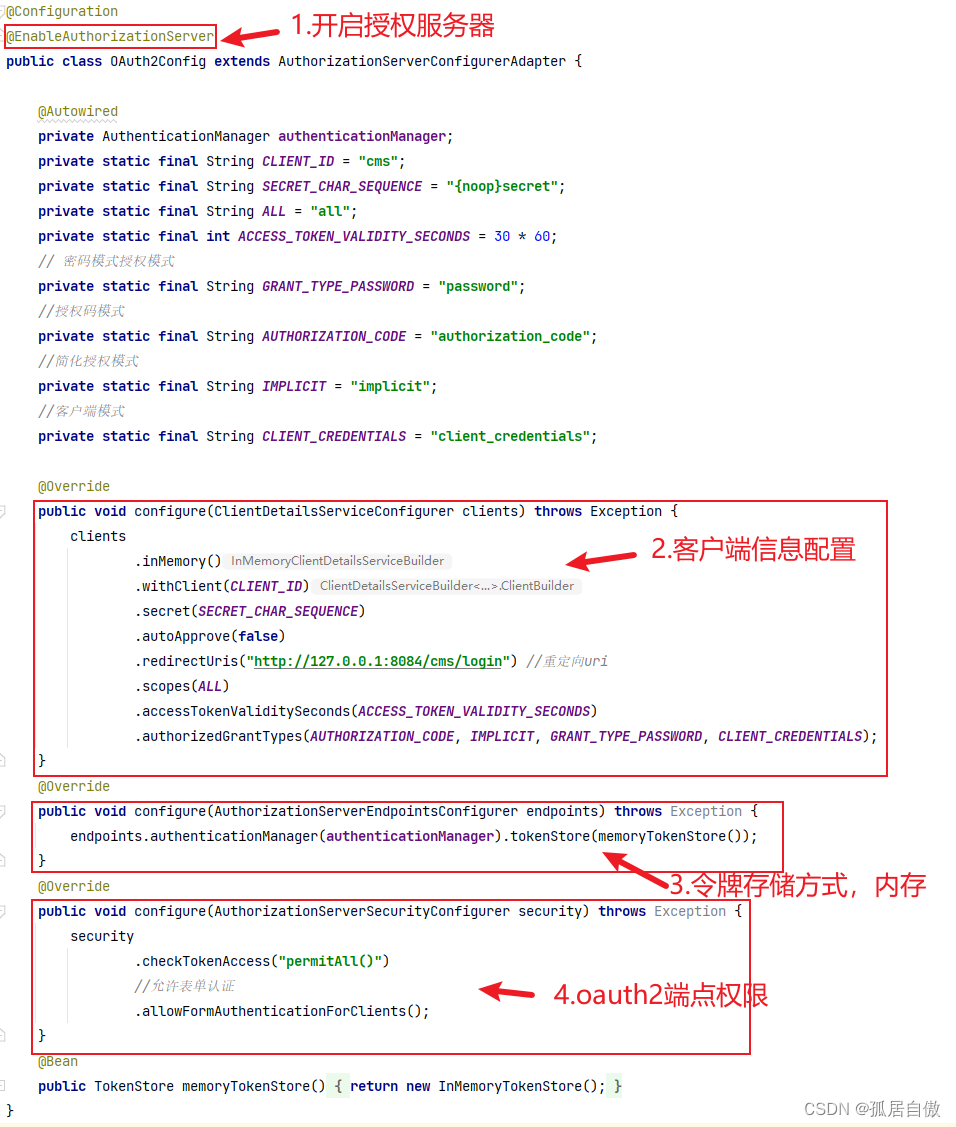
SecurityConfig代码介绍:
资源项目目录(oauth2-service-01)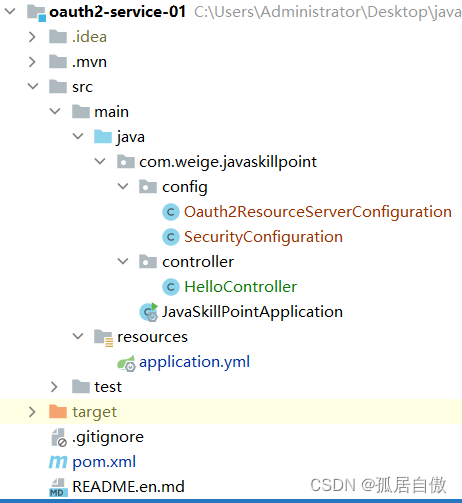
pom.xml文件
<?xml version="1.0" encoding="UTF-8"?>
<project xmlns="http://maven.apache.org/POM/4.0.0" xmlns:xsi="http://www.w3.org/2001/XMLSchema-instance"
         xsi:schemaLocation="http://maven.apache.org/POM/4.0.0 https://maven.apache.org/xsd/maven-4.0.0.xsd">
    <modelVersion>4.0.0</modelVersion>
    <parent>
        <groupId>org.springframework.boot</groupId>
        <artifactId>spring-boot-starter-parent</artifactId>
        <version>2.2.1.RELEASE</version>
        <relativePath/> <!-- lookup parent from repository -->
    </parent>
    <groupId>com.weige</groupId>
    <artifactId>java-skill-point</artifactId>
    <version>0.0.1-SNAPSHOT</version>
    <name>java-skill-point</name>
    <description>java-skill-point</description>
    <properties>
        <java.version>1.8</java.version>
        <spring-cloud.version>Hoxton.SR5</spring-cloud.version>
    </properties>
    <dependencies>
        <!--Springboot项目自带 -->
        <dependency>
            <groupId>org.springframework.boot</groupId>
            <artifactId>spring-boot-starter</artifactId>
        </dependency>
        <dependency>
            <groupId>org.springframework.boot</groupId>
            <artifactId>spring-boot-starter-test</artifactId>
            <scope>test</scope>
        </dependency>
        <!--Springboot Web项目 -->
        <dependency>
            <groupId>org.springframework.boot</groupId>
            <artifactId>spring-boot-starter-web</artifactId>
        </dependency>

        <!--lombok -->
        <dependency>
            <groupId>org.projectlombok</groupId>
            <artifactId>lombok</artifactId>
            <version>1.18.22</version>
        </dependency>


        <!-- hutool  -->
        <dependency>
            <groupId>cn.hutool</groupId>
            <artifactId>hutool-all</artifactId>
            <version>5.7.20</version>
        </dependency>

        <dependency>
            <groupId>org.springframework.cloud</groupId>
            <artifactId>spring-cloud-starter-oauth2</artifactId>
        </dependency>

        <dependency>
            <groupId>org.springframework.cloud</groupId>
            <artifactId>spring-cloud-starter-security</artifactId>
        </dependency>

    </dependencies>

    <dependencyManagement>
        <dependencies>
            <dependency>
                <groupId>org.springframework.cloud</groupId>
                <artifactId>spring-cloud-dependencies</artifactId>
                <version>${spring-cloud.version}</version>
                <type>pom</type>
                <scope>import</scope>
            </dependency>
        </dependencies>
    </dependencyManagement>

    <build>
        <plugins>
            <plugin>
                <groupId>org.springframework.boot</groupId>
                <artifactId>spring-boot-maven-plugin</artifactId>
            </plugin>
        </plugins>
    </build>

</project>
application.yml文件
server:
  port: 8084
Oauth2ResourceServerConfiguration文件
package com.weige.javaskillpoint.config;

import java.io.IOException;
import javax.annotation.Resource;
import org.springframework.context.annotation.Bean;
import org.springframework.context.annotation.Configuration;
import org.springframework.http.HttpStatus;
import org.springframework.http.client.ClientHttpRequestFactory;
import org.springframework.http.client.ClientHttpResponse;
import org.springframework.http.client.HttpComponentsClientHttpRequestFactory;
import org.springframework.security.oauth2.config.annotation.web.configuration.EnableResourceServer;
import org.springframework.security.oauth2.config.annotation.web.configuration.ResourceServerConfigurerAdapter;
import org.springframework.security.oauth2.config.annotation.web.configurers.ResourceServerSecurityConfigurer;
import org.springframework.security.oauth2.provider.token.DefaultAccessTokenConverter;
import org.springframework.security.oauth2.provider.token.RemoteTokenServices;
import org.springframework.web.client.DefaultResponseErrorHandler;
import org.springframework.web.client.RestTemplate;


@Configuration
@EnableResourceServer
public class Oauth2ResourceServerConfiguration extends
    ResourceServerConfigurerAdapter {

  private static final String CHECK_TOKEN_URL = "http://localhost:8888/oauth/check_token";

  @Override
  public void configure(ResourceServerSecurityConfigurer resources) {

    RemoteTokenServices tokenService = new RemoteTokenServices();

    tokenService.setCheckTokenEndpointUrl(CHECK_TOKEN_URL);
    tokenService.setClientId("cms");
    tokenService.setClientSecret("secret");

    resources.tokenServices(tokenService);
  }

}
SecurityConfiguration文件
package com.weige.javaskillpoint.config;

import org.springframework.security.config.annotation.web.builders.HttpSecurity;
import org.springframework.security.config.annotation.web.configuration.EnableWebSecurity;
import org.springframework.security.config.annotation.web.configuration.WebSecurityConfigurerAdapter;

@EnableWebSecurity
public class SecurityConfiguration extends WebSecurityConfigurerAdapter {

  @Override
  protected void configure(HttpSecurity http) throws Exception {
    http.authorizeRequests().antMatchers("/**").authenticated();
    // 禁用CSRF
    http.csrf().disable();
  }
}
HelloController文件
package com.weige.javaskillpoint.controller;

import org.springframework.security.access.annotation.Secured;
import org.springframework.security.core.Authentication;
import org.springframework.security.core.context.SecurityContextHolder;
import org.springframework.security.oauth2.provider.authentication.OAuth2AuthenticationDetails;
import org.springframework.web.bind.annotation.GetMapping;
import org.springframework.web.bind.annotation.PutMapping;
import org.springframework.web.bind.annotation.RequestMapping;
import org.springframework.web.bind.annotation.RestController;

import java.util.Arrays;

@RestController
@RequestMapping("/cms")
public class HelloController {

    @GetMapping("/getCurrentUser")
    public Object getCurrentUser(Authentication authentication) {
        return authentication;
    }

    @GetMapping("/index")
    public String index() {
        return "index";
    }


    @PutMapping("/index2")
    public String index2() {
        return "index2";
    }

}
资源项目代码码完了 接下来给大家介绍代码的含义 重点是Oauth2ResourceServerConfiguration与SecurityConfiguration两个类Oauth2ResourceServerConfiguration代码介绍: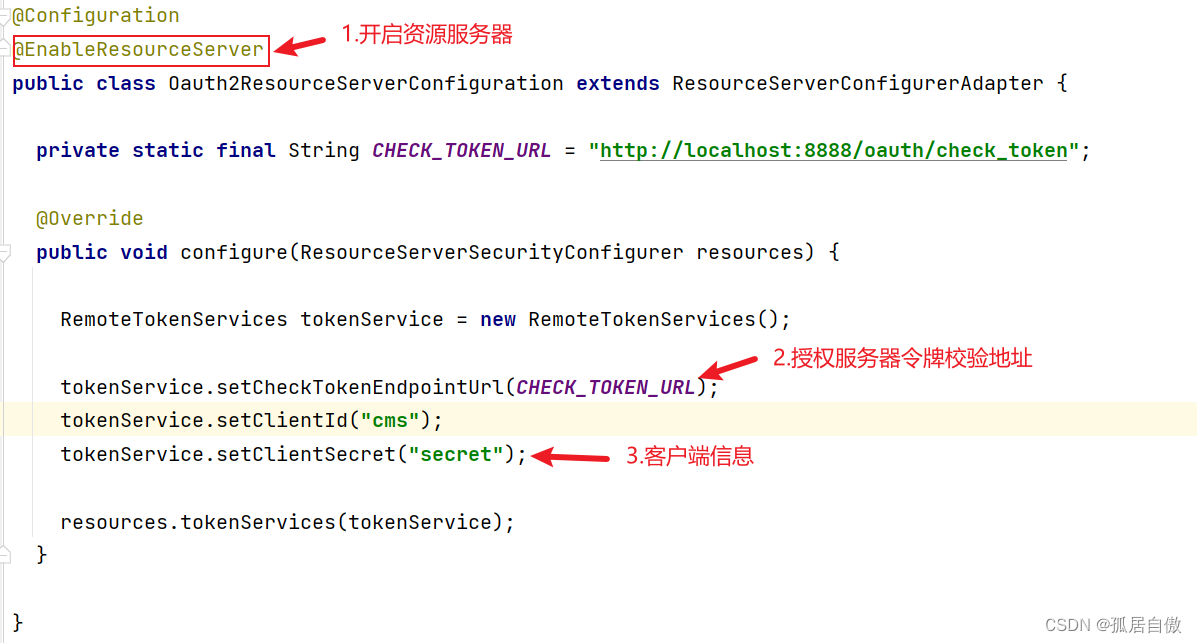
SecurityConfiguration代码介绍: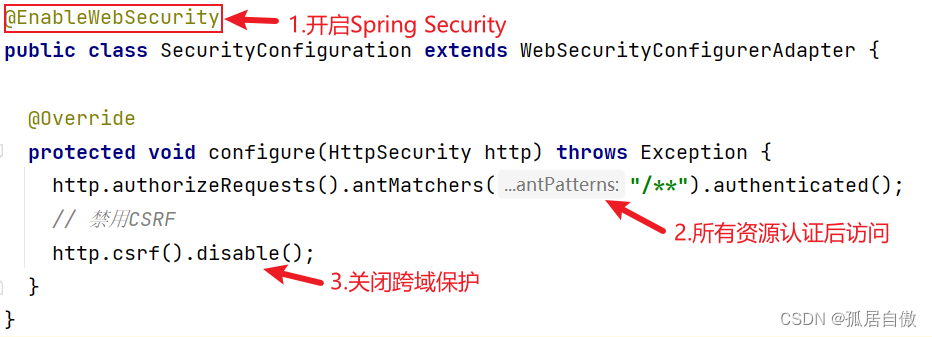
HelloController类中定义了受限访问的资源
2.2 启动两个项目 并进行接口测试
启动授权服务项目,结果演示:测试:随便校验一个令牌:校验接口 http://localhost:8888/oauth/check_token?token=abcdefg123456
启动资源服务项目,访问接口:没有携带token,访问无权限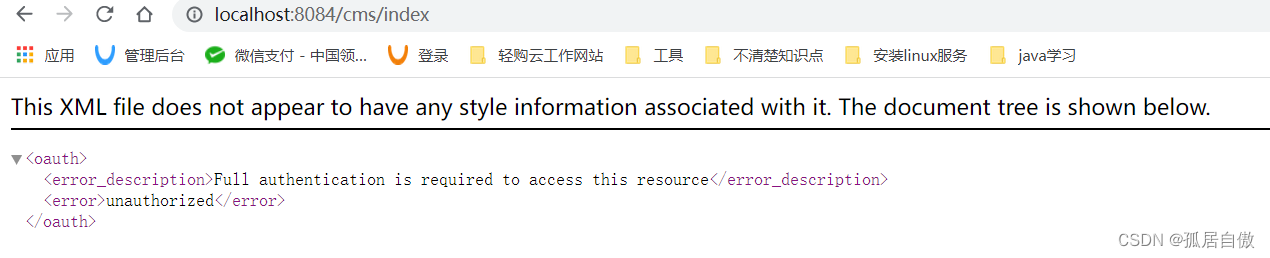
2.3 四种授权模式接口演示
授权码模式: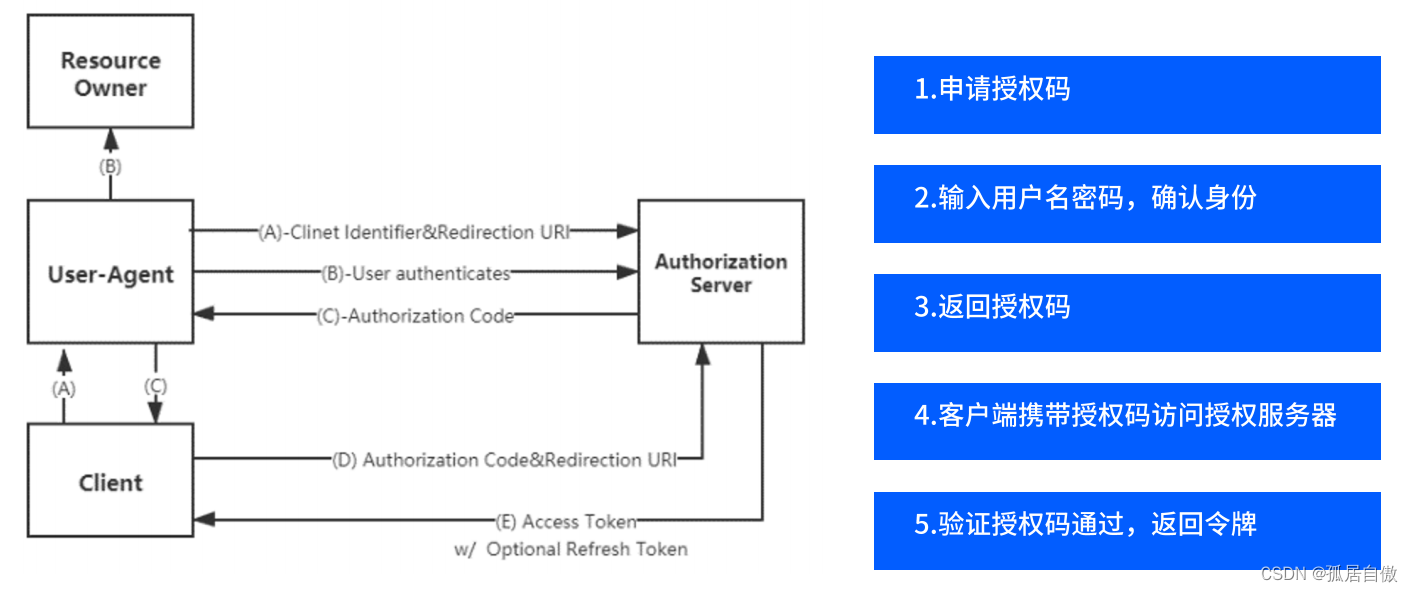
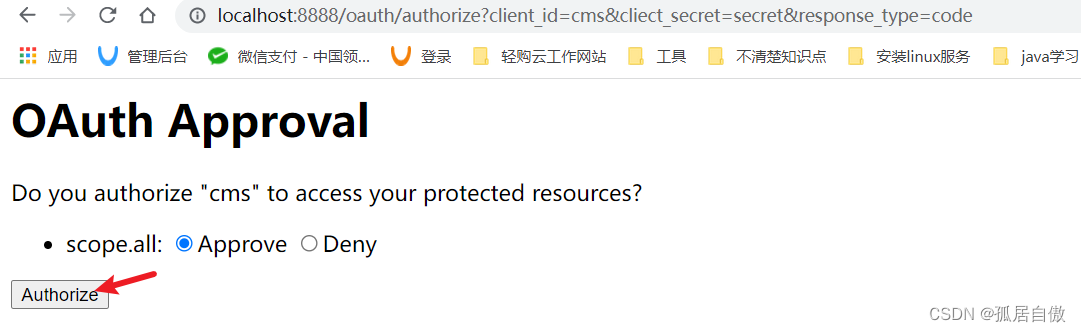
1.申请授权码 localhost:8888/oauth/authorize?client_id=cms&cliect_secret=secret&response_type=code
client_id:客户端id,和授权配置类中设置的客户端id一致。response_type:授权码模为code。cliect_secret:客户端密码,和授权配置类中设置的secret一致。

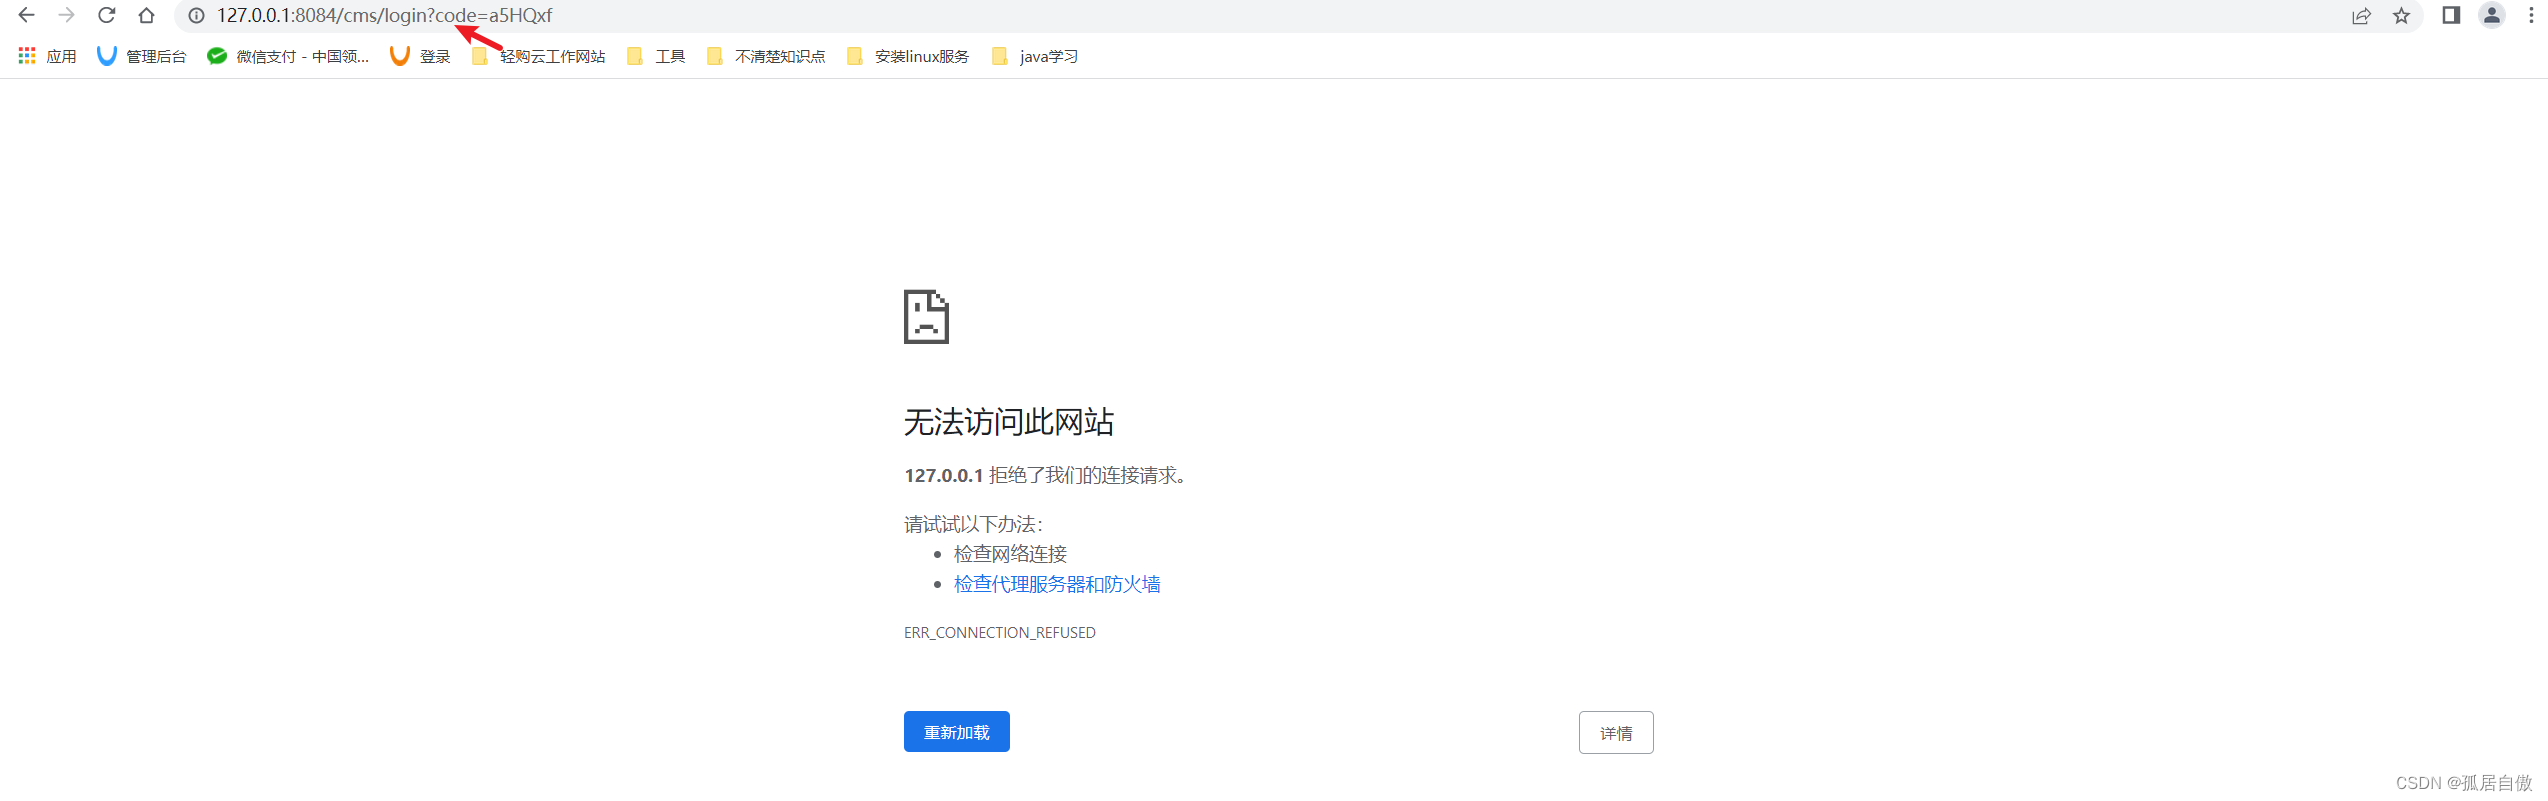
2.根据授权码申请令牌(在PostMan中调用接口):http://localhost:8888/oauth/token?code=ckujfQ&grant_type=authorization_code&redirect_url=http://127.0.0.1:8084/cms/login&scope=all
grant_type:授权类型,填写authorization_code,表示授权码模式。code:授权码,注意授权码使用一次就无效了,需要重新申请。redirect_uri:跳转uri,当授权码申请成功后会跳转到此地址,并在后边带上code参数,这里需要。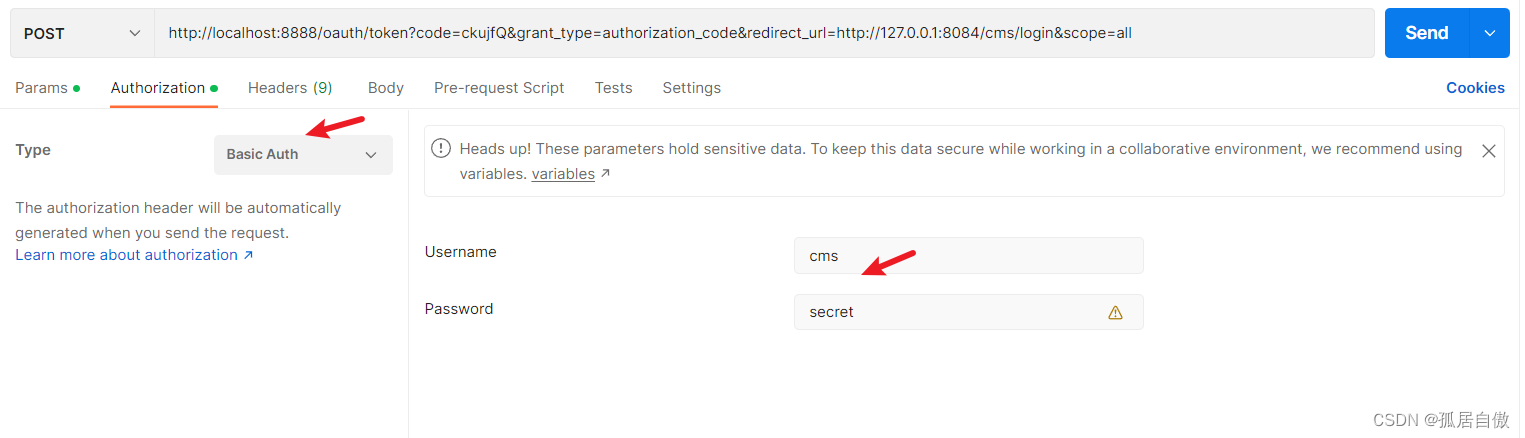

令牌校验:http://localhost:8888/oauth/check_token?token=4a7e8dbc-24ef-4517-8de3-d9b0229dfa0b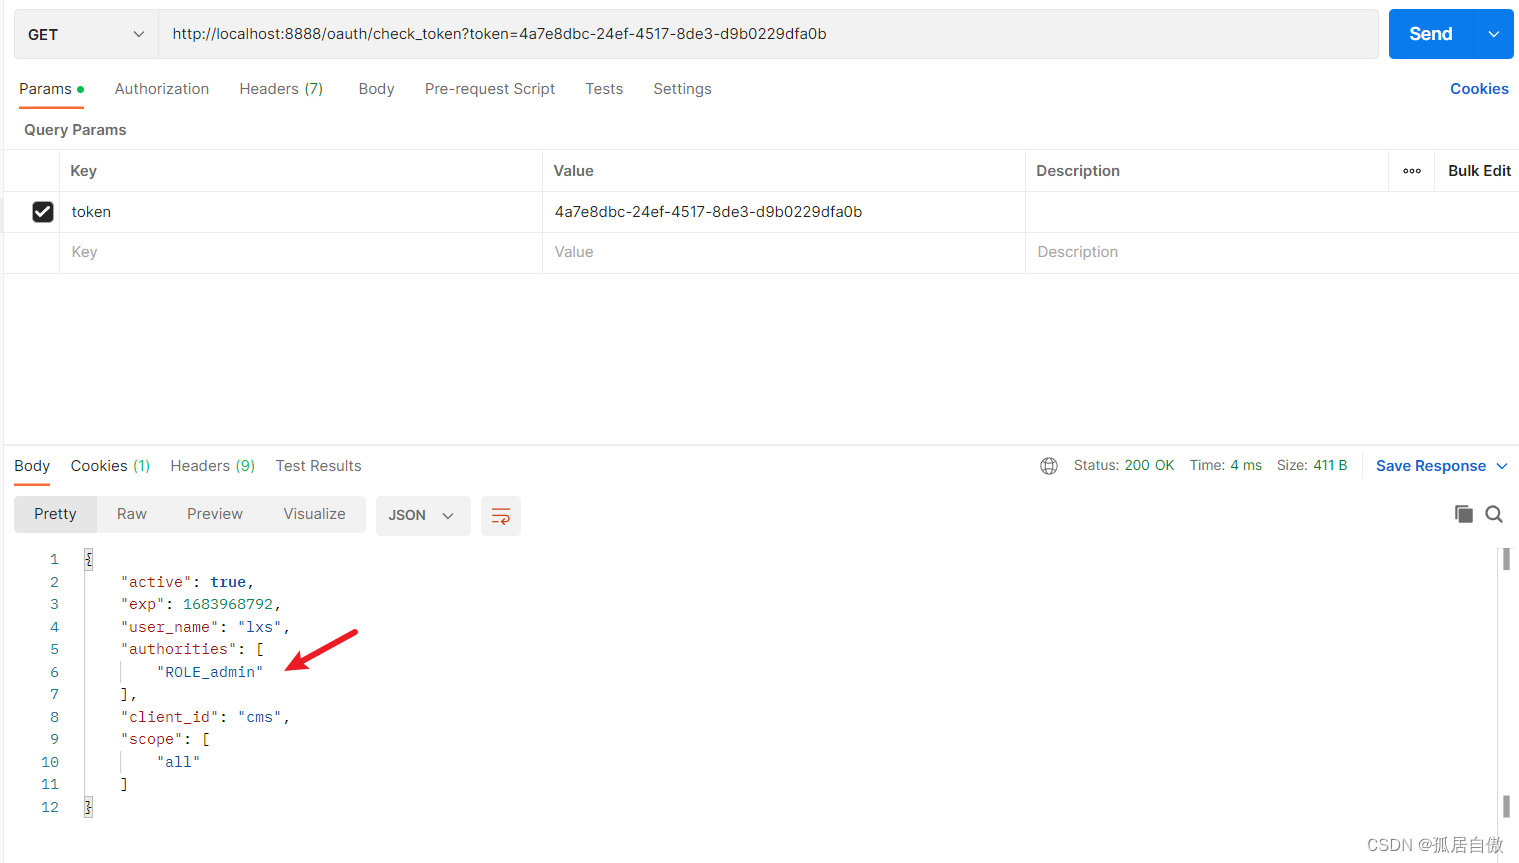
使用令牌:http://localhost:8888/oauth/check_token?token=4a7e8dbc-24ef-4517-8de3-d9b0229dfa0b携带token则访问资源项目接口成功
简化模式: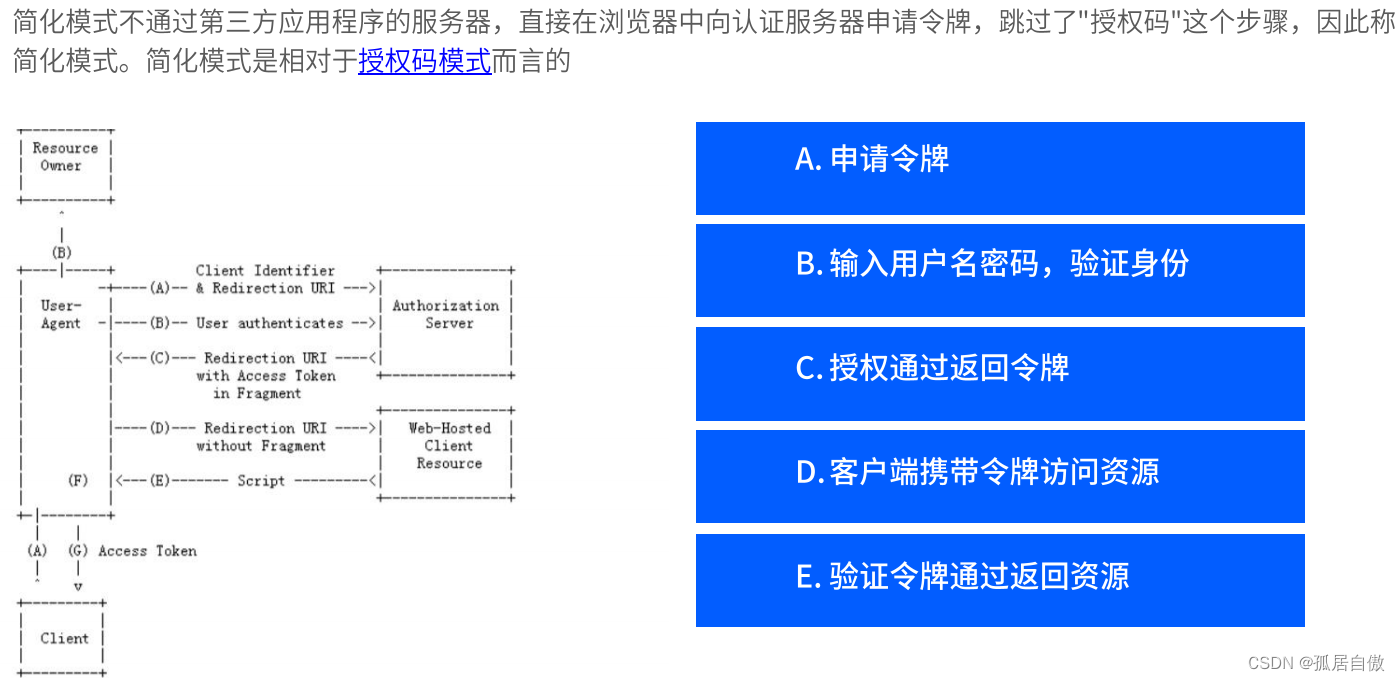
申请令牌 浏览器请求:localhost:8888/oauth/authorize?client_id=cms&redirect_uri=http://127.0.0.1:8084/cms/login&response_type=token&scope=all

输入网址回车

校验令牌:http://localhost:8888/oauth/check_token?token=f9013048-946b-4875-a83a-69371e7e0829
资源测试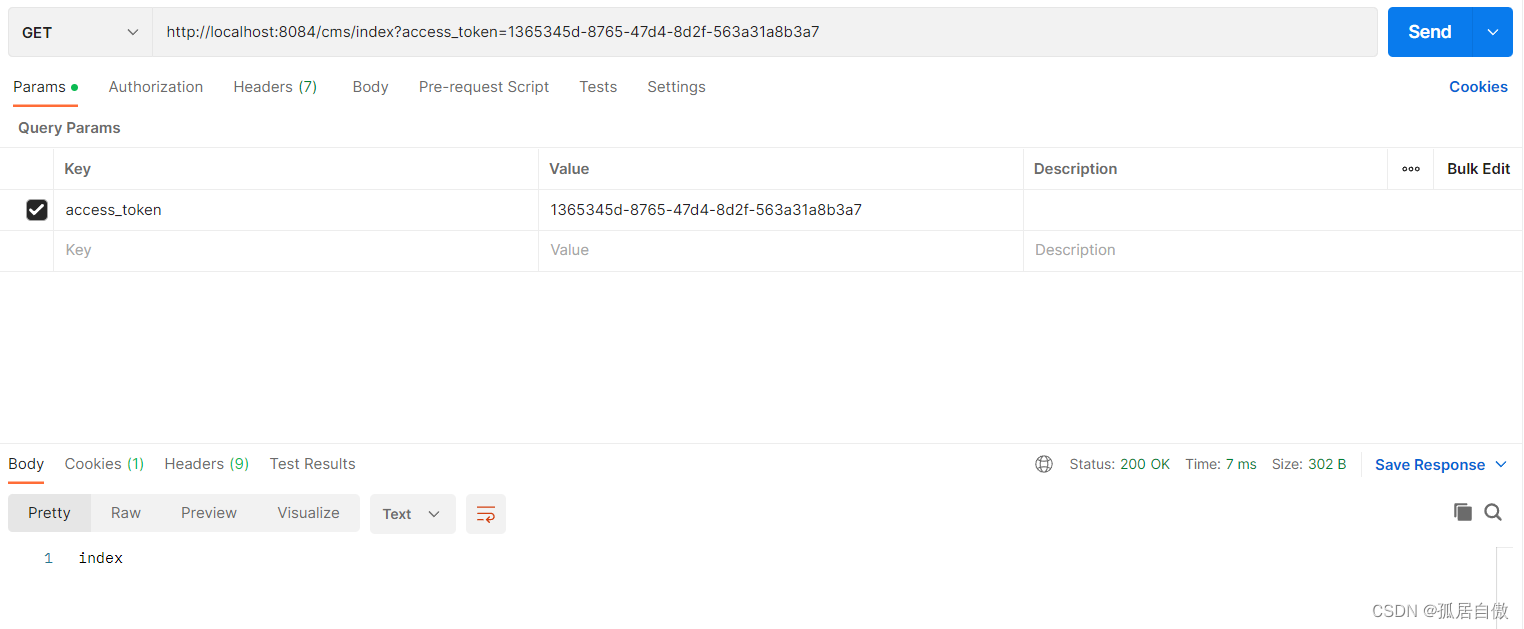
密码模式: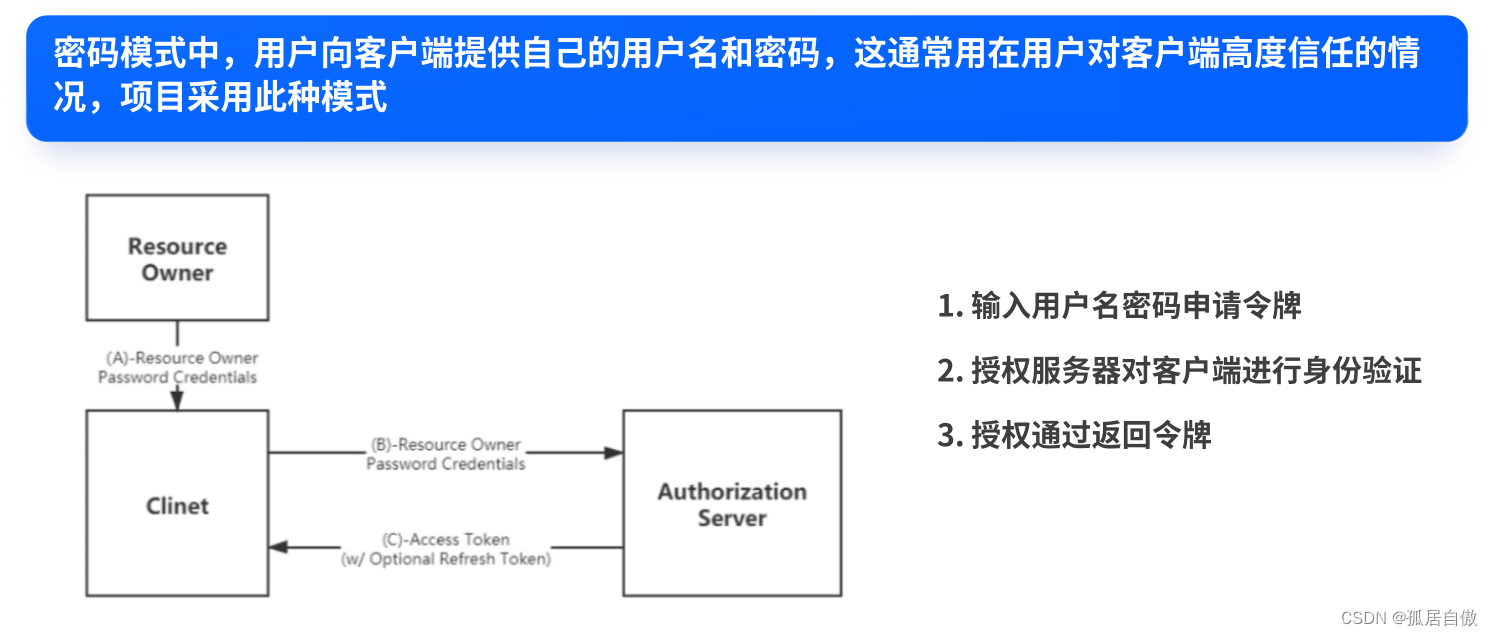
申请令牌 使用PostMan:localhost:8888/oauth/token?grant_type=password&username=lxs&password=123&scope=all
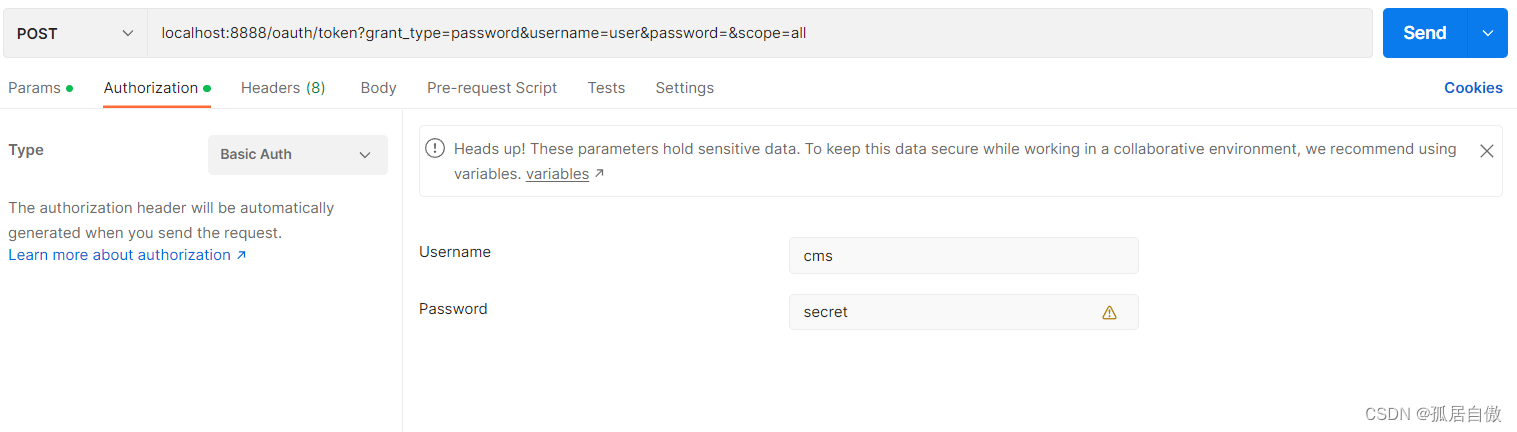
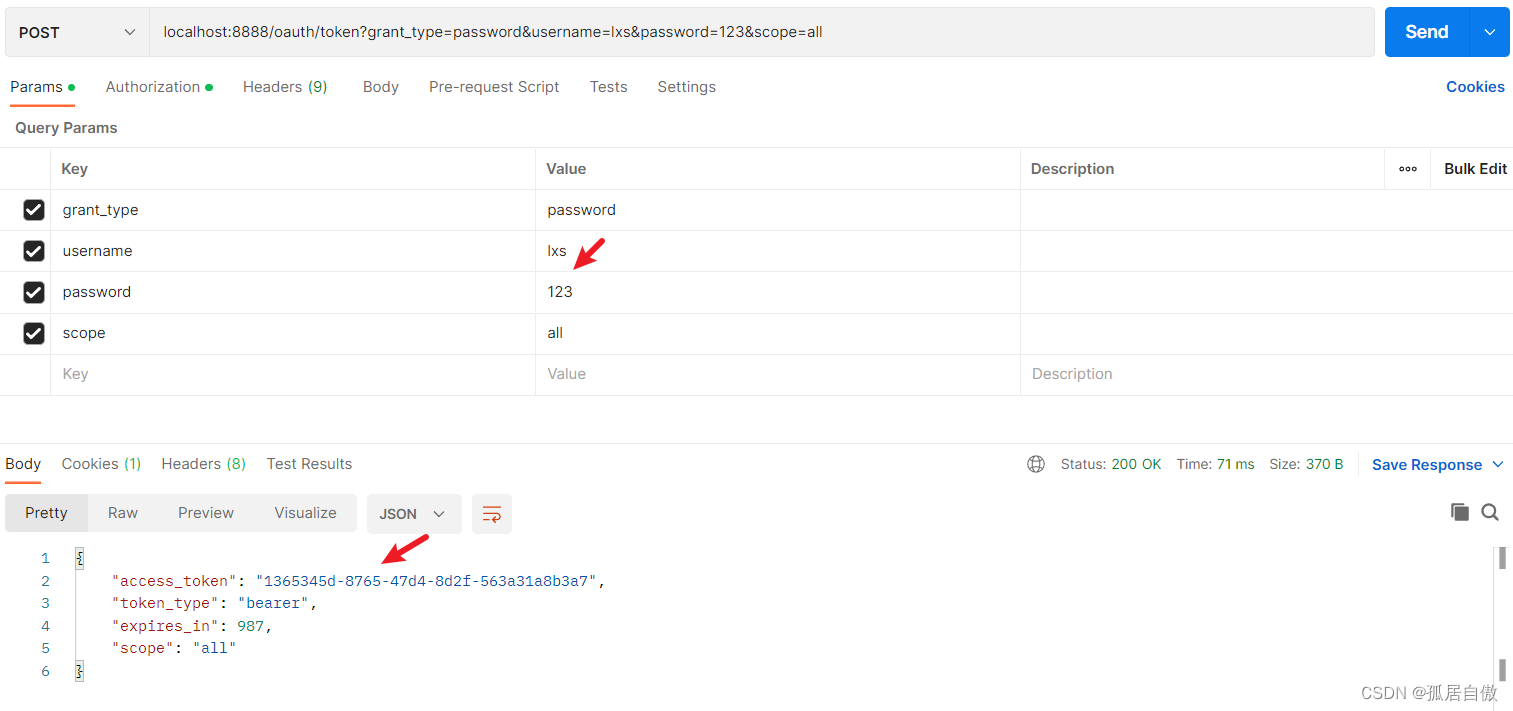
校验令牌:http://localhost:8888/oauth/check_token?token=1365345d-8765-47d4-8d2f-563a31a8b3a7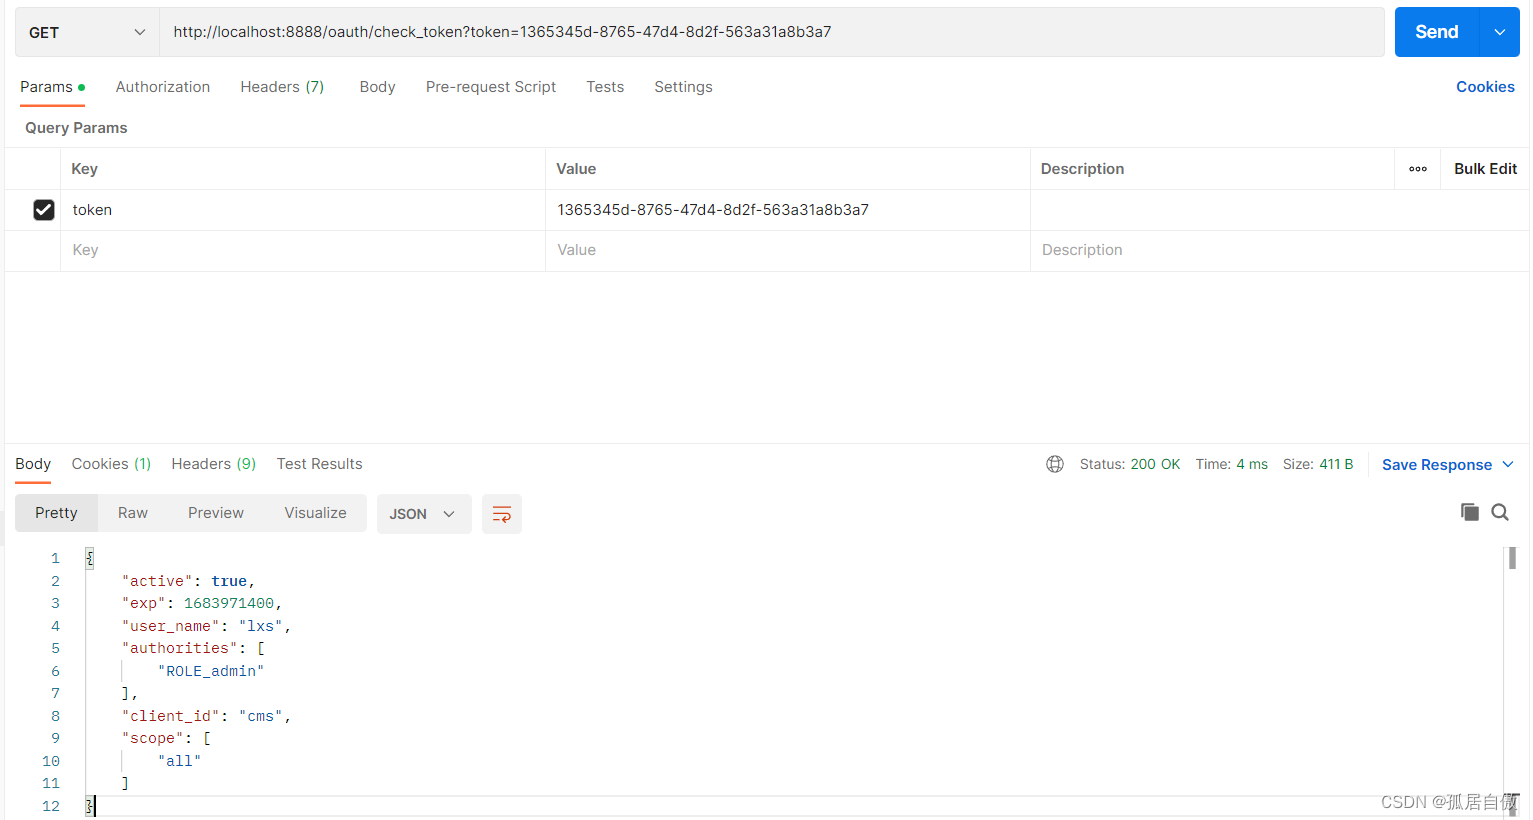
资源测试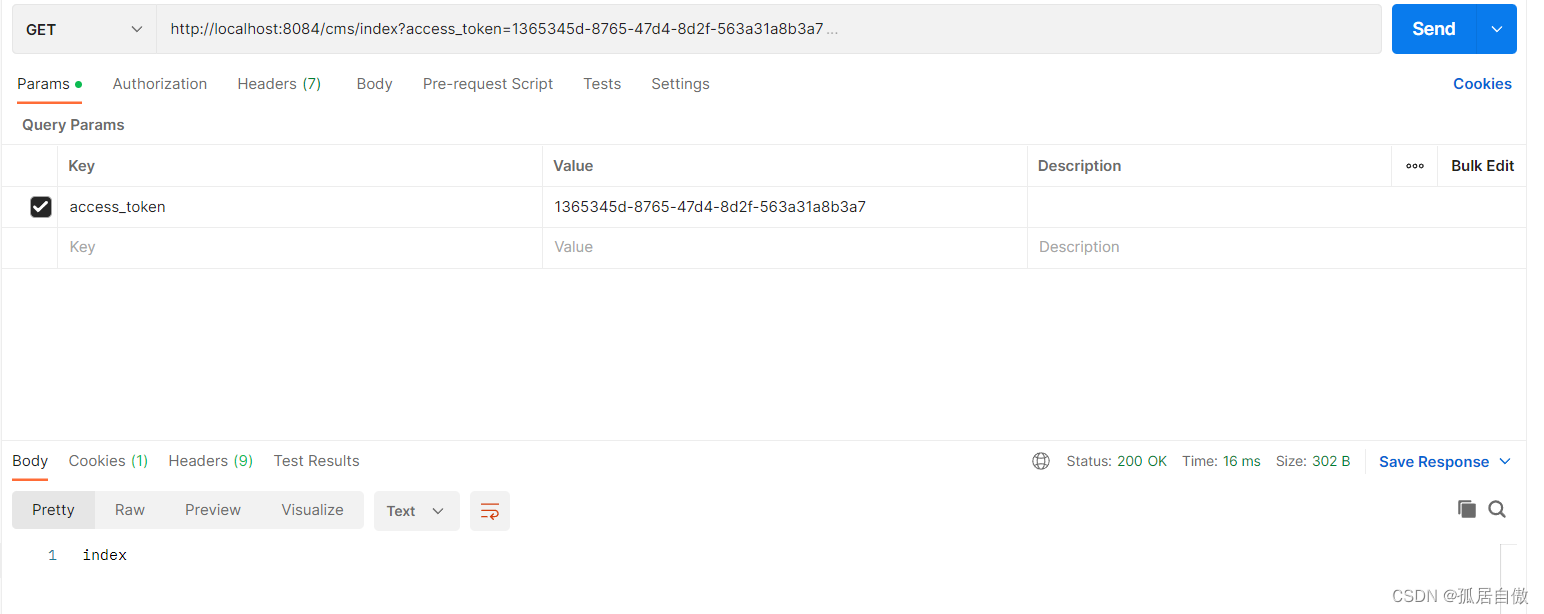
客户端模式: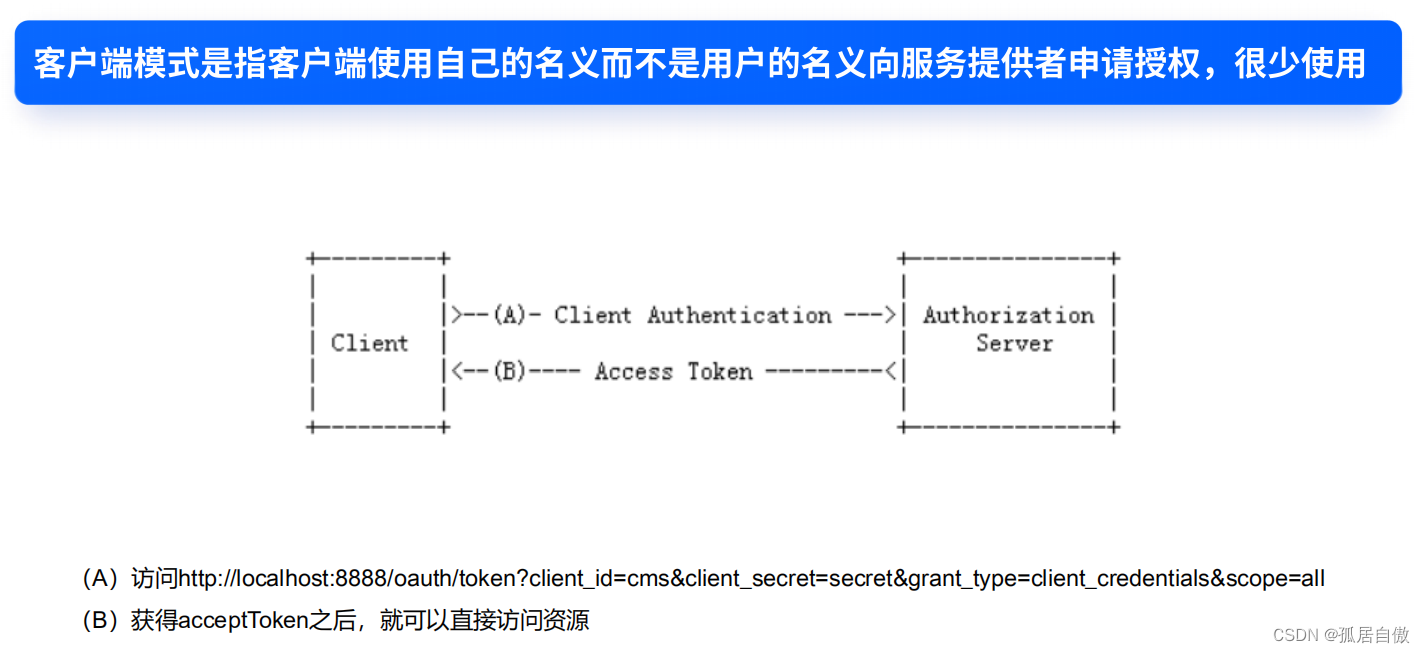
申请令牌 使用PostMan:localhost:8888/oauth/token?grant_type=password&username=lxs&password=123&scope=all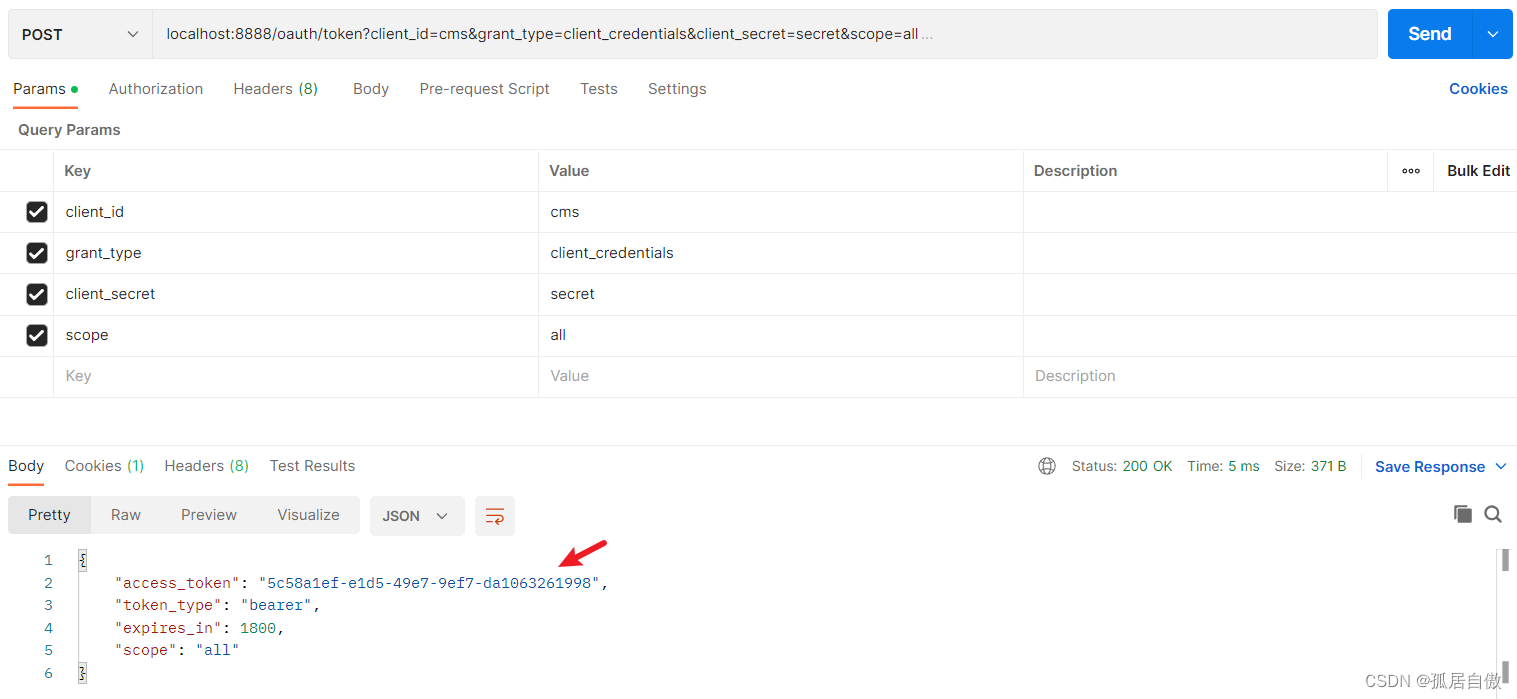
校验令牌:http://localhost:8888/oauth/check_token?token=5c58a1ef-e1d5-49e7-9ef7-da1063261998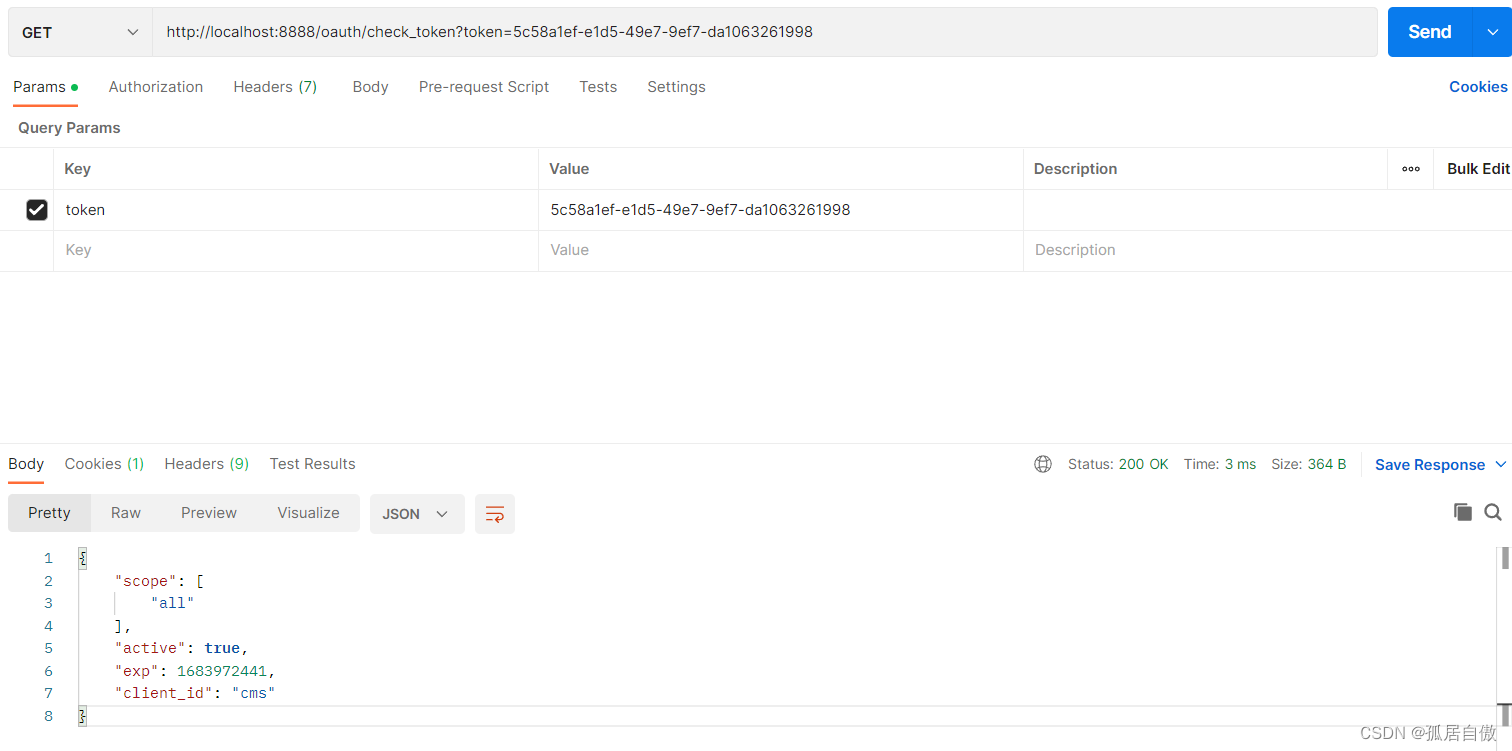
资源测试
三.Spring Security实现OAuth2协议实战(对标大厂)
3.1 生成JWT公钥私钥
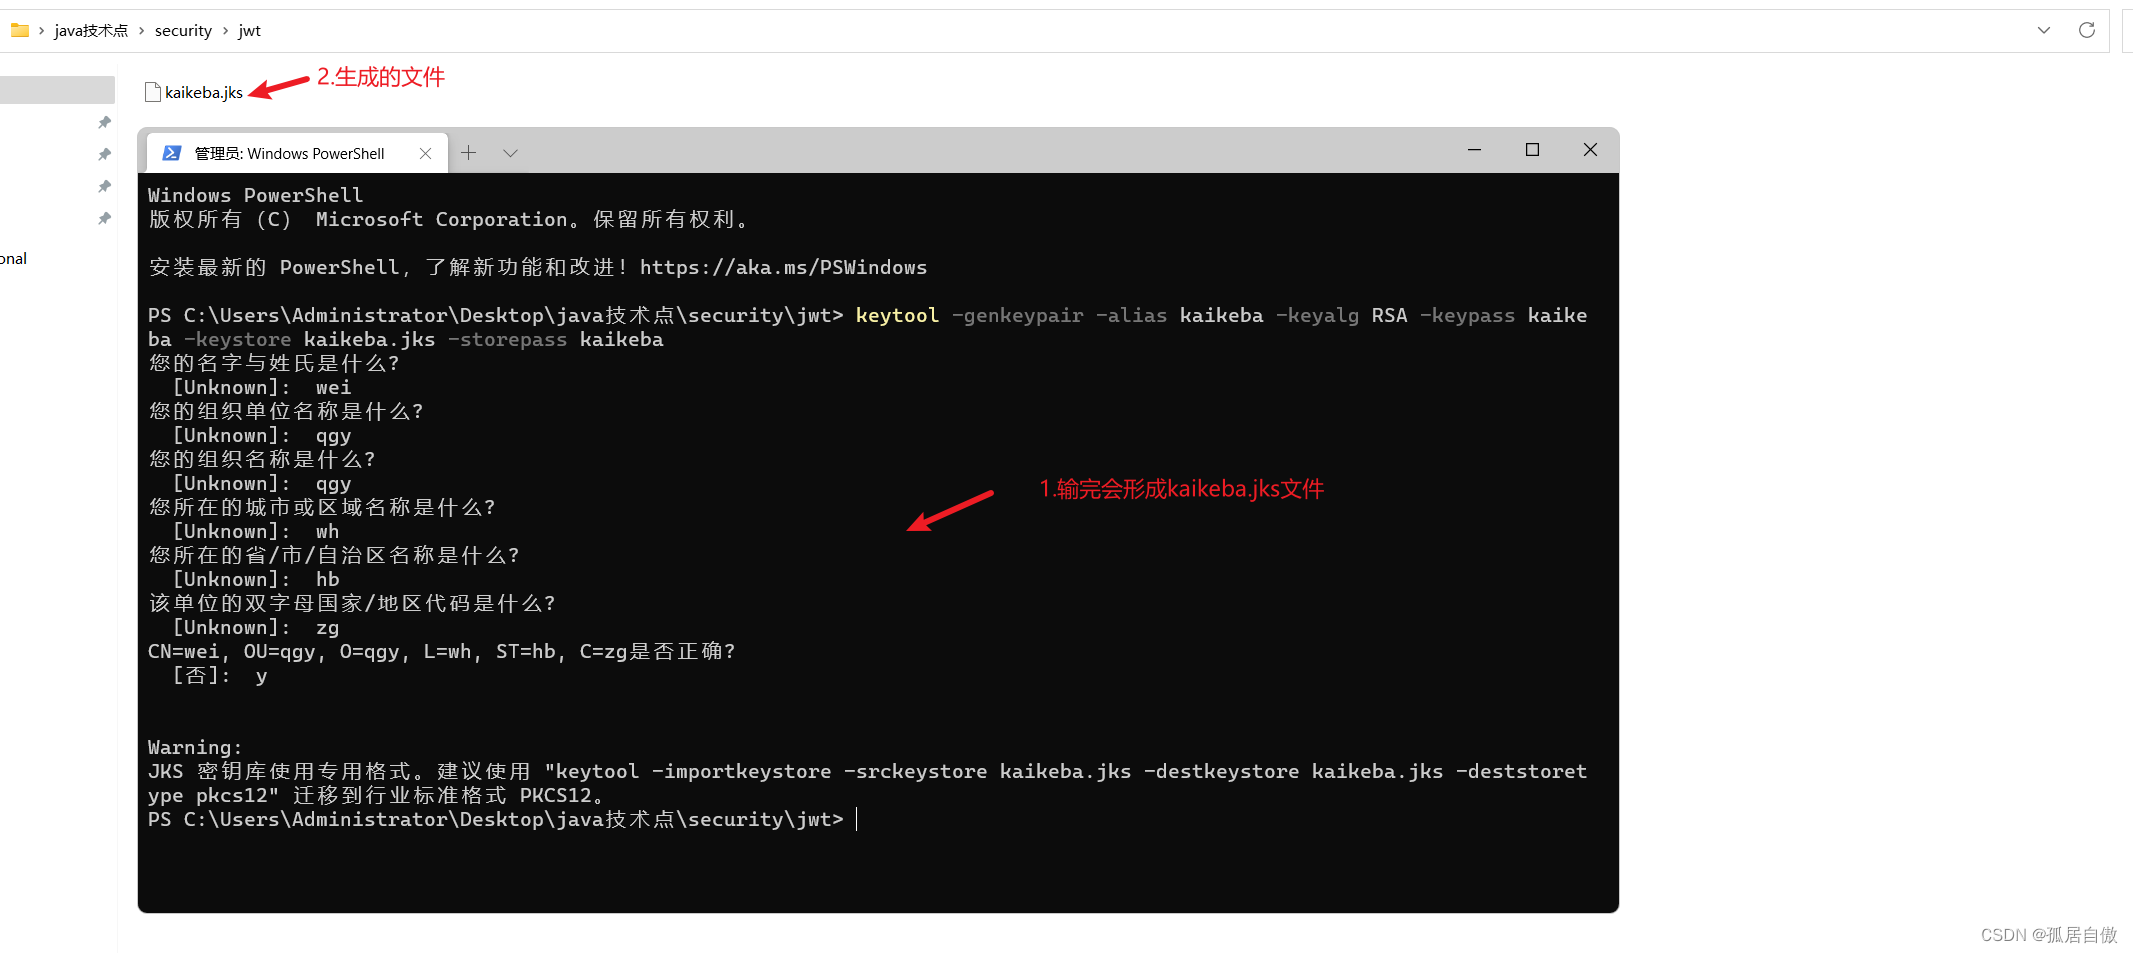
1. ⽣成密钥证书 下边命令⽣成密钥证书,采⽤RSA 算法每个证书包含公钥和私钥 创建⼀个⽂件夹,在该⽂件夹下执⾏如下命令⾏:
keytool -genkeypair -alias kaikeba -keyalg RSA -keypass kaikeba -keystore kaikeba.jks -storepass kaikeb参数解释:
alias:密钥的别名keyalg:使⽤的hash算法keypass:密钥的访问密码keystore:密钥库⽂件名storepass:密钥库的访问密码
导出公钥下载网址 https://slproweb.com/products/Win32OpenSSL.html
配置环境变量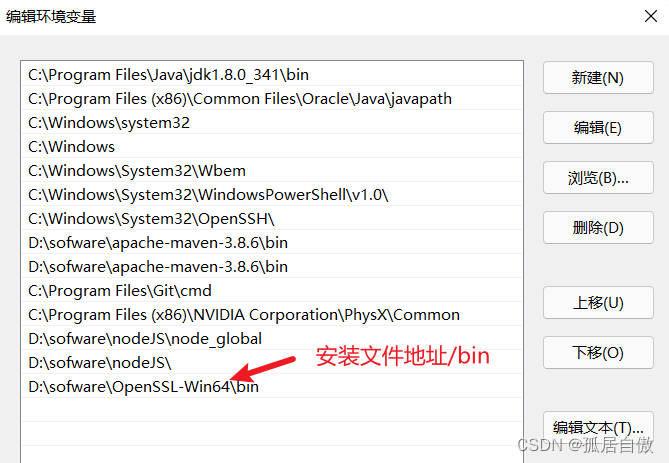
cmd进⼊kaikeba.jks⽂件所在⽬录执⾏如下命令 keytool -list -rfc --keystore kaikeba.jks | openssl x509 -inform pem -pubkey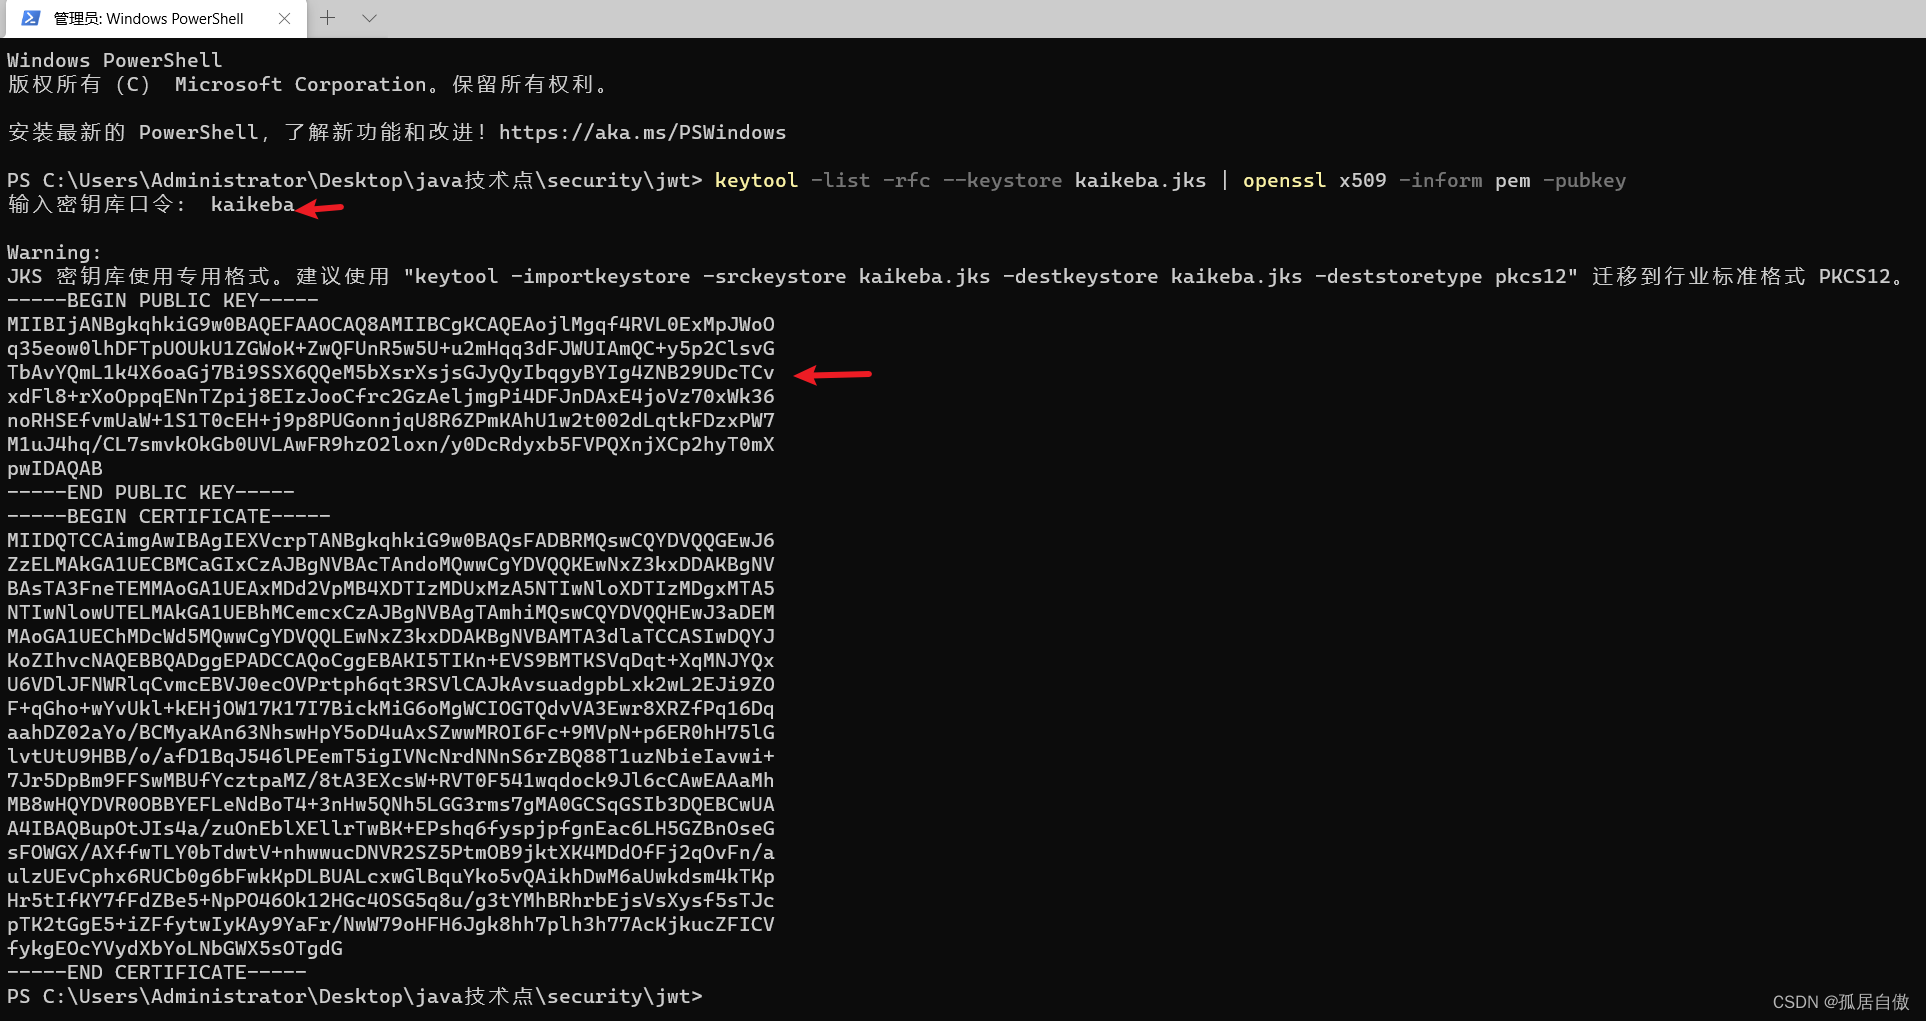
下⾯段内容是公钥-----BEGIN PUBLIC KEY----- MIIBIjANBgkqhkiG9w0BAQEFAAOCAQ8AMIIBCgKCAQEAojlMgqf4RVL0ExMpJWoO q35eow0lhDFTpUOUkU1ZGWoK+ZwQFUnR5w5U+u2mHqq3dFJWUIAmQC+y5p2ClsvG TbAvYQmL1k4X6oaGj7Bi9SSX6QQeM5bXsrXsjsGJyQyIbqgyBYIg4ZNB29UDcTCv xdFl8+rXoOppqENnTZpij8EIzJooCfrc2GzAeljmgPi4DFJnDAxE4joVz70xWk36 noRHSEfvmUaW+1S1T0cEH+j9p8PUGonnjqU8R6ZPmKAhU1w2t002dLqtkFDzxPW7 M1uJ4hq/CL7smvkOkGb0UVLAwFR9hzO2loxn/y0DcRdyxb5FVPQXnjXCp2hyT0mX pwIDAQAB -----END PUBLIC KEY-----
创建public.key文件 将公钥复制进去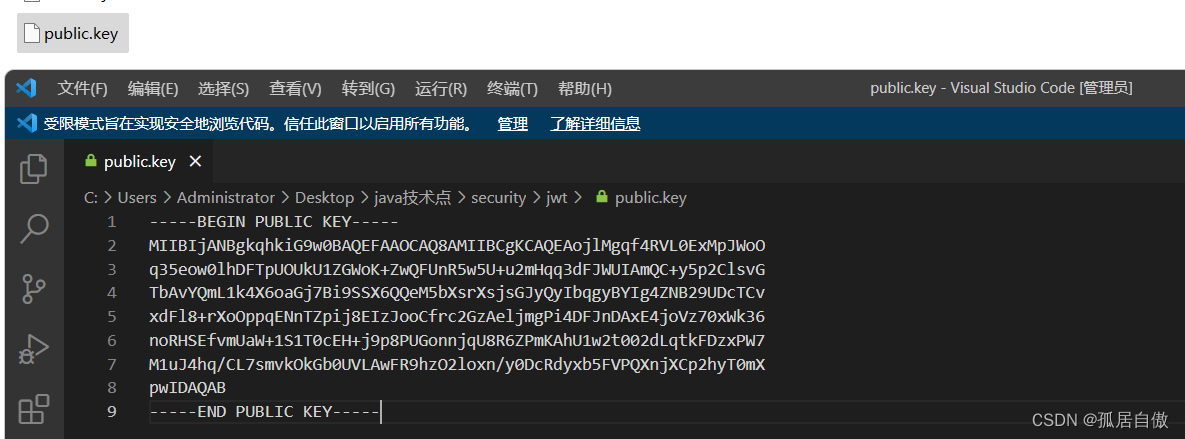
3.2 搭建授权项目与资源项目
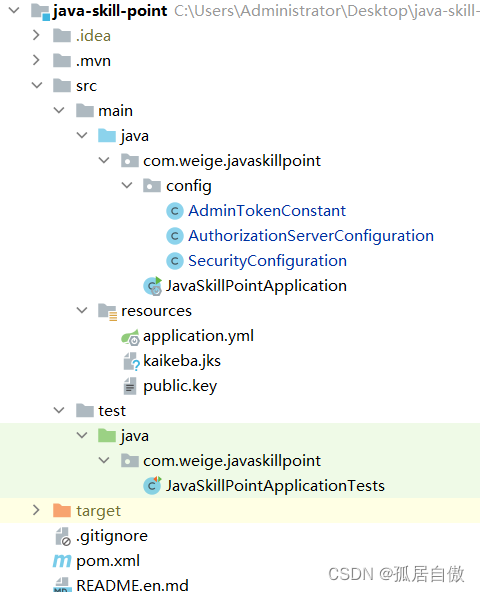
搭建授权项目 项目目录
pom.xml
<?xml version="1.0" encoding="UTF-8"?>
<project xmlns="http://maven.apache.org/POM/4.0.0" xmlns:xsi="http://www.w3.org/2001/XMLSchema-instance"
         xsi:schemaLocation="http://maven.apache.org/POM/4.0.0 https://maven.apache.org/xsd/maven-4.0.0.xsd">
    <modelVersion>4.0.0</modelVersion>
    <parent>
        <groupId>org.springframework.boot</groupId>
        <artifactId>spring-boot-starter-parent</artifactId>
        <version>2.2.1.RELEASE</version>
        <relativePath/> <!-- lookup parent from repository -->
    </parent>
    <groupId>com.weige</groupId>
    <artifactId>java-skill-point</artifactId>
    <version>0.0.1-SNAPSHOT</version>
    <name>java-skill-point</name>
    <description>java-skill-point</description>
    <properties>
        <java.version>1.8</java.version>
        <spring-cloud.version>Hoxton.SR5</spring-cloud.version>
    </properties>
    <dependencies>
        <!--Springboot项目自带 -->
        <dependency>
            <groupId>org.springframework.boot</groupId>
            <artifactId>spring-boot-starter</artifactId>
        </dependency>
        <dependency>
            <groupId>org.springframework.boot</groupId>
            <artifactId>spring-boot-starter-test</artifactId>
            <scope>test</scope>
        </dependency>
        <!--Springboot Web项目 -->
        <dependency>
            <groupId>org.springframework.boot</groupId>
            <artifactId>spring-boot-starter-web</artifactId>
        </dependency>

        <!--lombok -->
        <dependency>
            <groupId>org.projectlombok</groupId>
            <artifactId>lombok</artifactId>
            <version>1.18.22</version>
        </dependency>

        <!--Mysql依赖 -->
        <dependency>
            <groupId>mysql</groupId>
            <artifactId>mysql-connector-java</artifactId>
            <scope>runtime</scope>
        </dependency>
        <!-- mybatis 用于接口注解快速开发(@Insert @Select @Update) -->
        <dependency>
            <groupId>org.mybatis</groupId>
            <artifactId>mybatis</artifactId>
            <version>3.4.6</version>
        </dependency>
        <!--用于扫描mybatis注解 @Mapper @MapperScan-->
        <dependency>
            <groupId>org.mybatis.spring.boot</groupId>
            <artifactId>mybatis-spring-boot-starter</artifactId>
            <version>2.2.2</version>
        </dependency>

        <!-- hutool  -->
        <dependency>
            <groupId>cn.hutool</groupId>
            <artifactId>hutool-all</artifactId>
            <version>5.7.20</version>
        </dependency>

        <dependency>
            <groupId>org.apache.commons</groupId>
            <artifactId>commons-lang3</artifactId>
            <version>3.7</version>
        </dependency>

        <dependency>
            <groupId>org.springframework.cloud</groupId>
            <artifactId>spring-cloud-starter-oauth2</artifactId>
        </dependency>

        <dependency>
            <groupId>org.springframework.cloud</groupId>
            <artifactId>spring-cloud-starter-security</artifactId>
        </dependency>

    </dependencies>

    <dependencyManagement>
        <dependencies>
            <dependency>
                <groupId>org.springframework.cloud</groupId>
                <artifactId>spring-cloud-dependencies</artifactId>
                <version>${spring-cloud.version}</version>
                <type>pom</type>
                <scope>import</scope>
            </dependency>
        </dependencies>
    </dependencyManagement>

    <build>
        <plugins>
            <plugin>
                <groupId>org.springframework.boot</groupId>
                <artifactId>spring-boot-maven-plugin</artifactId>
            </plugin>
        </plugins>
    </build>

</project>
application.yml
server:
  port: 8888

spring:
  main:
    allow-bean-definition-overriding: true
  # mysql连接信息
  datasource:
    # mysql8之后
    driver-class-name: com.mysql.cj.jdbc.Driver
    url: jdbc:mysql://43.143.132.109:3306/index?useUnicode=true&characterEncoding=utf8&tinyInt1isBit=false&useSSL=false&serverTimezone=GMT
    username: root
    password: ******
大家在这里要创建对应的数据库index 并创建oauth_client_details表
CREATE TABLE `oauth_client_details` (
  `client_id` varchar(256) COLLATE utf8mb4_german2_ci NOT NULL,
  `resource_ids` varchar(256) COLLATE utf8mb4_german2_ci DEFAULT NULL,
  `client_secret` varchar(256) COLLATE utf8mb4_german2_ci DEFAULT NULL,
  `scope` varchar(256) COLLATE utf8mb4_german2_ci DEFAULT NULL,
  `authorized_grant_types` varchar(256) COLLATE utf8mb4_german2_ci DEFAULT NULL,
  `web_server_redirect_uri` varchar(256) COLLATE utf8mb4_german2_ci DEFAULT NULL,
  `authorities` varchar(256) COLLATE utf8mb4_german2_ci DEFAULT NULL,
  `access_token_validity` int(11) DEFAULT NULL,
  `refresh_token_validity` int(11) DEFAULT NULL,
  `additional_information` varchar(4096) COLLATE utf8mb4_german2_ci DEFAULT NULL,
  `autoapprove` varchar(256) COLLATE utf8mb4_german2_ci DEFAULT NULL,
  PRIMARY KEY (`client_id`)
) ENGINE=InnoDB DEFAULT CHARSET=utf8mb4 COLLATE=utf8mb4_german2_ci;

INSERT INTO `index`.`oauth_client_details` (`client_id`, `resource_ids`, `client_secret`, `scope`, `authorized_grant_types`, `web_server_redirect_uri`, `authorities`, `access_token_validity`, `refresh_token_validity`, `additional_information`, `autoapprove`) VALUES ('cms', '', '$2a$10$WZQaLHfS6amrJzN50wE3e.upn8KIi1wmCH9FSdZE6OBt8OKSyGLm.', 'read, write', 'client_credentials,implicit,authorization_code,refresh_token,password', 'http://www.baidu.com', NULL, NULL, NULL, NULL, 'false');

## '$2a$10$WZQaLHfS6amrJzN50wE3e.upn8KIi1wmCH9FSdZE6OBt8OKSyGLm.' 是加密过后的123456
AdminTokenConstant文件
package com.weige.javaskillpoint.config;

public class AdminTokenConstant {

    /**
     * 秘钥全名称
     */
    public static final String KEY_LOCATION = "kaikeba.jks";

    /**
     * 密钥的密码,此密码和别名要匹配
     */
    public static final String KEY_PASSWORD = "kaikeba";
}
AuthorizationServerConfiguration文件
package com.weige.javaskillpoint.config;

import org.springframework.context.annotation.Bean;
import org.springframework.context.annotation.Configuration;
import org.springframework.core.io.ClassPathResource;
import org.springframework.security.authentication.AuthenticationManager;
import org.springframework.security.oauth2.config.annotation.configurers.ClientDetailsServiceConfigurer;
import org.springframework.security.oauth2.config.annotation.web.configuration.AuthorizationServerConfigurerAdapter;
import org.springframework.security.oauth2.config.annotation.web.configuration.EnableAuthorizationServer;
import org.springframework.security.oauth2.config.annotation.web.configurers.AuthorizationServerEndpointsConfigurer;
import org.springframework.security.oauth2.config.annotation.web.configurers.AuthorizationServerSecurityConfigurer;
import org.springframework.security.oauth2.provider.ClientDetailsService;
import org.springframework.security.oauth2.provider.client.JdbcClientDetailsService;
import org.springframework.security.oauth2.provider.token.DefaultTokenServices;
import org.springframework.security.oauth2.provider.token.TokenStore;
import org.springframework.security.oauth2.provider.token.store.JwtAccessTokenConverter;
import org.springframework.security.oauth2.provider.token.store.JwtTokenStore;
import org.springframework.security.oauth2.provider.token.store.KeyStoreKeyFactory;

import javax.annotation.Resource;
import javax.sql.DataSource;
import java.util.concurrent.TimeUnit;

@Configuration
@EnableAuthorizationServer
public class AuthorizationServerConfiguration extends AuthorizationServerConfigurerAdapter {

    @Resource
    private AuthenticationManager authenticationManager;

    @Resource
    private DataSource dataSource;

    @Bean
    public TokenStore tokenStore() {
        return new JwtTokenStore(jwtAccessTokenConverter());
    }

    @Bean
    public JwtAccessTokenConverter jwtAccessTokenConverter() {
        // 证书路径和密钥库密码
        KeyStoreKeyFactory keyStoreKeyFactory = new KeyStoreKeyFactory(new ClassPathResource(AdminTokenConstant.KEY_LOCATION), AdminTokenConstant.KEY_PASSWORD.toCharArray());
        JwtAccessTokenConverter converter = new JwtAccessTokenConverter();
        // 密钥别名
        converter.setKeyPair(keyStoreKeyFactory.getKeyPair(AdminTokenConstant.KEY_PASSWORD));
        return converter;
    }

    /**
     * 声明 ClientDetails实现
     *
     * @return
     */
    @Bean
    public ClientDetailsService clientDetailsService() {
        return new JdbcClientDetailsService(dataSource);
    }

    /**
     * 配置客户端详情服务(ClientDetailsService),客户端详情信息在这里进行初始化,
     * 你能够把客户端详情信息写死在这里或者是通过数据库来存储调取详情信息
     *
     * @param clients
     * @throws Exception
     */
    @Override
    public void configure(ClientDetailsServiceConfigurer clients) throws Exception {
        // 直接读取数据库,需要保证数据库配置有客户端信息(oauth_client_details),否则资源服务器无法获取认证数据
        clients.withClientDetails(clientDetailsService());
    }

    /**
     * 配置授权(authorization)以及令牌(token)的访问端点和令牌服务(token services),还有token的存储方式(tokenStore)
     *
     * @param endpoints
     */
    @Override
    public void configure(AuthorizationServerEndpointsConfigurer endpoints) {
        endpoints.tokenStore(tokenStore()).tokenEnhancer(jwtAccessTokenConverter()).authenticationManager(authenticationManager);
        // 配置tokenServices参数
        DefaultTokenServices tokenServices = new DefaultTokenServices();
        tokenServices.setTokenStore(endpoints.getTokenStore());
        tokenServices.setSupportRefreshToken(false);
        tokenServices.setClientDetailsService(endpoints.getClientDetailsService());
        tokenServices.setTokenEnhancer(endpoints.getTokenEnhancer());
        tokenServices.setAccessTokenValiditySeconds((int) TimeUnit.DAYS.toSeconds(30));
        endpoints.tokenServices(tokenServices);
    }

    @Override
    public void configure(AuthorizationServerSecurityConfigurer security) {
        // 允许表单认证
        security.allowFormAuthenticationForClients()
                // 开启/oauth/token_key验证端口无权限访问
                .tokenKeyAccess("permitAll()")
                // 开启/oauth/check_token验证端口认证权限访问
                .checkTokenAccess("permitAll()");
    }
}
SecurityConfiguration文件
package com.weige.javaskillpoint.config;

import org.springframework.context.annotation.Bean;
import org.springframework.context.annotation.Configuration;
import org.springframework.security.authentication.AuthenticationManager;
import org.springframework.security.config.annotation.authentication.builders.AuthenticationManagerBuilder;
import org.springframework.security.config.annotation.web.builders.HttpSecurity;
import org.springframework.security.config.annotation.web.configuration.EnableWebSecurity;
import org.springframework.security.config.annotation.web.configuration.WebSecurityConfigurerAdapter;
import org.springframework.security.core.userdetails.UserDetailsService;
import org.springframework.security.crypto.bcrypt.BCryptPasswordEncoder;
import org.springframework.security.crypto.password.PasswordEncoder;

import javax.annotation.Resource;

@Configuration
@EnableWebSecurity
public class SecurityConfiguration extends WebSecurityConfigurerAdapter {

    @Resource
    private UserDetailsService userDetailsService;

    @Bean
    public PasswordEncoder passwordEncoder() {
        return new BCryptPasswordEncoder();
    }

    @Override
    @Bean
    public AuthenticationManager authenticationManagerBean() throws Exception {
        return super.authenticationManagerBean();
    }

    /**
     * @param http
     * @throws Exception
     */
    @Override
    protected void configure(HttpSecurity http) throws Exception {
        // 所有请求都加入HttpSecurity(多个HttpSecurity过滤)
        http.requestMatchers().anyRequest()
                // 开放/oauth/开头的所有请求
                .and().authorizeRequests().antMatchers("/oauth/**").permitAll();
    }

    @Override
    protected void configure(AuthenticationManagerBuilder auth) throws Exception {
        // 注入自定义的UserDetailsService,采用BCrypt加密
        auth.userDetailsService(userDetailsService).passwordEncoder(passwordEncoder());
    }
}
UserDetailServiceImpl文件
package com.weige.javaskillpoint.service.impl;

import lombok.extern.slf4j.Slf4j;
import org.springframework.security.core.GrantedAuthority;
import org.springframework.security.core.authority.SimpleGrantedAuthority;
import org.springframework.security.core.userdetails.User;
import org.springframework.security.core.userdetails.UserDetails;
import org.springframework.security.core.userdetails.UserDetailsService;
import org.springframework.security.core.userdetails.UsernameNotFoundException;
import org.springframework.security.crypto.bcrypt.BCryptPasswordEncoder;
import org.springframework.stereotype.Service;
import org.apache.commons.lang3.StringUtils;

import java.util.ArrayList;
import java.util.HashMap;
import java.util.List;
import java.util.Map;

@Slf4j
@Service
public class UserDetailServiceImpl implements UserDetailsService {

    /**
     * 根据用户名加载用户信息
     *
     * @param username 用户名
     * @return 用户详情
     * @throws UsernameNotFoundException
     */
    @Override
    public UserDetails loadUserByUsername(String username) throws UsernameNotFoundException {
        // 这里可以连接数据库 我这里写假数据
        // 有两个用户(username:user,password:user;username:admin,password:admin)
        Map<String, String> map = new HashMap<>();
        map.put("user", "USER");
        map.put("admin", "ADMIN");
        String passWord = "$2a$10$b7cqpfkMLYE2H5wxMluGQOrXo76ZfaAALEaemrfFLwDvvHuJuvX/2";
        if (username.equals("admin")) {
            passWord = "$2a$10$b7cqpfkMLYE2H5wxMluGQOrXo76ZfaAALEaemrfFLwDvvHuJuvX/2";
        }

        List<GrantedAuthority> grantedAuthorities = new ArrayList<>();
        // 获取用户的授权
        String s = map.get(username);
        // Spring Security 中权限名称必须满足ROLE_XXX
        GrantedAuthority grantedAuthority = new SimpleGrantedAuthority(StringUtils.join("ROLE_", s));
        grantedAuthorities.add(grantedAuthority);
        log.info("granted authorities :{} ", grantedAuthorities);
        return new User(username, passWord, grantedAuthorities);
    }
}
JavaSkillPointApplication文件
package com.weige.javaskillpoint;

import org.mybatis.spring.annotation.MapperScan;
import org.springframework.boot.SpringApplication;
import org.springframework.boot.autoconfigure.SpringBootApplication;

@SpringBootApplication
@MapperScan("com.weige.javaskillpoint.dao")
public class JavaSkillPointApplication {

    public static void main(String[] args) {
        SpringApplication.run(JavaSkillPointApplication.class, args);
    }
}
JavaSkillPointApplicationTests测试文件
package com.weige.javaskillpoint;

import com.fasterxml.jackson.databind.ObjectMapper;
import org.junit.jupiter.api.Test;
import org.springframework.boot.test.context.SpringBootTest;
import org.springframework.core.io.ClassPathResource;
import org.springframework.security.crypto.bcrypt.BCryptPasswordEncoder;
import org.springframework.security.jwt.Jwt;
import org.springframework.security.jwt.JwtHelper;
import org.springframework.security.jwt.crypto.sign.RsaSigner;
import org.springframework.security.jwt.crypto.sign.RsaVerifier;
import org.springframework.security.oauth2.provider.token.store.KeyStoreKeyFactory;

import java.security.KeyPair;
import java.security.interfaces.RSAPrivateKey;
import java.util.HashMap;
import java.util.Map;

@SpringBootTest
class JavaSkillPointApplicationTests {

    @Test
    public void testCreateJwt() throws Exception {
        //证书⽂件
        String key_location = "kaikeba.jks";
        // 密钥库密码
        String keystore_password = "kaikeba";
        // 访问证书路径
        ClassPathResource resource = new ClassPathResource(key_location);
        // 密钥⼯⼚
        KeyStoreKeyFactory keyStoreKeyFactory = new KeyStoreKeyFactory(resource, keystore_password.toCharArray());
        // 密钥的密码,此密码和别名要匹配
        String keypassword = "kaikeba";
        //密钥别名
        String alias = "kaikeba";
        // 密钥对(密钥和公钥)
        KeyPair keyPair = keyStoreKeyFactory.getKeyPair(alias, keypassword.toCharArray());
        // 私钥
        RSAPrivateKey aPrivate = (RSAPrivateKey) keyPair.getPrivate();
        // 定义payload信息
        Map<String, Object> tokenMap = new HashMap<String, Object>();
        tokenMap.put("id", "123");
        tokenMap.put("name", "malong");
        tokenMap.put("roles", "r01,r02");
        tokenMap.put("ext", "1");
        // ⽣成jwt令牌
        Jwt jwt = JwtHelper.encode(new ObjectMapper().writeValueAsString(tokenMap), new RsaSigner(aPrivate));
        // 取出jwt令牌
        String token = jwt.getEncoded();
        System.out.println(token);
    }

    @Test
    public void testVerify() {
        //jwt令牌
        String token = "eyJhbGciOiJSUzI1NiIsInR5cCI6IkpXVCJ9.eyJleHQiOiIxIiwicm9sZXMiOiJyMDEscjAyIiwibmFtZSI6Im1hbG9uZyIsImlkIjoiMTIzIn0.X68eLdVW69xJQGcICVZapWUay-vs5Fkv0cYRQoymuagR95G4bOkJ4d3rer6ko9gMS55htLmAmv3HkzeCOOE4R6fXJcGzyuDWY9D9lC7ca0-AX4okS4iLeTQAf53AIDLM3d1DQbRdJYrdDbSwhXZXIaaaaQNiVpnN3kGXK6YB7f1ohlEURFT50bf7lKVyc8xoJX4-ojLfZiWP2C8Ov84yEOc-Q2t9kRwPtPqQjial69b0FmPqtdfPbhJG66NAQdikRCxqHKSgb6QSMc9AF9AV4RluaPixoGIpufouWpWXyk9PvK-QJwwUJgM11emDTX2wv8lf5VXH-Wdg_1Jc_uwjLA";
        String publickey = "-----BEGIN PUBLIC KEY-----\n" +
                "MIIBIjANBgkqhkiG9w0BAQEFAAOCAQ8AMIIBCgKCAQEAlym6EoAWxPYpTQHuWfqn\n" +
                "WqRkiUDrD+CyXM3Rzgtfi6ofudPDyEY5JbFcKIcfwjdQo+VLF0dIvyJA2csHhQIS\n" +
                "vZBspsE9cjz24GOuYSYufYtwOVcbjsvZ3JQaJahR6rBXzPTjvaiu1KtFtEJavWQ8\n" +
                "S9nhZ4MEMImW8r+Qphd0R4OB8KHrWoztYNznWpSaaH3QB446tQyyBre7tEPp3E6J\n" +
                "Xq+ApI5UKBpTdHW7b7MSJW836sYm8g5XfaXF667rlkdS03q3B182hUcghRY+fAyS\n" +
                "OtD2A0ib7XlrNADPL9X3dazWCYTnbNDswiqfpoDrbLy0PWFeIq09amL+E1ivKJZS\n" +
                "9wIDAQAB\n" +
                "-----END PUBLIC KEY-----";
        //校验jwt
        Jwt jwt = JwtHelper.decodeAndVerify(token, new RsaVerifier(publickey));
        //获取jwt原始内容
        String claims = jwt.getClaims();
        System.out.println(claims);
    }

    @Test
    public void getEnPassword(){
        String encode = new BCryptPasswordEncoder().encode("123456");
        System.out.println(encode);
    }
}
这里别忘记了生成的JWT公钥私钥文件 放到reources目录下即可
搭建资源项目 项目目录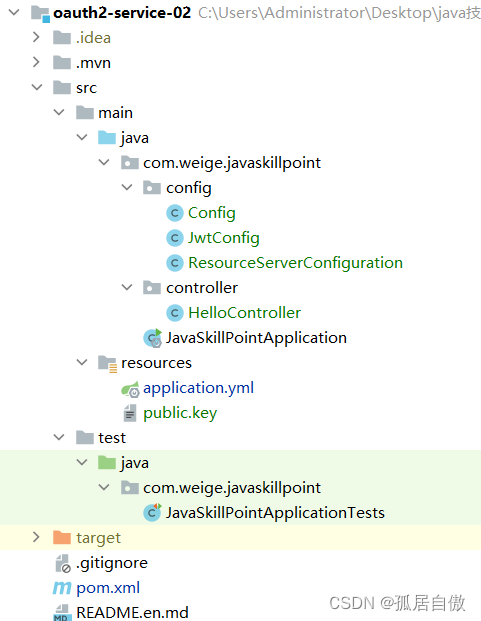
pom.xml
<?xml version="1.0" encoding="UTF-8"?>
<project xmlns="http://maven.apache.org/POM/4.0.0" xmlns:xsi="http://www.w3.org/2001/XMLSchema-instance"
         xsi:schemaLocation="http://maven.apache.org/POM/4.0.0 https://maven.apache.org/xsd/maven-4.0.0.xsd">
    <modelVersion>4.0.0</modelVersion>
    <parent>
        <groupId>org.springframework.boot</groupId>
        <artifactId>spring-boot-starter-parent</artifactId>
        <version>2.2.1.RELEASE</version>
        <relativePath/> <!-- lookup parent from repository -->
    </parent>
    <groupId>com.weige</groupId>
    <artifactId>java-skill-point</artifactId>
    <version>0.0.1-SNAPSHOT</version>
    <name>java-skill-point</name>
    <description>java-skill-point</description>
    <properties>
        <java.version>1.8</java.version>
        <spring-cloud.version>Hoxton.SR5</spring-cloud.version>
    </properties>
    <dependencies>
        <!--Springboot项目自带 -->
        <dependency>
            <groupId>org.springframework.boot</groupId>
            <artifactId>spring-boot-starter</artifactId>
        </dependency>
        <dependency>
            <groupId>org.springframework.boot</groupId>
            <artifactId>spring-boot-starter-test</artifactId>
            <scope>test</scope>
        </dependency>
        <!--Springboot Web项目 -->
        <dependency>
            <groupId>org.springframework.boot</groupId>
            <artifactId>spring-boot-starter-web</artifactId>
        </dependency>

        <!--lombok -->
        <dependency>
            <groupId>org.projectlombok</groupId>
            <artifactId>lombok</artifactId>
            <version>1.18.22</version>
        </dependency>

        <dependency>
            <groupId>org.apache.commons</groupId>
            <artifactId>commons-lang3</artifactId>
            <version>3.7</version>
        </dependency>

        <!--Mysql依赖 -->
        <dependency>
            <groupId>mysql</groupId>
            <artifactId>mysql-connector-java</artifactId>
            <scope>runtime</scope>
        </dependency>
        <!-- mybatis 用于接口注解快速开发(@Insert @Select @Update) -->
        <dependency>
            <groupId>org.mybatis</groupId>
            <artifactId>mybatis</artifactId>
            <version>3.4.6</version>
        </dependency>
        <!--用于扫描mybatis注解 @Mapper @MapperScan-->
        <dependency>
            <groupId>org.mybatis.spring.boot</groupId>o
            <artifactId>mybatis-spring-boot-starter</artifactId>
            <version>2.2.2</version>
        </dependency>

        <!-- hutool  -->
        <dependency>
            <groupId>cn.hutool</groupId>
            <artifactId>hutool-all</artifactId>
            <version>5.7.20</version>
        </dependency>

        <dependency>
            <groupId>org.springframework.cloud</groupId>
            <artifactId>spring-cloud-starter-oauth2</artifactId>
        </dependency>

        <dependency>
            <groupId>org.springframework.cloud</groupId>
            <artifactId>spring-cloud-starter-security</artifactId>
        </dependency>

    </dependencies>

    <dependencyManagement>
        <dependencies>
            <dependency>
                <groupId>org.springframework.cloud</groupId>
                <artifactId>spring-cloud-dependencies</artifactId>
                <version>${spring-cloud.version}</version>
                <type>pom</type>
                <scope>import</scope>
            </dependency>
        </dependencies>
    </dependencyManagement>

    <build>
        <plugins>
            <plugin>
                <groupId>org.springframework.boot</groupId>
                <artifactId>spring-boot-maven-plugin</artifactId>
            </plugin>
        </plugins>
    </build>
</project>
application.yml
server:
  port: 8084

spring:
  # mysql连接信息
  datasource:
    # mysql8之后
    driver-class-name: com.mysql.cj.jdbc.Driver
    url: jdbc:mysql://43.143.132.109:3306/index?useUnicode=true&characterEncoding=utf8&tinyInt1isBit=false&useSSL=false&serverTimezone=GMT
    username: root
    password: Weikai19991015.

security:
  oauth2:
    resource:
      jwt:
        key-uri: http://localhost:8888/oauth/token_key
Config文件
package com.weige.javaskillpoint.config;

import org.springframework.boot.web.client.RestTemplateBuilder;
import org.springframework.context.annotation.Bean;
import org.springframework.context.annotation.Configuration;
import org.springframework.web.client.RestTemplate;

@Configuration
public class Config {
    @Bean
    public RestTemplate restTemplate(RestTemplateBuilder builder) {
        return builder.build();
    }
}
JwtConfig文件
package com.weige.javaskillpoint.config;

import org.springframework.beans.factory.annotation.Autowired;
import org.springframework.beans.factory.annotation.Qualifier;
import org.springframework.context.annotation.Bean;
import org.springframework.context.annotation.Configuration;
import org.springframework.core.io.ClassPathResource;
import org.springframework.core.io.Resource;
import org.springframework.security.oauth2.provider.token.TokenStore;
import org.springframework.security.oauth2.provider.token.store.JwtAccessTokenConverter;
import org.springframework.security.oauth2.provider.token.store.JwtTokenStore;
import org.springframework.util.FileCopyUtils;

import java.io.IOException;

@Configuration
public class JwtConfig {
    public static final String public_cert = "public.key";
    @Autowired
    private JwtAccessTokenConverter jwtAccessTokenConverter;

    @Bean
    @Qualifier("tokenStore")
    public TokenStore tokenStore() {
        return new JwtTokenStore(jwtAccessTokenConverter);
    }

    @Bean
    protected JwtAccessTokenConverter jwtAccessTokenConverter() {
        JwtAccessTokenConverter converter = new JwtAccessTokenConverter();
        Resource resource = new ClassPathResource(public_cert);
        String publicKey;
        try {
            publicKey = new String(FileCopyUtils.copyToByteArray(resource.getInputStream()));
        } catch (IOException e) {
            throw new RuntimeException(e);
        }
        // 设置校验公钥
        converter.setVerifierKey(publicKey);
        // 设置证书签名密码,否则报错
        converter.setSigningKey("kaikeba");
        return converter;
    }
}
ResourceServerConfiguration文件
package com.weige.javaskillpoint.config;

import org.springframework.beans.factory.annotation.Autowired;
import org.springframework.context.annotation.Configuration;
import org.springframework.security.config.annotation.method.configuration.EnableGlobalMethodSecurity;
import org.springframework.security.config.annotation.web.builders.HttpSecurity;
import org.springframework.security.oauth2.config.annotation.web.configuration.EnableResourceServer;
import org.springframework.security.oauth2.config.annotation.web.configuration.ResourceServerConfigurerAdapter;
import org.springframework.security.oauth2.config.annotation.web.configurers.ResourceServerSecurityConfigurer;
import org.springframework.security.oauth2.provider.token.TokenStore;

@Configuration
@EnableResourceServer
@EnableGlobalMethodSecurity(prePostEnabled = true)
public class ResourceServerConfiguration extends ResourceServerConfigurerAdapter {
    @Autowired
    private TokenStore tokenStore;

    @Override
    public void configure(HttpSecurity http) throws Exception {
        http.csrf().disable().authorizeRequests()
                .antMatchers("/user/**")
                .permitAll()
                .antMatchers("/book/**").hasRole("admin")
                .antMatchers("/**")
                .authenticated();
    }

    @Override
    public void configure(ResourceServerSecurityConfigurer resources) throws Exception {
        resources.tokenStore(tokenStore);
    }
}
HelloController文件
package com.weige.javaskillpoint.controller;

import org.springframework.security.access.annotation.Secured;
import org.springframework.security.access.prepost.PreAuthorize;
import org.springframework.security.core.Authentication;
import org.springframework.security.core.context.SecurityContextHolder;
import org.springframework.security.oauth2.provider.authentication.OAuth2AuthenticationDetails;
import org.springframework.web.bind.annotation.GetMapping;
import org.springframework.web.bind.annotation.PutMapping;
import org.springframework.web.bind.annotation.RequestMapping;
import org.springframework.web.bind.annotation.RestController;

import java.util.Arrays;


@RestController
@RequestMapping("/cms")
public class HelloController {

    @GetMapping("/getCurrentUser")
    public Object getCurrentUser(Authentication authentication) {
        return authentication;
    }

    @GetMapping("/index/user")
    @PreAuthorize("hasRole('ROLE_USER')")
    public String index() {
        return "index/user";
    }


    @GetMapping("/index/admin")
    @PreAuthorize("hasRole('ROLE_ADMIN')")
    public String index2() {
        return "index/admin";
    }
}
JavaSkillPointApplication文件
package com.weige.javaskillpoint;

import org.mybatis.spring.annotation.MapperScan;
import org.springframework.boot.SpringApplication;
import org.springframework.boot.autoconfigure.SpringBootApplication;

@SpringBootApplication
@MapperScan("com.weige.javaskillpoint.dao")
public class JavaSkillPointApplication {

    public static void main(String[] args) {
        SpringApplication.run(JavaSkillPointApplication.class, args);
    }

}
这里别忘记了生成的JWT公钥文件 放到reources目录下即可
两个项目都创建完成,在启动项目时。要注意先后顺序,先启动授权项目,在启动资源项目。因为资源项目会请求授权项目中的token中JTW对应的公钥解析是否对应私钥。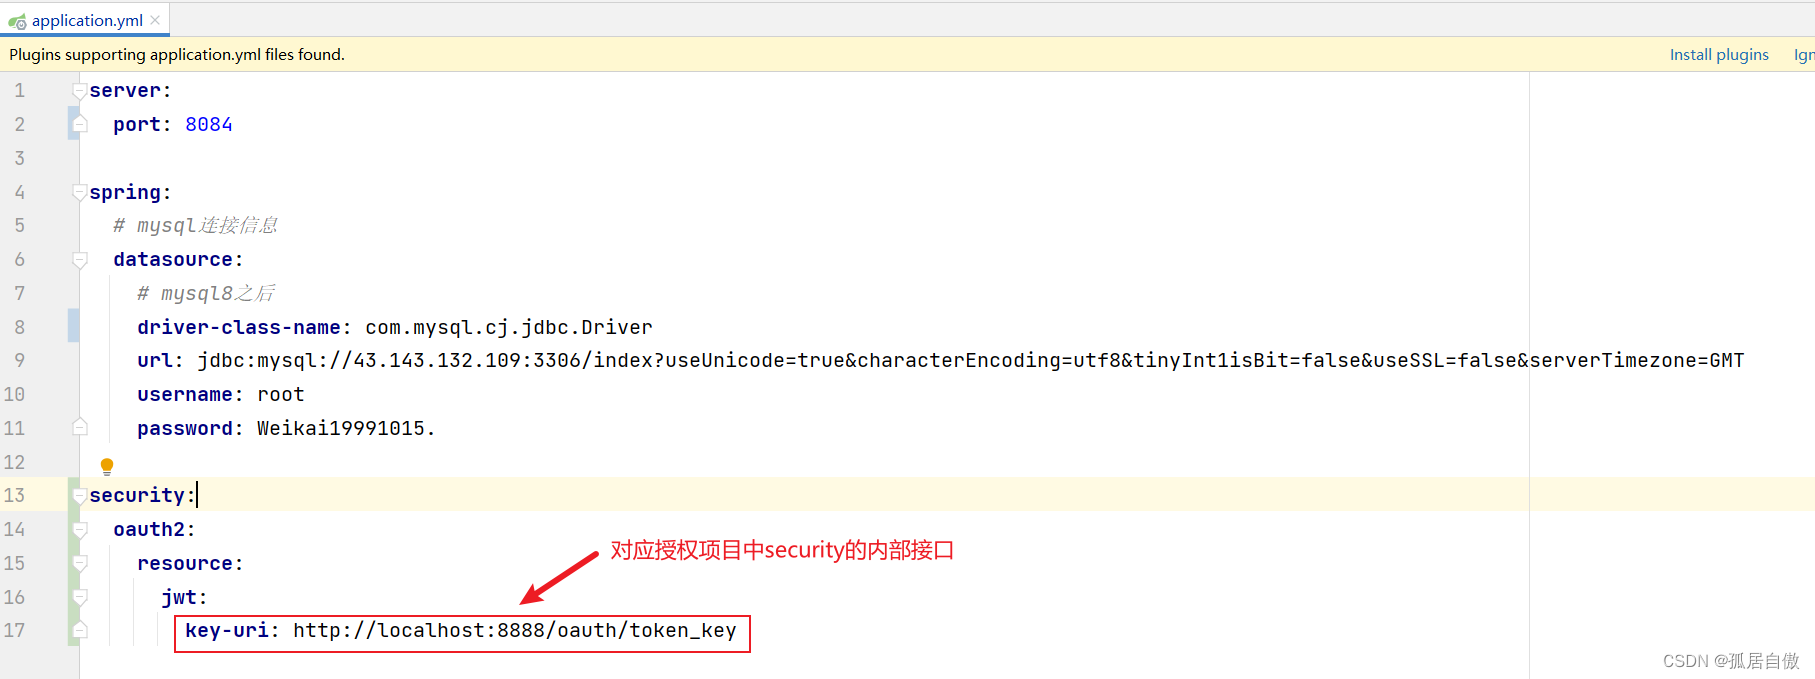
3.3 授权接口调用并测试资源接口
密码模式:申请令牌 PostMan请求 localhost:8888/oauth/token?grant_type=password&username=user&password=123456&scope=read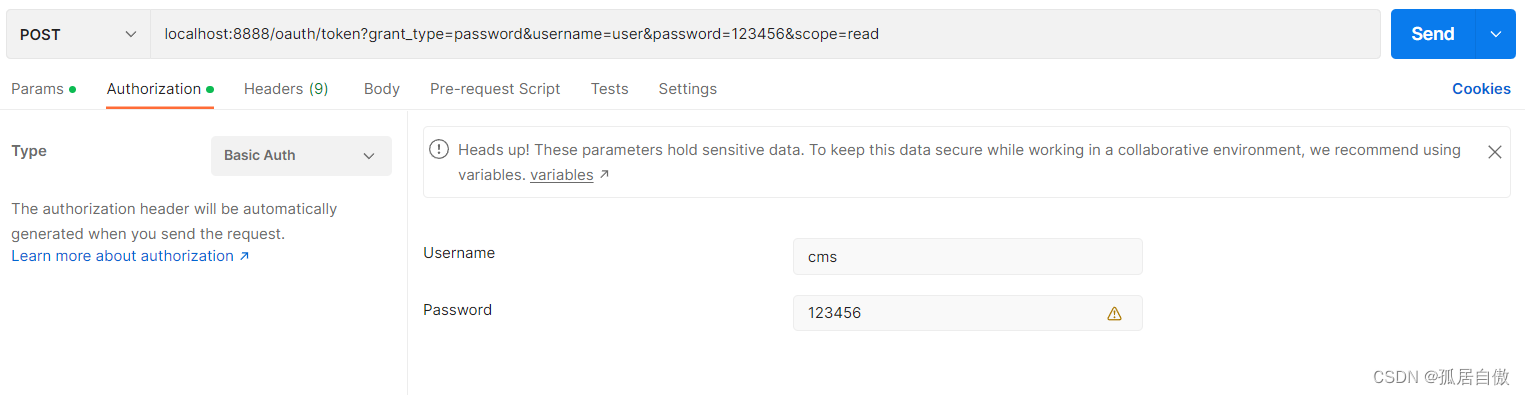
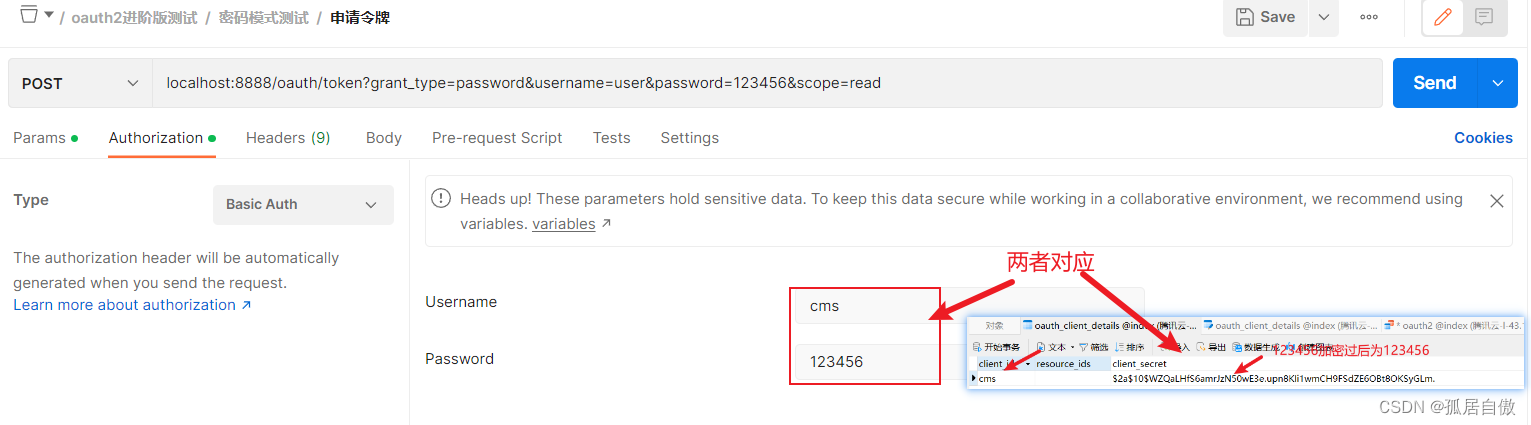

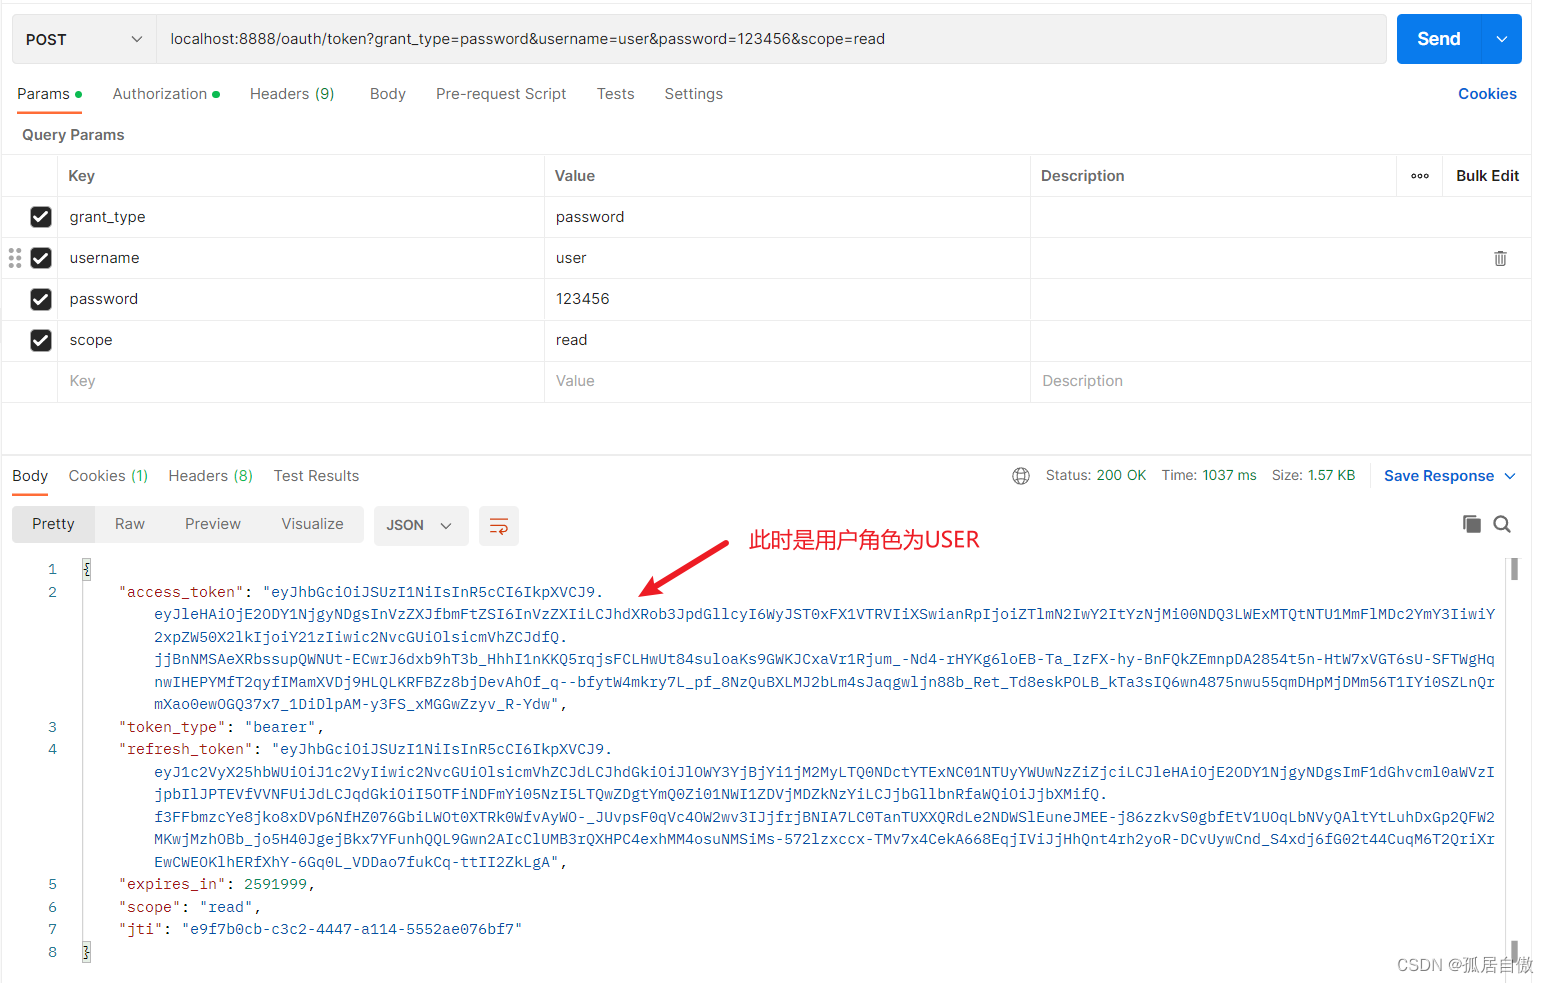
资源项目接口测试:
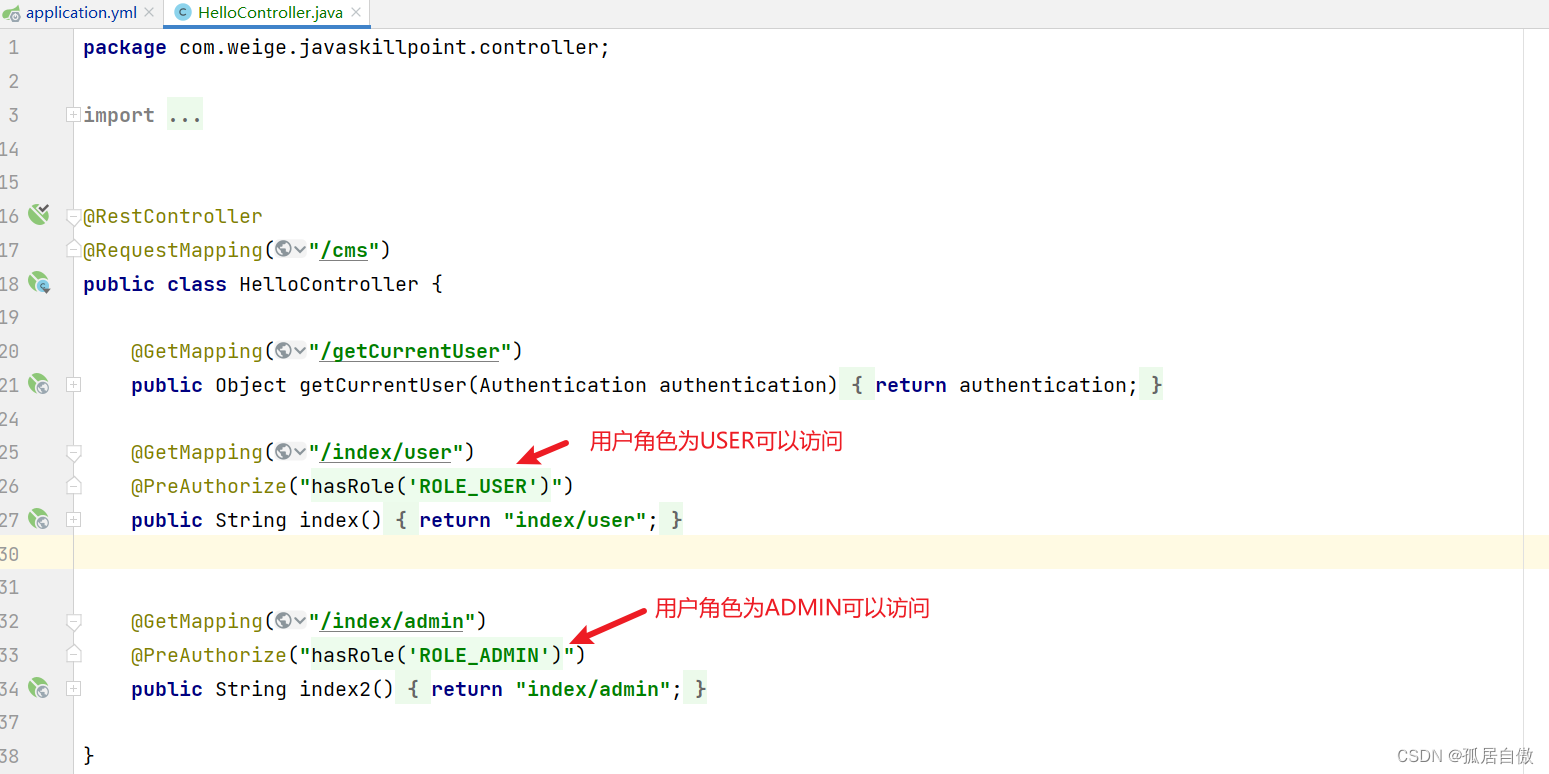
资源服务器接口调用 USER http://localhost:8084/cms/index/user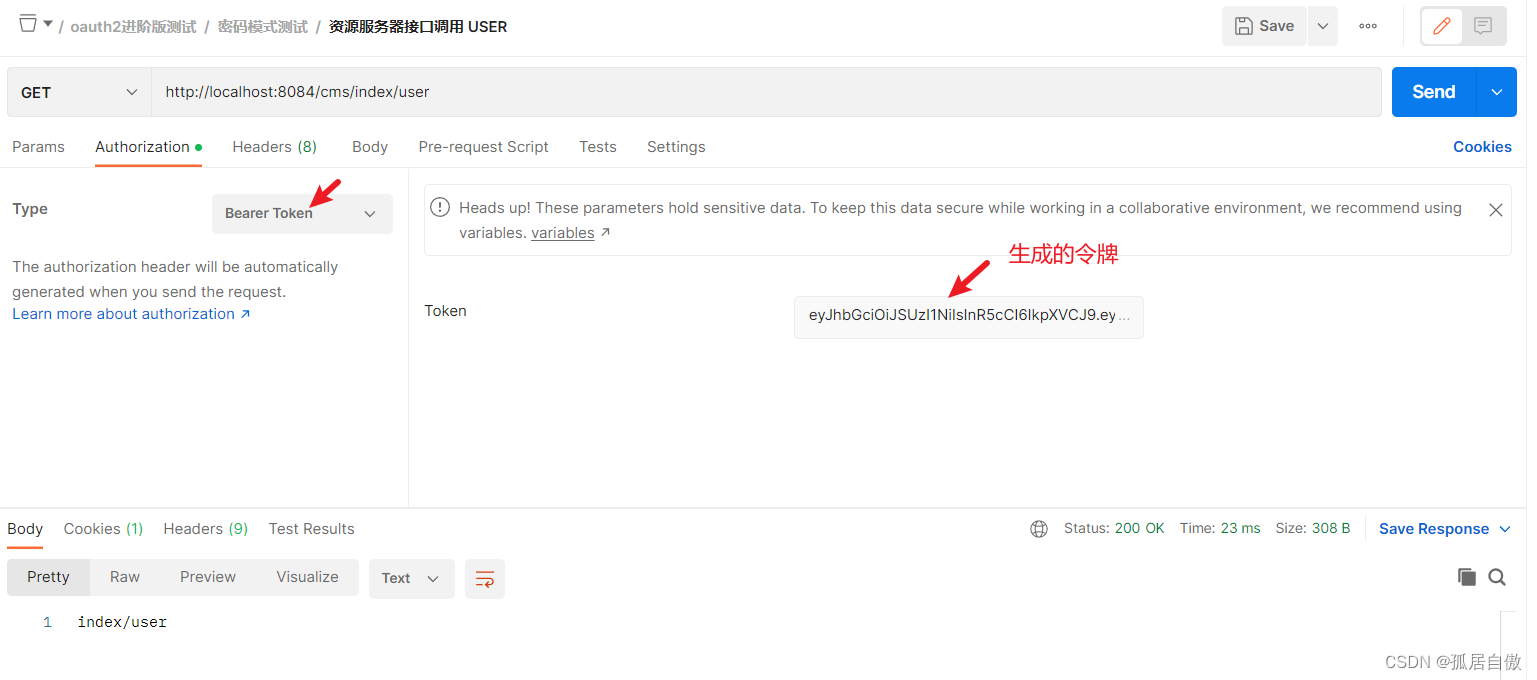
资源服务器接口调用 ADMIN http://localhost:8084/cms/index/admin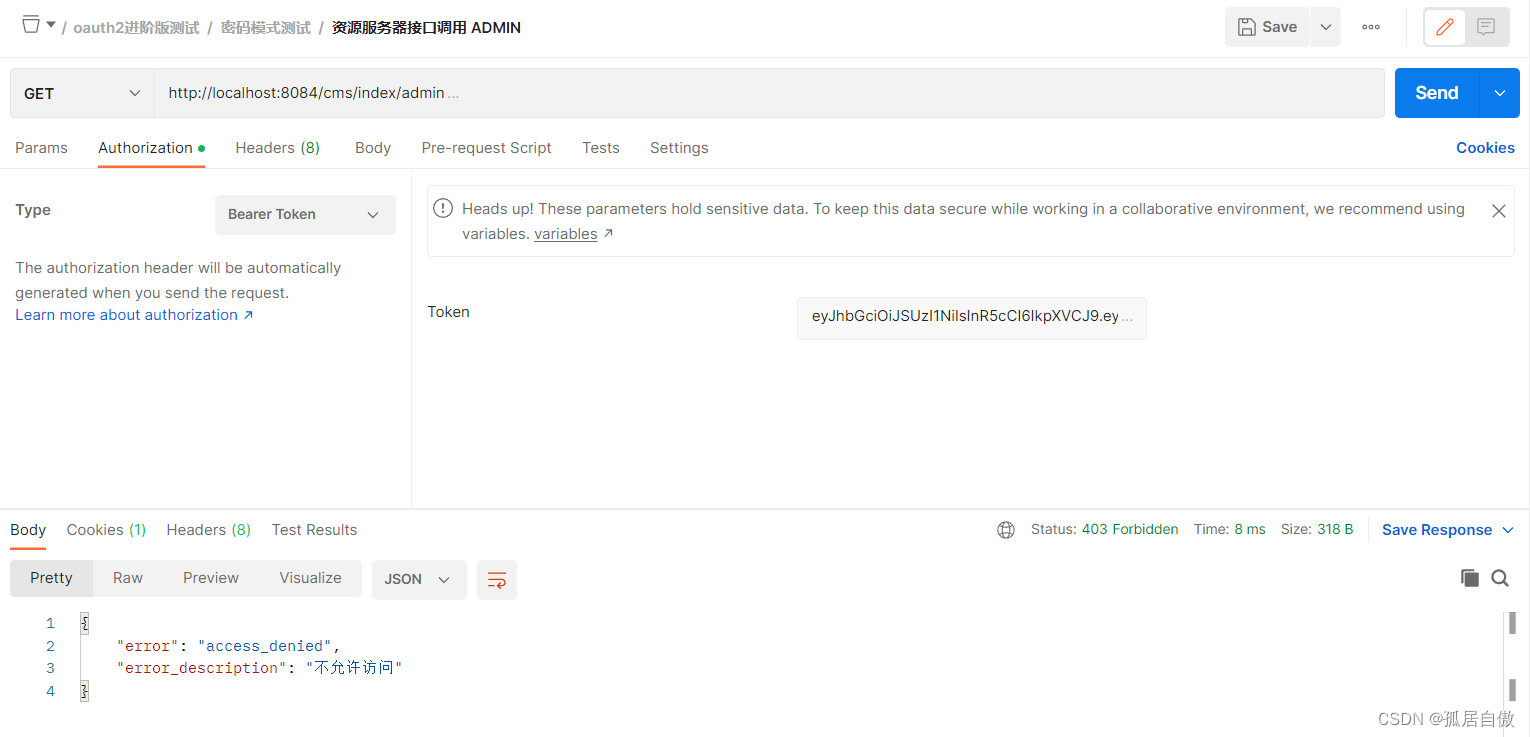
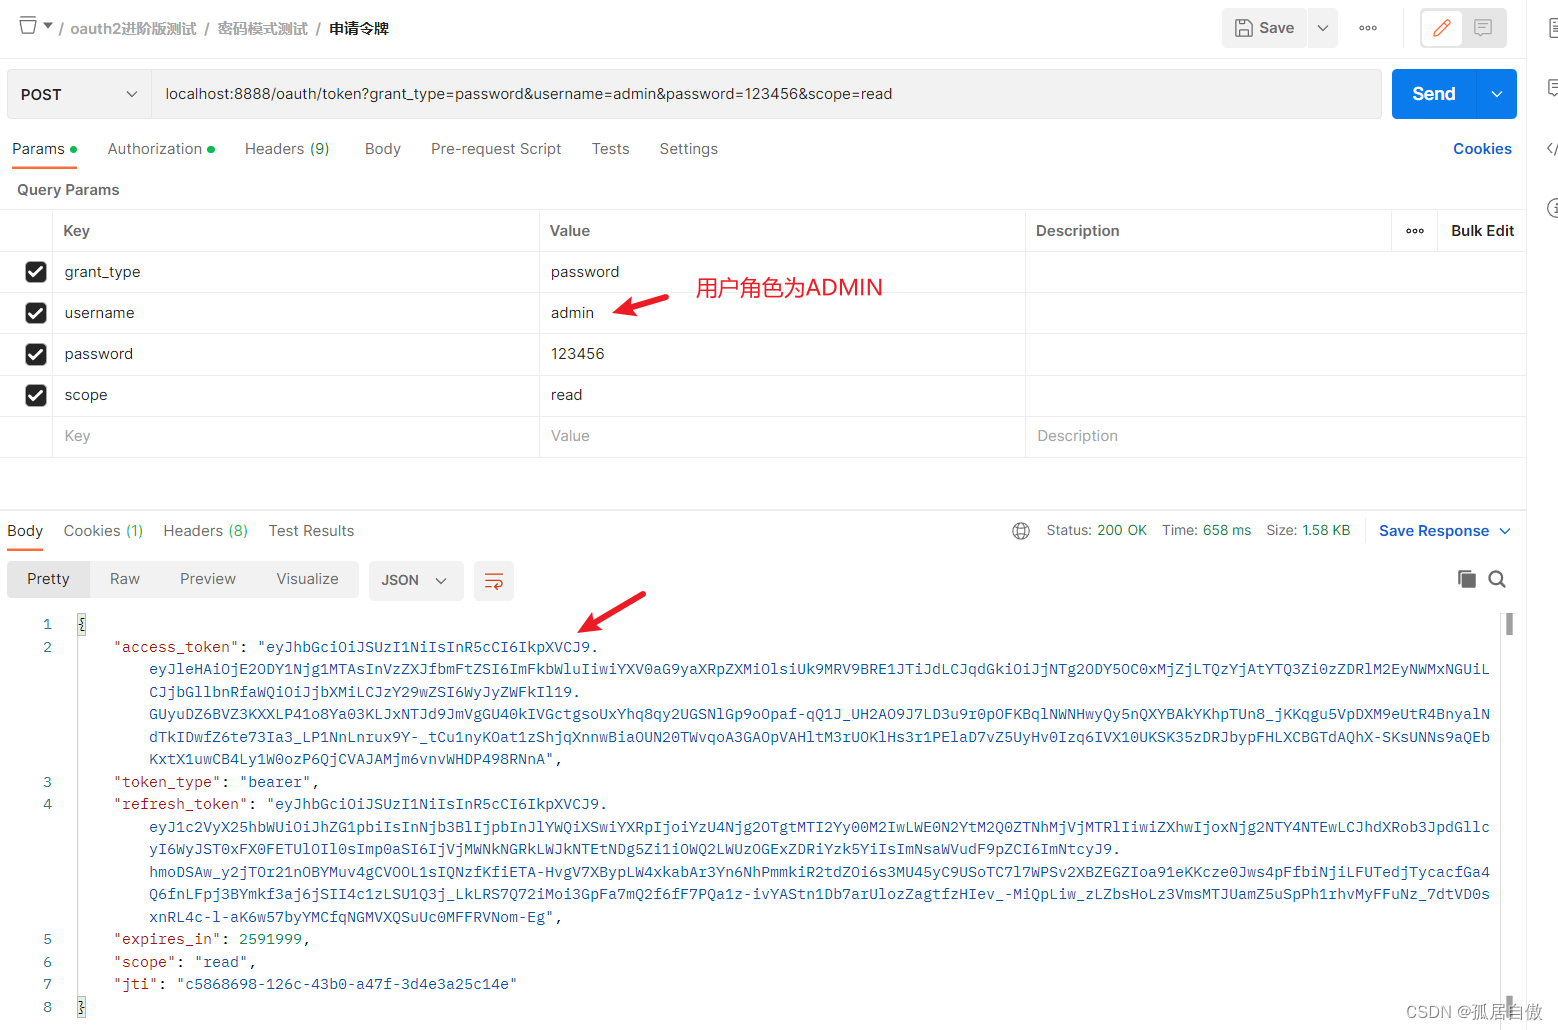
资源服务器接口调用 ADMIN http://localhost:8084/cms/index/admin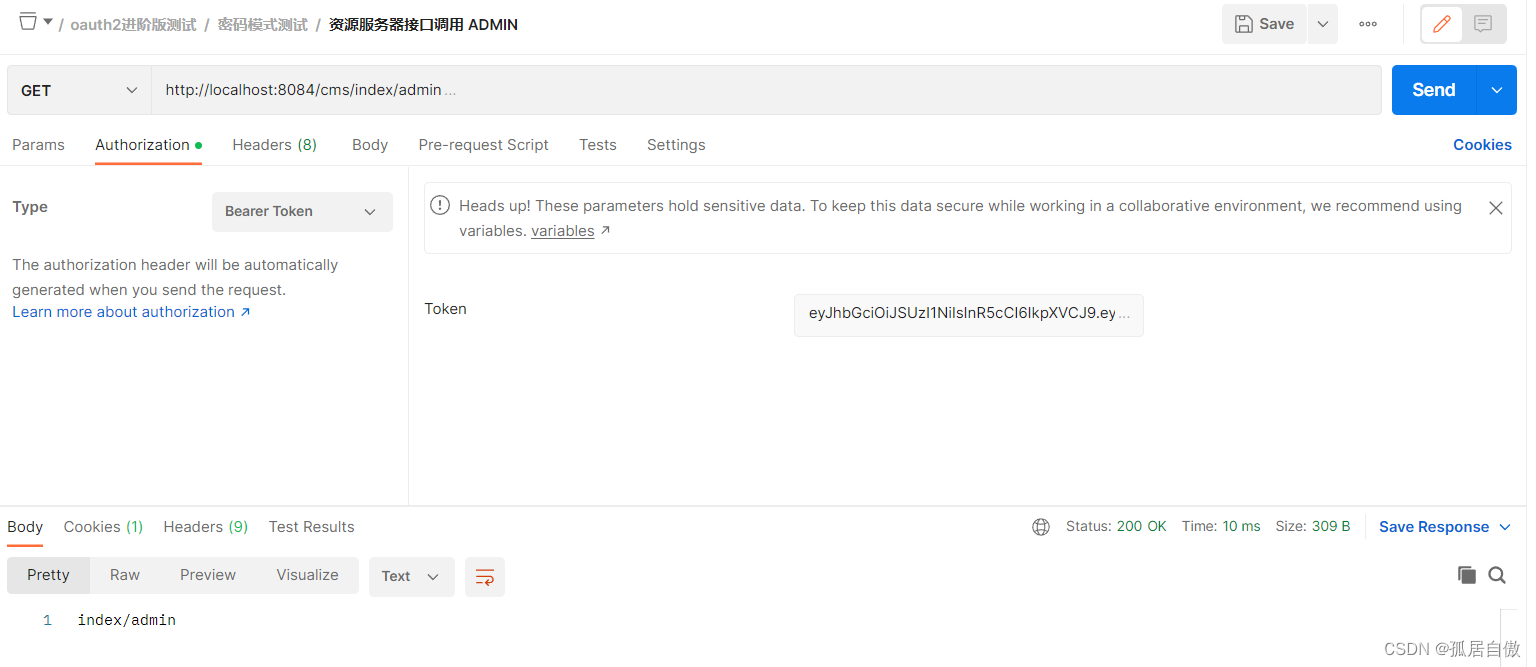
3.4 资源项目中添加用户登录接口 获取令牌(token)返回给前端
资源项目添加几个类: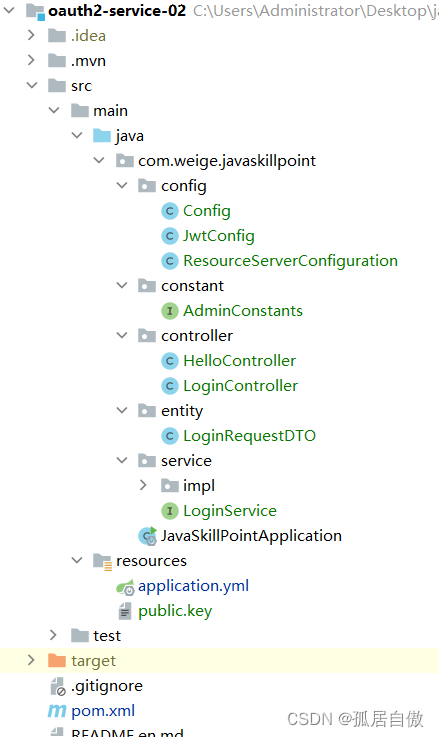
AdminConstants文件
package com.weige.javaskillpoint.constant;

public interface AdminConstants {

    /**
     * 请求头key
     */
    String AUTHORIZATION_KEY = "Authorization";

    /**
     * Basic
     */
    String BASIC_KEY = "Basic ";

    /**
     * 用户名key
     */
    String USERNAME_KEY = "username";

    /**
     * 密码key
     */
    String PASSWORD_KEY = "password";

    /**
     * 认证类型key
     */
    String GRANT_TYPE_KEY = "grant_type";

    /**
     * 授权范围key
     */
    String SCOPE_KEY = "scope";

    /**
     * 分隔符
     */
    String SPLIT = ":";
}
LoginController文件
package com.weige.javaskillpoint.controller;

import com.weige.javaskillpoint.entity.LoginRequestDTO;
import com.weige.javaskillpoint.service.LoginService;
import org.springframework.http.ResponseEntity;
import org.springframework.security.oauth2.common.OAuth2AccessToken;
import org.springframework.web.bind.annotation.PostMapping;
import org.springframework.web.bind.annotation.RequestBody;
import org.springframework.web.bind.annotation.RequestMapping;
import org.springframework.web.bind.annotation.RestController;

import javax.annotation.Resource;

@RestController
@RequestMapping("/user")
public class LoginController {

    @Resource
    private LoginService loginService;

    /**
     * 用户登录
     *
     * @param loginRequestDTO 登录请求DTO
     * @return org.springframework.http.ResponseEntity
     */
    @PostMapping("/login")
    public ResponseEntity<OAuth2AccessToken> login(@RequestBody LoginRequestDTO loginRequestDTO) {
        return loginService.login(loginRequestDTO);
    }

}
LoginRequestDTO文件
package com.weige.javaskillpoint.entity;

import lombok.Getter;
import lombok.Setter;
import lombok.ToString;


@Setter
@Getter
@ToString
public class LoginRequestDTO {

    /**
     * 用户名
     */
    private String username;

    /**
     * 密码
     */
    private String password;
}
LoginService文件
package com.weige.javaskillpoint.service;

import com.weige.javaskillpoint.entity.LoginRequestDTO;
import org.springframework.http.ResponseEntity;
import org.springframework.security.oauth2.common.OAuth2AccessToken;

public interface LoginService {


    /**
     * 用户登录
     *
     * @param loginRequestDTO 登录请求DTO
     * @return org.springframework.http.ResponseEntity
     */
    ResponseEntity<OAuth2AccessToken> login(LoginRequestDTO loginRequestDTO);
}
LoginServiceImpl文件
package com.weige.javaskillpoint.service.impl;

import com.weige.javaskillpoint.constant.AdminConstants;
import com.weige.javaskillpoint.entity.LoginRequestDTO;
import com.weige.javaskillpoint.service.LoginService;
import org.apache.commons.lang3.StringUtils;
import org.springframework.boot.autoconfigure.security.oauth2.OAuth2ClientProperties;
import org.springframework.http.HttpEntity;
import org.springframework.http.HttpHeaders;
import org.springframework.http.HttpMethod;
import org.springframework.http.ResponseEntity;
import org.springframework.security.oauth2.client.resource.OAuth2ProtectedResourceDetails;
import org.springframework.security.oauth2.common.OAuth2AccessToken;
import org.springframework.stereotype.Service;
import org.springframework.util.LinkedMultiValueMap;
import org.springframework.util.MultiValueMap;
import org.springframework.web.client.RestTemplate;

import javax.annotation.Resource;
import java.util.Base64;
import java.util.Collections;

@Service
public class LoginServiceImpl implements LoginService {

    @Resource
    private RestTemplate restTemplate;


    @Resource
    private OAuth2ClientProperties oAuth2ClientProperties;

    @Resource
    private OAuth2ProtectedResourceDetails oAuth2ProtectedResourceDetails;

    /**
     * 用户登录
     *
     * @param loginRequestDTO 登录请求DTO
     * @return org.springframework.http.ResponseEntity
     */
    @Override
    public ResponseEntity<OAuth2AccessToken> login(LoginRequestDTO loginRequestDTO) {

        HttpHeaders headers = new HttpHeaders();
        headers.set(AdminConstants.AUTHORIZATION_KEY, StringUtils.join(AdminConstants.BASIC_KEY, Base64.getEncoder().encodeToString(StringUtils.join(oAuth2ClientProperties.getClientId(), AdminConstants.SPLIT, oAuth2ClientProperties.getClientSecret()).getBytes())));
        // 组装请求参数
        MultiValueMap<String, String> map = new LinkedMultiValueMap<>(4);
        map.put(AdminConstants.USERNAME_KEY, Collections.singletonList(loginRequestDTO.getUsername()));
        map.put(AdminConstants.PASSWORD_KEY, Collections.singletonList(loginRequestDTO.getPassword()));
        map.put(AdminConstants.GRANT_TYPE_KEY, Collections.singletonList(oAuth2ProtectedResourceDetails.getGrantType()));
        map.put(AdminConstants.SCOPE_KEY, oAuth2ProtectedResourceDetails.getScope());
        // 请求到授权服务器,将授权完的用户信息存到授权服务器,并申请令牌
        return restTemplate.exchange(oAuth2ProtectedResourceDetails.getAccessTokenUri(), HttpMethod.POST, new HttpEntity(map, headers), OAuth2AccessToken.class);
    }

}
application.yml文件
server:
  port: 8084

spring:
  # mysql连接信息
  datasource:
    # mysql8之后
    driver-class-name: com.mysql.cj.jdbc.Driver
    url: jdbc:mysql://43.143.132.109:3306/index?useUnicode=true&characterEncoding=utf8&tinyInt1isBit=false&useSSL=false&serverTimezone=GMT
    username: root
    password: Weikai19991015.

security:
  oauth2:
    resource:
      jwt:
        key-uri: http://localhost:8888/oauth/token_key
    client:
      access-token-uri: http://localhost:8888/oauth/token #令牌端点
      user-authorization-uri: http://localhost:8888/oauth/authorize #授权端点
      client-id: cms
      client-secret: 123456
      grant-type: password
      scope: read,write
调用资源服务登录接口:PostMan调用 http://localhost:8084/user/login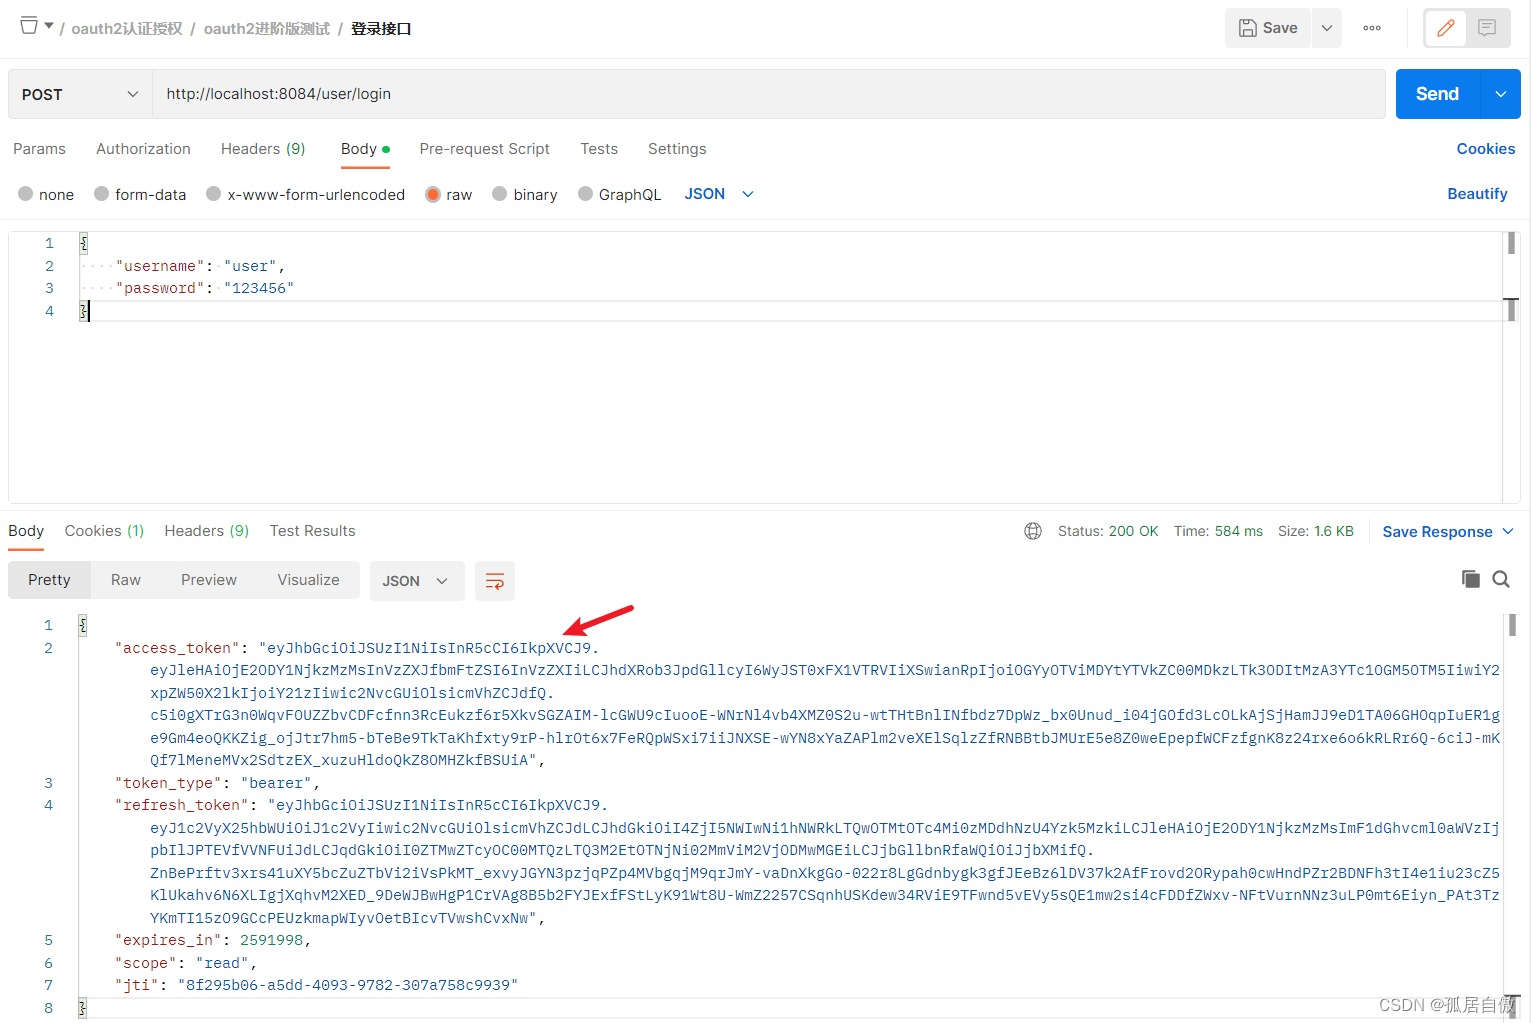
拿到获取的token访问资源服务的接口 http://localhost:8084/cms/index/user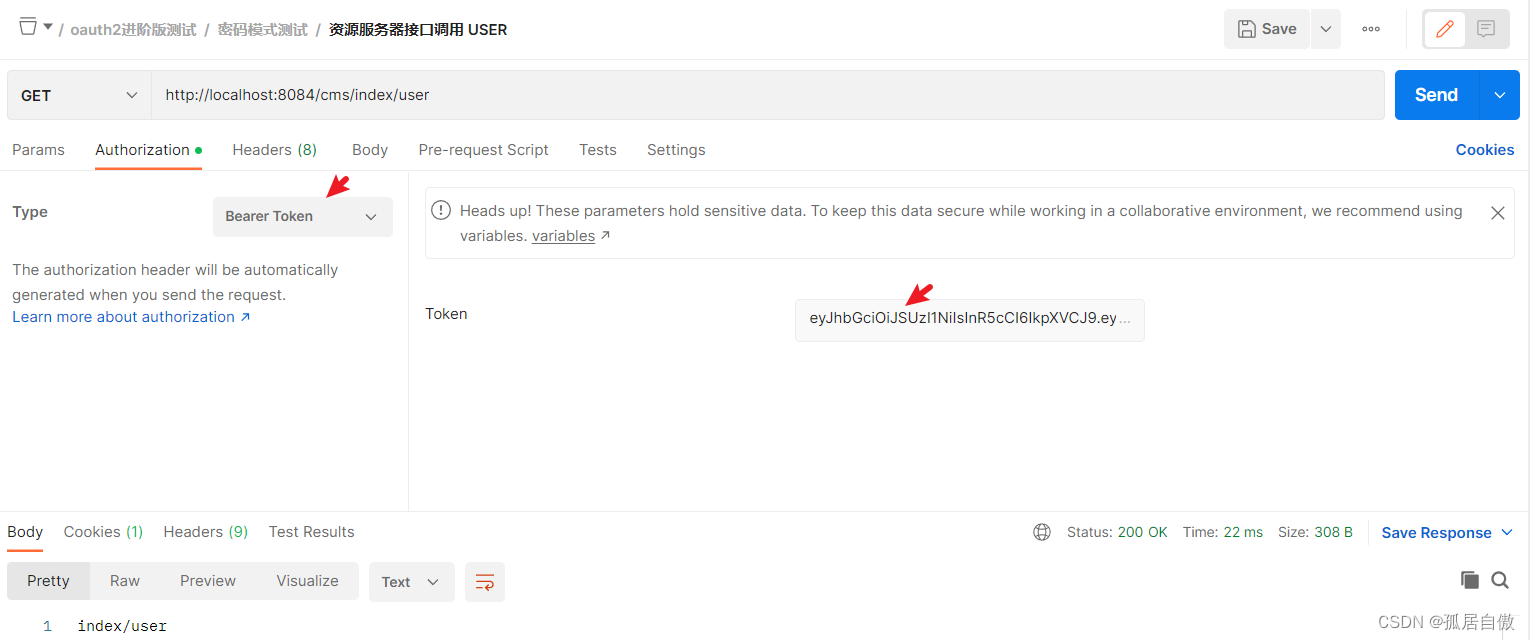
用admin登录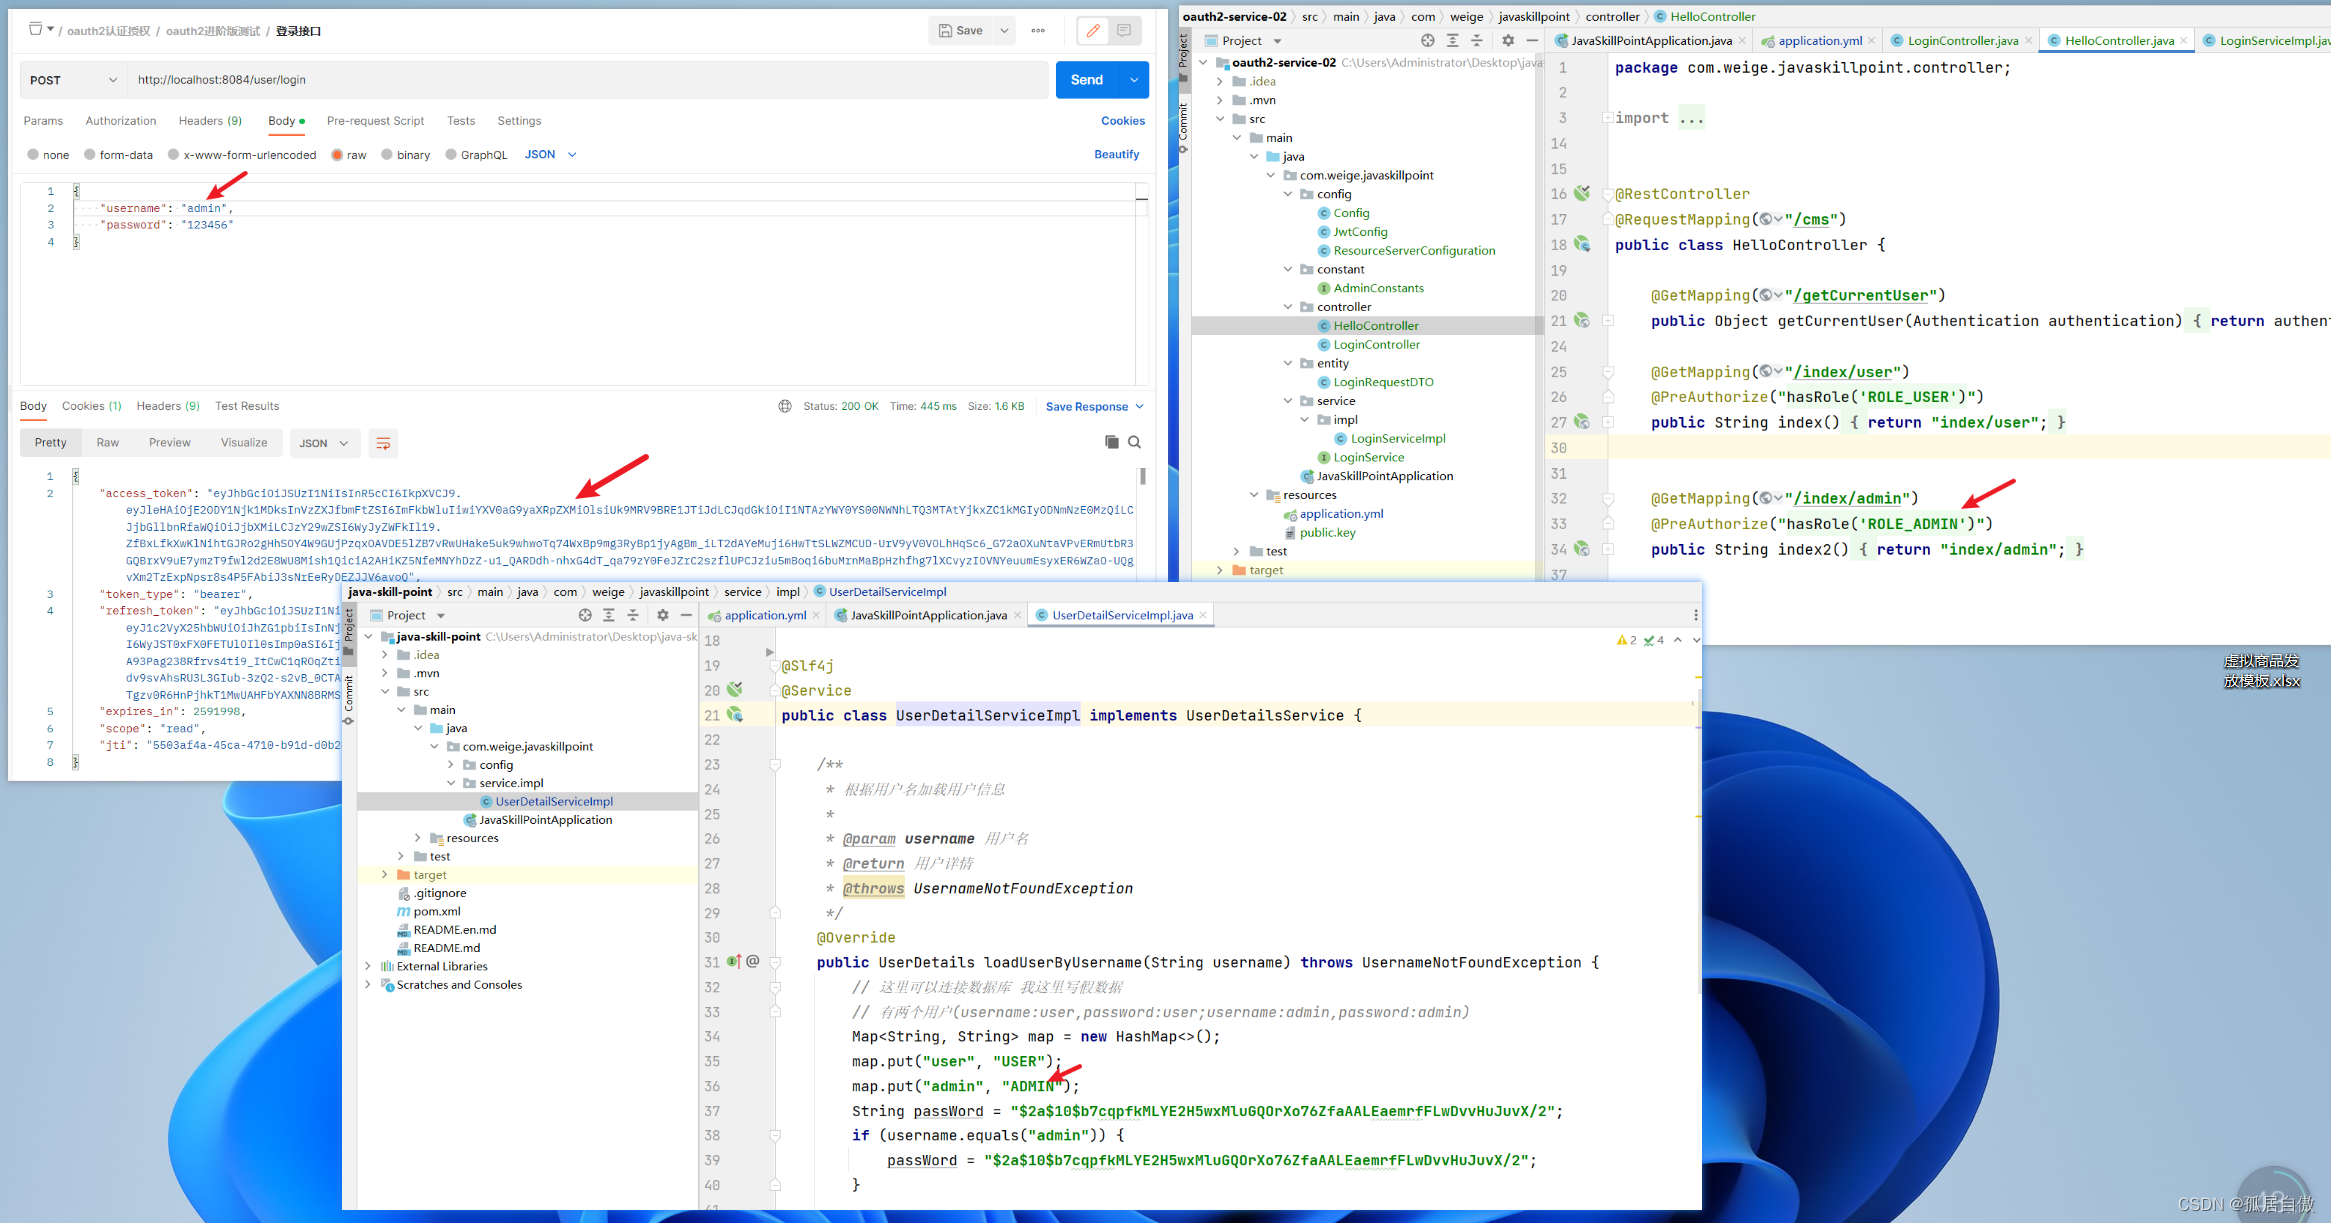
拿到获取的token访问资源服务的接口 http://localhost:8084/cms/index/admin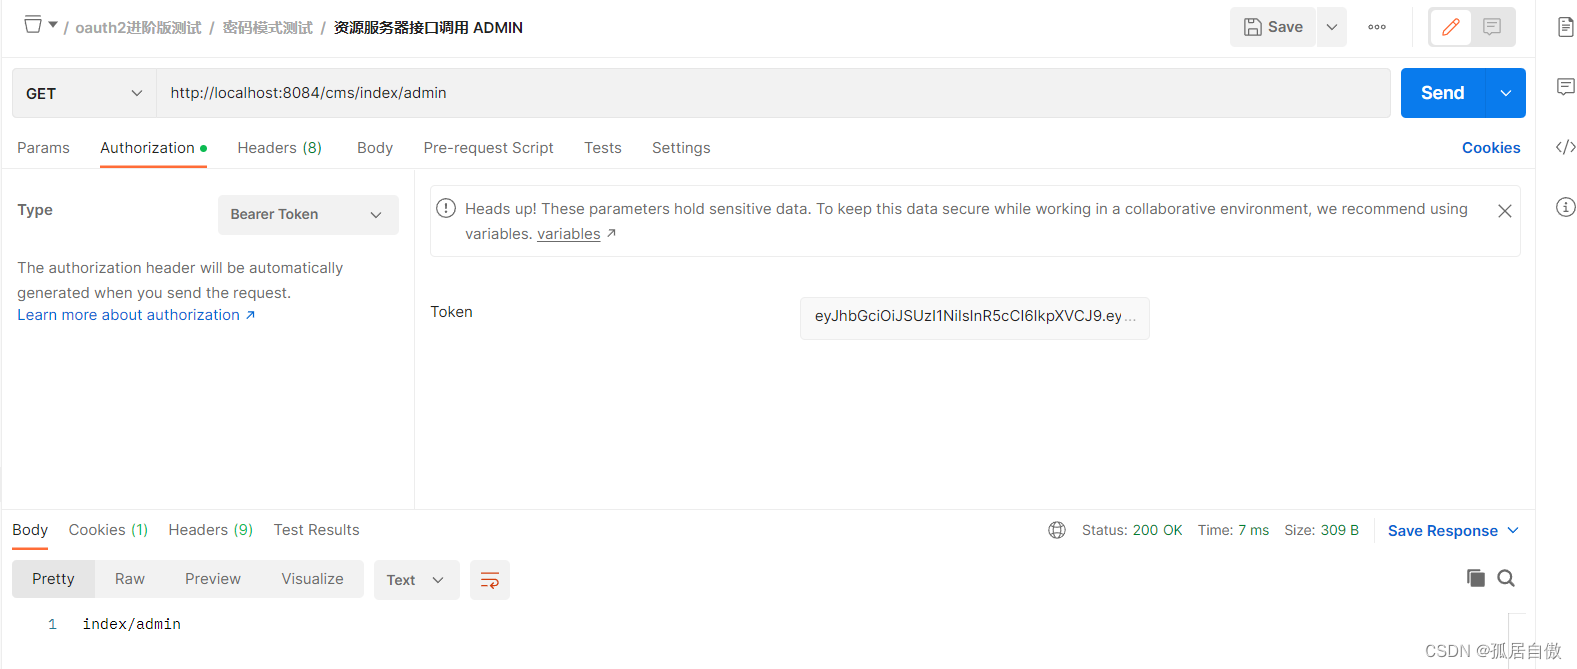
完结撒花 !
前言
最近的项目有使用到Sping Security和Oauth做用户身份验证和授权机制,所以在网上找了点资料简单学习并写了个小demo,在此进行记录总结。授权这块是直接拷贝了参考链接中的小demo,后续涉及到第三方应用授权码方式授权的话再学习然后总结
参考链接
1. Spring Security了解:https://www.springcloud.cc/spring-security-zhcn.html
2. Spring Boot集成Spring Security:
https://www.jianshu.com/p/afe6619d9663
https://www.cnblogs.com/lenve/p/11242055.html
https://blog.csdn.net/qq_29580525/article/details/79317969
https://blog.csdn.net/yuanlaijike/article/details/80249235
https://blog.csdn.net/yuanlaijike/article/details/84703690
3. Oauth2了解:
http://www.ruanyifeng.com/blog/2019/04/oauth_design.html
http://www.ruanyifeng.com/blog/2019/04/oauth-grant-types.html
https://www.cnblogs.com/meibaorui/p/9182660.html
4. Spring Security集成Oauth2:
https://www.cnblogs.com/fernfei/p/12200226.html
https://blog.csdn.net/weixin_34080571/article/details/91715402
https://www.cnblogs.com/dalianpai/p/12425962.html
实现过程
1. Spring Boot集成Spring Security
1.1 导入依赖以及配置服务器相关属性
1.1.1 导入依赖
可直接建立Spring Boot项目选择Spring Security,或者也可以建立一个空的Spring Boot项目后在pom.xml依赖配置文件中加入相关依赖。
-
<dependency>
-
<groupId>org.springframework.boot</groupId>
-
<artifactId>spring-boot-starter</artifactId>
-
</dependency>
-
-
<dependency>
-
<groupId>org.springframework.boot</groupId>
-
<artifactId>spring-boot-starter-security</artifactId>
-
</dependency>
1.1.2 配置服务器相关属性
一般配置服务器的访问端口和初始路径,默认为8080以及/,配置在resources/application.properties中配置
-
#配置服务器端口号
-
server.port=80
-
#配置服务器入口网址
-
server.servlet.context-path=/spring
1.2 普通web访问实现(UserController)
这里是写了个登录、home页面,但是由于没有写相应的前端页面,所以当用户跳转/login页面时会显示404错误,以及用户验证成功后跳转的home页面也会显示404错误。此处说明一下实际中会根据需要在SecurityConfig中对页面是否拦截以及跳转情况进行统一规范设计,此demo中直接使用Spring Security默认的login表单,用户身份信息验证成功后会将信息直接打印输出到前端。
-
-
-
public class UserController {
-
-
-
public String login(){
-
return "login.html";
-
}
-
-
//由于没有写对应的静态页面,所以用户身份验证成功后访问这些页面会报404错误;
-
// 如果身份未验证成功会跳转login页面(自己手动写的/Spring Security默认的login表单)
-
-
public String home(){
-
return "home.html";
-
}
-
-
/**
-
* 返回当前登录的用户信息(存在SecurityContextHolder的全局变量中)
-
* @return
-
*/
-
-
//@PreAuthorize("hasRole('ROLE_USER')") //@PreAuthorize 用于判断用户是否有指定权限,没有就不能访问
-
public Object whoIm(){
-
return SecurityContextHolder.getContext().getAuthentication().getPrincipal();
-
}
1.3 集成Spring Security(SecurityConfig)使用Java内存用户名和密码(指定可登录/通过拦截的用户名和密码,其中密码为明文)
SecurityConfig类继承WebSecurityConfigurerAdapter类,主要实现几个config方法,用来进行接口请求拦截/用户身份验证/前端静态页面拦截
-
/**
-
* 实现一个WebSecurityConfigurerAdapter然后重写一下configure方法,配置登录验证页、请求权限设置
-
* 标识该类是配置类、开启 Security 服务、开启全局 Securtiy 注解
-
*/
-
-
-
//启用基于注解的安全性 prePostEnable表示使用基于表达书的语法
-
public class SecurityConfig extends WebSecurityConfigurerAdapter {
-
-
ObjectMapper objectMapper; //json转换
-
-
/**
-
* 接口请求拦截
-
* @param http
-
* @throws Exception
-
*/
-
-
protected void configure(HttpSecurity http) throws Exception {
-
http.authorizeRequests() //安全请求策略,方法可有多个子节点matcher,每个matcher按照其声明顺序执行
-
//页面访问权限控制说明
-
.antMatchers("/").permitAll() //允许任何用户访问/路径(这个路径得有页面,否则后报404错误)
-
.antMatchers("/admin/**").hasRole("ADMIN") //以/admin/开头的URL只能由拥有ROLE_ADMIN角色的用户访问
-
.antMatchers("/db/**").access("hasRole('ADMIN') and hasRole('DBA')") //同理以/db/开头的URL
-
// 只能由同时具有ROLE_ADMIN和ROLE_DBA的用户访问
-
.anyRequest()
-
// .access("权限认证bean") 必须经过权限认证以后才能访问
-
.authenticated() //其它请求进行拦截(需要进行认证)
-
.and()
-
.formLogin() //支持基于表单的登录验证
-
// .loginPage("../../resources/static/login") //指定登录的路径(用户需要登录验证时跳转login页面)
-
// .loginPage("/user/login") //指定跳转controller层的相关方法中
-
// .loginProcessingUrl("/index") //登录成功后跳转/index页面(拦截通过后)
-
.permitAll() //允许基于表单登录的所有的URL的所有用户的访问
-
.successHandler(new UserAuthenticationSuccessHandler())
-

 浙公网安备 33010602011771号