通俗易懂的AQS,CLH,线程八锁(8种情况)
一文让你彻底搞懂AQS(通俗易懂的AQS)
一、什么是AQS
- AQS是一个用来构建锁和同步器的框架,使用AQS能简单且高效地构造出应用广泛的大量的同步器,比如我们提到的ReentrantLock,Semaphore,其他的诸如ReentrantReadWriteLock,SynchronousQueue,FutureTask等等皆是基于AQS的。当然,我们自己也能利用AQS非常轻松容易地构造出符合我们自己需求的同步器。
二、前置知识
- 学习AQS需要大家对同步锁有一定的概念。同时大家要知道LockSupport的使用,可以参考我这篇文章。(LockSupport从入门到深入理解)
三、AQS 的核心思想
- AQS核心思想是,如果被请求的共享资源空闲,则将当前请求资源的线程设置为有效的工作线程,并且将共享资源设置为锁定状态。如果被请求的共享资源被占用,那么就需要一套线程阻塞等待以及被唤醒时锁分配的机制,这个机制AQS是用CLH队列锁实现的,即将暂时获取不到锁的线程加入到队列中。 CLH(Craig,Landin,and Hagersten)队列是一个虚拟的双向队列(虚拟的双向队列即不存在队列实例,仅存在结点之间的关联关系)。AQS是将每条请求共享资源的线程封装成一个CLH锁队列的一个结点(Node)来实现锁的分配。 AQS使用一个int成员变量来表示同步状态,通过内置的FIFO队列来完成获取资源线程的排队工作。AQS使用CAS对该同步状态进行原子操作实现对其值的修改。 (图一为节点关系图)
private volatile int state;//共享变量,使用volatile修饰保证线程可见性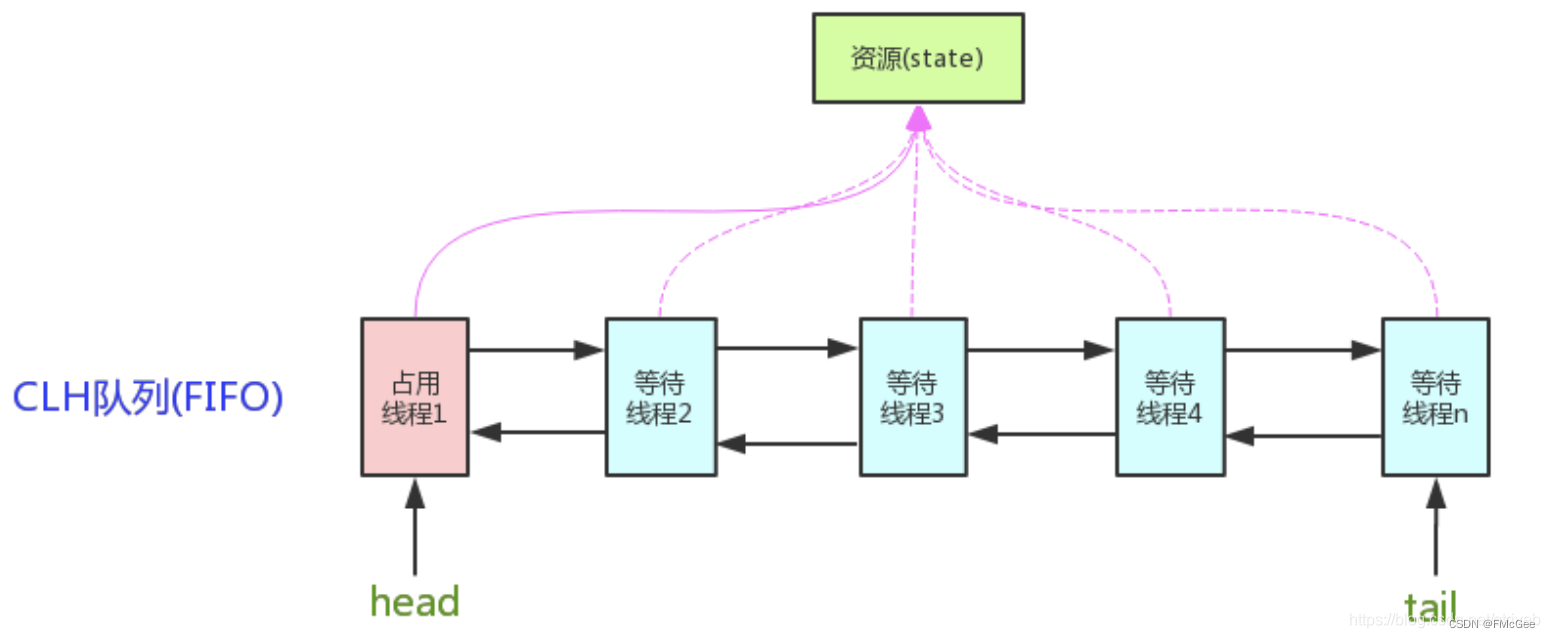
四、AQS 案例分析
上面讲述的原理还是太抽象了,那我我们上示例,结合案例来分析AQS 同步器的原理。以ReentrantLock使用方式为例。
代码如下:
public class AQSDemo {
private static int num;
public static void main(String[] args) {
ReentrantLock lock = new ReentrantLock();
new Thread(new Runnable() {
@Override
public void run() {
lock.lock();
try {
Thread.sleep(1000);
num += 1000;
System.out.println("A 线程执行了1秒,num = "+ num);
} catch (InterruptedException e) {
e.printStackTrace();
}
finally {
lock.unlock();
}
}
},"A").start();
new Thread(new Runnable() {
@Override
public void run() {
lock.lock();
try {
Thread.sleep(500);
num += 500;
System.out.println("B 线程执行了0.5秒,num = "+ num);
} catch (InterruptedException e) {
e.printStackTrace();
}
finally {
lock.unlock();
}
}
},"B").start();
new Thread(new Runnable() {
@Override
public void run() {
lock.lock();
try {
Thread.sleep(100);
num += 100;
System.out.println("C 线程执行了0.1秒,num = "+ num);
} catch (InterruptedException e) {
e.printStackTrace();
}
finally {
lock.unlock();
}
}
},"C").start();
}
}执行的某一种结果! 这个代码超级简单,但是执行结果却是可能不一样,大家可以自行实验。


对比一下三种结果,大家会发现,无论什么样的结果,num最终的值总是1600,这说明我们加锁是成功的。
五、AQS 源码分析
- 使用方法很简单,线程操纵资源类就行。主要方法有两个lock() 和unlock().我们深入代码去理解。我在源码的基础上加注释,希望大家也跟着调试源码。其实非常简单。
5.1 AQS 的数据结构
AQS 主要有三大属性分别是 head ,tail, state,其中state 表示同步状态,head为等待队列的头结点,tail 指向队列的尾节点。 /**
* Head of the wait queue, lazily initialized. Except for
* initialization, it is modified only via method setHead. Note:
* If head exists, its waitStatus is guaranteed not to be
* CANCELLED.
*/
private transient volatile Node head;
/**
* Tail of the wait queue, lazily initialized. Modified only via
* method enq to add new wait node.
*/
private transient volatile Node tail;
/**
* The synchronization state.
*/
private volatile int state; 还需要再去了解 Node的数据结构,在这里插入代码片
class Node{
//节点等待状态
volatile int waitStatus;
// 双向链表当前节点前节点
volatile Node prev;
// 下一个节点
volatile Node next;
// 当前节点存放的线程
volatile Thread thread;
// condition条件等待的下一个节点
Node nextWaiter;
}waitStatus 只有特定的几个常量,相应的值解释如下: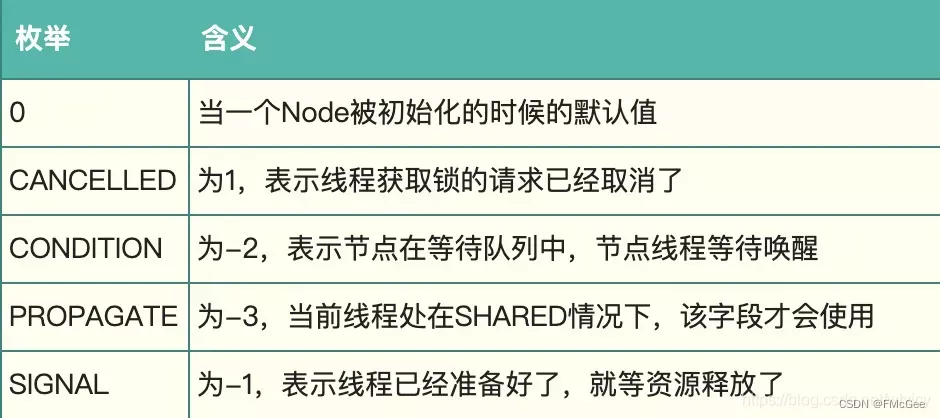
本次源码讲解,我们一ReentranLock的非公平锁为例。我们主要关注的方法是lock(),和unlock()。
5.2 lock源码分析
首先我们看一下lock()方法源代码,直接进入非公平锁的lock方法:
final void lock() {
            //1、判断当前state 状态, 没有锁则当前线程抢占锁
            if (compareAndSetState(0, 1))
                // 独占锁
                setExclusiveOwnerThread(Thread.currentThread());
            else
                // 2、锁被人占了,尝试获取锁,关键方法了
                acquire(1);
        }
进入 AQS的acquire() 方法:
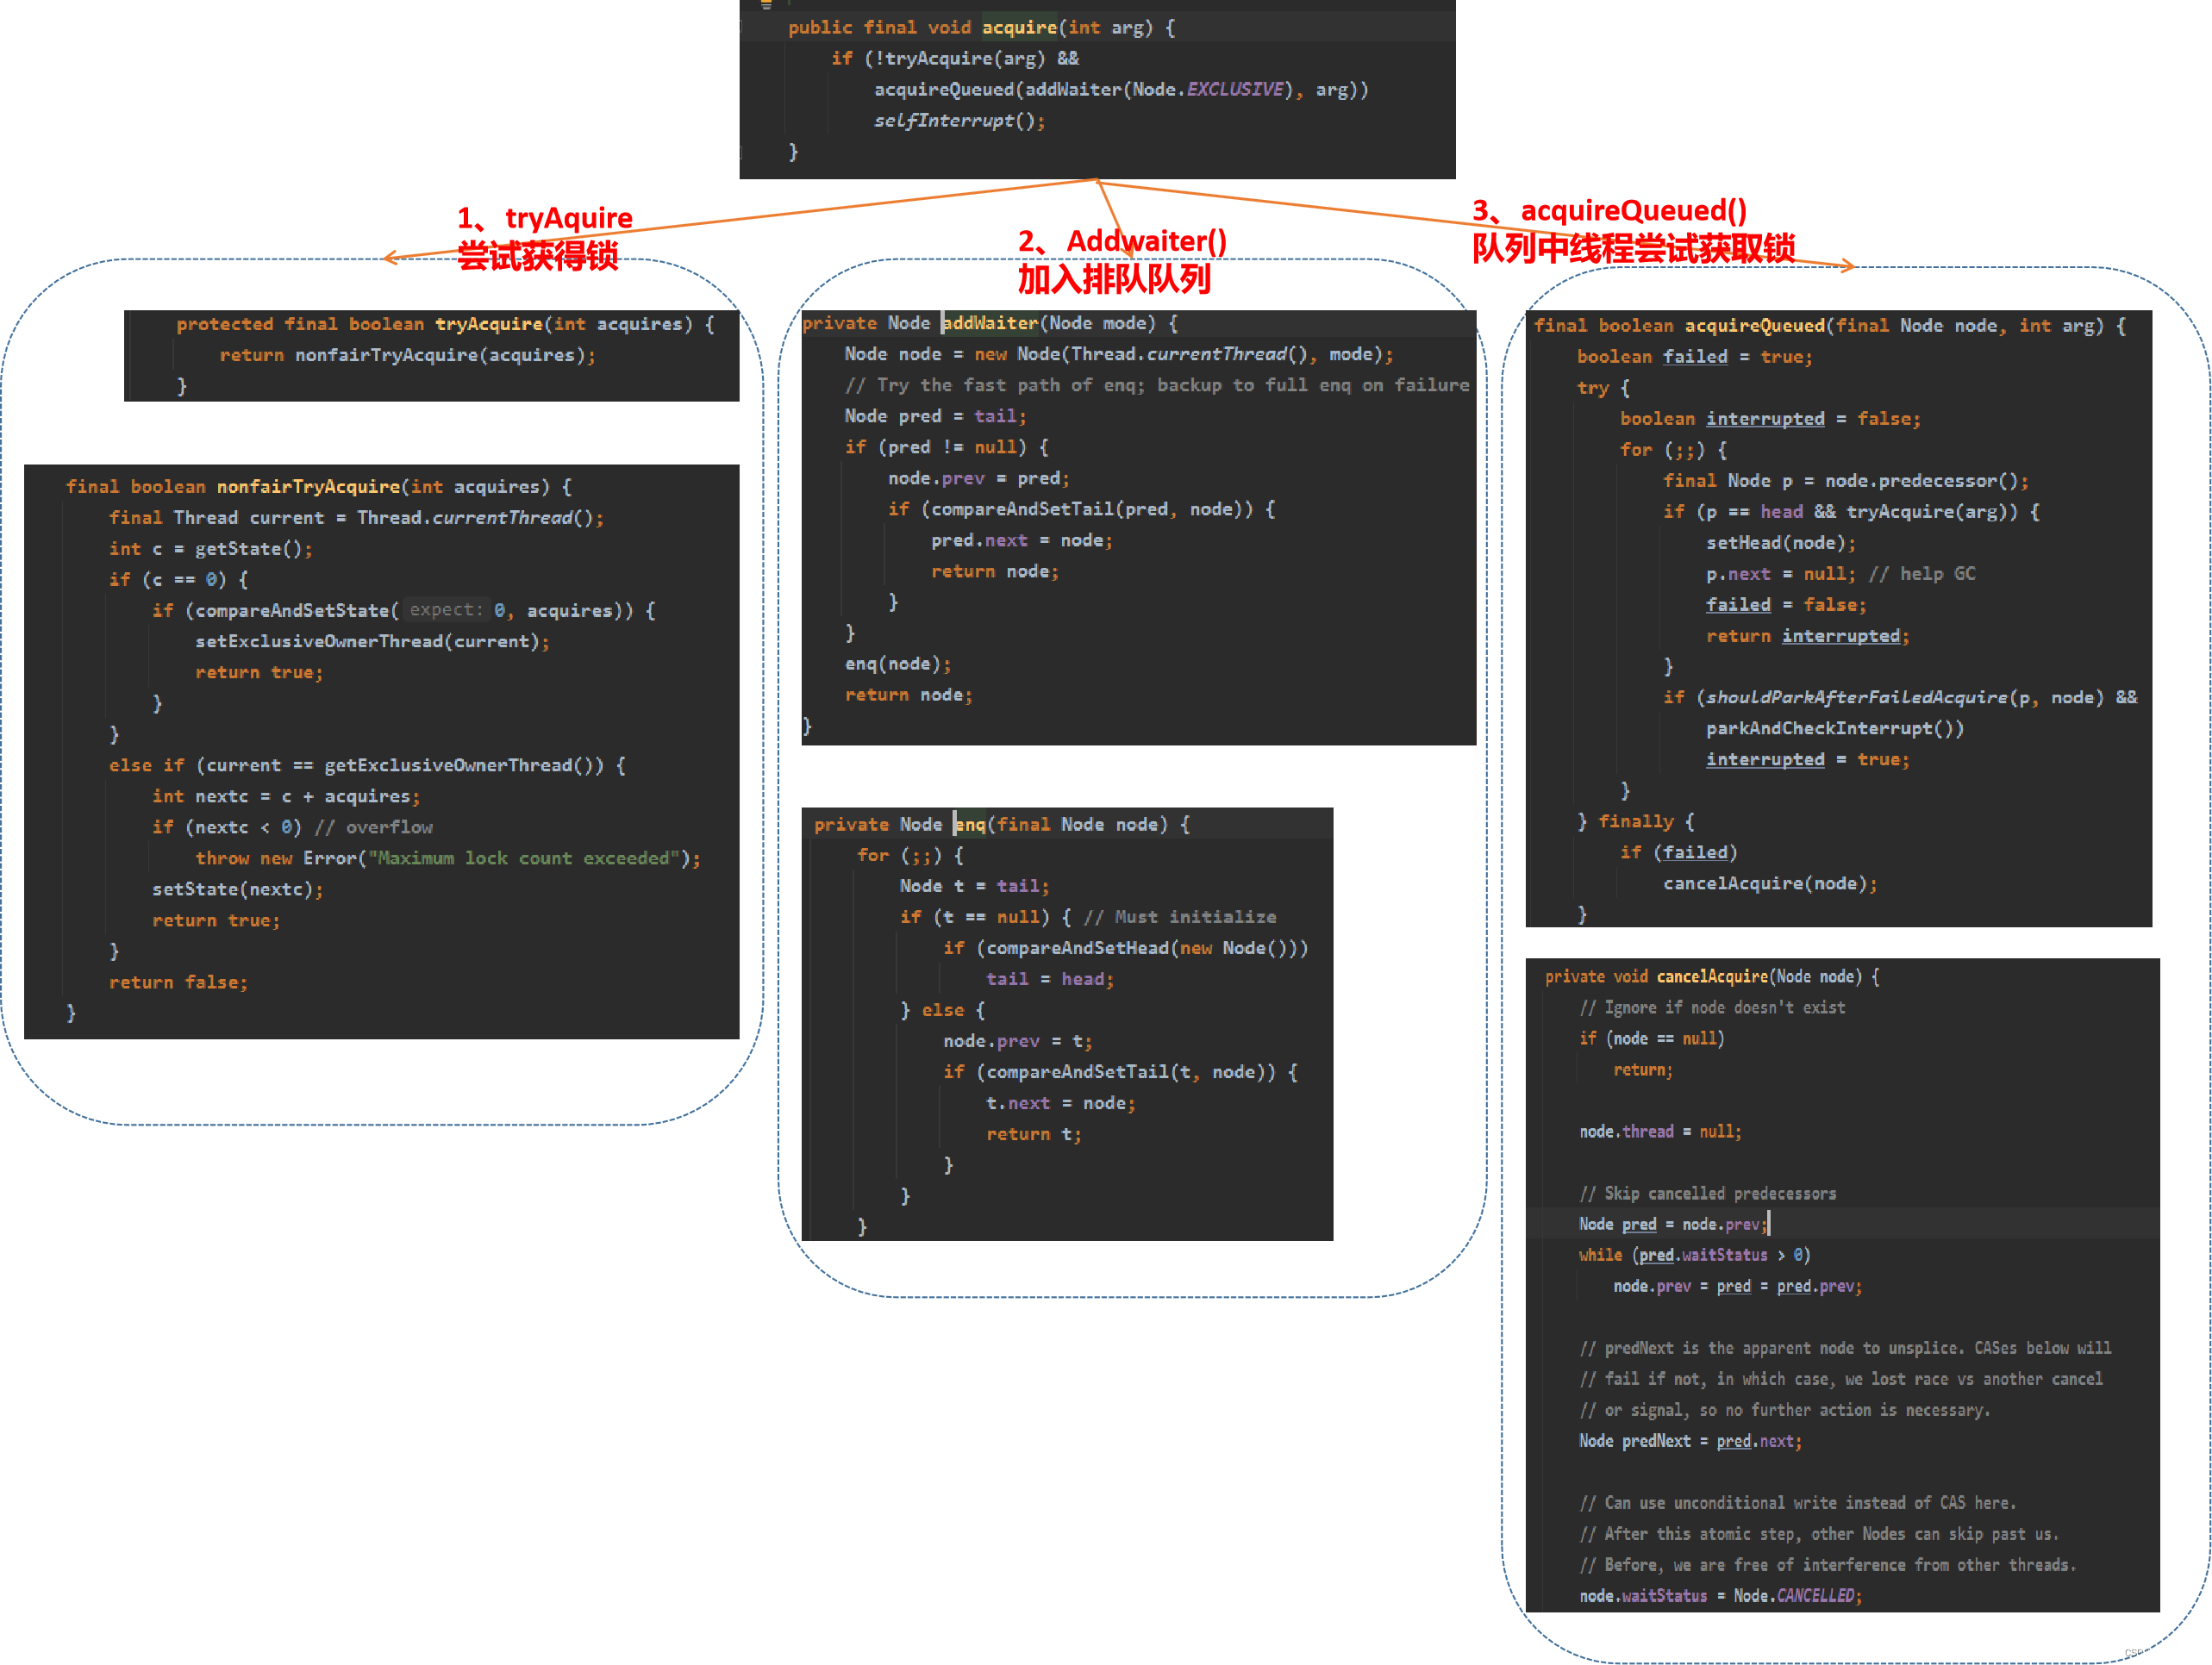
  public final void acquire(int arg) {
        if (!tryAcquire(arg) &&
            acquireQueued(addWaiter(Node.EXCLUSIVE), arg))
            selfInterrupt();
    }
总-分-总
- lock方法主要由tryAquire()尝试获取锁,addWaiter(Node.EXCLUSIVE) 加入等待队列,acquireQueued(node,arg)等待队列尝试获取锁。示意图如下:
5.2.1 tryAquire 方法源码
- 既然是非公平锁,那么我们一进来就想着去抢锁,不管三七二一,直接试试能不能抢到,抢不到再进队列。
  final boolean nonfairTryAcquire(int acquires) {
            //1、获取当前线程
            final Thread current = Thread.currentThread();
            // 2、获取当前锁的状态,0 表示没有被线程占有,>0 表示锁被别的线程占有
            int c = getState();
            // 3、如果锁没有被线程占有
            if (c == 0) {
                 // 3.1、 使用CAS去获取锁,   为什么用case呢,防止在获取c之后 c的状态被修改了,保证原子性
                if (compareAndSetState(0, acquires)) {
                    // 3.2、设置独占锁
                    setExclusiveOwnerThread(current);
                    // 3.3、当前线程获取到锁后,直接发挥true
                    return true;
                }
            }
            // 4、判断当前占有锁的线程是不是自己
            else if (current == getExclusiveOwnerThread()) {
                // 4.1 可重入锁,加+1
                int nextc = c + acquires;
                if (nextc < 0) // overflow
                    throw new Error("Maximum lock count exceeded");
                 // 4.2 设置锁的状态
                setState(nextc);
                return true;
            }
            return false;
        }
5.2.2 addWaiter() 方法的解析
- private Node addWaiter(Node mode),当前线程没有货得锁的情况下,进入CLH队列。
 private Node addWaiter(Node mode) {
 		// 1、初始化当前线程节点,虚拟节点
        Node node = new Node(Thread.currentThread(), mode);
        // Try the fast path of enq; backup to full enq on failure
        // 2、获取尾节点,初始进入节点是null
        Node pred = tail;
        // 3、如果尾节点不为null,怎将当前线程节点放到队列尾部,并返回当前节点
        if (pred != null) {
            node.prev = pred;
            if (compareAndSetTail(pred, node)) {
                pred.next = node;
                return node;
            }
        }
        // 如果尾节点为null(其实是链表没有初始化),怎进入enq方法
        enq(node);
        return node;
    }

   // 这个方法可以认为是初始化链表
   private Node enq(final Node node) {
   		// 1、入队 : 为什么要用循环呢?
        for (;;) {
           // 获取尾节点
            Node t = tail;
           // 2、尾节点为null
            if (t == null) { // Must initialize
               // 2.1 初始话头结点和尾节点
                if (compareAndSetHead(new Node()))
                    tail = head;
            }
            // 3、将当前节点加入链表尾部
            else {
                node.prev = t;
                if (compareAndSetTail(t, node)) {
                    t.next = node;
                    return t;
                }
            }
        }
    }
有人想明白为什么enq要用for(;;)吗? 咋一看最多只要循环2次啊! 答疑来了,这是对于单线程来说确实是这样的,但是对于多线程来说,有可能在第2部完成之后就被别的线程先执行入链表了,这时候第3步cas之后发现不成功了,怎么办?只能再一次循环去尝试加入链表,直到成功为止。
5.2.3 acquireQueued()方法详解
- addWaiter 方法我们已经将没有获取锁的线程放在了等待链表中,但是这些线程并没有处于等待状态。acquireQueued的作用就是将线程设置为等待状态。
 final boolean acquireQueued(final Node node, int arg) {
         // 失败标识
        boolean failed = true;
        try {
            // 中断标识
            boolean interrupted = false;
            for (;;) {
                // 获取当前节点的前一个节点
                final Node p = node.predecessor();
                // 1、如果前节点是头结点,那么去尝试获取锁
                if (p == head && tryAcquire(arg)) {
                    // 重置头结点
                    setHead(node);
                    p.next = null; // help GC
                    // 获得锁
                    failed = false;
                    // 返回false,节点获得锁,,,然后现在只有自己一个线程了这个时候就会自己唤醒自己
                    // 使用的是acquire中的selfInterrupt();
                    return interrupted;
                }
                // 2、如果线程没有获得锁,且节点waitStatus=0,shouldParkAfterFailedAcquire并将节点的waitStatus赋值为-1
                //parkAndCheckInterrupt将线程park,进入等待模式,
                if (shouldParkAfterFailedAcquire(p, node) &&
                    parkAndCheckInterrupt())
                    interrupted = true;
            }
        } finally {
            if (failed)
                cancelAcquire(node);
        }
    }

private static boolean shouldParkAfterFailedAcquire(Node pred, Node node) {
        int ws = pred.waitStatus;
        if (ws == Node.SIGNAL)
            /*
             * This node has already set status asking a release
             * to signal it, so it can safely park.
             */
            return true;
        if (ws > 0) {
            /*
             * Predecessor was cancelled. Skip over predecessors and
             * indicate retry.
             */
            do {
                node.prev = pred = pred.prev;
            } while (pred.waitStatus > 0);
            pred.next = node;
        } else {
            /*
             * waitStatus must be 0 or PROPAGATE.  Indicate that we
             * need a signal, but don't park yet.  Caller will need to
             * retry to make sure it cannot acquire before parking.
             */
            compareAndSetWaitStatus(pred, ws, Node.SIGNAL);
        }
        return false;
}- 好了,这个源码的解释就结束了,大家是不是还是云里雾里,不得不承认,这个代码太优雅了。不愧大神!
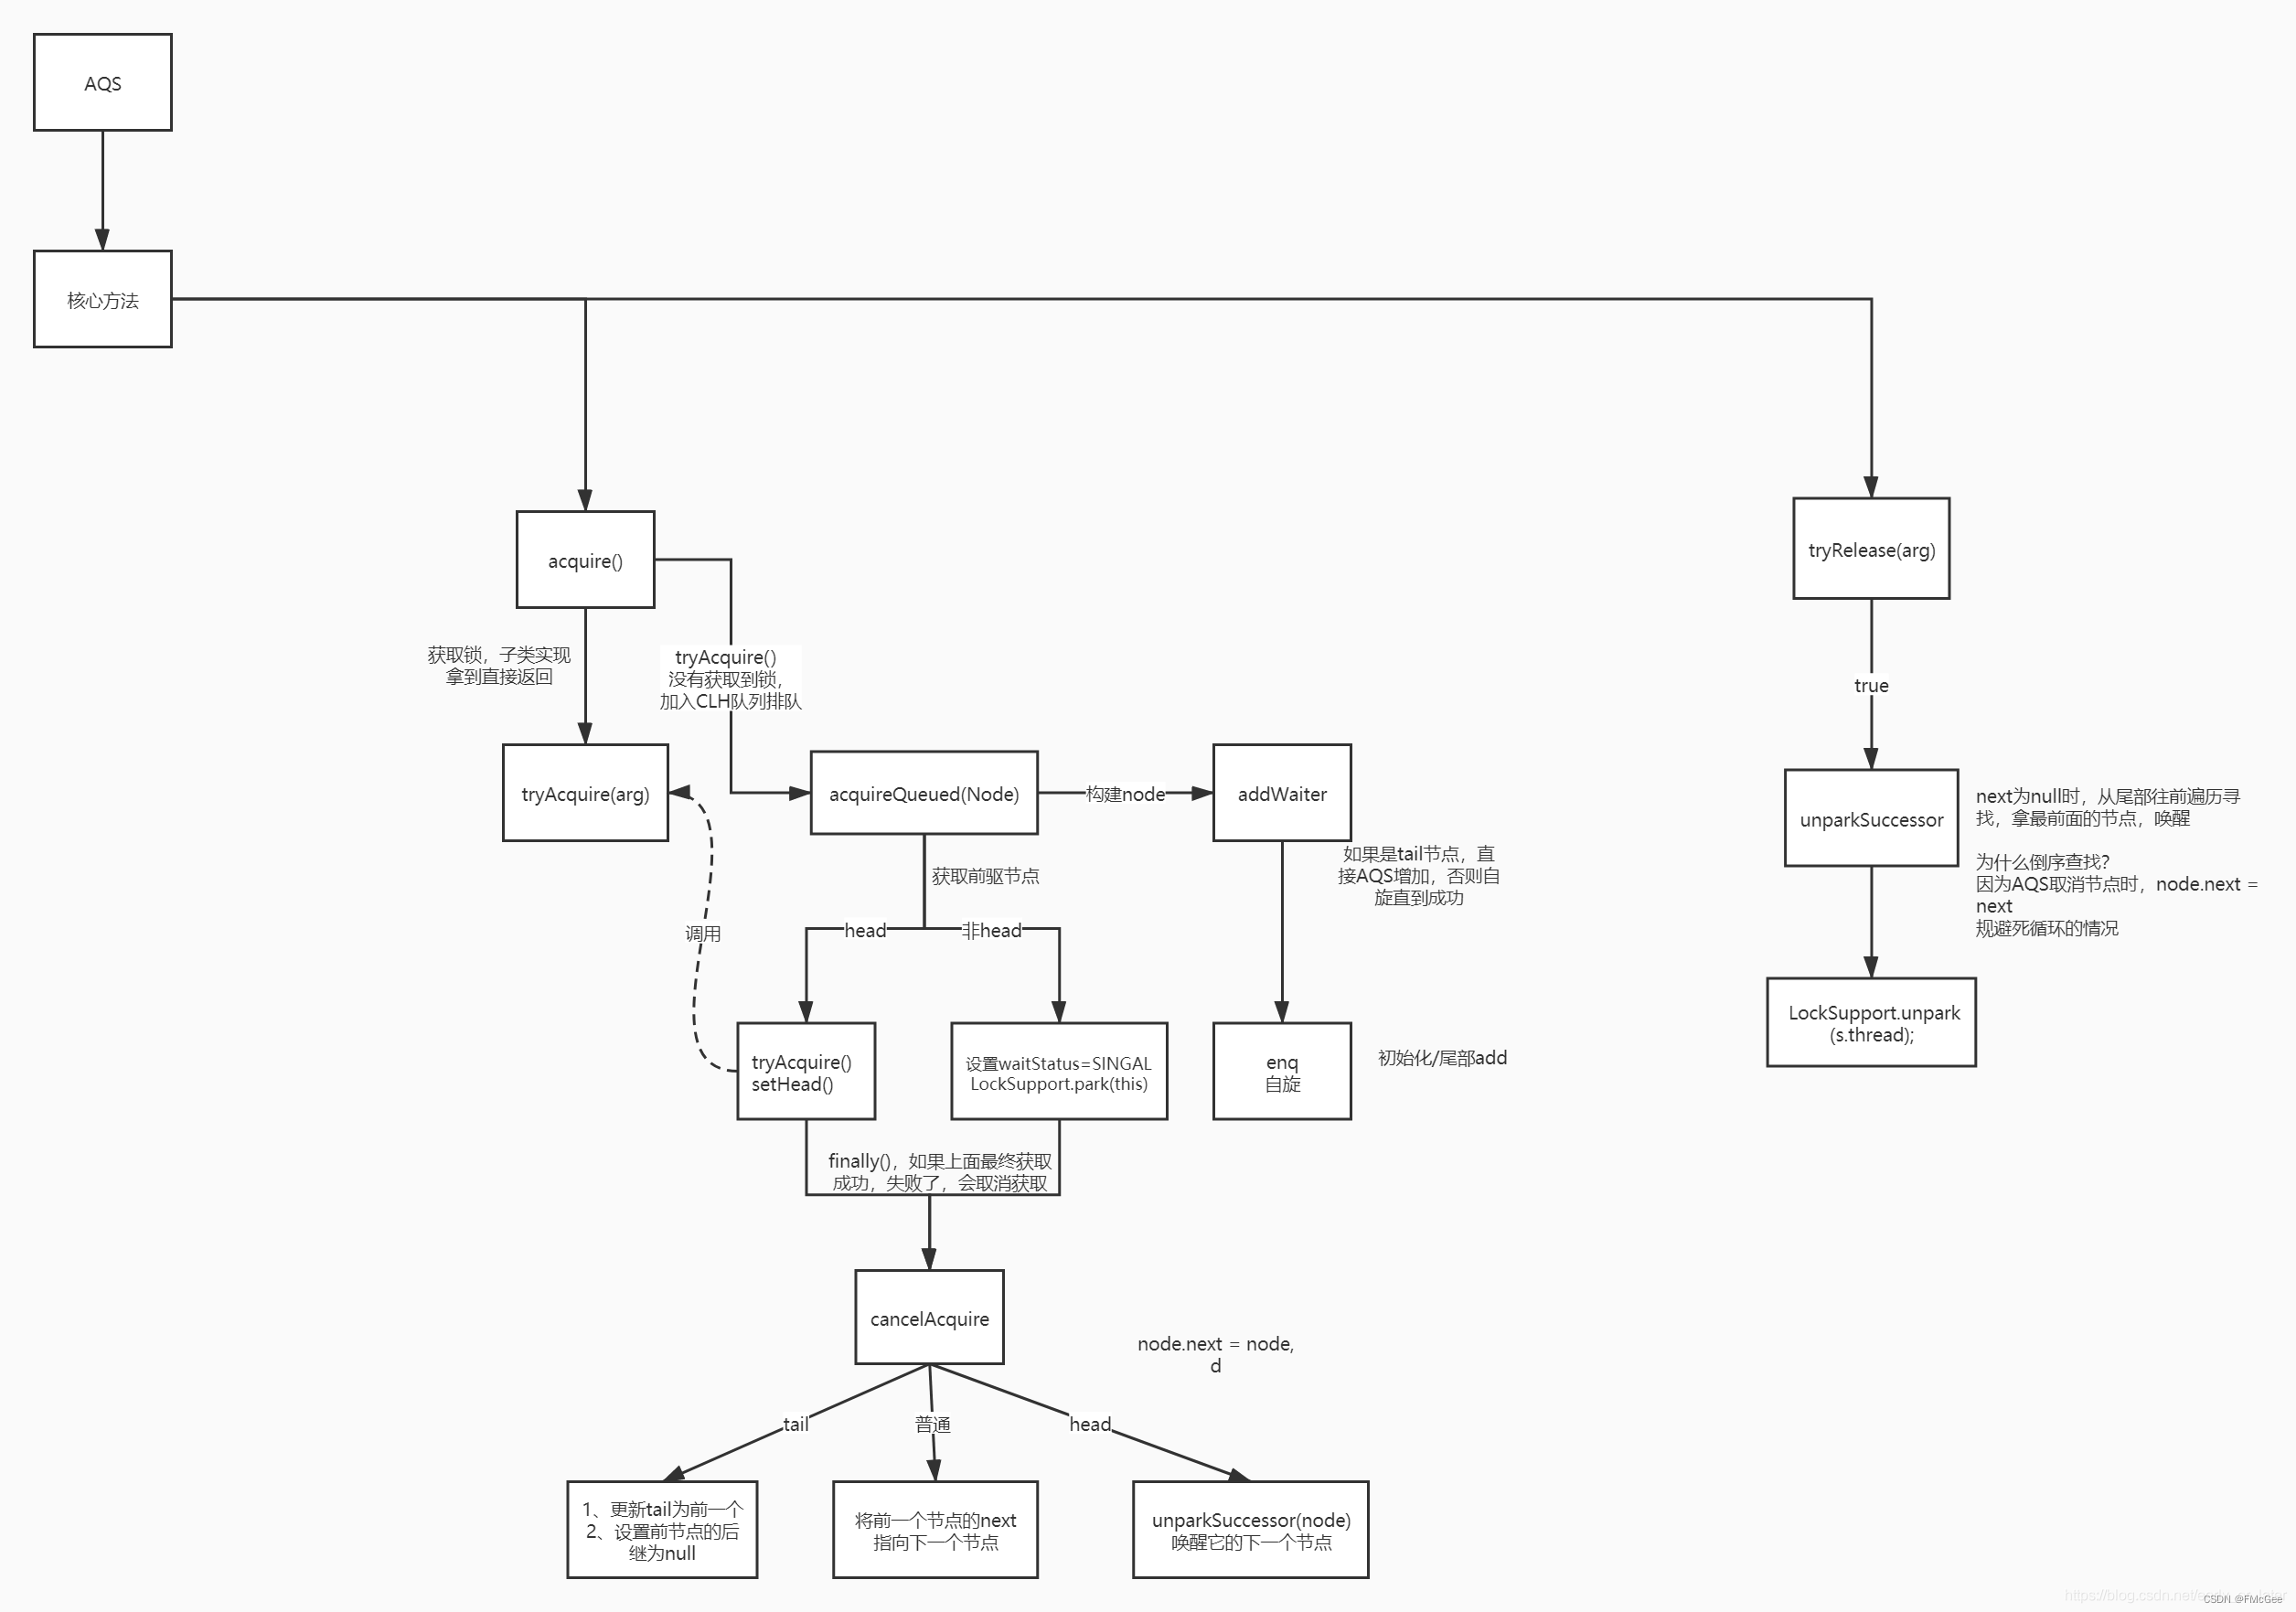
我用白话给大家串起来讲一下吧! 我们以reentrantLock的非公平锁结合我们案例4来讲解。
当线程A 到lock()方法时,通过compareAndSetState(0,1)获得锁,并且获得独占锁。当B,C线程去争抢锁时,运行到acquire(1),C线程运行tryAcquire(1),接着运行nonfairTryAcquire(1)方法,未获取锁,最后返回false,运行addWaiter(),运行enq(node),初始化head节点,同时C进入队列;再进入acquireQueued(node,1)方法,初始化waitStatus= -1,自旋并park()进入等待。
接着B线程开始去抢锁,B线程运行tryAcquire(1),运行nonfairTryAcquire(1)方法,未获得锁最后返回false,运行addWaiter(),直接添加到队尾,同时B进入队列;在进入acquireQueued(node,1)方法,初始化waitStatus= -1,自旋并park()进入等待。
5.3 unlock源码分析
unlock释放锁。主要利用的是LockSupport
  public final boolean release(int arg) {
         // 如果成功释放独占锁,
        if (tryRelease(arg)) {
            Node h = head;
            // 如果头结点不为null,且后续有入队结点
            if (h != null && h.waitStatus != 0)
                //释放当前线程,并激活等待队里的第一个有效节点
                unparkSuccessor(h);
            return true;
        }
        return false;
    }
    // 如果释放锁着返回true,否者返回false
    // 并且将sate 设置为0
 protected final boolean tryRelease(int releases) {
            int c = getState() - releases;
            if (Thread.currentThread() != getExclusiveOwnerThread())
                throw new IllegalMonitorStateException();
            boolean free = false;
            if (c == 0) {
                free = true;
                setExclusiveOwnerThread(null);
            }
            setState(c);
            return free;
        }


  private void unparkSuccessor(Node node) {
        /*
         * If status is negative (i.e., possibly needing signal) try
         * to clear in anticipation of signalling.  It is OK if this
         * fails or if status is changed by waiting thread.
         */
        int ws = node.waitStatus;
        if (ws < 0)
            // 重置头结点的状态waitStatus
            compareAndSetWaitStatus(node, ws, 0);

        /*
         * Thread to unpark is held in successor, which is normally
         * just the next node.  But if cancelled or apparently null,
         * traverse backwards from tail to find the actual
         * non-cancelled successor.
         */
         // 获取头结点的下一个节点
        Node s = node.next;
        // s.waitStatus > 0 为取消状态 ,结点为空且被取消
        if (s == null || s.waitStatus > 0) {
            s = null;
            // 获取队列里没有cancel的最前面的节点
            for (Node t = tail; t != null && t != node; t = t.prev)
                if (t.waitStatus <= 0)
                    s = t;
        }
        // 如果节点s不为null,则获得锁
        if (s != null)
            LockSupport.unpark(s.thread);
    }
锁的释放这个还是很简单。
总结
这个源码的最好阅读方式是结合例子去自己一步步跟代码,把每一个步骤写在纸上,尝试一两遍你就会有非常清晰的认识。
大家多给些意见,写之前我信心满满觉得能写的让大家看懂,写完之后我觉得一坨屎。
LockSupport从入门到深入理解_倔强的不服的博客-CSDN博客
LockSupport 常见面试题
1、为什么LockSupport也是核心基础类? AQS框架借助于两个类:Unsafe(提供CAS操作)和LockSupport(提供park/unpark操作) 2、写出分别通过wait/notify和LockSupport的park/unpark实现同步?
3、LockSupport.park()会释放锁资源吗? 那么Condition.await()呢?
4、Thread.sleep()、Object.wait()、Condition.await()、LockSupport.park()的区别?
5、 重点 如果在wait()之前执行了notify()会怎样?
6、如果在park()之前执行了unpark()会怎样?
一、LockSupport 是什么?
LockSupport是用来创建锁和其他同步工具类的基本线程阻塞原语。
java锁和同步器框架的核心 AQS: AbstractQueuedSynchronizer,就是通过调用 LockSupport .park()和 LockSupport .unpark()实现线程的阻塞和唤醒 的。 LockSupport 很类似于二元信号量(只有1个许可证可供使用),如果这个许可还没有被占用,当前线程获取许可并继 续 执行;如果许可已经被占用,当前线 程阻塞,等待获取许可。
LockSupport 类的属性
public class LockSupport {
    // Hotspot implementation via intrinsics API
    private static final sun.misc.Unsafe UNSAFE;
    // 表示内存偏移地址
    private static final long parkBlockerOffset;
    // 表示内存偏移地址
    private static final long SEED;
    // 表示内存偏移地址
    private static final long PROBE;
    // 表示内存偏移地址
    private static final long SECONDARY;

    static {
        try {
            // 获取Unsafe实例
            UNSAFE = sun.misc.Unsafe.getUnsafe();
            // 线程类类型
            Class<?> tk = Thread.class;
            // 获取Thread的parkBlocker字段的内存偏移地址
            parkBlockerOffset = UNSAFE.objectFieldOffset
                (tk.getDeclaredField("parkBlocker"));
            // 获取Thread的threadLocalRandomSeed字段的内存偏移地址
            SEED = UNSAFE.objectFieldOffset
                (tk.getDeclaredField("threadLocalRandomSeed"));
            // 获取Thread的threadLocalRandomProbe字段的内存偏移地址
            PROBE = UNSAFE.objectFieldOffset
                (tk.getDeclaredField("threadLocalRandomProbe"));
            // 获取Thread的threadLocalRandomSecondarySeed字段的内存偏移地址
            SECONDARY = UNSAFE.objectFieldOffset
                (tk.getDeclaredField("threadLocalRandomSecondarySeed"));
        } catch (Exception ex) { throw new Error(ex); }
    }
}
类的构造函数
// 私有构造函数,无法被实例化
private LockSupport() {}
二、三种让线程等待和唤醒的方法
前面简单的介绍了一下LockSupport定义。接下来我们介绍java中三种阻塞和唤醒机制,并总结它们的优缺点。
方法一:使用Object中的wait()方法让线程等待,使用Object的notify()方法唤醒线程,结合synchronized;
方法二:使用JUC包中的Condition的await()方法让线程等待,使用signal()方法唤醒线程;
方法三:LockSupport类可以阻塞当前线程以及唤醒指定被阻塞的线程;
我们用具体实例演示三种方法
方法一 使用wait()和notify():
public class ObjectWait {

    public static void main(String[] args) {
        Object o = new Object();


        Thread t = new Thread(new Runnable() {
            @Override
            public void run() {

                System.out.println("线程A被o.wait()阻塞前");
                synchronized(o){
                    try {
                        o.wait();
                    } catch (InterruptedException e) {
                        e.printStackTrace();
                    }

                }
                System.out.println("线程A被线程B o.notify()唤醒");

            }
        },"A");

        t.start();


        try {
            Thread.sleep(100);
        } catch (InterruptedException e) {
            e.printStackTrace();
        }

        new Thread(new Runnable() {
            @Override
            public void run() {
                System.out.println("线程B唤醒线程A");
                synchronized (o){
                    o.notify();
                }
            }
        },"B").start();
    }
}
结果:
线程A被o.wait()阻塞前
线程B唤醒线程A
线程A被线程B o.notify()唤醒
我们通过o.wait()将线程A阻塞,再通过线程B中运行o.notify()方法将线程A唤醒.
注意:1、wait和notify都需要在同步块或者同步方法里,也就是要使用到synchronized,将资源类锁住,且必须成对出现。 2、使用时必须先wait 在notify,否则wait不会被唤醒的情况,从而导致线程一直阻塞。
这里我没有演示 先notify再wait 会出现的wait不会唤醒的情况,大家可以自行测试。
方法二: Lock .condition
public class ConditionAwait {

    public static void main(String[] args) {

        Lock lock = new ReentrantLock();
        Condition condition = lock.newCondition();

        new Thread(new Runnable() {
            @Override
            public void run() {

                System.out.println("线程A被condition.await()阻塞前");

                try {
                    lock.lock();
                    condition.await();
                } catch (InterruptedException e) {
                    e.printStackTrace();
                }finally {
                    lock.unlock();
                }
                System.out.println("线程A被线程B condition.signl()唤醒");
            }
        }, "A").start();


        new Thread(new Runnable() {
            @Override
            public void run() {


                try {
                    lock.lock();

                    System.out.println("线程B中使用condition.signal()唤醒线程A");
                    condition.signal();
                }catch (Exception e){


                }finally {
                    lock.unlock();
                }

            }
        }, "B").start();

    }
}

结果:
线程A被condition.await()阻塞前
线程B中使用condition.signal()唤醒线程A
线程A被线程B condition.signl()唤醒
注意:1 、Condition中的线程等待和唤醒一定要先获得锁。
2、一定要先await,再signal,不能反了
方法三,使用LockSupport
public class LockSupportDemo {

    public static void main(String[] args) {

        Thread t = new Thread(new Runnable() {
            @Override
            public void run() {

                System.out.println("线程A被LockSupport.park()阻塞");
                LockSupport.park();

                System.out.println("线程A被线程B LockSupport.unpark()唤醒");

            }
        },"A");

        t.start();

        new Thread(new Runnable() {
            @Override
            public void run() {
                System.out.println("线程B唤醒线程A");
                // 唤醒指定线程t,也就是A
                LockSupport.unpark(t);
            }
        },"B").start();
    }
}

结果:
线程A被LockSupport.park()阻塞
线程B唤醒线程A
线程A被线程B LockSupport.unpark()唤醒
从上面可以看出使用LockSupport 进行线程阻塞和唤醒可以在线程的任意地方执行,并且可以通过unpart(thread)唤醒指定的线程。作为工具类LockSupport的使用,也降低了代码的耦合性。
使用interrupt() 中断park()阻塞
package CompleteFuture;

import java.util.concurrent.locks.LockSupport;

public class LockSupportDemo {

    public static void main(String[] args) {

        Thread t = new Thread(new Runnable() {
            @Override
            public void run() {

                System.out.println("before park");
                LockSupport.park();
                System.out.println("after park");

            }
        },"A");

        t.start();


       //确保 park()执行
        try {
            Thread.sleep(3000);
        } catch (InterruptedException e) {
            e.printStackTrace();
        }
//        System.out.println("线程t是否被阻塞: "+t.isInterrupted());
        System.out.println("before interrupted");
        t.interrupt();
        System.out.println("after interrupted");

    }
}

结果:
before park
before interrupted
after interrupted
after park
三种方法的总结
| 方法 | 特点 | 缺点 |
|---|---|---|
| wait/notify | wait和notify都需要在同步块或者同步方法里,也就是要使用到synchronized,将资源类锁住,且必须成对出现。 2、使用时必须先wait 在notify,否则wait不会被唤醒的情况,从而导致线程一直阻塞。 | 需要借助synchronized |
| condition | 需要结合lock 和unlock ,可以精准唤醒指定线程(示例没有展示),大家自行研究 | 它的底层其实还是使用的LockSupport |
| LockSupport | 使用park 和unpark唤醒指定线程 ,不关系是先执行 unpark 还是park,只要是成对出现线程都将被释放 | 多次调用unpark也只能释放一次 |
三、LockSupport 源码分析
LockSupport中方法如下: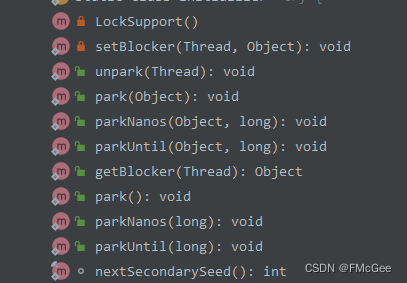
3.1 park() 源码分析
/**Disables the current thread for thread scheduling purposes unless the permit is available.
If the permit is available then it is consumed and the call returns immediately; otherwise the current thread becomes disabled for thread scheduling purposes and lies dormant until one of three things happens:
Some other thread invokes unpark with the current thread as the target; or
Some other thread interrupts the current thread; or
The call spuriously (that is, for no reason) returns.
This method does not report which of these caused the method to return. Callers should re-check the conditions which caused the thread to park in the first place. Callers may also determine, for example, the interrupt status of the thread upon return.
*/
public static void park() {
        UNSAFE.park(false, 0L);
    }
上面的方法如何理解呢?
如果没有permit许可,那么调用该方法后,当前线程立马停止执行计划(阻塞),直到有一下3中情况发生:
1、其他线程调用unpark(被阻塞线程引用)方法,参数为需要唤醒的线程;
2、其他线程中断当前线程;
3、调用虚假(即无缘无故)返回;
UNSAFE.park(isAbsolute,timeout)的理解,阻塞一个线程直到unpark出现、线程
-
被中断或者timeout时间到期。如果一个unpark调用已经出现了,
-
这里只计数。timeout为0表示永不过期.当isAbsolute为true时,
-
timeout是相对于新纪元之后的毫秒。否则这个值就是超时前的纳秒数。这个方法执行时
-
也可能不合理地返回(没有具体原因)
深入理解sun.misc.Unsafe原理
3.2 unpark(Thread thread)
 public static void unpark(Thread thread) {
        if (thread != null)
            UNSAFE.unpark(thread);
    }
给指定的线程提供unblock凭证。如果指定的线程使用了park(),则线程变成非阻塞。如果没有使用park,则线程下一次使用park时,怎线程不会阻塞。
park(blocker) 锁定指定对象
public static void park(Object blocker) {
    // 获取当前线程
    Thread t = Thread.currentThread();
    // 设置Blocker
    setBlocker(t, blocker);
    // 获取许可
    UNSAFE.park(false, 0L);
    // 重新可运行后再此设置Blocker
    setBlocker(t, null);
}
说明: 调用park函数时,首先获取当前线程,然后设置当前线程的parkBlocker字段,即调用setBlocker函数,之后调用Unsafe类的park函数,之后再调用setBlocker函数。那么问题来了,为什么要在此park函数中要调用两次setBlocker函数呢? 原因其实很简单,调用park函数时,当前线程首先设置好parkBlocker字段,然后再调用Unsafe的park函数,此后,当前线程就已经阻塞了,等待该线程的unpark函数被调用,所以后面的一个setBlocker函数无法运行,unpark函数被调用,该线程获得许可后,就可以继续运行了,也就运行第二个setBlocker,把该线程的parkBlocker字段设置为null,这样就完成了整个park函数的逻辑。如果没有第二个setBlocker,那么之后没有调用park(Object blocker),而直接调用getBlocker函数,得到的还是前一个park(Object blocker)设置的blocker,显然是不符合逻辑的。总之,必须要保证在park(Object blocker)整个函数执行完后,该线程的parkBlocker字段又恢复为null。所以,park(Object)型函数里必须要调用setBlocker函数两次。setBlocker方法如下。
五、更深入的理解
5.1 Thread.sleep()和Object.wait()的区别 Thread.sleep()不会释放占有的锁,Object.wait()会释放占有的锁;
- Thread.sleep()必须传入时间,Object.wait()可传可不传,不传表示一直阻塞下去;
- Thread.sleep()到时间了会自动唤醒,然后继续执行;
- Object.wait()不带时间的,需要另一个线程使用Object.notify()唤醒;
- Object.wait()带时间的,假如没有被notify,到时间了会自动唤醒,这时又分好两种情况,一是立即获取到了锁,线程自然会继续执行;二是没有立即获取锁,线程进入同步队列等待获取锁;
- 其实,他们俩最大的区别就是Thread.sleep()不会释放锁资源,Object.wait()会释放锁资源。
5.2 Object.wait()和Condition.await()的区别
- Object.wait()和Condition.await()的原理是基本一致的,不同的是Condition.await()底层是调用LockSupport.park()来实现阻塞当前线程的。
- 实际上,它在阻塞当前线程之前还干了两件事,一是把当前线程添加到条件队列中,二是“完全”释放锁,也就是让state状态变量变为0,然后才是调用LockSupport.park()阻塞当前线程。
5.3 Thread.sleep()和LockSupport.park()的区别
- LockSupport.park()还有几个兄弟方法——parkNanos()、parkUtil()等,我们这里说的park()方法统称这一类方法。
- 从功能上来说,Thread.sleep()和LockSupport.park()方法类似,都是阻塞当前线程的执行,且都不会释放当前线程占有的锁资源;
- Thread.sleep()没法从外部唤醒,只能自己醒过来;
- LockSupport.park()方法可以被另一个线程调用LockSupport.unpark()方法唤醒;
- Thread.sleep()方法声明上抛出了InterruptedException中断异常,所以调用者需要捕获这个异常或者再抛出;
- LockSupport.park()方法不需要捕获中断异常;
- Thread.sleep()本身就是一个native方法; LockSupport.park()底层是调用的Unsafe的native方法;
5.4 Object.wait()和LockSupport.park()的区别 二者都会阻塞当前线程的运行,他们有什么区别呢?
- 经过上面的分析相信你一定很清楚了,真的吗? 往下看!
- Object.wait()方法需要在synchronized块中执行; LockSupport.park()可以在任意地方执行;
- Object.wait()方法声明抛出了中断异常,调用者需要捕获或者再抛出
- LockSupport.park()不需要捕获中断异常;
- Object.wait()不带超时的,需要另一个线程执行notify()来唤醒,但不一定继续执行后续内容;
- LockSupport.park()不带超时的,需要另一个线程执行unpark()来唤醒,一定会继续执行后续内容;
- park()/unpark()底层的原理是“二元信号量”,你可以把它相像成只有一个许可证的Semaphore,只不过这个信号量在重复执行unpark()的时候也不会再增加许可证,最多只有一个许可证。
5.5 如果在wait()之前执行了notify()会怎样?
- 如果当前的线程不是此对象锁的所有者,却调用该对象的notify()或wait()方法时抛出IllegalMonitorStateException异常;
- 如果当前线程是此对象锁的所有者,wait()将一直阻塞,因为后续将没有其它notify()唤醒它。
5.6 如果在park()之前执行了unpark()会怎样?
线程不会被阻塞,直接跳过park(),继续执行后续内容
LockSupport.park()会释放锁资源吗?
不会,它只负责阻塞当前线程,释放锁资源实际上是在Condition的await()方法中实现的。
参考文章
https://blog.csdn.net/u013851082/article/details/70242395
什么是 AQS(抽象的队列同步器)_其实系一个须刨的博客-CSDN博客
AQS 原理概览
AQS核心思想是,如果被请求的共享资源空闲,则将当前请求资源的线程设置为有效的工作线程,并且将共享资源设置为锁定状态。如果被请求的共享资源被占用,那么就需要一套线程阻塞等待以及被唤醒时锁分配的机制,这个机制AQS是用CLH队列锁实现的,即将暂时获取不到锁的线程加入到队列中。
AbstractQueuedSynchronizer类如其名,抽象的队列式的同步器,AQS定义了一套多线程访问共享资源的同步器框架,许多同步类实现都依赖于它,如常用的ReentrantLock/Semaphore/CountDownLatch。
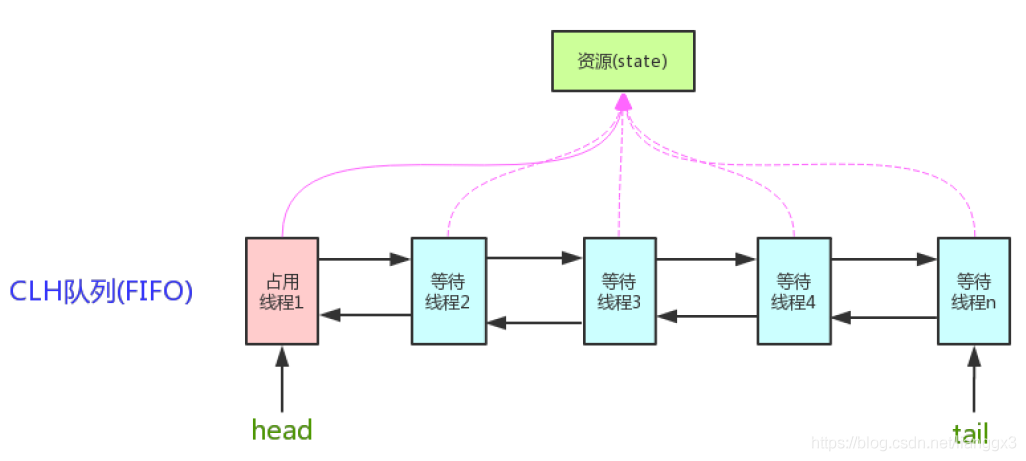
AQS使用一个int成员变量来表示同步状态,通过内置的FIFO队列来完成获取资源线程的排队工作。AQS使用CAS对该同步状态进行原子操作实现对其值的修改。
private volatile int state;//共享变量,使用volatile修饰保证线程可见性状态信息通过protected类型的getState,setState,compareAndSetState进行操作.
-
//返回同步状态的当前值
-
protected final int getState() {
-
return state;
-
}
-
// 设置同步状态的值
-
protected final void setState(int newState) {
-
state = newState;
-
}
-
//原子地(CAS操作)将同步状态值设置为给定值update如果当前同步状态的值等于expect(期望值)
-
protected final boolean compareAndSetState(int expect, int update) {
-
return unsafe.compareAndSwapInt(this, stateOffset, expect, update);
-
}
它维护了一个volatile int state(代表共享资源)和一个FIFO线程等待队列(多线程争用资源被阻塞时会进入此队列)。这里volatile是核心关键词。state的访问方式有三种: getState() setState() compareAndSetState()。
- Exclusive独占资源-ReentrantLock:独占,只有一个线程能执行,如ReentrantLock
- Share共享资源-Semaphore/CountDownLatch :共享,多个线程可同时执行,如Semaphore/CountDownLatch。
AQS使用了模板方法模式,自定义同步器时需要重写下面几个AQS提供的模板方法:
-
isHeldExclusively()//该线程是否正在独占资源。只有用到condition才需要去实现它。
-
tryAcquire(int)//独占方式。尝试获取资源,成功则返回true,失败则返回false。
-
tryRelease(int)//独占方式。尝试释放资源,成功则返回true,失败则返回false。
-
tryAcquireShared(int)//共享方式。尝试获取资源。负数表示失败;0表示成功,但没有剩余可用资源;正数表示成功,且有剩余资源。
-
tryReleaseShared(int)//共享方式。尝试释放资源,成功则返回true,失败则返回false。
默认情况下,每个方法都抛出 UnsupportedOperationException。 这些方法的实现必须是内部线程安全的,并且通常应该简短而不是阻塞。AQS类中的其他方法都是final ,所以无法被其他类使用,只有这几个方法可以被其他类使用。
同步状态的获取与释放
如果获取到资源,线程直接返回,否则进入等待队列,直到获取到资源为止,且整个过程忽略中断的影响。包含以下操作。
- tryAcquire:去尝试获取锁,获取成功则设置锁状态并返回true,否则返回false。该方法由自定义同步组件自己实现(通过state的get/set/CAS),该方法必须要保证线程安全的获取同步状态。
- addWaiter:如果tryAcquire返回FALSE(获取同步状态失败),则调用该方法将当前线程加入到CLH同步队列尾部,并标记为独占模式。
- acquireQueued:当前线程会根据公平性原则来进行阻塞等待(自旋),直到获取锁为止;如果在整个等待过程中被中断过,则返回true,否则返回false。
- selfInterrupt:如果线程在等待过程中被中断过,它是不响应的。只是获取资源后才再进行自我中断selfInterrupt(),将中断补上。
当前线程会一直尝试获取同步状态,当然前提是只有其前驱节点为头结点才能够尝试获取同步状态
1、保持FIFO同步队列原则。
2、头节点释放同步状态后,将会唤醒其后继节点,后继节点被唤醒后需要检查自己是否为头节点。`
检查当前线程是否需要被阻塞,具体规则如下:
1. 如果当前线程的前驱节点状态为SINNAL,则表明当前线程需要被阻塞,调用unpark()方法唤醒,直接返回true,当前线程阻塞
2. 如果当前线程的前驱节点状态为CANCELLED(ws > 0),则表明该线程的前驱节点已经等待超时或者被中断了,则需要从CLH队列中将该前驱节点删除掉,直到回溯到前驱节点状态 <= 0 ,返回false
3. 如果前驱节点非SINNAL,非CANCELLED,则通过CAS的方式将其前驱节点设置为SINNAL,返回false。整个流程中,如果前驱结点的状态不是SIGNAL,那么自己就不能被阻塞,需要去找个安心的休息点(前驱节点状态 <= 0 ),同时可以再尝试下看有没有机会去获取资源。如果 shouldParkAfterFailedAcquire(Node pred, Node node) 方法返回true,则调用parkAndCheckInterrupt()方法阻塞当前线程。
AQS,全称AbstractQuenedSynchronizer,可以理解为抽象的队列同步器。所谓抽象就代表着这个类要被继承和复用,实际上AQS这个类也确实是Java实现多线程并发编程的中必不可少的一个基础类,JUC中许多工具类的内部都继承了AQS,而AQS的底层则广泛的应用了CAS的实现。下面我们从源码的角度来深入了解一下AQS这个类。
1.AQS的内部属性
进入AQS类的内部我们先来了解其最重要的三个内部属性:
private transient volatile Node head;

private transient volatile Node tail;

private volatile int state;
从AQS的名字中我们就可以看出AQS内部会维护一个队列,实际上 AQS内部也确实是将竞争资源对象的线程都排成了一个FIFO队列,而这里的head与tail就代表了这个队列的对头与队尾。值得一提的是head实际上并不会真的指向队列中的第一个线程,它的下一个结点才是队列中的第一个线程。而这里的state则是代表了当前资源对象的锁状态,用于判断当前资源对象是否正在被占用,使用volatile实现其线程之间的可见性。这三个内部属性构成了AQS的简单架构,如下图所示:
可以看出,AQS内部维护一个先进先出的队列,用以记录所有等待调用资源对象的线程,而对象资源的占用状态则用state表示,从之前的内部属性我们可以看出AQS是用Node来实现队列,那么接下来让我们看一下AQS内部是如何定义这个Node的:
    static final class Node {
        /**
         * Marker to indicate a node is waiting in shared mode
         */
        static final Node SHARED = new Node();
        /**
         * Marker to indicate a node is waiting in exclusive mode
         */
        static final Node EXCLUSIVE = null;
        /**
         * waitStatus value to indicate thread has cancelled
         */
        static final int CANCELLED = 1;
        /**
         * waitStatus value to indicate successor's thread needs unparking
         */
        static final int SIGNAL = -1;
        /**
         * waitStatus value to indicate thread is waiting on condition
         */
        static final int CONDITION = -2;
        /**
         * waitStatus value to indicate the next acquireShared should
         * unconditionally propagate
         */
        static final int PROPAGATE = -3;
        volatile int waitStatus;
        volatile Node prev;

        volatile Node next;

        volatile Thread thread;

        Node nextWaiter;

        /**
         * Returns true if node is waiting in shared mode.
         */
        final boolean isShared() {
            return nextWaiter == SHARED;
        }

        /**
         * Returns previous node, or throws NullPointerException if null.
         * Use when predecessor cannot be null.  The null check could
         * be elided, but is present to help the VM.
         *
         * @return the predecessor of this node
         */
        final Node predecessor() throws NullPointerException {
            Node p = prev;
            if (p == null)
                throw new NullPointerException();
            else
                return p;
        }

        Node() {    // Used to establish initial head or SHARED marker
        }

        Node(Thread thread, Node mode) {     // Used by addWaiter
            this.nextWaiter = mode;
            this.thread = thread;
        }

        Node(Thread thread, int waitStatus) { // Used by Condition
            this.waitStatus = waitStatus;
            this.thread = thread;
        }
    }
从Node的代码里面我们可以看出以下信息:
①Node有两种状态,共享与独占;
②对于每一个Node都会有两个指针,分别指向自己的前后结点,因此可以看出AQS维护的这个FIFO队列内部其实是用双向链表实现的;
③每个Node结点都有一个等待状态waitStatus用以表示当前结点的线程状态,这是一个枚举值,取值范围为: CANCELLED = 1;SIGNAL = -1;CONDITION = -2;PROPAGATE = -3,对于这几个枚举值我们对其解释如下:
SIGNAL:表示该节点的后继节点被阻塞(或即将被阻塞),因此当前节点在释放或取消时必须解除其后继节点的阻塞。
CANCELLED:表示由于超时或中断,此节点被取消,节点永远不会离开这种状态。取消了节点的线程不会再阻塞其它线程。
CONDITION:表示此节点当前位于条件队列中,可以理解为它关联了某个条件对象。在传输之前,它不会被用作同步队列节点,传输时状态将被设置为0。(此处使用该值与该字段的其他用途无关,只是简化了机制。)
PROPAGATE:表示共享模式的结点释放资源对象后应该将该信息传播给其它结点。
而在初始化waitStatus时,会默认将其赋值为0,表示普通的同步结点,对条件队列则使用CONDITION。它们的修改过程都是CAS的。
以上就是Node内部类中比较重要的几个信息,当然它还有一些其它方法,如获取每个node的前置结点,记录当前线程信息等方法,上述代码中已有展示,在此不再一一叙述。
2.AQS中的重要方法
在我们基本上了解了AQS内部主要的属性,数据结构和架构后,接下来我们就要探究一下AQS具体是怎么使用我们说到的state,Node和FIFO实现多线程的同步管理的。
首先我们要知道,实现多线程同步的方法是对资源对象进行加锁,而加锁的情况可以分为两种,一种是线程尝试对资源对象加锁,不管成功与否都直接返回结果;一种是强行加锁,如果加锁不成功,就一直等待直到加锁成功。而AQS中正好也是使用tryAcquire和acquire这两个方法实现这两种不同的加锁情况的,下面我们来看一下具体实现的源码;
public final void acquire(int arg) {
        if (!tryAcquire(arg) &&
            acquireQueued(addWaiter(Node.EXCLUSIVE), arg))
            selfInterrupt();
    }
 protected boolean tryAcquire(int arg) {
        throw new UnsupportedOperationException();
    }
上面代码中我们可以看出AQS对尝试加锁tryAcquire方法的描写非常简单,里面只有一行简单的抛出异常,这是为了让开发人员去继承重写这个方法,在重写的方法里面我们可以加上自己的业务逻辑代码,而对于加锁acquire方法,AQS直接使用final修饰,意味着开发人员只需要去调用我这个方法就行,不需要去修改,其对自己的这个方法充满信心,那么让我们来仔细研究一下这个方法的具体实现吧。
首先在进入acquire方法后我们会进行判断,如果当前线程通过tryAcquire方法尝试获取锁成功,那么就不需要加锁,直接退出,如果尝试加锁失败就会进入addWaiter(Node.EXCLUSIVE)这个方法中,这个方法看名字应该是把当前结点加入等待队列的意思,那么让我们看一下它的具体实现吧:
private Node addWaiter(Node mode) {
        Node node = new Node(Thread.currentThread(), mode);
        // Try the fast path of enq; backup to full enq on failure
        Node pred = tail;
        if (pred != null) {
            node.prev = pred;
            if (compareAndSetTail(pred, node)) {
                pred.next = node;
                return node;
            }
        }
        enq(node);
        return node;
    }
进入addWaiter方法,我们首先看到它为当前线程创建了一个Node结点,并传入它是共享还是独占模式的,接下来又创建了一个Node结点pred,并让它指向了FIFO的尾结点,然后判断pred是否为空,如果不为空,那么就将代表当前线程的结点node的前指针指向pred,然后通过CAS操作将当前结点置为尾结点,即入队操作,如果CAS操作成功,则将pred结点尾指针指向node,完成完整的入队操作,返回node即可。但如果CAS操作失败,则代表当前的尾结点发生了变化,pred指向的已经不是尾结点,那么入队操作失败,执行完整的入队操作enq方法。
在入队操作中,如果CAS操作失败,或者一开始的队列为空都需要执行enq完整的入队方法,下面我们看一下完整入队方法的实现:
private Node enq(final Node node) {
       for (;;) {
           Node t = tail;
           if (t == null) { // Must initialize
               if (compareAndSetHead(new Node()))
                   tail = head;
           } else {
               node.prev = t;
               if (compareAndSetTail(t, node)) {
                   t.next = node;
                   return t;
               }
           }
       }
   }
可以看出,完整的入队方法enq里面是一个自旋操作,首先我们创建一个新结点t指向队尾,如果队尾为空,那我们就用CAS操作创建队头,然后让队尾指向队头结点,之后执行的入队方法就与addWaiter中的操作类似,使用CAS操作修改队尾,自旋直到成功后返回即可。
到此,我们就完全搞明白了acquire方法中执行入队操作的addWaiter方法的执行流程,那么回归acquire方法,在执行完入队操作后,我们就需要对这些入队的线程进行管理,接下来就会执行acquireQueued方法,下面我们来看一下acquireQueued方法的实现:
final boolean acquireQueued(final Node node, int arg) {
        boolean failed = true;
        try {
            boolean interrupted = false;
            for (;;) {
                final Node p = node.predecessor();
                if (p == head && tryAcquire(arg)) {
                    setHead(node);
                    p.next = null; // help GC
                    failed = false;
                    return interrupted;
                }
                if (shouldParkAfterFailedAcquire(p, node) &&
                    parkAndCheckInterrupt())
                    interrupted = true;
            }
        } finally {
            if (failed)
                cancelAcquire(node);
        }
    }
在这个方法中,我们看到AQS定义了默认为true的failed和默认为false的interrupted属性,接下来我们来看看AQS是怎么操作的,首先,程序会进入一个自旋,AQS定义一个Node结点p指向当前node的前置结点,如果node的前置结点是头结点,并且node结点尝试获取锁成功,那么我们将当前结点设置为头结点然后修改failed值为false,并返回值为false的interrupt额度,代表当前结点获取锁没有被中断。如果p确实为头结点,那么这里就会自旋等待当前结点获取锁。
若p结点不是头结点,这里我们就要进shouldParkAfterFailedAcquire和parkAndCheckInterrupt方法中,并修改interrupted为true,代表等待锁过程中被中断过,而如果获取锁的过程中出现异常等操作进入finally中,则会取消当前结点加锁的行为。
下面让我们再来看一下shouldParkAfterFailedAcquire与parkAndCheckInterrupt方法都做了什么吧:
private static boolean shouldParkAfterFailedAcquire(Node pred, Node node) {
        int ws = pred.waitStatus;
        if (ws == Node.SIGNAL)
            /*
             * This node has already set status asking a release
             * to signal it, so it can safely park.
             */
            return true;
        if (ws > 0) {
            /*
             * Predecessor was cancelled. Skip over predecessors and
             * indicate retry.
             */
            do {
                node.prev = pred = pred.prev;
            } while (pred.waitStatus > 0);
            pred.next = node;
        } else {
            /*
             * waitStatus must be 0 or PROPAGATE.  Indicate that we
             * need a signal, but don't park yet.  Caller will need to
             * retry to make sure it cannot acquire before parking.
             */
            compareAndSetWaitStatus(pred, ws, Node.SIGNAL);
        }
        return false;
    }
首先是shouldParkAfterFailedAcquire方法,这个方法是判断当前结点是否需要挂起(park),进入这个方法后会先获取当前结点前置结点的waitStatus,记为ws。如果ws值为SIGNAL,代表其前置结点也在拿锁,且其拿到锁在准备释放时会唤醒它后面的结点,因此当前结点就是安全的,可以被挂起;但如果ws>0,代表前置结点处于CANCEL,即被取消状态,那么就需要不断的向前寻找,直到找到第一个ws不是CANCEL状态的结点,此时当前结点的前置结点已经发生了变化,因此对其返回false,不允许挂起当前结点,要求其按照新的前置结点,再执行以此外层的判断。
如果前置结点的状态不是SIGNAL或者CANCEL,那么我们就通过CAS的操作把前置结点的状态更改为SIGNAL,然后返回false在此执行外层逻辑。
通过shouldParkAfterFailedAcquire方法我们判断当前结点能不能被挂起,如果返回false则不能挂起,继续执行外层逻辑,如果能挂起,那我们就需要执行parkAndCheckInterrupt执行具体的挂起操作,其内部代码如下:
private final boolean parkAndCheckInterrupt() {
        LockSupport.park(this);
        return Thread.interrupted();
    }
这个方法很简单,它调用一个LockSupport.park(this)方法实现对当前结点的挂起操作,而这个方法是通过unsafe方法调用native方法使用操作系统原语实现挂起的。在挂起期间,当前结点会在此阻塞,直到其它结点释放锁唤醒它。在park期间,当前结点是不会响应中断的,所以在当前结点被唤醒后,需要返回 Thread.interrupted();去判断它挂起期间是否有被中断过。
在了解完这两个方法后,我们基本上就了解了整个AQS加锁的过程,但其中还有一个问题没有解决,那就是所得释放问题,与加锁对应,释放锁也有两个方法tryRelease和release方法,具体如下:
 protected boolean tryRelease(int arg) {
        throw new UnsupportedOperationException();
    }
  public final boolean release(int arg) {
        if (tryRelease(arg)) {
            Node h = head;
            if (h != null && h.waitStatus != 0)
                unparkSuccessor(h);
            return true;
        }
        return false;
    }
从代码中我们可以看出,tryRelease与tryAcquire类似,都是用于让开发人员继承去实现具体的业务逻辑的,而release方法则是关键的释放代码,在release方法中,首先尝试释放锁,如果释放则直接返回false,若成功,则需要去唤醒后面的其它结点,具体方法为unparkSuccessor(h);其内部实现如下:
    private void unparkSuccessor(Node node) {
        /*
         * If status is negative (i.e., possibly needing signal) try
         * to clear in anticipation of signalling.  It is OK if this
         * fails or if status is changed by waiting thread.
         */
        int ws = node.waitStatus;
        if (ws < 0)
            compareAndSetWaitStatus(node, ws, 0);
    /*
     * Thread to unpark is held in successor, which is normally
     * just the next node.  But if cancelled or apparently null,
     * traverse backwards from tail to find the actual
     * non-cancelled successor.
     */
    Node s = node.next;
    if (s == null || s.waitStatus > 0) {
        s = null;
        for (Node t = tail; t != null && t != node; t = t.prev)
            if (t.waitStatus <= 0)
                s = t;
    }
    if (s != null)
        LockSupport.unpark(s.thread);
}
在这个方法里面,它首先会获取头结点的waitStatus,记为ws。如果ws<0,则使用CAS操作将其置为0,表示锁已经释放。然后创建Node结点指向队中第一个结点,记为s,如果s不存在,代表当前队列没有结点了,或者队中第一个结点的状态>0,及为CANCEL,那么先将s置为null,然后从后往前扫描整个队列,找到距离head最近的状态不是CANCEL的结点,然后唤醒它就可以了。这里需要说的是,为什么从后向前扫描,这是因为加入队列是我们是先让当前结点前指针指向记录的尾结点,然后修改记录的尾结点指向当前结点这个顺序的,这个操作在多线程情况下是线程安全的,因为两个结点的相对位置是固定的,而在扫描时,从前向后就可能出现线程不安全的情况。
3.总结
在前面两节内容中我们介绍了AQS中主要的内部属性和加锁,释放锁的过程,现在,我们对其进行总结如下:
AQS的内部维护了一个Node结点组成的FIFO队列,用来控制多线程等待获取资源对象,使用state属性记录资源对象的锁占有状态。
当多个线程竞争一个资源对象时,AQS提供两种加锁方式,第一种tryAcquire方法是用来让开发人员继承实现业务逻辑的,而acquire方法则是实现加锁的核心操作。在acquire方法中,首先会调用tryAcquire方法判断能否直接加锁,若成功则直接返回,否则进入addWaiter方法,在addWaiter方法中,首先创建Node结点指向当前FIFO队列的队尾,创建Node结点获取当前线程及其独占共享状态,之后判断如果队尾不为空则使用CAS的操作将当前结点置为队尾,修改当前结点的前指针为之前记录的队尾,将记录的队尾的后指针指向当前结点,然后返回当前结点即可。如果当前记录的队尾为空或者CAS操作失败,进入完整的enq入队方法,完整的enq方法里面是一个自旋操作,它会判断如果队尾为空,则创建一个队头,让队尾指向队头,然后自旋执行与addWaiter方法中类似的CAS操作,将当前结点入队即可。
在完成入队操作后,AQS通过acquireQuened方法管理队列,acquireQuened方法中初始设置faild为true与interrupted为false,创建结点p执行当前结点的前指针,如果p为头指针且对当前结点尝试加锁成功,则将当前结点置为头指针,然后返回interrupted表示当前获取锁过程是否有中断;当分析p不是头指针或者尝试获取锁失败后,需要考虑当前结点是否需要挂起,使用shouldParkAfterFailedAcquire与parkAndCheckInterrupt方法判断并执行挂起操作。shouldParkAfterFailedAcquire方法内部通过判断结点的waitStatus决定当前结点能否被挂起,而parkAndCheckInterrupt方法使用lockSupport.park执行挂起操作,唤醒后返回Thread.isInterrupted方法判断挂起期间是否有被中断过。
在释放锁时AQS与加锁类似,release方法调用unparkSuccessor方法唤醒下一个非CANCEL状态的结点去尝试获取锁。
线程八锁
据说是平常工作中常见的情况,线程八锁的重点就是:
① 非静态方法的默认锁是this
静态方法的默认锁是class
②某一时刻内,只能有一个线程有锁,无论几个方法
打个比方
我就不举八个例子了,举几个重点例子给大家看看:
public class ThreadEightLock {

    public static void main(String[] args) {
        thread t = new thread();
        thread t2 = new thread();
        new Thread(new Runnable() {
            @Override
            public void run() {
                t.getOne();//调用线程一
            }
        }).start();

        new Thread(new Runnable() {
            @Override
            public void run() {
                t.getTwo();//调用线程二
            }
        }).start();
    }
}

class thread{
    //线程一
    public synchronized void getOne(){
        try {
            Thread.sleep(3000);
        } catch (InterruptedException e) {
            e.printStackTrace();
        }
        System.out.println("one");
    }
    //线程二
    public synchronized void getTwo(){
        System.out.println("two");
    }
}代码如上,两个线程都是同一类对象,不同的非静态同步方法,结果是线程一等3秒后输出结果 线程二才会输出
one
two
这是运行结果
因为都是同一吧锁,所以另一个线程进不去。
但是如果一个静态同步方法,一个是非静态同步方法,两个线程都是不同的锁就不会有冲突,代码如下:
package com01;

import java.util.concurrent.locks.Lock;
import java.util.concurrent.locks.ReentrantLock;

public class ThreadEightLock {

    public static void main(String[] args) {
        thread t = new thread();
        thread t2 = new thread();
        new Thread(new Runnable() {
            @Override
            public void run() {
                t.getOne();//调用线程一
            }
        }).start();

        new Thread(new Runnable() {
            @Override
            public void run() {
                t.getTwo();//调用线程二
            }
        }).start();
    }
}

class thread{
    //线程一
    public synchronized void getOne(){
        try {
            Thread.sleep(3000);
        } catch (InterruptedException e) {
            e.printStackTrace();
        }
        System.out.println("one");
    }
    //线程二
    public static synchronized void getTwo(){
        System.out.println("two");
    }
}
结果如下
two
one
如果是两个对象,两个非静态同步方法,那么锁就是两个(this)锁,所以也不会冲突 代码如下:
public class ThreadEightLock {

    public static void main(String[] args) {
        thread t = new thread();
        thread t2 = new thread();
        new Thread(new Runnable() {
            @Override
            public void run() {
                t.getOne();//调用线程一
            }
        }).start();

        new Thread(new Runnable() {
            @Override
            public void run() {
                t2.getTwo();//调用线程二
            }
        }).start();
    }
}

class thread{
    //线程一
    public synchronized void getOne(){
        try {
            Thread.sleep(3000);
        } catch (InterruptedException e) {
            e.printStackTrace();
        }
        System.out.println("one");
    }
    //线程二
    public synchronized void getTwo(){
        System.out.println("two");
    }
}
结果如下
two
one
然后就是两个对象,两个静态同步方法就会有冲突,因为是(class)锁,代码如下:
public class ThreadEightLock {

    public static void main(String[] args) {
        thread t = new thread();
        thread t2 = new thread();
        new Thread(new Runnable() {
            @Override
            public void run() {
                t.getOne();//调用线程一
            }
        }).start();

        new Thread(new Runnable() {
            @Override
            public void run() {
                t2.getTwo();//调用线程二
            }
        }).start();
    }
}

class thread{
    //线程一
    public static synchronized void getOne(){
        try {
            Thread.sleep(3000);
        } catch (InterruptedException e) {
            e.printStackTrace();
        }
        System.out.println("one");
    }
    //线程二
    public static synchronized void getTwo(){
        System.out.println("two");
    }
}
结果如下
one
two
大家是不是有点看不明白,其实只要记住线程八锁的关键就是两句话:
① 非静态方法的默认锁是this ,静态方法的默认锁是class
②某一时刻内,只能有一个线程有锁,无论几个方法
线程八锁得到的结论:
- 非静态方法的锁默认为 this, 静态方法的锁为 对应的 Class 实例
- 某一个时刻内,只能有一个线程持有锁,无论几个方法。
论证过程:
1、八锁案例:判断打印的 “one” or “two”
- 两个普通同步方法,两个线程,标准打印, 打印? //one two
public class TestThread8Monitor {

	public static void main(String[] args) {
		Number number1 = new Number();

		new Thread(new Runnable() {
			@Override
			public void run() {
				number1.getOne();
			}
		},"A").start();

		new Thread(new Runnable() {
			@Override
			public void run() {
				number1.getTwo();
			}
		},"B").start();
	}

}

class Number{
	public synchronized void getOne(){
		System.out.println("one");
	}

	public synchronized void getTwo(){
		System.out.println("two");
	}

}- 新增 Thread.sleep() 给 getOne() ,打印? //one two
public class TestThread8Monitor {

	public static void main(String[] args) {
		Number number1 = new Number();

		new Thread(new Runnable() {
			@Override
			public void run() {
				number1.getOne();
			}
		},"A").start();

		new Thread(new Runnable() {
			@Override
			public void run() {
				number1.getTwo();
			}
		},"B").start();
	}

}

class Number{
	public synchronized void getOne(){

		try {
			Thread.sleep(3000);
		} catch (InterruptedException e) {}

		System.out.println("one");
	}

	public synchronized void getTwo(){
		System.out.println("two");
	}

}- 新增普通方法 getThree() , 打印? //three one two
public class TestThread8Monitor {

	public static void main(String[] args) {
		Number number1 = new Number();

		new Thread(new Runnable() {
			@Override
			public void run() {
				number1.getOne();
			}
		},"A").start();

		new Thread(new Runnable() {
			@Override
			public void run() {
				number1.getTwo();
			}
		},"B").start();

        new Thread(new Runnable() {
			@Override
			public void run() {
				number1.getThree();
			}
		},"C").start();
	}

}

class Number{
	public synchronized void getOne(){

		try {
			Thread.sleep(3000);
		} catch (InterruptedException e) {}

		System.out.println("one");
	}

	public synchronized void getTwo(){
		System.out.println("two");
	}

    public void getThree(){
        System.out.println("three")
    }

}- 两个普通同步方法,两个 Number 对象,打印? //two one
public class TestThread8Monitor {

	public static void main(String[] args) {
		Number number1 = new Number();
        Number number2 = new Number();

		new Thread(new Runnable() {
			@Override
			public void run() {
				number1.getOne();
			}
		},"A").start();

		new Thread(new Runnable() {
			@Override
			public void run() {
				number2.getTwo();
			}
		},"B").start();

	}

}

class Number{
	public synchronized void getOne(){

		try {
			Thread.sleep(3000);
		} catch (InterruptedException e) {}

		System.out.println("one");
	}

	public synchronized void getTwo(){
		System.out.println("two");
	}

}- 修改 getOne() 为静态同步方法,一个 Number 对象,打印? //two one
public class TestThread8Monitor {

	public static void main(String[] args) {
		Number number1 = new Number();

		new Thread(new Runnable() {
			@Override
			public void run() {
				number1.getOne();
			}
		},"A").start();

		new Thread(new Runnable() {
			@Override
			public void run() {
				number1.getTwo();
			}
		},"B").start();

	}

}

class Number{
	public static synchronized void getOne(){

		try {
			Thread.sleep(3000);
		} catch (InterruptedException e) {}

		System.out.println("one");
	}

	public synchronized void getTwo(){
		System.out.println("two");
	}

}- 修改两个方法均为静态同步方法,一个 Number 对象? //one two
public class TestThread8Monitor {

	public static void main(String[] args) {
		Number number1 = new Number();

		new Thread(new Runnable() {
			@Override
			public void run() {
				number1.getOne();
			}
		},"A").start();

		new Thread(new Runnable() {
			@Override
			public void run() {
				number1.getTwo();
			}
		},"B").start();

	}

}

class Number{
	public static synchronized void getOne(){

		try {
			Thread.sleep(3000);
		} catch (InterruptedException e) {}

		System.out.println("one");
	}

	public static synchronized void getTwo(){
		System.out.println("two");
	}

}- 一个静态同步方法,一个非静态同步方法,两个 Number 对象? //two one
public class TestThread8Monitor {

	public static void main(String[] args) {
		Number number1 = new Number();
        Number number2 = new Number();

		new Thread(new Runnable() {
			@Override
			public void run() {
				number1.getOne();
			}
		},"A").start();

		new Thread(new Runnable() {
			@Override
			public void run() {
				number2.getTwo();
			}
		},"B").start();

	}

}

class Number{
	public static synchronized void getOne(){

		try {
			Thread.sleep(3000);
		} catch (InterruptedException e) {}

		System.out.println("one");
	}

	public synchronized void getTwo(){
		System.out.println("two");
	}

}- 两个静态同步方法,两个 Number 对象? //one two
public class TestThread8Monitor {

	public static void main(String[] args) {
		Number number1 = new Number();
        Number number2 = new Number();

		new Thread(new Runnable() {
			@Override
			public void run() {
				number1.getOne();
			}
		},"A").start();

		new Thread(new Runnable() {
			@Override
			public void run() {
				number2.getTwo();
			}
		},"B").start();

	}

}

class Number{
	public static synchronized void getOne(){

		try {
			Thread.sleep(3000);
		} catch (InterruptedException e) {}

		System.out.println("one");
	}

	public static synchronized void getTwo(){
		System.out.println("two");
	}

}
2、分析:
-
两个普通同步方法,两个线程,标准打印, 打印? //one two
-
新增 Thread.sleep() 给 getOne() ,打印? //one two
-
新增普通方法 getThree() , 打印? //three one two
-
两个普通同步方法,两个 Number 对象,打印? //two one
-
修改 getOne() 为静态同步方法,一个 Number 对象,打印? //two one
-
修改两个方法均为静态同步方法,一个 Number 对象? //one two
-
一个静态同步方法,一个非静态同步方法,两个 Number 对象? //two one
-
两个静态同步方法,两个 Number 对象? //one two
1 和 2 对比:一个对象里面如果有多个synchronized方法,某一个时刻内,只要一个线程去调用其中的一个synchronized方法了,其它的线程都只能等待,换句话说,某一个时刻内,只能有唯一一个线程去访问这些synchronized方法
所有的非静态同步方法用的都是同一把锁——实例对象本身,也就是说如果一个实例对象的非静态同步方法获取锁后,该实例对象的其他非静态同步方法必须等待获取锁的方法释放锁后才能获取锁,可是别的实例对象的非静态同步方法因为跟该实例对象的非静态同步方法用的是不同的锁,所以毋须等待该实例对象已获取锁的非静态同步方法释放锁就可以获取他们自己的锁。
1 、2 和 3 对比:加个普通方法后发现和同步锁无关
2 和 4 对比:换成两个对象后,不是同一把锁了,情况立刻变化。 锁的是当前对象this,被锁定后,其它的线程都不能进入到当前对象的其它的 synchronized方法。
5 和 6 对比:都换成静态同步方法后,情况又变化
5 和 7 分析对比:情况没有发生改变,说明静态同步方法和非静态同步方法并不是同一把锁。
6 和 8 分析对比:所有的静态同步方法用的也是同一把锁——类对象本身(Object.class),这两把锁是两个不同的对 象,所以静态同步方法与非静态同步方法之间是不会有竞态条件的。但是一旦一个 静态同步方法获取锁后,其他的静态同步方法都必须等待该方法释放锁后才能获取 锁,而不管是同一个实例对象的静态同步方法之间,还是不同的实例对象的静态同 步方法之间,只要它们同一个类的实例对象!
所谓JUC的八锁问题其实就是指synchronized的八种使用情景(灵活使用)
其实就是两种情况:
- 是否加synchronized;
- 加了synchronized后是否加static
关于synchronized的知识点:
- 用于修饰代码块:作用对象是实例,作用的范围是其所有的synchronized代码块与synchronized方法(即,static synchronized 方法与普通方法不受影响),或者某个指定的资源
- 用于修饰方法:作用对象是实例,作用的范围是其所有的synchronized代码块与synchronized方法(即,static synchronized 方法与普通方法不受影响)
- 用于修饰静态方法:作用对象是类(class对象),作用的范围是该类下所有对象的static synchronized 方法(即,普通synchronized方法与普通方法不受影响)
- 用于修饰类:作用对象是类(class对象),作用的范围是该类下所有对象的static synchronized 方法(即,普通synchronized方法与普通方法不受影响)
synchronized的八种使用情景(八锁)
- 主线程在 new发短信后 睡眠100毫秒,发短信、发邮件的打印顺序
- 发短信线程中执行时睡眠4秒,发短信、发邮件的打印顺序
- 打电话线程,发短信、打电话的打印顺序
- 两个资源,发短信、发邮件的打印顺序
- 两个同步方法变静态、一个资源,发短信、发邮件的打印顺序
- 两个静态同步方法、两个资源,发短信、发邮件的打印顺序
- 一个静态同步方法、一个普通同步方法、一个资源,发短信、发邮件的打印顺序
- 一个静态同步方法、一个普通同步方法、两个资源,发短信、发邮件的打印顺序
1:主线程在 new发短信后 睡眠100毫秒,发短信、发邮件的打印顺序
public class Test01 {
    public static void main(String[] args) throws InterruptedException {
        Test0101 test0101 = new Test0101();

        new Thread(() -> {
            test0101.sendMessage();
        },"AAA").start();

        Thread.sleep(100);

        new Thread(() -> {
            test0101.sendEmail();
        },"BBB").start();
    }
}
class Test0101{
    public synchronized void sendMessage(){
        System.out.println("sendMessage");
    }
    public synchronized void sendEmail(){
        System.out.println("sendEmail");
    }
}
2.发短信线程中执行时睡眠4秒,发短信、发邮件的打印顺序
public class Test02 {
    public static void main(String[] args) throws InterruptedException {
        Test0201 test0201 = new Test0201();

        new Thread(() -> {
            test0201.sendMessage();
        },"AAA").start();

        Thread.sleep(100);

        new Thread(() -> {
            test0201.sendEmail();
        },"BBB").start();
    }
}
class Test0201{
    public synchronized void sendMessage(){
        try {
            Thread.sleep(4000);
        } catch (InterruptedException e) {
            e.printStackTrace();
        }
        System.out.println("sendMessage");
    }
    public synchronized void sendEmail(){
        System.out.println("sendEmail");
    }
}
3.打电话线程,发短信、打电话的打印顺序
public class Test03  {
    public static void main(String[] args) throws InterruptedException {
        Test0301 test0301 = new Test0301();

        new Thread(() -> {
            test0301.sendMessage();
        },"AAA").start();

        Thread.sleep(100);

        new Thread(() -> {
            test0301.call();
        },"BBB").start();
    }
}
class Test0301{
    public synchronized void sendMessage(){
        try {
            Thread.sleep(4000);
        } catch (InterruptedException e) {
            e.printStackTrace();
        }
        System.out.println("sendMessage");
    }
    public synchronized void sendEmail(){
        System.out.println("sendEmail");
    }
    public void call(){
        System.out.println("call");
    }
}
4.两个资源,发短信、发邮件的打印顺序
public class Test04  {
    public static void main(String[] args) throws InterruptedException {
        Test0401 test0401 = new Test0401();
        Test0401 test0402 = new Test0401();
        new Thread(() -> {
            test0401.sendMessage();
        },"AAA").start();

        Thread.sleep(100);

        new Thread(() -> {
            test0402.sendEmail();
        },"BBB").start();
    }
}
class Test0401{
    public synchronized void sendMessage(){
        try {
            Thread.sleep(4000);
        } catch (InterruptedException e) {
            e.printStackTrace();
        }
        System.out.println("sendMessage");
    }
    public synchronized void sendEmail(){
        System.out.println("sendEmail");
    }
    public void call(){
        System.out.println("call");
    }
}
5.两个同步方法变静态、一个资源,发短信、发邮件的打印顺序
public class Test05{
    public static void main(String[] args) throws InterruptedException {
        Test0501 test0401 = new Test0501();
        new Thread(() -> {
            test0401.sendMessage();
        },"AAA").start();

        Thread.sleep(100);

        new Thread(() -> {
            test0401.sendEmail();
        },"BBB").start();
    }
}
class Test0501{
    public static synchronized void sendMessage(){
        try {
            Thread.sleep(4000);
        } catch (InterruptedException e) {
            e.printStackTrace();
        }
        System.out.println("sendMessage");
    }
    public static synchronized void sendEmail(){
        System.out.println("sendEmail");
    }
    public void call(){
        System.out.println("call");
    }
}
6.两个静态同步方法、两个资源,发短信、发邮件的打印顺序
public class Test06 {
    public static void main(String[] args) throws InterruptedException {
        Test0601 test0601 = new Test0601();
        Test0601 test0602 = new Test0601();
        new Thread(() -> {
            test0601.sendMessage();
        },"AAA").start();

        Thread.sleep(100);

        new Thread(() -> {
            test0602.sendEmail();
        },"BBB").start();
    }
}
class Test0601{
    public static synchronized void sendMessage(){
        try {
            Thread.sleep(4000);
        } catch (InterruptedException e) {
            e.printStackTrace();
        }
        System.out.println("sendMessage");
    }
    public static synchronized void sendEmail(){
        System.out.println("sendEmail");
    }
    public void call(){
        System.out.println("call");
    }
}
7.一个静态同步方法、一个普通同步方法、一个资源,发短信、发邮件的打印顺序
public class Test07 {
    public static void main(String[] args) throws InterruptedException {
        Test0701 test0701 = new Test0701();
        new Thread(() -> {
            test0701.sendMessage();
        },"AAA").start();

        Thread.sleep(100);

        new Thread(() -> {
            test0701.sendEmail();
        },"BBB").start();
    }
}
class Test0701{
    public static synchronized void sendMessage(){
        try {
            Thread.sleep(4000);
        } catch (InterruptedException e) {
            e.printStackTrace();
        }
        System.out.println("sendMessage");
    }
    public synchronized void sendEmail(){
        System.out.println("sendEmail");
    }
    public void call(){
        System.out.println("call");
    }
}
8.一个静态同步方法、一个普通同步方法、两个资源,发短信、发邮件的打印顺序
public class Test08 {
    public static void main(String[] args) throws InterruptedException {
        Test0801 test0801 = new Test0801();
        Test0801 test0802 = new Test0801();
        new Thread(() -> {
            test0801.sendMessage();
        },"AAA").start();

        Thread.sleep(100);

        new Thread(() -> {
            test0802.sendEmail();
        },"BBB").start();
    }
}
class Test0801{
    public static synchronized void sendMessage(){
        try {
            Thread.sleep(4000);
        } catch (InterruptedException e) {
            e.printStackTrace();
        }
        System.out.println("sendMessage");
    }
    public synchronized void sendEmail(){
        System.out.println("sendEmail");
    }
    public void call(){
        System.out.println("call");
    }
}


 浙公网安备 33010602011771号