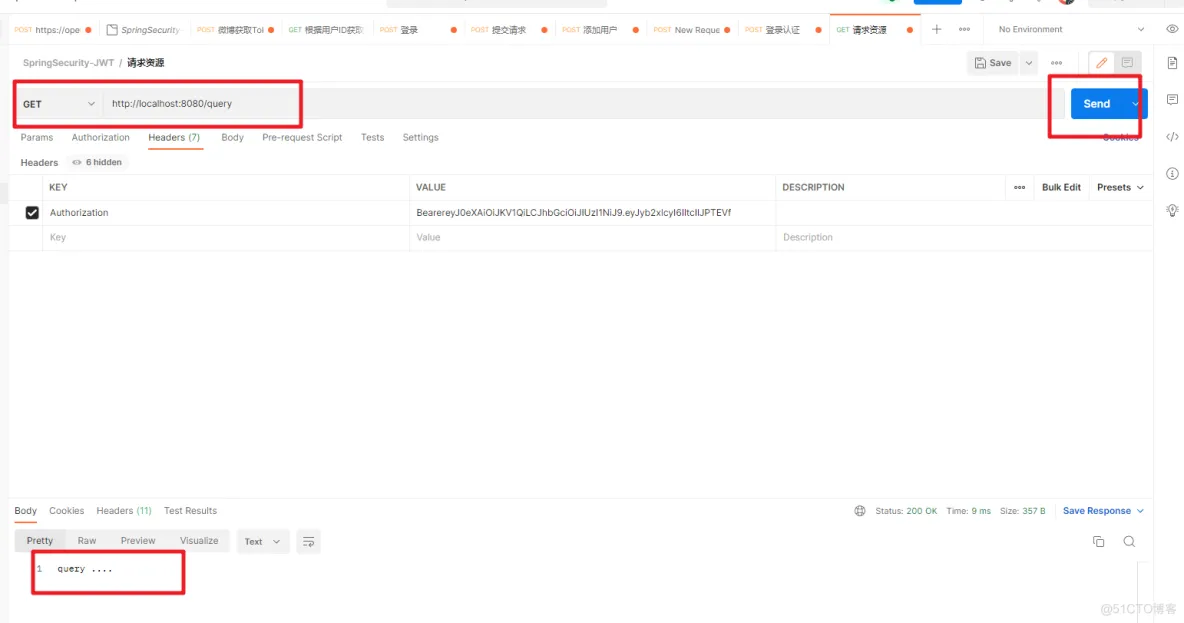
SpringSecurity核心

Spring源码篇-ApplicationContext

  前面通过手写IoC,DI、AOP和Bean的配置。到最后ApplicationContext的门面处理,对于Spring相关的核心概念应该会比较清楚了。接下来我们就看看在Spring源码中,对于的核心组件是如何实现的。

一、ApplicationContext

  ApplicationContext到底是什么?字面含义是应用的上下文。这块我们需要看看ApplicationContext的具体的结构。

第五篇:Spring源码篇-ApplicationContext_spring boot

  通过ApplicationContext实现的相关接口来分析,ApplicationContext接口在具备BeanFactory的功能的基础上还扩展了 应用事件发布,资源加载,环境参数和 国际化的能力。然后我们来看看ApplicationContext接口的实现类的情况。
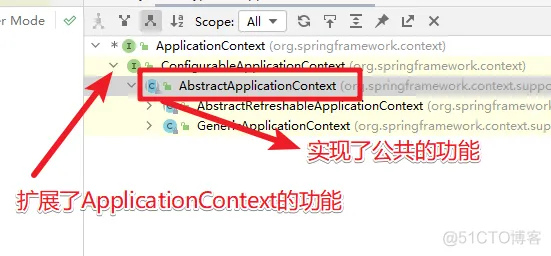
第五篇:Spring源码篇-ApplicationContext_spring boot_02

  在ApplicationContext的实现类中有两个比较重要的分支 AbstractRefreshableApplicationContext和 GenericApplicationContext.
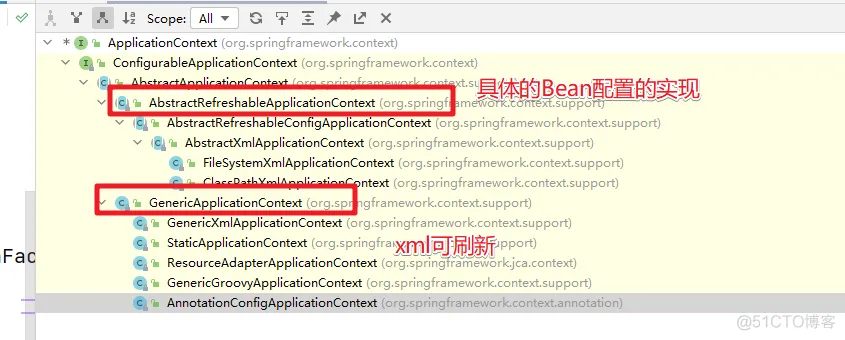
第五篇:Spring源码篇-ApplicationContext_java_03

二、BeanFactory

  上面分析了 ApplicationContext接口的结构。然后我们来看看 BeanFactory在ApplicationContext中具体的实现是怎么样的
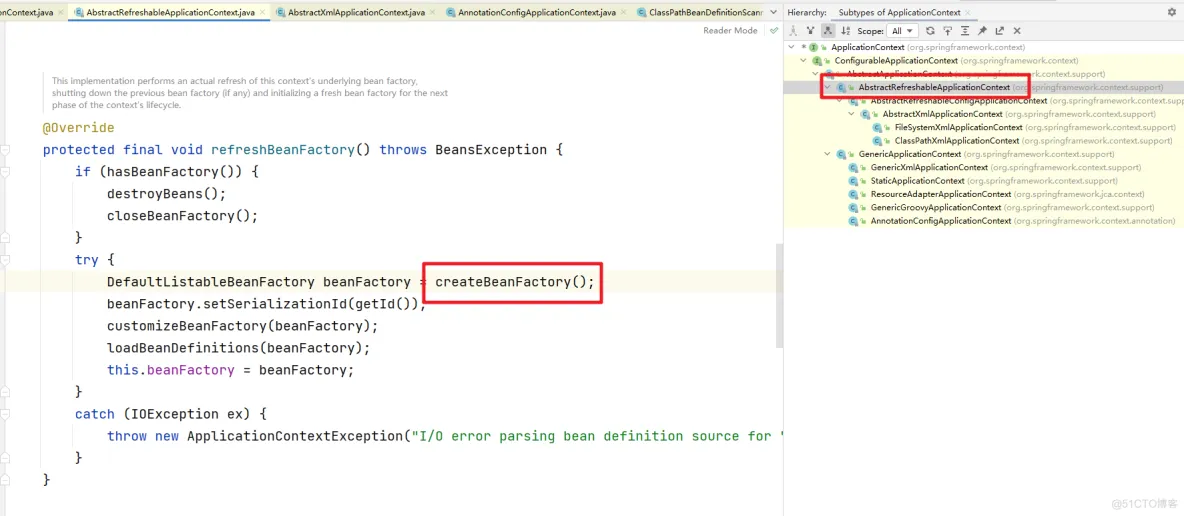
第五篇:Spring源码篇-ApplicationContext_spring_04

第五篇:Spring源码篇-ApplicationContext_元数据_05

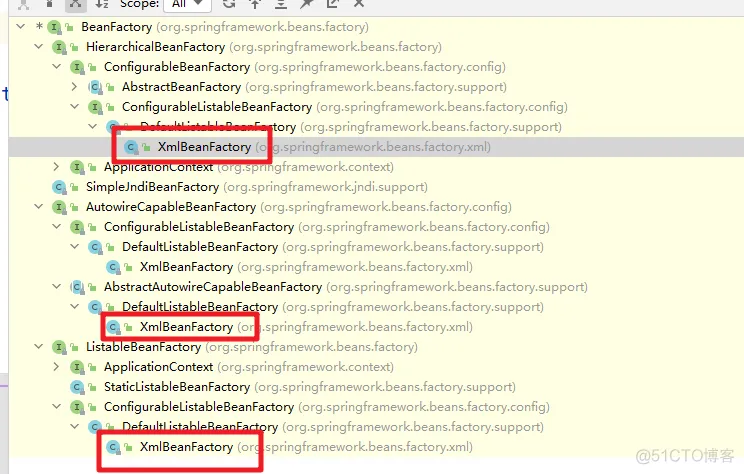
可以看到具体的实现是 DefaultListableBeanFactory .然后我们来看看他的体系结构
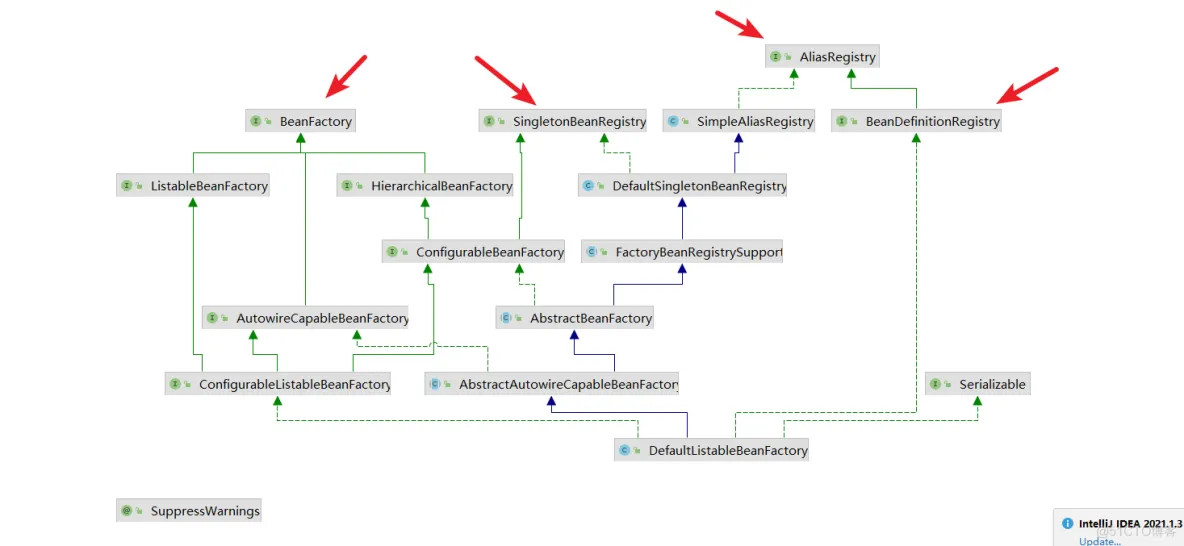
第五篇:Spring源码篇-ApplicationContext_spring_06

BeanFactory的继承体系

第五篇:Spring源码篇-ApplicationContext_java_07

三、BeanDefinition

  然后我们来了解下ApplicationContext是如何来加载Bean定义的。具体代码我们需要分为XML配置文件和基于注解的两种方式来看。

1.基于XML方式

  我们先定义对应的application.xml文件

<?xml version="1.0" encoding="UTF-8"?>
<beans xmlns="http://www.springframework.org/schema/beans"
    xmlns:xsi="http://www.w3.org/2001/XMLSchema-instance"
    xmlns:context="http://www.springframework.org/schema/context"
    xmlns:aop="http://www.springframework.org/schema/aop"
    xsi:schemaLocation="http://www.springframework.org/schema/beans
        http://www.springframework.org/schema/beans/spring-beans.xsd
        http://www.springframework.org/schema/context
        http://www.springframework.org/schema/context/spring-context.xsd
        http://www.springframework.org/schema/aop
        http://www.springframework.org/schema/aop/spring-aop.xsd">

	<bean id="beanE" class="com.study.spring.sample.config.BeanE" />

	<bean id="beanF" class="com.study.spring.sample.config.BeanF" ></bean>

	<context:annotation-config/>

	<context:component-scan base-package="com.study.spring.sample.config" ></context:component-scan>

</beans>


然后我们的测试类代码

public class XMLConfigMain {

	public static void main(String[] args) {
		ApplicationContext context = new GenericXmlApplicationContext(
				"classpath:com/study/spring/sample/config/application.xml");
		BeanF bf = context.getBean(BeanF.class);
		bf.do1();
	}
}


处理的过程 解析XML --> BeanDefinition --> BeanDefinitionRegistry --> BeanFactory
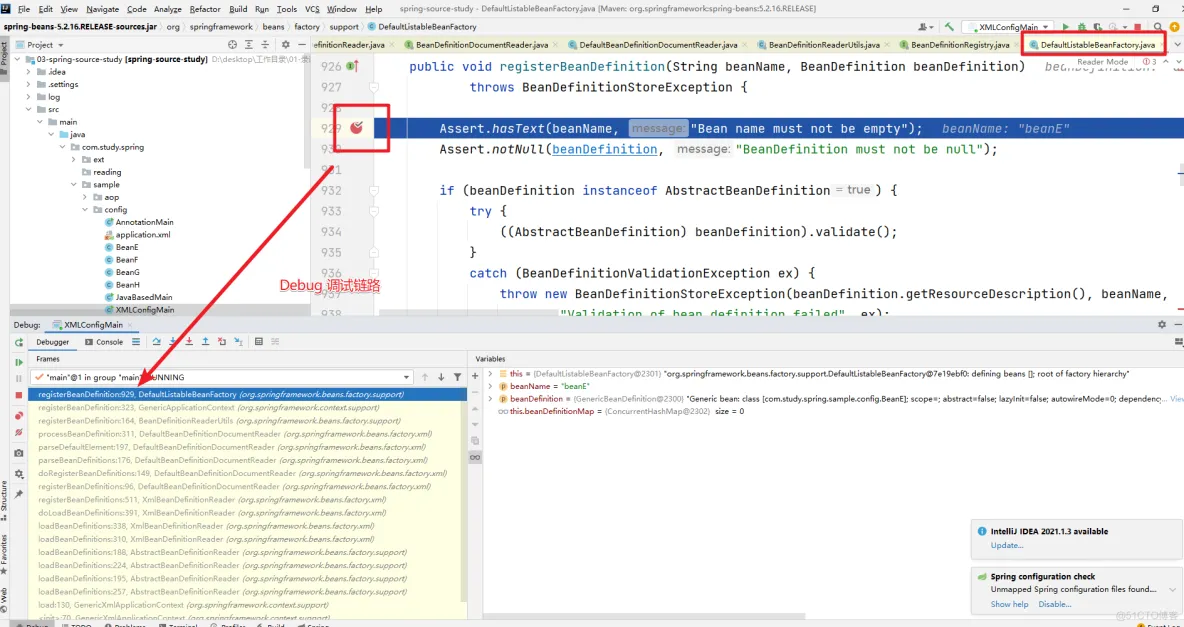
第五篇:Spring源码篇-ApplicationContext_元数据_08

2.基于注解方式

  然后来看看基于注解方式的使用的情况。首先是我们的配置类

@Configuration
@ComponentScan("com.study.spring.sample.config")
public class JavaBasedMain {

	@Bean
	public BeanH getBeanH() {
		return new BeanH();
	}

	public static void main(String[] args) {
		ApplicationContext context = new AnnotationConfigApplicationContext(JavaBasedMain.class);

		BeanH bh = context.getBean(BeanH.class);
		bh.doH();
	}
}


然后是我们的测试类

public class AnnotationMain {

	public static void main(String[] args) {
		ApplicationContext context = new AnnotationConfigApplicationContext("com.study.spring.sample.config");

		BeanG bg = context.getBean(BeanG.class);
		bg.dog();
	}
}


注解使用有两种方法:

  1. 配置扫描路径
  2. 配置@Configuration的注解类

2.1 this构造方法

  在this的构造方法中会完成相关的配置处理。

public AnnotationConfigApplicationContext() {
		this.reader = new AnnotatedBeanDefinitionReader(this);
		this.scanner = new ClassPathBeanDefinitionScanner(this);
	}


首先是AnnotatedBeanDefinitionReader(this)方法。会完成核心的ConfigurationClassPostProcessor的注入。ConfigurationClassPostProcessor 会完成@Configuration相关的注解的解析
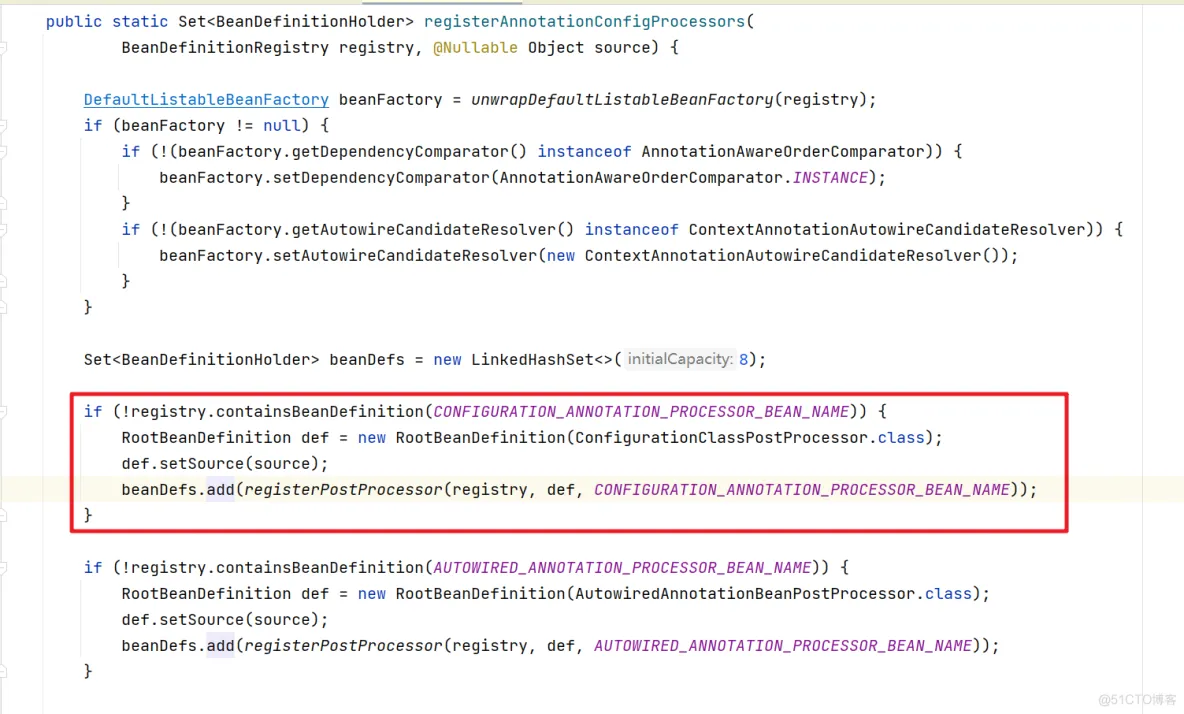
第五篇:Spring源码篇-ApplicationContext_元数据_09

this.scanner其实就是创建了一个对应的扫描器

第五篇:Spring源码篇-ApplicationContext_元数据_10

2.2 扫描实现

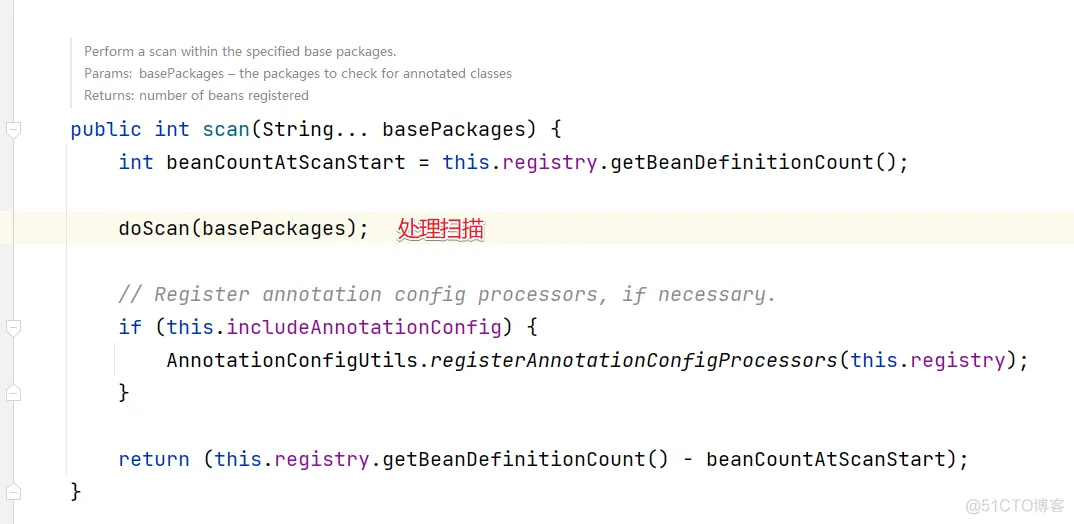
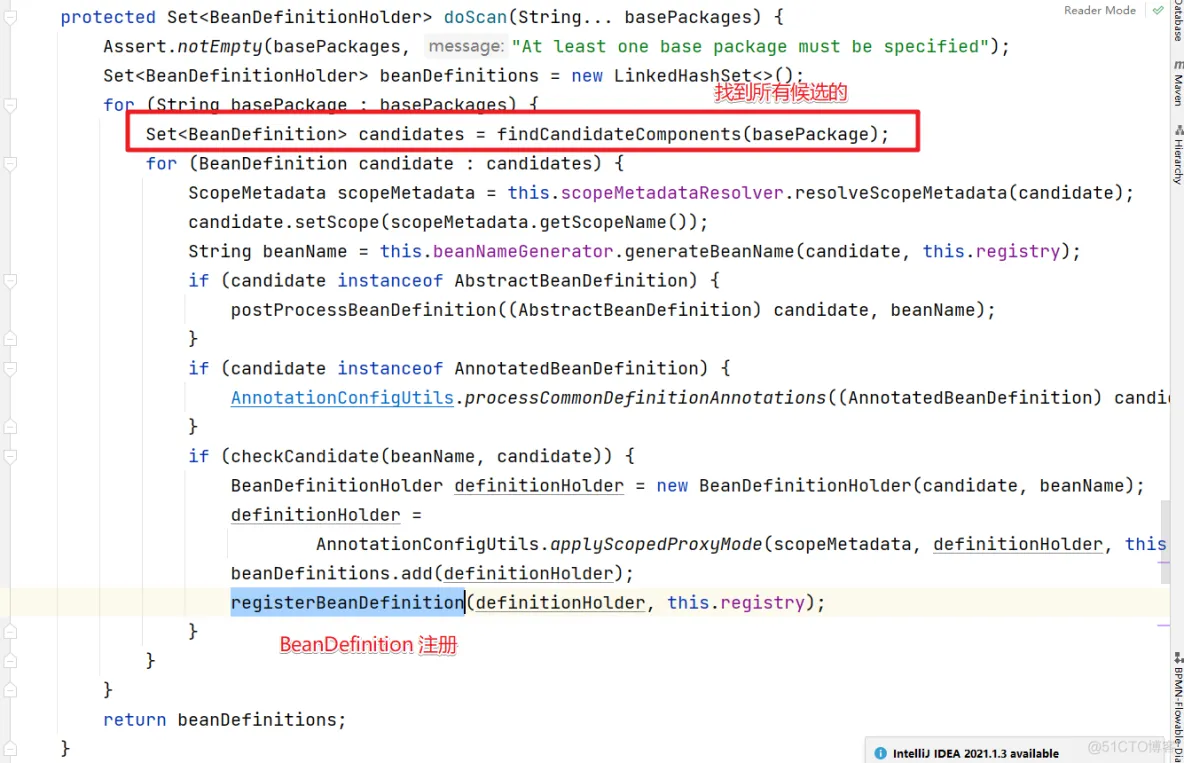
  扫描就需要进入到scan方法中。

第五篇:Spring源码篇-ApplicationContext_xml_11

第五篇:Spring源码篇-ApplicationContext_spring_12

第五篇:Spring源码篇-ApplicationContext_spring_13

完成相关的注册

第五篇:Spring源码篇-ApplicationContext_spring boot_14

2.3 @Configuration

  @Configuration的解析其实是在refresh方法中来实现的。
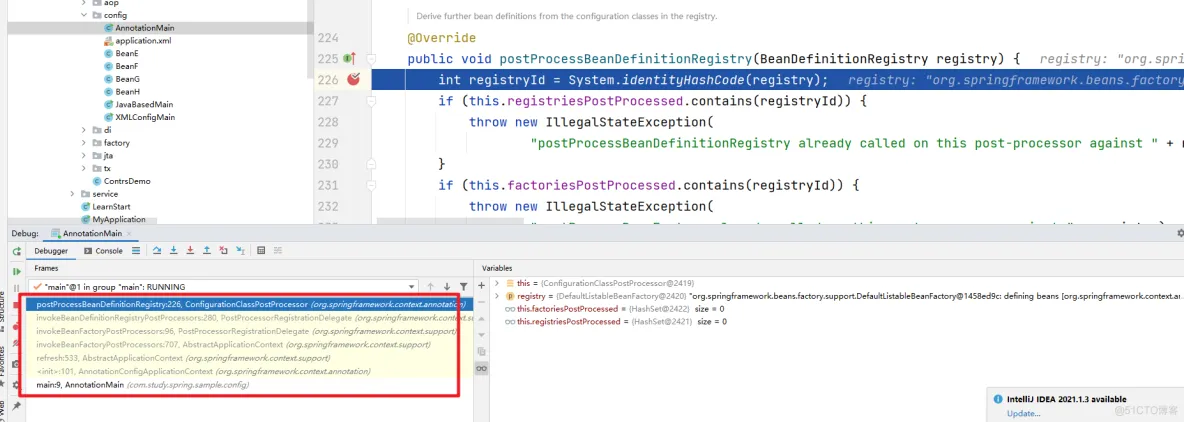
第五篇:Spring源码篇-ApplicationContext_xml_15

3.小结

  通过上面的分析其实我们已经对Bean定义的扫描,解析和注册过程有了一定的了解。归纳为:

  1. reader解析XML,完成xml方法配置的bean定义
  2. scanner扫描指定包下的类,找出带有@Component注解的类,注册成Bean定义
  3. 通过ConfigurationClassPostProcessor对带有@Configuration注解的类进行处理,解析它上面的注解,以及类中带有@Bean 注解,加入这些的Bean的定义。

4.BeanDefinition

  ;然后我们来看看BeanDefinition的继承结构

第五篇:Spring源码篇-ApplicationContext_spring_16

  继承属性访问器和元数据接口,增加了Bean定义操作,实现了数据和操作解耦。属性访问器和元数据接口接着往下看。

4.1 BeanMetadataElement

  BeanMetadataElement提供了获取数据源的方式,也就是可以指导Bean是来自哪个类。

public interface BeanMetadataElement {

	/**
	 * Return the configuration source {@code Object} for this metadata element
	 * (may be {@code null}).
	 */
	@Nullable
	default Object getSource() {
		return null;
	}

}


4.2 BeanMetadataAttribute元数据属性

  实现了元数据接口,增加了属性的名字和值。。

public class BeanMetadataAttribute implements BeanMetadataElement {

	private final String name;

	@Nullable
	private final Object value;

	@Nullable
	private Object source;

}


4.3 AttributeAccessor属性访问器

  AttributeAccessor用来给Bean定义了增删改查属性的功能

public interface AttributeAccessor {

	/**
	 * Set the attribute defined by {@code name} to the supplied {@code value}.
	 * If {@code value} is {@code null}, the attribute is {@link #removeAttribute removed}.
	 * <p>In general, users should take care to prevent overlaps with other
	 * metadata attributes by using fully-qualified names, perhaps using
	 * class or package names as prefix.
	 * @param name the unique attribute key
	 * @param value the attribute value to be attached
	 */
	void setAttribute(String name, @Nullable Object value);

	/**
	 * Get the value of the attribute identified by {@code name}.
	 * Return {@code null} if the attribute doesn't exist.
	 * @param name the unique attribute key
	 * @return the current value of the attribute, if any
	 */
	@Nullable
	Object getAttribute(String name);

	/**
	 * Remove the attribute identified by {@code name} and return its value.
	 * Return {@code null} if no attribute under {@code name} is found.
	 * @param name the unique attribute key
	 * @return the last value of the attribute, if any
	 */
	@Nullable
	Object removeAttribute(String name);

	/**
	 * Return {@code true} if the attribute identified by {@code name} exists.
	 * Otherwise return {@code false}.
	 * @param name the unique attribute key
	 */
	boolean hasAttribute(String name);

	/**
	 * Return the names of all attributes.
	 */
	String[] attributeNames();

}


4.4 AttributeAccessorSupport属性访问抽象实现类

  内部定义了1个map来存放属性。

public abstract class AttributeAccessorSupport implements AttributeAccessor, Serializable {

	/** Map with String keys and Object values. */
	private final Map<String, Object> attributes = new LinkedHashMap<>();


	@Override
	public void setAttribute(String name, @Nullable Object value) {
		Assert.notNull(name, "Name must not be null");
		if (value != null) {
			this.attributes.put(name, value);
		}
		else {
			removeAttribute(name);
		}
	}
    //  ......
}


4.5 BeanMetadataAttributeAccessor元数据属性访问器

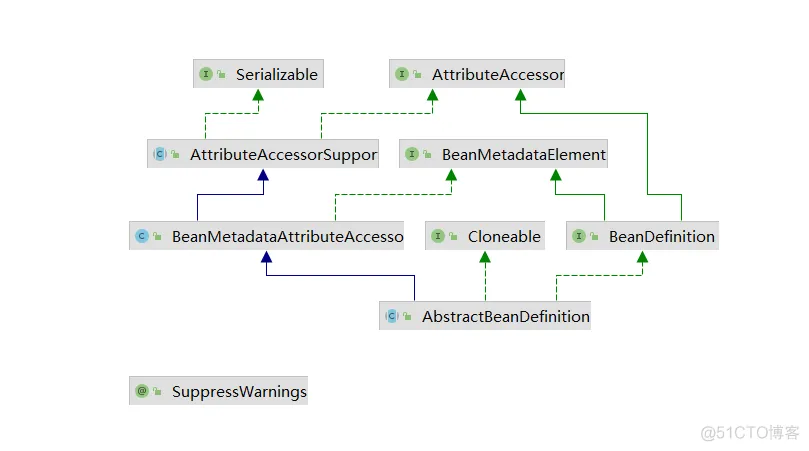
  继承AttributeAccessorSupport具备属性访问功能,实现BeanMetadataElement具备获取元数据功能。 **AbstractBeanDefinition就继承于它,使得同时具有属性访问和元数据访问的功能 **。
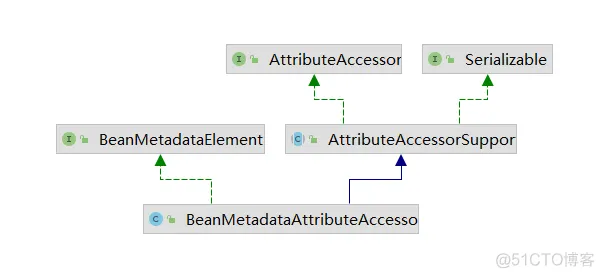
第五篇:Spring源码篇-ApplicationContext_xml_17

结合AbstractBeanDefinition.来看看他们的类图结构

第五篇:Spring源码篇-ApplicationContext_spring boot_18

5. BeanDefinition继承体系

5.1 AnnotatedBeanDefinition

  增加了2个方法,获取bean所在类的注解元数据和工厂方法元数据,这些数据在进行解析处理的时候需要用到。

public interface AnnotatedBeanDefinition extends BeanDefinition {

	/**
	 * Obtain the annotation metadata (as well as basic class metadata)
	 * for this bean definition's bean class.
	 * @return the annotation metadata object (never {@code null})
	 */
	AnnotationMetadata getMetadata();

	/**
	 * Obtain metadata for this bean definition's factory method, if any.
	 * @return the factory method metadata, or {@code null} if none
	 * @since 4.1.1
	 */
	@Nullable
	MethodMetadata getFactoryMethodMetadata();

}


  该注解有三个具体的实现。ScannedGenericBeanDefinition、AnnotatedGenericBeanDefinition、ConfigurationClassBeanDefinition。

第五篇:Spring源码篇-ApplicationContext_xml_19

5.2 AbstractBeanDefinition模板类

  AbstractBeanDefinition我们可以称之为BeanDefinition的模板类。结构我们上面其实有梳理
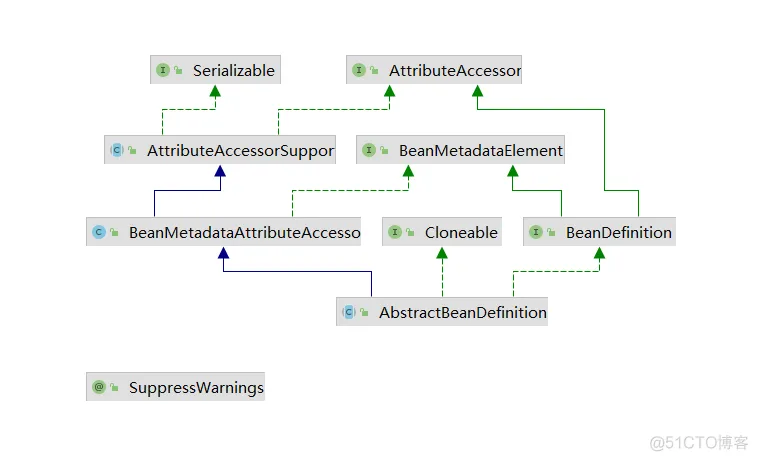
第五篇:Spring源码篇-ApplicationContext_元数据_20

  通过上面我们可以看到AbstractBeanDefinition 具备了 Bean元数据的获取和属性相关的操作。同时AbstractBeanDefinition的继承结构

第五篇:Spring源码篇-ApplicationContext_spring_21

5.3 RootBeanDefinition根bean定义

  它主要用在spring内部的bean定义、把不同类型的bean定义合并成RootBeanDefinition(getMergedLocalBeanDefinition方法)。没有实现BeanDefinition接口的设置获取父bean定义方法,不支持设置父子beanDefinition。

5.4 ConfigurationClassBeanDefinition

  用作ConfigurationClassPostProcessor解析过程中封装配置类的bean定义。

5.5 GenericBeanDefinition

  GenericBeanDefinition通用Bean的定义。

5.6 ScannedGenericBeanDefinition

  @ComponentScan扫描的bean定义使用。

5.7 AnnotatedGenericBeanDefinition

深入理解HttpSecurity的设计

一、HttpSecurity的应用

  在前章节的介绍中我们讲解了基于配置文件的使用方式,也就是如下的使用。
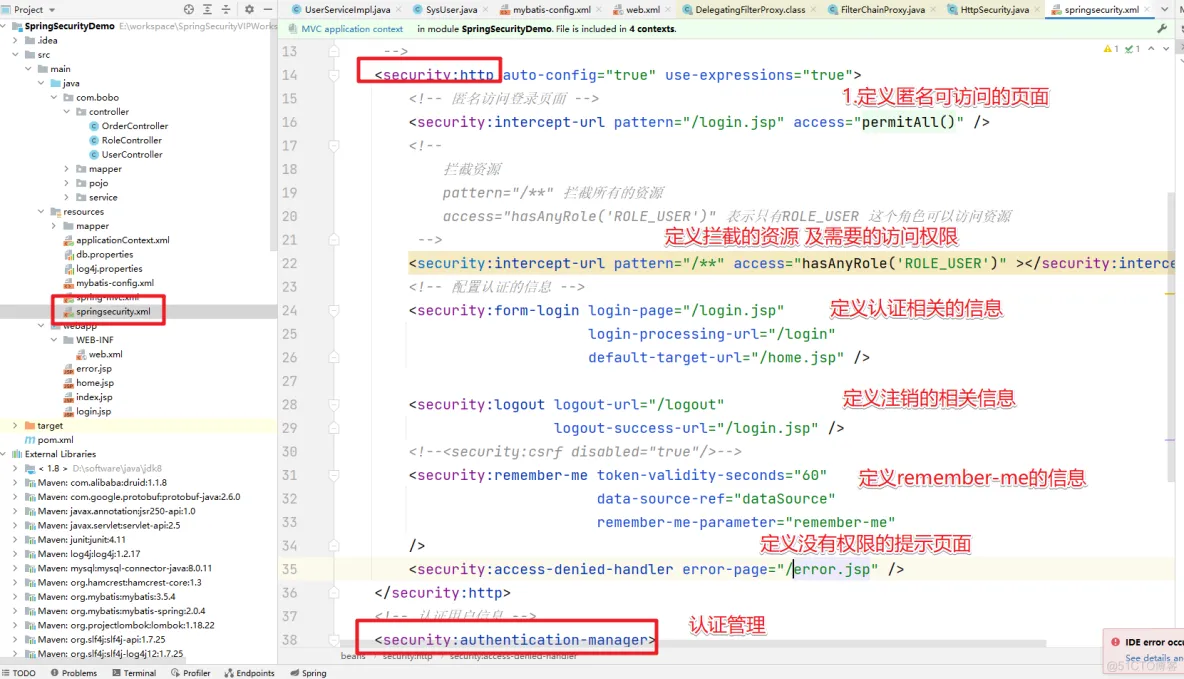
【第五篇】深入理解HttpSecurity的设计_List

  也就是在配置文件中通过 security:http 等标签来定义了认证需要的相关信息,但是在SpringBoot项目中,我们慢慢脱离了xml配置文件的方式,在SpringSecurity中提供了HttpSecurity等工具类,这里HttpSecurity就等同于我们在配置文件中定义的http标签。要使用的话方式如下。
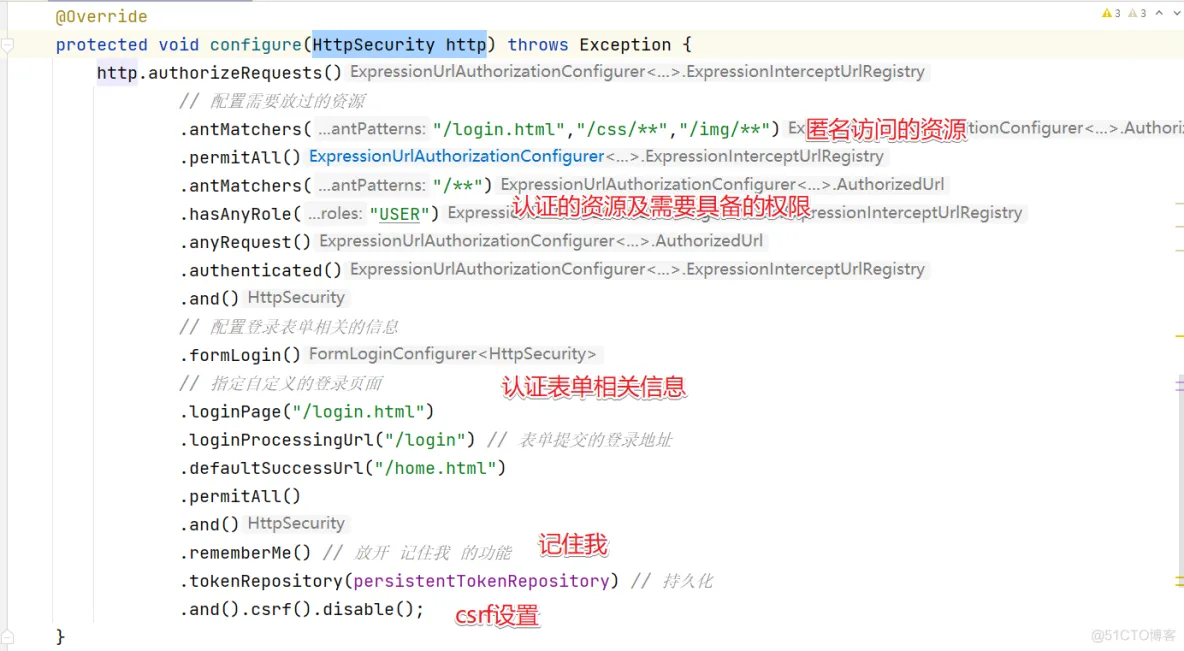
【第五篇】深入理解HttpSecurity的设计_spring_02

  通过代码结果来看和配置文件的效果是一样的。基于配置文件的方式我们之前分析过,是通过标签对应的handler来解析处理的,那么HttpSecurity这块是如何处理的呢?我们来详细分析下。

二、HttpSecurity的类图结构
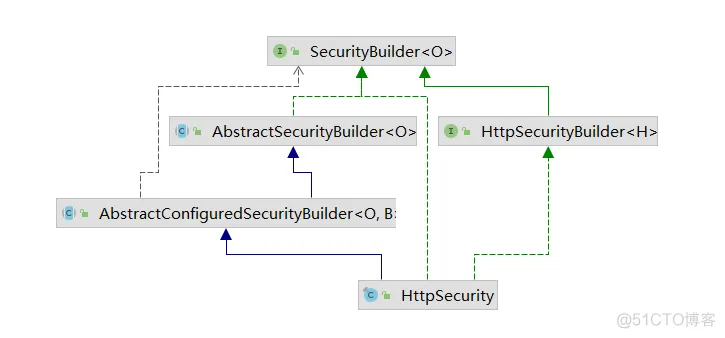
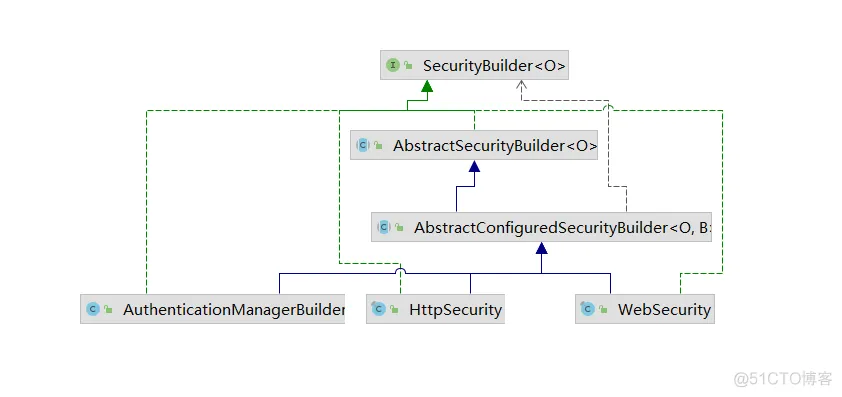
【第五篇】深入理解HttpSecurity的设计_List_03

  可以看出HttpSecurity的类图结构相对比较简单,继承了一个父类,实现了两个接口。我们分别来看看他们的作用是什么?

1.SecurityBuilder接口

  我们先来看看SecurityBuilder接口,通过字面含义我们就可以发现这是一个帮我们创建对象的工具类。

public interface SecurityBuilder<O> {

	/**
	 * Builds the object and returns it or null.
	 * @return the Object to be built or null if the implementation allows it.
	 * @throws Exception if an error occurred when building the Object
	 */
	O build() throws Exception;

}


  通过源码我们可以看到在SecurityBuilder中给我们提供了一个build()方法。在接口名称处声明了一个泛型,而build()方法返回的正好是这个泛型的对象,其实就很好理解了,也就是SecurityBuilder会创建指定类型的对象。结合HttpSecurity中实现SecurityBuilder接口时指定的泛型我们可以看出创建的具体对象是什么类型。

【第五篇】深入理解HttpSecurity的设计_jvm_04

  可以看出SecurityBuilder会通过build方法给我们创建一个DefaultSecurityFilterChain对象。也就是拦截请求的那个默认的过滤器链对象。
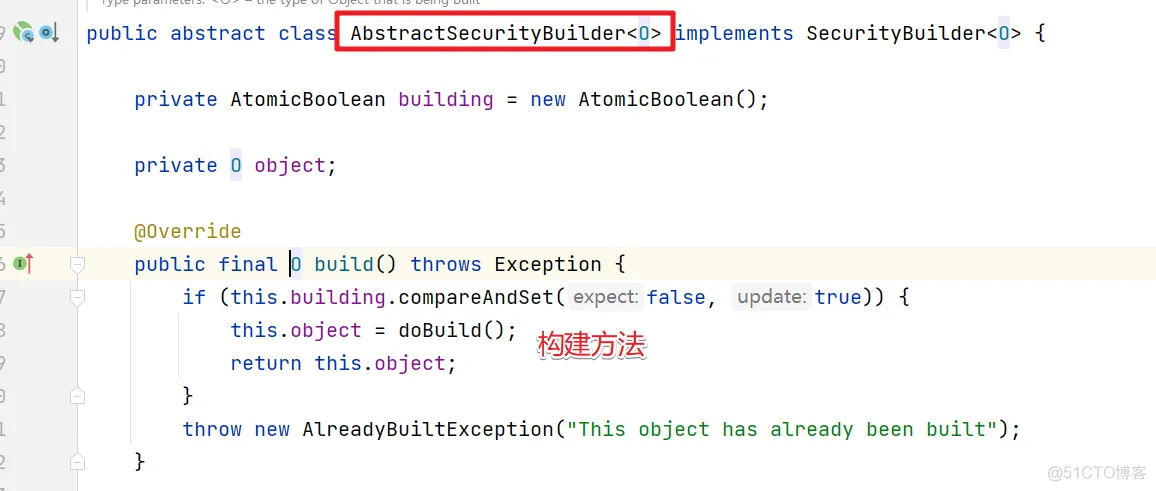
【第五篇】深入理解HttpSecurity的设计_List_05

然后进入到doBuild()方法,会进入到AbstractConfiguredSecurityBuilder中的方法

@Override
	protected final O doBuild() throws Exception {
		synchronized (this.configurers) {
			this.buildState = BuildState.INITIALIZING;
			beforeInit();
			init();
			this.buildState = BuildState.CONFIGURING;
			beforeConfigure();
			configure();
			this.buildState = BuildState.BUILDING;
	 		// 获取构建的对象,上面的方法可以先忽略
			O result = performBuild();
			this.buildState = BuildState.BUILT;
			return result;
		}
	}


进入到HttpSecurity中可以查看performBuild()方法的具体实现。

@Override
	protected DefaultSecurityFilterChain performBuild() {
        // 对所有的过滤器做排序
		this.filters.sort(OrderComparator.INSTANCE);
		List<Filter> sortedFilters = new ArrayList<>(this.filters.size());
		for (Filter filter : this.filters) {
			sortedFilters.add(((OrderedFilter) filter).filter);
		}
		// 然后生成 DefaultSecurityFilterChain
		return new DefaultSecurityFilterChain(this.requestMatcher, sortedFilters);
	}


在构造方法中绑定了对应的请求匹配器和过滤器集合。

【第五篇】深入理解HttpSecurity的设计_jvm_06

对应的请求匹配器则是 AnyRequestMatcher 匹配所有的请求。当然我们会比较关心默认的过滤器链中的过滤器是哪来的,这块儿我们继续来分析。

2.AbstractConfiguredSecurityBuilder

  然后我们再来看看AbstractConfiguredSecurityBuilder这个抽象类,他其实是SecurityBuilder的实现,在这儿需要搞清楚他们的关系。
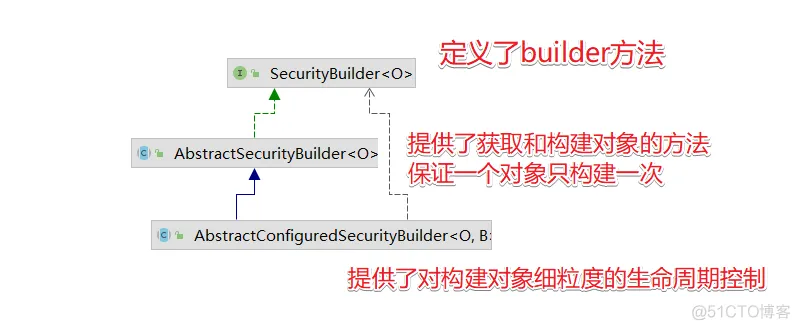
【第五篇】深入理解HttpSecurity的设计_List_07

类型

作用

SecurityBuilder

声明了build方法

AbstractSecurityBuilder

提供了获取对象的方法以及控制一个对象只能build一次

AbstractConfiguredSecurityBuilder

除了提供对对象细粒度的控制外还扩展了对configurer的操作

然后对应的三个实现类。

【第五篇】深入理解HttpSecurity的设计_List_08

首先 AbstractConfiguredSecurityBuilder 中定义了一个枚举类,将整个构建过程分为 5 种状态,也可
以理解为构建过程生命周期的五个阶段,如下:

private enum BuildState {

		/**
		 * 还没开始构建
		 */
		UNBUILT(0),

		/**
		 * 构建中
		 */
		INITIALIZING(1),

		/**
		 * 配置中
		 */
		CONFIGURING(2),

		/**
		 * 构建中
		 */
		BUILDING(3),

		/**
		 * 构建完成
		 */
		BUILT(4);

		private final int order;

		BuildState(int order) {
			this.order = order;
		}

		public boolean isInitializing() {
			return INITIALIZING.order == this.order;
		}

		/**
		 * Determines if the state is CONFIGURING or later
		 * @return
		 */
		public boolean isConfigured() {
			return this.order >= CONFIGURING.order;
		}

	}


通过这些状态来管理需要构建的对象的不同阶段。

2.1 add方法

  AbstractConfiguredSecurityBuilder中方法概览

【第五篇】深入理解HttpSecurity的设计_List_09

  我们先来看看add方法。

private <C extends SecurityConfigurer<O, B>> void add(C configurer) {
		Assert.notNull(configurer, "configurer cannot be null");
		Class<? extends SecurityConfigurer<O, B>> clazz = (Class<? extends SecurityConfigurer<O, B>>) configurer
				.getClass();
		synchronized (this.configurers) {
			if (this.buildState.isConfigured()) {
				throw new IllegalStateException("Cannot apply " + configurer + " to already built object");
			}
			List<SecurityConfigurer<O, B>> configs = null;
			if (this.allowConfigurersOfSameType) {
				configs = this.configurers.get(clazz);
			}
			configs = (configs != null) ? configs : new ArrayList<>(1);
			configs.add(configurer);
			this.configurers.put(clazz, configs);
			if (this.buildState.isInitializing()) {
				this.configurersAddedInInitializing.add(configurer);
			}
		}
	}

	/**
	 * Gets all the {@link SecurityConfigurer} instances by its class name or an empty
	 * List if not found. Note that object hierarchies are not considered.
	 * @param clazz the {@link SecurityConfigurer} class to look for
	 * @return a list of {@link SecurityConfigurer}s for further customization
	 */
	@SuppressWarnings("unchecked")
	public <C extends SecurityConfigurer<O, B>> List<C> getConfigurers(Class<C> clazz) {
		List<C> configs = (List<C>) this.configurers.get(clazz);
		if (configs == null) {
			return new ArrayList<>();
		}
		return new ArrayList<>(configs);
	}


  add 方法,这相当于是在收集所有的配置类。将所有的 xxxConfigure 收集起来存储到 configurers
中,将来再统一初始化并配置,configurers 本身是一个 LinkedHashMap ,key 是配置类的 class,
value 是一个集合,集合里边放着 xxxConfigure 配置类。当需要对这些配置类进行集中配置的时候,
会通过 getConfigurers 方法获取配置类,这个获取过程就是把 LinkedHashMap 中的 value 拿出来,
放到一个集合中返回。

2.2 doBuild方法

  然后来看看doBuild方法中的代码

@Override
	protected final O doBuild() throws Exception {
		synchronized (this.configurers) {
			this.buildState = BuildState.INITIALIZING;
			beforeInit(); //是一个预留方法,没有任何实现
			init(); // 就是找到所有的 xxxConfigure,挨个调用其 init 方法进行初始化
			this.buildState = BuildState.CONFIGURING;
			beforeConfigure(); // 是一个预留方法,没有任何实现
			configure(); // 就是找到所有的 xxxConfigure,挨个调用其 configure 方法进行配置。
			this.buildState = BuildState.BUILDING;
			O result = performBuild();
// 是真正的过滤器链构建方法,但是在 AbstractConfiguredSecurityBuilder中 performBuild 方法只是一个抽象方法,具体的实现在 HttpSecurity 中
			this.buildState = BuildState.BUILT;
			return result;
		}
	}


init方法:完成所有相关过滤器的初始化

private void init() throws Exception {
		Collection<SecurityConfigurer<O, B>> configurers = getConfigurers();
		for (SecurityConfigurer<O, B> configurer : configurers) {
			configurer.init((B) this); // 初始化对应的过滤器
		}
		for (SecurityConfigurer<O, B> configurer : this.configurersAddedInInitializing) {
			configurer.init((B) this);
		}
	}


configure方法:完成HttpSecurity和对应的过滤器的绑定。

private void configure() throws Exception {
		Collection<SecurityConfigurer<O, B>> configurers = getConfigurers();
		for (SecurityConfigurer<O, B> configurer : configurers) {
			configurer.configure((B) this);
		}
	}


3.HttpSecurity

  HttpSecurity 做的事情,就是进行各种各样的 xxxConfigurer 配置
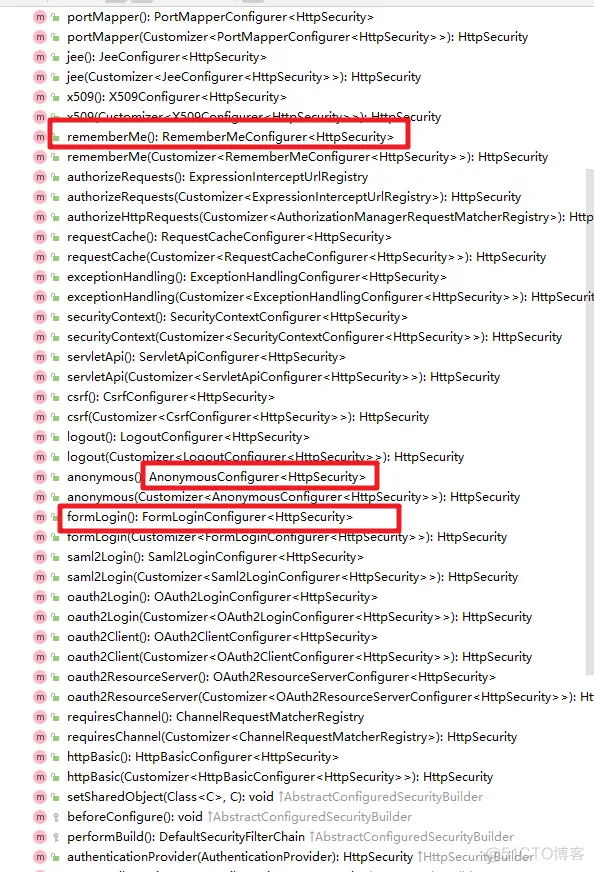
【第五篇】深入理解HttpSecurity的设计_java_10

HttpSecurity 中有大量类似的方法,过滤器链中的过滤器就是这样一个一个配置的。我们就不一一介绍
了。每个配置方法的结尾都会来一句 getOrApply,这个是干嘛的?我们来看下

private <C extends SecurityConfigurerAdapter<DefaultSecurityFilterChain, HttpSecurity>> C getOrApply(C configurer)
			throws Exception {
		C existingConfig = (C) getConfigurer(configurer.getClass());
		if (existingConfig != null) {
			return existingConfig;
		}
		return apply(configurer);
	}


  getConfigurer 方法是在它的父类 AbstractConfiguredSecurityBuilder 中定义的,目的就是去查看当前
这个 xxxConfigurer 是否已经配置过了。
  如果当前 xxxConfigurer 已经配置过了,则直接返回,否则调用 apply 方法,这个 apply 方法最终会调
用到 AbstractConfiguredSecurityBuilder#add 方法,将当前配置 configurer 收集起来
HttpSecurity 中还有一个 addFilter 方法.

@Override
	public HttpSecurity addFilter(Filter filter) {
		Integer order = this.filterOrders.getOrder(filter.getClass());
		if (order == null) {
			throw new IllegalArgumentException("The Filter class " + filter.getClass().getName()
					+ " does not have a registered order and cannot be added without a specified order. Consider using addFilterBefore or addFilterAfter instead.");
		}
		this.filters.add(new OrderedFilter(filter, order));
		return this;
	}


  这个 addFilter 方法的作用,主要是在各个 xxxConfigurer 进行配置的时候,会调用到这个方法,
(xxxConfigurer 就是用来配置过滤器的),把 Filter 都添加到 fitlers 变量中。

小结:这就是 HttpSecurity 的一个大致工作流程。把握住了这个工作流程,剩下的就只是一些简单的重
复的 xxxConfigurer 配置了

SpringSecurity请求流转的本质

1. SpringSecurity核心源码分析

分析SpringSecurity的核心原理,那么我们从哪开始分析?以及我们要分析哪些内容?

  1. 系统启动的时候SpringSecurity做了哪些事情?
  2. 第一次请求执行的流程是什么?
  3. SpringSecurity中的认证流程是怎么样的?

1.1 系统启动

当我们的Web服务启动的时候,SpringSecurity做了哪些事情?当系统启动的时候,肯定会加载我们配置的web.xml文件

<!DOCTYPE web-app PUBLIC
        "-//Sun Microsystems, Inc.//DTD Web Application 2.3//EN"
        "http://java.sun.com/dtd/web-app_2_3.dtd" >

<web-app version="2.5" id="WebApp_ID" xmlns="http://java.sun.com/xml/ns/javaee"
         xmlns:xsi="http://www.w3.org/2001/XMLSchema-instance"
         xsi:schemaLocation="http://java.sun.com/xml/ns/javaee
 http://java.sun.com/xml/ns/javaee/web-app_2_5.xsd">
  <display-name>Archetype Created Web Application</display-name>

  <!-- 初始化spring容器 -->
  <context-param>
    <param-name>contextConfigLocation</param-name>
    <param-value>classpath:applicationContext.xml</param-value>
  </context-param>
  <listener>
    <listener-class>org.springframework.web.context.ContextLoaderListener</listener-class>
  </listener>

  <!-- post乱码过滤器 -->
  <filter>
    <filter-name>CharacterEncodingFilter</filter-name>
    <filter-class>org.springframework.web.filter.CharacterEncodingFilter</filter-class>
    <init-param>
      <param-name>encoding</param-name>
      <param-value>utf-8</param-value>
    </init-param>
  </filter>
  <filter-mapping>
    <filter-name>CharacterEncodingFilter</filter-name>
    <url-pattern>/*</url-pattern>
  </filter-mapping>
  <!-- 前端控制器 -->
  <servlet>
    <servlet-name>dispatcherServletb</servlet-name>
    <servlet-class>org.springframework.web.servlet.DispatcherServlet</servlet-class>
    <!-- contextConfigLocation不是必须的, 如果不配置contextConfigLocation, springmvc的配置文件默认在:WEB-INF/servlet的name+"-servlet.xml" -->
    <init-param>
      <param-name>contextConfigLocation</param-name>
      <param-value>classpath:spring-mvc.xml</param-value>
    </init-param>
    <load-on-startup>1</load-on-startup>
  </servlet>
  <servlet-mapping>
    <servlet-name>dispatcherServletb</servlet-name>
    <!-- 拦截所有请求jsp除外 -->
    <url-pattern>/</url-pattern>
  </servlet-mapping>

  <!-- 配置过滤器链 springSecurityFilterChain 名称固定 -->
  <filter>
    <filter-name>springSecurityFilterChain</filter-name>
    <filter-class>org.springframework.web.filter.DelegatingFilterProxy</filter-class>
  </filter>
  <filter-mapping>
    <filter-name>springSecurityFilterChain</filter-name>
    <url-pattern>/*</url-pattern>
  </filter-mapping>

</web-app>


web.xml中配置的信息:

  1. Spring的初始化(会加载解析SpringSecurity的配置文件)
  2. SpringMVC的前端控制器初始化
  3. 加载DelegatingFilterProxy过滤器

Spring的初始化操作和SpringSecurity有关系的操作是,会加载介绍SpringSecurity的配置文件,将相关的数据添加到Spring容器中
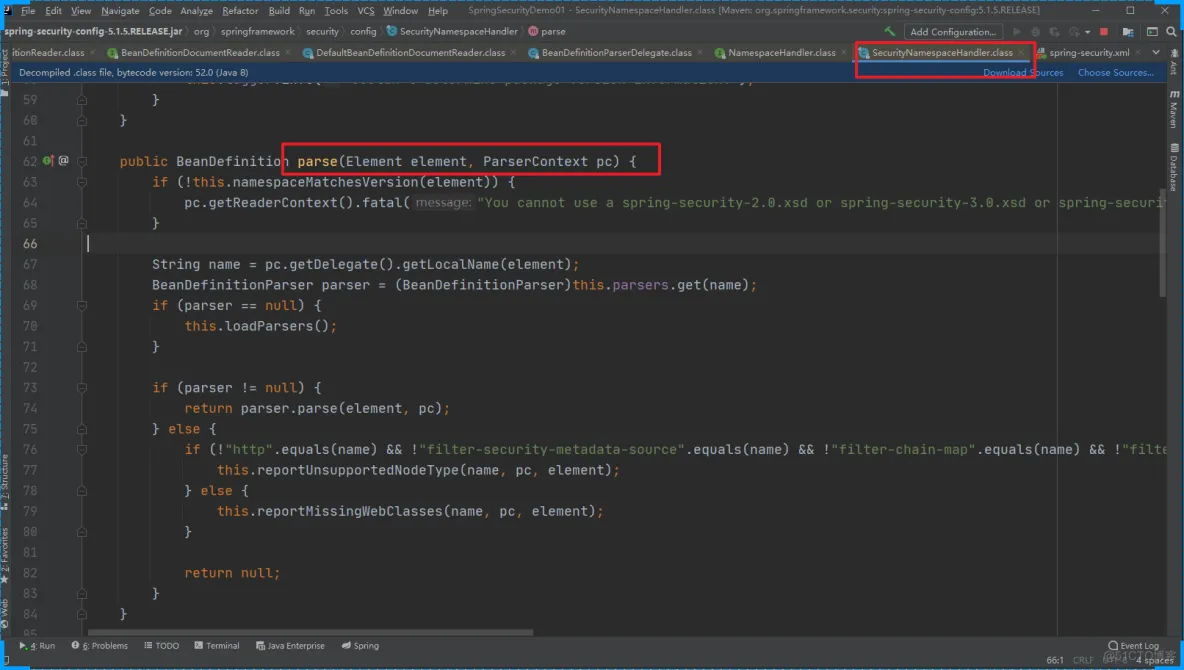
【第三篇】SpringSecurity请求流转的本质_servlet_02

SpringMVC的初始化和SpringSecurity其实是没有多大关系的

DelegatingFilterProxy过滤器:拦截所有的请求。而且这个过滤器本身是和SpringSecurity没有关系的!!!在之前介绍Shiro的时候,和Spring整合的时候我们也是使用的这个过滤器。 其实就是完成从IoC容器中获取DelegatingFilterProxy这个过滤器配置的 FileterName 的对象。

系统启动的时候会执行DelegatingFilterProxy的init方法
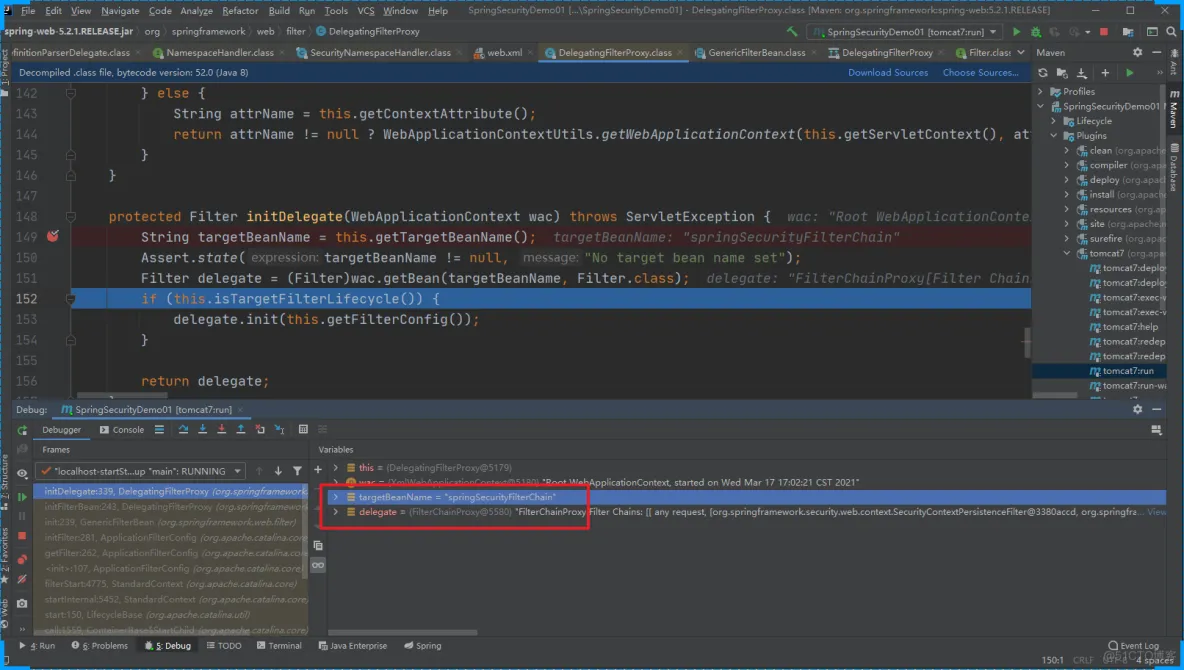
protected void initFilterBean() throws ServletException {
    synchronized(this.delegateMonitor) {
        // 如果委托对象为null 进入
        if (this.delegate == null) {
            // 如果targetBeanName==null
            if (this.targetBeanName == null) {
                // targetBeanName = 'springSecurityFilterChain'
                this.targetBeanName = this.getFilterName();
            }
// 获取Spring的容器对象
            WebApplicationContext wac = this.findWebApplicationContext();
            if (wac != null) {
                // 初始化代理对象
                this.delegate = this.initDelegate(wac);
            }
        }

    }
}
 
 
protected Filter initDelegate(WebApplicationContext wac) throws ServletException {
    // springSecurityFilterChain
    String targetBeanName = this.getTargetBeanName();
    Assert.state(targetBeanName != null, "No target bean name set");
    // 从IoC容器中获取 springSecurityFilterChain的类型为Filter的对象
    Filter delegate = (Filter)wac.getBean(targetBeanName, Filter.class);
    if (this.isTargetFilterLifecycle()) {
        delegate.init(this.getFilterConfig());
    }

    return delegate;
}


【第三篇】SpringSecurity请求流转的本质_java_03

init方法的作用是:从IoC容器中获取 FilterChainProxy的实例对象,并赋值给 DelegatingFilterProxy的delegate属性

1.2 第一次请求

客户发送请求会经过很多歌Web Filter拦截。
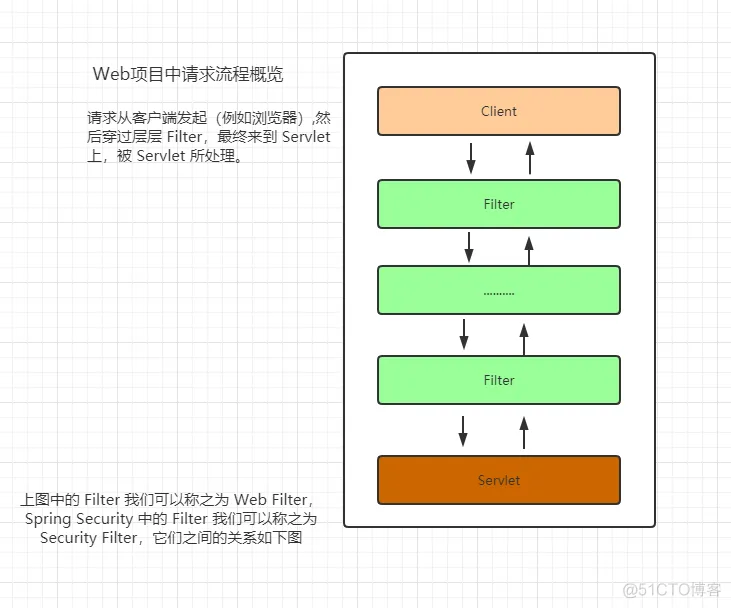
【第三篇】SpringSecurity请求流转的本质_servlet_04

然后经过系统启动的分析,我们知道有一个我们定义的过滤器会拦截客户端的所有的请求。DelegatingFilterProxy
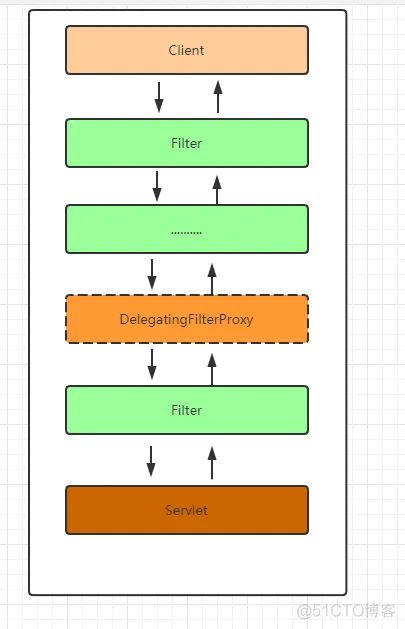
【第三篇】SpringSecurity请求流转的本质_java_05

当用户请求进来的时候会被doFilter方法拦截

public void doFilter(ServletRequest request, ServletResponse response, FilterChain filterChain) throws ServletException, IOException {
    Filter delegateToUse = this.delegate;
    if (delegateToUse == null) {
        // 如果 delegateToUse 为空 那么完成init中的初始化操作
        synchronized(this.delegateMonitor) {
            delegateToUse = this.delegate;
            if (delegateToUse == null) {
                WebApplicationContext wac = this.findWebApplicationContext();
                if (wac == null) {
                    throw new IllegalStateException("No WebApplicationContext found: no ContextLoaderListener or DispatcherServlet registered?");
                }

                delegateToUse = this.initDelegate(wac);
            }

            this.delegate = delegateToUse;
        }
    }

    this.invokeDelegate(delegateToUse, request, response, filterChain);
}


invokeDelegate

protected void invokeDelegate(Filter delegate, ServletRequest request, ServletResponse response, FilterChain filterChain) throws ServletException, IOException {
    // delegate.doFilter() FilterChainProxy
    delegate.doFilter(request, response, filterChain);
}


所以在此处我们发现DelegatingFilterProxy最终是调用的委托代理对象的doFilter方法
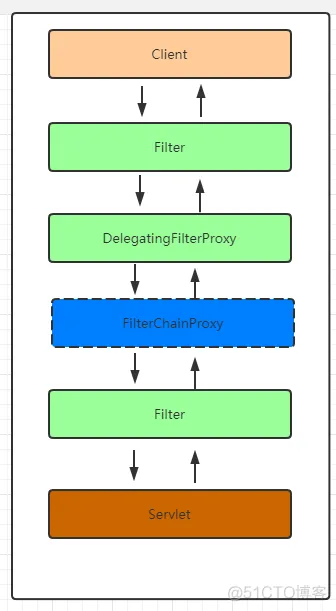
【第三篇】SpringSecurity请求流转的本质_java_06

FilterChainProxy

过滤器链的代理对象:增强过滤器链(具体处理请求的过滤器还不是FilterChainProxy ) 根据客户端的请求匹配合适的过滤器链链来处理请求
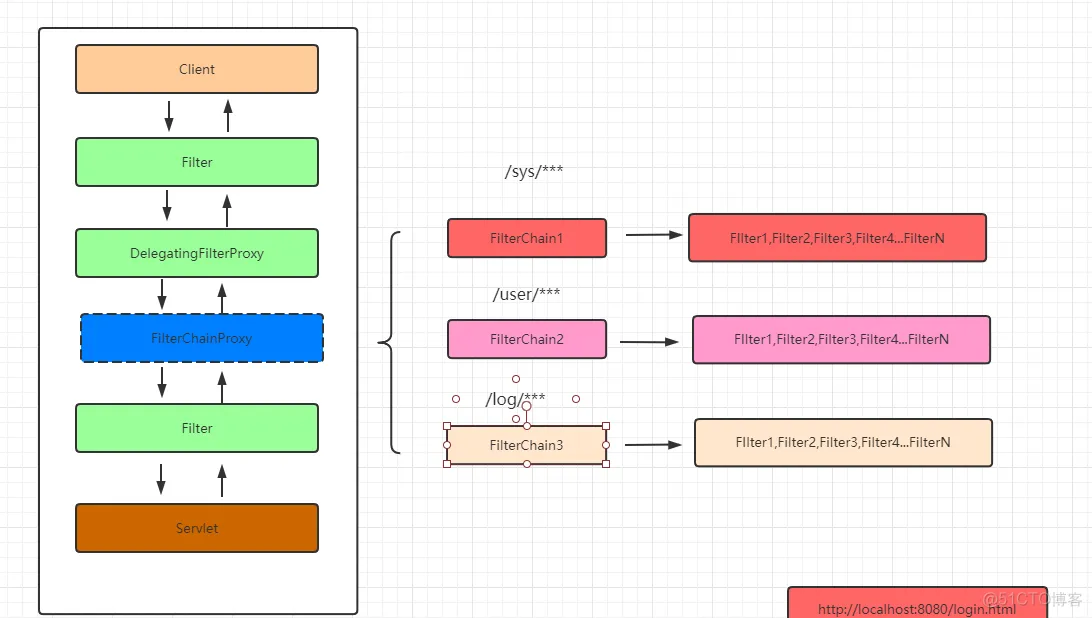
public class FilterChainProxy extends GenericFilterBean {
    private static final Log logger = LogFactory.getLog(FilterChainProxy.class);
    private static final String FILTER_APPLIED = FilterChainProxy.class.getName().concat(".APPLIED");
    // 过滤器链的集合  保存的有很多个过滤器链  一个过滤器链中包含的有多个过滤器
    private List<SecurityFilterChain> filterChains;
    private FilterChainProxy.FilterChainValidator filterChainValidator;
    private HttpFirewall firewall;
// .....
}


【第三篇】SpringSecurity请求流转的本质_初始化_07

// 处理用户请求
public void doFilter(ServletRequest request, ServletResponse response, FilterChain chain) throws IOException, ServletException {
    boolean clearContext = request.getAttribute(FILTER_APPLIED) == null;
    if (clearContext) {
        try {
            request.setAttribute(FILTER_APPLIED, Boolean.TRUE);
            this.doFilterInternal(request, response, chain);
        } finally {
            SecurityContextHolder.clearContext();
            request.removeAttribute(FILTER_APPLIED);
        }
    } else {
        this.doFilterInternal(request, response, chain);
    }

}


doFilterInternal

private void doFilterInternal(ServletRequest request, ServletResponse response, FilterChain chain) throws IOException, ServletException {
    FirewalledRequest fwRequest = this.firewall.getFirewalledRequest((HttpServletRequest)request);
    HttpServletResponse fwResponse = this.firewall.getFirewalledResponse((HttpServletResponse)response);
    // 根据当前的请求获取对应的过滤器链
    List<Filter> filters = this.getFilters((HttpServletRequest)fwRequest);
    if (filters != null && filters.size() != 0) {
        FilterChainProxy.VirtualFilterChain vfc = new FilterChainProxy.VirtualFilterChain(fwRequest, chain, filters);
        vfc.doFilter(fwRequest, fwResponse);
    } else {
        if (logger.isDebugEnabled()) {
            logger.debug(UrlUtils.buildRequestUrl(fwRequest) + (filters == null ? " has no matching filters" : " has an empty filter list"));
        }

        fwRequest.reset();
        chain.doFilter(fwRequest, fwResponse);
    }
}


获取到了对应处理请求的过滤器链

【第三篇】SpringSecurity请求流转的本质_xml_08

SpringSecurity中处理请求的过滤器中具体处理请求的方法

public void doFilter(ServletRequest request, ServletResponse response) throws IOException, ServletException {
    if (this.currentPosition == this.size) {
        if (FilterChainProxy.logger.isDebugEnabled()) {
            FilterChainProxy.logger.debug(UrlUtils.buildRequestUrl(this.firewalledRequest) + " reached end of additional filter chain; proceeding with original chain");
        }

        this.firewalledRequest.reset();
        this.originalChain.doFilter(request, response);
    } else {
        ++this.currentPosition;
        Filter nextFilter = (Filter)this.additionalFilters.get(this.currentPosition - 1);
        if (FilterChainProxy.logger.isDebugEnabled()) {
            FilterChainProxy.logger.debug(UrlUtils.buildRequestUrl(this.firewalledRequest) + " at position " + this.currentPosition + " of " + this.size + " in additional filter chain; firing Filter: '" + nextFilter.getClass().getSimpleName() + "'");
        }

        nextFilter.doFilter(request, response, this);
    }

}


【第三篇】SpringSecurity请求流转的本质_java_09

主要过滤器的介绍

 https://www.processon.com/view/link/5f7b197ee0b34d0711f3e955

ExceptionTranslationFilter

ExceptionTranslationFilter是我们看的过滤器链中的倒数第二个,作用是捕获倒数第一个过滤器抛出来的异常信息。
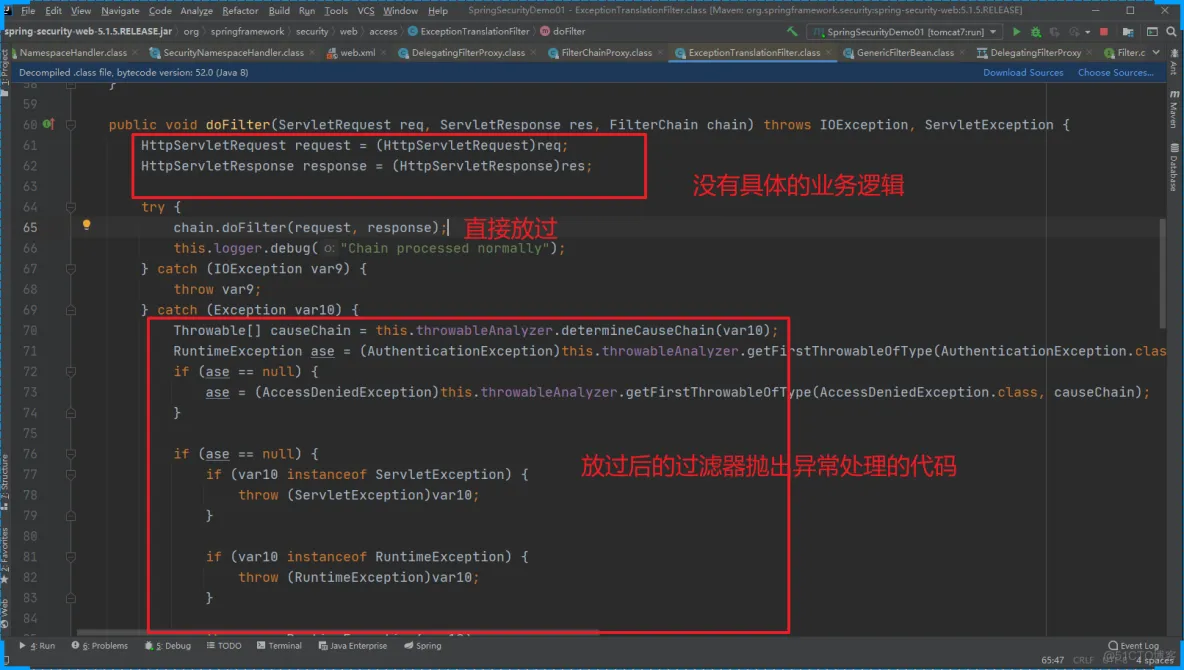
【第三篇】SpringSecurity请求流转的本质_java_10

FilterSecurityInterceptor

做权限相关的内容

public void invoke(FilterInvocation fi) throws IOException, ServletException {
        if (fi.getRequest() != null && fi.getRequest().getAttribute("__spring_security_filterSecurityInterceptor_filterApplied") != null && this.observeOncePerRequest) {
            fi.getChain().doFilter(fi.getRequest(), fi.getResponse());
        } else {
            if (fi.getRequest() != null && this.observeOncePerRequest) {
                fi.getRequest().setAttribute("__spring_security_filterSecurityInterceptor_filterApplied", Boolean.TRUE);
            }
// 抛出异常 ExceptionTranslationFilter就会捕获异常
            InterceptorStatusToken token = super.beforeInvocation(fi);

            try {
                fi.getChain().doFilter(fi.getRequest(), fi.getResponse());
            } finally {
                super.finallyInvocation(token);
            }

            super.afterInvocation(token, (Object)null);
        }

    }


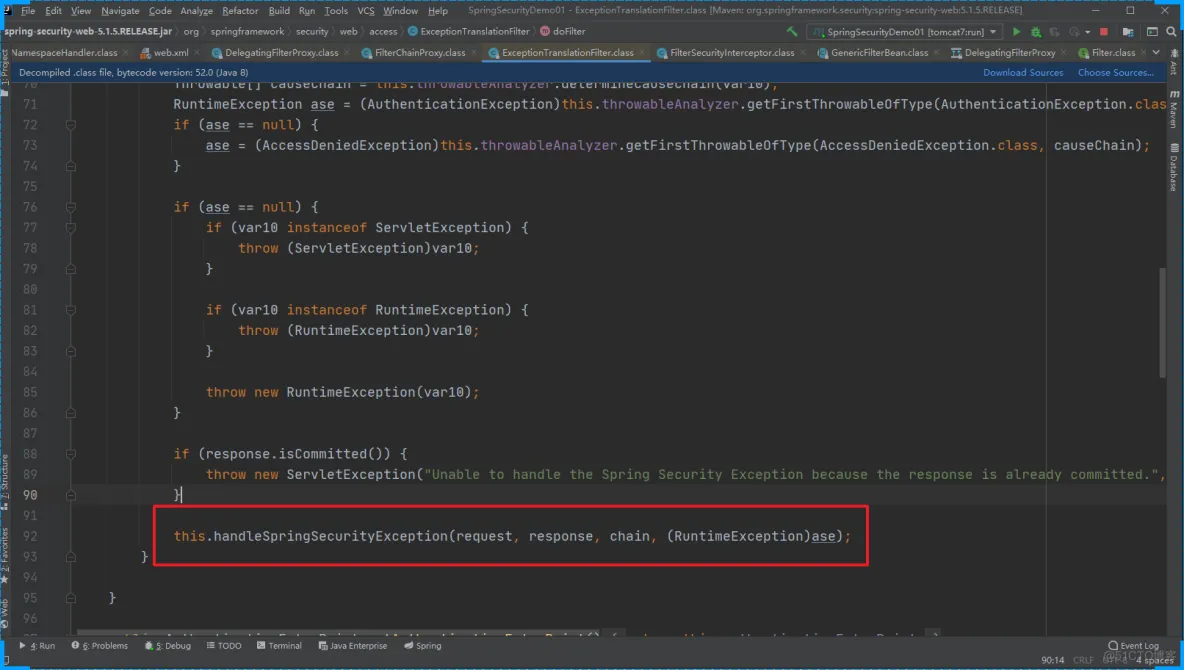
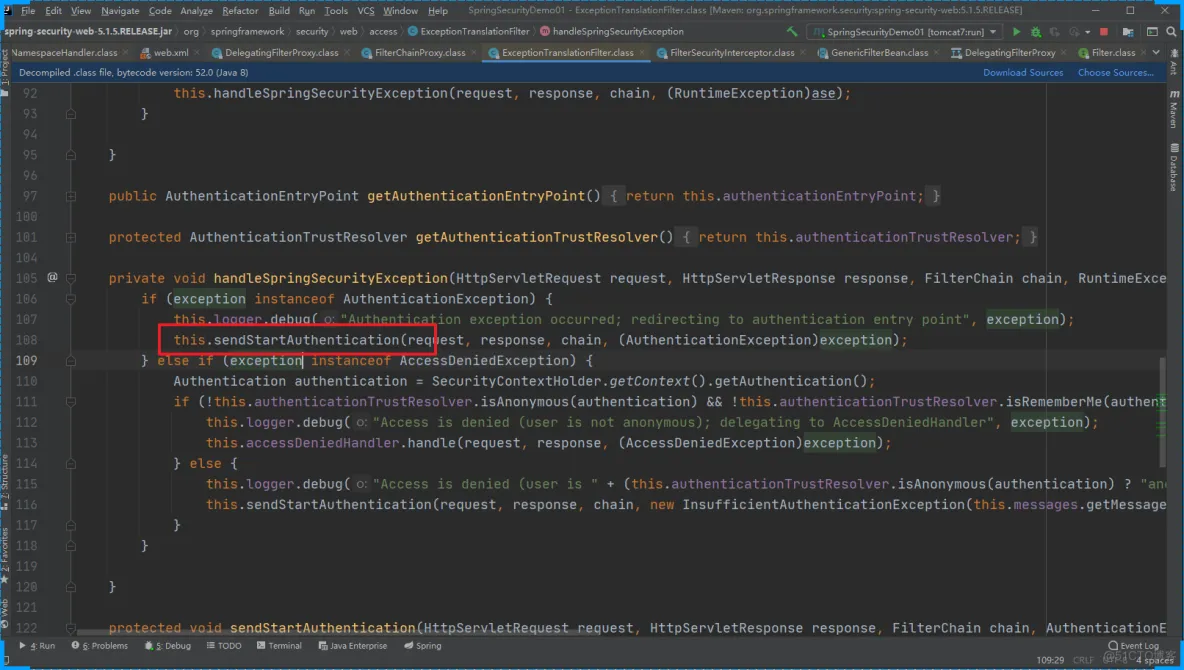
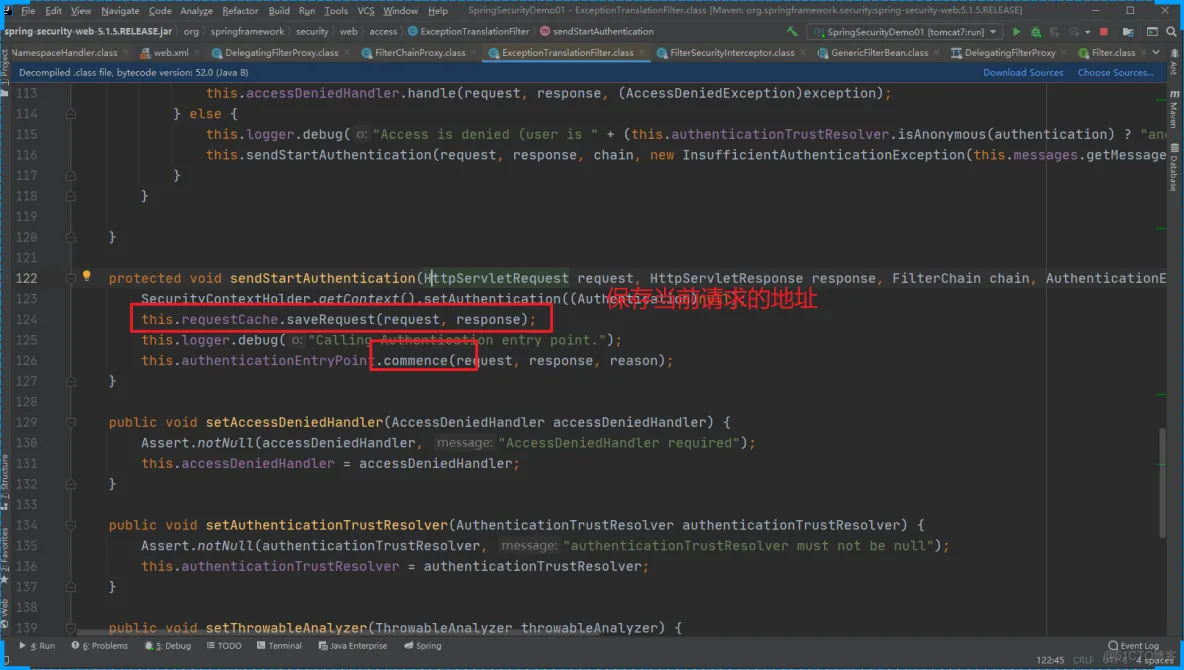
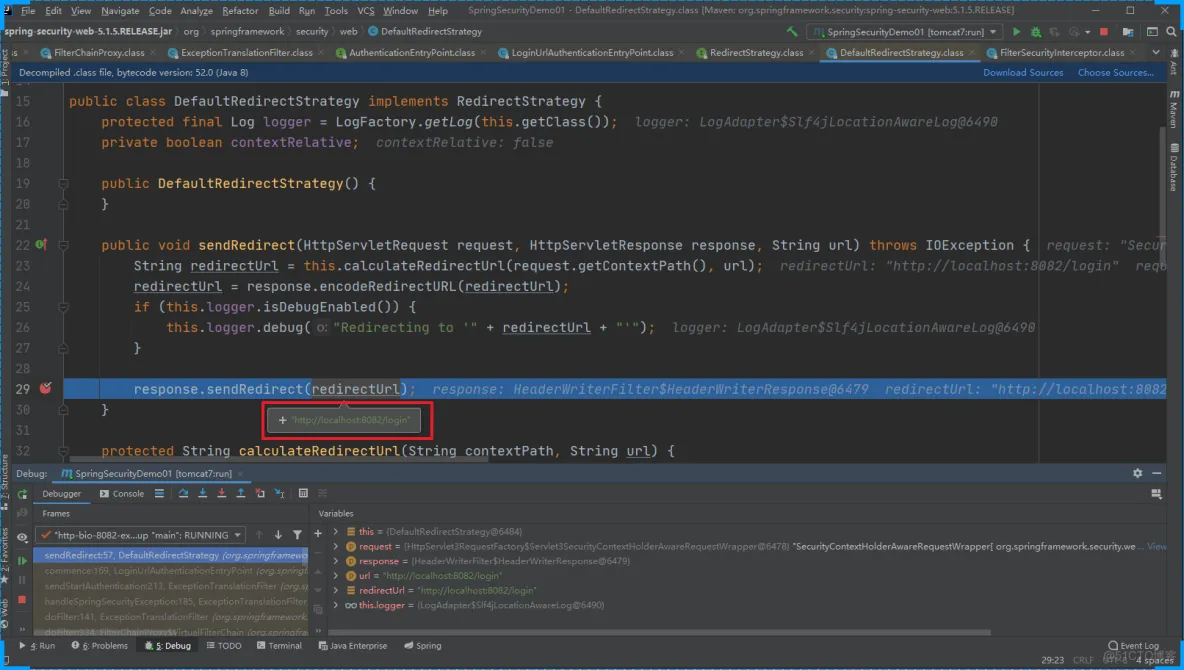
ExceptionTranslationFilter 处理异常的代码
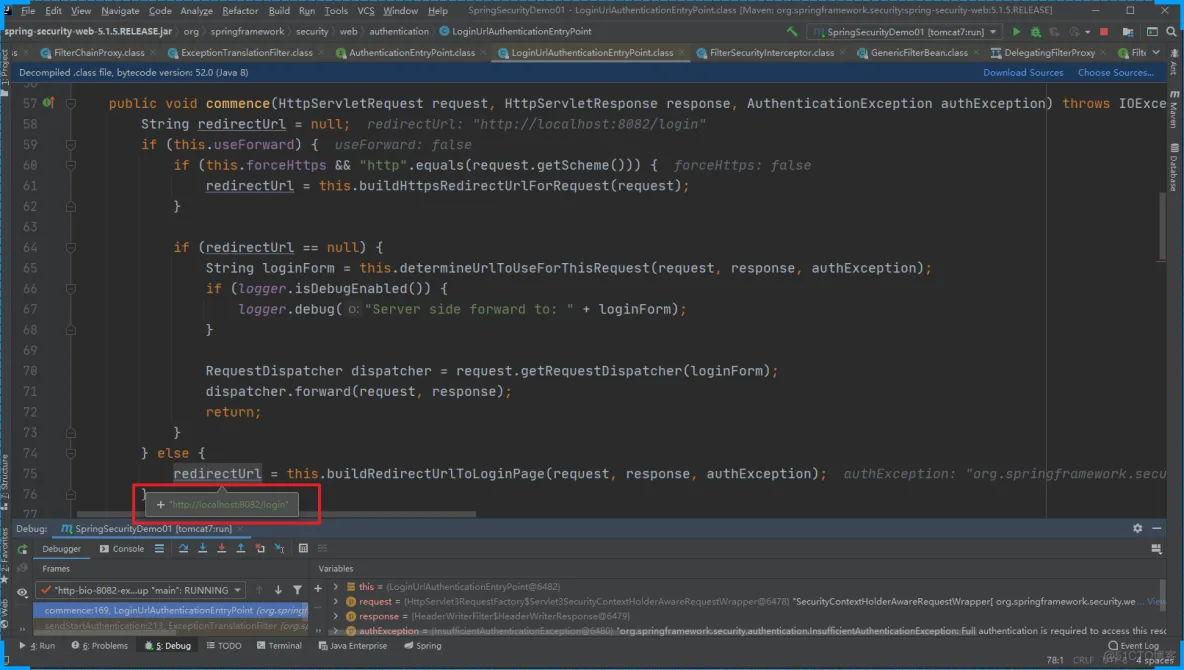
【第三篇】SpringSecurity请求流转的本质_xml_11

【第三篇】SpringSecurity请求流转的本质_初始化_12

【第三篇】SpringSecurity请求流转的本质_spring_13

【第三篇】SpringSecurity请求流转的本质_java_14

【第三篇】SpringSecurity请求流转的本质_servlet_15

【第三篇】SpringSecurity请求流转的本质_spring_16

【第三篇】SpringSecurity请求流转的本质_java_17

当用第二次提交 http://localhost:8082/login时 我们要关注的是 DefaultLoginPageGeneratingFilter 这个过滤器

public void doFilter(ServletRequest req, ServletResponse res, FilterChain chain) throws IOException, ServletException {
    HttpServletRequest request = (HttpServletRequest)req;
    HttpServletResponse response = (HttpServletResponse)res;
    boolean loginError = this.isErrorPage(request);
    boolean logoutSuccess = this.isLogoutSuccess(request);
    if (!this.isLoginUrlRequest(request) && !loginError && !logoutSuccess) {
        // 正常的业务请求就直接放过
        chain.doFilter(request, response);
    } else {
        // 需要跳转到登录页面的请求
        String loginPageHtml = this.generateLoginPageHtml(request, loginError, logoutSuccess);
        // 直接响应登录页面
        response.setContentType("text/html;charset=UTF-8");
        response.setContentLength(loginPageHtml.getBytes(StandardCharsets.UTF_8).length);
        response.getWriter().write(loginPageHtml);
    }
}


generateLoginPageHtml

private String generateLoginPageHtml(HttpServletRequest request, boolean loginError, boolean logoutSuccess) {
    String errorMsg = "Invalid credentials";
    if (loginError) {
        HttpSession session = request.getSession(false);
        if (session != null) {
            AuthenticationException ex = (AuthenticationException)session.getAttribute("SPRING_SECURITY_LAST_EXCEPTION");
            errorMsg = ex != null ? ex.getMessage() : "Invalid credentials";
        }
    }

    StringBuilder sb = new StringBuilder();
    sb.append("<!DOCTYPE html>\n<html lang=\"en\">\n  <head>\n    <meta charset=\"utf-8\">\n    <meta name=\"viewport\" content=\"width=device-width, initial-scale=1, shrink-to-fit=no\">\n    <meta name=\"description\" content=\"\">\n    <meta name=\"author\" content=\"\">\n    <title>Please sign in</title>\n    <link href=\"https://maxcdn.bootstrapcdn.com/bootstrap/4.0.0-beta/css/bootstrap.min.css\" rel=\"stylesheet\" integrity=\"sha384-/Y6pD6FV/Vv2HJnA6t+vslU6fwYXjCFtcEpHbNJ0lyAFsXTsjBbfaDjzALeQsN6M\" crossorigin=\"anonymous\">\n    <link href=\"https://getbootstrap.com/docs/4.0/examples/signin/signin.css\" rel=\"stylesheet\" crossorigin=\"anonymous\"/>\n  </head>\n  <body>\n     <div class=\"container\">\n");
    String contextPath = request.getContextPath();
    if (this.formLoginEnabled) {
        sb.append("      <form class=\"form-signin\" method=\"post\" action=\"" + contextPath + this.authenticationUrl + "\">\n        <h2 class=\"form-signin-heading\">Please sign in</h2>\n" + createError(loginError, errorMsg) + createLogoutSuccess(logoutSuccess) + "        <p>\n          <label for=\"username\" class=\"sr-only\">Username</label>\n          <input type=\"text\" id=\"username\" name=\"" + this.usernameParameter + "\" class=\"form-control\" placeholder=\"Username\" required autofocus>\n        </p>\n        <p>\n          <label for=\"password\" class=\"sr-only\">Password</label>\n          <input type=\"password\" id=\"password\" name=\"" + this.passwordParameter + "\" class=\"form-control\" placeholder=\"Password\" required>\n        </p>\n" + this.createRememberMe(this.rememberMeParameter) + this.renderHiddenInputs(request) + "        <button class=\"btn btn-lg btn-primary btn-block\" type=\"submit\">Sign in</button>\n      </form>\n");
    }

    if (this.openIdEnabled) {
        sb.append("      <form name=\"oidf\" class=\"form-signin\" method=\"post\" action=\"" + contextPath + this.openIDauthenticationUrl + "\">\n        <h2 class=\"form-signin-heading\">Login with OpenID Identity</h2>\n" + createError(loginError, errorMsg) + createLogoutSuccess(logoutSuccess) + "        <p>\n          <label for=\"username\" class=\"sr-only\">Identity</label>\n          <input type=\"text\" id=\"username\" name=\"" + this.openIDusernameParameter + "\" class=\"form-control\" placeholder=\"Username\" required autofocus>\n        </p>\n" + this.createRememberMe(this.openIDrememberMeParameter) + this.renderHiddenInputs(request) + "        <button class=\"btn btn-lg btn-primary btn-block\" type=\"submit\">Sign in</button>\n      </form>\n");
    }

    if (this.oauth2LoginEnabled) {
        sb.append("<h2 class=\"form-signin-heading\">Login with OAuth 2.0</h2>");
        sb.append(createError(loginError, errorMsg));
        sb.append(createLogoutSuccess(logoutSuccess));
        sb.append("<table class=\"table table-striped\">\n");
        Iterator var7 = this.oauth2AuthenticationUrlToClientName.entrySet().iterator();

        while(var7.hasNext()) {
            Entry<String, String> clientAuthenticationUrlToClientName = (Entry)var7.next();
            sb.append(" <tr><td>");
            String url = (String)clientAuthenticationUrlToClientName.getKey();
            sb.append("<a href=\"").append(contextPath).append(url).append("\">");
            String clientName = HtmlUtils.htmlEscape((String)clientAuthenticationUrlToClientName.getValue());
            sb.append(clientName);
            sb.append("</a>");
            sb.append("</td></tr>\n");
        }

        sb.append("</table>\n");
    }

    sb.append("</div>\n");
    sb.append("</body></html>");
    return sb.toString();
}


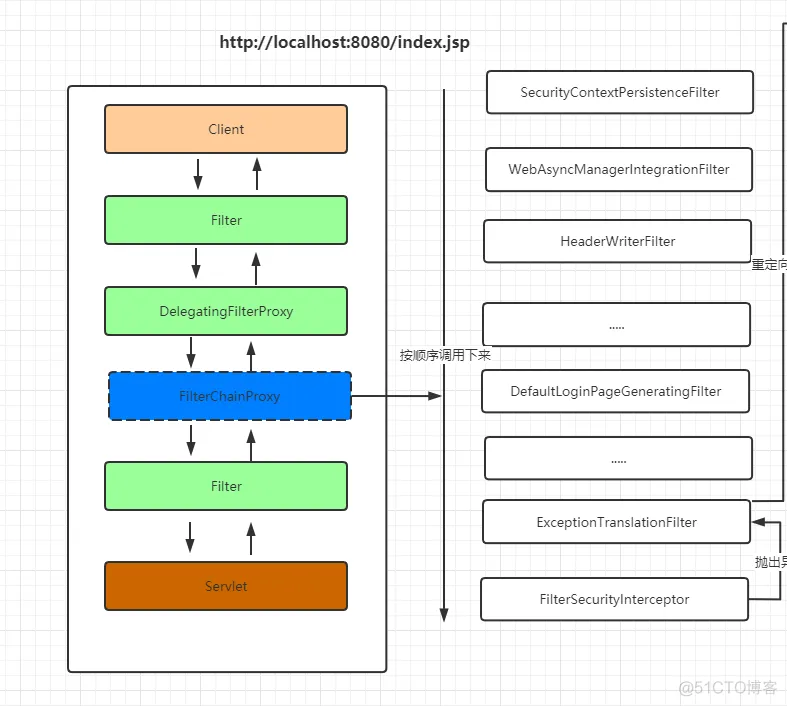
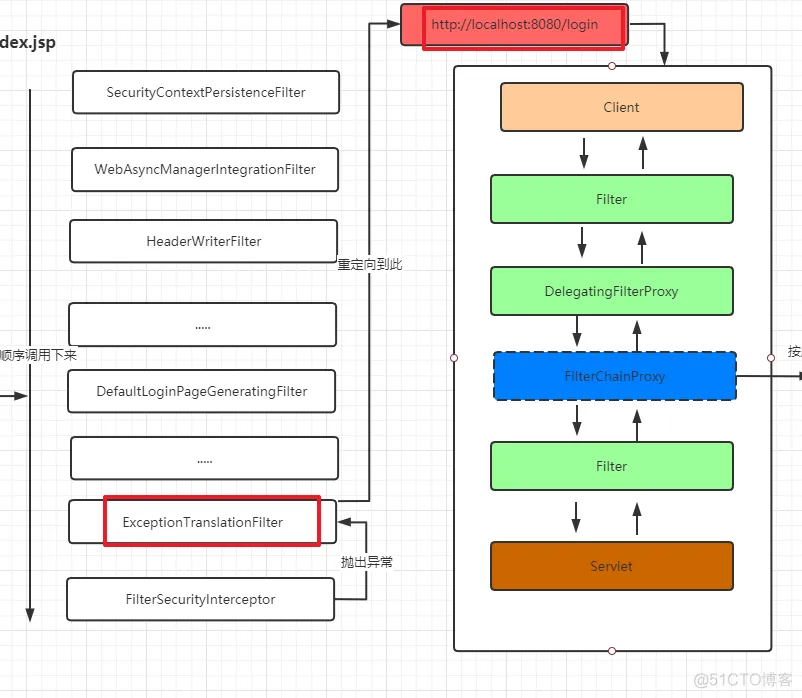
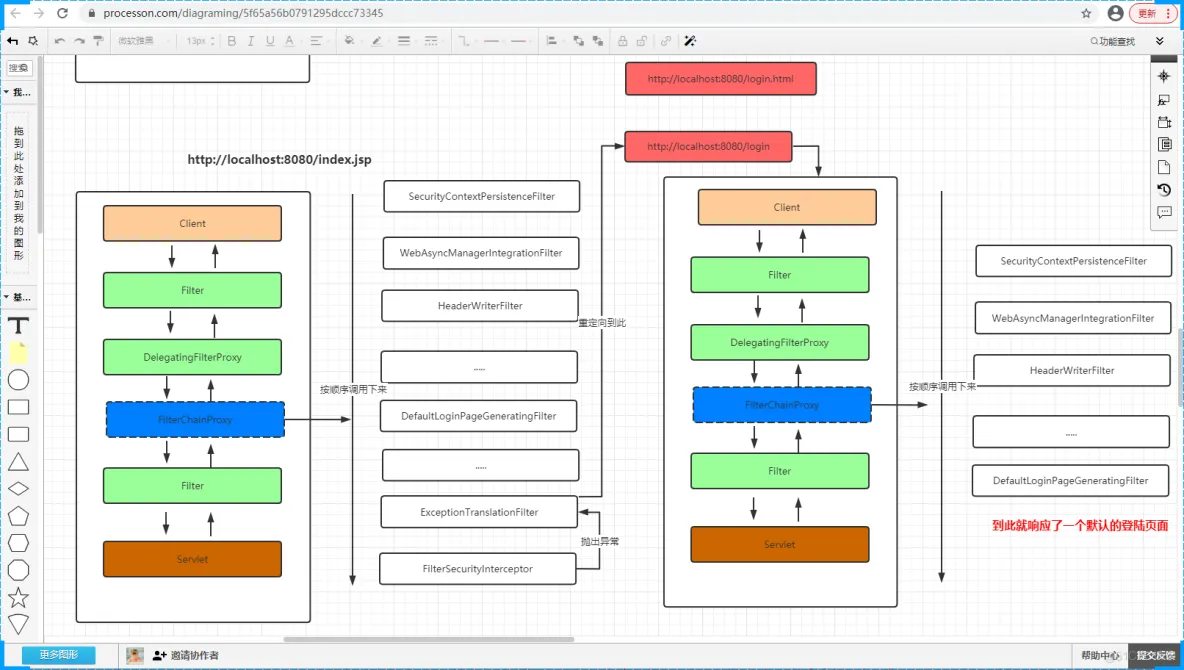
第一次请求的完整的流程

【第三篇】SpringSecurity请求流转的本质_servlet_18

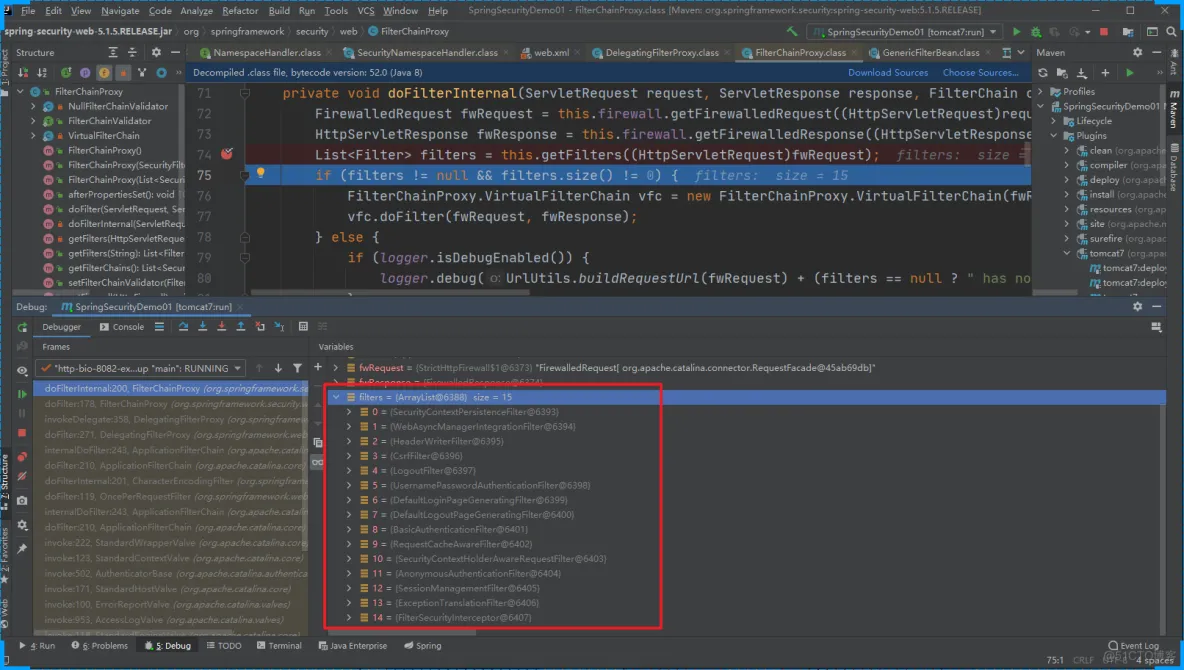
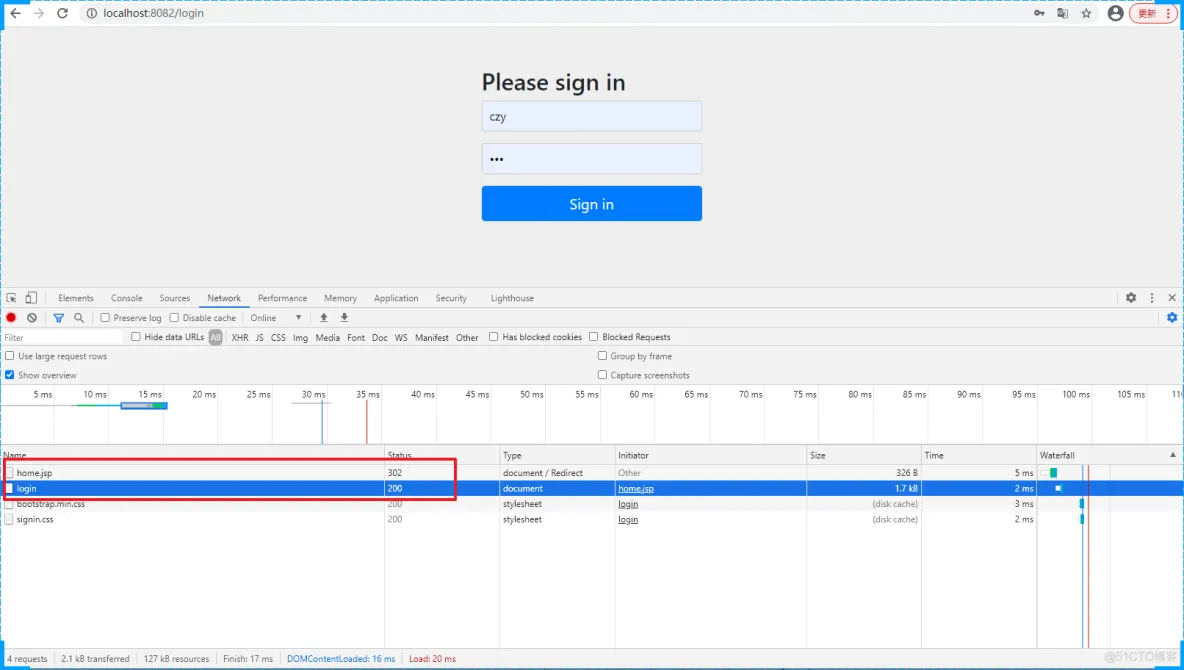
页面调试也可以验证我的推论

【第三篇】SpringSecurity请求流转的本质_java_19

Spring源码手写篇-手写AOP

  手写IoC和DI后已经实现的类图结构。
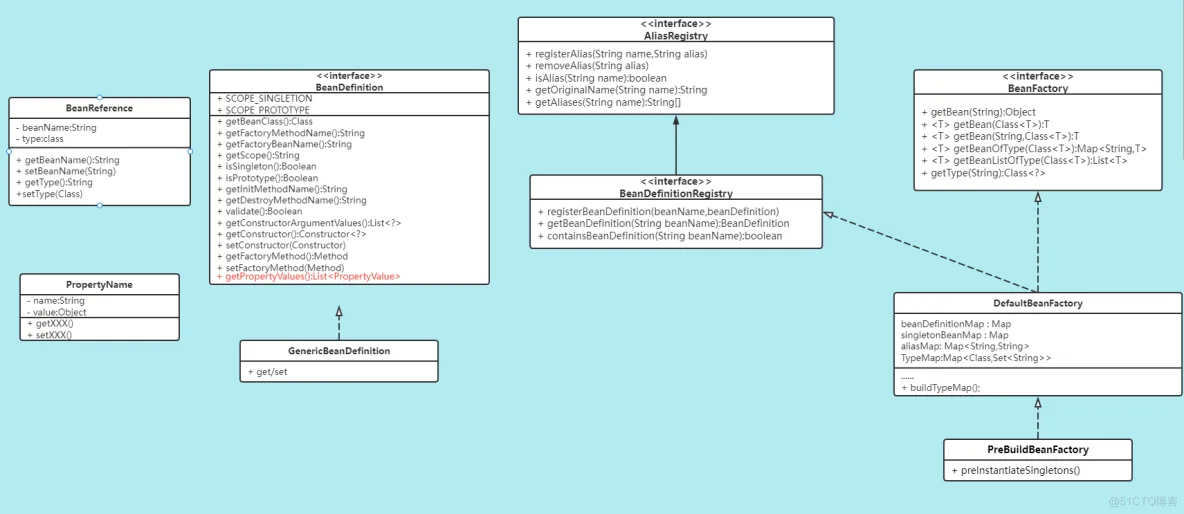
第三篇:Spring源码篇-手写篇-手写AOP_java

一、AOP分析

第三篇:Spring源码篇-手写篇-手写AOP_AOP_02

1.AOP是什么?

   AOP[Aspect Oriented Programming] 面向切面编程,在不改变类的代码的情况下,对类方法进行功能的增强。

2.我们要做什么?

  我们需要在前面手写IoC,手写DI的基础上给用户提供AOP功能,让他们可以通过AOP技术实现对类方法功能增强。

第三篇:Spring源码篇-手写篇-手写AOP_面向接口编程_03

3.我们的需求是什么?

  提供AOP功能!,然后呢?… 没有了。关键还是得从上面的定义来理解。

第三篇:Spring源码篇-手写篇-手写AOP_面向接口编程_04

第三篇:Spring源码篇-手写篇-手写AOP_AOP_05

二、AOP概念讲解

  上面在分析AOP需求的时候,我们介绍到了相关的概念,Advice、Pointcuts和weaving等,首先我们来看看在AOP中我们会接触到的相关的概念都有哪些。
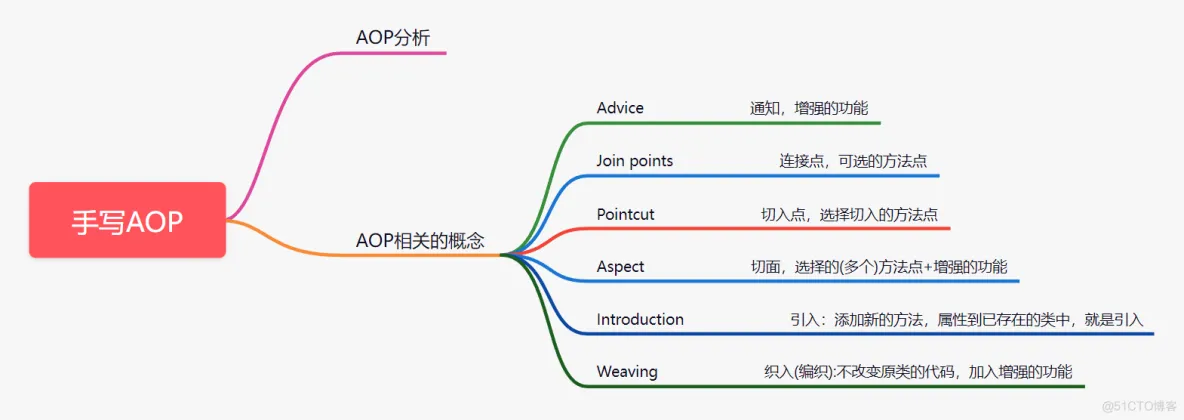
第三篇:Spring源码篇-手写篇-手写AOP_java_06

更加形象的描述

然后对于上面的相关概念,我们就要考虑哪些是用户需要提供的,哪些是框架要写好的?
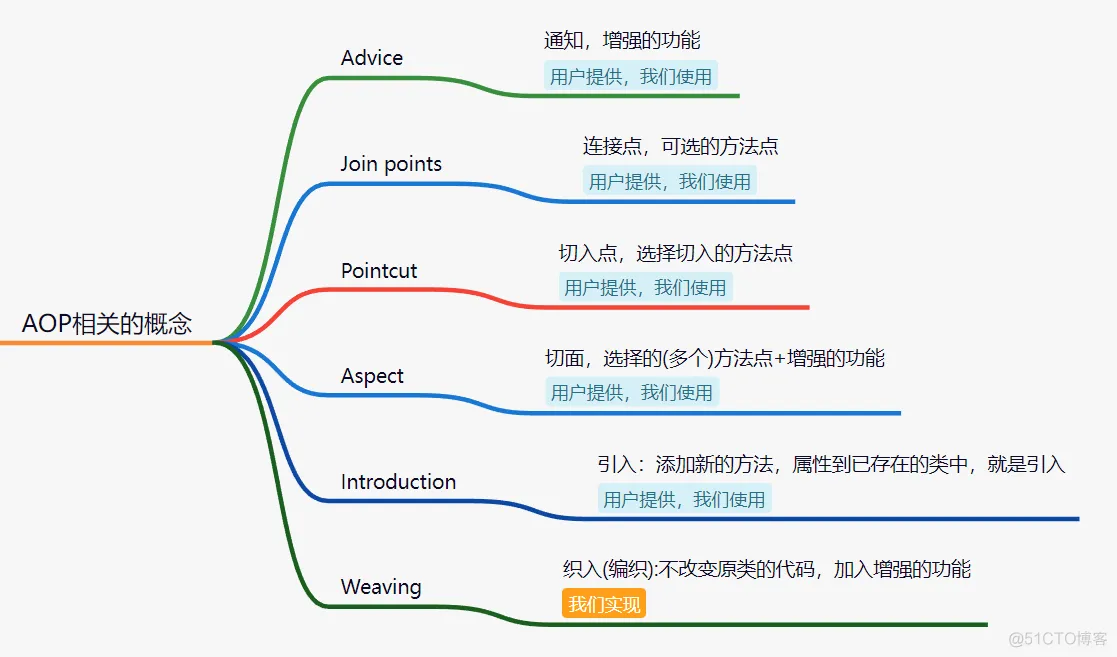
第三篇:Spring源码篇-手写篇-手写AOP_java_07

思考:Advice,Pointcuts和Weaving各自的特点

三、切面实现

  通过上面的分析,我们要设计实现AOP功能,其实就是要设计实现上面分析的相关概念对应的组件。

1.Advice

1.1 面向接口编程

  Advice:通知,是由用户提供的,我们来使用,主要是用户提供就突出了 多变性。针对这块我们应该怎么设计?这里有两个问题:

  1. 我们如何能够识别用户提供的东西呢?用户在我们写好框架后使用我们的框架
  2. 如何让我们的代码隔绝用户提供的多变性呢?

针对这种情况我们定义一套标准的接口,用户通过实现接口类提供他们不同的逻辑。是否可行?

第三篇:Spring源码篇-手写篇-手写AOP_spring_08

这里有个重要的设计原则大家要注意: 如何应对变化,通过面向接口编程来搞定!!!

我们先定义一个空的接口,可以先思考下我们为什么定义一个空的接口呢?

第三篇:Spring源码篇-手写篇-手写AOP_面向接口编程_09

1.2 Advice的特点分析

  Advice的特点:可选时机,可选择在方法执行前、后、异常时进行功能的增强
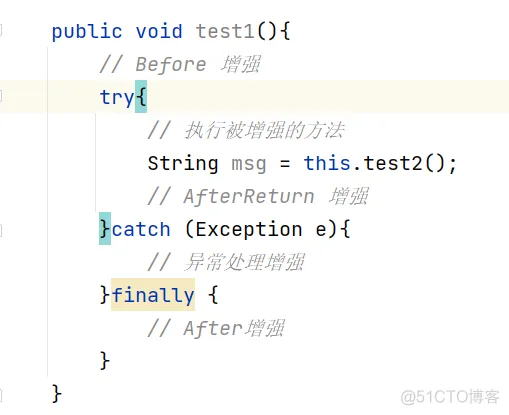
第三篇:Spring源码篇-手写篇-手写AOP_面向接口编程_10

结合上面的情况我们可以分析出Advice通知的几种情况

  • 前置增强-Before
  • 后置增强-AfterReturn
  • 环绕增强-Around
  • 最终通知-After
  • 异常通知-Throwing

有这么多的情况我们应该要怎么来实现呢?我们可以定义标准的接口方法,让用户来实现它,提供各种具体的增强内容。那么这四种增强相关的方法定义是怎样的呢?我们一一来分析下。

1.3 各种通知分析

1.3.1 前置增强

前置增强:在方法执行前进行增强。

问题1:它可能需要的参数?

  目的是对方法进行增强,应该需要的是方法相关的信息,我们使用它的时候能给如它的就是当前要执行方法的相关信息了

问题2:运行时方法有哪些信息?

  1. 方法本身 Method
  2. 方法所属的对象 Object
  3. 方法的参数 Object[]

问题3:前置增强的返回值是什么?

  在方法执行前进行增强,不需要返回值!

public interface MethodBeforeAdvice extends Advice {

	/**
	 * 实现该方法进行前置增强
	 * 
	 * @param method
	 *            被增强的方法
	 * @param args
	 *            方法的参数
	 * @param target
	 *            被增强的目标对象
	 * @throws Throwable
	 */
	void before(Method method, Object[] args, Object target) throws Throwable;
}
 
 
1.3.2 最终通知

  最终通知:在方法执行后进行增强

问题1:它可能需要的参数?

  • 方法本身 Method
  • 方法所属的对象 Object
  • 方法的参数 Object[]
  • 方法的返回值 Object 可能没有

问题2:它的返回值是什么?

  这个就需要看是否允许在After中更改返回的结果,如果规定只可用、不可修改返回值就不需要返回值

public interface AfterAdvice extends Advice {
	/**
	 * 实现该方法,提供后置增强
	 * 
	 * @param returnValue
	 *            返回值
	 * @param method
	 *            被增强的方法
	 * @param args
	 *            方法的参数
	 * @param target
	 *            方法的所属对象
	 * @throws Throwable
	 */
	void after(Object returnValue, Method method, Object[] args, Object target) throws Throwable;
}
 
 
1.3.3 后置通知

  后置增强:在方法执行后进行增强

问题1:他可能需要的参数

  • 方法本身 Method
  • 方法所属的对象 Object
  • 方法的参数 Object[]
  • 方法的返回值 Object

问题2:它的返回值是什么?

  这个就需要看是否允许在After中更改返回的结果,如果规定只可用、不可修改返回值就不需要返回值

public interface AfterReturningAdvice extends Advice {
	/**
	 * 实现该方法,提供AfterRetun增强
	 * 
	 * @param returnValue
	 *            返回值
	 * @param method
	 *            被增强的方法
	 * @param args
	 *            方法的参数
	 * @param target
	 *            方法的所属对象
	 * @throws Throwable
	 */
	void afterReturning(Object returnValue, Method method, Object[] args, Object target) throws Throwable;
}
 
 
1.3.4 环绕通知

Around环绕增强:包裹方法进行增强

问题1:他可能需要的参数

  • 方法本身 Method
  • 方法所属的对象 Object
  • 方法的参数 Object[]

问题2:它的返回值是面试?

  方法被它包裹,即方法将由它来执行,它需要返回方法的返回值

public interface MethodInterceptor extends Advice {
	/**
	 * 对方法进行环绕(前置、后置)增强、异常处理增强,方法实现中需调用目标方法。
	 * 
	 * @param method
	 *            被增强的方法
	 * @param args
	 *            方法的参数
	 * @param target
	 *            方法所属对象
	 * @return Object 返回值
	 * @throws Throwable
	 */
	Object invoke(Method method, Object[] args, Object target) throws Throwable;
}
 
 
1.3.5 异常通知

异常通知增强:对方法执行时的异常,进行增强处理

问题1:它可能需要什么参数?

  • 一定需要Exception
  • 可能需要方法本身 Method
  • 可能需要方法所属的对象 Object
  • 可能需要方法的参数 Object[]

问题2:它的返回值是什么?

  这个就需要看是否允许在After中更改返回的结果,如果规定只可用、不可修改返回值就不需要返回值

public interface ThrowsAdvice extends Advice {

    void afterThrowing(Method method, Object[] args, Object target, Exception ex) throws Throwable;
}


1.4 Advice设计

  结合上面的分析,我们就可以得出Advice的体系图了

第三篇:Spring源码篇-手写篇-手写AOP_前端_11

2.Pointcut

2.1 Pointcut的特点有:

  • 用户性:由用户指定
  • 变化性:用户可灵活指定
  • 多点性:用户可以选择在多个点上进行增强

2.2 Pointcut分析

  为用户提供一个东西,让他们可以灵活地指定多个方法点,而且我们还能看懂!

思考:切入点是由用户来指定在哪些方法点上进行增强,那么这个哪些方法点如何来表示能满足上面的需求呢?

分析:

  1. 指定哪些方法,是不是一个描述信息?
  2. 如何来指定一个方法?
  3. 如果有重载的情况怎么办?
  4. 123要求的其实就是一个完整的方法签名
com.boge.spring.aop.Girl.dbj(Boy,Time)

com.boge.spring.aop.Girl.dbj(Boy,Girl,Time)


我们还得进一步分析:如何做到多点性和灵活性,在一个描述中指定一类类的某些方法?

  • 某个包下的某个类的某个方法
  • 某个包下的所有类中的所有方法
  • 某个包下的所有类中的do开头的方法
  • 某个包下的以service结尾的类中的do开头的方法

也就是我们需要有这样一个表达式能够灵活的描述上面的这些信息。

这个表达式表达的内容有:

第三篇:Spring源码篇-手写篇-手写AOP_面向接口编程_12

而且每个部分的要求是怎么样的呢?

  • 包名:有父子特点,要能模糊匹配
  • 类名:要能模糊匹配
  • 方法名:要能模糊匹配
  • 参数类型:参数可以有多个

那么我们设计的这个表达式将被我们用来决定是否需要对某个类的某个方法进行增强,这个决定过程应该是怎么样的?

第三篇:Spring源码篇-手写篇-手写AOP_AOP_13

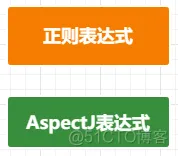
针对需求我们的选择是:

第三篇:Spring源码篇-手写篇-手写AOP_前端_14

AspectJ官网:http://www.eclipse.org/aspectj

第三篇:Spring源码篇-手写篇-手写AOP_面向接口编程_15

切入点表达式要匹配的对象就是目标方法的方法名。所以,execution表达式中明显就是方法的签名。注意,表达式中加[ ]的部分表示可省略部分,各部分间用空格分开。在其中可以使用以下符号

第三篇:Spring源码篇-手写篇-手写AOP_AOP_16

举例:

execution(public * (. .))
 指定切入点为:任意公共方法。
 execution( set (. .))
 指定切入点为:任何一个以“set”开始的方法。
 execution( com.xyz.service..(. .))
 指定切入点为:定义在service包里的任意类的任意方法。
 execution(* com.xyz.service. ..(. .))
 指定切入点为:定义在service包或者子包里的任意类的任意方法。“…”出现在类名中时,
 后面必须跟“”,表示包、子包下的所有类。
 execution( .service..(. .))
 指定只有一级包下的serivce子包下所有类(接口)中的所有方法为切入点
 execution( . .service..*(. .))
 指定所有包下的serivce子包下所有类(接口)中的所有方法为切入点


2.3 Pointcut设计

  通过分析完成我们就该对Pointcut类设计了,接口,类。

思考1:首先考虑切入点应该具有的属性—>切入点表达式

思考2:切入点应对外提供什么行为

思考3:切入点被我们设计用来做什么?

  对类和方法进行匹配,切入点应该提供匹配类,匹配方法的行为

思考4:如果在我们设计的框架中要能灵活的扩展切点,我们应该如何设计?

  这又是一个要支持可多变的问题,像通知一样,我们定义一套标准接口,定义好基本行为,面向接口编程,屏蔽掉具体的实现。不管哪些方案,都实现匹配类,匹配方法的接口。
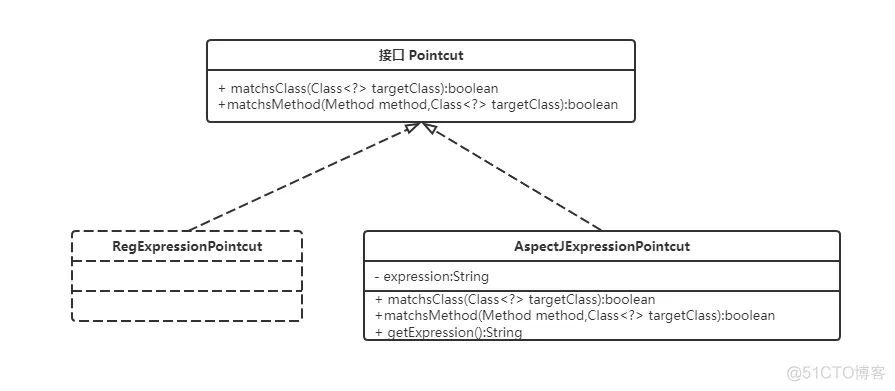
第三篇:Spring源码篇-手写篇-手写AOP_面向接口编程_17

案例代码

public interface Pointcut {

	boolean matchsClass(Class<?> targetClass);

	boolean matchsMethod(Method method, Class<?> targetClass);
}


然后来看看AspectJ的实现

第三篇:Spring源码篇-手写篇-手写AOP_spring_18

案例代码

public class AspectJExpressionPointcut implements Pointcut {

	private static PointcutParser pp = PointcutParser
			.getPointcutParserSupportingAllPrimitivesAndUsingContextClassloaderForResolution();

	private String expression;

	private PointcutExpression pe;

	public AspectJExpressionPointcut(String expression) {
		super();
		this.expression = expression;
		pe = pp.parsePointcutExpression(expression);
	}

	@Override
	public boolean matchsClass(Class<?> targetClass) {
		return pe.couldMatchJoinPointsInType(targetClass);
	}

	@Override
	public boolean matchsMethod(Method method, Class<?> targetClass) {
		ShadowMatch sm = pe.matchesMethodExecution(method);
		return sm.alwaysMatches();
	}

	public String getExpression() {
		return expression;
	}

}


3.切面Aspect

搞定了两个难点后,我们来看看用户该如何使用我们提供的东西

为此我们需要创建对应的接口来管理。

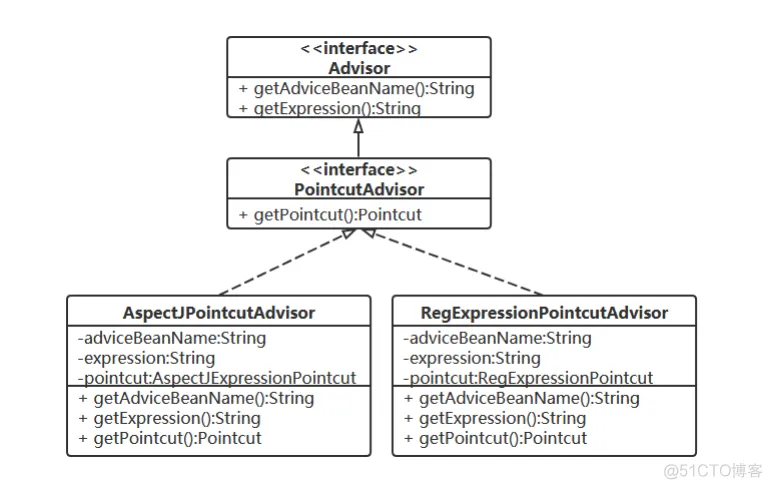
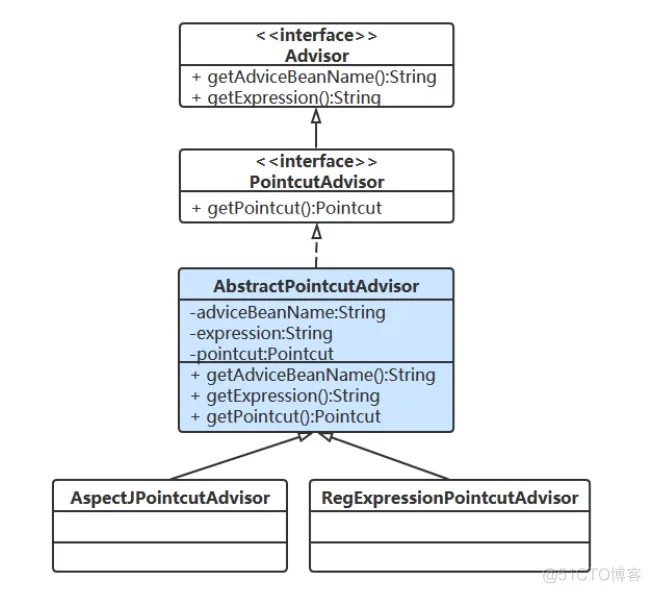
4. Advisor

为用户提供更简单的外观,Advisor(通知者)组合Advice和Pointcut。
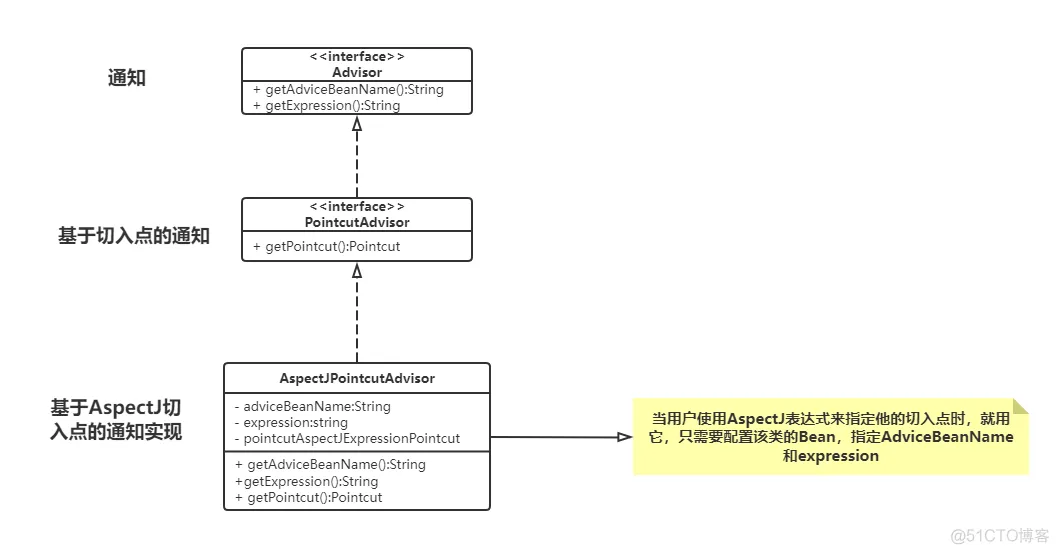
第三篇:Spring源码篇-手写篇-手写AOP_spring_19

当然扩展的形式比较多:

第三篇:Spring源码篇-手写篇-手写AOP_面向接口编程_20

或者:

第三篇:Spring源码篇-手写篇-手写AOP_面向接口编程_21

四、织入实现

1. 织入的分析

  织入要完成的是什么?织入其实就是要把用户提供的增强功能加到指定的方法上。

第三篇:Spring源码篇-手写篇-手写AOP_前端_22

思考1:在什么时候织入?

  创建Bean实例的时候,在Bean初始化后,再对其进行增强。

思考2:如何确定bean要增强?

  对bean类及方法挨个匹配用户配置的切面,如果有切面匹配就是要增强

思考3:如何实现织入?

  代理方式

2.织入的设计

  为了更好的去设计织入的实现,先整理下AOP的使用流程。
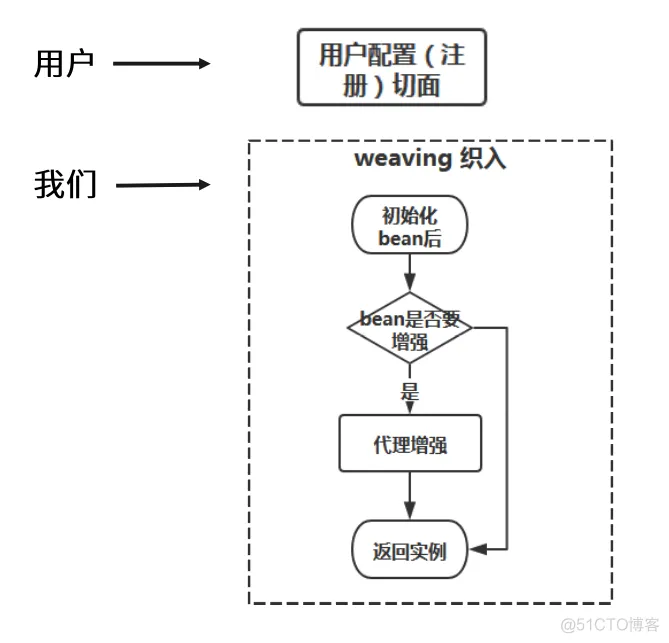
第三篇:Spring源码篇-手写篇-手写AOP_AOP_23

这里我们要考虑匹配、织入逻辑写到哪里?是写在BeanFactory中吗?

这时我们要考虑如果我们直接在BeanFactory中来处理,后续如果还有其他的需求是不是也要在BeanFactory中处理呢?这样操作有什么不好的地方呢?

  • BeanFactory代码爆炸,不专情
  • 不易扩展

那我们应该要怎么来设计呢?

我们先来回顾下Bean的生产的过程

第三篇:Spring源码篇-手写篇-手写AOP_spring_24

在这个过程中, 将来会有更多处理逻辑加入到Bean生产过程的不同阶段。我们现在最好是设计出能让我们后面不用再改BeanFactory的代码就能灵活的扩展。

这时我们可以考虑用观察者模式,通过在各个节点加入扩展点,加入注册机制。

第三篇:Spring源码篇-手写篇-手写AOP_AOP_25

那么在这块我们就应用观察者模式来加入一个Bean的后置处理器 BeanPostProcessor
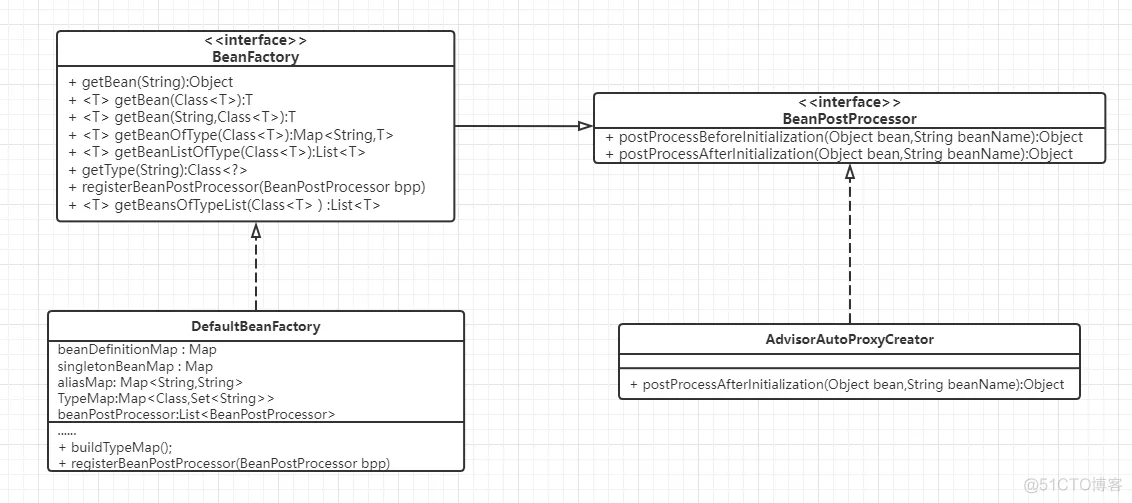
第三篇:Spring源码篇-手写篇-手写AOP_面向接口编程_26

具体的我们在代码中来看看。

Spring源码-Bean的实例化

  接下来我们看看Bean的实例化处理

一、BeanDefinition

  首先我们来看看BeanDefinition的存放位置。因为Bean对象的实例化肯定是BeanFactory基于对应的BeanDefinition的定义来实现的,所以在这个过程中BeanDefinition是非常重要的,前面的课程讲解已经完成了BeanDefinition的定义。同时根据前面refresh方法的讲解我们知道了BeanFactory的具体实现是 DefaultListableBeanFactory.所以BeanDefinition的相关信息是存储在 DefaultListableBeanFactory的相关属性中的。

/** Map of bean definition objects, keyed by bean name. */
private final Map<String, BeanDefinition> beanDefinitionMap = new
ConcurrentHashMap<>(256);


二、Bean实例的创建过程

  然后就是Bean实例的创建过程。这块儿我们可以通过Debug的形式非常直观的看到。
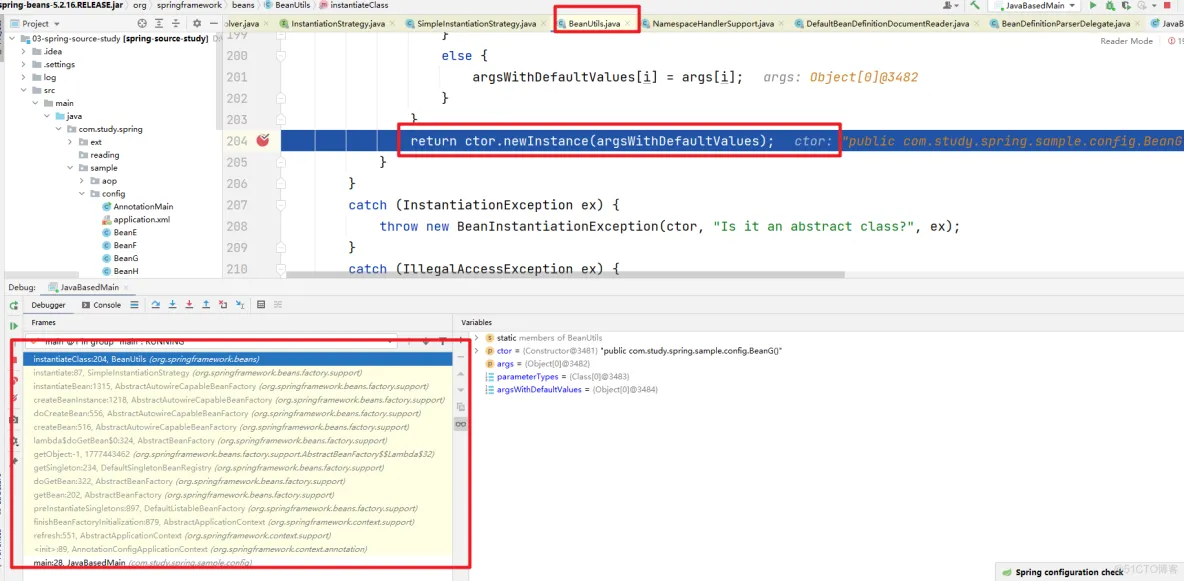
第七篇:Spring源码Bean的实例化_spring

  按照这种步骤一个个去分析就OK了。

三、单例对象

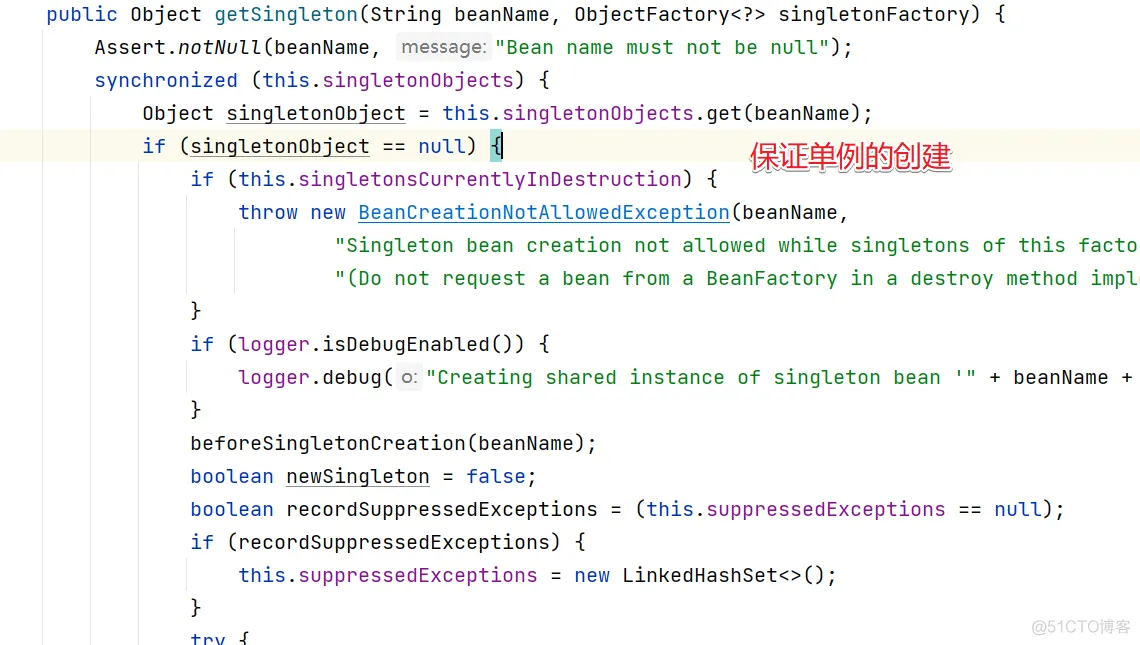
  在创建单例对象的时候是如何保存单例的特性的?这块我们需要注意下面的代码
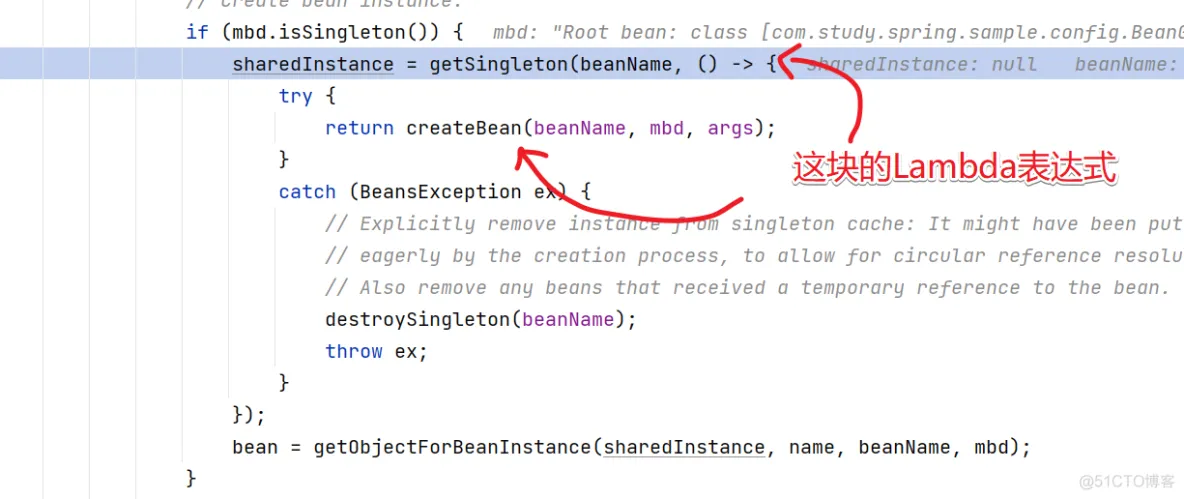
第七篇:Spring源码Bean的实例化_实例化_02

然后进入到getSingleton方法中。

第七篇:Spring源码Bean的实例化_spring_03

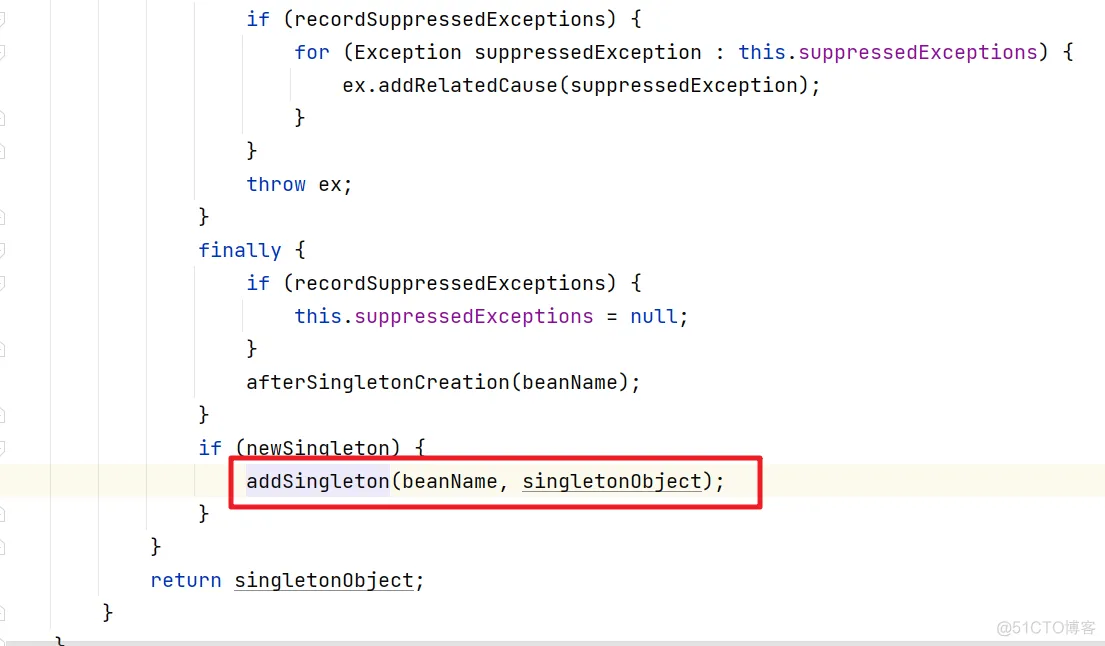
创建成功的单例对象会被缓存起来。在 addSingleton 方法中

第七篇:Spring源码Bean的实例化_缓存_04

第七篇:Spring源码Bean的实例化_spring_05

所以singletonObjects是缓存所有Bean实例的容器

第七篇:Spring源码Bean的实例化_实例化_06

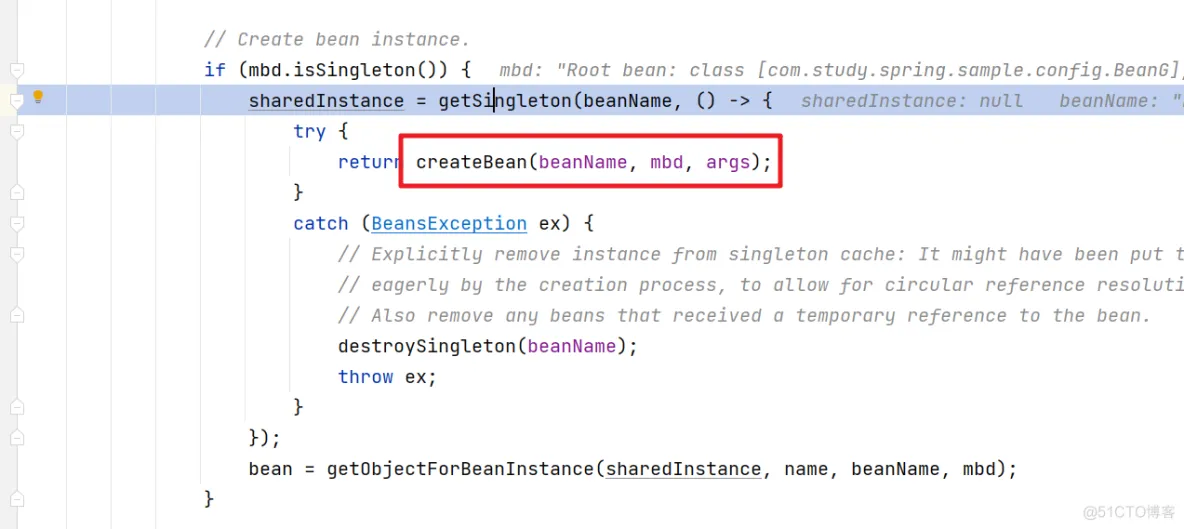
而具体创建单例Bean的逻辑会回调前面的Lambda表达式中的createBean方法
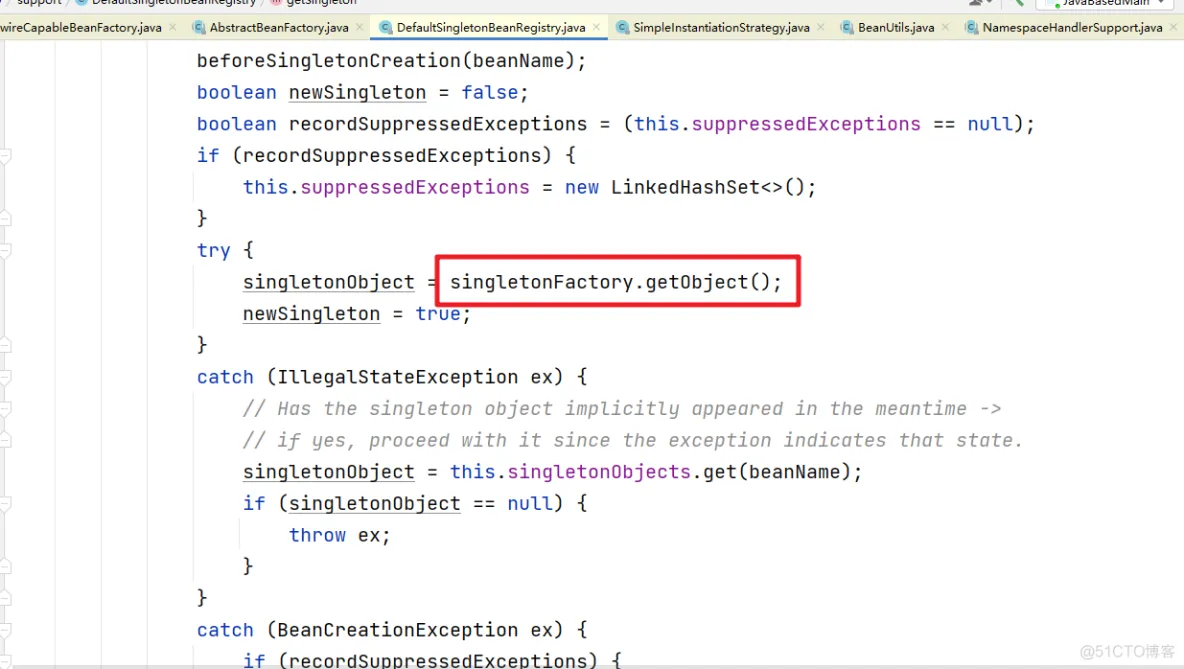
第七篇:Spring源码Bean的实例化_实例化_07

第七篇:Spring源码Bean的实例化_spring_08

四、单例对象的销毁

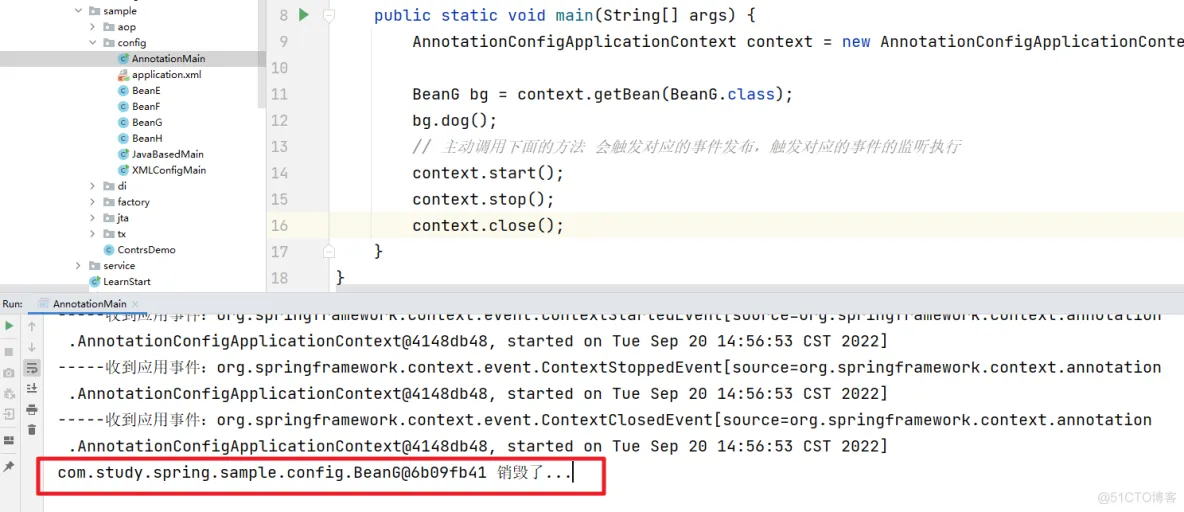
  然后我们先来看下一个单例Bean对象的销毁过程。定义一个案例
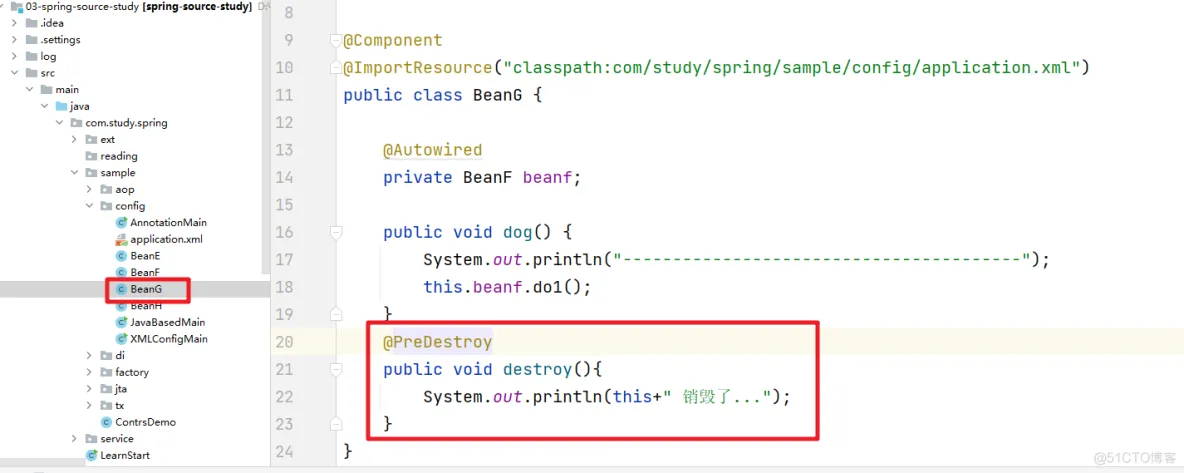
第七篇:Spring源码Bean的实例化_java_09

然后我们在测试的案例中显示的调用 close方法

第七篇:Spring源码Bean的实例化_缓存_10

执行的时候可以看到相关的日志执行了。

第七篇:Spring源码Bean的实例化_java_11

进入到close方法中分析,比较核心的有两个位置。在doClose方法中。
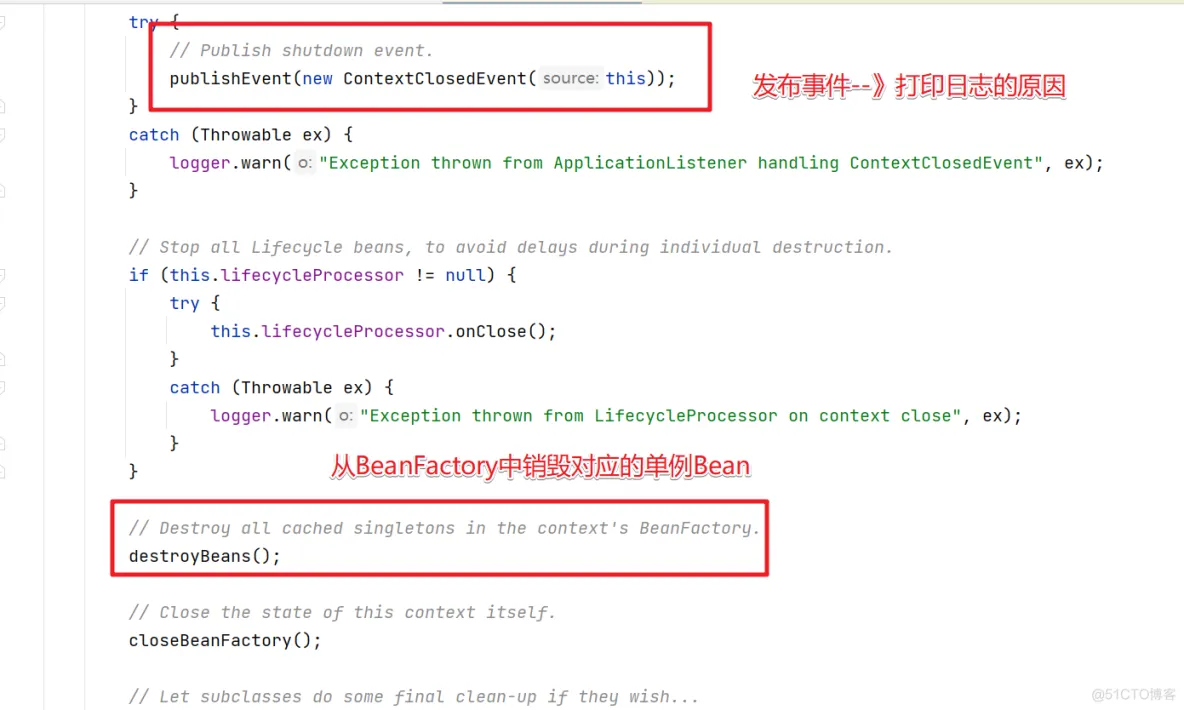
第七篇:Spring源码Bean的实例化_spring_12

具体销毁的代码进入destroyBeans()中查看即可。

在doClose方法中有个提示。registerShutdownHook方法
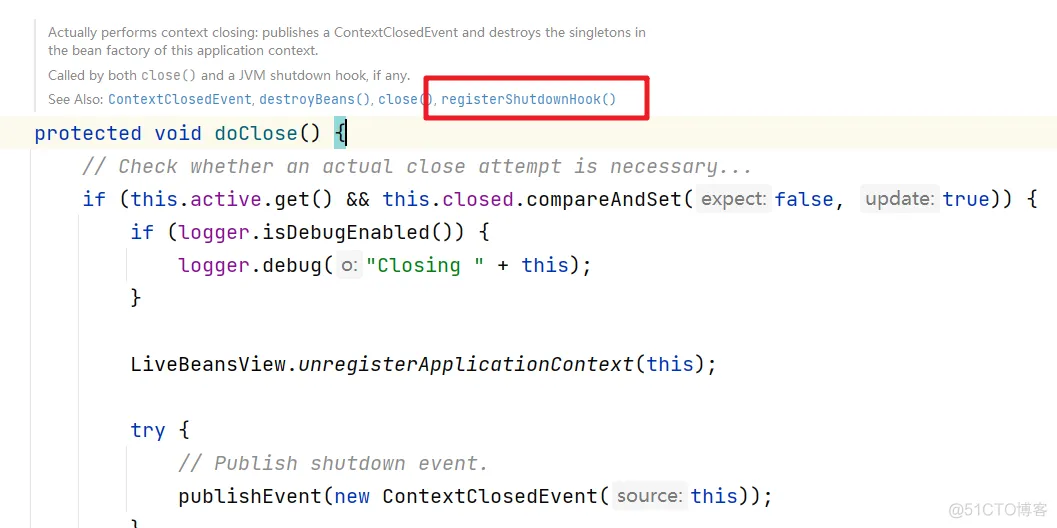
第七篇:Spring源码Bean的实例化_实例化_13

@Override
	public void registerShutdownHook() {
		if (this.shutdownHook == null) {
			// No shutdown hook registered yet.
			this.shutdownHook = new Thread(SHUTDOWN_HOOK_THREAD_NAME) {
				@Override
				public void run() {
					synchronized (startupShutdownMonitor) {
						doClose();
					}
				}
			};
			Runtime.getRuntime().addShutdownHook(this.shutdownHook);
		}
	}


对应的在web项目中就有对应的调用

第七篇:Spring源码Bean的实例化_spring_14

这个就是Bean实例化的过程了,当然在实例化中的DI问题我们在下篇文章中重点分析。

SpringSecurity中的权限管理

  SpringSecurity是一个权限管理框架,核心是认证和授权,前面已经系统的给大家介绍过了认证的实现和源码分析,本文重点来介绍下权限管理这块的原理。

一、权限管理的实现

  服务端的各种资源要被SpringSecurity的权限管理控制我们可以通过注解和标签两种方式来处理。
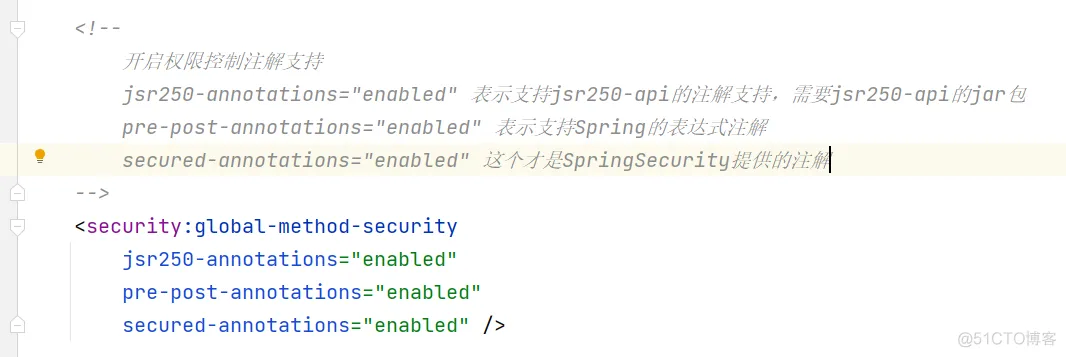
【第七篇】SpringSecurity中的权限管理原理_java

放开了相关的注解后我们在Controller中就可以使用相关的注解来控制了

/**
 * JSR250
 */
@Controller
@RequestMapping("/user")
public class UserController {

    @RolesAllowed(value = {"ROLE_ADMIN"})
    @RequestMapping("/query")
    public String query(){
        System.out.println("用户查询....");
        return "/home.jsp";
    }
    @RolesAllowed(value = {"ROLE_USER"})
    @RequestMapping("/save")
    public String save(){
        System.out.println("用户添加....");
        return "/home.jsp";
    }

    @RequestMapping("/update")
    public String update(){
        System.out.println("用户更新....");
        return "/home.jsp";
    }
}
 
 
/**
 * Spring表达式
 */
@Controller
@RequestMapping("/order")
public class OrderController {

    @PreAuthorize(value = "hasAnyRole('ROLE_USER')")
    @RequestMapping("/query")
    public String query(){
        System.out.println("用户查询....");
        return "/home.jsp";
    }
    @PreAuthorize(value = "hasAnyRole('ROLE_ADMIN')")
    @RequestMapping("/save")
    public String save(){
        System.out.println("用户添加....");
        return "/home.jsp";
    }

    @RequestMapping("/update")
    public String update(){
        System.out.println("用户更新....");
        return "/home.jsp";
    }
}
 
 
@Controller
@RequestMapping("/role")
public class RoleController {

    @Secured(value = "ROLE_USER")
    @RequestMapping("/query")
    public String query(){
        System.out.println("用户查询....");
        return "/home.jsp";
    }

    @Secured("ROLE_ADMIN")
    @RequestMapping("/save")
    public String save(){
        System.out.println("用户添加....");
        return "/home.jsp";
    }

    @RequestMapping("/update")
    public String update(){
        System.out.println("用户更新....");
        return "/home.jsp";
    }
}


然后在页面模板文件中我们可以通过taglib来实现权限更细粒度的控制

<%@ page contentType="text/html;charset=UTF-8" language="java" %>
<%@ taglib prefix="security" uri="http://www.springframework.org/security/tags" %>
<html>
<head>
    <title>Title</title>
</head>
<body>
    <h1>HOME页面</h1>
<security:authentication property="principal.username" />
<security:authorize access="hasAnyRole('ROLE_USER')" >
    <a href="#">用户查询</a><br>
</security:authorize>
    <security:authorize access="hasAnyRole('ROLE_ADMIN')" >
        <a href="#">用户添加</a><br>
    </security:authorize>
</body>
</html>


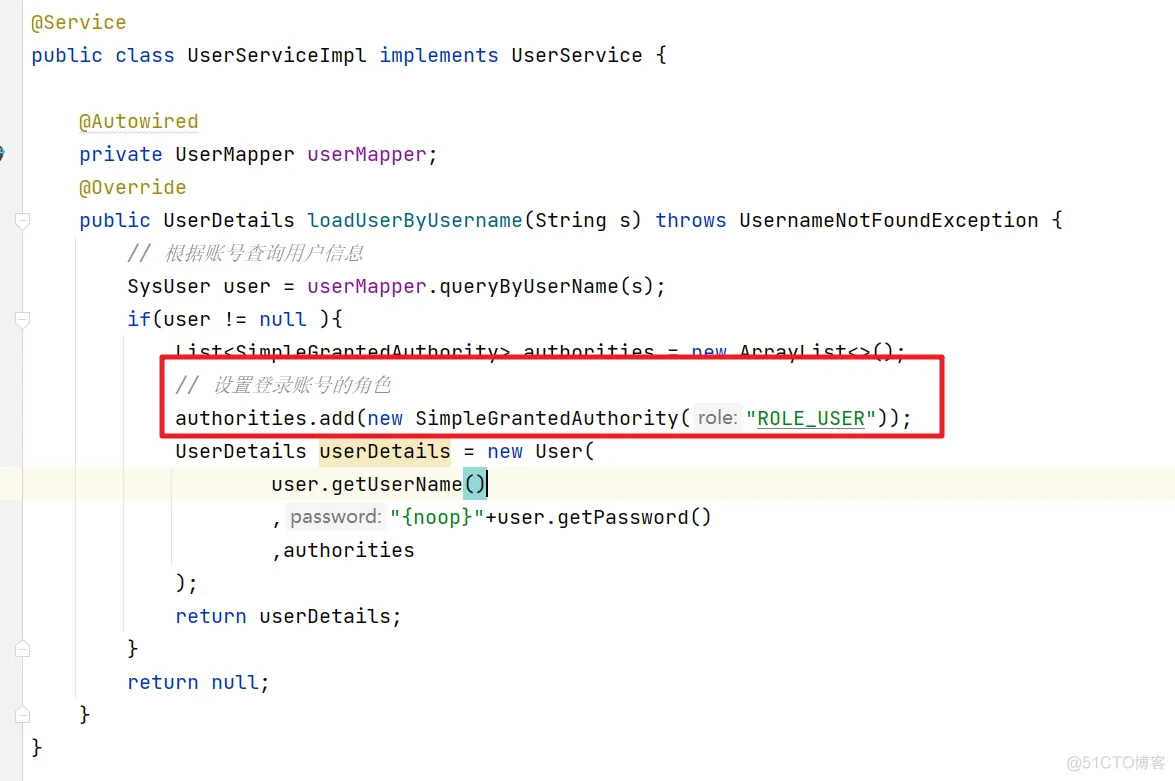
然后我们在做用户认证的时候会绑定当前用户的角色和权限数据

【第七篇】SpringSecurity中的权限管理原理_java_02

二、权限校验的原理

  接下来我们看看在用户提交请求后SpringSecurity是如何对用户的请求资源做出权限校验的。首先我们要回顾下SpringSecurity处理请求的过滤器链。如下:
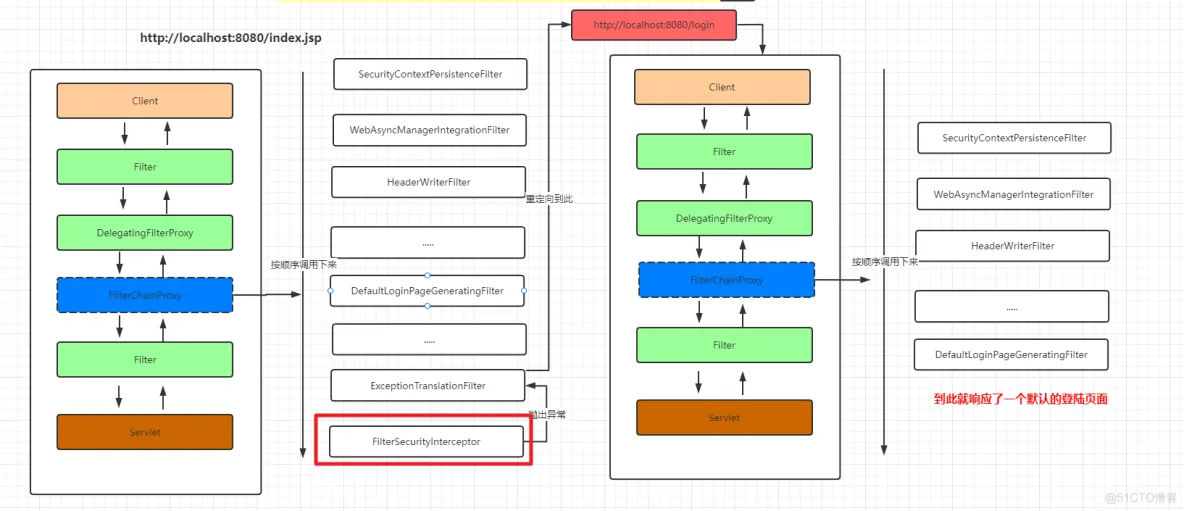
【第七篇】SpringSecurity中的权限管理原理_java_03

  通过前面介绍我们请求,当一个请求到来的时候会经过上面的过滤器来一个个来处理对应的请求,最后在FilterSecurityInterceptor中做认证和权限的校验操作,

1.FilterSecurityInterceptor

  我们进入FilterSecurityInterceptor中找到对应的doFilter方法

public void doFilter(ServletRequest request, ServletResponse response,
			FilterChain chain) throws IOException, ServletException {
		// 把 request response 以及对应的 FilterChain 封装为了一个FilterInvocation对象
		FilterInvocation fi = new FilterInvocation(request, response, chain);
		invoke(fi); // 然后执行invoke方法
	}


  首先看看FilterInvocation的构造方法,我们可以看到FilterInvocation其实就是对Request,Response和FilterChain做了一个非空的校验。

public FilterInvocation(ServletRequest request, ServletResponse response,
			FilterChain chain) {
		// 如果有一个为空就抛出异常
		if ((request == null) || (response == null) || (chain == null)) {
			throw new IllegalArgumentException("Cannot pass null values to constructor");
		}

		this.request = (HttpServletRequest) request;
		this.response = (HttpServletResponse) response;
		this.chain = chain;
	}


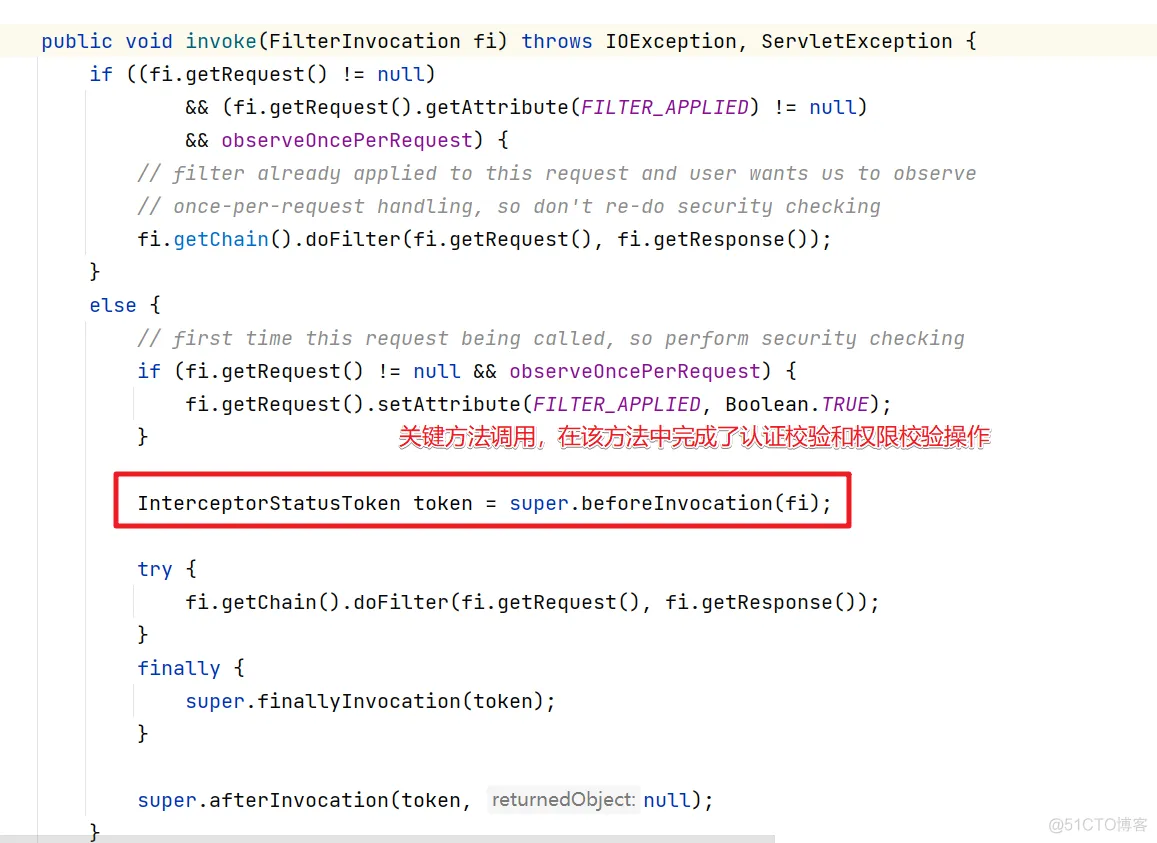
  然后进入到invoke方法中。

【第七篇】SpringSecurity中的权限管理原理_java_04

  所以关键我们需要进入到beforeInvocation方法中

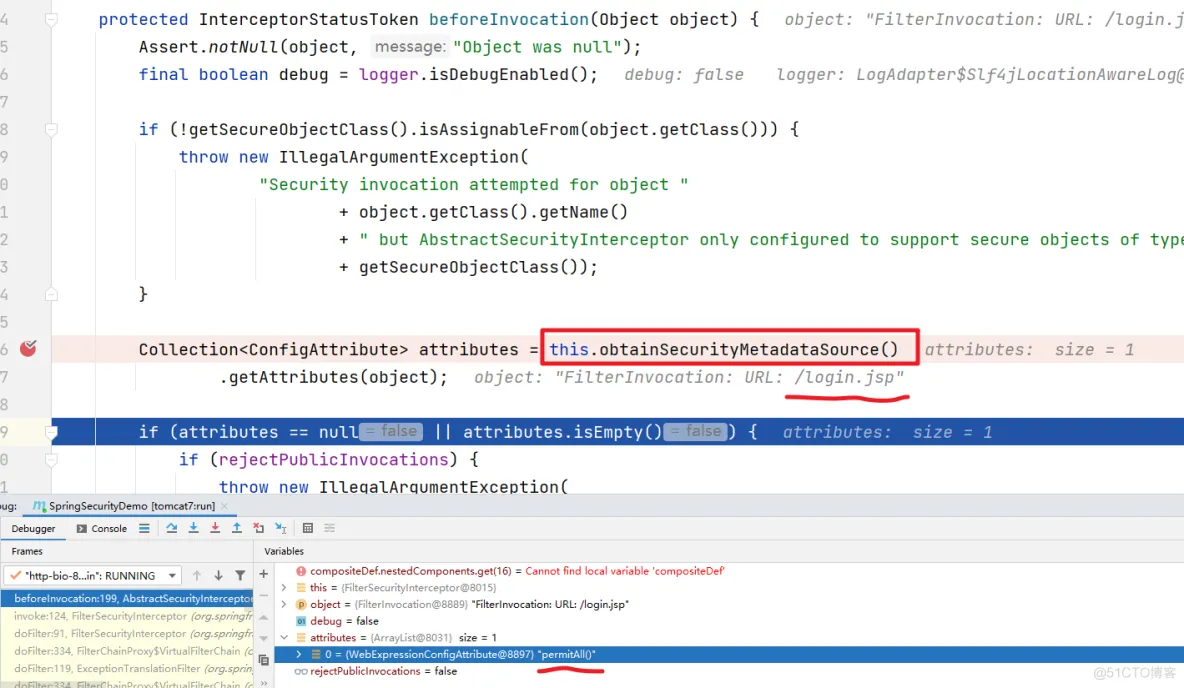
【第七篇】SpringSecurity中的权限管理原理_java_05

  首先是obtainSecurityMetadataSource()方法,该方法的作用是根据当前的请求获取对应的需要具备的权限信息,比如访问/login.jsp需要的信息是 permitAll 也就是可以匿名访问。
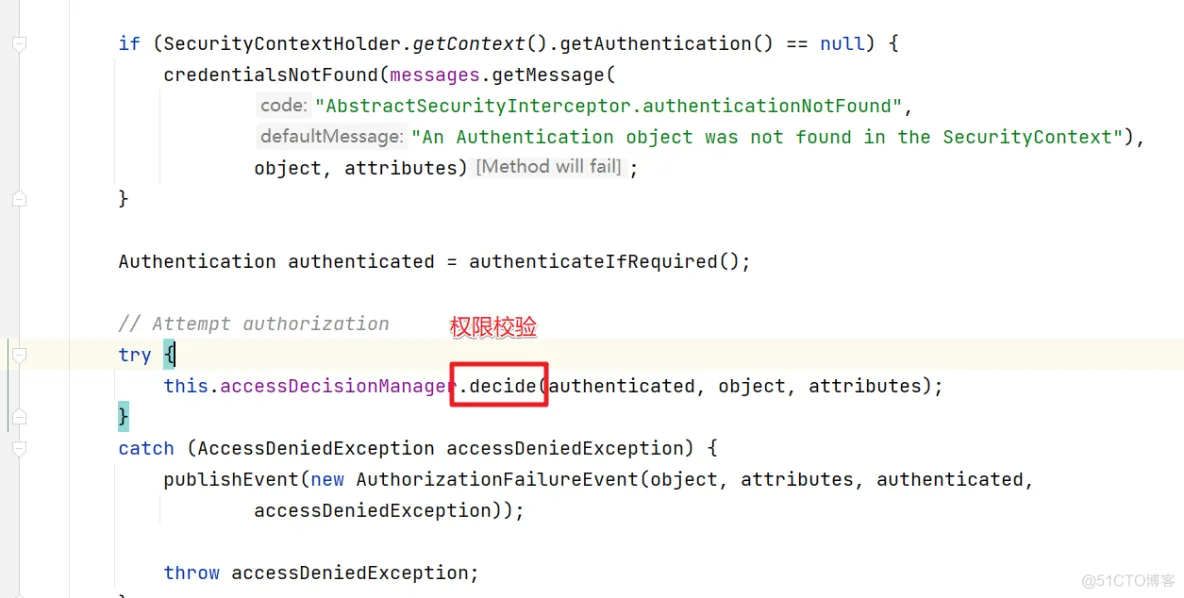
【第七篇】SpringSecurity中的权限管理原理_sed_06

  然后就是decide()方法,该方法中会完成权限的校验。这里会通过AccessDecisionManager来处理。

2.AccessDescisionManager

  AccessDescisionManager字面含义是决策管理器。源码中的描述是
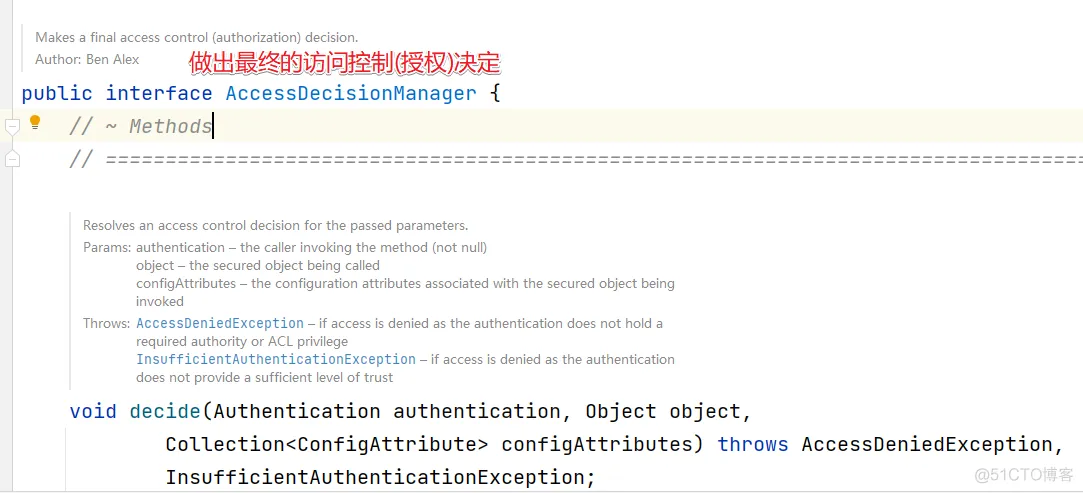
【第七篇】SpringSecurity中的权限管理原理_java_07

  AccessDescisionManager有三个默认的实现

【第七篇】SpringSecurity中的权限管理原理_jvm_08

2.1 AffirmativeBased

  在SpringSecurity中默认的权限决策对象就是AffirmativeBased。AffirmativeBased的作用是在众多的投票者中只要有一个返回肯定的结果,就会授予访问权限。具体的决策逻辑如下:

public void decide(Authentication authentication, Object object,
			Collection<ConfigAttribute> configAttributes) throws AccessDeniedException {
		int deny = 0; // 否决的票数
		// getDecisionVoters() 获取所有的投票器
		for (AccessDecisionVoter voter : getDecisionVoters()) {
			// 投票处理
			int result = voter.vote(authentication, object, configAttributes);

			if (logger.isDebugEnabled()) {
				logger.debug("Voter: " + voter + ", returned: " + result);
			}

			switch (result) {
			case AccessDecisionVoter.ACCESS_GRANTED:
				return; // 如果投票器做出了 同意的操作,那么整个方法就结束了

			case AccessDecisionVoter.ACCESS_DENIED:
				deny++;

				break;

			default:
				break;
			}
		}

		if (deny > 0) { // 如果deny > 0 说明没有投票器投赞成的,有投了否决的 则抛出异常
			throw new AccessDeniedException(messages.getMessage(
					"AbstractAccessDecisionManager.accessDenied", "Access is denied"));
		}
		// 执行到这儿说明 deny = 0 说明都投了弃权 票   然后检查是否支持都弃权
		// To get this far, every AccessDecisionVoter abstained
		checkAllowIfAllAbstainDecisions();
	}


2.2 ConsensusBased

  ConsensusBased则是基于少数服从多数的方案来实现授权的决策方案。具体看看代码就非常清楚了

public void decide(Authentication authentication, Object object,
			Collection<ConfigAttribute> configAttributes) throws AccessDeniedException {
		int grant = 0; // 同意
		int deny = 0;  // 否决

		for (AccessDecisionVoter voter : getDecisionVoters()) {
			int result = voter.vote(authentication, object, configAttributes);

			if (logger.isDebugEnabled()) {
				logger.debug("Voter: " + voter + ", returned: " + result);
			}

			switch (result) {
			case AccessDecisionVoter.ACCESS_GRANTED:
				grant++; // 同意的 grant + 1

				break;

			case AccessDecisionVoter.ACCESS_DENIED:
				deny++; // 否决的 deny + 1

				break;

			default:
				break;
			}
		}

		if (grant > deny) {
			return; // 如果 同意的多与 否决的就放过
		}

		if (deny > grant) { // 如果否决的占多数 就拒绝访问
			throw new AccessDeniedException(messages.getMessage(
					"AbstractAccessDecisionManager.accessDenied", "Access is denied"));
		}

		if ((grant == deny) && (grant != 0)) { // 如果同意的和拒绝的票数一样 继续判断
			if (this.allowIfEqualGrantedDeniedDecisions) {
				return; // 如果支持票数相同就放过
			}
			else { // 否则就抛出异常 拒绝
				throw new AccessDeniedException(messages.getMessage(
						"AbstractAccessDecisionManager.accessDenied", "Access is denied"));
			}
		}
		// 所有都投了弃权票的情况
		// To get this far, every AccessDecisionVoter abstained
		checkAllowIfAllAbstainDecisions();
	}


  上面代码的逻辑还是非常简单的,只需要注意下授予权限和否决权限相等时的逻辑就可以了。决策器也考虑到了这一点,所以提供了 allowIfEqualGrantedDeniedDecisions 参数,用于给用户提供自定义的机会,其默认值为 true,即代表允许授予权限和拒绝权限相等,且同时也代表授予访问权限。

2.3 UnanimousBased

  UnanimousBased是最严格的决策器,要求所有的AccessDecisionVoter都授权,才代表授予资源权限,否则就拒绝。具体来看下逻辑代码:

public void decide(Authentication authentication, Object object,
			Collection<ConfigAttribute> attributes) throws AccessDeniedException {

		int grant = 0; // 赞成的计票器

		List<ConfigAttribute> singleAttributeList = new ArrayList<>(1);
		singleAttributeList.add(null);

		for (ConfigAttribute attribute : attributes) {
			singleAttributeList.set(0, attribute);

			for (AccessDecisionVoter voter : getDecisionVoters()) {
				int result = voter.vote(authentication, object, singleAttributeList);

				if (logger.isDebugEnabled()) {
					logger.debug("Voter: " + voter + ", returned: " + result);
				}

				switch (result) {
				case AccessDecisionVoter.ACCESS_GRANTED:
					grant++;

					break;

				case AccessDecisionVoter.ACCESS_DENIED: // 只要有一个拒绝 就 否决授权 抛出异常
					throw new AccessDeniedException(messages.getMessage(
							"AbstractAccessDecisionManager.accessDenied",
							"Access is denied"));

				default:
					break;
				}
			}
		}
		// 执行到这儿说明没有投 否决的, grant>0 说明有投 同意的
		// To get this far, there were no deny votes
		if (grant > 0) {
			return;
		}
		// 说明都投了 弃权票
		// To get this far, every AccessDecisionVoter abstained
		checkAllowIfAllAbstainDecisions();
	}


  上面看了在SpringSecurity中的各种决策器外我们可以再来看看各种投票器AccessDecisionVoter

3.AccessDecisionVoter

  AccessDecisionVoter是一个投票器,负责对授权决策进行表决。表决的结构最终由AccessDecisionManager统计,并做出最终的决策。

public interface AccessDecisionVoter<S> {

	int ACCESS_GRANTED = 1; // 赞成

	int ACCESS_ABSTAIN = 0; // 弃权

	int ACCESS_DENIED = -1;  // 否决

	boolean supports(ConfigAttribute attribute);

	boolean supports(Class<?> clazz);

	int vote(Authentication authentication, S object, Collection<ConfigAttribute> attributes);

}


  AccessDecisionVoter的具体实现有

【第七篇】SpringSecurity中的权限管理原理_spring_09

  然后我们来看看常见的几种投票器

3.1 WebExpressionVoter

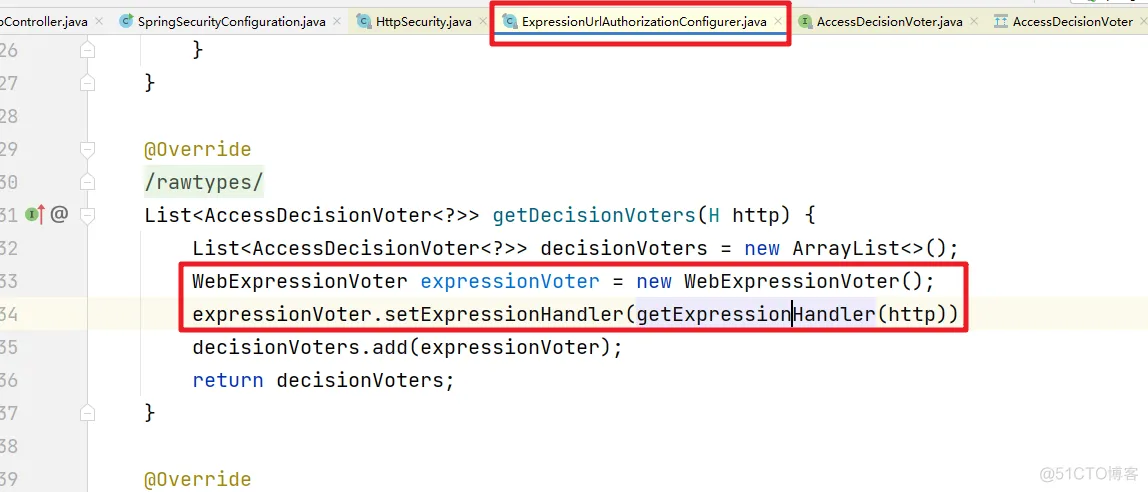
  最常用的,也是SpringSecurity中默认的 FilterSecurityInterceptor实例中 AccessDecisionManager默认的投票器,它其实就是 http.authorizeRequests()基于 Spring-EL进行控制权限的授权决策类。
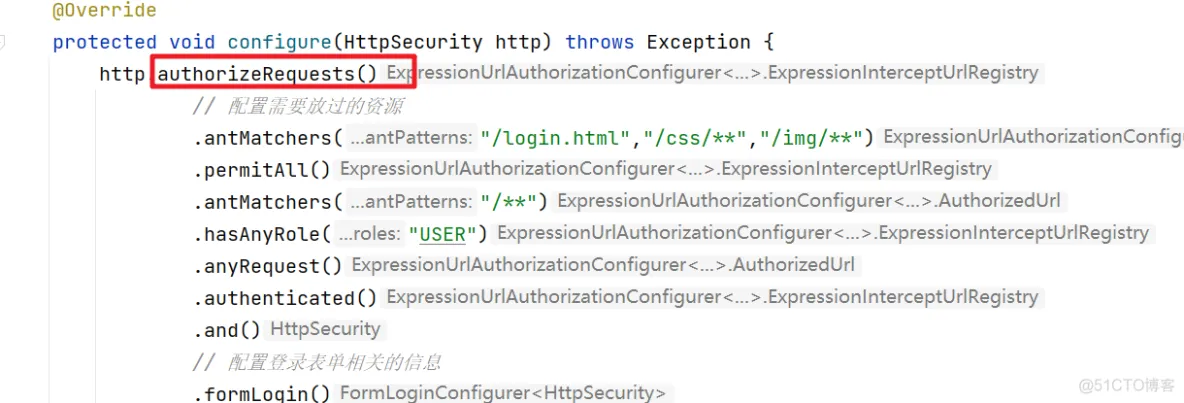
【第七篇】SpringSecurity中的权限管理原理_spring_10

进入authorizeRequests()方法

【第七篇】SpringSecurity中的权限管理原理_spring_11

而对应的ExpressionHandler其实就是对SPEL表达式做相关的解析处理

3.2 AuthenticatedVoter

  AuthenticatedVoter针对的是ConfigAttribute#getAttribute() 中配置为 IS_AUTHENTICATED_FULLY 、IS_AUTHENTICATED_REMEMBERED、IS_AUTHENTICATED_ANONYMOUSLY 权限标识时的授权决策。因此,其投票策略比较简单:

@Override
	public int vote(Authentication authentication, Object object, Collection<ConfigAttribute> attributes) {
		int result = ACCESS_ABSTAIN; // 默认 弃权 0
		for (ConfigAttribute attribute : attributes) {
			if (this.supports(attribute)) {
				result = ACCESS_DENIED; // 拒绝
				if (IS_AUTHENTICATED_FULLY.equals(attribute.getAttribute())) {
					if (isFullyAuthenticated(authentication)) {
						return ACCESS_GRANTED; // 认证状态直接放过
					}
				}
				if (IS_AUTHENTICATED_REMEMBERED.equals(attribute.getAttribute())) {
					if (this.authenticationTrustResolver.isRememberMe(authentication)
							|| isFullyAuthenticated(authentication)) {
						return ACCESS_GRANTED; // 记住我的状态 放过
					}
				}
				if (IS_AUTHENTICATED_ANONYMOUSLY.equals(attribute.getAttribute())) {
					if (this.authenticationTrustResolver.isAnonymous(authentication)
							|| isFullyAuthenticated(authentication)
							|| this.authenticationTrustResolver.isRememberMe(authentication)) {
						return ACCESS_GRANTED; // 可匿名访问 放过
					}
				}
			}
		}
		return result;
	}


3.3 PreInvocationAuthorizationAdviceVoter

  用于处理基于注解 @PreFilter 和 @PreAuthorize 生成的 PreInvocationAuthorizationAdvice,来处理授权决策的实现.
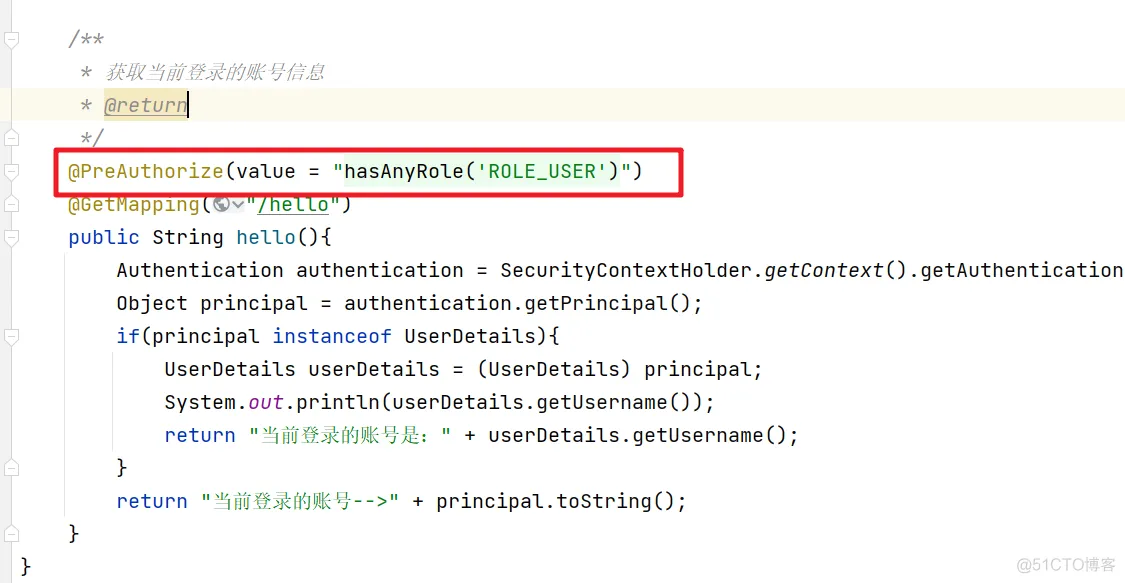
【第七篇】SpringSecurity中的权限管理原理_System_12

具体是投票逻辑

@Override
	public int vote(Authentication authentication, MethodInvocation method, Collection<ConfigAttribute> attributes) {
		// Find prefilter and preauth (or combined) attributes
		// if both null, abstain else call advice with them
		PreInvocationAttribute preAttr = findPreInvocationAttribute(attributes);
		if (preAttr == null) {
			// No expression based metadata, so abstain
			return ACCESS_ABSTAIN;
		}
		return this.preAdvice.before(authentication, method, preAttr) ? ACCESS_GRANTED : ACCESS_DENIED;
	}


3.4 RoleVoter

  角色投票器。用于 ConfigAttribute#getAttribute() 中配置为角色的授权决策。其默认前缀为 ROLE_,可以自定义,也可以设置为空,直接使用角色标识进行判断。这就意味着,任何属性都可以使用该投票器投票,也就偏离了该投票器的本意,是不可取的。

@Override
	public int vote(Authentication authentication, Object object, Collection<ConfigAttribute> attributes) {
		if (authentication == null) {
			return ACCESS_DENIED;
		}
		int result = ACCESS_ABSTAIN;
		Collection<? extends GrantedAuthority> authorities = extractAuthorities(authentication);
		for (ConfigAttribute attribute : attributes) {
			if (this.supports(attribute)) {
				result = ACCESS_DENIED;
				// Attempt to find a matching granted authority
				for (GrantedAuthority authority : authorities) {
					if (attribute.getAttribute().equals(authority.getAuthority())) {
						return ACCESS_GRANTED;
					}
				}
			}
		}
		return result;
	}


注意,决策策略比较简单,用户只需拥有任一当前请求需要的角色即可,不必全部拥有 。

3.5 RoleHierarchyVoter

  基于 RoleVoter,唯一的不同就是该投票器中的角色是附带上下级关系的。也就是说,角色A包含角色B,角色B包含 角色C,此时,如果用户拥有角色A,那么理论上可以同时拥有角色B、角色C的全部资源访问权限.

@Override
	Collection<? extends GrantedAuthority> extractAuthorities(Authentication authentication) {
		return this.roleHierarchy.getReachableGrantedAuthorities(authentication.getAuthorities());
	}

SpringSecurity核心过滤器-SecurityContextPersistenceFilter

一、SpringSecurity中的核心组件

  在SpringSecurity中的jar分为4个,作用分别为

jar

作用

spring-security-core

SpringSecurity的核心jar包,认证和授权的核心代码都在这里面

spring-security-config

如果使用Spring Security XML名称空间进行配置或Spring Security的<br />Java configuration支持,则需要它

spring-security-web

用于Spring Security web身份验证服务和基于url的访问控制

spring-security-test

测试单元

1.SecurityContextHolder

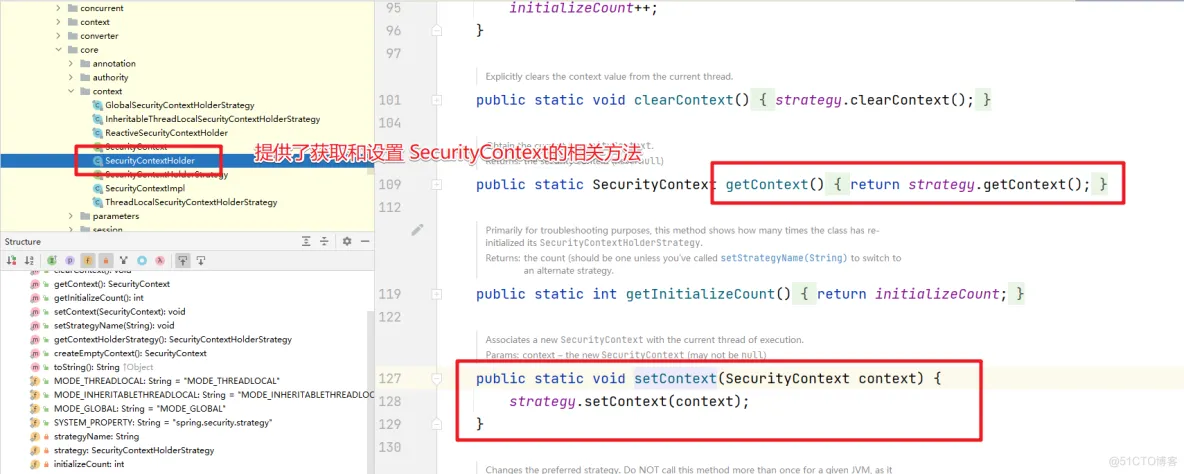
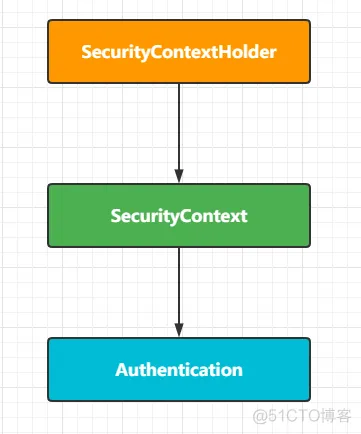
  首先来看看在spring-security-core中的SecurityContextHolder,这个是一个非常基础的对象,存储了当前应用的上下文SecurityContext,而在SecurityContext可以获取Authentication对象。也就是当前认证的相关信息会存储在Authentication对象中。

【第九篇】SpringSecurity核心过滤器-SecurityContextPersistenceFilter_开发语言_02

  默认情况下,SecurityContextHolder是通过 ThreadLocal来存储对应的信息的。也就是在一个线程中我们可以通过这种方式来获取当前登录的用户的相关信息。而在SecurityContext中就只提供了对Authentication对象操作的方法

public interface SecurityContext extends Serializable {

	Authentication getAuthentication();

	void setAuthentication(Authentication authentication);

}


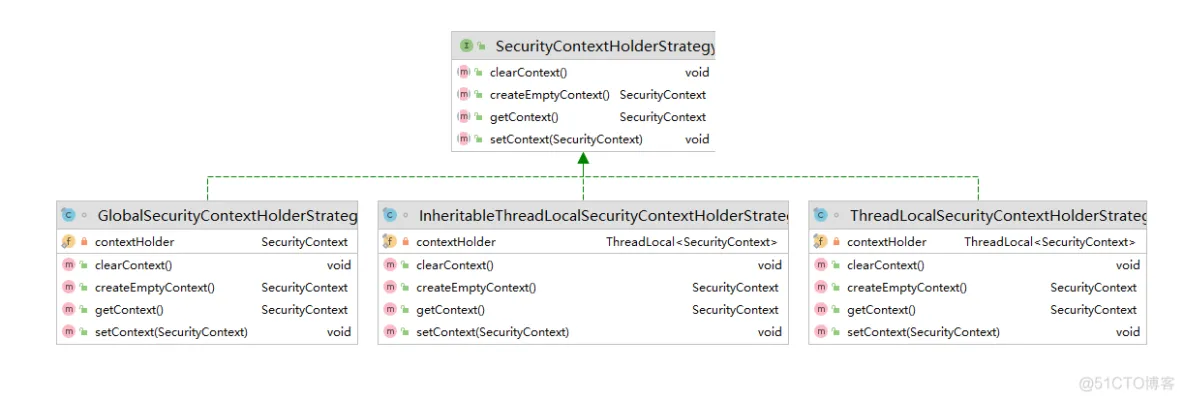
xxxStrategy的各种实现

【第九篇】SpringSecurity核心过滤器-SecurityContextPersistenceFilter_ci_03

策略实现

说明

GlobalSecurityContextHolderStrategy

把SecurityContext存储为static变量

InheritableThreadLocalSecurityContextStrategy

把SecurityContext存储在InheritableThreadLocal中<br />InheritableThreadLocal解决父线程生成的变量传递到子线程中进行使用

ThreadLocalSecurityContextStrategy

把SecurityContext存储在ThreadLocal中

2.Authentication

  Authentication是一个认证对象。在Authentication接口中声明了如下的相关方法。

public interface Authentication extends Principal, Serializable {

	// 获取认证用户拥有的对应的权限
	Collection<? extends GrantedAuthority> getAuthorities();

	// 获取哦凭证
	Object getCredentials();

    // 存储有关身份验证请求的其他详细信息。这些可能是 IP地址、证书编号等
	Object getDetails();

     // 获取用户信息 通常是 UserDetails 对象
	Object getPrincipal();

    // 是否认证
	boolean isAuthenticated();

    // 设置认证状态
	void setAuthenticated(boolean isAuthenticated) throws IllegalArgumentException;

}


【第九篇】SpringSecurity核心过滤器-SecurityContextPersistenceFilter_开发语言_04

  基于上面讲解的三者的关系我们在项目中如此来获取当前登录的用户信息了。

public String hello(){
        Authentication authentication = SecurityContextHolder.getContext().getAuthentication();
        Object principal = authentication.getPrincipal();
        if(principal instanceof UserDetails){
            UserDetails userDetails = (UserDetails) principal;
            System.out.println(userDetails.getUsername());
            return "当前登录的账号是:" + userDetails.getUsername();
        }
        return "当前登录的账号-->" + principal.toString();
    }


  调用 getContext()返回的对象是 SecurityContext接口的一个实例,这个对象就是保存在线程中的。接下来将看到,Spring Security中的认证大都返回一个 UserDetails的实例作为principa。

3.UserDetailsService

  在上面的关系中我们看到在Authentication中存储当前登录用户的是Principal对象,而通常情况下Principal对象可以转换为UserDetails对象。UserDetails是Spring Security中的一个核心接口。它表示一个principal,但是是可扩展的、特定于应用的。可以认为 UserDetails是数据库中用户表记录和Spring Security在 SecurityContextHolder中所必须信息的适配器。

public interface UserDetails extends Serializable {

	// 对应的权限
	Collection<? extends GrantedAuthority> getAuthorities();

	// 密码
	String getPassword();

	// 账号
	String getUsername();

	// 账号是否过期
	boolean isAccountNonExpired();

	// 是否锁定
	boolean isAccountNonLocked();

	// 凭证是否过期
	boolean isCredentialsNonExpired();

	// 账号是否可用
	boolean isEnabled();

}


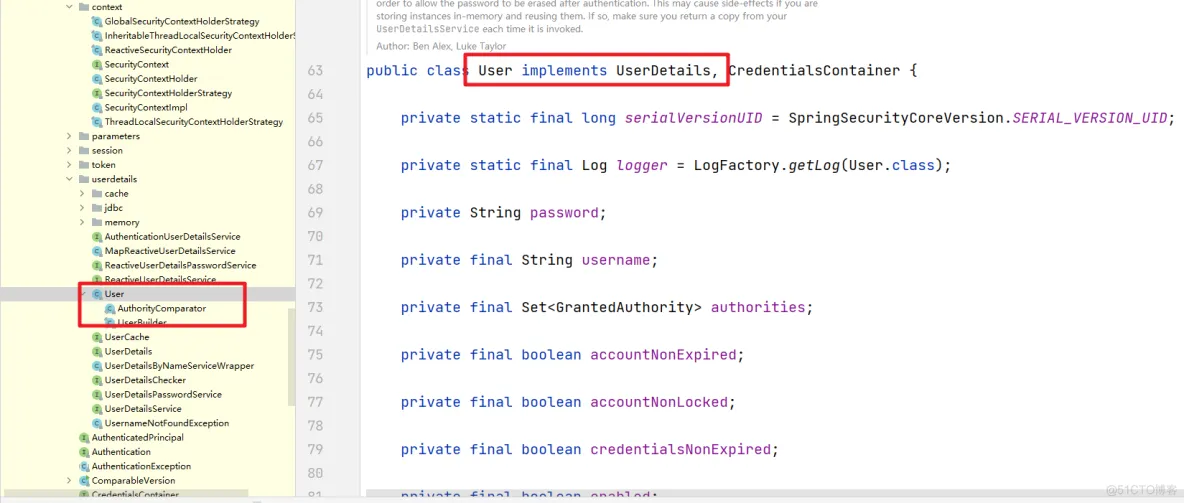
  而这个接口的默认实现就是 User

【第九篇】SpringSecurity核心过滤器-SecurityContextPersistenceFilter_开发语言_05

  那么这个UserDetails对象什么时候提供呢?其实在我们前面介绍的数据库认证的Service中我们就用到了,有一个特殊接口 UserDetailsService,在这个接口中定义了一个loadUserByUsername的方法,接收一个用户名,来实现根据账号的查询操作,返回的是一个 UserDetails对象。

public interface UserDetailsService {

	UserDetails loadUserByUsername(String username) throws UsernameNotFoundException;

}


  UserDetailsService接口的实现有如下:

【第九篇】SpringSecurity核心过滤器-SecurityContextPersistenceFilter_开发语言_06

  Spring Security提供了许多 UserDetailsSerivice接口的实现,包括使用内存中map的实现(InMemoryDaoImpl 低版本 InMemoryUserDetailsManager)和使用JDBC的实现(JdbcDaoImpl)。但在实际开发中我们更喜欢自己来编写,比如UserServiceImpl我们的案例

/**
 * 用户的Service
 */
public interface UserService extends UserDetailsService {

}

/**
 * UserService接口的实现类
 */
@Service
public class UserServiceImpl implements UserService {

    @Autowired
    UserMapper userMapper;

    /**
     * 根据账号密码验证的方法
     * @param username
     * @return
     * @throws UsernameNotFoundException
     */
    @Override
    public UserDetails loadUserByUsername(String username) throws UsernameNotFoundException {
        SysUser user = userMapper.queryByUserName(username);
        System.out.println("---------->"+user);
        if(user != null){
            // 账号对应的权限
            List<SimpleGrantedAuthority> authorities = new ArrayList<>();
            authorities.add(new SimpleGrantedAuthority("ROLE_USER"));
            // 说明账号存在 {noop} 非加密的使用
            UserDetails details = new User(user.getUserName()
                    ,user.getPassword()
                    ,true
                    ,true
                    ,true
                    ,true
                    ,authorities);
            return details;
        }
        throw new UsernameNotFoundException("账号不存在...");

    }
}


4.GrantedAuthority

  我们在Authentication中看到不光关联了Principal还提供了一个getAuthorities()方法来获取对应的GrantedAuthority对象数组。和权限相关,后面在权限模块详细讲解

public interface GrantedAuthority extends Serializable {


	String getAuthority();

}


上面介绍到的核心对象小结:

核心对象

作用

SecurityContextHolder

用于获取SecurityContext

SecurityContext

存放了Authentication和特定于请求的安全信息

Authentication

特定于Spring Security的principal

GrantedAuthority

对某个principal的应用范围内的授权许可

UserDetail

提供从应用程序的DAO或其他安全数据源构建Authentication对象所需的信息

UserDetailsService

接受String类型的用户名,创建并返回UserDetail

而这块和SpringSecurity的运行关联我们就需要来看看SecurityContextPersistenceFilter的作用了

二、SecurityContextPersistenceFilter

  首先在Session中维护一个用户的安全信息就是这个过滤器处理的。从request中获取session,从Session中取出已认证用户的信息保存在SecurityContext中,提高效率,避免每一次请求都要解析用户认证信息,方便接下来的filter直接获取当前的用户信息。

1.SecutiryContextRepository

  SecutiryContextRepository接口非常简单,定义了对SecurityContext的存储操作,在该接口中定义了如下的几个方法

public interface SecurityContextRepository {

	/**
	 * 获取SecurityContext对象
	 */
	SecurityContext loadContext(HttpRequestResponseHolder requestResponseHolder);

	/**
	 * 存储SecurityContext
	 */
	void saveContext(SecurityContext context, HttpServletRequest request, HttpServletResponse response);

	/**
	 * 判断是否存在SecurityContext对象
	 */
	boolean containsContext(HttpServletRequest request);

}


  默认的实现是HttpSessionSecurityContextRepository。也就是把SecurityContext存储在了HttpSession中。对应的抽象方法实现如下:

  先来看看loadContext方法

public SecurityContext loadContext(HttpRequestResponseHolder requestResponseHolder) {
        // 获取对有的Request和Response对象
		HttpServletRequest request = requestResponseHolder.getRequest();
		HttpServletResponse response = requestResponseHolder.getResponse();
		// 获取HttpSession对象
		HttpSession httpSession = request.getSession(false);
        // 从HttpSession中获取SecurityContext对象
		SecurityContext context = readSecurityContextFromSession(httpSession);
		if (context == null) {
			// 如果HttpSession中不存在SecurityContext对象就创建一个
			// SecurityContextHolder.createEmptyContext();
			// 默认是ThreadLocalSecurityContextHolderStrategy存储在本地线程中
			context = generateNewContext();
			if (this.logger.isTraceEnabled()) {
				this.logger.trace(LogMessage.format("Created %s", context));
			}
		}
		// 包装Request和Response对象
		SaveToSessionResponseWrapper wrappedResponse = new SaveToSessionResponseWrapper(response, request,
				httpSession != null, context);
		requestResponseHolder.setResponse(wrappedResponse);
		requestResponseHolder.setRequest(new SaveToSessionRequestWrapper(request, wrappedResponse));
		return context;
	}


  然后再来看看saveContext方法。

@Override
	public void saveContext(SecurityContext context, HttpServletRequest request, HttpServletResponse response) {
		SaveContextOnUpdateOrErrorResponseWrapper responseWrapper = WebUtils.getNativeResponse(response,
				SaveContextOnUpdateOrErrorResponseWrapper.class);
		Assert.state(responseWrapper != null, () -> "Cannot invoke saveContext on response " + response
				+ ". You must use the HttpRequestResponseHolder.response after invoking loadContext");

		responseWrapper.saveContext(context);
	}


继续进入

@Override
		protected void saveContext(SecurityContext context) {
			// 获取Authentication对象
			final Authentication authentication = context.getAuthentication();
			// 获取HttpSession对象
			HttpSession httpSession = this.request.getSession(false);
			// 
			String springSecurityContextKey = HttpSessionSecurityContextRepository.this.springSecurityContextKey;
			// See SEC-776
			if (authentication == null
					|| HttpSessionSecurityContextRepository.this.trustResolver.isAnonymous(authentication)) {
				if (httpSession != null && this.authBeforeExecution != null) {
					// SEC-1587 A non-anonymous context may still be in the session
					// SEC-1735 remove if the contextBeforeExecution was not anonymous
					httpSession.removeAttribute(springSecurityContextKey);
					this.isSaveContextInvoked = true;
				}
				if (this.logger.isDebugEnabled()) {
					if (authentication == null) {
						this.logger.debug("Did not store empty SecurityContext");
					}
					else {
						this.logger.debug("Did not store anonymous SecurityContext");
					}
				}
				return;
			}
			httpSession = (httpSession != null) ? httpSession : createNewSessionIfAllowed(context, authentication);
			// If HttpSession exists, store current SecurityContext but only if it has
			// actually changed in this thread (see SEC-37, SEC-1307, SEC-1528)
			if (httpSession != null) {
				// We may have a new session, so check also whether the context attribute
				// is set SEC-1561
				if (contextChanged(context) || httpSession.getAttribute(springSecurityContextKey) == null) {
					// HttpSession 中存储SecurityContext
					httpSession.setAttribute(springSecurityContextKey, context);
					this.isSaveContextInvoked = true;
					if (this.logger.isDebugEnabled()) {
						this.logger.debug(LogMessage.format("Stored %s to HttpSession [%s]", context, httpSession));
					}
				}
			}
		}


最后就是containsContext方法

@Override
	public boolean containsContext(HttpServletRequest request) {
		// 获取HttpSession
		HttpSession session = request.getSession(false);
		if (session == null) {
			return false;
		}
		// 从session中能获取就返回true否则false
		return session.getAttribute(this.springSecurityContextKey) != null;
	}


2.SecurityContextPersistenceFilter

  然后我们来看看SecurityContextPersistenceFilter的具体处理逻辑

private void doFilter(HttpServletRequest request, HttpServletResponse response, FilterChain chain)
			throws IOException, ServletException {
		// 同一个请求之处理一次
		if (request.getAttribute(FILTER_APPLIED) != null) {
			chain.doFilter(request, response);
			return;
		}
		// 更新状态
		request.setAttribute(FILTER_APPLIED, Boolean.TRUE);
		// 是否提前创建 HttpSession
		if (this.forceEagerSessionCreation) {
			// 创建HttpSession
			HttpSession session = request.getSession();
			if (this.logger.isDebugEnabled() && session.isNew()) {
				this.logger.debug(LogMessage.format("Created session %s eagerly", session.getId()));
			}
		}
		// 把Request和Response对象封装为HttpRequestResponseHolder对象
		HttpRequestResponseHolder holder = new HttpRequestResponseHolder(request, response);
		// 获取SecurityContext对象
		SecurityContext contextBeforeChainExecution = this.repo.loadContext(holder);
		try {
			// SecurityContextHolder绑定SecurityContext对象
			SecurityContextHolder.setContext(contextBeforeChainExecution);
			if (contextBeforeChainExecution.getAuthentication() == null) {
				logger.debug("Set SecurityContextHolder to empty SecurityContext");
			}
			else {
				if (this.logger.isDebugEnabled()) {
					this.logger
							.debug(LogMessage.format("Set SecurityContextHolder to %s", contextBeforeChainExecution));
				}
			}// 结束交给下一个过滤器处理
			chain.doFilter(holder.getRequest(), holder.getResponse());
		}
		finally {
			// 当其他过滤器都处理完成后
			SecurityContext contextAfterChainExecution = SecurityContextHolder.getContext();
			// 移除SecurityContextHolder中的Security
			SecurityContextHolder.clearContext();
			// 把
			this.repo.saveContext(contextAfterChainExecution, holder.getRequest(), holder.getResponse());
			// 存储Context在HttpSession中
			request.removeAttribute(FILTER_APPLIED);
			this.logger.debug("Cleared SecurityContextHolder to complete request");
		}
	}


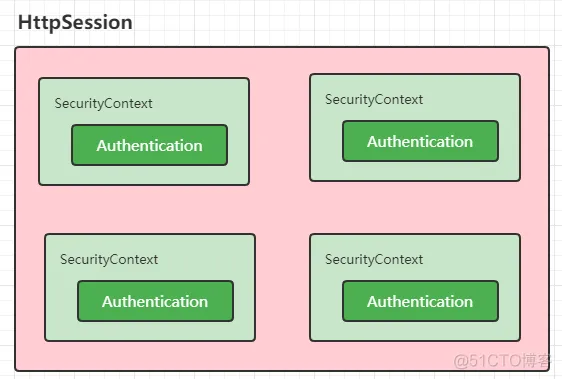
  通过上面的代码逻辑其实我们就清楚了在SpringSecurity中的认证信息的流转方式了。首先用户的认证状态Authentication是存储在SecurityContext中的,而每个用户的SecurityContext是统一存储在HttpSession中的。一次请求流转中我们需要获取当前的认证信息是通过SecurityContextHolder来获取的,默认是在ThreadLocal中存储的。

【第九篇】SpringSecurity核心过滤器-SecurityContextPersistenceFilter_ide_07

SpringSecurity基于JWT实现Token的处理

  前面介绍了手写单点登录和JWT的应用,本文结合SpringSecurity来介绍下在SpringBoot项目中基于SpringSecurity作为认证授权框架的情况下如何整合JWT来实现Token的处理。

一、认证思路分析

  SpringSecurity主要是通过过滤器来实现功能的!我们要找到SpringSecurity实现认证和校验身份的过滤器!

1.回顾集中式认证流程

用户认证
  使用 UsernamePasswordAuthenticationFilter过滤器中 attemptAuthentication方法实现认证功能,该过滤器父类中 successfulAuthentication方法实现认证成功后的操作。认证失败是在 unsuccessfulAuthentication

身份校验

  使用 BasicAuthenticationFilter过滤器中 doFilterInternal方法验证是否登录,以决定能否进入后续过滤器。

2.分析分布式认证流程

用户认证
  由于分布式项目,多数是前后端分离的架构设计,我们要满足可以接受异步post的认证请求参数,需要修改UsernamePasswordAuthenticationFilter过滤器中attemptAuthentication方法,让其能够接收请求体。
  另外,默认successfulAuthentication方法在认证通过后,是把用户信息直接放入session就完事了,现在我们需要修改这个方法,在认证通过后生成token并返回给用户。
身份校验
  原来BasicAuthenticationFilter过滤器中doFilterInternal方法校验用户是否登录,就是看session中是否有用户信息,我们要修改为,验证用户携带的token是否合法,并解析出用户信息,交给SpringSecurity,以便于后续的授权功能可以正常使用。

二、具体实现

1.创建项目

  创建一个SpringBoot项目.引入必要的依赖

<dependencies>
        <dependency>
            <groupId>org.springframework.boot</groupId>
            <artifactId>spring-boot-starter-security</artifactId>
        </dependency>
        <dependency>
            <groupId>org.springframework.boot</groupId>
            <artifactId>spring-boot-starter-web</artifactId>
        </dependency>

        <dependency>
            <groupId>org.projectlombok</groupId>
            <artifactId>lombok</artifactId>
            <optional>true</optional>
        </dependency>
        <dependency>
            <groupId>org.springframework.boot</groupId>
            <artifactId>spring-boot-starter-test</artifactId>
            <scope>test</scope>
        </dependency>
        <dependency>
            <groupId>org.springframework.security</groupId>
            <artifactId>spring-security-test</artifactId>
            <scope>test</scope>
        </dependency>
        <dependency>
            <groupId>com.bobo</groupId>
            <artifactId>security-jwt-common</artifactId>
            <version>1.0-SNAPSHOT</version>
        </dependency>
        <dependency>
            <groupId>com.alibaba</groupId>
            <artifactId>fastjson</artifactId>
            <version>1.2.80</version>
        </dependency>
	<dependency>
            <groupId>com.auth0</groupId>
            <artifactId>java-jwt</artifactId>
            <version>3.4.0</version>
        </dependency>
    </dependencies>


2.JWT工具类

  引入前面创建的JWT的工具类。

import com.auth0.jwt.JWT;
import com.auth0.jwt.JWTCreator;
import com.auth0.jwt.algorithms.Algorithm;
import com.auth0.jwt.exceptions.AlgorithmMismatchException;
import com.auth0.jwt.exceptions.SignatureVerificationException;
import com.auth0.jwt.interfaces.DecodedJWT;

import java.security.SignatureException;
import java.util.Calendar;
import java.util.Map;

public class JWTUtils {
    // 秘钥
    private static final String SING = "123qwaszx";

    /**
     * 生成Token  header.payload.sing 组成
     * @return
     */
    public static String getToken(Map<String,String> map){
        Calendar instance = Calendar.getInstance();
        instance.add(Calendar.DATE,7); // 默认过期时间 7天
        JWTCreator.Builder builder = JWT.create();
        // payload 设置
        map.forEach((k,v)->{
            builder.withClaim(k,v);
        });
        // 生成Token 并返回
        return builder.withExpiresAt(instance.getTime())
                .sign(Algorithm.HMAC256(SING));
    }

    /**
     * 验证Token
     * @return
     *     DecodedJWT  可以用来获取用户信息
     */
    public static DecodedJWT verify(String token){
        // 如果不抛出异常说明验证通过,否则验证失败
        DecodedJWT verify = null;
        try {
            verify = JWT.require(Algorithm.HMAC256(SING)).build().verify(token);
        }catch (SignatureVerificationException e){
            e.printStackTrace();
        }catch (AlgorithmMismatchException e){
            e.printStackTrace();
        }catch (Exception e){
            e.printStackTrace();
        }
        return verify;
    }
}


3.用户实例

  创建用户的实例,添加必要的属性

@Data
public class UserPojo implements UserDetails {

    private Integer id;

    private String username;

    private String password;

    private Integer status;


    @JsonIgnore
    @Override
    public Collection<? extends GrantedAuthority> getAuthorities() {
        List<SimpleGrantedAuthority> auth = new ArrayList<>();
        auth.add(new SimpleGrantedAuthority("ROLE_ADMIN"));
        return auth;
    }

    @Override
    public String getPassword() {
        return this.password;
    }

    @Override
    public String getUsername() {
        return this.username;
    }
    @JsonIgnore
    @Override
    public boolean isAccountNonExpired() {
        return true;
    }
    @JsonIgnore
    @Override
    public boolean isAccountNonLocked() {
        return true;
    }
    @JsonIgnore
    @Override
    public boolean isCredentialsNonExpired() {
        return true;
    }
    @JsonIgnore
    @Override
    public boolean isEnabled() {
        return true;
    }
}


4.UserService

  完成基于SpringSecurity的数据库认证。创建UserService接口并实现

public interface UserService extends UserDetailsService {
}

@Service
public class UserServiceImpl implements UserService {
    @Override
    public UserDetails loadUserByUsername(String username) throws UsernameNotFoundException {
        UserPojo userPojo = new UserPojo();
        if("zhang".equals(username)){
            userPojo.setUsername("zhang");
            userPojo.setPassword("$2a$10$hbMJRuxJoa6kWcfeT7cNPOGdoEXm5sdfSm5DQtp//2cmCF0MHO8b6");
            return userPojo;
        }
        return userPojo;
    }
}


5.自定义认证过滤器

  在SpringSecurity中的认证是通过UsernamePasswordAuthenticationFilter来处理的,现在我们要通过JWT来处理,那么我们就需要重写其中几个处理的方法

5.1 认证的方法

  认证的逻辑还是走的UserService处理,但是我们需要自己来手动的调用认证逻辑。

@Override
    public Authentication attemptAuthentication(HttpServletRequest request, HttpServletResponse response)
            throws AuthenticationException {

        UserPojo sysUser = null;
        try {
            sysUser = JSON.parseObject(getJson(request), UserPojo.class);
        } catch (IOException e) {
            e.printStackTrace();
        }
        UsernamePasswordAuthenticationToken authRequest = new UsernamePasswordAuthenticationToken(sysUser.getUsername(), sysUser.getPassword());
        this.setDetails(request, authRequest);
        return authenticationManager.authenticate(authRequest);
    }

    public String getJson(HttpServletRequest request) throws IOException{
        BufferedReader streamReader = new BufferedReader( new InputStreamReader(request.getInputStream(), "UTF-8"));
        StringBuilder sb = new StringBuilder();
        String inputStr;
        while ((inputStr = streamReader.readLine()) != null) {
            sb.append(inputStr);
        }
        return sb.toString();
    }


5.2 认证成功

  认证成功生成Token信息,并保存在响应的header头中。

@Override
    protected void successfulAuthentication(HttpServletRequest request
            , HttpServletResponse response
            , FilterChain chain
            , Authentication authResult) throws IOException, ServletException {
        // 生成Token信息
        Map<String,String> map = new HashMap<>();
        map.put("username",authResult.getName());
        Collection<? extends GrantedAuthority> authorities = authResult.getAuthorities();
        List<String> list = new ArrayList<>();
        for (GrantedAuthority authority : authorities) {
            list.add(authority.getAuthority());
        }
        map.put("roles", JSON.toJSONString(list));
        String token = JWTUtils.getToken(map);
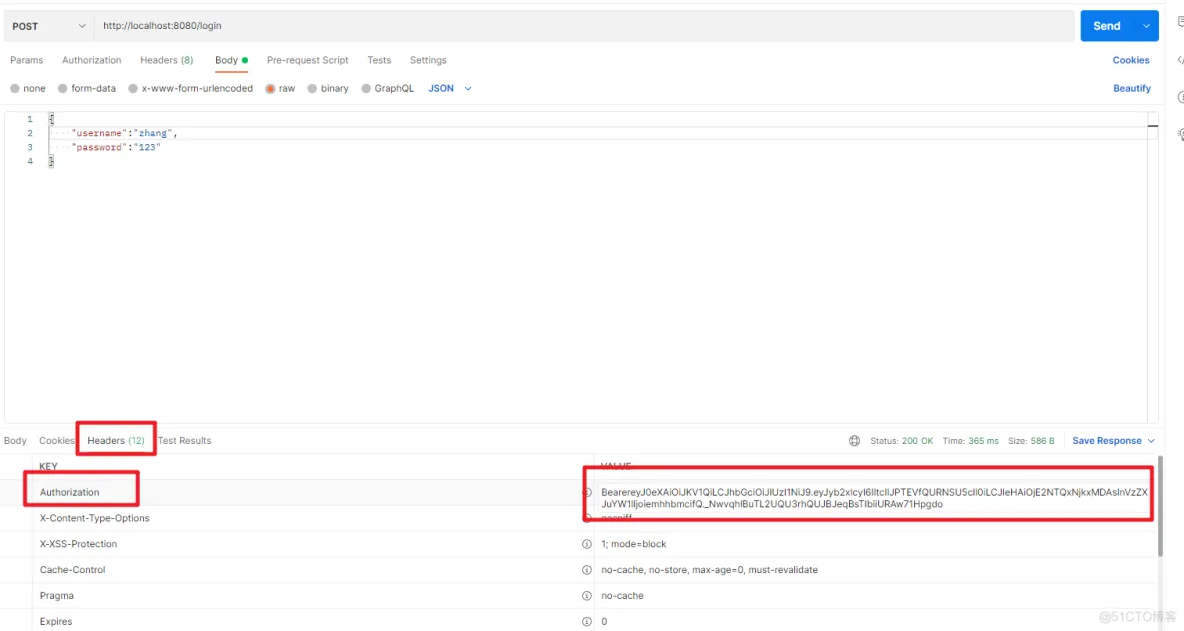
        response.addHeader("Authorization","Bearer"+token);
        try {
            response.setContentType("application/json;charset=utf-8");
            response.setStatus(HttpServletResponse.SC_OK);
            PrintWriter out = response.getWriter();
            Map<String,Object> resultMap = new HashMap();
            resultMap.put("code", HttpServletResponse.SC_OK);
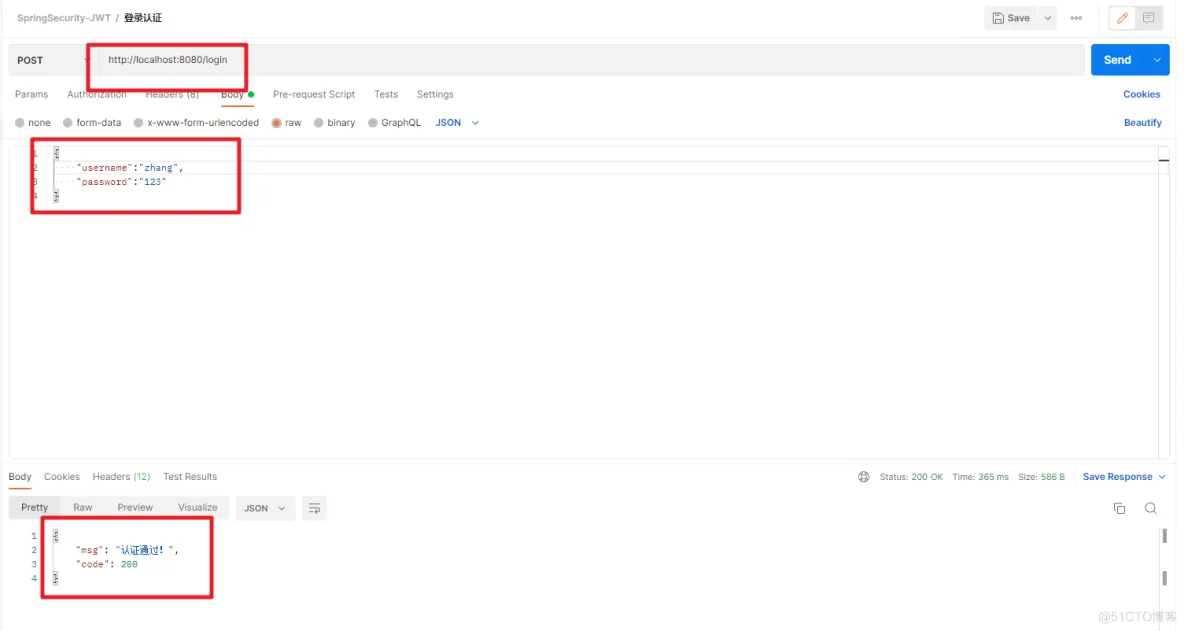
            resultMap.put("msg", "认证通过!");
            out.write(JSON.toJSONString(resultMap));
            out.flush();
            out.close();
        }catch (Exception outEx){
            outEx.printStackTrace();
        }
    }


5.3 认证失败

  认证失败会调用 unsuccess… 方法来处理,那么在这儿我们就需要直接响应了

@Override
    protected void unsuccessfulAuthentication(HttpServletRequest request, HttpServletResponse response, AuthenticationException failed) throws IOException, ServletException {
        try {
            response.setContentType("application/json;charset=utf-8");
            response.setStatus(HttpServletResponse.SC_UNAUTHORIZED);
            PrintWriter out = response.getWriter();
            Map resultMap = new HashMap();
            resultMap.put("code", HttpServletResponse.SC_UNAUTHORIZED);
            resultMap.put("msg", "用户名或密码错误!");
            out.write(new ObjectMapper().writeValueAsString(resultMap));
            out.flush();
            out.close();
        }catch (Exception outEx){
            outEx.printStackTrace();
        }
    }


完整代码:

package com.bobo.jwt.filter;

public class TokenLoginFilter extends UsernamePasswordAuthenticationFilter {

    private  AuthenticationManager authenticationManager;
    public TokenLoginFilter(AuthenticationManager authenticationManager){
        this.authenticationManager = authenticationManager;
    }

    /**
     * 具体认证的方法
     * @param request
     * @param response
     * @return
     * @throws AuthenticationException
     */
    @Override
    public Authentication attemptAuthentication(HttpServletRequest request, HttpServletResponse response)
            throws AuthenticationException {

        UserPojo sysUser = null;
        try {
            sysUser = JSON.parseObject(getJson(request), UserPojo.class);
        } catch (IOException e) {
            e.printStackTrace();
        }
        UsernamePasswordAuthenticationToken authRequest = new UsernamePasswordAuthenticationToken(sysUser.getUsername(), sysUser.getPassword());
        this.setDetails(request, authRequest);
        return authenticationManager.authenticate(authRequest);
    }

    @Override
    protected void unsuccessfulAuthentication(HttpServletRequest request, HttpServletResponse response, AuthenticationException failed) throws IOException, ServletException {
        try {
            response.setContentType("application/json;charset=utf-8");
            response.setStatus(HttpServletResponse.SC_UNAUTHORIZED);
            PrintWriter out = response.getWriter();
            Map resultMap = new HashMap();
            resultMap.put("code", HttpServletResponse.SC_UNAUTHORIZED);
            resultMap.put("msg", "用户名或密码错误!");
            out.write(new ObjectMapper().writeValueAsString(resultMap));
            out.flush();
            out.close();
        }catch (Exception outEx){
            outEx.printStackTrace();
        }
    }

    public String getJson(HttpServletRequest request) throws IOException{
        BufferedReader streamReader = new BufferedReader( new InputStreamReader(request.getInputStream(), "UTF-8"));
        StringBuilder sb = new StringBuilder();
        String inputStr;
        while ((inputStr = streamReader.readLine()) != null) {
            sb.append(inputStr);
        }
        return sb.toString();
    }


    /**
     * 登录成功后的处理
     * @param request
     * @param response
     * @param chain
     * @param authResult
     * @throws IOException
     * @throws ServletException
     */
    @Override
    protected void successfulAuthentication(HttpServletRequest request
            , HttpServletResponse response
            , FilterChain chain
            , Authentication authResult) throws IOException, ServletException {
        // 生成Token信息
        Map<String,String> map = new HashMap<>();
        map.put("username",authResult.getName());
        Collection<? extends GrantedAuthority> authorities = authResult.getAuthorities();
        List<String> list = new ArrayList<>();
        for (GrantedAuthority authority : authorities) {
            list.add(authority.getAuthority());
        }
        map.put("roles", JSON.toJSONString(list));
        String token = JWTUtils.getToken(map);
        response.addHeader("Authorization","Bearer"+token);
        try {
            response.setContentType("application/json;charset=utf-8");
            response.setStatus(HttpServletResponse.SC_OK);
            PrintWriter out = response.getWriter();
            Map<String,Object> resultMap = new HashMap();
            resultMap.put("code", HttpServletResponse.SC_OK);
            resultMap.put("msg", "认证通过!");
            out.write(JSON.toJSONString(resultMap));
            out.flush();
            out.close();
        }catch (Exception outEx){
            outEx.printStackTrace();
        }
    }
}


6.自定义校验过滤器

  然后就是当客户端提交请求,我们需要拦截请求检查header头中是否携带了对应的Token信息,并检查是否合法。

/**
 * 校验Token是否合法的Filter
 */
public class TokenVerifyFilter  extends BasicAuthenticationFilter {


    public TokenVerifyFilter(AuthenticationManager authenticationManager) {
        super(authenticationManager);
    }

    @Override
    protected void doFilterInternal(HttpServletRequest request, HttpServletResponse response, FilterChain chain) throws IOException, ServletException {
        String header = request.getHeader("Authorization");
        if (header == null || !header.startsWith("Bearer")) {
            //如果携带错误的token,则给用户提示请登录!
            chain.doFilter(request, response);
            response.setContentType("application/json;charset=utf-8");
            response.setStatus(HttpServletResponse.SC_FORBIDDEN);
            PrintWriter out = response.getWriter();
            Map resultMap = new HashMap();
            resultMap.put("code", HttpServletResponse.SC_FORBIDDEN);
            resultMap.put("msg", "请登录!");
            out.write(JSON.toJSONString(resultMap));
            out.flush();
            out.close();
        } else {
            //如果携带了正确格式的token要先得到token
            String token = header.replace("Bearer", "");
            //验证tken是否正确
            DecodedJWT verify = JWTUtils.verify(token);
            String userName = verify.getClaim("username").asString();
            String roleJSON = verify.getClaim("roles").asString();
            System.out.println("roleJSON = " + roleJSON);
            List<String> roleArray = JSON.parseArray(roleJSON,String.class);
            List<SimpleGrantedAuthority> list = new ArrayList<>();
            for (String s : roleArray) {
                list.add(new SimpleGrantedAuthority(s));
            }
            UsernamePasswordAuthenticationToken authResult =
                    new UsernamePasswordAuthenticationToken(userName, null, list);
            SecurityContextHolder.getContext().setAuthentication(authResult);
            chain.doFilter(request, response);

        }
    }
}


7.配置类

  然后我们需要添加SpringSecurity的配置类,添加自定义的过滤器

@Configuration
@EnableWebSecurity
@EnableGlobalMethodSecurity(prePostEnabled = true)
public class SpringSecurityWebConfig extends WebSecurityConfigurerAdapter {
    @Autowired
    private UserService userService;


    @Bean
    public BCryptPasswordEncoder passwordEncoder(){
        return new BCryptPasswordEncoder();
    }

    //指定认证对象的来源
    public void configure(AuthenticationManagerBuilder auth) throws Exception {
        auth.userDetailsService(userService).passwordEncoder(passwordEncoder());
    }
    //SpringSecurity配置信息
    public void configure(HttpSecurity http) throws Exception {
        http.csrf()
                .disable()
                .authorizeRequests()
                .antMatchers("/user/query").hasAnyRole("ADMIN")
                .anyRequest()
                .authenticated()
                .and()
                .addFilter(new TokenLoginFilter(super.authenticationManager()))
                .addFilter(new TokenVerifyFilter(super.authenticationManager()))
                .sessionManagement().sessionCreationPolicy(SessionCreationPolicy.STATELESS);
    }
}


8.Controller

  为了便于测试,我们添加了一个Controller,如下:

@RestController
public class UserController {

    @PreAuthorize(value = "hasAnyRole('ROLE_ADMIN')")
    @GetMapping("/query")
    public String query(){
        System.out.println("---------->query");
        return "query .... ";
    }

    @PreAuthorize(value = "hasAnyRole('ROOT')")
    @GetMapping("/update")
    public String update(){
        System.out.println("---------->update");
        return "update .... ";
    }

    @GetMapping("/save")
    public String save(){
        System.out.println("---------->save");
        return "save .... ";
    }
}


9.测试

  我们通过Postman来调试,首先登录测试:

【第十一篇】SpringSecurity基于JWT实现Token的处理_User

同时在header中可以获取对应的Token信息

【第十一篇】SpringSecurity基于JWT实现Token的处理_spring boot_02

  然后根据返回的Token来测试访问Controller的接口

【第十一篇】SpringSecurity基于JWT实现Token的处理_User_03

有权限的能正常访问,没有权限的就访问不了。搞定!!!


posted @ 2024-02-22 11:28  CharyGao  阅读(1)  评论(0编辑  收藏  举报