Spring Cloud
Spring Cloud(十五):Spring Cloud Gateway(限流) - 好一则博 (haoyizebo.com)
绝境长城(冰与火之歌)
在高并发的应用中,限流是一个绕不开的话题。限流可以保障我们的 API 服务对所有用户的可用性,也可以防止网络攻击。
一般开发高并发系统常见的限流有:限制总并发数(比如数据库连接池、线程池)、限制瞬时并发数(如 nginx 的 limit_conn 模块,用来限制瞬时并发连接数)、限制时间窗口内的平均速率(如 Guava 的 RateLimiter、nginx 的 limit_req 模块,限制每秒的平均速率);其他还有如限制远程接口调用速率、限制 MQ 的消费速率。另外还可以根据网络连接数、网络流量、CPU 或内存负载等来限流。
本文详细探讨在 Spring Cloud Gateway 中如何实现限流。
限流算法
做限流 (Rate Limiting/Throttling) 的时候,除了简单的控制并发,如果要准确的控制 TPS,简单的做法是维护一个单位时间内的 Counter,如判断单位时间已经过去,则将 Counter 重置零。此做法被认为没有很好的处理单位时间的边界,比如在前一秒的最后一毫秒里和下一秒的第一毫秒都触发了最大的请求数,也就是在两毫秒内发生了两倍的 TPS。
常用的更平滑的限流算法有两种:漏桶算法和令牌桶算法。很多传统的服务提供商如华为中兴都有类似的专利,参考采用令牌漏桶进行报文限流的方法。
漏桶算法
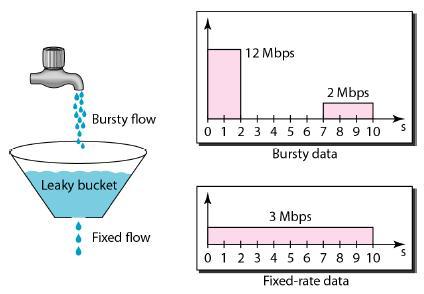
漏桶(Leaky Bucket)算法思路很简单,水(请求)先进入到漏桶里,漏桶以一定的速度出水(接口有响应速率),当水流入速度过大会直接溢出(访问频率超过接口响应速率),然后就拒绝请求,可以看出漏桶算法能强行限制数据的传输速率。
Leaky Bucket
可见这里有两个变量,一个是桶的大小,支持流量突发增多时可以存多少的水(burst),另一个是水桶漏洞的大小(rate)。因为漏桶的漏出速率是固定的参数,所以,即使网络中不存在资源冲突(没有发生拥塞),漏桶算法也不能使流突发(burst)到端口速率。因此,漏桶算法对于存在突发特性的流量来说缺乏效率。
令牌桶算法
令牌桶算法(Token Bucket)和 Leaky Bucket 效果一样但方向相反的算法,更加容易理解。随着时间流逝,系统会按恒定 1/QPS 时间间隔(如果 QPS=100,则间隔是 10ms)往桶里加入 Token(想象和漏洞漏水相反,有个水龙头在不断的加水),如果桶已经满了就不再加了。新请求来临时,会各自拿走一个 Token,如果没有 Token 可拿了就阻塞或者拒绝服务。
Token Bucket
令牌桶的另外一个好处是可以方便的改变速度。一旦需要提高速率,则按需提高放入桶中的令牌的速率。一般会定时(比如 100 毫秒)往桶中增加一定数量的令牌,有些变种算法则实时的计算应该增加的令牌的数量。
Guava 中的 RateLimiter 采用了令牌桶的算法,设计思路参见 How is the RateLimiter designed, and why?,详细的算法实现参见源码。
Leakly Bucket vs Token Bucket
| 对比项 | Leakly bucket | Token bucket | Token bucket 的备注 |
|---|---|---|---|
| 依赖 token | 否 | 是 | |
| 立即执行 | 是 | 否 | 有足够的 token 才能执行 |
| 堆积 token | 否 | 是 | |
| 速率恒定 | 是 | 否 | 可以大于设定的 QPS |
限流实现
在 Gateway 上实现限流是个不错的选择,只需要编写一个过滤器就可以了。有了前边过滤器的基础,写起来很轻松。(如果你对 Spring Cloud Gateway 的过滤器还不了解,请先看这里)
我们这里采用令牌桶算法,Google Guava 的RateLimiter、Bucket4j、RateLimitJ 都是一些基于此算法的实现,只是他们支持的 back-ends(JCache、Hazelcast、Redis 等)不同罢了,你可以根据自己的技术栈选择相应的实现。
这里我们使用 Bucket4j,引入它的依赖坐标,为了方便顺便引入 Lombok
|
|
我们来实现具体的过滤器
|
|
通过对令牌桶算法的了解,我们知道需要定义三个变量:
capacity:桶的最大容量,即能装载 Token 的最大数量refillTokens:每次 Token 补充量refillDuration:补充 Token 的时间间隔
在这个实现中,我们使用了 IP 来进行限制,当达到最大流量就返回429错误。这里我们简单使用一个 Map 来存储 bucket,所以也决定了它只能单点使用,如果是分布式的话,可以采用 Hazelcast 或 Redis 等解决方案。
在 Route 中我们添加这个过滤器,这里指定了 bucket 的容量为 10 且每一秒会补充 1 个 Token。
|
|
启动服务并多次快速刷新改接口,就会看到 Tokens 的数量在不断减小,等一会又会增加上来
|
|
RequestRateLimiter
刚刚我们通过过滤器实现了限流的功能,你可能在想为什么不直接创建一个过滤器工厂呢,那样多方便。这是因为 Spring Cloud Gateway 已经内置了一个RequestRateLimiterGatewayFilterFactory,我们可以直接使用(这里有坑,后边详说)。
目前RequestRateLimiterGatewayFilterFactory的实现依赖于 Redis,所以我们还要引入spring-boot-starter-data-redis-reactive
|
|
因为这里有坑,所以把 application.yml 的配置再全部贴一遍,新增的部分我已经用# ---标出来了
|
|
默认情况下,是基于令牌桶算法实现的限流,有个三个参数需要配置:
burstCapacity,令牌桶容量。replenishRate,令牌桶每秒填充平均速率。key-resolver,用于限流的键的解析器的 Bean 对象名字(有些绕,看代码吧)。它使用 SpEL 表达式根据#{@beanName}从 Spring 容器中获取 Bean 对象。默认情况下,使用PrincipalNameKeyResolver,以请求认证的java.security.Principal作为限流键。
关于
filters的那段配置格式,参考这里
我们实现一个使用请求 IP 作为限流键的KeyResolver
|
|
配置RemoteAddrKeyResolver Bean 对象
|
|
以上就是代码部分,我们还差一个 Redis,我就本地用 docker 来快速启动了
|
|
万事俱备,只欠测试了。以上的代码的和配置都是 OK 的,可以自行测试。下面来说一下这里边的坑。
遇到的坑
配置不生效
参考这个 issue
No Configuration found for route
这个异常信息如下:
|
|
出现在将 RequestRateLimiter 配置为 defaultFilters 的情况下,比如像这样
|
|
这时候就会导致这个异常。我通过分析源码,发现了一些端倪,感觉像是一个 bug,已经提交了 issue
我们从异常入手来看, RedisRateLimiter#isAllowed 这个方法要获取 routeId 对应的 routerConfig,如果获取不到就抛出刚才我们看到的那个异常。
|
|
既然这里要 get,那必然有个地方要 put。put 的相关代码在 AbstractRateLimiter#onApplicationEvent 这个方法。
|
|
上边的 args 里是是配置参数的键值对,比如我们之前自定义的过滤器工厂Elapsed,有个参数withParams,这里就是withParams=true。关键代码在第 7 行,hasRelevantKey方法用于检测 args 里边是否包含configurationPropertyName.,具体到本例就是是否包含redis-rate-limiter.。悲剧就发生在这里,因为我们只为 defaultFilters 配置了相关 args,注定其他的 route 到这里就直接 return 了。
现在不清楚这是 bug 还是设计者有意为之,等答复吧。
基于系统负载的动态限流
在实际工作中,我们可能还需要根据网络连接数、网络流量、CPU 或内存负载等来进行动态限流。在这里我们以 CPU 为栗子。
我们需要借助 Spring Boot Actuator 提供的 Metrics 能力进行实现基于 CPU 的限流——当 CPU 使用率高于某个阈值就开启限流,否则不开启限流。
我们在项目中引入 Actuator 的依赖坐标
|
|
因为 Spring Boot 2.x 之后,Actuator 被重新设计了,和 1.x 的区别还是挺大的(参考这里)。我们先在配置中设置management.endpoints.web.exposure.include=*来观察一下新的 Metrics 的能力
http://localhost:10000/actuator/metrics
|
|
我们可以利用里边的系统 CPU 使用率system.cpu.usage
http://localhost:10000/actuator/metrics/system.cpu.usage
|
|
最近一分钟内的平均负载system.load.average.1m也是一样的
http://localhost:10000/actuator/metrics/system.load.average.1m
|
|
知道了 Metrics 提供的指标,我们就来看在代码里具体怎么实现吧。Actuator 2.x 里边已经没有了之前 1.x 里边提供的SystemPublicMetrics,但是经过阅读源码可以发现MetricsEndpoint这个类可以提供类似的功能。就用它来撸代码吧
|
|
配置 Route
|
|
至于效果嘛,自己试试吧。因为 CPU 的使用率一般波动较大,测试效果还是挺明显的,实际使用就得慎重了。
示例代码可以从 Github 获取:https://github.com/zhaoyibo/spring-cloud-study
改进与提升
实际项目中,除以上实现的限流方式,还可能会:一、在上文的基础上,增加配置项,控制每个路由的限流指标,并实现动态刷新,从而实现更加灵活的管理。二、实现不同维度的限流,例如:
- 对请求的目标 URL 进行限流(例如:某个 URL 每分钟只允许调用多少次)
- 对客户端的访问 IP 进行限流(例如:某个 IP 每分钟只允许请求多少次)
- 对某些特定用户或者用户组进行限流(例如:非 VIP 用户限制每分钟只允许调用 100 次某个 API 等)
- 多维度混合的限流。此时,就需要实现一些限流规则的编排机制(与、或、非等关系)
参考
Token bucket
RequestRateLimiter GatewayFilter Factory
Scaling your API with rate limiters
Scaling your API with rate limiters 译文
Spring Boot Actuator Web API Documentation
https://github.com/nereuschen/blog/issues/37
http://www.itmuch.com/spring-cloud-sum/spring-cloud-ratelimit
深入 Hystrix 线程池隔离与接口限流-Java知音 (javazhiyin.com)
深入 Hystrix 线程池隔离与接口限流
前面讲了 Hystrix 的 request cache 请求缓存、fallback 优雅降级、circuit breaker 断路器快速熔断,这一讲,我们来详细说说 Hystrix 的线程池隔离与接口限流。
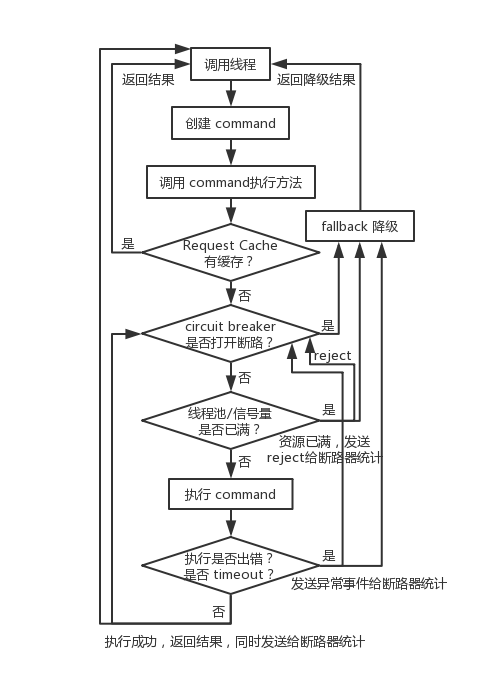
Hystrix 通过判断线程池或者信号量是否已满,超出容量的请求,直接 Reject 走降级,从而达到限流的作用。
限流是限制对后端的服务的访问量,比如说你对 MySQL、Redis、Zookeeper 以及其它各种后端中间件的资源的访问的限制,其实是为了避免过大的流量直接打死后端的服务。
线程池隔离技术的设计
Hystrix 采用了 Bulkhead Partition 舱壁隔离技术,来将外部依赖进行资源隔离,进而避免任何外部依赖的故障导致本服务崩溃。
舱壁隔离,是说将船体内部空间区隔划分成若干个隔舱,一旦某几个隔舱发生破损进水,水流不会在其间相互流动,如此一来船舶在受损时,依然能具有足够的浮力和稳定性,进而减低立即沉船的危险。

Hystrix 对每个外部依赖用一个单独的线程池,这样的话,如果对那个外部依赖调用延迟很严重,最多就是耗尽那个依赖自己的线程池而已,不会影响其他的依赖调用。
Hystrix 应用线程池机制的场景
- 每个服务都会调用几十个后端依赖服务,那些后端依赖服务通常是由很多不同的团队开发的。
- 每个后端依赖服务都会提供它自己的 client 调用库,比如说用 thrift 的话,就会提供对应的 thrift 依赖。
- client 调用库随时会变更。
- client 调用库随时可能会增加新的网络请求的逻辑。
- client 调用库可能会包含诸如自动重试、数据解析、内存中缓存等逻辑。
- client 调用库一般都对调用者来说是个黑盒,包括实现细节、网络访问、默认配置等等。
- 在真实的生产环境中,经常会出现调用者,突然间惊讶的发现,client 调用库发生了某些变化。
- 即使 client 调用库没有改变,依赖服务本身可能有会发生逻辑上的变化。
- 有些依赖的 client 调用库可能还会拉取其他的依赖库,而且可能那些依赖库配置的不正确。
- 大多数网络请求都是同步调用的。
- 调用失败和延迟,也有可能会发生在 client 调用库本身的代码中,不一定就是发生在网络请求中。
简单来说,就是你必须默认 client 调用库很不靠谱,而且随时可能发生各种变化,所以就要用强制隔离的方式来确保任何服务的故障不会影响当前服务。
线程池机制的优点
- 任何一个依赖服务都可以被隔离在自己的线程池内,即使自己的线程池资源填满了,也不会影响任何其他的服务调用。
- 服务可以随时引入一个新的依赖服务,因为即使这个新的依赖服务有问题,也不会影响其他任何服务的调用。
- 当一个故障的依赖服务重新变好的时候,可以通过清理掉线程池,瞬间恢复该服务的调用,而如果是 tomcat 线程池被占满,再恢复就很麻烦。
- 如果一个 client 调用库配置有问题,线程池的健康状况随时会报告,比如成功/失败/拒绝/超时的次数统计,然后可以近实时热修改依赖服务的调用配置,而不用停机。
- 基于线程池的异步本质,可以在同步的调用之上,构建一层异步调用层。
简单来说,最大的好处,就是资源隔离,确保说任何一个依赖服务故障,不会拖垮当前的这个服务。
线程池机制的缺点
- 线程池机制最大的缺点就是增加了 CPU 的开销。
除了 tomcat 本身的调用线程之外,还有 hystrix 自己管理的线程池。 - 每个 command 的执行都依托一个独立的线程,会进行排队,调度,还有上下文切换。
- Hystrix 官方自己做了一个多线程异步带来的额外开销,通过对比多线程异步调用+同步调用得出,Netflix API 每天通过 Hystrix 执行 10 亿次调用,每个服务实例有 40 个以上的线程池,每个线程池有 10 个左右的线程。)最后发现说,用 Hystrix 的额外开销,就是给请求带来了 3ms 左右的延时,最多延时在 10ms 以内,相比于可用性和稳定性的提升,这是可以接受的。
我们可以用 Hystrix semaphore 技术来实现对某个依赖服务的并发访问量的限制,而不是通过线程池/队列的大小来限制流量。
sempahore 技术可以用来限流和削峰,但是不能用来对调研延迟的服务进行 timeout 和隔离。
execution.isolation.strategy 设置为 SEMAPHORE,那么 Hystrix 就会用 semaphore 机制来替代线程池机制,来对依赖服务的访问进行限流。如果通过 semaphore 调用的时候,底层的网络调用延迟很严重,那么是无法 timeout 的,只能一直 block 住。一旦请求数量超过了 semephore 限定的数量之后,就会立即开启限流。
接口限流 Demo
假设一个线程池大小为 8,等待队列的大小为 10。timeout 时长我们设置长一些,20s。
在 command 内部,写死代码,做一个 sleep,比如 sleep 3s。
- withCoreSize:设置线程池大小
- withMaxQueueSize:设置等待队列大小
- withQueueSizeRejectionThreshold:这个与 withMaxQueueSize 配合使用,等待队列的大小,取得是这两个参数的较小值。
如果只设置了线程池大小,另外两个 queue 相关参数没有设置的话,等待队列是处于关闭的状态。
|
|
我们模拟 25 个请求。前 8 个请求,调用接口时会直接被 hang 住 3s,那么后面的 10 个请求会先进入等待队列中等待前面的请求执行完毕。最后的 7 个请求过来,会直接被 reject,调用 fallback 降级逻辑。
|
|
从执行结果中,我们可以明显看出一共打印出了 7 个降级商品。这也就是请求数超过线程池+队列的数量而直接被 reject 的结果。
|
|
SpringCloud组件:Eureka服务注册中心的失效剔除与自我保护机制 - 简书 (jianshu.com)
Eureka作为一个成熟的服务注册中心当然也有合理的内部维护服务节点的机制,比如我们本章将要讲解到的服务下线、失效剔除、自我保护,也正是因为内部有这种维护机制才让Eureka更健壮、更稳定。
本章目标
了解Eureka是怎么保证服务相对较短时长内的有效性。
服务下线
迭代更新、终止访问某一个或者多个服务节点时,我们在正常关闭服务节点的情况下,Eureka Client会通过PUT请求方式调用Eureka Server的REST访问节点/eureka/apps/{appID}/{instanceID}/status?value=DOWN请求地址,告知Eureka Server我要下线了,Eureka Server收到请求后会将该服务实例的运行状态由UP修改为DOWN,这样我们在管理平台服务列表内看到的就是DOWN状态的服务实例。
有关
Eureka Server内部的REST节点地址,请访问SpringCloud组件:Eureka服务注册中心内置的REST节点列表来了解详情。
失效剔除
Eureka Server在启动完成后会创建一个定时器每隔60秒检查一次服务健康状况,如果其中一个服务节点超过90秒未检查到心跳,那么Eureka Server会自动从服务实例列表内将该服务剔除。
由于非正常关闭不会执行
主动下线动作,所以才会出现失效剔除机制,该机制主要是应对非正常关闭服务的情况,如:内存溢出、杀死进程、服务器宕机等非正常流程关闭服务节点时。
自我保护
Eureka Server的自我保护机制会检查最近15分钟内所有Eureka Client正常心跳的占比,如果低于85%就会被触发。
我们如果在Eureka Server的管理界面发现如下的红色内容,就说明已经触发了自我保护机制。
EMERGENCY! EUREKA MAY BE INCORRECTLY CLAIMING INSTANCES ARE UP WHEN THEY'RE NOT. RENEWALS ARE LESSER THAN THRESHOLD AND HENCE THE INSTANCES ARE NOT BEING EXPIRED JUST TO BE SAFE.
当触发自我保护机制后Eureka Server就会锁定服务列表,不让服务列表内的服务过期,不过这样我们在访问服务时,得到的服务很有可能是已经失效的实例,如果是这样我们就会无法访问到期望的资源,会导致服务调用失败,所以这时我们就需要有对应的容错机制、熔断机制,我们在接下来的文章内会详细讲解这块知识点。
我们的服务如果是采用的公网IP地址,出现自我保护机制的几率就会大大增加,所以这时更要我们部署多个相同InstanId的服务或者建立一套完整的熔断机制解决方案。
自我保护开关
如果在本地测试环境,建议关掉自我保护机制,这样方便我们进行测试,也更准备的保证了服务实例的有效性!!!
关闭自我保护只需要修改application.yml配置文件内参数eureka.server.enable-self-preservation将值设置为false即可。
总结
我们通过本章的讲解,了解到了Eureka Server对服务的治理,其中包含服务下线、失效剔除、自我保护等,对自我保护机制一定要谨慎的处理,防止出现服务失效问题。
源码位置
- SpringBoot配套源码地址:访问码云查看源码、访问GitHub查看源码
- SpringCloud配套源码地址(
本章源码在这):访问码云查看源码,访问GitHub查看源码 - SpringCloud实战微服务之——Ribbon详解_LIUXUN1993728的博客-CSDN博客_spring-cloud-starter-ribbon
-
Ribbon简介
需要解决的问题:① 如何在配置Eureka Client注册中心时不去硬编码Eureka Server的地址?② 在微服务不同模块间进行通信时,如何不去硬编码服务提供者的地址?
③ 当部署多个相同微服务时,如何实现请求时的负载均衡?
实现负载均衡方式1:通过服务器端实现负载均衡(nginx)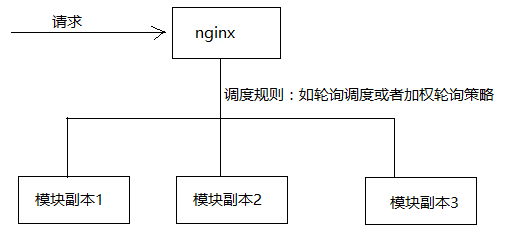
实现负载均衡方式2:通过客户端实现负载均衡。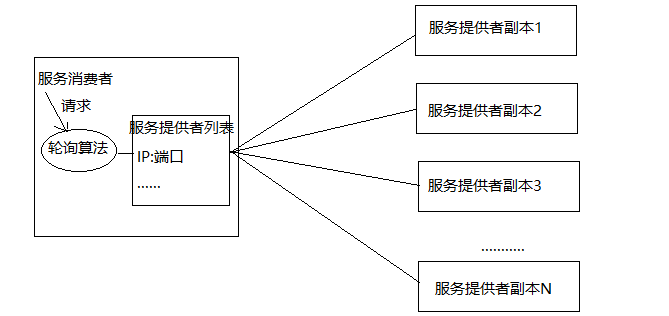 Ribbon是什么?Ribbon是Netflix发布的云中间层服务开源项目,其主要功能是提供客户端实现负载均衡算法。Ribbon客户端组件提供一系列完善的配置项如连接超时,重试等。简单的说,Ribbon是一个客户端负载均衡器,我们可以在配置文件中Load Balancer后面的所有机器,Ribbon会自动的帮助你基于某种规则(如简单轮询,随机连接等)去连接这些机器,我们也很容易使用Ribbon实现自定义的负载均衡算法。下图展示了Eureka使用Ribbon时的大致架构:
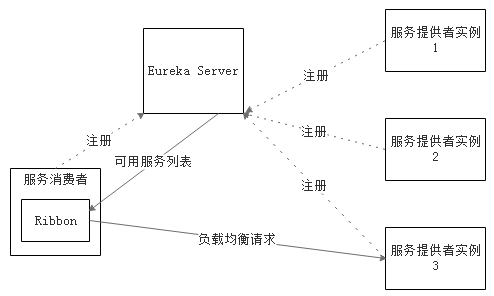
Ribbon工作时分为两步:第一步选择Eureka Server,它优先选择在同一个Zone且负载较少的Server;第二步再根据用户指定的策略,再从Server取到的服务注册列表中选择一个地址。其中Ribbon提供了很多策略,例如轮询round robin、随机Random、根据响应时间加权等。
Ribbon的使用
集成Ribbon以及简单使用
如何集成Ribbon?查看Spring cloud官方文档,搜索Ribbon。① 首先引入Ribbon依赖按照官方的意思是需要加入以下依赖org.springframework.cloudspring-cloud-starter-ribbon但是其实是不需要的加入这个依赖的,在spring-cloud-starter-eureka依赖中就已经包含了Ribbon Starter (上节已知spring-cloud-starter-eureka-server 是为编写Eureka Server提供依赖,spring-cloud-starter-eureka是为编写Eureka Client提供依赖),因此只需要Eureka Client具有spring-cloud-starter-eureka依赖即可。即在POM中需要有-
<dependency>
-
<groupId>org.springframework.cloud</groupId>
-
<artifactId>spring-cloud-starter-eureka</artifactId>
-
</dependency>
② 如何使用Ribbon上节示例中是使用RestTemplate进行Eureka Client(包括服务提供者以及服务消费者,在这里其实是服务消费者使用RestTemplate)之间的通信,为RestTemplate配置类添加@LoadBalanced注解即可,如下所示:-
-
-
public RestTemplate restTemplate() {
-
return new RestTemplate();
-
}
③ 如何解决硬编码使用添加@LoadBalanced注解后的RestTemplate调用服务提供者的接口时,可以使用虚拟IP替代真实IP地址。所谓的虚拟IP就是服务提供者在application.properties或yml文件中配置的spring.application.name属性的值。示例如下:-
-
public User findById( Long id) {
-
// VIP: Virtual IP http://microservice-provider-user/即虚拟IP 服务提供者的ServiceId (spring.application.name)
-
return this.restTemplate.getForObject("http://microservice-provider-user/simple/" + id, User.class);
-
}
运行测试:依次启动Eureka Server和Eureka Clients(服务提供者和服务消费者)
访问测试:
负载均衡测试:依次启动Eureka Servler 和 Eureka Client(一个服务消费者movie 两个不同端口号相同的服务提供者)在服务提供者端访问4次

发现两个服务提供者user分别被调用了2次,说明Ribbon默认的负载均衡策略是轮询。自定义RibbonClient
如何为服务消费者自定义Ribbon Client?① 代码自定义RibbonClient所谓的自定义Ribbon Client的主要作用就是使用自定义配置替代Ribbon默认的负载均衡策略,注意:自定义的Ribbon Client是有针对性的,一般一个自定义的Ribbon Client是对一个服务提供者(包括服务名相同的一系列副本)而言的。自定义了一个Ribbon Client 它所设定的负载均衡策略只对某一特定服务名的服务提供者有效,但不能影响服务消费者与别的服务提供者通信所使用的策略。根据官方文档的意思,推荐在 springboot主程序扫描的包范围之外进行自定义配置类。其实纯代码自定义RibbonClient的话有两种方式:方式一:在springboot主程序扫描的包外定义配置类,然后为springboot主程序添加@RibbonClient注解引入配置类-
-
public class TestConfiguration {
-
-
private IClientConfig config;
-
-
public IRule ribbonRule(IClientConfig config) { // 自定义为随机规则
-
return new RandomRule();
-
}
-
}
注意:@RibbonClient注解中的name属性是指服务提供者的服务名(即当前消费者使用自定义配置与其通信的服务提供者的spring.application.name的属性)
@RibbonClient(name = "microservice-provider-user",configuration = TestConfiguration.class)方式二:在与springboot主程序的同一级目录新建RibbonClient的配置类,但是必须在springboot扫描的包范围内排除掉,方法是自定义注解标识配置类,然后在springboot的添加@ComponentScan根据自定义注解类型过滤掉配置类自定义注解-
public ExcludeFromComponentScan {
-
}
自定义配置类
-
-
-
public class TestConfiguration1 {
-
-
private IClientConfig config;
-
-
public IRule ribbonRule(IClientConfig config) { // 自定义为随机规则
-
return new RandomRule();
-
}
-
}
在springboot主程序上添加注解
运行测试:

② 通过配置文件自定义RibbonClient
官方文档地址: http://cloud.spring.io/spring-cloud-static/Camden.SR7/#_customizing_the_ribbon_client_using_properties
意思就是:配置RibbonClient规则是<服务名>.ribbon.<类型>=与类型对应的类名(也可以自定义)类型可以为一下几个:NFLoadBalancerClassName: 应该实现 ILoadBalancer接口NFLoadBalancerRuleClassName: 应该实现 IRule接口NFLoadBalancerPingClassName: 应该实现 IPing接口NIWSServerListClassName: 应该实现ServerList接口NIWSServerListFilterClassName: 应该实现ServerListFilter接口详解:独立使用Spring Cloud Ribbon,在没有引入Spring Cloud Eureka服务治理框架时, 默认接口实现类:1.IClientConfig:Ribbon的客户端配置,默认采用com.netflix.cilent.config.DefaultClientConfigImpl实现。2.IRule:Ribbon的负载均衡策略,默认采用com.netflix.loadbalancer.ZoneAvoidanceRule实现,该策略能够在多区 域环境下选择出最佳区域的实例访问。3.IPing:Ribbon的实例检查策略,默认采用com.netflix.loadbalancer.NoOpPing实现,该检查策略是一种特殊实现方式,实际上它并不会检查实例是否可用,而是始终返回True,默认认为所有实例都可用。4.ServerList:服务实例清单的维护机制,默认采用com.netflix.loadbalancer.ConfigurationBasedServerList实现。5.ServerListFilter:服务实例清单过滤机制,默认采用org.springframework.cloud.netflix.ribbon.ZonePreferenceServerListFilter实现,该策略能够优先过滤出与请求调用方处于同区域的服务实例。6.ILoadBalancer:负载均衡器,默认采用com.netflix.loadbalancer.ZoneAwareLoadBalancer实现,它具备区域感知能力Spring Cloud Eureka和Spring Cloud Ribbon结合使用,Ribbon默认接口实现类:1.IPing:Ribbon的实例检查策略,默认采用com.netflix.niws.loadbalancer.NIWSDiscoveryPing实现,该检查策略是一种特殊实现方式,实际上它并不会检查实例是否可用,而是始终返回True,默认认为所有实例都可用2.ServerList:服务实例清单的维护机制,默认采用com.netflix.niws.loadbalancer.DiscoveryEnabledNIWSServerList实现,将所有服务清单交给Eureka的服务治理机制进行维护其中最常用的是配置RibbonClient的负载均衡规则,如下所示:application.yml中添加users:ribbon:NFLoadBalancerRuleClassName: com.netflix.loadbalancer.WeightedResponseTimeRule自带的IRule实现类有以下几个:BestAvailableRule 选择最小请求数ClientConfigEnabledRoundRobinRule 轮询RandomRule 随机选择一个serverRoundRobinRule 轮询选择serverRetryRule 根据轮询的方式重试WeightedResponseTimeRule 根据响应时间去分配一个weight ,weight越低,被选择的可能性就越低(响应时间加权)ZoneAvoidanceRule 根据server的zone区域和可用性来轮询选择注意:如果多种整合方式都存在的话是存在优先级的,即 文件配置优先级 > 代码配置优先级 > 默认配置优先级使用示例如下:在application.yml中添加如下配置即可为请求microservice-provider-user的服务提供者时设置随机策略。
经过测试是完全可行的。microservice-provider-user: ribbon: NFLoadBalancerRuleClassName: com.netflix.loadbalancer.RandomRuleRibbon脱离Eureka使用
官方描述地址: http://cloud.spring.io/spring-cloud-static/Camden.SR7/#spring-cloud-ribbon-without-eureka
Eureka是用于服务发现和服务注册、以及使用服务名来解决服务消费者和服务提供者通信时地址的硬编码问题的。如果Ribbon脱离了Eureka,那么在服务消费者端就无法根据服务名通过心跳机制从EurekaServer端获取对应服务提供者的IP以及端口号。这时就需要在服务消费者端配置对应服务提供者的地址列表,然后Ribbon才能通过配置文件或者自定义的RibbonClient或者默认的配置获取负载均衡的轮询策略进行请求分发。配置方式:第一步:检查是否引入了Eureka。如果服务在依赖中添加了spring-cloud-starter-eureka,这种情况下如果想使Ribbon脱离Eureka使用的话就需要将Eureka禁用掉。仅仅需要添加以下配置,如果没有引入Eureka就不需要禁用。
第二步:配置某服务提供者的地址列表以及均衡策略(默认是轮询)ribbon: eureka: enabled: false
因为我的Demo中引入了Eureka,所以我的配置如下所示:<服务提供者名称>: ribbon: listOfServers: localhost:7901,localhost:7902 NFLoadBalancerRuleClassName: com.netflix.loadbalancer.RandomRule
具体代码已上传GitHub,地址: https://github.com/liuxun1993728/ribbonDemoribbon: eureka: enabled: false microservice-provider-user: ribbon: listOfServers: localhost:7901,localhost:7902 NFLoadBalancerRuleClassName: com.netflix.loadbalancer.RandomRule -
- Spring Cloud Ribbon设计原理 - 简书 (jianshu.com)
Ribbon 是netflix 公司开源的基于客户端的负载均衡组件,是Spring Cloud大家庭中非常重要的一个模块;Ribbon应该也是整个大家庭中相对而言比较复杂的模块,直接影响到服务调度的质量和性能。全面掌握Ribbon可以帮助我们了解在分布式微服务集群工作模式下,服务调度应该考虑到的每个环节。
本文将详细地剖析Ribbon的设计原理,帮助大家对Spring Cloud 有一个更好的认知。
一. Spring集成下的Ribbon工作结构
先贴一张总览图,说明一下Spring如何集成Ribbon的,如下所示:
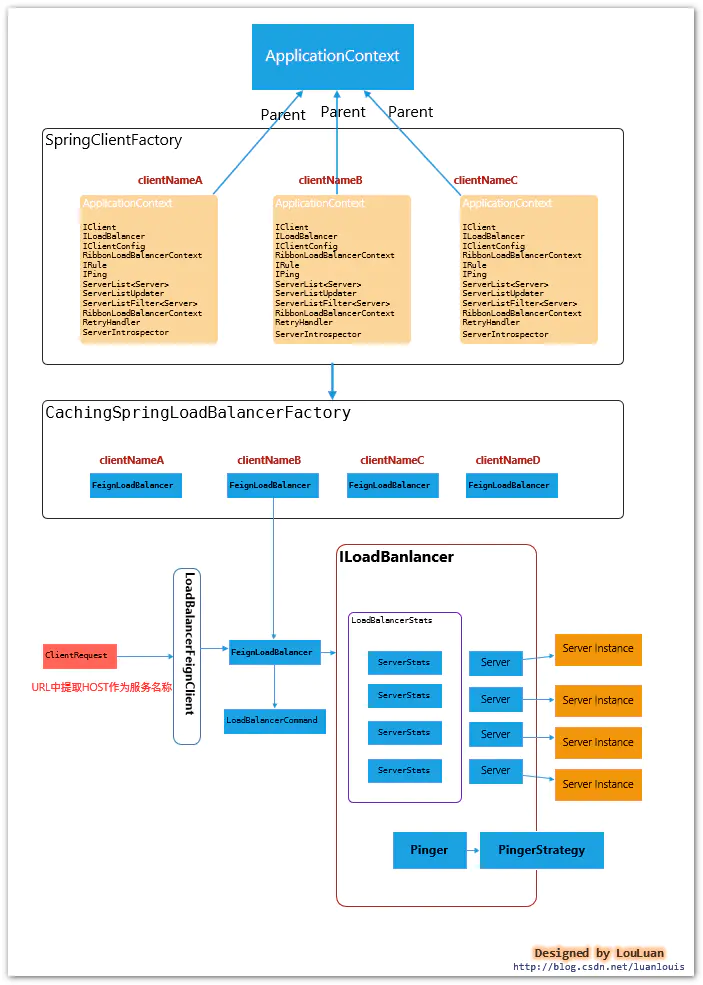
Spring Cloud集成模式下的Ribbon有以下几个特征:
- Ribbon 服务配置方式
每一个服务配置都有一个Spring ApplicationContext上下文,用于加载各自服务的实例。
比如,当前Spring Cloud 系统内,有如下几个服务:
| 服务名称 | 角色 | 依赖服务 |
|---|---|---|
order |
订单模块 | user |
user |
用户模块 | 无 |
mobile-bff |
移动端BFF | order,user |
mobile-bff服务在实际使用中,会用到order和user模块,那么在mobile-bff服务的Spring上下文中,会为order 和user 分别创建一个子ApplicationContext,用于加载各自服务模块的配置。也就是说,各个客户端的配置相互独立,彼此不收影响
- 和Feign的集成模式
在使用Feign作为客户端时,最终请求会转发成http://<服务名称>/的格式,通过LoadBalancerFeignClient, 提取出服务标识<服务名称>,然后根据服务名称在上下文中查找对应服务的负载均衡器FeignLoadBalancer,负载均衡器负责根据既有的服务实例的统计信息,挑选出最合适的服务实例
二、Spring Cloud模式下和Feign的集成实现方式
和Feign结合的场景下,Feign的调用会被包装成调用请求LoadBalancerCommand,然后底层通过Rxjava基于事件的编码风格,发送请求;Spring Cloud框架通过 Feigin 请求的URL,提取出服务名称,然后在上下文中找到对应服务的的负载均衡器实现FeignLoadBalancer,然后通过负载均衡器中挑选一个合适的Server实例,然后将调用请求转发到该Server实例上,完成调用,在此过程中,记录对应Server实例的调用统计信息。
/**
     * Create an {@link Observable} that once subscribed execute network call asynchronously with a server chosen by load balancer.
     * If there are any errors that are indicated as retriable by the {@link RetryHandler}, they will be consumed internally by the
     * function and will not be observed by the {@link Observer} subscribed to the returned {@link Observable}. If number of retries has
     * exceeds the maximal allowed, a final error will be emitted by the returned {@link Observable}. Otherwise, the first successful
     * result during execution and retries will be emitted.
     */
    public Observable submit(final ServerOperation operation) {
        final ExecutionInfoContext context = new ExecutionInfoContext();

        if (listenerInvoker != null) {
            try {
                listenerInvoker.onExecutionStart();
            } catch (AbortExecutionException e) {
                return Observable.error(e);
            }
        }

        // 同一Server最大尝试次数
        final int maxRetrysSame = retryHandler.getMaxRetriesOnSameServer();
        //下一Server最大尝试次数
        final int maxRetrysNext = retryHandler.getMaxRetriesOnNextServer();

        // Use the load balancer
        // 使用负载均衡器,挑选出合适的Server,然后执行Server请求,将请求的数据和行为整合到ServerStats中
        Observable o =
                (server == null ? selectServer() : Observable.just(server))
                .concatMap(new Func1<Server, Observable>() {
                    @Override
                    // Called for each server being selected
                    public Observable call(Server server) {
                        // 获取Server的统计值
                        context.setServer(server);
                        final ServerStats stats = loadBalancerContext.getServerStats(server);

                        // Called for each attempt and retry 服务调用
                        Observable o = Observable
                                .just(server)
                                .concatMap(new Func1<Server, Observable>() {
                                    @Override
                                    public Observable call(final Server server) {
                                        context.incAttemptCount();//重试计数
                                        loadBalancerContext.noteOpenConnection(stats);//链接统计

                                        if (listenerInvoker != null) {
                                            try {
                                                listenerInvoker.onStartWithServer(context.toExecutionInfo());
                                            } catch (AbortExecutionException e) {
                                                return Observable.error(e);
                                            }
                                        }
                                        //执行监控器,记录执行时间
                                        final Stopwatch tracer = loadBalancerContext.getExecuteTracer().start();
                                        //找到合适的server后,开始执行请求
                                        //底层调用有结果后,做消息处理
                                        return operation.call(server).doOnEach(new Observer() {
                                            private T entity;
                                            @Override
                                            public void onCompleted() {
                                                recordStats(tracer, stats, entity, null);
                                                // 记录统计信息
                                            }

                                            @Override
                                            public void onError(Throwable e) {
                                                recordStats(tracer, stats, null, e);//记录异常信息
                                                logger.debug("Got error {} when executed on server {}", e, server);
                                                if (listenerInvoker != null) {
                                                    listenerInvoker.onExceptionWithServer(e, context.toExecutionInfo());
                                                }
                                            }

                                            @Override
                                            public void onNext(T entity) {
                                                this.entity = entity;//返回结果值
                                                if (listenerInvoker != null) {
                                                    listenerInvoker.onExecutionSuccess(entity, context.toExecutionInfo());
                                                }
                                            }

                                            private void recordStats(Stopwatch tracer, ServerStats stats, Object entity, Throwable exception) {
                                                tracer.stop();//结束计时
                                                //标记请求结束,更新统计信息
                                                loadBalancerContext.noteRequestCompletion(stats, entity, exception, tracer.getDuration(TimeUnit.MILLISECONDS), retryHandler);
                                            }
                                        });
                                    }
                                });
                        //如果失败,根据重试策略触发重试逻辑
                        // 使用observable 做重试逻辑,根据predicate 做逻辑判断,这里做
                        if (maxRetrysSame > 0)
                            o = o.retry(retryPolicy(maxRetrysSame, true));
                        return o;
                    }
                });
         // next请求处理,基于重试器操作
        if (maxRetrysNext > 0 && server == null)
            o = o.retry(retryPolicy(maxRetrysNext, false));

        return o.onErrorResumeNext(new Func1<Throwable, Observable>() {
            @Override
            public Observable call(Throwable e) {
                if (context.getAttemptCount() > 0) {
                    if (maxRetrysNext > 0 && context.getServerAttemptCount() == (maxRetrysNext + 1)) {
                        e = new ClientException(ClientException.ErrorType.NUMBEROF_RETRIES_NEXTSERVER_EXCEEDED,
                                "Number of retries on next server exceeded max " + maxRetrysNext
                                + " retries, while making a call for: " + context.getServer(), e);
                    }
                    else if (maxRetrysSame > 0 && context.getAttemptCount() == (maxRetrysSame + 1)) {
                        e = new ClientException(ClientException.ErrorType.NUMBEROF_RETRIES_EXEEDED,
                                "Number of retries exceeded max " + maxRetrysSame
                                + " retries, while making a call for: " + context.getServer(), e);
                    }
                }
                if (listenerInvoker != null) {
                    listenerInvoker.onExecutionFailed(e, context.toFinalExecutionInfo());
                }
                return Observable.error(e);
            }
        });
    }
从一组ServerList 列表中挑选合适的Server
    /**
     * Compute the final URI from a partial URI in the request. The following steps are performed:
*- *
- 如果host尚未指定,则从负载均衡器中选定 host/port *
- 如果host 尚未指定并且尚未找到负载均衡器,则尝试从 虚拟地址中确定host/port *
- 如果指定了HOST,并且URI的授权部分通过虚拟地址设置,并且存在负载均衡器,则通过负载就均衡器中确定host/port(指定的HOST将会被忽略) *
- 如果host已指定,但是尚未指定负载均衡器和虚拟地址配置,则使用真实地址作为host *
- if host is missing but none of the above applies, throws ClientException *
     *
     * @param original Original URI passed from caller
     */
    public Server getServerFromLoadBalancer(@Nullable URI original, @Nullable Object loadBalancerKey) throws ClientException {
        String host = null;
        int port = -1;
        if (original != null) {
            host = original.getHost();
        }
        if (original != null) {
            Pair<String, Integer> schemeAndPort = deriveSchemeAndPortFromPartialUri(original);
            port = schemeAndPort.second();
        }

        // Various Supported Cases
        // The loadbalancer to use and the instances it has is based on how it was registered
        // In each of these cases, the client might come in using Full Url or Partial URL
        ILoadBalancer lb = getLoadBalancer();
        if (host == null) {
            // 提供部分URI,缺少HOST情况下
            // well we have to just get the right instances from lb - or we fall back
            if (lb != null){
                Server svc = lb.chooseServer(loadBalancerKey);// 使用负载均衡器选择Server
                if (svc == null){
                    throw new ClientException(ClientException.ErrorType.GENERAL,
                            "Load balancer does not have available server for client: "
                                    + clientName);
                }
                //通过负载均衡器选择的结果中选择host
                host = svc.getHost();
                if (host == null){
                    throw new ClientException(ClientException.ErrorType.GENERAL,
                            "Invalid Server for :" + svc);
                }
                logger.debug("{} using LB returned Server: {} for request {}", new Object[]{clientName, svc, original});
                return svc;
            } else {
                // No Full URL - and we dont have a LoadBalancer registered to
                // obtain a server
                // if we have a vipAddress that came with the registration, we
                // can use that else we
                // bail out
                // 通过虚拟地址配置解析出host配置返回
                if (vipAddresses != null && vipAddresses.contains(",")) {
                    throw new ClientException(
                            ClientException.ErrorType.GENERAL,
                            "Method is invoked for client " + clientName + " with partial URI of ("
                            + original
                            + ") with no load balancer configured."
                            + " Also, there are multiple vipAddresses and hence no vip address can be chosen"
                            + " to complete this partial uri");
                } else if (vipAddresses != null) {
                    try {
                        Pair<String,Integer> hostAndPort = deriveHostAndPortFromVipAddress(vipAddresses);
                        host = hostAndPort.first();
                        port = hostAndPort.second();
                    } catch (URISyntaxException e) {
                        throw new ClientException(
                                ClientException.ErrorType.GENERAL,
                                "Method is invoked for client " + clientName + " with partial URI of ("
                                + original
                                + ") with no load balancer configured. "
                                + " Also, the configured/registered vipAddress is unparseable (to determine host and port)");
                    }
                } else {
                    throw new ClientException(
                            ClientException.ErrorType.GENERAL,
                            this.clientName
                            + " has no LoadBalancer registered and passed in a partial URL request (with no host:port)."
                            + " Also has no vipAddress registered");
                }
            }
        } else {
            // Full URL Case URL中指定了全地址,可能是虚拟地址或者是hostAndPort
            // This could either be a vipAddress or a hostAndPort or a real DNS
            // if vipAddress or hostAndPort, we just have to consult the loadbalancer
            // but if it does not return a server, we should just proceed anyways
            // and assume its a DNS
            // For restClients registered using a vipAddress AND executing a request
            // by passing in the full URL (including host and port), we should only
            // consult lb IFF the URL passed is registered as vipAddress in Discovery
            boolean shouldInterpretAsVip = false;

            if (lb != null) {
                shouldInterpretAsVip = isVipRecognized(original.getAuthority());
            }
            if (shouldInterpretAsVip) {
                Server svc = lb.chooseServer(loadBalancerKey);
                if (svc != null){
                    host = svc.getHost();
                    if (host == null){
                        throw new ClientException(ClientException.ErrorType.GENERAL,
                                "Invalid Server for :" + svc);
                    }
                    logger.debug("using LB returned Server: {} for request: {}", svc, original);
                    return svc;
                } else {
                    // just fall back as real DNS
                    logger.debug("{}:{} assumed to be a valid VIP address or exists in the DNS", host, port);
                }
            } else {
                // consult LB to obtain vipAddress backed instance given full URL
                //Full URL execute request - where url!=vipAddress
                logger.debug("Using full URL passed in by caller (not using load balancer): {}", original);
            }
        }
        // end of creating final URL
        if (host == null){
            throw new ClientException(ClientException.ErrorType.GENERAL,"Request contains no HOST to talk to");
        }
        // just verify that at this point we have a full URL

        return new Server(host, port);
    }
三. LoadBalancer--负载均衡器的核心
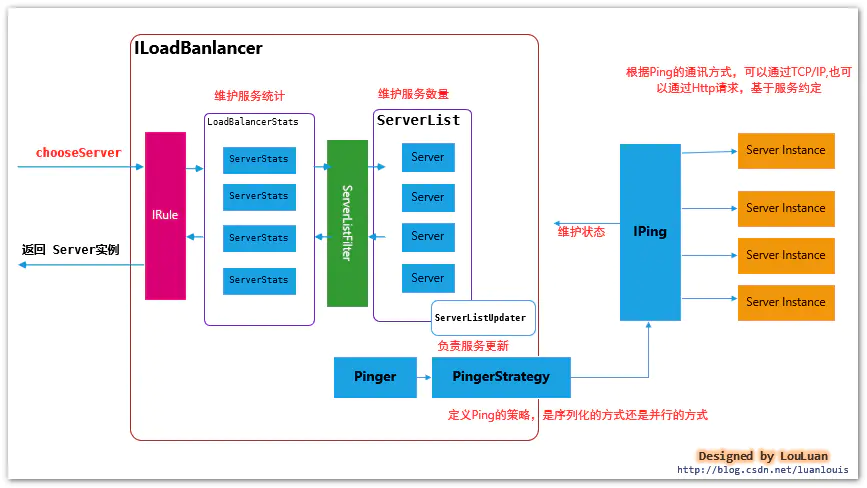
LoadBalancer 的职能主要有三个:
- 维护Sever列表的数量(新增、更新、删除等)
- 维护Server列表的状态(状态更新)
- 当请求Server实例时,能否返回最合适的Server实例
本章节将通过详细阐述着这三个方面。
3.1 负载均衡器的内部基本实现原理
先熟悉一下负载均衡器LoadBalancer的实现原理图:
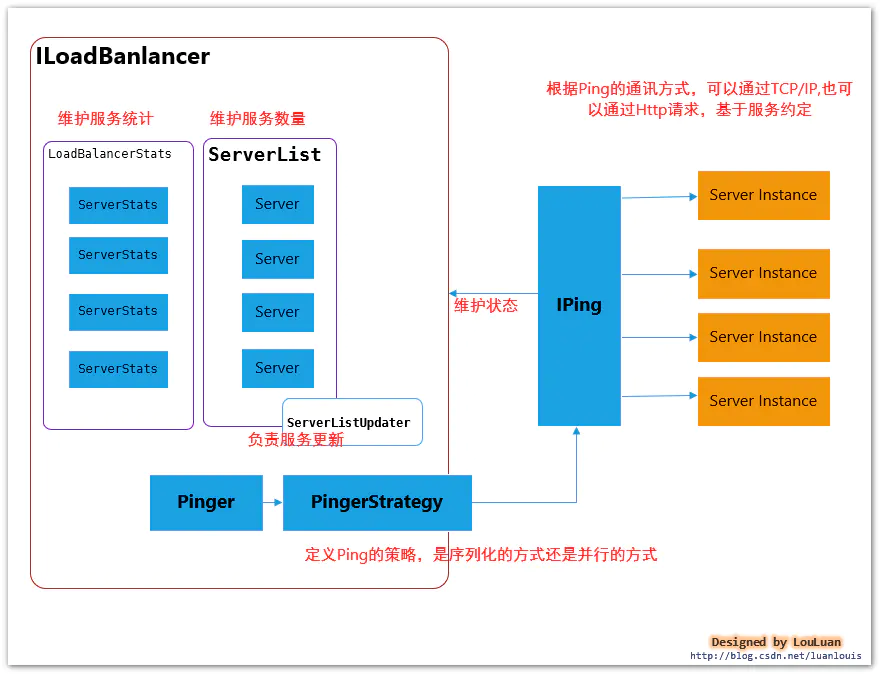
| 组成部分 | 职能 | 参考章节 |
|---|---|---|
| Server | Server 作为服务实例的表示,会记录服务实例的相关信息,如:服务地址,所属zone,服务名称,实例ID等 |
|
| ServerList | 维护着一组Server实例列表,在应用运行的过程中,Ribbon通过ServerList中的服务实例供负载均衡器选择。ServerList维护列表可能在运行的过程中动态改变 |
3.2 |
| ServerStats | 作为对应Server 的运行情况统计,一般是服务调用过程中的Server平均响应时间,累计请求失败计数,熔断时间控制等。一个ServerStats实例唯一对应一个Server实例 |
|
| LoadBalancerStats | 作为 ServerStats实例列表的容器,统一维护 |
|
| ServerListUpdater | 负载均衡器通过ServerListUpdater来更新ServerList,比如实现一个定时任务,每隔一段时间获取最新的Server实例列表 |
3.2 |
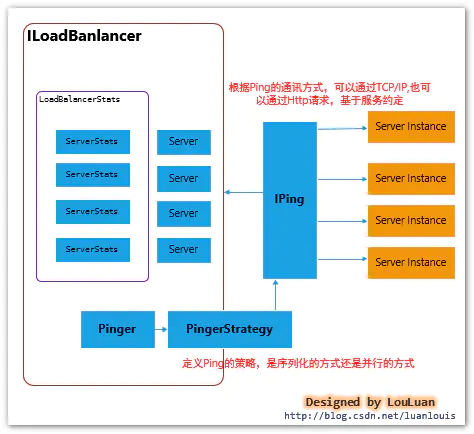
| Pinger | 服务状态检验器,负责维护ServerList列表中的服务状态注意:Pinger仅仅负责Server的状态,没有能力决定是否删除 |
|
| PingerStrategy | 定义以何种方式还检验服务是否有效,比如是按照顺序的方式还是并行的方式 | |
| IPing | Ping,检验服务是否可用的方法,常见的是通过HTTP,或者TCP/IP的方式看服务有无认为正常的请求 |
3.2 如何维护Server列表?(新增、更新、删除)
单从服务列表的维护角度上,Ribbon的结构如下所示:

Server列表的维护从实现方法上分为两类:
- 基于配置的服务列表
这种方式一般是通过配置文件,静态地配置服务器列表,这种方式相对而言比较简单,但并不是意味着在机器运行的时候就一直不变。netflix在做Spring cloud 套件时,使用了分布式配置框架netflix archaius,archaius框架有一个特点是会动态的监控配置文件的变化,将变化刷新到各个应用上。也就是说,当我们在不关闭服务的情况下,如果修改了基于配置的服务列表时, 服务列表可以直接刷新- 结合服务发现组件(如
Eureka)的服务注册信息动态维护服务列表
基于Spring Cloud框架下,服务注册和发现是一个分布式服务集群必不可少的一个组件,它负责维护不同的服务实例(注册、续约、取消注册),本文将介绍和Eureka集成模式下,如果借助Eureka的服务注册信息动态刷新ribbon的服务列表
Ribbon 通过配置项:.ribbon.NIWSServerListClassName 来决定使用哪种实现方式。对应地:
| 策略 | ServerList实现 |
|---|---|
| 基于配置 | com.netflix.loadbalancer.ConfigurationBasedServerList |
| 基于服务发现 | com.netflix.loadbalancer.DiscoveryEnabledNIWSServerList |
Server列表可能在运行的时候动态的更新,而具体的更新方式由.ribbon.ServerListUpdaterClassName,当前有如下两种实现方式:
| 更新策略 | ServerListUpdater实现 |
|---|---|
| 基于定时任务的拉取服务列表 | com.netflix.loadbalancer.PollingServerListUpdater |
| 基于Eureka服务事件通知的方式更新 | com.netflix.loadbalancer.EurekaNotificationServerListUpdater |
- 基于定时任务拉取服务列表方式
这种方式的实现为:com.netflix.loadbalancer.PollingServerListUpdater,其内部维护了一个周期性的定时任务,拉取最新的服务列表,然后将最新的服务列表更新到ServerList之中,其核心的实现逻辑如下:
public class PollingServerListUpdater implements ServerListUpdater {
    private static final Logger logger = LoggerFactory.getLogger(PollingServerListUpdater.class);

    private static long LISTOFSERVERS_CACHE_UPDATE_DELAY = 1000; // msecs;
    private static int LISTOFSERVERS_CACHE_REPEAT_INTERVAL = 30 * 1000; // msecs;
    // 更新器线程池定义以及钩子设置
    private static class LazyHolder {
        private final static String CORE_THREAD = "DynamicServerListLoadBalancer.ThreadPoolSize";
        private final static DynamicIntProperty poolSizeProp = new DynamicIntProperty(CORE_THREAD, 2);
        private static Thread _shutdownThread;

        static ScheduledThreadPoolExecutor _serverListRefreshExecutor = null;

        static {
            int coreSize = poolSizeProp.get();
            ThreadFactory factory = (new ThreadFactoryBuilder())
                    .setNameFormat("PollingServerListUpdater-%d")
                    .setDaemon(true)
                    .build();
            _serverListRefreshExecutor = new ScheduledThreadPoolExecutor(coreSize, factory);
            poolSizeProp.addCallback(new Runnable() {
                @Override
                public void run() {
                    _serverListRefreshExecutor.setCorePoolSize(poolSizeProp.get());
                }

            });
            _shutdownThread = new Thread(new Runnable() {
                public void run() {
                    logger.info("Shutting down the Executor Pool for PollingServerListUpdater");
                    shutdownExecutorPool();
                }
            });
            Runtime.getRuntime().addShutdownHook(_shutdownThread);
        }

        private static void shutdownExecutorPool() {
            if (_serverListRefreshExecutor != null) {
                _serverListRefreshExecutor.shutdown();

                if (_shutdownThread != null) {
                    try {
                        Runtime.getRuntime().removeShutdownHook(_shutdownThread);
                    } catch (IllegalStateException ise) { // NOPMD
                        // this can happen if we're in the middle of a real
                        // shutdown,
                        // and that's 'ok'
                    }
                }

            }
        }
    }
    // 省略部分代码
    @Override
    public synchronized void start(final UpdateAction updateAction) {
        if (isActive.compareAndSet(false, true)) {
            //创建定时任务,按照特定的实行周期执行更新操作
            final Runnable wrapperRunnable = new Runnable() {
                @Override
                public void run() {
                    if (!isActive.get()) {
                        if (scheduledFuture != null) {
                            scheduledFuture.cancel(true);
                        }
                        return;
                    }
                    try {
                        //执行update操作 ,更新操作定义在LoadBalancer中
                        updateAction.doUpdate();
                        lastUpdated = System.currentTimeMillis();
                    } catch (Exception e) {
                        logger.warn("Failed one update cycle", e);
                    }
                }
            };
           //定时任务创建
            scheduledFuture = getRefreshExecutor().scheduleWithFixedDelay(
                    wrapperRunnable,
                    initialDelayMs, //初始延迟时间
                    refreshIntervalMs, //内部刷新时间
                    TimeUnit.MILLISECONDS
            );
        } else {
            logger.info("Already active, no-op");
        }
    }
//省略部分代码
}
有上述代码可以看到,ServerListUpdator只是定义了更新的方式,而具体怎么更新,则是封装成UpdateAction来操作的:
    /**
     * an interface for the updateAction that actually executes a server list update
     */
    public interface UpdateAction {
        void doUpdate();
    }

    //在DynamicServerListLoadBalancer 中则实现了具体的操作:
    public DynamicServerListLoadBalancer() {
        this.isSecure = false;
        this.useTunnel = false;
        this.serverListUpdateInProgress = new AtomicBoolean(false);
        this.updateAction = new UpdateAction() {
            public void doUpdate() {
                //更新服务列表
                DynamicServerListLoadBalancer.this.updateListOfServers();
            }
        };
    }

    @VisibleForTesting
    public void updateListOfServers() {
        List servers = new ArrayList();
       // 通过ServerList获取最新的服务列表
       if (this.serverListImpl != null) {
            servers = this.serverListImpl.getUpdatedListOfServers();
            LOGGER.debug("List of Servers for {} obtained from Discovery client: {}", this.getIdentifier(), servers);
            //返回的结果通过过滤器的方式进行过滤
            if (this.filter != null) {
                servers = this.filter.getFilteredListOfServers((List)servers);
                LOGGER.debug("Filtered List of Servers for {} obtained from Discovery client: {}", this.getIdentifier(), servers);
            }
        }
        //更新列表
        this.updateAllServerList((List)servers);
    }

    protected void updateAllServerList(List ls) {
        if (this.serverListUpdateInProgress.compareAndSet(false, true)) {
            try {
                Iterator var2 = ls.iterator();

                while(var2.hasNext()) {
                    T s = (Server)var2.next();
                    s.setAlive(true);
                }

                this.setServersList(ls);
                super.forceQuickPing();
            } finally {
                this.serverListUpdateInProgress.set(false);
            }
        }

    }
- 基于Eureka服务事件通知的方式更新
基于Eureka的更新方式则有些不同, 当Eureka注册中心发生了Server服务注册信息变更时,会将消息通知发送到EurekaNotificationServerListUpdater上,然后此Updator触发刷新ServerList:
public class EurekaNotificationServerListUpdater implements ServerListUpdater {

   //省略部分代码

    @Override
    public synchronized void start(final UpdateAction updateAction) {
        if (isActive.compareAndSet(false, true)) {
          //创建Eureka时间监听器,当Eureka发生改变后,将触发对应逻辑
          this.updateListener = new EurekaEventListener() {
                @Override
                public void onEvent(EurekaEvent event) {
                    if (event instanceof CacheRefreshedEvent) {
                        //内部消息队列
                       if (!updateQueued.compareAndSet(false, true)) {  // if an update is already queued
                            logger.info("an update action is already queued, returning as no-op");
                            return;
                        }

                        if (!refreshExecutor.isShutdown()) {
                            try {
                                //提交更新操作请求到消息队列中
                                refreshExecutor.submit(new Runnable() {
                                    @Override
                                    public void run() {
                                        try {
                                            updateAction.doUpdate(); // 执行真正的更新操作
                                            lastUpdated.set(System.currentTimeMillis());
                                        } catch (Exception e) {
                                            logger.warn("Failed to update serverList", e);
                                        } finally {
                                            updateQueued.set(false);
                                        }
                                    }
                                });  // fire and forget
                            } catch (Exception e) {
                                logger.warn("Error submitting update task to executor, skipping one round of updates", e);
                                updateQueued.set(false);  // if submit fails, need to reset updateQueued to false
                            }
                        }
                        else {
                            logger.debug("stopping EurekaNotificationServerListUpdater, as refreshExecutor has been shut down");
                            stop();
                        }
                    }
                }
            };
            //EurekaClient 客户端实例
            if (eurekaClient == null) {
                eurekaClient = eurekaClientProvider.get();
            }
            //基于EeurekaClient注册事件监听器
            if (eurekaClient != null) {
                eurekaClient.registerEventListener(updateListener);
            } else {
                logger.error("Failed to register an updateListener to eureka client, eureka client is null");
                throw new IllegalStateException("Failed to start the updater, unable to register the update listener due to eureka client being null.");
            }
        } else {
            logger.info("Update listener already registered, no-op");
        }
    }

}
3.2.1 相关的配置项
| 配置项 | 说明 | 生效场景 | 默认值 |
|---|---|---|---|
.ribbon.NIWSServerListClassName |
ServerList的实现,实现参考上述描述 |
ConfigurationBasedServerList |
|
.ribbon.listOfServers |
服务列表 hostname:port 形式,以逗号隔开 | 当ServerList实现基于配置时 |
|
.ribbon.ServerListUpdaterClassName |
服务列表更新策略实现,参考上述描述 | PollingServerListUpdater |
|
.ribbon.ServerListRefreshInterval |
服务列表刷新频率 | 基于定时任务拉取时 | 30s |
3.2.2 ribbon的默认实现
ribbon在默认情况下,会采用如下的配置项,即,采用基于配置的服务列表维护,基于定时任务按时拉取服务列表的方式,频率为30s.
.ribbon.NIWSServerListClassName=com.netflix.loadbalancer.ConfigurationBasedServerList
.ribbon.listOfServers=,
.ribbon.ServerListUpdaterClassName=com.netflix.loadbalancer.EurekaNotificationServerListUpdater
.ribbon.ServerListRefreshInterval=30
### 更新线程池大小
DynamicServerListLoadBalancer.ThreadPoolSize=2
3.2.3 Spring Cloud集成下的配置
ribbon在默认情况下,会采用如下的配置项,即,采用基于配置的服务列表维护,基于定时任务按时拉取服务列表的方式,频率为30s.
.ribbon.NIWSServerListClassName=com.netflix.loadbalancer.DiscoveryEnabledNIWSServerList
.ribbon.ServerListUpdaterClassName=com.netflix.loadbalancer.EurekaNotificationServerListUpdater
### 更新线程池大小
EurekaNotificationServerListUpdater.ThreadPoolSize=2
###通知队列接收大小
EurekaNotificationServerListUpdater.queueSize=1000
3.3 负载均衡器如何维护服务实例的状态?
Ribbon负载均衡器将服务实例的状态维护托交给Pinger、 PingerStrategy、IPing 来维护,具体交互模式如下所示:
/**
* 定义Ping服务状态是否有效的策略,是序列化顺序Ping,还是并行的方式Ping,在此过程中,应当保证相互不受影响
 *
 */
public interface IPingStrategy {

    boolean[] pingServers(IPing ping, Server[] servers);
}


/**
 * 定义如何Ping一个服务,确保是否有效
 * @author stonse
 *
 */
public interface IPing {

    /**
     * Checks whether the given Server is "alive" i.e. should be * considered a candidate while loadbalancing * 校验是否存活 */ public boolean isAlive(Server server); }
3.3.1 创建Ping定时任务
默认情况下,负载均衡器内部会创建一个周期性定时任务
| 控制参数 | 说明 | 默认值 |
|---|---|---|
| .ribbon.NFLoadBalancerPingInterval | Ping定时任务周期 | 30 s |
| .ribbon.NFLoadBalancerMaxTotalPingTime | Ping超时时间 | 2s |
| .ribbon.NFLoadBalancerPingClassName | IPing实现类 | DummyPing,直接返回true |
默认的PingStrategy,采用序列化的实现方式,依次检查服务实例是否可用:
/**
     * Default implementation for IPingStrategy, performs ping
     * serially, which may not be desirable, if your IPing
     * implementation is slow, or you have large number of servers.
     */
    private static class SerialPingStrategy implements IPingStrategy {

        @Override
        public boolean[] pingServers(IPing ping, Server[] servers) {
            int numCandidates = servers.length;
            boolean[] results = new boolean[numCandidates];

            logger.debug("LoadBalancer:  PingTask executing [{}] servers configured", numCandidates);

            for (int i = 0; i < numCandidates; i++) {
                results[i] = false; /* Default answer is DEAD. */
                try {
                    // 按序列依次检查服务是否正常,并返回对应的数组表示
                    if (ping != null) {
                        results[i] = ping.isAlive(servers[i]);
                    }
                } catch (Exception e) {
                    logger.error("Exception while pinging Server: '{}'", servers[i], e);
                }
            }
            return results;
        }
    }
3.3.2 Ribbon默认的IPing实现:DummyPing
默认的IPing实现,直接返回为true:
public class DummyPing extends AbstractLoadBalancerPing {

    public DummyPing() {
    }

    public boolean isAlive(Server server) {
        return true;
    }

    @Override
    public void initWithNiwsConfig(IClientConfig clientConfig) {
    }
}
除此之外,IPing还有如下几种实现:
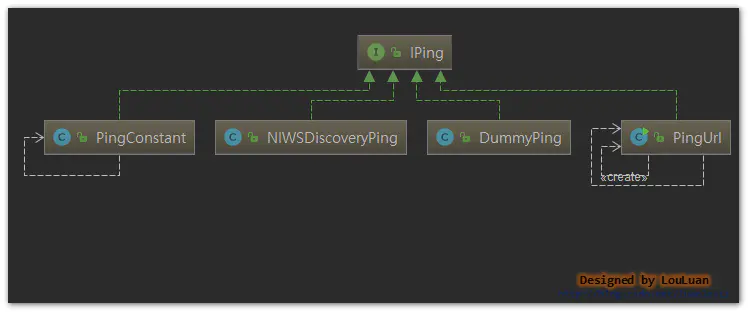
3.3.3 Spring Cloud集成下的IPing实现:NIWSDiscoveryPing
而和Spring Cloud 集成后,IPing的默认实现,是
NIWSDiscoveryPing,其使用Eureka作为服务注册和发现,则校验服务是否可用,则通过监听Eureka 服务更新来更新Ribbon的Server状态,而具体的实现就是NIWSDiscoveryPing:
/**
 * "Ping" Discovery Client
 * i.e. we dont do a real "ping". We just assume that the server is up if Discovery Client says so
 * @author stonse
 *
 */
public class NIWSDiscoveryPing extends AbstractLoadBalancerPing {

        BaseLoadBalancer lb = null;


        public NIWSDiscoveryPing() {
        }

        public BaseLoadBalancer getLb() {
            return lb;
        }

        /**
         * Non IPing interface method - only set this if you care about the "newServers Feature"
         * @param lb
         */
        public void setLb(BaseLoadBalancer lb) {
            this.lb = lb;
        }

        public boolean isAlive(Server server) {
            boolean isAlive = true;
         //取 Eureka Server 的Instance实例状态作为Ribbon服务的状态
                 if (server!=null && server instanceof DiscoveryEnabledServer){
                DiscoveryEnabledServer dServer = (DiscoveryEnabledServer)server;
                InstanceInfo instanceInfo = dServer.getInstanceInfo();
                if (instanceInfo!=null){
                    InstanceStatus status = instanceInfo.getStatus();
                    if (status!=null){
                        isAlive = status.equals(InstanceStatus.UP);
                    }
                }
            }
            return isAlive;
        }

        @Override
        public void initWithNiwsConfig(
                IClientConfig clientConfig) {
        }

}
Spring Cloud下的默认实现入口:
    @Bean
    @ConditionalOnMissingBean
    public IPing ribbonPing(IClientConfig config) {
        if (this.propertiesFactory.isSet(IPing.class, serviceId)) {
            return this.propertiesFactory.get(IPing.class, config, serviceId);
        }
        NIWSDiscoveryPing ping = new NIWSDiscoveryPing();
        ping.initWithNiwsConfig(config);
        return ping;
    }
3.4 如何从服务列表中挑选一个合适的服务实例?
3.4.1 服务实例容器:ServerList的维护
负载均衡器通过 ServerList来统一维护服务实例,具体模式如下:

基础的接口定义非常简单:
/**
 * Interface that defines the methods sed to obtain the List of Servers
 * @author stonse
 *
 * @param
 */
public interface ServerList {
    //获取初始化的服务列表
    public List getInitialListOfServers();

    /**
     * Return updated list of servers. This is called say every 30 secs
     * (configurable) by the Loadbalancer's Ping cycle
     * 获取更新后的的服务列表
     */
    public List getUpdatedListOfServers();

}
在Ribbon的实现中,在ServerList中,维护着Server的实例,并返回最新的List集合,供LoadBalancer使用
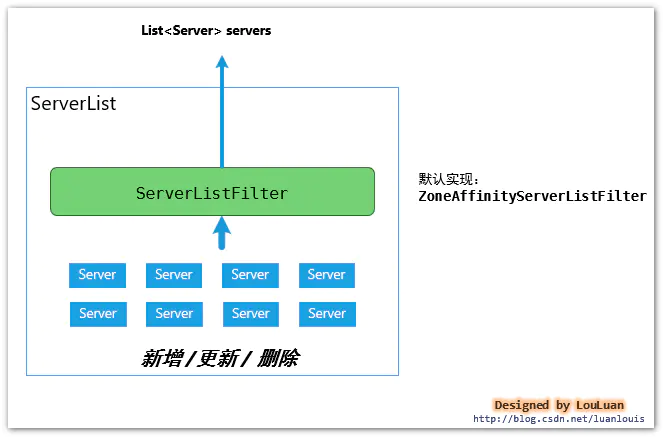
ServerList的职能:
负责维护服务实例,并使用ServerListFilter过滤器过滤出符合要求的服务实例列表List
3.4.2 服务实例列表过滤器ServerListFilter
服务实例列表过滤器
ServerListFilter的职能很简单:
传入一个服务实例列表,过滤出满足过滤条件的服务列表
public interface ServerListFilter {
    public List getFilteredListOfServers(List servers);
}
3.4.2.1 Ribbon 的默认ServerListFilter实现:ZoneAffinityServerListFilter
Ribbon默认采取了区域优先的过滤策略,即当Server列表中,过滤出和当前实例所在的区域(zone)一致的server列表
与此相关联的,Ribbon有两个相关得配置参数:
| 控制参数 | 说明 | 默认值 |
|---|---|---|
| .ribbon.EnableZoneAffinity | 是否开启区域优先 | false |
| .ribbon.EnableZoneExclusivity | 是否采取区域排他性,即只返回和当前Zone一致的服务实例 | false |
| .ribbon.zoneAffinity.maxLoadPerServer | 每个Server上的最大活跃请求负载数阈值 | 0.6 |
| .ribbon.zoneAffinity.maxBlackOutServesrPercentage | 最大断路过滤的百分比 | 0.8 |
| .ribbon.zoneAffinity.minAvailableServers | 最少可用的服务实例阈值 | 2 |
其核心实现如下所示:
public class ZoneAffinityServerListFilter extends
        AbstractServerListFilter implements IClientConfigAware {

     @Override
    public List getFilteredListOfServers(List servers) {
          //zone非空,并且开启了区域优先,并且服务实例数量不为空
          if (zone != null && (zoneAffinity || zoneExclusive) && servers !=null && servers.size() > 0){
           //基于断言过滤服务列表
           List filteredServers = Lists.newArrayList(Iterables.filter(
                    servers, this.zoneAffinityPredicate.getServerOnlyPredicate()));
            //如果允许区域优先,则返回过滤列表
            if (shouldEnableZoneAffinity(filteredServers)) {
                return filteredServers;
            } else if (zoneAffinity) {
                overrideCounter.increment();
            }
        }
        return servers;
    }
    // 判断是否应该使用区域优先过滤条件
    private boolean shouldEnableZoneAffinity(List filtered) {
        if (!zoneAffinity && !zoneExclusive) {
            return false;
        }
        if (zoneExclusive) {
            return true;
        }
       // 获取统计信息
        LoadBalancerStats stats = getLoadBalancerStats();
        if (stats == null) {
            return zoneAffinity;
        } else {
            logger.debug("Determining if zone affinity should be enabled with given server list: {}", filtered);
            //获取区域Server快照,包含统计数据
            ZoneSnapshot snapshot = stats.getZoneSnapshot(filtered);
            //平均负载,此负载的意思是,当前所有的Server中,平均每台机器上的活跃请求数
           double loadPerServer = snapshot.getLoadPerServer();
            int instanceCount = snapshot.getInstanceCount();
            int circuitBreakerTrippedCount = snapshot.getCircuitTrippedCount();
            // 1. 如果Server断路的比例超过了设置的上限(默认`0.8`)
            // 2. 或者当前负载超过了设置的负载上限
            // 3. 如果可用的服务小于设置的服务上限`默认为2`
            if (((double) circuitBreakerTrippedCount) / instanceCount >= blackOutServerPercentageThreshold.get()
                    || loadPerServer >= activeReqeustsPerServerThreshold.get()
                    || (instanceCount - circuitBreakerTrippedCount) < availableServersThreshold.get()) {
                logger.debug("zoneAffinity is overriden. blackOutServerPercentage: {}, activeReqeustsPerServer: {}, availableServers: {}",
                        new Object[] {(double) circuitBreakerTrippedCount / instanceCount,  loadPerServer, instanceCount - circuitBreakerTrippedCount});
                return false;
            } else {
                return true;
            }

        }
    }


}
具体判断流程如下所示:

3.4.2.2 Ribbon 的ServerListFilter实现2:ZonePreferenceServerListFilter
ZonePreferenceServerListFilter 集成自 ZoneAffinityServerListFilter,在此基础上做了拓展,在 ZoneAffinityServerListFilter返回结果的基础上,再过滤出和本地服务相同区域(zone)的服务列表。
核心逻辑-什么时候起作用?
当指定了当前服务的所在Zone,并且ZoneAffinityServerListFilter没有起到过滤效果时,ZonePreferenceServerListFilter会返回当前Zone的Server列表。
public class ZonePreferenceServerListFilter extends ZoneAffinityServerListFilter {

    private String zone;

    @Override
    public void initWithNiwsConfig(IClientConfig niwsClientConfig) {
        super.initWithNiwsConfig(niwsClientConfig);
        if (ConfigurationManager.getDeploymentContext() != null) {
            this.zone = ConfigurationManager.getDeploymentContext().getValue(
                    ContextKey.zone);
        }
    }

    @Override
    public List getFilteredListOfServers(List servers) {
        //父类的基础上,获取过滤结果
                List output = super.getFilteredListOfServers(servers);
        //没有起到过滤效果,则进行区域优先过滤
                if (this.zone != null && output.size() == servers.size()) {
            List local = new ArrayList<>();
            for (Server server : output) {
                if (this.zone.equalsIgnoreCase(server.getZone())) {
                    local.add(server);
                }
            }
            if (!local.isEmpty()) {
                return local;
            }
        }
        return output;
    }

    public String getZone() {
        return zone;
    }

    public void setZone(String zone) {
        this.zone = zone;
    }
3.4.2.3 Ribbon 的ServerListFilter实现3:ServerListSubsetFilter
这个过滤器作用于当Server数量列表特别庞大时(比如有上百个Server实例),这时,长时间保持Http链接也不太合适,可以适当地保留部分服务,舍弃其中一些服务,这样可使释放没必要的链接。
此过滤器也是继承自 ZoneAffinityServerListFilter,在此基础上做了拓展,在实际使用中不太常见,这个后续再展开介绍,暂且不表。
3.4.3 LoadBalancer选择服务实例 的流程
LoadBalancer的核心功能是根据负载情况,从服务列表中挑选最合适的服务实例。LoadBalancer内部采用了如下图所示的组件完成:
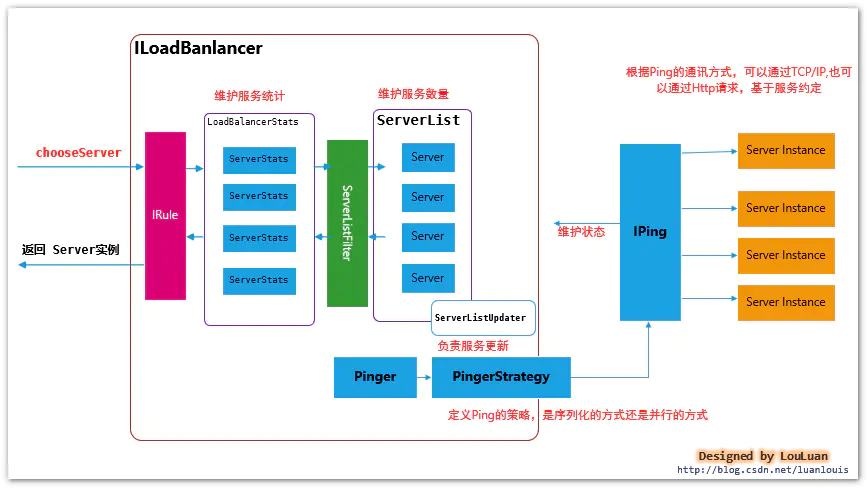
LoadBalancer 选择服务实例的流程
- 通过
ServerList获取当前可用的服务实例列表;- 通过
ServerListFilter将步骤1 得到的服务列表进行一次过滤,返回满足过滤器条件的服务实例列表;- 应用
Rule规则,结合服务实例的统计信息,返回满足规则的某一个服务实例;通过上述的流程可以看到,实际上,在服务实例列表选择的过程中,有两次过滤的机会:第一次是首先通过ServerListFilter过滤器,另外一次是用过IRule 的选择规则进行过滤
通过ServerListFilter进行服务实例过滤的策略上面已经介绍得比较详细了,接下来将介绍Rule是如何从一堆服务列表中选择服务的。
在介绍Rule之前,需要介绍一个概念:Server统计信息
当LoadBalancer在选择合适的Server提供给应用后,应用会向该Server发送服务请求,则在请求的过程中,应用会根据请求的相应时间或者网络连接情况等进行统计;当应用后续从LoadBalancer选择合适的Server时,LoadBalancer 会根据每个服务的统计信息,结合Rule来判定哪个服务是最合适的。
3.4.3.1 负载均衡器LoaderBalancer 都统计了哪些关于服务实例Server相关的信息?
| ServerStats | 说明 | 类型 | 默认值 |
|---|---|---|---|
| zone | 当前服务所属的可用区 | 配置 | 可通过 eureka.instance.meta.zone 指定 |
| totalRequests | 总请求数量,client每次调用,数量会递增 | 实时 | 0 |
| activeRequestsCountTimeout | 活动请求计数时间窗niws.loadbalancer.serverStats.activeRequestsCount.effectiveWindowSeconds,如果时间窗范围之内没有activeRequestsCount值的改变,则activeRequestsCounts初始化为0 |
配置 | 60*10(seconds) |
| successiveConnectionFailureCount | 连续连接失败计数 | 实时 | |
| connectionFailureThreshold | 连接失败阈值通过属性niws.loadbalancer.default.connectionFailureCountThreshold 进行配置 |
配置 | 3 |
| circuitTrippedTimeoutFactor | 断路器超时因子,niws.loadbalancer.default.circuitTripTimeoutFactorSeconds |
配置 | 10(seconds) |
| maxCircuitTrippedTimeout | 最大断路器超时秒数,niws.loadbalancer.default.circuitTripMaxTimeoutSeconds |
配置 | 30(seconds) |
| totalCircuitBreakerBlackOutPeriod | 累计断路器终端时间区间 | 实时 | milliseconds |
| lastAccessedTimestamp | 最后连接时间 | 实时 | |
| lastConnectionFailedTimestamp | 最后连接失败时间 | 实时 | |
| firstConnectionTimestamp | 首次连接时间 | 实时 | |
| activeRequestsCount | 当前活跃的连接数 | 实时 | |
| failureCountSlidingWindowInterval | 失败次数统计时间窗 | 配置 | 1000(ms) |
| serverFailureCounts | 当前时间窗内连接失败的数量 | 实时 | |
| responseTimeDist.mean | 请求平均响应时间 | 实时 | (ms) |
| responseTimeDist.max | 请求最大响应时间 | 实时 | (ms) |
| responseTimeDist.minimum | 请求最小响应时间 | 实时 | (ms) |
| responseTimeDist.minimum | 请求最小响应时间 | 实时 | (ms) |
| responseTimeDist.stddev | 请求响应时间标准差 | 实时 | (ms) |
| dataDist.sampleSize | QoS服务质量采集点大小 | 实时 | |
| dataDist.timestamp | QoS服务质量最后计算时间点 | 实时 | |
| dataDist.timestampMillis | QoS服务质量最后计算时间点毫秒数,自1970.1.1开始 | 实时 | |
| dataDist.mean | QoS 最近的时间窗内的请求平均响应时间 | 实时 | |
| dataDist.10thPercentile | QoS 10% 处理请求的时间 | 实时 | ms |
| dataDist.25thPercentile | QoS 25% 处理请求的时间 | 实时 | ms |
| dataDist.50thPercentile | QoS 50% 处理请求的时间 | 实时 | ms |
| dataDist.75thPercentile | QoS 75% 处理请求的时间 | 实时 | ms |
| dataDist.95thPercentile | QoS 95% 处理请求的时间 | 实时 | ms |
| dataDist.99thPercentile | QoS 99% 处理请求的时间 | 实时 | ms |
| dataDist.99.5thPercentile | QoS 前99.5% 处理请求的时间 | 实时 | ms |
3.4.3.2 服务断路器的工作原理
当有某个服务存在多个实例时,在请求的过程中,负载均衡器会统计每次请求的情况(请求相应时间,是否发生网络异常等),当出现了请求出现累计重试时,负载均衡器会标识当前
服务实例,设置当前服务实例的断路的时间区间,在此区间内,当请求过来时,负载均衡器会将此服务实例从可用服务实例列表中暂时剔除,优先选择其他服务实例。
相关统计信息如下:
| ServerStats | 说明 | 类型 | 默认值 |
|---|---|---|---|
| successiveConnectionFailureCount | 连续连接失败计数 | 实时 | |
| connectionFailureThreshold | 连接失败阈值通过属性niws.loadbalancer.default.connectionFailureCountThreshold 进行配置,当successiveConnectionFailureCount 超过了此限制时,将计算熔断时间 |
配置 | 3 |
| circuitTrippedTimeoutFactor | 断路器超时因子,niws.loadbalancer.default.circuitTripTimeoutFactorSeconds |
配置 | 10(seconds) |
| maxCircuitTrippedTimeout | 最大断路器超时秒数,niws.loadbalancer.default.circuitTripMaxTimeoutSeconds |
配置 | 30(seconds) |
| totalCircuitBreakerBlackOutPeriod | 累计断路器终端时间区间 | 实时 | milliseconds |
| lastAccessedTimestamp | 最后连接时间 | 实时 | |
| lastConnectionFailedTimestamp | 最后连接失败时间 | 实时 | |
| firstConnectionTimestamp | 首次连接时间 | 实时 |
@Monitor(name="CircuitBreakerTripped", type = DataSourceType.INFORMATIONAL)
    public boolean isCircuitBreakerTripped() {
        return isCircuitBreakerTripped(System.currentTimeMillis());
    }

    public boolean isCircuitBreakerTripped(long currentTime) {
        //断路器熔断的时间戳
        long circuitBreakerTimeout = getCircuitBreakerTimeout();
        if (circuitBreakerTimeout <= 0) {
            return false;
        }
        return circuitBreakerTimeout > currentTime;//还在熔断区间内,则返回熔断结果
    }
   //获取熔断超时时间
   private long getCircuitBreakerTimeout() {
        long blackOutPeriod = getCircuitBreakerBlackoutPeriod();
        if (blackOutPeriod <= 0) {
            return 0;
        }
        return lastConnectionFailedTimestamp + blackOutPeriod;
    }
    //返回中断毫秒数
    private long getCircuitBreakerBlackoutPeriod() {
        int failureCount = successiveConnectionFailureCount.get();
        int threshold = connectionFailureThreshold.get();
       // 连续失败,但是尚未超过上限,则服务中断周期为 0 ,表示可用
       if (failureCount < threshold) {
            return 0;
        }
        //当链接失败超过阈值时,将进行熔断,熔断的时间间隔为:
        int diff = (failureCount - threshold) > 16 ? 16 : (failureCount - threshold);
        int blackOutSeconds = (1 << diff) * circuitTrippedTimeoutFactor.get();
        if (blackOutSeconds > maxCircuitTrippedTimeout.get()) {
            blackOutSeconds = maxCircuitTrippedTimeout.get();
        }
        return blackOutSeconds * 1000L;
    }
熔断时间的计算
- 计算累计连接失败计数
successiveConnectionFailureCount是否超过 链接失败阈值connectionFailureThreshold。如果successiveConnectionFailureCount<connectionFailureThreshold,即尚未超过限额,则熔断时间为 0 ;反之,如果超过限额,则进行步骤2的计算; - 计算失败基数,最大不得超过 16:
diff = (failureCount - threshold) > 16 ? 16 : (failureCount - threshold) - 根据超时因子
circuitTrippedTimeoutFactor计算超时时间:int blackOutSeconds = (1 << diff) * circuitTrippedTimeoutFactor.get(); - 超时时间不得超过最大超时时间`maxCircuitTrippedTimeout 上线,
当有链接失败情况出现断路逻辑时,将会最多:1<<16 * 10 =320s、最少1<<1 * 10 =100s 的请求熔断时间,再此期间内,此Server将会被忽略。
即:
熔断时间最大值:1<<16 * 10 =320s
熔断时间最小值:1<<1 * 10 =100s
熔断统计何时清空?
熔断的统计有自己的清除策略,当如下几种场景存在时,熔断统计会清空归零:
- 当请求时,发生的异常不是
断路拦截类的异常(Exception)时(至于如何节点是否是断路拦截类异常,可以自定义)- 当请求未发生异常,切且有结果返回时
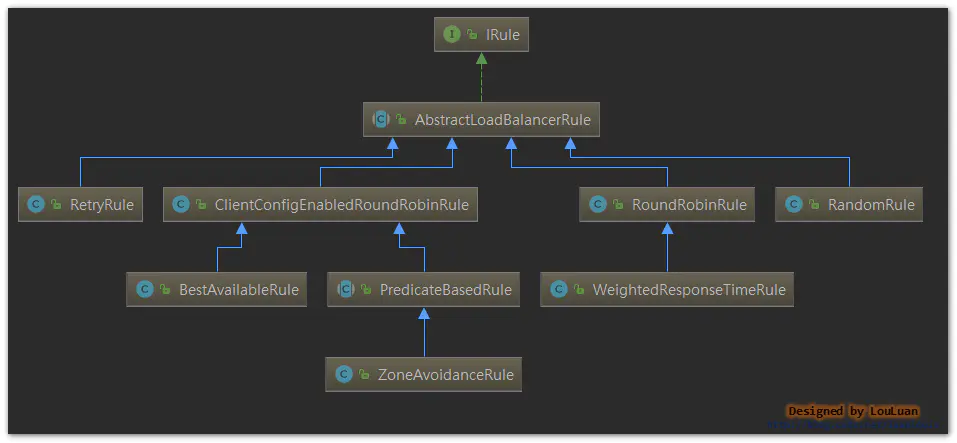
3.4.3.3 定义IRule,从服务实例列表中,选择最合适的Server实例
由上图可见,IRule会从服务列表中,根据自身定义的规则,返回最合适的Server实例,其接口定义如下:
public interface IRule{
    /*
     * choose one alive server from lb.allServers or
     * lb.upServers according to key
     *
     * @return choosen Server object. NULL is returned if none
     *  server is available
     */

    public Server choose(Object key);

    public void setLoadBalancer(ILoadBalancer lb);

    public ILoadBalancer getLoadBalancer();
}
Ribbon定义了一些常见的规则
| 实现 | 描述 | 备注 |
|---|---|---|
| RoundRobinRule | 通过轮询的方式,选择过程会有最多10次的重试机制 | |
| RandomRule | 随机方式,从列表中随机挑选一个服务 | |
| ZoneAvoidanceRule | 基于ZoneAvoidancePredicate断言和AvailabilityPredicate断言的规则。ZoneAvoidancePredicate计算出哪个Zone的服务最差,然后将此Zone的服务从服务列表中剔除掉;而AvaliabitiyPredicate是过滤掉正处于熔断状态的服务;上述两个断言过滤出来的结果后,再通过RoundRobin轮询的方式从列表中挑选一个服务 | |
| BestAvailableRule | 最优匹配规则:从服务列表中给挑选出并发数最少的Server | |
| RetryRule | 采用了装饰模式,为Rule提供了重试机制 | |
| WeightedResponseTimeRule | 基于请求响应时间加权计算的规则,如果此规则没有生效,将采用 RoundRobinRule的的策略选择服务实例 |
3.4.3.3.1 RoundRobinRule 的实现
public class RoundRobinRule extends AbstractLoadBalancerRule {

    private AtomicInteger nextServerCyclicCounter;
    private static final boolean AVAILABLE_ONLY_SERVERS = true;
    private static final boolean ALL_SERVERS = false;

    private static Logger log = LoggerFactory.getLogger(RoundRobinRule.class);

    public RoundRobinRule() {
        nextServerCyclicCounter = new AtomicInteger(0);
    }

    public RoundRobinRule(ILoadBalancer lb) {
        this();
        setLoadBalancer(lb);
    }

    public Server choose(ILoadBalancer lb, Object key) {
        if (lb == null) {
            log.warn("no load balancer");
            return null;
        }

        Server server = null;
        int count = 0;
        //10次重试机制
        while (server == null && count++ < 10) {
            List reachableServers = lb.getReachableServers();
            List allServers = lb.getAllServers();
            int upCount = reachableServers.size();
            int serverCount = allServers.size();

            if ((upCount == 0) || (serverCount == 0)) {
                log.warn("No up servers available from load balancer: " + lb);
                return null;
            }
            // 生成轮询数据
            int nextServerIndex = incrementAndGetModulo(serverCount);
            server = allServers.get(nextServerIndex);

            if (server == null) {
                /* Transient. */
                Thread.yield();
                continue;
            }

            if (server.isAlive() && (server.isReadyToServe())) {
                return (server);
            }

            // Next.
            server = null;
        }

        if (count >= 10) {
            log.warn("No available alive servers after 10 tries from load balancer: "
                    + lb);
        }
        return server;
    }

    /**
     * Inspired by the implementation of {@link AtomicInteger#incrementAndGet()}.
     *
     * @param modulo The modulo to bound the value of the counter.
     * @return The next value.
     */
    private int incrementAndGetModulo(int modulo) {
        for (;;) {
            int current = nextServerCyclicCounter.get();
            int next = (current + 1) % modulo;
            if (nextServerCyclicCounter.compareAndSet(current, next))
                return next;
        }
    }

    @Override
    public Server choose(Object key) {
        return choose(getLoadBalancer(), key);
    }
}
3.4.3.3.2 ZoneAvoidanceRule的实现
ZoneAvoidanceRule的处理思路:
- ZoneAvoidancePredicate 计算出哪个Zone的服务最差,然后将此Zone的服务从服务列表中剔除掉;
- AvailabilityPredicate 将处于熔断状态的服务剔除掉;
- 将上述两步骤过滤后的服务通过RoundRobinRule挑选一个服务实例返回
ZoneAvoidancePredicate 剔除最差的Zone的过程:
public static Set getAvailableZones(
            Map<String, ZoneSnapshot> snapshot, double triggeringLoad,
            double triggeringBlackoutPercentage) {
        if (snapshot.isEmpty()) {
            return null;
        }
        Set availableZones = new HashSet(snapshot.keySet());
        if (availableZones.size() == 1) {
            return availableZones;
        }
        Set worstZones = new HashSet();
        double maxLoadPerServer = 0;
        boolean limitedZoneAvailability = false;

        for (Map.Entry<String, ZoneSnapshot> zoneEntry : snapshot.entrySet()) {
            String zone = zoneEntry.getKey();
            ZoneSnapshot zoneSnapshot = zoneEntry.getValue();
            int instanceCount = zoneSnapshot.getInstanceCount();
            if (instanceCount == 0) {
                availableZones.remove(zone);
                limitedZoneAvailability = true;
            } else {
                double loadPerServer = zoneSnapshot.getLoadPerServer();
                   //如果负载超过限额,则将用可用区中剔除出去
                  if (((double) zoneSnapshot.getCircuitTrippedCount())
                        / instanceCount >= triggeringBlackoutPercentage
                        || loadPerServer < 0) {
                    availableZones.remove(zone);
                    limitedZoneAvailability = true;
                } else {
                    //计算最差的Zone区域
                    if (Math.abs(loadPerServer - maxLoadPerServer) < 0.000001d) {
                        // they are the same considering double calculation
                        // round error
                        worstZones.add(zone);
                    } else if (loadPerServer > maxLoadPerServer) {
                        maxLoadPerServer = loadPerServer;
                        worstZones.clear();
                        worstZones.add(zone);
                    }
                }
            }
        }
        // 如果最大负载没有超过上限,则返回所有可用分区
        if (maxLoadPerServer < triggeringLoad && !limitedZoneAvailability) {
            // zone override is not needed here
            return availableZones;
        }
        // 从最差的可用分区中随机挑选一个剔除,这么做是保证服务的高可用
        String zoneToAvoid = randomChooseZone(snapshot, worstZones);
        if (zoneToAvoid != null) {
            availableZones.remove(zoneToAvoid);
        }
        return availableZones;

    }
四. Ribbon的配置参数
| 控制参数 | 说明 | 默认值 |
|---|---|---|
| .ribbon.NFLoadBalancerPingInterval | Ping定时任务周期 | 30 s |
| .ribbon.NFLoadBalancerMaxTotalPingTime | Ping超时时间 | 2s |
| .ribbon.NFLoadBalancerRuleClassName | IRule实现类 | RoundRobinRule,基于轮询调度算法规则选择服务实例 |
| .ribbon.NFLoadBalancerPingClassName | IPing实现类 | DummyPing,直接返回true |
| .ribbon.NFLoadBalancerClassName | 负载均衡器实现类 | 2s |
| .ribbon.NIWSServerListClassName | ServerList实现类 | ConfigurationBasedServerList,基于配置的服务列表 |
| .ribbon.ServerListUpdaterClassName | 服务列表更新类 | PollingServerListUpdater, |
| .ribbon.NIWSServerListFilterClassName | 服务实例过滤器 | 2s |
| .ribbon.ServerListRefreshInterval | 服务列表刷新频率 | 2s |
| .ribbon.NFLoadBalancerClassName | 自定义负载均衡器实现类 | 2s |
| .ribbon.NFLoadBalancerClassName | 自定义负载均衡器实现类 | 2s |
| .ribbon.NFLoadBalancerClassName | 自定义负载均衡器实现类 | 2s |
五. 结语
Ribbon是Spring Cloud框架中相当核心的模块,负责着服务负载调用,Ribbon也可以脱离SpringCloud单独使用。
另外Ribbon是客户端的负载均衡框架,即每个客户端上,独立维护着自身的调用信息统计,相互隔离;也就是说:Ribbon的负载均衡表现在各个机器上变现并不完全一致
Ribbon 也是整个组件框架中最复杂的一环,控制流程上为了保证服务的高可用性,有很多比较细节的参数控制,在使用的过程中,需要深入理清每个环节的处理机制,这样在问题定位上会高效很多。
Ribbon 均衡策略 与 脱离 Eureka 使用、LoadBalancerClient_蚩尤后裔-CSDN博客_loadbalancer.client.name
Ribbon 负载均衡策略概述
1、如有微服务 mc 下有 3 个节点 A、B、C,当微服务 mk 请求微服务 mc 时,应该使用何种规则向节点 A、B、C 发起请求呢?于是 Ribbon 有了负载均衡策略。
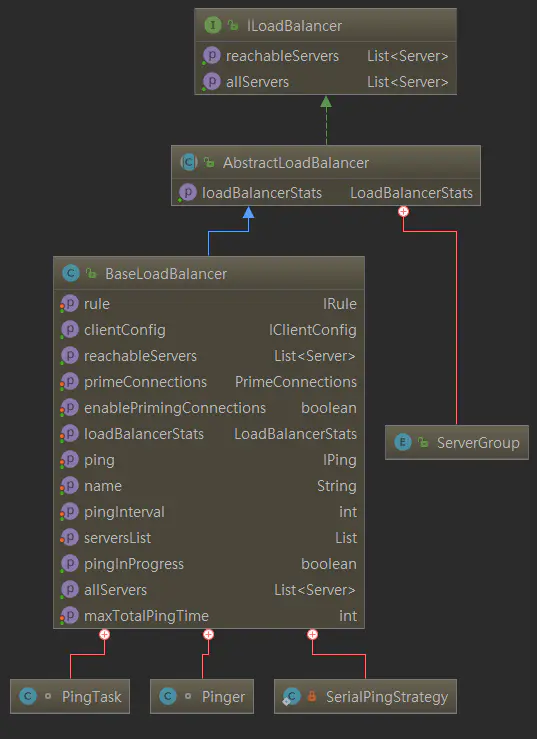
2、Ribbon 负载均衡继承结构如下图所示,IRule 接口是整个规则/策略的超类/接口:
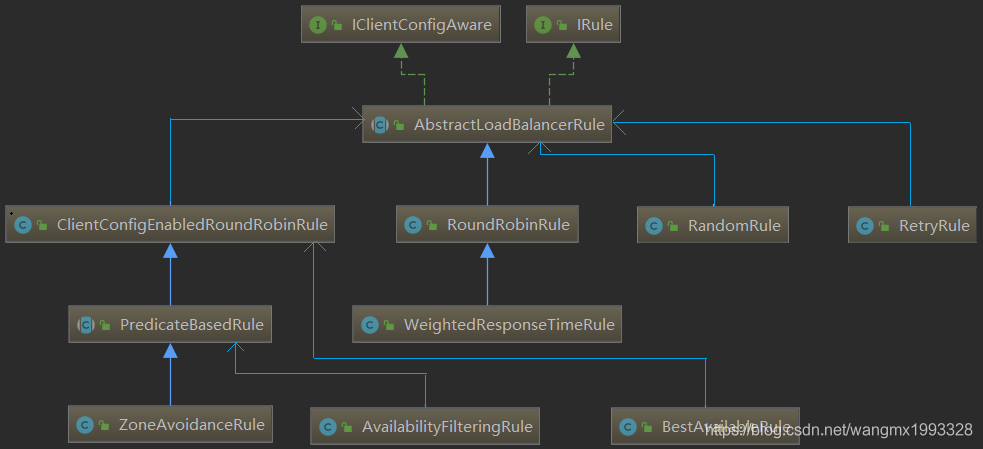
| 策略名 | 描述 |
| BestAvailableRule | 选择一个最小的并发请求的server。逐个考察 Server,如果 Server 被 tripped(跳闸)了,则忽略,再选择其中 ActiveRequestsCount 最小的 server。 |
| AvailabilityFilteringRule | 过滤掉那些因为一直连接失败的被标记为circuit tripped的后端server,并过滤掉那些高并发的的后端server(active connections 超过配置的阈值) |
| WeightedResponseTimeRule | 根据响应时间分配一个weight,响应时间越长,weight越小,被选中的可能性越低。 |
| RetryRule | 对选定的负载均衡策略机上重试机制。在一个配置时间段内当选择server不成功,则一直尝试使用subRule的方式选择一个可用的server |
| RoundRobinRule | 轮询index,选择index对应位置的server |
| RandomRule | 随机选择一个server。在index上随机,选择index对应位置的server |
| ZoneAvoidanceRule | 复合判断server所在区域的性能和server的可用性选择server |
Ribbon 负载均衡策略配置
1、仍然以 <<netflix ribbon 概述与基本使用、以及 RestTemplate 概述>> 中的 3 个应用作为本文介绍的基础:
eurekaserverchangSha 应用作为 Eureka 服务端, eurekaclientfood、eurekaclient_cat 作为客户端,eurekaclientcat 微服务请求 eurekaclientfood 微服务。
2、eureka 依赖 ribbon,导入了 eureka 客户端组件就同时导入了 ribbon。环境:Java jdk 8 + Spring boot 2.1.3 + spring cloud Greenwich.SR1 + spring 5.1.5。
3、官网 "6.4 Customizing the Ribbon Client by Setting Properties" 有说明:
全局配置文件的选项优先级高于 @RibbonClient(configuration=MyRibbonConfig.class 代码方式,@RibbonClient 代码方式高于默认值。
从 1.2.0 版本开始 Spring Cloud Netflix 支持从全局文件进行配置,支持的配置如下:
-
.ribbon.NFLoadBalancerClassName: Should implement ILoadBalancer
-
.ribbon.NFLoadBalancerRuleClassName: Should implement IRule
-
.ribbon.NFLoadBalancerPingClassName: Should implement IPing
-
.ribbon.NIWSServerListClassName: Should implement ServerList
-
.ribbon.NIWSServerListFilterClassName: Should implement ServerListFilter
其中的 为 Eureka 注册中心注册好的微服务名称,也是微服务应用配置的 spring.applicatoin.name 属性值。
配置的属性值为各个接口实现类的全类名。如下所示 users 为需要请求的微服务名称,属性值为各接口实现类的全类名:
-
users:
-
ribbon:
-
NIWSServerListClassName: com.netflix.loadbalancer.ConfigurationBasedServerList
-
NFLoadBalancerRuleClassName: com.netflix.loadbalancer.WeightedResponseTimeRule #加权响应时间规则
4、eurekaclientcat 请求 eurekaclientfood,所以修改 eurekaclient_cat 的配置文件如下,其余的内容都无需修改:
-
server:
-
port: 9394
-
-
spring:
-
application:
-
name: eureka-client-cat #微服务名称
-
-
eureka:
-
client:
-
service-url:
-
defaultZone: http://localhost:9393/eureka/ #eureka 服务器地址
-
instance:
-
prefer-ip-address: true # IP 地址代替主机名注册
-
instance-id: changSha-cat # 微服务实例id名称
-
-
#EUREKA-CLIENT-FOOD 请求的微服务名称,即对方的 spring.application.name 属性值
-
EUREKA-CLIENT-FOOD:
-
ribbon:
-
#随机规则,对 EUREKA-CLIENT-FOOD 微服务下的节点随机访问
-
NFLoadBalancerRuleClassName: com.netflix.loadbalancer.RandomRule
5、启动 eurekaserverchangSha 、eurekaclient_cat 应用 ,然后使用下面的命令再启动打包好的 eurekaclient_food 3 个实例,使用不同的端口以及实例 id:
-
java -jar eurekaclient_food-0.0.1-SNAPSHOT.jar --server.port=9396 --eureka.instance.instance-id=changSha-food-9396
-
java -jar eurekaclient_food-0.0.1-SNAPSHOT.jar --server.port=9397 --eureka.instance.instance-id=changSha-food-9397
-
java -jar eurekaclient_food-0.0.1-SNAPSHOT.jar --server.port=9398 --eureka.instance.instance-id=changSha-food-9398
此时 eureka 注册中心如下所示:

6、访问 http://localhost:9394/getCatById?id=110 通过 changSha-cat 微服务后台请求 Eureka-client-food 微服务下的3个节点:
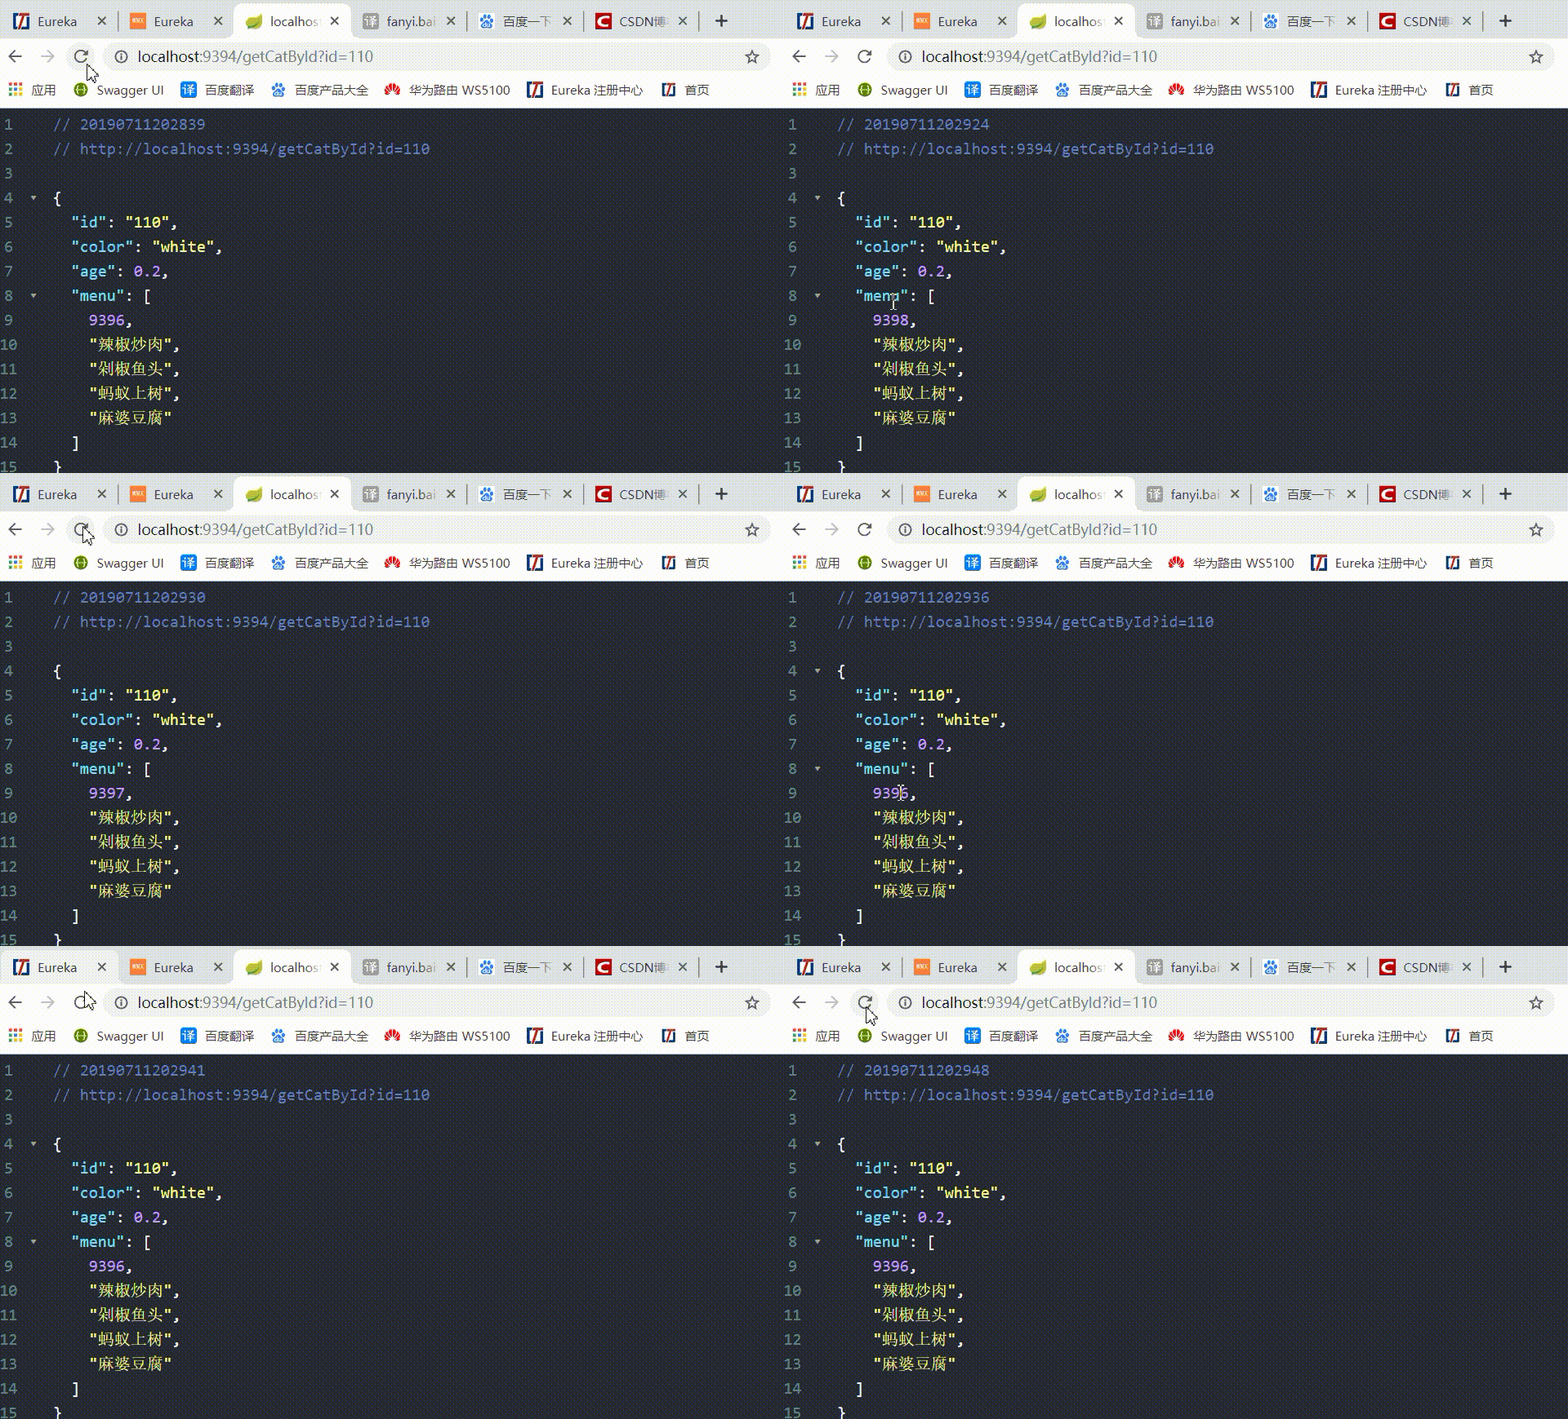
如果没有在 eurekaclient_cat 中配置随机访问负载均衡策略,则默认情况下是使用轮询策略的,如上所示,显示现在是随机访问的,负载均衡配置生效。其它的均衡策略也是同理。
Ribbon 脱离 Eureka 使用
Ribbon 脱离 Eureka 使用分为两种情况,一是项目中并没有使用 Eureka,二是项目中已经有 Eureka
没有 Eureka 时
1、之前说过 Eureka 无论是服务端还是客户端都依赖了 Ribbon,所以导入了 Eureka 组件后,同时已经导入了 Ribbon 组件,所以直接编码 Ribbon 即可。现在没有 Eureka 时,需要单独导入 Ribbon 组件,修改 eureka-client-cat 的 pom.xml 文件如下(此时没有 Eureka 组件):
-
-
-
org.springframework.boot
-
spring-boot-starter-web
-
-
-
org.springframework.cloud
-
spring-cloud-starter-netflix-ribbon
-
-
2、官网介绍地址:"How to Use Ribbon Without Eureka" ,当没有 Eureka 时,只需要修改 application.yml 如下:
-
stores:
-
ribbon:
-
listOfServers: example.com,google.com
-
-
#stores 是一个自定义的标识符,建议写成请求的微服务名称,即对方的 spring.application.name 属性值。
-
#listOfServers 为请求的服务域名地址,也可以直接是 Ip:Port 格式,不用带应用名称,而是在代码中写应用名
3、现在继续修改 eureka-client-cat 配置文件如下(此时没有 eureka 的配置了):
-
server:
-
port: 9394
-
-
#EUREKA-CLIENT-FOOD 纯粹是一个自定义的标识,会在代码中使用类似如下的方式进行识别,根据标识找到服务器地址,然后发起请求
-
#restTemplate.getForObject("http://EUREKA-CLIENT-FOOD/getHunanCuisine", String.class);#如果对方写提供了应用名称,则也要在URL中加上
-
EUREKA-CLIENT-FOOD:
-
ribbon:
-
#随机规则,对 EUREKA-CLIENT-FOOD 微服务下的节点随机访问
-
NFLoadBalancerRuleClassName: com.netflix.loadbalancer.RandomRule
-
listOfServers: 192.168.3.6:9396,192.168.3.6:9397 #请求的服务地址,ip:port,多个时使用 逗号 隔开
-
#注意不用带应用名称,而是在代码中写应用名
4、eureka-client-cat 其它位置都不需要修改。后台代码使用:
String foodMenu = restTemplate.getForObject("http://EUREKA-CLIENT-FOOD/getHunanCuisine", String.class); 因为 restTemplate 具有负载均衡的能力,所以会根据标识 EUREKA-CLIENT-FOOD 查找配置文件中的服务器实际地址(listOfServers),然后根据策略发起请求。后台代码不变
5、此时因为没有使用 Eureka 客户端,所以 Eureka 注册中心是没有 eureka-client-cat 微服务的,但是并不影响对 EUREKA-CLIENT-FOOD 的访问。
总结:没有使用 Eureka 时,先导入 Ribbon 组件,然后修改配置文件添加服务器列表,最后使用具有负载均衡能力的 RestTemplate 向目标微服务发起 http 请求。
已有 Eureka 时
1、官网文档 Disable Eureka Use in Ribbon,对于项目中已经使用了 Eureka 时,需要 Ribbon 禁用 Eureka ,配置如下:
-
ribbon:
-
eureka:
-
enabled: false
2、ribbon.eureka.enabled=false 是 Ribbon 不再使用 Eureka 发现的服务,而使用自己 stores.ribbon.listOfServers 配置的服务。
所以仅仅是 Ribbon 不再依赖 Eureka,而不是项目中禁用 Eureka。
3、修改 eureka-client-cat 的 pom.xml 文件重新添加 spring-cloud-starter-netflix-eureka-client,然后修改配置文件如下:
-
server:
-
port: 9394
-
-
spring:
-
application:
-
name: eureka-client-cat #微服务名称
-
-
eureka:
-
client:
-
service-url:
-
defaultZone: http://localhost:9393/eureka/ #eureka 服务器地址
-
instance:
-
prefer-ip-address: true # IP 地址代替主机名注册
-
instance-id: changSha-cat # 微服务实例id名称
-
-
#EUREKA-CLIENT-FOOD :虽然 Ribbon 脱离 Eureka 使用可以自定义标识符,但还是建议写成对方的微服务名称
-
EUREKA-CLIENT-FOOD:
-
ribbon:
-
#随机规则,对 EUREKA-CLIENT-FOOD 微服务下的节点随机访问
-
NFLoadBalancerRuleClassName: com.netflix.loadbalancer.RandomRule
-
listOfServers: 192.168.3.6:9396 #请求的服务地址,ip:port,多个时使用 逗号 隔开。不要带应用名称
-
-
ribbon:
-
eureka:
-
enabled: false #Ribbon 禁用 Eureka,禁用后 Ribbon 自己的 *.ribbon.listOfServers 服务配置才会生效
总结:有 Eureka 与没有 Eureka 相比多了一个 Ribbon 禁用 Eureka 的操作,其余是一样的。
后台代码:String foodMenu = restTemplate.getForObject("http://EUREKA-CLIENT-FOOD/getHunanCuisine", String.class);(如果有应用名称,则在 url 中加上)
原理:Ribbon 没有脱离 Eureka 时,负载均衡请求的服务名称 "EUREKA-CLIENT-FOOD" 会自动从 Eureka 客户端服务发现的服务列表中进行查询解析,然后根据实际地址发起请求。当 Ribbon 脱离了 Eureka 时,显然无法再从 Eureka 发现的服务列表中获取,所以需要在配置文件中使用 *.ribbon.listOfServers 进行服务配置,配置服务实际的 ip 与 端口。

因为 EUREKA-CLIENT-FOOD.ribbon.listOfServers 只配置了一个服务器地址,所以永远都是请求它。
Using the Ribbon API Directly(直接使用 Ribbon API)
1、可以通过 LoadBalancerClient API 来获取请求的服务实例 org.springframework.cloud.client.ServiceInstance。
2、直接 @Autowired、@Resource 从容器中获取 org.springframework.cloud.client.loadbalancer.LoadBalancerClient 使用即可。
3、官网文档 "Using the Ribbon API Directly" 已经写的很详细,这里在依样画葫芦:
-
import org.springframework.beans.factory.annotation.Autowired;
-
import org.springframework.cloud.client.ServiceInstance;
-
import org.springframework.cloud.client.loadbalancer.LoadBalancerClient;
-
import org.springframework.web.bind.annotation.GetMapping;
-
import org.springframework.web.bind.annotation.RestController;
-
import org.springframework.web.client.RestTemplate;
-
-
import javax.annotation.Resource;
-
import java.net.URI;
-
-
@RestController
-
public class SystemController {
-
-
//获取容器中创建好的 RestTemplate 实例
-
@Resource
-
private RestTemplate restTemplate;
-
-
//默认已经在容器中创建好了实例,直接获取即可
-
@Autowired
-
private LoadBalancerClient loadBalancerClient;
-
-
/**
-
* localhost:9394/loadBalancerClient
-
*
-
* @return
-
*/
-
@GetMapping("loadBalancerClient")
-
public String testLoadBalancerClient() {
-
//choose(String serviceId):服务id,没有脱离 Eureka 时,这里通常就是对方服务名称,即 spring.application 属性值
-
//当 Ribbon 脱离 Eureka 时,服务id 就是与自己的配置文件 xxx.ribbon.listOfServers 中的 xxx 保持一致
-
ServiceInstance serviceInstance = loadBalancerClient.choose("EUREKA-CLIENT-FOOD");
-
String host = serviceInstance.getHost();
-
int port = serviceInstance.getPort();
-
String instanceId = serviceInstance.getInstanceId();
-
String serviceId = serviceInstance.getServiceId();
-
URI uri = serviceInstance.getUri();
-
URI storesUri = URI.create(String.format("http://%s:%s", serviceInstance.getHost(), serviceInstance.getPort()));
-
-
System.out.println("host:" + host);
-
System.out.println("port:" + port);
-
System.out.println("instanceId:" + instanceId);
-
System.out.println("serviceId:" + serviceId);
-
System.out.println("uri:" + uri);
-
System.out.println("storesUri:" + storesUri);
-
-
return "";
-
}
-
}
-
-
//控制台输出如下:
-
host:192.168.3.6
-
port:9395
-
instanceId:192.168.3.6:9395
-
serviceId:wmx
-
uri:http://192.168.3.6:9395
-
storesUri:http://192.168.3.6:9395
演示源码 github 地址:https://github.com/wangmaoxiong/ribbon_study


